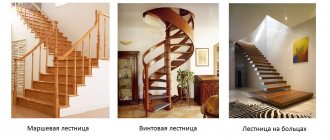
A country house is undoubtedly a convenience. But if it is two or three stories high, it has a staircase, which means there is a possibility that the residents of the house may accidentally fall from it in the dark. Automatic staircase lighting helps solve this problem. Modern technologies can not only provide lighting for the entire staircase, but also for each step separately. At the same time, a pleasant soft light will not dazzle the eyes, which not only ensures safety, but also adds an additional element of aesthetics to the design of the entire house.
Beauty, safety, savings
Automatic lighting gives a very impressive appearance. In addition, the safety of movement increases. In addition to this there are other benefits:
- There is no need to feel for a switch on the wall in pitch darkness.
- Even if only slightly, energy is saved. Due to automation, the system is in an economical standby mode.
- Using automation tools when installing lighting, you can set up beautiful visual effects.
And you don’t have to worry that it’s expensive and inaccessible to an inexperienced user. The entire set of additional lighting is initially very inexpensive, and can easily bring additional comfort and benefit to residents.
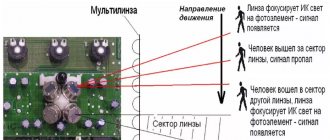
How to choose a motion sensor
There are many ways to categorize sensors depending on the features of a particular design. At installation location:
- Outdoor - designed for outdoor installation, have a degree of protection IP44-IP65;
- internal - designed for indoor installation.
Based on the operating principle:
- ultrasonic - react to ultrasound;
- microwave - emit high-frequency radio waves;
- infrared - detect thermal radiation.
By device:
- single-position: the receiver and transmitter are mounted in one housing;
- two-position transmitter and receiver are installed in different places;
- a multi-position system with several transmitters and receivers installed in different locations.
By installation type:
- multifunctional - monitor the level of illumination and movement;
- indoor - installed indoors and connected to security or lighting control systems;
- street motion sensors - used to turn on street lighting and protect the territory;
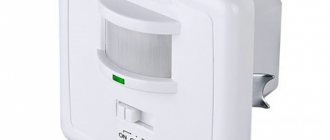
- overhead - designed for wall mounting;
- ceiling - mounted in a suspended ceiling;
- mortise - can be built into walls and furniture, they look like a miniature interior detail.
A motion sensor to turn on the lights is needed not only on the street
Street traffic sensors have a high degree of body protection. For normal outdoor use, take sensors with an IP rating of at least 55, or better yet, higher. For installation in a home, you can take IP 22 and higher.
Power type
Next, you need to consider what source the light sensor is powered from. The following options are available:
- Wired sensors powered by 220 V.
- Wireless, powered by batteries or rechargeable batteries.
Motion sensors are wired and wireless
The largest group is wired for connecting to 220 V. There are fewer wireless ones, but there are enough of them. They are good if you need to turn on lighting that runs on low-voltage power sources - for example, a battery or solar panels.
Method for determining the presence of motion
The motion sensor for turning on the light can detect moving objects using various detection principles:
- Infrared motion sensors. They react to the heat generated by the body of warm-blooded creatures. They are classified as passive devices, since they themselves do not produce anything, they only register radiation. These sensors also react to the movement of animals, so there may be false alarms.
- Acoustic motion (noise) sensors. Also belongs to the passive group of equipment. They react to noise and can be turned on by a clap or the sound of a door opening. They can be used in the basements of private houses, where noise occurs as soon as someone enters there. Use elsewhere is limited. The operation of infrared motion sensors is based on tracking the heat generated by a person
- Microwave motion sensors. Belong to the group of active devices. They themselves produce waves in the microwave range and monitor their return. In the presence of a moving object, contacts are closed/opened (there are different types). There are sensitive models that “see” even through partitions or walls. Typically used in security systems.
- Ultrasonic. The principle of operation is the same as that of microwaves, but the range of emitted waves is different. This type of device is rarely used, since animals can react to ultrasound, and long-term exposure to humans (the devices constantly generate radiation) will not bring any benefit. Various designs, but the color is mainly white and black
- Combined (dual). Combines several motion detection methods. They are more reliable, have fewer false positives, but are also more expensive.
Most often, infrared motion sensors are used to turn on lights on the street or at home. They have a low price, a large range and a lot of adjustments to help you customize. On stairs and in long corridors it is better to install a sensor with ultrasound or microwave. They can turn on the lights even if you are still far away from the light source. It is recommended to install microwave devices in security systems - they detect movement even behind partitions.
Motion Sensor. Motion sensor connection diagram. How to connect a motion sensor yourself.
How automatic backlight works
What’s good about this type of auto-backlight is that it’s independent. She herself will determine when and for how long to turn on the light. Due to the fact that the circuit includes motion sensors, they will react to the appearance of a person and turn on the lighting either of the entire staircase at once or of each step separately. It is better to provide two motion sensors in the circuit - at the beginning and at the end of the flight of stairs. This way the system will determine that after a person passes the light can be turned off. Also, the power circuit is necessarily supplemented with controllers that can be programmed for different response conditions. An additionally installed sensor for turning on the light when darkness sets in will allow the operation of motion sensors and prevent the backlight from turning on if the lighting level in the room is high enough.
In case the stairs in the house are very long and have several flights, it is possible to install additional sensors. It's even more interesting this way. The connection circuit can be complicated:
- Include not all stages, but several - in groups;
- Or one step along the route of a person’s movement.
Preparatory work
Planning a lighting system
Before you start drilling walls and laying wires, you need to at least outline a diagram of our future lighting.
And there are only two fundamental questions here:
- what we will use as a light source;
- How will the staircase lighting be adjusted on and off?
Regarding the first question, you have to choose from the following options:
- LED strip for staircase lighting - placed under the overhangs of the steps, providing an even and fairly bright light. It is economical and reliably protected from moisture.
- LED bulbs. They are mounted into the thickness of the wall along the steps, equipped with special grilles to redirect the light flux. The key disadvantages are the complexity of installation and relatively high cost.
Illumination of staircase steps: types and areas of use
- Wall and ceiling lamps. They are used in the simplest options for lighting staircases, since they do not require the installation of a special controller.
In our article, we will look at the installation of the first two options, since this process contains several nuances that are not obvious to a beginner.
As for the circuit diagram, lighting for the stairs can be implemented in this way:
- The easiest way is to install two switches at the top and bottom, which will activate the lighting devices . This will allow us to use the backlight only when we need it.
- The system for automatically turning on light elements based on a “command” from a motion sensor is somewhat more complicated . To implement it, we need a programmable controller, a driver chip for LEDs, and sensors.
System with controlled activation from a motion sensor
- The most complex design involves the presence of sensors at each stage . You take a step, the sensor is triggered, and the next step lights up, illuminating your path. On the one hand, this system looks very impressive, but it is much more difficult to implement. And, to be honest, it’s not that convenient to use.
Below we will tell you how to make staircase lighting controlled using a controller. As lighting elements of such a system, you can use either strips with LEDs or recessed lamps.
Selecting lighting sources
The most common option is LEDs.
The most affordable models that emit light of one tone.
More expensive LEDs with RGB backlighting. Such LEDs produce light of any shade that the controller sets for them.
Due to the fact that LED strips of both types operate from a 12 V mains voltage, do-it-yourself automatic staircase lighting is absolutely safe to use. In addition, the installation of the staircase lighting system itself is possible on your own without special equipment.
Backlight types
The question of how to illuminate steps has many solutions. It all depends on the capabilities, experience and desires of the master. First of all, you need to decide how the lighting fixtures will be located on the stairs:
- Will they be only on the sides, bottom or top, along the entire length or only in the center.
- How will they be controlled - with a regular switch, automatically using a motion sensor or a pass-through switch.
- What will the power supply be like - wired or battery powered?
The complexity of the installation and the final cost of the system largely depend on the choice of all these parameters.
Automatic
Automatic step lighting greatly simplifies the control task. It increases the operating comfort of the staircase lighting system. It can be activated, for example, by movement, touching a special area, voice command or noise (claps, knocking).
The following types of devices are used to organize lighting:
- Switch with motion sensor. It works on the principle of detecting the movement of an object/subject in a certain area. As soon as a person enters the stairs, the device is triggered and the system turns on, and when he leaves it, the light goes out.
- Timer. It operates strictly within a given period of time. For example, it could be from 6 pm to 11 pm.
- Load sensor. The backlight is activated when pressure is applied to the steps or railings.
- Photosensitive element. The system starts working at a certain level of illumination (at nightfall).
- Sound detector. The staircase lighting is turned on or off by voice command or clap.
Recommendation! It is better to organize optimal automatic illumination by combining several sensors at once. For example, this could be a timer that works only in the evening, and a load sensor that turns on the staircase lighting at night, if the need suddenly arises.
Wireless
Lighting stair steps based on an autonomous current source is one of the effective and safe options for solving the lighting issue. Modern manufacturers produce a large number of models of such lamps. Typically, they include two types of devices:
- Motion sensors installed at the edges of the system (for example, on the first and last steps of a flight of stairs).
- A set of lighting modules (the number can be equal to the number of steps or half of them if they are mounted one after another).
Such devices are powered by batteries. They use LEDs as batteries, the main advantage of which is high aperture and minimal power consumption. If the batteries are of high quality and reliable, the system will operate for at least a year. Installation of such lamps is not difficult and anyone can do it. They do not consume energy from the network, are completely safe and do not require preparatory procedures (laying cables, cutting walls and steps).
Regular
A staircase lighting system from a household power supply is the most complex and expensive, although the most effective and reliable option. To install it, you will need experience in electrical installation work and knowledge of safety regulations. The work plan for creating staircase lighting of this type includes:
- Development and creation of electrical wiring diagrams.
- Calculation and purchase of wires, consumables and lamps (specialized stores offer ready-made kits).
- Laying of communications, including installation of cable ducts or gating of walls, depending on the selected type of installation.
- Installation, connection and testing of lamps, regulating and control equipment.
In the absence of experience in laying cables and preparatory work, as well as knowledge of the correct connection of the electrical circuit, it is better to entrust the work of installing the backlight to a professional. Otherwise, there is a high risk of making mistakes, which will lead to additional costs for repairing walls and stairs or even a fire hazard.
Preparing for installation
If there is no ready-made kit for lighting the steps of the stairs, you need to think through the lighting scheme yourself. It's not difficult at all. In this age of the Internet, you can find almost everything on this topic.
If you have already decided where all the necessary elements will be placed, it is best to sketch out a small drawing on a blank sheet of paper with connection elements with their installation locations directly on the stairs. This will give you a clearer picture of the future outcome of your project.
Knowing the initial dimensions of the room, the dimensions of the stairs and flights of stairs, it is not difficult to calculate both the footage of the LED strip and the number of sensors that will work in the future lighting system.
This type of lighting scheme is often found on the Internet:
This scheme is quite workable if you use a regular and inexpensive strip of LEDs. Although there is a significant drawback to it. It is necessary to install a special controller for each piece of tape. That's how many steps there are, that's how many sections of LED strips there are. Each strip needs its own output and all the wires are combined together. Therefore, already at the output of the controller you get an impressive braid of wires.
But the most interesting effects are provided by the addressable RGB LED strip. In addition to simplifying the scheme, we will get the color design of the steps with a variety of color effects.
If anyone doesn't know, we'll explain. The addressable LED strip makes it possible to control a separately soldered LED. And each LED in the strip is capable of producing about 16 million different shades!
A more simplified diagram of the project “staircase lighting on steps with a motion sensor” can be presented in this version:
Now about the details.
Addressable type light strips are highly directional and are connected to the DI pin.
As can be seen from the example, all separately cut strips of tape are connected through D0 to DI.
We recommend using ws2811 chip strips to illuminate small flights of stairs.
Tapes of this type can be powered from a 12 V source. Every three LEDs in this strip are controlled by their own chip, which produces a certain light on the 3 LEDs for which it is responsible.
We advise you to buy a roll of tape (or as much as you need according to your calculations) on the Chinese trading platform Aliexpress. You will not lose in quality, but you will definitely gain in price. For some reason, in our retail chains similar tapes cost orders of magnitude more than in China.
At the time of writing, a five-meter roll of tape with a density of sixty diodes could be purchased for only 700 rubles.
A denser arrangement of LEDs is also on sale, and costs more. But for staircase design there is no point in buying such a strip, since 60 LEDs per meter is the optimal parameter for illuminating steps.
Now we need to talk about one more parameter.
There are tapes on sale with different degrees of moisture protection - IP:
- IP30 without protection;
- IP65 - silicone coated tape;
- IP67 - sealed tape in a silicone casing.
It doesn’t make much sense to buy IP67 for indoor stairs, but illumination of stair steps from IP30 or IP65 is at the discretion of the owner. It seems to us that giving preference to IP65 would be wiser. Do you still need to wash the steps sometimes?
Here on Ali Express you can find the bright tape. It will cost an order of magnitude more, but you will benefit from the power of the luminous flux - the light will be much brighter.
Immediately on Ali you need to select a microcontroller to control the tape. We recommend paying attention to similar devices on the Arduino Nano platform.
Backlight system
Schematic diagrams
Staircase lighting with LEDs can be implemented in several options:
- The simplest circuit involves the presence of a switch . Either an LED strip or special small luminaires are placed under the overhangs of the steps or on their side surfaces. The backlight is turned on using a button located on the wall, and is constantly on at night.
Constant glow uses a lot of energy, but looks very beautiful
Advice! To optimize the operation of the system, you can install a time relay in it. Then the lighting will start working on the clock, helping to save energy.
- An intelligent circuit that is based on the relationship between sensor and controller . Touch-type sensors are installed opposite the upper and lower steps, and when motion is detected, they activate the LED controller. As a result, the light elements are gradually activated, illuminating the path of a descending or ascending person.
Tape connection diagram
Of course, each diagram can be modified. For example, if you install multi-colored LED lights for the stairs, the appearance of the structure will only benefit.
Also, as a modification, albeit more complex, it is possible to provide sensors for each stage. In this case, the backlight will move synchronously with you.
What do we need
Despite all the apparent simplicity, to assemble such a circuit we will need a lot of parts.
We will try to sketch out an approximate list of necessary equipment in this section:
Note! This list is indicative and is for informational purposes only. By planning your work, you can replace parts according to your ideas.
- The key element of the entire circuit is the controller, which will control the operation of the LEDs, i.e. ensure the system starts based on a signal from the sensor and gradually turns on the belts under the steps.
Arduino programmable device
- Many experts recommend Arduino devices as a controller. For example, the Arduino Mega 2560 model is equipped with 15 outputs, which is quite enough for most standard single-flight stairs.
- To install the controller you will need an appropriate board, but you can do without it.
- In addition to the controller, the full operation of the system is carried out by the LED driver. The driver is a small chip that will need to be connected to the controller outputs.
- Touch-type sensors are responsible for turning the system on and off.
Motion Sensor
Note! If there are animals in the house, then it is better to abandon ultrasonic sensors in favor of infrared ones. On the other hand, a working ultrasonic device sometimes repels rodents. In general, the choice is yours.
- To save energy and preserve the life of the system, it is worth installing a photocell so that the LED lights for stairs do not light up during the day.
In addition, we will need wires to connect all elements: 2x0.12 for connecting LEDs and 4x0.12 for connecting sensors. A 12V power supply will be responsible for the operation of the system.
Control unit under the stairs
LEDs
The easiest way to use self-adhesive LED strips as a light source is:
- The tape is a strip of flexible polymer on which LEDs and resistors are attached at certain intervals. These elements are connected to each other through a thin conductive substrate.
- The most common tapes are based on SMD 3528 diodes. They provide a fairly bright glow with a wide angle of luminous flux (up to 1600).
- For brighter illumination, you can use strips with SMD 5050 elements. These diodes are also used to create colored lighting for the steps of the stairs, which is controlled by a special RGB controller.
Tape on reel
- An important indicator when choosing an LED strip is the number of LEDs per meter. Comfortable diode lighting for stairs can be achieved using options containing 60 elements, but for other purposes, models are produced containing from 90 to 120 diodes.
- Since we are planning to make our light strip on the stairs, it is worth taking care of protection from moisture. To ensure that our lighting is not damaged during cleaning, it is necessary to install models with an index of IP67 or IP68. The silicone layer of these tapes reliably protects conductive parts from water droplets and short circuits.
An alternative to strips can be special recessed lamps. They are installed either in the plane of the step or recessed into the side surface of the wall next to the stairs.
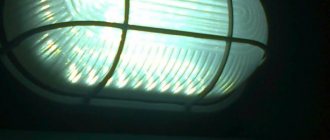
Lamp with protective grille
To protect the eyes from bright light, such lamps are often equipped with a special protective grille.
However, these devices have a number of disadvantages compared to tapes. First of all, this is a rather complicated installation, because for each lamp you need to make a socket in the wall, and also drill channels for wiring. In addition, their price is very high.
Required tools, components and materials
Let’s summarize what we may need to continue the DIY automatic staircase lighting project:
- Ready-made Arduino Nano control board;
- LED strip with or without a motion sensor, addressable type;
- A pair of infrared motion sensors;
- Light sensor;
- 12V power supply;
- Soldering iron;
- Device for removing insulation from wires;
- UTP wires.
Automatic staircase lighting. With my own hands. Last time.
I accidentally caught a comment here and it became painful (in a figurative sense) and insulting, indeed, there are not enough large-scale projects on mysku. DIY is kind of sad. Of course, it’s difficult to achieve the level of a homemade car, no matter how, it’s already in the “top of all time”... but I’ll tell you about the lighting of the stairs. More precisely, about its modification. It all started with the boss at work. He came up to me and asked: “Can you do it? Otherwise, everywhere they ask for some kind of inadequate money. 5000, 10000, 40000...” Well, I thought, why is it so complicated? PWM+sonars. It seems simple. Checking the sign
6 hours is normal.
I wouldn’t be writing this article here if, of all the solutions I found on the Internet, I didn’t like this one the most.
For some reason it’s not in the DIY section, well, that’s not the point...
By the way, automatic lighting of the stairs is one of the few things that is an exception to the rule “Everything you came up with today, the Chinese made it the day before yesterday and sold it yesterday” © [my]
Respect and respect to the author of the article, after all, it was in 2015, November 20 will be the 4th anniversary, but I didn’t like several points: - The software clearly required serious rework. — The size of the board is tin. These are purely my internal aspirations for minimalism. Never mind. — The use of huge NPN transistors also with radiators. Not so much a complaint about the huge ones, but about the NPN.
Well, okay, the size, I already warned you not to pay attention, but why NPN? The TLC5940 puts outputs to ground. The author needed to install 74LS04 inverters where they are basically not needed in order to get a plus on the base for NPN. Well, let’s say, I made it from what was at hand, but no one thought that all the steps of the staircase are constantly connected to 12V, and the PWM pulls the minuses. Once again: the entire staircase, each step, is constantly connected to 12V. Even when the tapes don't light up. Nothing bothers you?
And we went to replicate this board in large quantities throughout all the cities of the former Soviet Union...
I got carried away with the criticism. I don't want to offend anyone. Sorry. Everything is already working for you, but not for me. Let's better criticize me. In general, the first prototype on the knee turned out like this: The same Arduino Nano, the same TLC5940, dual IRF7314 P-channel 20v 5.3A mosfets, double power distribution for LM7805 and for AMS1117-5.0. He later abandoned the latter. It gets hot, I don’t like it, I threw it out the window. I ordered the boards at the factory and they arrived. Yes, by the way, the dimensions are 48*100mm, there is almost no free space.
I quickly soldered... ...and almost relaxed, not suspecting what lay ahead. Well, although no, of course I suspected it, so I ordered a little more boards than needed A few transistors A few resistors with capacitors A few sonars
A little Arduin By the way, I solder the legs to them myself. There are 1500 of them in the photo. A very meditative activity.
I immediately threw PIR out of the software. This is not Feng Shui. If you want to use PIR, hang a light bulb above the stairs and don’t wince. Why these arduinos, PWMs, power supplies, tapes, a bunch of wires?
I increased the number of brightness gradations, threw out the sonar reset (I don’t remember the HY-SRF05 freezing), added reading of the temt6000 light sensor, moved everything that could be changed into the structure, cleaned up the dubious moments.
In general, the boss connected the controller and more or less configured it.
True, I was tired of tinkering with variables and re-uploading the firmware, which he certainly told me about, saying that white people have controls on the board, buttons, LCD screens with menus, and we, like blacks, edit the code. And then I noticed a small piece of hardware sticking out on the side of the Arduino Nano. It's called a miniUSB connector. And the arduino itself in the system is already seen as a virtual COM port. Bingo! We add saving/reading of the structure to EEPROM, change parameters via UART: Well, yes, I added something of my own. If suddenly someone found out the names of the variables And then we unpack C# and make a utility for setting up the controller via USB. Connect the cord, launch the utility and change everything you can. The latest version looks like this:
Of course, the sketch for this case was seriously reworked, and the very idea of \u200b\u200bsuch adjustment of parameters was liked by familiar and not so familiar people. You can do this from a laptop or from a tablet on Windows. The controller went on sale slowly.
Every woman has a little wrinkled one... That's right, a highlight.
Likewise, the controller board has a twist that was originally built into it. The boards are stackable. That is, by combining 2,3,4 boards in series with 5pin cables, you can get 32,48,64 PWM channels, respectively, controlled by one Arduino installed only in the first board. I foolishly even hacked several controllers with DIP components.
On ATmega328P. Yes, this is exactly what 476 resistors with 952 legs look like, which need to be inserted into 952 holes, soldered 952 times and bitten off 952 times with wire cutters. +784 legs of DIP beds +504 legs of terminal blocks. It seems to me that it was after this that some hitherto unknown chakras protruded and I began to retreat from my plans :)))))
Step right...
At the same time, I was working on a project that involved touch switches. Not in the sense that ready-made ones like Livolo or whatever they are... but homemade sensors on a microcontroller.
I came across an article on the Internet about the touch keyboard on the Attiny2313. Just a ready-made project, diagram, program, everything is there. I decided to have some fun.
Of course, from the original 60*50mm board I made my own 33*40mm
In general, I like to reduce everything that can be reduced. The keyboard worked, the idea is cool, it works quite well, you can make good control panels. And then I thought, how is actually pressing a finger on a plate through a dielectric different from stepping on a ladder with your foot? What if, say, the plate is hidden under a step? That's right, the thickness of this dielectric differs, and quite significantly. A step is not a film on PCB.
And I made my own two-channel touch driver with preference and courtesans... (board size 27.64 * 15.24mm) It can “pierce” 60mm wood quite confidently. Concrete 3-4 centimeters.
Yes, straight to the factory, I’m sure it’s a bomb. It's not only a sensor for the steps, but also a hidden switch inside
walls, and a bunch of other uses. By the way, 27.64*15.24mm can also be reduced and made 23.83*15.24 by removing the terminal blocks. The stone prevents further reduction. The first ones are more convenient to connect, the second ones are more convenient to hide. It’s difficult to decide which is better – I left both options. Microcontroller PIC18 in TQFP-44 if anything... My favorite. Well, so... This module (there are 24 of them in the photo) has its own utility for configuration using a regular UART-USB cord. C# has already been exposed - it can no longer be stopped. Creativity is flowing. We write, debug, make things beautiful... Switching operating modes, changing/saving settings/parameters, real-time output, full interactivity. I made 3 videos on the operation of the module and the configuration utility, but the sound is bad. If anyone can handle my droning, he will be delighted with this street magic.
Once
Two
Three
In principle, the module was made not only for the stairs. It is two-channel and very versatile. It operates either in UART protocol mode or in TTL mode, producing “0” or “1” at the outputs depending on the “sensor” value. Saves settings in EEPROM, self-calibrates at startup. Two-byte packets of the form “<command><argument>”, 32 MHz, interrupts, ring buffer, other mince. Of course, the protocol is different.
The ideally tuned sensor under the step turned out to be in the garage.
Steps made from boards 200*50, the most brutal, not planed - an excellent test. I filmed it on my slippers, sorry. I showed this creation to a friend - the reaction was something like this.
The staircase lighting controller sketch allows you to use these modules instead of sonars by connecting the first and last steps, but not to one sensor module. To two different ones.
This was done to sell more modules because the wiring from the sensor plate to the sensor module should be as short as possible so that the entire ladder does not turn into a large antenna. And since the first step is usually quite far from the last, two modules are needed. Well, since the module is two-channel, we lay down the prospect of connecting a second
and
the penultimate
step, which will provide unambiguous information about the direction of a person’s movement. Without any lasers or other infrared barriers. For now, these 2 channels on the modules remain free. From the stair controller's point of view, of course.
Step left...
I got around to blinking the LED on the ESP8266 and then it dawned on me again. But actually, why not connect the ESP-01 UART to the Arduino Nano UART? Who forbids me? Looked back... Nobody! Connected
Added a DC-DC converter LM3671MF-3.3 (2MHz PWM) to the board. I ordered the boards again, they arrived and we soldered them.
It is connected with a choke, with feedback, because taking 3.3V for ESP from Arduino with a crutch in the form of a capacitor is not our method at all. "N" - Reliability.
And the staircase lighting controller began to look like this: And the control and configuration is like this: And I thought there was no space on the board. I was wrong
Trying to fly away...
At the moment, there is already the 5th version of the software for the staircase lighting controller.
Adjustment possibilities and other parameters: - number of steps - overall brightness (if you suddenly went too far with the power of the tape) - brightness of the first and last in standby mode (you can set it to 0%) - ignition time - decay time - waiting time - possibility of using tabular PWM values (linear/power-law ignition function) - sonar 1 response range - sonar 2 response range - the ability to block sonars for the time of “ignition-wait-extinguished” - the ability to use sensor modules. Installation under the step (or inside. This has already been done) of ordinary foil connected to the module input. Aluminum trims, thresholds, corners, strips - any metal. — the value from the light sensor is displayed in real time in the utility and on the web. Only TEMT6000 are used. — threshold of response of the light sensor — amount of spread in the values of the light sensor (corridor) — number of polls of the light sensor for averaging — the ability to connect a switch that will turn everything on forcibly — the ability to connect a switch that will turn everything off forcibly. (These 2 switches are especially for grandma, who is against your high-tech troubles in the country) - the ability to disable all incoming sensors for direct control of channels via uart or http - wi-fi can create its own access point and/or connect to an existing one
Speaking of tabular PWM values... I conducted an experiment. The idea is to direct light from the tape to the light sensor and record its values at different PWM duty cycle values. Thousands of dimensions. The result is the following picture: That is, there is quite a linear dependence of the brightness of a piece of tape on the average voltage supplied from the transistor to the tape. Here, of course, the fact that the TEMT6000 sensor is as close in parameters as possible to the human eye plays a role, but it is not difficult to notice that at low values there is a sudden increase in brightness. And with large ones it no longer affects the brightness. This is all due to the fact that I divided the maximum value of 4000 (in fact, of course 4096, but that’s not the point) into 100 equal segments, that is, +1% to brightness is +40 to the PWM value. Brightness changes from 0% to 100%. 0…4000
It turns out that 0% is 0, and 1% is immediately 40. This fact quite significantly steals the range of visible changes in the brightness of the tape, because If you turn on the tape from 0 to 40 PWM values, you can see a smooth change in brightness by eye, but from 3960 to 4000 it’s not noticeable at all, even if measured “experimentally.” Therefore, instead of a linear dependence in the settings, you can choose a power one. In order not to burden the stone with calculations, in the sketch these values are output to an array, which is stored in ROM, because it does not change during operation.
And since I put wi-fi there, the controller has the ability to ignore the logic of the staircase (check the “disable all sensors”) and work simply as a controlled lighting controller with 16 (32 channels). UART commands from another microcontroller (yes, the UART pins are output separately) or a computer, or http requests. That is, use it without sensors at all. Shield with esp01+arduino nano.
So, for example, the command via UART: $ch=5,70,1000
smoothly (in
a second
) sets
the 5th
channel to
70
% brightness.
And the command $ch=5,0,0
instantly extinguishes it to zero. The same actions can be performed with queries:
https://192.168.4.1/uart?c=$ch&a=5,70,1000 https://192.168.4.1/uart?c=$ch&a=5,0,0
, where c
— command,
a
— argument,
192.168.4.1
— IP address of the staircase lighting controller.
All settings can be changed either in the web interface using a form, or using http requests like https://192.168.4.1/uart?c=stairsCount&a=15 or https://192.168.4.1/uart?c=sonar2minLimit&a=90
Since the sensor modules, in the mode of communication with the staircase controller, simply output “1” or “0” to the leg corresponding to the response channel, in the same controller mode, PIR sensors and pass-through buttons can be connected to it - the logic of operation will not be disrupted.
And the main beauty of sensor modules is that the sensor plates themselves can be installed not only under a step or inside a step, but also under the laminate/tile in FRONT
ladder, which increases the probability of correct operation of the module to 146% due to the smaller thickness of the “dielectric”, and sends a big greeting to the manufacturers of backlight controllers for 5,10,40 thousand rubles.
with sonars. In this case, we can already talk about connecting those two free channels on the modules to implement counting people on the stairs and building more cosmic algorithms class=”aligncenter” width=”634″ height=”346″[/img] Well, for example, increase the brightness the duty step when approaching
the stairs and begin
to light the rest only when stepping on it
. This is not the case even in the best houses in Paris and London. Someone will say that you have to be really stubborn to install something like this in your home. And he will be right. But stairs are not only about dachas and cottages. These, as it turned out, are also cafes and restaurants. Installers are delighted with such opportunities - and this is an incentive to come up with new features and improve existing ones.
And yet, why “Automatic staircase lighting. With my own hands. Last time."?
Initially I wanted to write “Penultimate...”, maybe I’ll find the time with the desire and write an article about CAN backlighting. Yes, I have one too. There’s no need to create more articles – I’ll mention it right here. These are the huge 36.3*17mm dual-channel modules:
There are 12 modules in the photos (in case someone didn’t understand) There are 24 channels in total. Everything seems fine, but they are also two-story
On one side there are CAN terminal blocks, on the other there are 2 outputs to the tape/lamp.
On board STM32 + IRF7314 transistor with wiring + CAN transmitter + DC-DC on top.
Without installed feeders they look like this:
CAN modules are connected in series by a bus of 4 wires: +12v (+24v), GND, CAN_H, CAN_L
Sensor modules (of course with a CAN interface) are mounted on the same bus: 2pin - 2 sensors, 3pin - light sensor. "U" - Versatility. Spoiler: these same 3 pins are a pressure sensor (water supply) with CAN, but more on that in another article
and Wi-Fi modules (with it) Hi-tech sandwich
There can be up to 125 modules on the bus, the bus range is up to 250m.
PWM is respectively hardware with STM32.
This project is more for street lighting of the territory of country houses with remote control and IP67 housings, but if desired, it can be easily installed on the stairs, using 4 wires instead of “number_of_steps + 1”.
Since CAN modules are self-sufficient, they make it easier to implement all sorts of tricky things like lighting up the stairs simultaneously from both sides (when different people enter) and shutting off the ignition/extinguishing. That is, when the next step begins to flare up/extinguish at a moment when the previous one has not completely flared up/extinguished. I'll wait with CAN on the stairs. Now the world is not ready for 10-core staircases :))) I would like to sort out the sensory ones...
I think that I have fully covered the topic of automatic staircase lighting, so to speak, “finished the owl” :))) that’s why it’s the “last time”. Although maybe someone will undertake to paint it
Yes, I misjudged the time on the sign. Of course, this project is not “sort of simple” but “sort of crappy.”
Regarding software, the policy is simple. Since part of the sketch was borrowed from my friend Vipeg, and there is not a word about the license, I am posting my sketch here under the WTFPL license.
Was:
The sketch uses 5406 bytes (17%) of device memory. A total of 30720 bytes are available. Global variables use 277 bytes (13%) of dynamic memory, leaving 1771 bytes for local variables. Maximum: 2048 bytes. New: The sketch uses 12354 bytes (40%) of device memory. A total of 30720 bytes are available. Global variables use 902 bytes (44%) of dynamic memory, leaving 1146 bytes for local variables. Maximum: 2048 bytes.
Considering that with the release of sensor and CAN modules, staircase lighting on sonars and pirs is gradually becoming a bad manners, and the algorithms of these modules are my unique developments - their software, as well as the source codes of the configuration utilities, and even more so all the software, regarding CAN and Wi-Fi, let me keep it with you.
Since you can essentially connect the Arduino Nano to the TLC5940 in one single way - via SPI - my sketch is most likely suitable for all controllers that you have already soldered according to the Vipeg article. Enjoy it for your health.
Thank you for reading this footcloth. I tried not to be boring. If you have questions, ask.
Where can I buy
You can purchase equipment for creating lighting either in a specialized store or online in an online store. In the second case, the budget option for purchasing products on the Aliexpress website deserves special attention. For some video cameras there is an option for shipment from a warehouse in the Russian Federation; they can be received as quickly as possible; to do this, when ordering, select “Delivery from the Russian Federation”:
| Compatible Arduino Nano controller with bootloader | Wireless LED strip with motion sensor | IR sensor HC-SR501 |
| Light Sensor Module LM393 | Power supply 5,12,24,36,48 Volts | Digital electric soldering iron |
Criteria for choosing staircase lighting
The variety of light sources offered by specialty stores is awe-inspiring. You can illuminate a flight of stairs in different ways; in addition, stairs differ in design, material and style, which also does not simplify the choice.
In such conditions, it is most logical to determine which option will fit into a particular interior, and then, discarding the rest of the assortment, focus on suitable models. The following criteria will help you save time and choose appropriate lighting for the stairs in your home:
- Design. Sometimes it imposes restrictions on the lighting device. For example, a spiral staircase can be illuminated with a single elegant cascading chandelier, but even if you are delighted with cascading models, you will have to look for another option for a marching design. If the spiral staircase is small, you will have to think, for example, about an LED strip.
- Arrangement of steps. In an open type (air) staircase there is no possibility of installing built-in lighting. In this case, there are two options left: to build in the light from the side or from above.
Soft lighting of stepsSource akak7.ru
- Having a window nearby. A window opening next to the stairs is not only beautiful, but also practical. Even a little sunlight falling on a flight of stairs makes it possible to save on artificial lighting and reduce the number of lighting fixtures, and, therefore, costs.
- Additional features. Sometimes the design of railings and fences allows them to be used to organize spectacular lighting. The easiest way to do this is with an LED strip.
- Financial restrictions. To stay within your budget and get the highest quality results, you will have to compare the characteristics and energy consumption of different types of lamps. Expenses also depend on the lighting scheme of the span, whether it will be turned on manually or automatically.
With a decorative effectSource tree-wood.ru
Sensors
We install one motion sensor at the beginning and end of a flight of stairs.
We recommend that you learn more about how to adjust the motion sensor if you are using a non-programmable version of the device.
Our infrared motion sensors for turning on the lights on the stairs are quite functional, but the installed caps narrow the viewing angle. Therefore, we get rid of the caps and leave the sensor itself. In order for it to turn on when approaching the steps, it is advisable to even deepen it a little during installation in order to further narrow the viewing angle. Thus, it will react to movement precisely when approaching and leaving the steps.
Another light sensor wouldn't hurt. Thus, we get automatic control of the brightness of the backlight so that it does not blind the eyes after dark.
The final system diagram looks like this:
Preparing the controller
What is a controller with Arduino based driver chips? This is a microcontroller with many ready-made settings and hardware modules.
In order for it to work in the desired mode, it needs to be programmed. Suitable firmware with download instructions are freely available on the Internet. Below is also a sketch of the program, you can download the sketch here: https://cloud.mail.ru/public/5GtW/5M5CvRwLc
We take our Adruino scarf and connect it to a computer or laptop. Go to the Arduino IDE and click on the “Download” button.
Once the selected firmware is downloaded to the board, we can begin the final assembly of our entire backlight circuit.
Selection of lighting fixtures and locations for their installation
A variety of types of lamps can be used as the main lighting devices for illuminating staircases:
- Point sources.
- LED strips.
- Chandeliers for stairs.
- Wall sconce.
Each of them has its pros, cons and area of use. Let's look at them in detail.
Spotlights
Point light sources have long proven their effectiveness as staircase lighting. Their main advantage is their compact location on steps, railings or on the side of the stairs. Thanks to this, they do not interfere with the passage and cope well with the task. The following options for their spatial arrangement are used:
- Built into the steps. The lamps are installed in pre-drilled holes in the vertical part of the steps. The method is best suited for wooden closed stairs.
- Spotlights in the floor. If the material from which the steps are made is difficult to process or there is simply no desire to carry out complex installation work, install spotlights next to the stairs, directing its radiation onto its surface.
- Lanterns under the railings. Single lighting fixtures are mounted under the handrails, usually on the wall side. In this way, it is possible to highlight all the important elements of the staircase for maximum safety and give it a unique design.
- On the side of the wall. The advantage of this installation option is that the lamps are preserved better.
Installation of overhead (or on brackets) spotlights is convenient when the staircase is already decorated or its material is difficult to process, for example, reinforced concrete construction. In addition, installing such lighting allows you to minimize costs.
LED strips
Installing LED lamps or strips as lighting has many advantages:
- Easy installation.
- Low cost.
- Minimum energy consumption.
- Fire safety.
- Long service life.
- Possibility of creating a light show with different cycles and color shades.
The LED elements in the tape are distinguished by good power and, at the same time, they can be cut to any length and fixed to any surface, which, for example, is very important when choosing lamps for a spiral staircase with semicircular steps. As a backlight, it can also be installed on the floor, walls and handrails.
Staircase chandelier
If the flight of stairs has sufficient space, you can install a chandelier for illumination. When choosing an installation location, you need to ensure that it does not interfere with the passage and possible carrying of large items. Such a lamp should have good brightness and illuminate all steps. The design should be in harmony with the interior design style.
Wall sconces
The use of wall sconces for lighting is most suitable for a room designed in a retro and classic style. To illuminate large staircases or if the structure has a platform with a turn, several lamps connected in one circuit are used at once (the distance between them is 1-1.5 meters). Automatic models are often used as a control system for them - with motion sensors, sound activation or light-sensitive sensors.
Stages of work
Once we have all the necessary components, we can begin installing the entire circuit. It is probably better to first assemble the entire sequence of components on the floor, check its operation, and after making sure that everything works as it should, you can begin installing all the elements directly on the stairs.
So, the stages of work:
- But first we need to cut the LED strip into the required lengths.
- It is necessary to solder the stripped ends of the wires to them at the required points on the tape.
- At the edge of each piece of LED strip there are marked points (D0 and DI). Wires are soldered to them in a certain order.
Important! When soldering wires, observe polarity.
- Protect the soldering areas with a plastic tip.
Checking the circuit
After the circuit is soldered, it’s time to check the functionality of the automatic staircase lighting.
We lay out all the elements on a flat surface (on the floor).
And we make the connection.
As soon as a person enters the zone of the first sensor, the strip either sequentially turns on the stripes of the LED strip or the entire one lights up. If the system has lighting effects built into it, they should work.
After crossing the second motion sensor, the staircase should go out after a certain timeout.
Each time the backlight is turned on, the lighting effect changes to the next one.
If the system does not notice movement after crossing the first motion sensor for the stairs (you change your mind about going up/down), after 7 seconds all this festive illumination will turn off automatically and the light will gradually go out.
Advertising design
Very often, step lighting is used as advertising. In this case, the logo or name of the advertised product or service is displayed with LED strip. After all, it is flexible and can change colors according to the customer’s wishes.
You can place running line lighting on the steps. In this case, there is a double benefit - advertising and lighting.
Important! You can implement advertising lighting in an expensive but original way - install a laser gun, which will highlight the necessary pictures and words on the steps.
System installation
Installing the tape under the step is best done with double-sided tape. The surface is treated before sticking. Dust particles are removed and the surface is cleaned with a solvent.
The wiring for the lamps is laid in the cable channel.
- Wall option.
- Under the stairs.
Since the tape is attached under the step, it is more advisable to cover it with a small visor.
After installation work, it is necessary to carry out a test run of the system. If malfunctions are found, they must be eliminated or amendments must be made to the operation of the software module.
Making the backlight
Assembling the control module
We begin equipping a staircase with lighting with our own hands by assembling a system that will regulate turning the light on and off:
- The backlight of the Arduino ladder is installed on the printed circuit board with parallel fastening of the controller chips. One of the options for connecting all elements is given in the article.
Control unit wiring option
- The board is placed in a plastic case with a lid. On the one hand, the case should be made quite reliable, and on the other, its design should provide relatively free access to the “filling” for repair and adjustment.
- We connect the Arduino controller to the computer and load the firmware into it to control the system. You can write a program for the firmware yourself, and the simplicity of the development environment and fairly detailed instructions allow this to be done even by a person who has not previously encountered programming.
Connection between controller and driver
- If you don’t want to tinker for a long time, you should just download the software module from the network, fortunately it’s quite easy to find it.
- On the surface of the case we attach connectors for connecting LEDs and power supplies, and then connect them to the contacts of the controller.
Advice! It is worth testing the system in advance to identify any problems before it is installed.
Lighting installation
If the circuit is assembled, tested and works, you can congratulate yourself on completing the most difficult stage. Next up is the most labor-intensive part - installation and connection of lighting.
The tapes are installed quite simply:
- Using scissors, we cut off a piece of tape to the length we need according to the markings.
- We put a special connector on one end of the fragment, to which we attach two wires.
- Degrease the surface of the step on which installation will be carried out using acetone or a similar solvent.
- After removing the protective tape, we apply a self-adhesive layer of LEDs to the bottom of the step.
Connected pieces of LED strip
- We run the wires under the stairs through a small hole in the riser.
Recessed luminaires are somewhat more difficult to install:
- Using a hammer drill, we make sockets for housings and grooves for laying wiring in the wall.
- We install socket boxes or special casings included in the set of lamps into the sockets.
- We mount the lamps, fixing them with clamping screws.
- We lay the wires in plastic cable channels, sealing the grooves with cement mortar.
Installation of built-in lamps
Using the same scheme, sensors are installed on the upper and lower steps of the stairs.
Backlight assembly
Our lighting with a motion sensor for stairs is almost ready.
All that remains is to put all its elements together:
- To begin with, we install and calibrate a photocell, which will be responsible for activating the system in the dark. We run the wires from the photocell under the stairs.
- We attach the power supply and the box with the installed control circuit in such a way that it is not conspicuous and at the same time accessible for maintenance.
- We collect the wires from the lamps and motion sensors into a bundle, tighten them with plastic clamps and place them in a cable channel. We fix the casing with wiring on the wall under the stairs or on the side surface of one of the stringers.
- We connect the wires to the corresponding controller connectors.
- We connect the power supply to the electrical network. A residual current device may be installed for safety purposes, but this is not usually necessary.
A clear result of our work.
We test the assembled system in the main operating modes. If necessary, we make adjustments to the program (this is not difficult to do), eliminate the detected problems, and then close the control circuit housing.
Wireless staircase lighting
Wireless lighting of staircase steps using autonomous power sources is an effective solution to the problem of staircase lighting automation. On the modern market you can find various models of wireless lamps.
Typically the kit consists of:
- motion sensor;
- lamps.
Typically, a standard kit is a set of 5 light sources and 2 motion sensors. All devices operate on batteries.
The installation of all elements is so simple that even an untrained person can handle it.
Manufacturers of such systems, as a rule, claim that a set of batteries is enough for a year of operation. In fact, the battery life is much longer.
DIY step lighting
The installation of stage lighting using recessed luminaires must begin with planning. At this stage, it is necessary to calculate the places where the lamps will be installed, their number, connection diagram and activation method. That is, what will be used as a switch - a button, a motion sensor or some other element.
After purchasing all the lighting elements for the steps, you can begin their installation:
- Marking. As a rule, lamps are installed approximately in the middle of the vertical part of each step. From 2 to 6 lamps can be installed on one stage. If there are more of them, you need to select the power so that the light does not blind your eyes.
- Holes for lamps are cut using a round cutter installed in an electric drill or hammer drill.
- When all the holes are ready, lamps are installed in them.
- Next, all the lamps are connected to each other in a parallel circuit. All wires must either be soldered, or special connectors must be used for better contact. The wires are placed in a thin box, attached to the inside of the stairs with double-sided tape.
- The main wire is connected to the motion sensor control unit or to a regular switch mounted on the wall.
If the staircase is not a light wooden structure, but a concrete monolith, you need to reconsider the way you install the lamps.
There is no need to install them in each step: this is a very labor-intensive process in this case.
As an alternative, you can place lamps opposite each step so that the beam falls on its surface. In this case, the wires can be easily hidden in a shallow groove on the same wall.
Standard kit
- lamps - 5 pieces;
- motion sensors - 2 pieces;
- installation instructions.
What is attractive about staircase lighting:
- When a person enters the field of view of the sensor installed before the start/descent of the stairs, a smart autonomous motion sensor installed on the stairs is triggered, which transmits a control signal to all lighting elements.
- The wireless circuit allows you to install elements in any, even the most inaccessible places.
- The maximum distance between all elements of the system is about 16 meters.
Staircase lighting with LED strip with motion sensor
If you purchase an additional motion sensor, you can protect yourself and not waste electricity on unnecessary lighting. If someone approaches, it immediately lights up and then goes out.
How it turns on and off depends on the sensor you buy. We don’t recommend buying sensors with cool functions - it’s a waste of money, but it’s also better not to buy Chinese ones - they rarely work.
The sensor must be installed in a place where it will not be covered by anything. The best solution is to install a sensor under the first step. When connected, experiment with the grip angle.
Description
All elements of the lighting system operate autonomously. Each device contains 3 batteries.
More extensive information on the operation of autonomous backlight can be obtained either from the product data sheet, or you can find the desired model on the Internet.
But in any case, such a system will not require much effort for installation, and the stairs will no longer be a source of increased danger.
Subtleties of choosing lighting equipment and recommended installation locations
A more modern and economical method of supplying light for staircases is LEDs. They have a service life of about 20 years, they use energy resources sparingly, and are quick and easy to install. Conventional lamps are used less frequently for this purpose. When choosing a sensor system, consider:
- length of the site;
- availability of other lighting fixtures;
- material of steps and walls;
- current value, electricity consumption for other devices;
- temperature and humidity at the installation site.
When purchasing a light switch for a staircase, take into account the installation location (walls, ceiling, steps), viewing angle, power supply to the device, and the ability to adjust the operation of the device.
Mounting box
When choosing a sensor, study the type of device and mechanism of action, operating principle and equipment diagrams. There are built-in and overhead mechanisms, as well as wired and wireless devices.
Wireless lighting with a motion sensor is quickly installed; no wires are laid for its installation or connected to a common power system. This option is convenient for distant objects. Wired devices need to be connected to a power supply; for this, wires are laid and connected to the general power supply.
The following motion sensors are available for sale:
- ultrasonic and sound (they are not installed in places with high noise levels);
- infrared (do not work in areas where heating devices are located);
- radio wave (cannot be installed near curtains and drapes, near fluorescent lamps with starters, or on thin walls).
Based on the listed conditions, a system is selected to turn on the lighting on the spans.
Types of stairs
When choosing the type of automatic lighting, it is wise to match it to the type of stairs that are installed in your home.
- Wooden stairs. Considering the fact that wooden products have a risk of fire, lighting devices should not become very hot. Also, all wooden elements must be treated with a fire-resistant compound.
- Metal. From the point of view of safe operation, it is most reasonable to wall mount overhead LED lamps.
- Spiral staircases . Such stairs are ideally suited for illumination using LED strip. You can decorate not only the steps, but also the railings.
- Glass stairs . Spot wireless LED lighting looks very advantageous.
Different options for stairs and suitable lighting schemes for them
The choice of the type of lamp is determined not only by the wishes of the owner, but also by the structural features of the staircase and the material from which it is made. Let's look at their main types and what types of lighting are recommended to be installed on them.
Screw
Spiral staircases can be made of any material. However, their structural feature is very difficult for the installation of standard lighting devices. Therefore, LED backlighting is most often chosen here. The tapes are easily cut into pieces of suitable length and mounted on any part - steps, railings or walls.
Wooden
Wood, on the one hand, is a material that can be easily processed. In a wooden staircase you can easily make niches for mounting devices with lighting of any type. On the other hand, lamps must be fireproof - either they must emit little heat, or it must be effectively removed from them. The best option is LED strips.
Metal
Metal stairs are not afraid of excess heat, but they easily conduct electricity. Therefore, the wiring diagram must include a grounding conductor. In addition, the material is quite difficult to process. Therefore, instead of a built-in one, it is better to use overhead lighting.
Stairs with transparent steps
Illumination for glass steps is usually based on LED strips. If installed correctly, it can create the effect of a “floating staircase”. The use of spotlights is also possible. In this case, transparent material provides a great advantage - the lights can be installed under, rather than above, the surface. This will contribute to their better preservation.
LED option - which scheme is right for you?
Staircase lighting with LEDs can be done in two main ways. The first scheme is as simple as possible. To implement it, it is necessary to mount LEDs on the side parts of the staircase structure or under the overhangs of its steps. The lighting is turned on by a button placed on the wall.
When it gets dark, you just need to turn on the LED strip lighting. It will burn all night. In the morning you need to press the button again to turn off the lights. This type of lighting can be installed fairly quickly. Any home craftsman can install it. And if desired, the lighting scheme can be improved. For example, it is possible to install a regular time relay in the lighting circuit. Then the backlight will turn on and off independently at a clearly specified time. In this case, less electricity is consumed, which saves the family budget.
Staircase lighting with LED strip
The second scheme is intelligent, even more economical in terms of electricity consumption. But not every person can implement it with their own hands. The intelligent system operates through the interaction of a special controller and touch sensors. The latter are placed opposite the bottom and top steps of the stairs. As soon as a person passes between the sensors, they automatically send a signal to the controller, which activates the lighting. With this LED strip illumination scheme, much less electricity is spent. After all, the light does not burn all night, but only when a person goes up or down the stairs.
The intelligent system, if desired and having some electrical skills, is easy to modify. You can install separate sensors on each stage. Then the light will turn on on the stairs as a person moves along it. You can also use LEDs of different colors, giving the staircase design a special chic.
Connection sequence
- Provide energy. Do not use solid copper wire to connect the power supply. A more economical solution is to use a multi-pole cable.
- Install the controller into the box.
- We lay the wire at the location where the sensors are installed if automation is used.
- Connect the cables to the appropriate connectors on the device.
- Run wires from each peg to the back of the box. Be sure to mark the strands with a marker when styling. You can put stickers on them with masking tape so you don't get confused in the future about where each end of the thread comes from.
- Start the lighting system and make changes.
- Carefully study the entire diagram and sequence, whether all the wires are connected correctly, whether the “pros” and “disadvantages” are mixed up, whether the markings for connecting the cables on the sensors and on the control unit match.
- Lay cables for walk-through switches installed at the beginning and end of the stairs.
- Select a location to install the box. It is recommended to place it under the stairs in a place where it will be easier to route cables in any area.
It is important that the mounting surface is degreased. If you need to bend the tape as you apply it, remember that the minimum bend radius is 2 centimeters.
You will have to work with power cables. Some tape models do not have contact wires at all, and if they do exist, the quality of their soldering is not the best. To replace the contact wires you will need a soldering iron. Use a low-power tool—up to 40 W—to prevent the LEDs from overheating when soldering. A suitable wire cross-section is 0.75 mm and a length of 20 cm. When installing a single-color tape, you will need two wires - red and black. Differences in wire colors are necessary so as not to confuse the polarity: black will be “less” and red will be “more”. If you choose RGB tape, take threads of different colors: blue, red, black, green. This will help avoid confusion in color channels when connecting the tape to the controller.
LED strip connection diagrams: correct and incorrect
Strip the ends of the wires from the side of the tape by 0.5 centimeters and from the side opposite 1 centimeter, and then solder them to the tape, but so that the diodes do not overheat. Place contact tips on the ends of the wires. This solution improves the quality of contacts in the power supply terminal block. Use a crimp to secure the wires into the ferrule to ensure a good connection.
Make sure you insulate the solder joints. The best tool for this is heat shrink tubing. The isolation process is simple:
- heat the hose with a hair dryer with a narrow nozzle so that the heat does not reach the LEDs;
- place it in the place where welding was carried out;
- cut a small piece of pipe;
- If you don't have a hair dryer, use another heat source.
The result is strong insulation and reliable cable soldering. It is not recommended to use electrical tape.
Selecting color and brightness of lighting
White is the optimal light color for lighting steps - it will provide illumination for the entire staircase. But if you want to get lighting effects to transform your interior, then choose colored diodes:
- Red.
- Yellow.
- Green.
- Blue, etc.
- Blue.
Remember that lighting is installed primarily for convenience, and secondly for beauty. Choose a color temperature of 3000 K; this indicator provides accurate and pleasant illumination. If you choose sources that are too bright, the light will be dazzling.
Lighting schemes for staircases in a house
To install staircase lighting sensors, use the following diagrams:
- 2 switches are located on the upper and lower levels of the flight. The user turns on the lighting when approaching the steps, and turns it off when leaving them. Both devices close the same lamp line. This is the simplest lighting method. The disadvantage of this method is that in the dark you have to look for the switch, which is inconvenient and can lead to injury, and time is wasted searching for the device and turning it on.
- Installation of touch sensors at the top and bottom of the staircase structure. For such a system, a controller is used. This is a more expensive option that requires more installation and installation time. The advantage of the scheme is that a person does not participate in the operation of the system and does not waste time. The light turns on and off automatically after an object appears or leaves the motion sensor's coverage area.
- The most complex and expensive option is to install sensors at each stage. By lowering the foot onto the surface of the step, the person turns on the lighting, and by removing the foot from the step, turns off the light. This is a very effective and original method of lighting stairs.
When installing sensors that turn on lighting on the steps, they take into account the style of the room. Not only white LEDs are used, but also various color options that will highlight your interior.
Staircase lighting with chandelier
The chandelier is installed in the center or on top of the spans. If there is a chandelier in the room, motion sensors are connected to it, and wires are routed to a common power supply. This option is cheap, provided that the chandelier is installed in the room before installing the system. If you need to install a new system with a chandelier, this option will cost much more.
Chandelier
Laying the wire
To hide the wire, we recommend using regular cable channels, this way they will be protected. Plus, they look natural and can be matched to the color of your staircase.
It’s better not to consider other options; of course, you can lay the wire just above the stairs, but then it will look completely ugly. Sometimes you need to connect the tape together, keep this in mind.
It is optimal if you have the opportunity to run the wire from the inside. Then everything will look simply gorgeous, but this opportunity is quite rare.
Safety rules for installation and connection
Installing LED strip lights is a simple process. Even a non-professional can take on this work, doing everything efficiently with his own hands, but subject to the necessary safety rules:
- parallel connection is preferred.
- Installation and fastening of LED products, as well as the procedure for connecting to the electrical network, are carried out taking into account the safety of working with electricity.
- When connecting, be careful not to damage or destroy the conductive paths in the circuit.
- When installing, strictly observe polarity.
- Do not expose the LED strip to mechanical shocks or falls.
- Make sure the ballasts match the total load of the light sources. The use of power supplies with a power less than the consumed tape is not allowed.