Where to place the outlet for the air conditioner
Where should the outlet for the air conditioner be located? There is no strictly regulated standard that regulates its location and the number of connection points to the electrical network in a particular room. The choice of a specific solution is carried out taking into account the following factors:
- room design features;
- where furniture and household appliances are located;
- cross-sectional thickness of electrical wiring;
- power of the air conditioners used.
The distance from the outlet point of the electrical network to the ceiling generally does not exceed 30 cm. The height of the air conditioner outlet depends on the installation location of the indoor unit of the air conditioning system. It is usually mounted close to the ceiling surface. Consequently, the socket is placed next to it. Otherwise, the power cord will dangle, negatively affecting the interior of the room.
When installing sockets, the following recommendations must be observed:
the distance between the ceiling covering and the nearest edge of the outlet should not be less than 15 cm; the distance from the ceiling to the connection point is 30 cm; When placing the indoor air conditioner unit in the corner of the room, it is not installed close to the adjacent wall. There should be a space of 20-25 cm between them; when the electrical outlet is located at the bottom of the wall covering, the distance between the floor surface and the bottom edge of the outlet is 10 cm
If you place it lower when performing wet cleaning, you can inadvertently pour water into the connector and damage it; the connection point should be located so that it is not blocked by furniture and household appliances; If you plan to use an existing outlet, you should check the cross-section of the network cable. It is calculated for a certain device power.
At what height should I make an air conditioner socket?
You cannot place an electrical circuit connector (socket) for an air conditioner in an apartment at your own discretion, at any height. And although there are no clear rules for choosing a location, you need to follow the standards of PUE 7.1.48 - 1.50, GOST R 50571.11-96 and SP 31-110-2003. They do not contain exact instructions on where to make the outlet. But there are location criteria in relation to the structural elements of the apartment and other components of the room arrangement.
Recommendations for choosing a location:
- from the ceiling - from 15 cm;
- from the floor surface - from 90 cm;
- distance from the window slope – 10 cm;
- distance from gas pipelines – 0.5 m.
There are inaccuracies in the list of rules. Thus, the minimum distance from the ceiling is 15 cm. But according to the PUE it should not exceed 30 cm. In this case, it is recommended to count the distance from the ceiling from 30 cm or more.
For a mobile air conditioner, you can use standard connection points in the apartment. Their height relative to the floor is 30 or 90 cm. The first standard is used in Europe, the second remains from Soviet regulatory documents
It is important to consider the maximum load
We recommend a useful article about which air conditioner is better to choose - inverter or conventional.
Choosing a place to place an outlet for an air conditioner
Although many people think that there are certain criteria regarding the choice of the place where the outlet for a household air conditioner should be located, their location and quantity do not matter at all. Each case involves consideration of questions about the number of electrical appliances and their power, as well as the interior and localization of furniture.
You can install further, but in this case the wire will greatly spoil the aesthetics of the interior. There may not be enough wire length to connect, and then you will have to solve the problem with the help of an extension cord. The length of the cord from the internal air conditioner module is no more than 1 m, so be guided by this parameter. Tips from experts on the rules for locating an outlet for a household air conditioner:
- the ideal distance from the ceiling is 15–30 cm;
- when the module is localized in the central area of the wall, the distance to the nearest wall from the electrical unit should be at least 20 cm;
- if the outlet is planned to be located at the bottom of the wall, then the distance from it to the floor should be at least 10 cm.
The electrical unit for the air conditioner should be freely accessible; furniture and equipment should not be placed near it.
Placement of sockets in the apartment
Laws and technical standards
After choosing a location to install the access point, you need to pay attention to several important details. These include:
- Power cable length.
- Type of cable section.
- Number of cores in the cable.
The following recommendations are also relevant:
- Opt for copper wiring for the premises, as it is recognized as the most reliable.
- If the apartment is equipped with aluminum wiring, it will have to be replaced.
- To connect air conditioners, it is customary to use a single-phase connection, so you need to check this characteristic before installing an electrical outlet.
As mentioned above, the height of the air conditioner outlet will directly depend on the size of the device. It can be installed either at the bottom or at the top of the wall.
We recommend that you read: Do-it-yourself check valve for a kitchen exhaust fan
Selecting a location for the indoor unit and its installation
The indoor unit is mounted on a special panel (usually included in the kit). When choosing a mounting location, one factor must be taken into account - it is necessary to ensure the minimum length of the route (minimum distance to the already fixed outdoor unit) - this criterion ensures rapid removal of condensate and liquid, and with a route less than 6 m, automatic removal of liquid is ensured.
The question at what height to hang the air conditioner (its internal part) is also very important - with proper installation, to ensure normal air circulation, the minimum required height is 1.5 m from the floor level, it is also incorrect to hang the air conditioner close to the ceiling (a distance of at least 15 cm), to walls or other obstacles (required distance 30 cm).
Adding refrigerant and starting
After a vacuum has been created in the device, you can fill the system with refrigerant. In the case of split air conditioners, the outdoor units are filled at the factory with the appropriate quantity sufficient for the piping length specified by the manufacturer. If the unit will be installed with an installation of more than 10 m, you need to determine the amount of additional refrigerant and add it before the valves of the outdoor unit open. The volume for each extra meter depends on the power of the system and the diameter of the pipeline. For 1⁄4 inch pipe, the amount of additional refrigerant is 20 g/m.
After filling with freon, the air conditioner is started using the remote control and the cooling mode is set, the pressure readings on the pressure gauges connected to the air conditioner service valve are monitored. The pressure measured by the pressure gauge during cooling operation is the suction pressure. For the R410 A coefficient it should be about 7.5 bar, which corresponds to the refrigerant evaporation temperature of +2 degrees.
INSTALLATION AND LAYING OF WIRES
Installation methods vary depending on the material of the walls and ceiling. Wires can be laid:
- in grooves (for plastered walls) – hidden installation of electrical wiring;
- in a corrugated protective pipe (for walls and partitions made of plasterboard sheets);
- in a cable channel - for installing open electrical wiring on flammable surfaces - wood or plastic.
Installation of electrical wiring in boxes is convenient because it requires minimal effort when replacing or repairing the cable.
Electrical wiring requires compliance with the following conditions:
- horizontal sections of the laying should be spaced from the ceiling or floor level at a distance of 150 - 200 mm;
- vertical sections - at a distance of at least 100 mm from corners, door and window openings;
- outlets for connecting sockets, switches, lighting fixtures - strictly at right angles to the main wiring.
The desire to save money and lay the wire along the nearest path will lead to the fact that after a while, when drilling a hole in the wall for a picture or cornice, the drill will stumble upon the wire. It will also be difficult to find the faulty section of electrical wiring.
The diameter of the pipe must be selected in such a way that it is possible, if necessary, to replace the cable without resorting to major repairs.
Electrical wiring along the ceiling is carried out either in grooves or in technological holes in concrete floors. If there is a suspended or suspended ceiling, the wire is laid in the interceiling space in a corrugated hose.
The ends of the cable coming out at the installation sites of sockets, switches and distribution boxes must have the required length margin. When installing hidden electrical wiring in grooves, the cable is secured with special brackets.
ELECTRICAL WIRING IN THE FLOOR
Installing electrical wiring in the floor has its own characteristics. It is beneficial at the stage of performing rough repair or construction work and can reduce the cost of purchasing wires, since the requirements for the location of the cable here are not as strict as for wall or ceiling installations.
The following conditions must be met:
- use of protective corrugated pipe;
- the thickness of the concrete screed on top of the wires is at least 30 mm.
Electrical wiring on the floor must be carefully thought out, since it will be impossible to redo it later.
INSTALLATION OF DISTRIBUTION BOXES
Distribution boxes are used for making taps and branches of electrical wiring. Distribution boxes are installed in places where lines for sockets, switches, and lighting fixtures are branched off.
Wire connections in boxes are made using special connecting terminals, twisting or soldering. The last method is the most reliable, but also the most labor-intensive, since it requires the use of special tools and materials.
Wire connections in junction boxes are insulated using insulating caps, bushings or, in extreme cases, fabric insulating tape.
SELECTION OF PROTECTION MACHINES
To protect against short circuits on the electrical panel, circuit breakers are installed in each circuit, which open the circuit when the specified current is exceeded.
To reduce the risk of electric shock when electrical appliances are damaged in rooms with high humidity - bathrooms, kitchens, residual current devices (RCDs) are used, which also open the circuit when leakage currents occur, for example, when the heating element in a washing machine or kettle is damaged.
After all work is completed, the electrical wiring installation diagram is adjusted, since in most cases, the original diagram will change due to factors not taken into account during the design.
ERRORS IN ELECTRICAL WIRING
Common mistakes to avoid that can lead to accidents:
- for any installation options, conductors should not be allowed to intersect;
- Direct connection of aluminum and copper conductors is not allowed;
- The use of plastic electrical tape in junction boxes is not permitted.
Circuit breakers should not have too much current reserve, but weak circuit breakers can cause false network shutdowns, for example, when several loads are switched on.
RCDs are selected according to the permissible leakage current. Incorrectly selected parameters will also cause false alarms or, conversely, lead to electric shock if the selected margin is large.
* * *
2014-2020 All rights reserved. The site materials are for informational purposes only and cannot be used as guidelines or regulatory documents.
Rules and requirements
Usually it is within the range of 0.8 - 1.8 kW, depending on how much area is to be cooled. 16 - ampere plug socket - ideal, but only for small rooms.
The best option for the refrigeration machine would be to install a separate power point. Grounding is required.
It is preferable to choose wires with copper
Make sure that they can withstand the maximum load that can be applied simultaneously, and are protected by the machine
There are no specific rules that govern the placement of an outlet. Each room is considered individually.
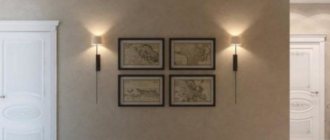
The location of the furniture and connection with other electrical appliances are important. We are accustomed to the fact that the inside of the air conditioner is located under the ceiling, and since the outlet should be located close to it, it is placed 0.3 meters below the ceiling.
You have the right to place the power supply point in another location, but you must take into account where the wire will be hidden. In most cases, the wire length is less than 1 meter.
Be guided by this parameter during installation so that you do not have to use an extension cord.
Rules for connecting to the network
There are different ways to connect air conditioners. You need to select them depending on the network parameters and individual conditions:
- Using a distribution box. The new power point in the room is connected in the distribution box in the same place where the split system will be installed. If you decide to turn on the device through the box, a plug or electrical outlet will not be needed. Difficulties with this option will arise if the total power of the room’s appliances is higher than the network can withstand. The socketless method implies the presence of very reliable contacts for connecting wires using high-quality terminals. Due to a number of inconveniences, this connection method is rarely used; usually a cord with a plug or socket is used to turn on the device. If the distribution box is located far from the future location of the air conditioner, you can connect the outlet using a cable from another electrical point located nearby.
- Hidden way to turn on. Since this technique requires trenching the walls, it makes sense to use it at the stage of apartment renovation. Using a hammer drill, you need to make grooves in the wall and lay the wires in the resulting holes. One end of the wire is connected to the junction box, the other to the electrical outlet. Then all the holes need to be carefully filled, plastered, and finished. The socket is made directly next to the air conditioner; it will be very convenient to turn it on. With the hidden method, the wires are not noticeable at all, the connection is reliable and safe. No external factor can cause problems with the wiring.
- Open method of inclusion. If it is not possible to do hidden wiring, there is only one option left - open wiring. Usually it is performed if the renovation of the premises has already been completed. From the junction box, the cable is laid along the wall directly to the air conditioner. It is run along the baseboard with a cable channel, and a wall cable channel is mounted (this is necessary to give a more aesthetic appearance to the room). If desired, the cable can be secured with small nails without a cable channel.
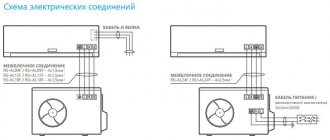
The air conditioner itself has 2 blocks - external, internal. Experts install the external unit outside the house, the internal unit - in the room. The unit, which is located outside the premises, is powered by the internal one, the latter is connected to the network. Both cords are always included with the device; you need to buy a socket yourself. To connect both blocks do the following:
- remove decorative panels;
- remove terminal protection;
- dismantle the cable clamps;
- insert cables into the intended holes;
- the ends of the cables are cleared of braiding and secured with terminals;
- decorative panels are returned to their original place.
Afterwards, the device can be connected to the network and used. Correct installation and provision of the necessary network parameters are a guarantee of comfortable use of the split system.
At what distance are they installed in the room?
Let's look at European and Soviet options for mounting connectors and find out the height from the floor.
European installation standard
This term became popular after the introduction of the definition of “European-quality renovation”. Some users find the following arrangement of sockets and switches convenient:
- switches at a distance of 90 cm from the floor surface (by passing by and without raising a hand, a person fixes the lighting in the room);
- mounting electrical sources at a height of 3 cm from the floor (at this distance you can hide the wires and conveniently use household appliances).
When choosing European sockets, you need to know that the diameter of the pins and the length between them are greater than those of Russian models. The current strength of imported devices is 10-16 amperes, Russian - no more than 10. Therefore, more powerful devices can be inserted into such connectors.
Soviet standards
Previously, sockets were fixed at a height of 90 cm from the floor, switches - at a distance of 160 cm. These indicators are no worse than the European standard and have a number of advantages:
- the plug can be inserted into the electrical socket without bending over;
- small children cannot reach the connector because it is installed at a height;
- This location is convenient for equipment that does not need to be constantly connected to the network (air conditioners).
Minimum height from floor
The rules for the installation of electrical installations and the design of residential buildings do not contain clear requirements for the location of sockets and switches with regard to floor coverings, walls and other elements.
The Electrical Installation Rules state that the distance from devices and gas pipelines must be higher than 50 cm. In the bathroom it can be placed at a distance of 60 cm from the sink.
At what height are plug sockets installed?
The joint venture states that electrical installations must be installed anywhere at a height of up to 1 meter.
The distance from sockets for connecting electric stoves and air conditioners is not indicated. In schools, kindergartens are placed at a height of 180 cm from the floor. The recommended length from the floor covering is 1 meter.
The height and distance are determined by the owner of the premises. In some cases the following rules apply:
- sockets are placed no closer than half a meter to the gas pipeline;
- in the kitchen and bathroom, electrical installations are placed at a distance above 60 cm from the floor surface and water supply.
Plug connectors in homes must be protected with a special device that will prevent access to them when the plugs are pulled out.
After completing the installation of connectors for electrical devices and switches, the PUE indicates the need to carry out work regarding electrical measurements. They will allow you to identify violations, possible problems and completely secure the process of use in everyday life.
For proper and convenient placement of connectors and switches, it is first recommended to determine which way the door opens. Then the switches are placed on the side of the handles on the door leaves. This is done at a distance of 80 cm to 1 meter, depending on the height of the residents.
The placement of electrical installations depends on the type of room:
- in a long corridor, on the staircase, sources are installed at the beginning and end of the path;
- in the living room and bedroom it is comfortable when the switches are located at the entrance to the room and next to the sofa and bed to simplify the process of using lighting.
The length of electrical installations from the floor must be selected taking into account the location from which they will be accessible. For example, when entering a room, choose a height of 90 cm, next to an armchair or bed - 60 cm, so that it is convenient to reach with your hand.
Connecting the air conditioner to the network
Before connecting the split system to the electrical network, you should familiarize yourself with the diagrams and specifications for the device components and analyze the composition of the walls. Then you need to inspect the existing power supply system, measure the cross-section of the incoming cables and test the selected route with a special detector.
There are several ways to connect an air conditioner to the electrical network. If the wiring line for a powerful electrical appliance was not provided in advance, you will have to lay networks and install sockets after a major overhaul.
It is most convenient to connect the outlet in the distribution box of the room. But this becomes possible only if the electrical wiring running from this box to the electrical panel of an apartment or private house can withstand the maximum possible load of all connected electrical appliances.
Another method involves laying new electrical wiring lines. In this case, you need to groove the wall, lay a new cable in a plastic corrugated pipe and connect it to the junction box. If the depth of the groove is more than 2 cm, the cable can be hidden in the wall without a corrugated pipe.
Corrugated pipe (corrugated pipe) is a pipe with a variable cross-section, in which there are thick-walled and thin-walled sections, giving it rigidity and flexibility at the same time
The groove can run horizontally or vertically, but it cannot be located diagonally. This is contrary to basic building regulations.
Based on the line arrangement project, it is possible to determine in advance the locations of the electrical network, incl. and for climate control equipment. If it is not possible to groove the wall, the electrical wiring can be laid openly.
In this case, the wires are hidden in a special plastic cable channel, which is fixed to the wall with screws. This method is the least labor-intensive and expensive, but the plastic channel can disrupt the appearance of the room.
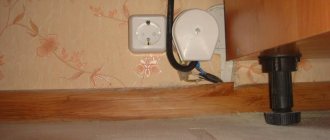
You can hide the cord running from a household air conditioner to a power outlet in a plastic box of any color and shape, depending on the interior design of the room.
If none of these methods work, you can connect the device via a cable to an outlet that powers equipment with less power. In this case, the cable stretches from the socket next to the air conditioner to the very point of power supply. But you need to check the capabilities of the outlet. If the network cannot cope with the load, the wires will burn out.
Connecting the split system to the power supply using a plug and a previously installed socket is the easiest way. This does not require any electrical work, so anyone can make this connection.
This installation option is chosen for:
- low power split systems (up to 4 kW);
- air conditioners built into the window;
- air conditioners that were installed in the room for a short time.
But it’s better to work out the location of climate control equipment and sockets for it in advance. This will allow you to lay more reliable wires to those outlets from which the air conditioner will be powered in the future.
Connecting the air conditioning system
When answering the question of whether an outlet is needed for an air conditioner, you need to consider various options for connecting the cooling system:
- the connection point is connected directly to the junction box. In this situation, they do without a socket and plug. But with this connection method, it should be taken into account that the electrical wiring used must withstand the load during the simultaneous operation of all household devices connected to it. The distribution panel is additionally equipped with a system that controls automatic shutdown in case of overload;
- If an air conditioning device is installed during general repair work, a closed structure is most often used during installation. A special channel is installed in the wall. It houses the cable. One end is connected to the distribution panel, and the other is secured to the outlet terminal. At the final stage, the channel is sealed. At the same time, the interior of the room does not deteriorate. The wiring is not influenced by external negative factors;
- Installation of the socket under the air conditioner can be done in an open way. This method is used if the repairs have already been completed and residents do not want to further damage the wall. One of the ends of the wiring is connected to the junction box. A socket is connected to the other end. The cable is located on the surface of the wall covering. It is placed in a decorative box.
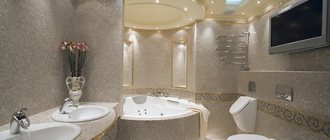
Installation of sockets in the bathroom: standards
Before installing sockets, it is important to choose the right locations for their installation. It is imperative to follow the electrical safety rules:
- Grounding. It is responsible for safety and is provided in all new-style houses. Grounding cannot be routed into the bathroom or into metal pipelines; it is routed only to the input panel with circuit breakers.
- Automatic machines. They are installed in apartments where the power of the connected equipment is high - for example, when installing washing machines and water heaters.
- RCD. It is recommended to install a device with a protective shutdown in the bathroom along all the wiring. The RCD will respond to any minimal current leakage and will cut off the electricity supply completely.
It is important to note that bathrooms do not require terminal blocks with twists and other wire connectors. Moisture-resistant electrical outlets are connected using three-wire, double-insulated cables
Each of the conductors has its own marking. Using copper cables, sockets are connected, which are less susceptible to oxidation, are resistant to significant loads and have low contact resistance when connected to machines
Moisture-resistant electrical outlets are connected using three-core, double-insulated cables. Each of the conductors has its own marking. Using copper cables, sockets are connected, which are less susceptible to oxidation, are resistant to significant loads and have low contact resistance when connected to machines.
Installation height for washing machine: correct location
Mandatory conditions for connecting washing machines:
- connection is made only to working wiring via a three-core copper cable;
- Only special sockets with protection against water ingress are installed inside the bathroom.
- It is imperative to follow safety precautions;
- The socket must be grounded and have a built-in RCD.
Choose the location of the outlet carefully. The device should be located at a considerable distance from water sources, next to the washing machine and in a place convenient for access.
In the bathroom, electrical sockets for washing machines are placed at a height of at least 60 cm from the floor. Typically, a distance of 100 cm is chosen with the average height of the machines being 85 cm. For ease of use, the socket is placed above the machine. They should also be placed no closer than 60 cm from objects that are sources of water.
Height above sink for wet areas
The socket in the bathroom should be located at a distance of at least 60 cm from the sink, the optimal value is 100 cm. The device should also be equipped with a protective cover to prevent splashes of water from getting inside. For additional protection, the product can be installed in niches, behind a partition or in hanging cabinets. For sinks with a countertop, you can make a device with a hidden module that will be hidden in the table.
At what height should a hair dryer socket be placed in the bathroom?
A bathroom is not just about having a shower or washbasin, it is a place where you can dry and style your hair with a hairdryer, use an electric razor, and dry towels. For low-power devices, such as a hair dryer, curling iron, the optimal location would be a height of 100 cm. The calculation should be carried out so that the wires are not stretched when used.
Rules for placing sockets in the kitchen
When planning to place corner kitchen sockets, follow the building regulations:
- the socket is removed from the side of the equipment by 15-20 cm;
- the distance from the device to the device built into the headset is no more than 1 m;
- installation near the sink of products with moisture protection from IP44;
- removing the block from the hood by 20-30 cm;
- connecting an electric stove, washing machine, oven, refrigerator, PMM to separate power sources;
- the total power of electrical appliances should not exceed that allowed for the power line;
- There are two types of power sockets - 10 A (2.2 kW) and 16 A (3.5 kW).
How many sockets are needed?
The number of outlets should be planned at the space design stage. In the classical scheme, the number of connection points is equal to the number of household appliances. This is not entirely true:
- Portable gadgets are used indoors - vacuum cleaner, laptop, mobile phone;
- users purchase additional equipment for which there is no room;
- there is a need to use an extension cord.
To avoid inconvenience, you need to add another 25% to the existing devices. When making calculations, take into account stationary equipment and temporary devices. The best option would be:
- 2-3 devices near the apron;
- 1 – in the countertop or near the eating area;
- 1 – next to the entrance.
How to position
- Upper – extractor hood, TV, furniture lighting. The optimal location for the outlet would be at a height of 5-10 cm from the edge of the top cabinet.
- Medium – low-power devices. For ease of access, socket boxes are placed 20-10 cm above the tabletop, and 60 cm away from the edges of the stove and sink.
- Bottom - kitchen appliances can be built in here, placing sockets at a height of 30-60 cm from the floor only in cabinets or in niches on the back walls of the cabinets.
Installation behind a stove or dishwasher eliminates direct access to the units.
How to connect an air conditioner to the mains
There are two common ways to connect an air conditioner to mains power:
- through a socket for single-phase household appliances;
- from a separate line mainly for industrial devices.
With socket
Connecting power to a split system using a plug and socket is the simplest way, which does not require preparatory electrical work. This option is chosen for air conditioners built into the window, low-power systems up to 4 kW, as well as for temporary use. It must be remembered that the outlet for a household air conditioner must be strictly individual.
The connection can only be made if you have experience in electrical work with household appliances. The algorithm of actions will be as follows:
- prepare materials and tools;
- study the diagrams in the instructions;
- lay and connect interconnect cables (this was discussed above);
- install a socket.
Before a test run of the split system, you need to check the circuit for correct connection.
The socket must have copper wires and be connected to the panel in accordance with all electrical safety rules.
Direct connection to the network
A separate power line is best suited for a powerful split system. In this case, you need to make sure whether it is possible to connect additional equipment to the electrical panel (which must be grounded). The option of direct connection to the network does not load the operating network lines: power is supplied directly to the indoor unit of the air conditioner.
The cable is laid along a prepared groove in the wall or in a box along the surface of the wall. The cable is pulled to the shield through a machine with calculated power, which will be discussed in detail in the next subsection. The cross-section of the wire will depend on the power of the device and the distance from the panel.
The connection instructions otherwise repeat the first method. This method allows you to install an air conditioner anywhere in the house.
Requirements for the parameters of the air conditioner network cable
When connecting the air conditioning system to an outlet, you need to take into account the length of the power cord; According to the requirements, it must easily, without tension, reach the power point. It is also worth taking into account the following characteristics:
- Current strength.
- Number of cores
- Section.
- Number of phases.
- Remoteness of the shield.
Electrical wiring made of copper is suitable. Wires with a single-phase connection are recommended. As for the cross-section diameter, its optimal size is 1.5-2.5 millimeters.
Which cable to choose for the kitchen
Next, you need to calculate the cross-section of the common supply wire of the electrical panel and the outgoing wiring to each pantograph. Follow the rules here:
for device loads up to 3.5 kW - copper cable VVGng-Ls 3*2.5mm2
for device loads up to 5.5 kW - copper cable VVGng-Ls 3*4mm2
with a total load of all devices up to 10 kW - copper cable VVGng-Ls 3*6mm2
with a total load of all devices up to 15 kW - copper cable VVGng-Ls 3*10mm2
Why there should be a brand VVGnG-Ls is discussed in detail in the article below:
Even if you have a house with an old grounding system (without a third protective conductor), still do the wiring with a 3-core cable. This will save you in the future from additional costs for reconstruction and replacement of wires.
As a last resort, the third wire will be a backup for zero or phase, in case of a possible break or other damage.
The location where the electrical outlet will be located
There may be different air conditioners in the room. The socket or sockets must be installed so that the power cord can be easily reached. Availability is the main requirement for a point.
When choosing a specific location, there are a number of details to take into account:
- Air conditioner power.
- The thickness of the electrical wiring section.
- Furniture arrangement.
The interior design is also of great importance for the installation location. When chasing practicality, you should always remember the aesthetic component. The socket must be installed in an accessible place, but in such a way that the wires from the equipment are not noticeable or, at least, do not negatively affect the appearance of the room or damage the walls and windows.
As a rule, the socket is mounted next to the air conditioning unit. The height of the part will depend on the size of the equipment.
Standard dimensions of air cooling device units:
- Dimensions of the indoor unit (hxwxd) – 24x71 or 8x18.
- Dimensions of the outdoor unit (hxwxd) – 54x77.
Tips and recommendations for choosing the location where the electrical outlet will be installed:
- 15 centimeters is the minimum distance between the ceiling and the closest edge of the outlet.
- 30 centimeters is the distance from the ceiling covering to the outlet.
- 25 centimeters is the recommended distance between the walls if the indoor air conditioner unit is placed in a corner.
- 10 centimeters is the recommended distance between the floor and the bottom edge of the outlet if it is located at the bottom of the wall.
- Nothing should block the network connection point.
Sometimes an existing socket is used for connection. In this case, you need to be careful and measure the length of the power cord. It should reach the point without tension.
Features of air conditioner sockets
The installation of a conventional household air conditioner allows the use of standard power outlets. Most air conditioners have plugs and cords in the factory configuration, but still, climate control equipment is not a TV or refrigerator, so you need to take care of arranging electrical lines for it in advance.
Such equipment is a powerful technical device that consumes a large amount of electricity during operation.
Because of this, you cannot connect other energy-intensive equipment to the same outlet as the air conditioner. Correctly performed electrical installation when connecting climate control equipment to the network is the key to long-term and efficient operation of these devices.
Professional development of a design project involves determining the location of the outlet for climate control equipment in the room, regardless of its purpose
Each air conditioner has its own rated power consumption. This value must be taken into account when installing the device in order to minimize the risk of an accident and ensure normal power supply to the equipment. It is indicated in the technical data sheet of the device. But when laying electrical lines and sockets, it is better to take slightly higher indicators.
Standard power ratings for a non-commercial air conditioner typically range from 800 to 1800 watts. The exact value depends on the type of climate control equipment and the area of the cooled room. In most cases, a simple plug socket with a load rating of about 16 A will be sufficient for such equipment.
Before installing a socket for an air conditioner, you should familiarize yourself with the main characteristics of the climate control equipment specified in the technical data sheet of the device
But for split systems designed to cool large areas, such an outlet will not be suitable, since it will not be able to withstand the load. For powerful equipment, sockets are selected individually depending on the power parameters of the device.
It is best to buy European sockets to connect climate control equipment. They cope well with high loads and have a long service life. The most reliable European sockets include products from the brands ABB, Legrand, Siemens, GIRA, etc.
How to hide a split system outlet?
Air conditioner sockets are usually in plain sight. They do not need to be crowded with furniture or appliances, but sometimes they can disrupt the overall design concept of the entire room.
This applies even to modern flat sockets, which only protrude slightly on the wall, to say nothing of the usual “pot-bellied” models. In this case, designers resort to small tricks and disguise sockets in the most unusual ways.
Spectacular retractable sockets are ideal for living spaces designed in a modern style (high-tech, modern, gothic, etc.)
For example, the socket is mounted in a shelf on which the climate control equipment is located, hidden in a three-dimensional picture next to the air conditioner, or made in the form of a block that extends out of the wall when pressed. The latter option is suitable if the air conditioner will only occasionally be connected to the power supply.
Also today, sockets with covers (hinged and retractable) are produced. These covers can be further decorated, painted in a bright color, or made as inconspicuous as possible.
The shelf next to the air conditioner, in which the electrical outlet is hidden, can also be used for its intended purpose, i.e. You can put books or figurines on it
If there is a cabinet next to the air conditioner, then the socket can be hidden in it and arranged in the form of a retractable block (top, bottom or side). It can also be covered with a false panel or cornice.
If the climate control equipment has a cord that is too long, then it, together with the socket, can be disguised using a non-standard volumetric plasterboard block made in the same interior style.
Installing an unusual painting near the air conditioner in the bedroom, hall or living room allows you to refresh the interior of any living space
Also today there are other ways to disguise sockets. They can be locked in a small cabinet with sliding doors or hung with a folding mirror. If the interior style allows, the connector can be placed behind a small decorative door. This solution will look interesting in interiors in country style, Provence, chalet, etc.
The rosette can be covered with artificial flowers. In the bedroom or living room, you can use a print, stained glass panel or pattern to disguise the connector so that it looks like part of the design composition.
In a children's room, an electrical outlet can be hidden behind a retractable multi-colored panel, an interactive map or some three-dimensional models. For example, if your child is into Star Wars, you can hide the connector behind a plastic model of the Death Star or Millennium Falcon.
You can hide an air conditioner socket in a mini-cabinet in the living room, in the hallway, in the bedroom, and in the children's room
Typically, air conditioner sockets are hidden in the same way as sockets for other household appliances in the room. The choice of one or another method of camouflage depends on the design features of the room. But today, some architects propose not to hide sockets and wiring to the air conditioner, but to make them as open as possible.
Moreover, the design concept involves using wires of contrasting colors (for example, on a white wall, attach black wires almost in the central part of the wall). If the air conditioner wiring is open, then there will be no point in installing a hidden socket, and this detail can be made bright.
Choosing a location
Although many people think that there are certain criteria regarding where the socket for a household air conditioner should be located, their location and quantity have absolutely no meaning. Each case involves consideration of questions about the number of electrical appliances and their power, as well as the interior and localization of furniture.
You can install further, but in this case the wire will greatly spoil the aesthetics of the interior. There may not be enough wire length to connect, and then you will have to solve the problem with the help of an extension cord. The length of the cord from the internal air conditioner module is no more than 1 m, so be guided by this parameter. Tips from experts on the rules for locating an outlet for a household air conditioner:
- the ideal distance from the ceiling is 15–30 cm;
- when the module is localized in the central area of the wall, the distance to the nearest wall from the electrical unit should be at least 20 cm;
- if the outlet is planned to be located at the bottom of the wall, then the distance from it to the floor should be at least 10 cm.
The electrical unit for the air conditioner should be freely accessible; furniture and equipment should not be placed near it.
Placement of sockets in the apartment
Air conditioners for a one-room apartment
air conditioner in the opening between the wall and the window
Many buyers are often confused about the possibility of high-quality cooling/heating of both the room and the kitchen with one indoor unit. Even when placing the device in the hallway, which is equidistant from other rooms, the coolness or heat will not flow there enough. When the stove or oven is turned on, the coolness will instantly go away, but in the hallway it will always be very cold.
An air conditioner with increased power is also not a solution, since it will often operate in stop-start mode, and this renders the main part of the system unusable - the compressor.
Then how to install an air conditioner in a one-room apartment and which type should you prefer? There are three options here:
- installation of two split systems separately in the kitchen and room;
- installation of a multi-split system with one external and two internal units;
- installation of a duct air conditioner (in a one-room apartment, a low-pressure model is sufficient).
The only disadvantage of the first option is the presence of two external modules on the facade of the building. Installing a ducted air conditioning system is quite acceptable, but it will cost much more. In addition, you will have to pull out air ducts, install them in a false mezzanine or wall, and most importantly, this can only be done in apartments with high ceilings.
With a ducted air conditioner, such a nuisance may arise as the spread of kitchen aromas throughout the apartment, because the air duct system connected to all rooms will mix the air taken from them and then distribute it to all zones. This air conditioner is ideal for several rooms in an apartment.
standard one-room apartment in Khrushchev
If funds are very limited, then you can install one wall-mounted split system, but in such a way as to cover all the rooms as much as possible. In an apartment with zones arranged as in the picture, usually the best option for installing an air conditioner is above the doorway in the room. The air will be reflected from the opposite wall and enter the corridor and kitchen in 30% of the volume of the total air masses circulating throughout the apartment.
As an option, install the block opposite the opening. But in this case, only 30-40% of the cooled/heated air will remain in the room, and 60-70% will disperse to other zones. This arrangement of the air conditioner is more suitable for a small room, where the temperature change is felt much faster and the flow divergence is better.
You should not buy a window air conditioner for a small room. Even modern models make noticeable noise, which is unacceptable for a sleeping area. It is better to choose an air conditioner for a small room with less power. Appliances up to 2-2.5 kW are hung in a room with an area of up to 15 m².
A window monoblock can replace a split system in the kitchen. It works properly in areas up to 15-18 m². But you will have to find a special place to collect splashing condensate, because under the window there may be a walking path or a recreation area.
Sometimes the question arises of the correct placement of an air conditioner in a room with an adjacent balcony. There are no deviations from the rules in the installation of the indoor unit. It is recommended to hang the outdoor module on the facade or on the side of the balcony/loggia. The option of mounting inside is possible, but only if there is no glazing. An elongated route is laid between the blocks, which passes through the balcony onto the street at a slope.
Selecting a location for the indoor unit and its installation
The indoor unit is mounted on a special panel (usually included in the kit). When choosing a mounting location, one factor must be taken into account - it is necessary to ensure the minimum length of the route (minimum distance to the already fixed outdoor unit) - this criterion ensures rapid removal of condensate and liquid, and with a route less than 6 m, automatic removal of liquid is ensured.
The question at what height to hang the air conditioner (its internal part) is also very important - with proper installation, to ensure normal air circulation, the minimum required height is 1.5 m from the floor level, it is also incorrect to hang the air conditioner close to the ceiling (a distance of at least 15 cm), to walls or other obstacles (required distance 30 cm).
Corner installation of air conditioner
You can install an air conditioner in the corner of a room where another method is simply impossible due to architectural features or the size of the room. Some manufacturers have corner models of split systems with a very attractive design and compact dimensions. But this is the least desirable location of the air conditioner in the kitchen or room, since in any case the uniformity of distribution will suffer and the formation of different temperature zones cannot be avoided.
At the same time, sometimes the question arises of where to place the air conditioner in the room if there is an opening of 70 cm wide between the window frame and the wall, and there is no other place to choose. In this case, corner installation is justified. When the homeowner chooses this option, you should take into account the location of the doorway - you cannot hang the device opposite it, as the air will flow into another room.
conclusions
It doesn't matter how many nests there are in the room and where they are located. The main thing is that they can withstand the rated voltage of the devices connected to the network. For the air conditioner you need to make a separate line. If this is not possible, then the capabilities of the shared network should be taken into account. Do not forget that the cord from the internal air conditioner module rarely reaches 1 m in length, so when arranging sockets, be guided by this figure.
When installing a new socket for a split system, build a grounding connection. The socket must be connected only through a circuit breaker. Experts advise giving preference to European sockets. They are designed for high power devices. After installing the electrical unit, you must call the specialist who installed the split system and ask him to conduct a test connection. This is the only way you will be able to maintain the warranty on the device.
In spring and summer, people turn on air conditioners in private homes, apartments and office buildings. Wall-mounted split systems help combat heat by cooling the air inside the building. As a result, people provide themselves with a comfortable microclimate and optimal temperature conditions. However, in order for the use of the equipment to be possible, proper installation and connection of air conditioners to the power source is required.
The socket for the air conditioner is a necessary part for connecting the equipment to the network. You can install the electrical outlet yourself. The main thing is to know about the rules and recommendations for its installation, which will be discussed in this article.
Conclusions and useful video on the topic
Since installing an air conditioner and sockets for it takes a lot of time and effort, the issues of its power supply must be taken as seriously as possible. Before installation, you should take the advice of electricians and designers.
Some recommendations for installing sockets in an apartment are given in the video below:
If possible, you should design the location of an individual outlet and lay a separate power line to ensure uninterrupted operation of the climate control equipment. This can be done both at the stage of major renovation of the premises, and during the installation of an air conditioner in an already renovated room.
Tell us where and how you placed the electrical outlet for the air conditioner in your apartment/office/house. Share the nuances of the location known only to you. Please leave comments, ask questions, post photos in the block form below.
Conclusion
A prerequisite for the normal service life of the air conditioner is the correct choice of outlet to power it. When choosing an outlet, you should take into account not only its quality, but also its compliance with the specified rated load. The plug connectors of such an outlet must ensure the most reliable and safe contact connection with a household electrical appliance, in particular with an air conditioner plug.
You should also pay attention to the contact connection and the design of the terminals of the socket itself, to which the cable of a certain wiring line is connected. Thus, knowing the nuances described in the article, you can easily install the air conditioner and choose the right outlet for it yourself.
Network load calculation
Location is not the only factor to consider when installing an electrical outlet for an air cooler.
It is also important to correctly determine the power of the future connection point
To ensure reliable power supply to the air conditioner and eliminate the risk of an accident, you need to correctly calculate the power of the electrical wiring line to which the air conditioning device will be connected. To do this, you need to find out the maximum power consumption of the air conditioner (the highest power consumption during operation). Typically this information is contained in the technical data sheet of the device.
The power of a household air cooling device depends on the area of the cooled room and varies between 800-1800 W. Accordingly, during operation, this equipment creates a load on the network at the level of 3-10A. This means that to connect a household air cooling device to the electrical network, a standard plug socket is sufficient, the rated load of which does not exceed 16A.
The exception is high-power air conditioners installed in very large rooms. For such devices, high-power power points are purchased or a direct connection is made without using an electrical outlet. It should be remembered that the electrical outlet, regardless of the power level, must be grounded.
All of the above calculations are relevant if a separate line is laid under the air conditioner, to which other electrical appliances are not connected. If the line is used to connect other household appliances, then the maximum power of these devices must be added to the maximum power of the air conditioner. If the total indicators exceed the permissible load on the network, then turning on these devices at the same time is prohibited. Experts advise connecting the air conditioner to a separate line, this will avoid overloading the wiring.
Troubleshooting procedure
All sockets in the apartment do not work
Possible reasons for such a malfunction can be formulated as follows:
- there is no general power supply to the apartment;
- there is a malfunction in the input distribution panel;
- All sockets in the apartment are powered from the panel from one group, the wiring of which was damaged or de-energized.
The general absence of tension is easily determined. If the input circuit breaker is turned on, the outgoing circuit breakers are also turned on, but the electrical appliances in the apartment do not work (including in the kitchen), and there is no light in any room, which means there is no power at all. We are finally convinced of this by checking with an indicator the presence of voltage at the input circuit breaker.
If there is voltage at the input terminal of the machine and there is no voltage at the output terminal, turn off and turn on the machine again. If nothing has changed, the switch is faulty and must be replaced.
In the same way we check all outgoing switches. Among them we find the one from which the socket group is powered. If voltage is supplied to the line, but the socket group does not work, you should look for a broken wire. Power supply to the socket group can be provided through distribution boxes or via a cable. In the first option, you need to open the first box from the panel and ring the wires to determine the location of the wire break. In the second option, the socket closest to the panel is opened, the wires coming from the panel are disconnected.
Sockets do not work in one or two rooms
If a distribution panel is installed that has an input circuit breaker and several outgoing circuit breakers, we try to determine which of the circuit breakers supplies the section of the wiring where the sockets do not work. Most often, socket and lighting wiring in one room or two rooms are combined into one group, powered by one machine. Sometimes sockets are installed on the same wall in different rooms. We check whether all machines are turned on; if so, we check the presence of voltage at the input and output of the machines. If there is a disabled machine, we turn it on. If the lowered toggle switch in the panel does not rise, there may be two reasons:
- the mechanical drive of the machine is faulty and the device must be replaced;
- The circuit breaker has just been tripped by the protection and the thermal release has not yet cooled down.
In the first case, you need to purchase a machine of the required rating and replace the faulty one with it. In the second case, we look for the location of the damage. Since the wiring in modern apartments is hidden, access to the wires is possible only in panels, junction boxes (if they are installed and not walled in the wall) and in the sockets themselves.
Armed with a multimeter, we measure the resistance between the phase and neutral wires of the found group, of course, turning off the voltage. We make this measurement from the input panel. When detected, we try to trace the route of the electrical wiring group that interests us. You need to find a junction box that has two wires coming into it, indicating a short circuit. If the box found has a lid, open it, remove the insulation from the twists, disconnect the wires and release the pair that showed a short circuit. We measure the resistance of this pair towards the input panel. A resistance close to zero means that the damage is located in the wiring section between the input panel and the junction box. If it is not possible to remove the wires, all that remains is to lay new wiring in this area.
Damage to hidden wiring rarely occurs on its own. There are often situations when a wiring fault is discovered after repair. When drilling holes in walls, for example to hang a cabinet or shelf, the wiring or its insulation may be damaged. To prevent this from happening in the future, we recommend that you read our advice on how to do this.
A short circuit can occur after the electrical wiring is flooded, when heating or water supply pipes break, or after a flood in the bathroom of the upstairs neighbors. The wiring insulation may have minor defects that do not appear while the wires are dry. When moistened, cement dust with water forms a conductive medium, resulting in a short circuit, insulation burnout and sintering of wires together.
Problems with one outlet
If one outlet in the room does not work, one of the reasons may be a weakening of the contact, as a result of which the wire may simply fall off. In this case, troubleshooting comes down to the fact that you need to remove the socket from the groove and check its connection. The video below clearly demonstrates the repair technology:
The most common installation errors
Installation is not easy, and even complete compliance with the installation instructions for an air conditioner is not enough for the unit to work properly. Errors in assembling air conditioners are:
- Poor location of the indoor unit.
- Incorrect connection of the factory section installed in the device with the rest of the system. This violation can lead to leaks and losses of refrigerant.
- Weak fastening of the external unit of the air conditioner.
- Incorrect connection of the unit to the external unit, which may result in leakage and loss of refrigerant.
- Unintentional pinching of copper piping when bending the installation. It should be remembered that the copper pipe must be correctly bent with a right bend angle. Otherwise, it is flattened, and the refraction of the cross-section leads to restricted refrigerant flow and improper operation.
- Inappropriate length or installation height, lack of bracket for the outdoor unit of the air conditioner.
- Incorrect routing of condensate unit.
- Incorrect connection of the drain to the sewer system, for example, the absence of a siphon, the connection directly creates foul odors coming out of the air conditioner.
- Incorrect choice of device cooling power. The norm is 1 kW per 10 m2 - in homes, offices and other institutions, which will significantly increase the cost of installing an air conditioner.
- Installation of a condenser without shock-absorbing washers, which leads to the transfer of vibrations from the device to the building.
- There is a pressure problem in the system after the refrigerant is released and the air conditioner is turned on.
Unprofessional installation carries a high risk. The subsequent trouble-free operation depends on the diligence and precision of the assembly performed before installing the air conditioner in the apartment. It is worth remembering that even the most advanced device will not work for long if the assembly is done carelessly and in violation of basic rules.
Heating in modern country houses
The principle of organizing a dacha heating system, thought out at the stage of designing a house, is no different from the heating systems of cottages and residential buildings. The decisive point is the presence of heating mains. But, as a rule, they are not. The second difference is the implementation of an economical, periodically used heating option, rather than a daily operating one.
To do this, any system must provide: rapid heating of the room of the required area, drainage of water from the pipeline during water heating and have high power for effective heating of houses with low thermal insulation properties.
The heating system in the country begins with the installation of the selected type of boiler and piping the house. It is better to entrust such necessary work as preparing the premises for the boiler room, organizing the devices necessary for ventilation of solid-state boilers, installing the pipeline, starting and testing to experienced specialists. The boiler can be electric, diesel, solid-state and gas.
There are hybrid boiler models that use solid fuel and electricity to operate. Their cost is much higher and they are not always profitable for a dacha where they do not live permanently in the winter. A wood-burning boiler is the easiest to withstand temperature changes in winter.
It also falls into the category of economical options. The convection type of wood boiler is the most common. It has a low noise level, which makes it possible to install it in basements. A large selection of modern boiler models makes it possible to increasingly use water heating.
When building a large dacha, it is the best heating option. Its essence lies in the possibility of constant circulation of water heated to the desired temperature through pipes to the batteries located in the house and back. To lay the pipeline, pipes made of metal, polypropylene or metal-plastic are most often used. They can be used for many decades only if properly preserved for the winter.
Another problem is the timely replacement of water filters, in the absence of which, the pipes quickly become clogged with various deposits of impurities contained in the water. Not only water, but also saline solution, glycerin, and propylene glycol can be used as a coolant.
Each of them has its own advantages and disadvantages. Glycerin, for example, does not harden and retains its fluid properties even at temperatures of 30° below zero, which prevents pipes from bursting. It's very expensive. Propylene glycol is not toxic, but its specific heat capacity is worse than the harmful ethylene glycol. In connection with the growing volume of construction of dachas from modern materials, it is most appropriate to involve experienced specialists in the implementation of your own heating system.
To keep your dacha warm in winter, you must choose one of the heating options. In this case, early insulation of the house is a very important point. Otherwise, efficiency sharply decreases and energy consumption increases. And it will be difficult to stay warm.
Practical recommendations for organizing heating in the video:
Selecting operating temperature
After connecting the refrigerator to the mains, you should not immediately fill it with food. It is better to give him time to adapt to the temperature regime. Typically, the refrigerator operating cycle consists of 10 minutes of operation and 20-30 minutes of rest. In order for the refrigerator to start normal operation, at least three cycles must pass from the first start. Some models may take up to three days to become operational.
Depending on the model, the cooling mode may vary. It is recommended to first set the temperature inside the refrigerator to +5 degrees and check the condition of the food. If you find that they are spoiling quickly, the temperature should be reduced.
When setting the optimal mode in the freezer, it should be taken into account that the temperature in it should not be above zero. For long-term storage of products, modern manufacturers recommend a temperature of no lower than -30 degrees, but in practice -20 is usually sufficient. Moreover, the reproduction of microbes stops already at -18 degrees.
The temperature inside the refrigerator can be adjusted using a mechanical thermostat. In this case, the temperature is adjusted by turning the control knob from 1 to 7 or according to the scale drawing to o or “colder”. “1” on the scale corresponds to the highest operating temperature, and “7” or “max” corresponds to the lowest.
Modern refrigerators are often equipped with an electronic temperature setting method. For this purpose, there is a control panel on the door of the unit. The required temperature mode is selected by simply pressing a button. The most advanced models are equipped with touch control panels.
Electronically controlled refrigerators use special sensors - thermistors - instead of thermostats. They are installed on the evaporator, in the refrigerator and freezer compartments, and even on the ice maker, if such an option is present. The sensor readings are sent to the electronic control board and, after processing, serve as a signal to turn the compressor on or off. The electronic control method provides finer and more precise adjustment of the refrigerator’s operating modes.