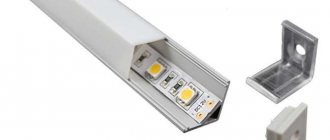
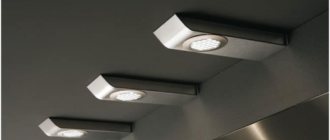
An LED profile (corner, overhead or mortise) can be used to organize lighting using a diode-based strip. This solution is an effective alternative to installing lighting fixtures directly on a wall/ceiling or other surface.
The main reason why you should use an LED profile is the increased fastening strength of such a design. And in addition, it is quite easy to install it yourself.
Installation of corner profile
Mounting such an element on self-tapping screws is not so easy, so it is much easier to use double-sided tape.
First, degrease the substrate with solvent or alcohol.
Then apply tape to both edges and cut off the excess.
Now degrease the surface itself. To do this, lightly spray it with water or “Mr. Muscle”.
Why is this being done? In most cases, the corner profile is mounted unevenly to two planes. And initially, setting it straight is very problematic.
And if you lightly spray the surface with water, the tape will not stick immediately and will give you time to adjust everything as needed.
For more reliable fastening, it is recommended to use polyurethane glue along with tape. All that remains is to stick the tape inside, insert the lens and close everything with plugs.
Possible installation methods
Pasting
– applies only to corner profiles. This is done using special double-sided tape or special glue, for example, “liquid nails”.
Self-tapping screws, screws with dowels
– the most common option, providing better fastening reliability.
Holders
– usually used by professional installers. Fastening accessories are not universal, but differ in purpose for different types of profiles:
For invoices
For corners
LED strips in the interior
As a rule, LED strips are used in the interior, in auto mechanics, instead of the main lighting in offices and factories. You can highlight furniture elements, a plasterboard box (special, now fashionable protrusions formed as decoration under the ceiling), a mirror with a simple pattern, etc. The backlight can be mounted in many different ways, emphasizing its aesthetics. Very often, LED is used to illuminate the ceiling. Lighting the ceiling with an LED strip creates a mesmerizing effect, giving the interior and all decorative items the necessary high cost. In many cases, your guests will not even understand where exactly the pure and diffused light is coming from.
Why LEDs?
At this point in time, lighting in the house can be organized with your own hands in a variety of ways:
- Spotlights;
- chandelier;
- wall lighting fixtures;
- various types of lamps;
- LED strips.
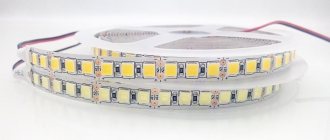
With such variety available, LED strips are especially popular today. It is with their help that many people design basic and additional lighting. The strip consists of several LED modules installed on a flexible base. Therefore, such a light source is excellent for situations where more classic and standard types of lamps cannot be installed for a number of reasons.
LED strip
Installation of such tapes is possible in the following places:
- ends of kitchen units (wall and floor cabinets);
- ceiling in hidden niches or boxes;
- wall niches and shelves;
- advertising signs;
- tension and plasterboard ceiling structures;
- cornices, etc.
In addition, LED strips are characterized by the following positive qualities:
- high lighting efficiency. The light of the tapes is quite bright and with their help you can create a variety of light variations;
Note! Using several types of ribbons with different glow colors will help you create a unique ceiling and embody all your wildest ideas regarding lighting here. Moreover, you can do all this with your own hands without outside help.
Ribbon glow
- excellent aesthetic appearance;
- low power consumption. The savings in this case will be approximately 80% of standard neon lights;
- long period of product operation. This LED strip will last about 5-7 years;
- versatility. This type of lighting device can operate adequately in a fairly wide temperature range - from -40 °C to +60 °C;
- environmental friendliness and absence of negative impact of the product on human health;
- pleasant luminous flux that does not irritate the human visual system. LED strips do not have the blinking effect that is typical for fluorescent light bulbs;
- the presence of high fire safety - the tapes do not heat up during operation;
- the ability to combine the tape with various materials (aluminum and plastic boxes, wood, metal and glass);
- light weight, thanks to which the LED strip can be easily mounted in any kind of structure, even without additional reinforcement.
The LED strip will be an excellent addition not only to your ceiling, but also to any other structure or furniture.
Kinds
Profiles are divided into 3 types:
overhead - those that are placed on top of the surface or suspended from it
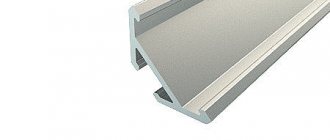
corner - placed in the corner of a cabinet or ceiling and usually shines at an angle of 45 degrees to the surface
mortise - have protrusions on the sides that cover irregularities and chips along the edges of the groove, where they are inserted
The groove is specially created on the surface, and the profile, after immersion in it, is obtained at the same level with this very surface.
Since the main function of the LED profile is heat removal, a very important parameter that you should pay attention to is its surface area. Keep in mind that heat is dissipated not only from the bottom substrate, but also from the side edges.
Keep in mind that heat is dissipated not only from the bottom substrate, but also from the side edges.
The higher they are, the better. Therefore, when installing, be sure to maintain free air access to each side.
For example, when installing an overlay profile, at least one surface (bottom) is already insulated. Therefore, it is necessary to make special spacers on it.
These can be plastic or metal elements. It is best to use factory mounting clips for this.
The main thing is to ensure air passage under the substrate.
It is advisable to maintain the distance from the wall to the bottom surface at least 3 mm.
There are also profiles that come complete with a removable base. In them, the base is first attached to the surface, and the profile itself is inserted into it. The necessary gap is provided between them.
The rules for creating gaps also apply to the sides. They cannot be mounted, as they say, end-to-end with another surface.
In addition to better cooling, high sides have another advantage. Thanks to them, special connectors for connecting pieces of tape can be easily placed inside.
If the sides are low, you will have to remove the top closing cover from the connector. And insert the connector itself from the side, after grinding it down a little with a file.
Based on the above, it is best to use overhead profiles. In any case, other types will be closed from air on either side.
As soon as the mortise profile is inserted into the groove, three sides are immediately insulated. Only the area of the upper protruding side remains, and this will clearly not be enough.
It is recommended to choose models in which this area will be as wide as possible. Firstly, better cooling, and secondly, you don’t need to cut a groove in the furniture with millimeter precision. Make a mistake and the profile will simply fall through there.
In fact, mortise views perform only one function - decorative. For powerful LED strips, if there are no voids or gaps, it is better not to use them, maximum for strips up to 9.6 W/meter.
The same applies to corner models. When you put them in a corner, you immediately isolate it on both sides.
Therefore, it is not advisable to use such profiles specifically as a heat sink when working with bright and powerful LED strips SMD 5050, 5630, 5730.
Several types of aluminum profiles from Klus, their components and sizes:
Installation features
The installation features of the profile depend on the type of its body, since the surfaces on which they are mounted, as a rule, differ significantly.
There are also general installation requirements for all methods: LEDs are installed in the profiles, the power of which does not exceed 3 Watts. Installation of any additional substrates for heat removal is not required. The design itself will successfully cope with this task.
During installation, care should be taken to ensure that direct air access is maintained on each side of the side. For example, when installing an overlay profile, the lower surface is already insulated, and therefore it is recommended to decorate it with special gaskets - metal or plastic. It is advisable to use factory fasteners for this purpose, for example, clips. The main thing is that there is a free air passage under the substrate.
It is recommended to maintain a minimum distance from the bottom surface to the wall of 3 mm. If this option cannot be implemented for some reason, you need to buy a finished product equipped with 15-20 mm sides. This will allow the profile to be mounted closely.
Embedded profile
Installation is carried out in specially made gutters and grooves. It is securely attached using special holders and is not intended for relocation to another location.
Can be secured with glue or by pressing into the surface. To give the ends of the profile a more aesthetic appearance, plugs are used.
Overlay profile
They are used when installing a profile with a tape width of no more than 1 cm. Fastening to the base is most often carried out with screws. But you can also secure it with glue or double-sided tape. This allows you to rearrange the light source without damaging the surface.
In this case, no additional fasteners (for example, holders) are needed. Also, such structures are immediately equipped with plugs.
Corner profile
Mounted between the ceiling and wall or between two furniture shelves. The LED strip is located inside the corner profile. Fastening grooves are made along the edges.
Suspended profile
Special ropes are used for fastening to the ceiling covering.
Installation of LED strip
The final stage includes the following procedure:
- Trimming the tape according to profile parameters. It should only be carried out in specially marked areas. Simple scissors are used for pruning.
- Preparing for installation. It includes removing the protective layer that protects the surface treated with glue and fixing it to the profile;
- Connection to the power supply and other elements. To control the on/off function, it is possible to install a touch device that will operate from the control panel.
- Connection to power source. It is necessary to install diffusers and plugs.
- Checking the functionality of the mounted light source.
- It is advisable to hide the wires used during connection by placing them in special channels or behind the wall decoration.
How to install an LED strip in a profile is shown in the following video:
By correctly selecting and installing a profile for the LED strip, the owner of the room will be able to significantly improve it with beautiful lighting in any desired place. The self-installation process will take very little time and effort.
LED difference
The LED itself consists of a housing in which emitting crystal chips are placed. The whole thing is filled with compound on top. The chips in cheap and expensive tapes are different.
What are the differences?
in size
In inexpensive tapes, they are smaller in size and, accordingly, produce a lower luminous flux.
conductive thread material
For high-quality ribbons they are gold. In standard versions they are made of alloys. Over time, under the influence of a phosphor or compound, the alloy threads are destroyed. Therefore, the service life of the LED itself is shorter.
quality of phosphor filling
For the elite class, it has less impact on the chips themselves and their contact does not affect the service life of the LED.
difference in chips
The so-called binning. This is when neighboring LEDs, due to different crystals, can shine with different fluxes and shades.
How can you see all this clearly in the store? Unfortunately, this cannot be done visually without applying voltage. But by turning on the tapes in parallel, one next to the other, you can see the difference.
The premium LED will appear to be slightly larger. Actually this is not true. Both may have SMD3528, but the high-quality version will simply have a larger chip. Because of this, this impression is created.
But it’s best to look not at the LEDs themselves, but at the surface illuminated by them. LEDs from different companies may have different scattering angles (according to the standard it should be 120 degrees). A chip with a smaller angle (90-100 degrees) will visually seem much brighter to you, although in fact this will not be the case.
Lighting on a plasterboard box
To create open lighting, you need to decide for yourself whether it will be located along the entire plane of the ceiling, or just along the perimeter. In the first case, you will have to install a suspended structure that will completely cover the ceiling. In the second, it is enough to build a small box on the ceiling, and leave the middle of the ceiling unchanged. Some craftsmen prefer not to attach vertical jumpers to the side, but simply screw on drywall.
Of course, this can be done if the height of the box is less than 40 centimeters. Before assembling the structure of the box on the ceiling, it is worth drawing a plan that will show in which places it is planned to make spotlights. The wiring must be routed in advance and secured to the ceiling at the points where the spotlights are attached to the surface of the box. Assemble the frame in one of three ways and fix it to the ceiling. Today, the most popular among designers is the decoration of the ceiling with lighting elements. A backlit plasterboard box helps make the interior original and unusual. Lighting helps to divide a large room into zones.
The popularity of this type of finishing is added by the inexpensive cost of the material and ease of arrangement. Decoration and design of a room with lighting on a plasterboard box To install hidden ceiling lighting, you need a box, which can be open or closed. The difference is that you will need to arrange a small niche for the diode strip. Before arranging it, you need to decide what type of lighting you want - a wide, bright strip along the entire ceiling, or a thin strip that will give the ceiling structure a soaring look. This is what hidden lighting on the ceiling looks like. Important! The smaller the niche, the thinner the glow will be.
Do-it-yourself profile for LED strip - can it be made and how?
Due to the availability of LED strips, their good technical characteristics in terms of energy saving, as well as the possibility of creating an individual style using them, the issue of making a profile for their installation is quite relevant for many users. The main conditions for successfully making a profile with your own hands are: availability of free time, the ability to think creatively, and the ability to work with hand tools.
To make a profile yourself, basic skills in working with hand tools are sufficient.
Firstly, for the manufacture of a profile that serves as the basis for the subsequent installation of LED strips, electrical cable channels, which are widely represented on the electrical products market, can be used. In this case, the cable channel is mounted as when laying electrical and low-current wires, and the LED strip is placed in its internal space. In this case, there is no need to install the cable channel cover, and you can use decorative film as a diffuser or do without it altogether. Another option is to use an electrical or decorative baseboard, equipped with a channel for laying wires and cables.
Using plastic frames for steps for mounting LED light sources
The installation of such elements is carried out in accordance with their intended purpose, and the LED strip is laid in the internal space of the channel existing on the baseboard.
With a detachable design of the product, the removable part is removed, and the diffuser, as in the case of using an electrical cable channel, can be a decorative film or other transparent material fixed to the surface of the baseboard. In the case of using one-piece products, it is necessary to make a cut on the outer surface of the plinth, thereby ensuring the penetration of light emitted by the source into the interior space of the room, as well as ensuring the removal of heat generated by the LEDs during operation.
Using a construction plastic profile for mounting LED strip
When it is necessary to illuminate the steps of a staircase or other building structures on which special elements that have voids (slots, cracks, etc.) must be installed, then LED strips can also be installed in these places. In this case, it may be necessary to expand the existing voids, after which they can be used as profiles for mounting lighting and decorative elements. When illuminating the corners of building structures or pieces of furniture and interior design, plastic or aluminum building profiles, which are used for finishing work, can be used to mount the LED strip. In this case, they are mounted in the place of intended placement using fastening elements suitable for these purposes. An LED strip is used that has an adhesive base, with which it is attached to the building profile used.
Thanks to the adhesive base, the LED strip can be attached directly to the surface of building structures and decorative elements
Related article:
Design Features
Box
LED strips are products with different numbers of LEDs. There can be from 30 to 60 pieces on one tape. Therefore, in order to ensure their high-quality installation during repairs, special aluminum or plastic boxes are used.
A plastic or aluminum box is a reliable sealed structure, on the basis of which all types of LED strips are placed. Such a device can either be purchased at a specialized store or made with your own hands. At the same time, making it yourself will cost you several times less, which is very important for a budget but stylish renovation.
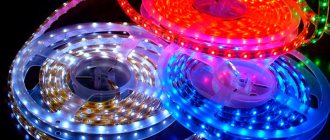
Types of LED strips
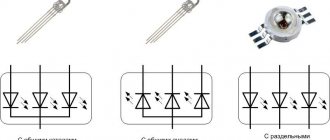
LED strips come in several types:
monochrome or monochrome
colored or RGB=Red-Green-Blue (red-blue-green)
You can distinguish one-color from RGB by the number of soldered wires. There are only two of them on monochrome, and four on color.
At the same time, to connect a single-color strip, you only need a power supply, and for an RGB strip, a controller is also required.
open
protected from moisture
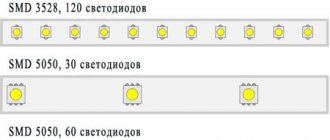
They are also divided according to the size of the LEDs and the method of their application. The most common are:
SMD3528
SMD5050
Less popular:
SMD2835
SMD5630 (5730)
What is SMD and how does it stand for? SMD from English Surface Mounted Device - surface mount device. That is, the LED is soldered to the substrate on top.
The numbers after SMD indicate the size of the LED in millimeters - its length and width.
Installation of a gypsum board box with lighting
Boxes are created not only in rooms with normal humidity levels, such as living rooms or halls, but they are also quite often placed in bathrooms to hide pipes, etc. To work in such conditions, that is, high humidity, it is necessary to use plasterboard with moisture-resistant properties. Also, if the structure is located in a sauna, which can also be placed in a house, then fire-resistant plasterboard with moisture-proof properties (GKLVO) is used to cover the frame. Also, start joining large pieces of plasterboard on the frame, and finish the cladding by fastening small parts of the gypsum board.
The entire surface must be carefully primed, which will give it some moisture-proof properties, thereby preventing the paint from penetrating deep into the sheet and soaking the plaster. It is better if the primer is applied in two layers where the box itself will be located. On the ceiling, mark the boundaries of the box and all adjacent structures. Then start selecting all the parts of the frame that will be inside the box, that is, they will make up its skeleton, this is necessary to make it easier and faster to mount the profile. Also, indicate the location of the guide rails, keep in mind that the step between them is about 50 centimeters, but depending on the situation, you can change this figure, for example, up to 20 centimeters, which will increase the strength of the entire frame.
It will be difficult to sheathe the entire structure with gypsum plasterboard sheets at once, so you need to start from those areas where it is possible to immediately place a single sheet of drywall. If you need to bend the drywall, then cut it on one side along the lines, which should be 5-7 centimeters from each other over the entire surface of the sheet. But so as not to touch the other side, otherwise you will simply cut the sheet.
Using these cuts, you can safely bend the sheet in any direction. But before you start marking, you need to decide what the ceiling will look like, what size and shape it will have. To do this, sketch out several options on a piece of paper or in a graphics program. The exact dimensions of the product will help you correctly determine the required number of profiles and sheets of drywall, so don’t be lazy and compose them correctly.
It is better to indicate the size directly on the marked surface, this will make it easier to work in the future.
Installation of the overlay profile
Fastening is carried out in three ways:
on double-sided tape
on screws or dowels
on glue
Use a tape measure to measure the distance at the fastening site.
Then use a hacksaw to cut off the required length of the profile.
At the base, drill several holes with a diameter of 3 mm for 3.5 mm screws.
Some types of plugs already have holes for fasteners. Therefore, before drilling the edges, check what kind of plugs you have.
The pitch between the holes is 100-200mm. Do not forget to countersink each hole under the screw head, otherwise the tape in these places will peel off.
Using screws, mount the base backing in place of the backlight.
Measure the required length of the LED strip according to the length of the substrate and cut according to the cutting marks.
Remove the protective layer of double-sided tape and glue the tape. Install the diffuser and plug.
After that, all that remains is to insert the profile into the base already fixed to the surface and connect the power wires to the block.
Installation of mortise profile
First, form a groove in the furniture or other material, according to the profile dimensions.
From the very edge, drill a hole-notch for the power wires.
Then glue the tape and insert the diffusion lens.
All that remains is to install the plug and drive the whole thing into the groove. If the groove is made end-to-end, you can use a rubber hammer.
Three main types of profiles
From a design point of view, the LED profile is an aluminum guide containing a screen. Diffusers are available in transparent or matte finishes. The profile design must cope with the following difficult tasks:
- effectively remove heat, thereby positively influencing the shelf life of the LED strip;
- protect the light source and accompanying wiring from mechanical influences;
- distribute the light flux equally (this becomes possible thanks to the diffuser);
- be a housing thanks to which LED elements can be easily mounted and dismantled on a wall, ceiling, furniture, etc.
The most common material from which profiles are made is aluminum. For an aluminum profile, installation is the simplest, since the metal is not only light, but also quite durable, although it has malleable properties when assembling the profile.
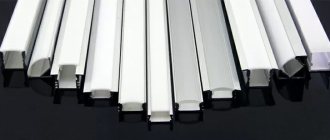
Aluminum LED profiles come in a wide variety of shapes and types:
- aluminum box for LED lighting;
- flexible aluminum profile;
- overlay profile used for LED strip.
Metal profiles are made not only from aluminum, there is also a brass profile and copper structures. Also, plastic is used to make profiles; polycarbonate profiles are widely used. The LED profile, which is made from this material, is often either overhead or corner.
The aluminum profile for the LED strip is a flexible, lightweight and elastic design with very high thermal conductivity parameters. The aluminum profile for LED lighting will not darken and will cope with the task perfectly.
Overlay profile
The overlay profile for the LED strip is made in the “U” shape, has the widest applications, and is attached to the bases with screws (more often, self-tapping screws are used). The depth of the profile strip corresponds to the width of the existing LED strip. When installing the overlay profile, the diffusers are inserted into the groove, snapping tightly along the entire strip. Most often, this type of structure is made of metal. The overlay aluminum profile for LED strips is quite expensive, but is very resistant to oxidation, easy to clean and looks extremely aesthetically pleasing.
Corner profile
Profiles for LED strips, including those used for ceiling lighting (the joint between the wall and the ceiling is used to attach such corner strips), have a wide variety of shapes, but corner profiles are most often used.
The corner aluminum profile for the LED strip is designed in such a way that the profile panels are located at an angle of 90 degrees to each other. Along the edges of the slats there is a groove for diffusers. Inside the profile, at an angle of 45 degrees, there is a small shelf designed for gluing the LED strip to the wall. Thus, during operation of the tape, the light does not come out in all directions, but at an angle of 45 degrees, which creates uniform lighting throughout the room. A large number of LED lamps (especially models created for stretch ceilings) and lamps are produced specifically on the bases of corner profiles. They are great for lighting a retail space or display case. Such lamps do not take up space, do not blind potential clients, and do not create clear, contour shadows.
Embedded profile
Built-in (also called mortise) profiles are designed to install LED strips in special niches. It, like the invoice, has a “U” shape - like, it has an edge along its entire length. The LEDs are placed on the shelf of the product itself, while it is hidden and has a diffuser on it. The light comes from the panel at an angle of 90 degrees, the tape is attached to the base of the profile using screws or strong industrial adhesive. To make the profile look aesthetically pleasing, special caps are placed on its edges. Built-in profiles are widely used in kitchen furniture, wardrobes and other places where it is customary to save every millimeter.
Purpose of the profile
Basically, the profile is intended for installing LED strips that perform the functions of local illumination of various interior objects: floors, ceilings, cabinets, shelves, etc. They blend well with the interior, providing a harmonious atmosphere without flickering. In this case, LED lighting can serve as main or decorative lighting.
In addition, the profile is designed to solve the following tasks:
- increase the life of the LED strip by effectively removing heat;
- protect the light source and accompanying wiring from damage;
- scatter the light flux using special scattering devices;
- provide easy installation and dismantling of LED elements on interior objects.
The profiles are not only convenient for installation, but also help extend the service life of LED strips.
Kinds
The profile for the diode strip is most common in the following configurations:
- Band;
- Corner profile;
- Overlay profile;
- Built-in (mortise).
Aluminum strip
An aluminum strip profile for ice tape, as the simplest and cheapest option, is used only to improve cooling and ease of mounting a flexible light source. It does not have protective functions, but is convenient for mounting on curved surfaces. The overhead strip takes up virtually no space.
Corner aluminum profile
As the name suggests, the lamp is designed in the form of an angle, the side walls of which are located at an angle of 90 degrees. relative to each other. Inside there is a shelf for attaching the tape, and on the side walls there are grooves into which the diffuser is installed.
Corner design
This type of profile is intended for installation instead of a plinth at the joints of walls and ceilings, between furniture shelves. The corner format is most widely used when it is necessary to decorate a suspended ceiling with lighting, since a straight strip is attached to the wall surface through one of the sidewalls.
Overlay profile
The overhead element has a U-shape and is widely used. Designs are available with different heights of side walls. The smallest one is a few millimeters and is not much higher than the height of the strip profile, but at the same time it has protective glass.
Surface mounted lamp
Important! Even a small height does not allow bending, since the resulting deformation will not allow the scattering screen to be fixed. The overhead profile for lighting allows for mounting on any flat surface:
The overhead profile for lighting allows for mounting on any flat surface:
- Drywall;
- MDF;
- Kitchen apron made of any material.
The disadvantage of such lighting is that it is not always possible to hide the step that forms between the lamp and the surface.
Built-in or mortise aluminum profile
The mortise design is designed for installation in specially made grooves. Structurally, this profile differs from the overhead profile by specially designed edges that hide the junction of the lighting element and the surface.
Recessed lamp
Visually, the overlay profile for the tape looks much more aesthetically pleasing than the overlay, but requires special additional work at the stage of furniture design. An additional effect from the use of recessed lighting elements is space saving, since in this case the external glass diffuser practically does not protrude above the surface.
Diffuser
The matte lamp diffuser performs several functions:
- Protection of internal elements from moisture and dust;
- Uniform distribution of light from light-emitting elements located far apart from each other.
The material used for manufacturing is glass or transparent plastic. Special tempered glass is used, since ordinary glass is quite fragile. It is used in designs with high-power LEDs, since glass is not exposed to elevated temperatures. The most commonly used is transparent polycarbonate. Its positive qualities are:
- Resistance to ultraviolet lighting (does not change characteristics in the sun);
- Temperature resistance;
- High strength;
- Durability;
- Resistance to chemical reagents.
Stubs
To visually hide the end of the profile, special plugs are produced for each standard size. The plugs have slots with latches into which the bottom and walls of the profile fit, so the use of glue is not necessary.
Material of manufacture
- Plastic. As a rule, this is polycarbonate - one of the most affordable materials. Having an affordable price, it is the best option for those who are used to doing everything with their own hands. This material comes in various colors: matte, transparent, colored, which gives significant scope for design ideas. Its physical properties are also almost universal: polycarbonate, being flexible, is at the same time quite airtight and resistant to mechanical damage.
Box for LED - plastic strips can be easily embedded into plasterboard walls. It can be easily glued to a suspended ceiling, and the ceiling will not bear any extra loads. Plastic compositions look beautiful, especially snow and ice sculptures.
Polycarbonate products are also resistant to temperature changes.
- Aluminum. The most popular design model, because in addition to its aesthetic appearance, it has a number of additional advantages, such as resistance to corrosion (aluminum, as you know, is coated with a thin oxide film that protects it from the external environment), and a high coefficient of thermal conductivity. For an LED strip, this is a real godsend, allowing for efficient heat removal, which is important: 30–60 light sources turned on simultaneously can heat up well, incapacitating themselves.
This profile can be used at high humidity without fear of negative consequences. The diodes in it will never overheat, and with proper care it will not lose its appearance, which cannot be said about other materials. Therefore, when making lighting with your own hands, just such a box is most often used.
By the way, it was specially developed for LED strips, so we can say that the aluminum profile is a universal profile. With its help, it is very easy to assemble a backlight yourself that will be different from anything anyone has seen before, and at the same time its functionality will remain at its best. The most progressive design solutions in the field of LED lighting are considered to be solutions using an aluminum box.
Why do you need a profile for LED strip?
The popularity of these light sources is explained by their compactness, economical energy consumption, durability and other well-known advantages. However, practical application for ordinary users and professionals is associated with certain difficulties:
- it is difficult to handle miniature products during installation;
- there is no protection from splashes or other adverse external influences;
- in the basic version, heat removal is not efficient enough;
- individual emitters are visible, an uneven light flux is formed.
The minimum cost of such a solution is the only advantage.
A typical tape glued to a wooden surface overheats. It is not protected from the outside, so it is easily damaged by careless action when cleaning the room. Poor aesthetic characteristics limit the scope of application to areas hidden from direct view. The listed disadvantages are eliminated using a specialized profile for LED strip.
Even when carefully examined at close range, such products look flawless
Official operating warranties for typical LED strips range from several months to 3 years or more. However, the metal profile is capable of performing the functions of a radiator. This design reduces the rate of degradation of the semiconductor emitter and significantly increases the service life.
How to make a plasterboard ceiling with lighting
First make markings on the ceiling. All given dimensions are set aside and lines are drawn using a paint cord. Please note that the line on the ceiling is laid at a distance of 54 cm, and not 60 cm, as in the first diagram. It is obtained taking into account the fact that the step is moved forward by 6 cm.
The profile guides (CD or PNP as marked) are attached along the marked lines. They attached it to dowels at 50 cm intervals. They drilled straight through the metal. Having installed the plug, we tightened the dowel-nail. Now all that remains is to putty everything and achieve a smooth surface.
Almost everything. The plasterboard ceiling with lighting is ready, all that remains is to install the lighting itself. And it can be different.
This shelf can be open or closed and, depending on this, and the position of the light sources, the width and brightness of the strip of light on the ceiling changes. No news: to make curves, we cut the sides, bend them to the required diameter and install them in place, fixing them with self-tapping screws. The device can use LED lamps or strips.
They are sequentially installed low-power LEDs of 12 or 24 V, which is provided using an adapter from a 220 V household network. The main advantage of the suspended structure is that it can be installed independently. Let's take a closer look at these lighting systems and clarify how they are installed. In addition, the box for the LED strip varies depending on how it will be installed. In this regard, it can be: This kind of tape is a modern material that combines excellent aesthetic qualities, as well as practicality and versatility.
This article will outline the main points of installing LED strips on the ceiling with your own hands using a variety of devices (aluminum, plastic box, etc.).
Main types of profiles for lighting
Based on the material they are made of, profiles are divided into aluminum and plastic. Plastic boxes contain polycarbonate. The advantage of this material is its elasticity, which allows you to make rounded frames. Other advantages of plastic profiles:
- low cost;
- ease of installation;
- elasticity;
- the ability to choose a transparent or plastic case;
- different texture (surface, color).
Metal profiles are made only from aluminum. They come in different lengths - 1150, 2000, 2500 mm. The advantage of the material is the removal of heat from the lighting source, in this case diodes.
Appearance of LED strips SMD 3528 and SMD 5050
LEDs such as SMD 3528 and their analogues do not require a heat sink. SMD 5050 samples must be installed on surfaces with low thermal conductivity.
Aluminum boxes are most often used to decorate lighting in the kitchen, in public places and on steps. To seal the case, use a special tape if it is mounted outdoors or in rooms with high humidity levels.
Products are divided into several types and according to installation method.
Corner
Using an LED strip using an aluminum corner profile
This type is used for installing LED strips in the corners of building structures, cabinets or, for example, commercial equipment. With their help, it is possible to effectively hide all the unevenness of the joints.
This option is preferable if you need to provide lighting at an angle. Diode light sources themselves emit light that is irritating to the eye, so you must additionally install a diffuser (almost always included in the kit).
Built-in or mortise
Appearance and example of using a mortise profile
The main difference between the built-in type is the presence of special protrusions that hide uneven edges of the material at the installation site. There are two installation methods:
- A groove is made in the material, and the profile itself is inserted into its cavity.
- Installed in places where the material changes. Example: a line connecting a slab and drywall, plastic panels of different colors. The hidden structure is beyond the reach of the human eye; it sees only a light stripe.
The second method is more common, since modern room design involves the use of different materials and textures, which can be combined thanks to LED strips.
Invoices
Overlay profile
These models are considered one of the most popular and popular products. They can be installed on any flat surface. They are attached to it using high-quality double-sided tape, screws and glue.
As a rule, the kit includes not only a profile, but also a special cover made of plastic. Matte or transparent polycarbonate serves as a diffuser. The type of cover will depend on the purpose of the lighting. Matte profiles are used for decorative purposes, while transparent ones are used for lighting. The end side is closed with a plug.
The bodies have different geometric shapes - circle, cone, square, rectangle.
Diffusers
As a rule, two types of diffusers (screens) are included with the corner aluminum LED profile:
- Transparent.
- Matte.
Both types of screen are made of plastic. When choosing a diffuser, it is worth considering the fact: a transparent diffuser transmits 95% of the backlight brightness, a matte one – only 70%. In the first case, the task of the screen is to protect the LED strip from damage and external influences. In the second, a diffuser is used to not only protect the backlight from moisture and dust, but also to muffle the light emission.
In most models of corner LED profiles, the screens are mounted on the structure from the front - they are snapped on top, unlike other types of fastening systems, where the diffusers are pushed in from the end.
What types of boxes are there, their features
There are a large number of varieties of boxes designed for installation in specific locations. There are special types of profiles for end lighting of glass shelves or for decorating staircase steps. However, the vast majority of boxes are installed on plasterboard ceiling structures that form the ceiling slab or the top tier of a window opening. Let's look at the most common designs:
Niche for lighting
A niche is a section of a cornice or other surface intended for mounting an LED strip. There are different types of niches, corresponding to the characteristics of the supporting structures:
- groove for the mortise channel. It is done in plasterboard volumetric figures, in the floor or along the boundaries of parapets, steps, etc.;
- the edge of the cornice around the perimeter of the room. A matte or transparent cable channel can be installed in it, creating a soft or accentuated illumination of the ceiling slab;
- areas located under the bottom of beds, sofas or cabinet furniture. In combination with a hidden type of support, such niches allow you to create the effect of an object floating above the floor surface.
Interesting! The dimensions of the niches allow installation of any type of box, although there are designs that are precisely designed for a specific type of channel.
Hidden Niche
A niche for hidden installation of an LED box allows you to install the strip so that the viewer can only see the reflection from the strip on the surface of the wall or ceiling, and the LED strip itself is hidden behind the cornice. Such lighting allows you to create a stylish and unobtrusive appearance of the room, creating sufficiently abundant, but not excessive lighting of the room. The design of such niches involves the vertical or inclined direction of the LEDs (on the ceiling or on the wall). The box is attached to a horizontal plane, and if it is a corner structure, at the junction between the horizontal and vertical surfaces of the ceiling cornice with the diffuser directed towards the wall. The fundamental difference is the placement of the tape, invisible to the viewer, forming a soft evening or night-type illumination.
What is needed for installation and installation of LED strip
To mount and install the LED strip, you need a working LED board with the correct technical characteristics:
- Length. The standard length of a board in a reel is 5 meters, but the maximum length of parallel connected sections is 15 meters. At the greatest length, distant sections have dimmer light and a high probability of conductor wear.
- The density indicator characterizes the number of diodes installed on 1 meter of the board. For example, 30, 60 or 120 diodes per 1 meter.
Density of diodes on the board
The power consumption, load current and supply voltage depend on the density of the crystals.
- Particle and moisture protection (IP) rating. The parameter ranges from 00 (no protection) to 68 (complete isolation). Thus, SDLs with IP20 are used indoors, for example, for interior lighting of furniture, and with IP67 - for external lighting of buildings, swimming pools and inside saunas/baths.
Particle and Moisture Protection Table
- Light flux color (monotonous/one-color or multi-color RGB strip).
Characteristics of RGB strip
- Supply voltage. The board consists of groups of series-connected crystals that are connected in parallel to each other. Each crystal receives a supply voltage of no more than 3.3 Volts. Thus, knowing the density of the crystals, a supply voltage of 12 or 24 Volts is supplied to the board.
A special transformer installed between the SDL and the AC voltage source is responsible for building the required voltage level in the board. It supplies the required amount of electric current.
power unit
- Length of the supply cable line. The main rule is that the voltage drop of the supply cable should not exceed 8%. To do this, you need to calculate the load level and select a cable with the appropriate cross-section.
Permissible continuous current for wires and cords with rubber and polyvinyl chloride insulation with copper conductors
LED strip power calculation
The power consumption indicator directly depends on the density of crystals on the board:
| Density, pcs | Power consumption per 1 meter, W | Total power, W |
| 30 | 2,4 | The product of power consumption per 1 meter and the length of the board. For example, for a 3-meter tape with a density of 60, the power will be: 4.8*3=14.4 W. |
| 60 | 4,8 | |
| 120 | 9,6 | |
| 240 | 19,2 |
To select a power supply, the power value is 20 - 30% more than the power consumed by the board. For example:
LED strip with a density of 120 crystals per 1 meter. The total length of the SDL is 11 meters. Power consumption will be:
Plen = 9.6 * 11 = 105.6 W.
Pblock = 105.6 * 1.25 = 132 W.
Thus, the block with the closest power value is selected, this is 135 W. If you select a block with a power lower than the value that the board consumes, the latter will not light up. And the absence of a power reserve of 20-30% will lead to failure of the unit .
Safety precautions
- All installation work is carried out with the power turned off.
- When installing the SDL on a conductive surface, the attachment point is pre-insulated.
- Observe polarity when connecting contacts; multi-colored conductors help with this.
- Do not touch exposed conductive parts while the power is on.
- Do not expose the board to mechanical stress (kinks).
- Follow electrical safety rules when working with 220 V networks.
- Related Posts
- Lighting of building facades: varieties, principles of organization
- Why are chokes (ballasts) needed for fluorescent lamps?
- Aquarium lamps and fixtures: types, requirements and characteristics
LiveInternetLiveInternet
Sunday, December 07, 2014 15:05 + in quote book I decided to take a little break from politics, especially since six months ago I threatened to publish the result of my work on installing original and convenient LED lighting in the kitchen. In addition, when reading my previous articles, you may get the impression that I am a hopeless theorist. But the fact that I do not have time to describe many of my developments in various directions should not be the reason for such unfounded conclusions, since I have repeatedly mentioned that there is simply not enough time for everything. However, for the sake of variety, I will pay attention to such a small but useful detail as LEDs.
Alas, as is usually the case with me, the article turned out to be quite detailed and extensive. Those who are not interested in it, but are interested in the lighting ideas themselves, can simply look at the photo or video (which I may post). But I hope that the description itself will be useful. Maybe someone will even offer some ideas, improvements, comments. It will also be interesting to read constructive criticism on this issue. But don’t judge strictly, since this is the first time I’ve done this type of illumination, and naturally it could have been done much better, but due to lack of time and difficulties with materials and tools, what happened was what happened.
1 change in lighting angle
[/url]" class="aligncenter" width="648″ height="260″[/img]
Relevance
Previously, as a rule, a fluorescent lamp was used for illumination, but as you know, sometimes it has a problem with the starter, and besides, LEDs are much more economical and (if the manufacturers do not lie) - durable. So I naturally decided to use them. Moreover, LED strip as a material for creativity has very great prospects. Although many do not take full advantage of them, simply placing LEDs along the cabinets next to the wall. Yes, and this is often the case, it turns out beautiful, original and practical, but I went further... As you know, necessity is the mother of inventions. In this case, I was tormented by the question of how to place the LEDs so that they shine exactly where I need them. For example, if I am standing near a table and doing something, holding my hands at chest level, it would be convenient for the light to be directed almost horizontally, and if I am sitting at a table and my hands are on the table, then vertically - on the table.
2 light horizontal and vertical
Of course, you could hang the same lamp, or buy LEDs, which have a large angle of the illuminated surface, but then they would shine in your eyes: if you do something next to the table. For example, this is how a halogen lamp shines, from which the light spreads in all directions.
3 lumen lamp
Therefore, I decided to use lighting that is more economical and directed to a specific location. But come up with something so that the direction of the light could be changed. Those. How about trying to mount it on a movable support, with the ability to adjust the angle of incidence of the light. For this purpose, it is not suitable to use clamps from window blinds,
4 clamps for window blinds
which were at hand. As the base on which the tape would be placed, I planned to use a plastic profile about 1 cm wide (the width of the tape).
5 plastic profile
But after wandering around the bazaar for a long time in search of one, purely by chance I found the best option, which was already sold by one of the sellers. It's amazing that he came up with practically the same thing as me. However, you shouldn’t be surprised: this often happens in innovation and science. As a sample, he used a 10 cm LED strip mounted on the same window clips, but he used a metal profile with plugs.
It turned out that it is better to use a metal profile, because... Oddly enough, the tape itself contains small capacitors that heat up. The temperature is certainly not high, but it is better that they give off heat to a good heat conductor. As you know, metal conducts better than plastic, the more durable it is. That's why I purchased this profile. After unsuccessful searches I also bought plugs. For them I had to pay the same seller as much as 2 UAH. for each ((. For centimeter-long pieces of plastic, it seems to me that this is quite expensive. I regret that I took it without thinking, I could have replaced them if it hadn’t been different. Although I still don’t know the correct name for this particular profile and plugs to him.
6 metal profile
Unfortunately, I couldn’t find profile markings on the Internet. If anyone can tell me, I will be glad.
So I bought the most necessary things.
Preparation
That's all you need. List in order from most necessary to least necessary:
- - LED Strip Light.
- – a 12-volt power supply (amperage depending on the number of LEDs) can be checked with the sellers or calculated using the formula (or here). Here is a calculator for LED strip
- - the wire. I used copper because... copper is a better conductor than aluminum. A wire with a two-strand cross-section, about 0.3-0.5 cm. It is better to take it with a reserve. For example, I barely had enough.
- – metal profile (depending on the length of the LED strip, it is advisable to count on 5-10 centimeters longer than the strip)
- – clamps for blinds 2 pcs. on 1st tape.
- self-tapping screws – 1 cm long (no thicker than the walls of the cabinet).
- - bolts with a diameter of about 0.4 cm, thickness and length of 2 cm, 2 on each side.
- - nuts. Accordingly, 2 bolts, for each bolt there are 3 nuts, i.e. total 6
- – switch and brightness control. To taste)) You don’t have to use it because... it’s quite expensive, but it’s more interesting and you can add on. Save on electricity in the future if you use it often.
- – Scotch tape, transparent + optional white.
- – plugs for metal profiles.
- – terminals for LED strip (optional).
Additionally for retractable removable lighting.
- – a wooden strip and a plastic I-beam (H-shaped) profile. The latter should fit into the metal one, and accordingly be approximately 0.7-1 cm wide.
7 profiles – 2-
- 1n bolt 8ka. Long corresponding to the thickness of the cabinet bottom + the thickness of the slats and 3 washers with a plastic profile. Those. if my cabinet wall is 1.5 cm, then + the thickness of the rail 1 + washers and profile is approximately 0.5, it turns out that the bolt needed is approximately (1.5 + 1 + 0.5) = 3 cm long.
8 calculation of bolt length
according to the formula - applied - cut off.
- It’s better to take a margin of 3.5 – 4 cm. Then you can trim it.
- The washers should preferably be wider, but not much larger than the width of the rack, i.e. about 1 - 1.5 cm. Also, if possible, you can strengthen the structure by inserting a metal plate between the rail and the plastic profile. But my design is no more than 40 cm and no more than 1 m when extended, so it holds firmly as is. But if anyone wants to install more than 1 m, then it’s worth considering.
- And naturally you need an 8 mm nut or better 2e (with a lock nut).
Tools needed
:
- – roulette
- - hacksaw for metal.
- – soldering iron (solder, tin)
- - knife
- – drill and metal drill bits 6 and 8 mm.
- – pliers, screwdriver
- – tweezers, etc. may come in handy.
- a sober head, free time and a pair of hairy, not very crooked arms. ))
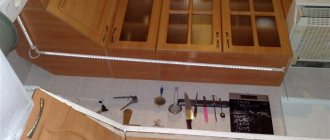
Where is the best place to place the tape?
At first I thought of placing it on the wall at the base of the cabinet, but then I decided on the cabinet itself. The optimal placement option was determined using an LED flashlight, which was applied to the cabinet, focusing on the direction of the light and the area illuminated by the proposed lighting.
Therefore, if you have a flashlight, you can also use it to see approximately in advance how the light will fall on the work surface. When changing the location of the flashlight, you should pay attention to whether the tape will shine in your eyes, whether it will interfere with taking something located under or in cabinets, in what position it will optimally illuminate the sink, countertop, etc. For myself, I have found that the optimal area for tape is the middle of the cross section of the cabinet. Light from the tape, if it shines straight down, falls perpendicularly and illuminates the surface most effectively. But if you place the tape on the wall, the light would fall obliquely and some of it would be scattered. And so it is like the sun, which shines on the equator, and not on the pole caps (with a perpendicular incidence of light (at an angle of 90°).
2 change-angle-of-light-
Of course, the cabinets are shorter than the work area and the tape could be placed even closer to the cabinet doors (further from the wall). But in this case, she could interfere, take something from the locker. In addition, I specially placed the edge, the strips above the sink directly above the faucet (closer to the cabinet doors), and the edge next to the stove closer to the wall. Those. moved away from the wall about 10 cm near the stove and about 30 cm near the sink (where the wide corner cabinet is).
9 tape above the sink and near the stove
[/url]" class="aligncenter" width="2592″ height="1944″[/img]
Maybe someone won’t like the fact that the tape is not located parallel to the wall and cabinets, but a little obliquely, however, I was guided primarily by practicality, and only then by aesthetics. And thanks to this uneven arrangement, the edge of the tape near the stove was further from the hot burners, and the edge of the tape near the sink was almost above the tap, which provided better lighting during washing.
9.1 tape above the sink and near the stove
[/url]" class="aligncenter" width="4114″ height="1717″[/img]
Installation
1 We measure and cut
with a hacksaw,
a metal profile
along the length of the surface that is supposed to be illuminated.
After you have finally decided how the tape will be positioned, use small self-tapping screws to fit the profile size and screw the fasteners for the profile (clamps for blinds) into the bottom of the kitchen cabinets. At first I screwed in one screw at a time. And only then, when everything was done, I adjusted it and secured it with another one.
9.2 with self-tapping screws to the cabinet
2 Try on and cut
the LED strip
to the profile. The tape to be cut should naturally be shorter than the profile + space must be left for soldering wires and bolts. For me it was about 5 cm on each side. 10 tape with cable in profile
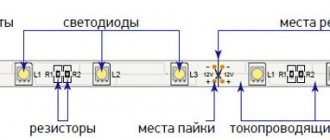
That is, the tape should be 5-10 cm shorter than the profile itself. Cut off the LED strip. You need to cut exactly where the small scissors are shown on the tape.
11 cut here
As a rule, they are located every 10 cm. Therefore, it is better to estimate in advance how the tape will be placed and cut it a little shorter, and not longer than the required section.
3. Cut and solder a piece of wire
.
It should not be too long because... then you need to push it into a metal profile, and not too short. About 5 cm. Although you could try and not cut it off, but stretch the entire wire through the profile and connect it to the switch. But I decided that it would be easier to first solder a piece of wire, and only then screw the main one to it. The bare wires themselves (the places where the wire contacts the LED strip) must be short enough, since long ones can, going beyond the strip, short circuit with each other. 12 wires contacts [/url]" class="aligncenter" width="1731″ height="1148″[/img]
We expose the contacts on the tape itself using a blade, a carpenter's knife and tweezers, removing the silicone.
This must be done carefully to remove the silicone, but not damage the contacts. I specifically left silicone between the anode and cathode (+ and -) so that it would be convenient to solder, and in the future it will provide additional protection against short circuits.
13 silicone. contacts
[/url]" class="aligncenter" width="5073″ height="1374″[/img]
Soldering was especially difficult for me. I still don’t understand what the reason is. I regret that I didn’t find special terminals for LED strips. Although at the market I was still advised to solder, and various sellers said that clamps are not as reliable as soldering. However, it seems to me that it would be much easier with them, because... I couldn't solder it the first time. The wires kept falling off, despite the fact that before soldering I tinned the contacts in phosphoric acid and thoroughly cleaned the soldering iron.
It was especially unpleasant when the contacts stopped working after you insulated them. I still can't determine what is causing the poor connection. Either because of the soldering, or perhaps because I tried too hard to insert the wire into the profile by drilling a very small hole. In general, when I check the soldered wires, everything is fine, but as soon as I insulate them and install them, they begin to periodically blink and short-circuit. Therefore, I recommend that everyone who follows my example and wants to make such a profile will go into more detail at this stage. After soldering, lightly fixing everything with insulation, carefully check everything with a load by connecting the LEDs to the power supply and moving the cable. If the tape works, does not blink when the cable moves and shines fully, you can continue to insulate thoroughly and install the tape in the profile. Although my LEDs started to malfunction precisely when I had already thoroughly insulated and assembled everything.
At the same time, I was pleasantly surprised that the LEDs can be connected from either side of the strip, but the main thing is not to confuse the polarity. However, if you mix it up by applying the rated voltage, the “Big Bang” will not happen and the LEDs will not burn out; they just won't shine. If you will connect the next one to this tape, then you just need to connect the contacts on both sides (one side to the power source, the other to the other tape). After the wires are soldered to the tape, we attach it to the profile and mark where these wires will come out of it.
4 Drilling the profile
. First, I drilled the plastic plugs that are inserted into the end of the profile: I tried where and how the bolt would be located.
14 drilling plastic plugs
After which I drilled a hole behind it for the wire, which comes out from the back of the profile (from the back). 15 at the end of the plug the wire comes out from the back
Of course, it would be possible to bring the wire out through the plugs, but the bolt is located there, and besides, if they are brought out directly next to the bolt, this could interfere with the mobility of the structure. Therefore, it is better to route the wires in the place where they will interfere the least; besides, they naturally should not be stretched, because will limit the mobility of the profile. The wire itself should not bend too much when leaving the profile and no further. Because may communicate poorly, as I wrote about above. Therefore, it may be better to drill 2 holes side by side, connecting them using a needle file or pliers. By making an oval hole located along the profile through which the wire will come out at an obtuse angle. 16 angle wire
[/url]" class="aligncenter" width="5073″ height="1944″[/img]
5 We assemble the entire structure:
we insert the LEDs into the profile, fixing the latter with bolts; securing it with nuts to the clamp from the blinds and insulating the wires soldered to the LED strip (I did this using tape). You can use white or regular. The main thing is that it does not interfere with inserting the LED into the profile, and at the same time reliably fixes and insulates the wire contacts on the tape. If there are several profiles, securing them to the cabinet, we connect the wires to each other and to switches, lighting controls and the power supply. Here, as I already wrote, the main thing is not to confuse the polarity, because LEDs will not light up.
It is also very important, before connecting the wires to the power supply and switches, to think about how they will be located. For example, I had to drill a couple of holes in the cabinets to hide the wires inside and route them conveniently. But if you don't want to drill holes, you can run the wires behind cabinets or somewhere else where they are out of sight and out of the way. You can secure them using clamps or in a special plastic channel for wires, or, as I did, simply with tape. For greater convenience, transition switches could be used. I regret that I didn’t buy these switches, it would have been very convenient. Although I, in fact, have 2 switches located in different places. At the entrance, and on the opposite side - next to the tiles. Only at the entrance there is just a switch, and near the stove there is a brightness control that, if you turn it to minimum, turns off the light. So you can turn it off here and there, but unlike the walk-through ones, you have to turn it on in the same place.
The connection diagram itself is as follows
: socket → 12 volt power supply → brightness control located near the stove (can be assembled or bought) → wire to the door (located above the cabinet and inside) → switch → 1st LED strip → 2nd long LED strip → length of the wire → retractable removable LED backlight.
Retractable removable light
.
After I assembled the entire structure, I still had a piece of LED strip left. At first I planned to place it above the oven, but I was afraid that the heat from the oven would heat up the LEDs. Therefore, I decided to make a retractable profile. It would be located next to the stove and could, if necessary, extend above it.
In addition, it can be removed from the movable rail and used as a flashlight. For example, for oven lighting. 16.5 in the oven
The idea turned out to be very useful because... Now this piece can illuminate both the oven and the countertop above one of the cabinets. Although basically the lamp is turned and extended above the window sill on which the plant is placed.
17 plant
But lighting plants with LEDs is a separate issue. For now I will only say that this light is very little for plants, and besides, it is not the wavelength that plants need. And as you know, the range of LED waves is very narrow, so plants need other special LEDs with a wavelength of 450, 650 nm, if I’m not mistaken. But this is a topic for other research that I plan to conduct in the future, until I return to retractable lighting. In order to assemble such a backlight, a square block was used for rigidity. A plastic profile is attached to the block using double-sided tape, along which a metal profile (with LEDs built into it) rides. 18 bars per tape
[/url]" class="aligncenter" width="2592″ height="1944″[/img] I described above how to insert LEDs into an iron profile, the only thing I would like to add is that in this case there is no plugs and clamp at the end. therefore, on one side, the LEDs freely come out of the profile hanging above it, and on the other, the power wire attached to the LED strip enters the end of the profile. Because This design is more mobile and, accordingly, prone to wear. After soldering and insulation, I additionally treated the wire with glue from glue guns.
And then, using the same glue, I melted the base of the wire near the profile. 19 additional fixing the wire with glue
When attaching the plastic profile to the rail, in addition to double-sided tape, nylon threads were used. The profile was drilled together with the rail in the dorsomedial direction (closer to the top and center) and secured with threads in 3 places.
20 fixation with threads.
It is necessary to drill and pass the threads closer to the center and top of the plastic profile, because otherwise, the iron profile, when passing over the plastic one, may rub against the threads or will not fit at all. In the rail itself, and the plastic profile that is fixed on it, I drilled a hole for the bolt that will attach it to the wall cabinet. The hole should not be drilled very close to the edge of the rail because... the structure will be flimsy. It is better to step back 10 centimeters from the edge if the profile is about 40-50 cm.
This will provide additional support (based on the rocker principle). 22 stop rocker
[/url]" class="aligncenter" width="2592″ height="1944″[/img] Thus, due to the fact that the rail is fixed with only 1 bolt, it can be rotated in a circle. The 10 cm slats in front of the bolt do not allow it to sag much, and the installed wide washers prevent it from cracking. In addition, due to the fact that the metal profile rides on a plastic one as if on rails, it can be pulled out above the stove if you need additional light above the pans and pushed back if there is a danger that the burner flame could damage the LEDs.
23 light above the pans
[/url]" class="aligncenter" width="2592″ height="1944″[/img] (in a saucepan there is a culinary know-how crisis dish caused by the rise in price of cereals and the eating of the last remnants - buckwheat-rice porridge)).
Moreover, this “flashlight” can be removed and hung somewhere, or, if necessary, illuminated inside the oven if something is baking there. But again, naturally, it should not be placed in the oven for more than a couple of seconds because... this may cause the LEDs to fail. In addition, if you are going to use it as an oven light, you need to immediately think about how long the wire should be so that it reaches the oven and does not interfere when it hangs above the oven. I have this wire hidden behind the stove cover, so it’s practically invisible. In general, this design is in some ways even more convenient than the previous one, but it has one drawback: despite greater mobility and the ability to easily remove and put back in place, you cannot change the angle at which the light will fall. Although this drawback is fully compensated by the fact that the structure is movable.
I turn the backlight
[/url]" class="aligncenter" width="532″ height="446″[/img]
Before drilling and attaching it to the plastic profile, I wrapped the rail itself with white tape for greater aesthetics.
24 wrapped with white tape
If you have the opportunity to find a good, smooth strip and it matches the interior of your cabinet, then wrapping it with tape is naturally not necessary.
Conclusion
Overall, I'm pleased with the lighting.
[/url]" class="aligncenter" width="583″ height="437″[/img]
Moreover, recently it has stopped blinking. Strange as it may seem, but now the contacts have somehow corrected themselves. However, there is a fly in the ointment... For example, even the maximum brightness of the light is sometimes not enough. But I won’t redo it, and maybe I’ll just add another LED lamp in the kitchen. Although these lamps are still very expensive. It would be interesting to carry out calculations to clearly see how long it will take for an LED lamp to pay for itself due to its economy. It would also be good to find hygienic standards for room illumination and, when purchasing and upgrading, to determine exactly which LEDs to take, because When purchasing, it is practically impossible to determine visually whether the brightness will be enough or not.
By the way, as luck would have it, just recently my LED lamp, which came from a table lamp, was covered. The warranty on it just recently expired. So all currents, the issue of LED durability is very controversial. More precisely, the LEDs themselves are stronger than conventional lamps, but for example, in this broken lamp, apparently the problem turned out to be in the capacitors. Although I am not strong in these matters and I hope that someone will tell me.
Many other general questions also remain. For example, won’t the LEDs burn out if you turn the light switch to minimum (i.e., they keep on shining)? If I'm not mistaken, ordinary lamps can burn out from this. What other load can the power supply withstand? After the LEDs, I wanted to hang a small portable mixer on the same wire for mixing tea and other liquids. Isn't it dangerous that the LEDs are blinking? Will poor contact shorten their service life?
In the future I would like to make similar but more interesting lighting in the bathroom or room, but alas, with my salary this is not a cheap pleasure... Perhaps in a couple of years I’ll save up for lighting in the bathroom, and if I have time and desire I’ll write...
Tags:
LEDs LED strip LEDs LED Strip Light kitchen lighting movable lighting LED profile
Cited 1 time Liked by 1 user
Like share
0
Like
- 1
I liked the post - Quoted
- 0
Saved
- Add to quote book
- 0
Save to links
Liked1
0
Features and types of designs
Most types of LED strips have an adhesive layer on the back side, designed for fixation on supporting elements. However, you cannot rely entirely on this method of fastening, since not every surface is capable of providing reliable adhesion to the sticky layer. The presence of dust, roughness and other imperfections reduces, and sometimes completely eliminates, the ability to hold the tape on a given structure. To solve such problems, special boxes (profiles, channels) have been created to ensure reliable and simple installation of the tape.
The design of the box is a closed extended channel, rectangular, triangular or flat cross-section. Three sides typically form a continuous, one-piece tray, while the fourth is a clear, removable diffuser. The standard length of one section is 2 m; with sequential joining, a box of any length can be formed. At the same time, the external shape of the channel can be any and be intended to solve certain problems.
From a design point of view, all ducts are manufactured for installation in specific conditions. There are channels designed for installation in specific decorative elements, furniture fittings or other parts. There are also universal types of boxes that can be installed not only as additional elements, but also as independent types of lighting.