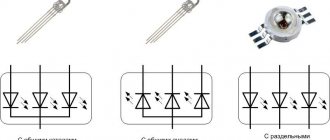
When installing LED lighting, to achieve high-quality installation and maximum effect, use a box for LED strip. It is divided into groups, and in order to choose the right one, we will consider each one separately.
- Plastic. As a rule, this is polycarbonate - one of the most affordable materials. Having an affordable price, it is the best option for those who are used to doing everything with their own hands. This material comes in various colors: matte, transparent, colored, which gives significant scope for design ideas. Its physical properties are also almost universal: polycarbonate, being flexible, is at the same time quite airtight and resistant to mechanical damage.
Box for LED - plastic strips can be easily embedded into plasterboard walls. It can be easily glued to a suspended ceiling, and the ceiling will not bear any extra loads. Plastic compositions look beautiful, especially snow and ice sculptures.
Polycarbonate products are also resistant to temperature changes.
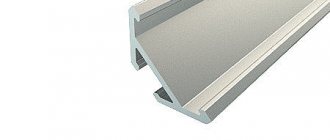
- Aluminum. The most popular design model, because in addition to its aesthetic appearance, it has a number of additional advantages, such as resistance to corrosion (aluminum, as you know, is coated with a thin oxide film that protects it from the external environment), and a high coefficient of thermal conductivity. For an LED strip, this is a real godsend, allowing for efficient heat removal, which is important: 30–60 light sources turned on simultaneously can heat up well, incapacitating themselves.
This profile can be used at high humidity without fear of negative consequences. The diodes in it will never overheat, and with proper care it will not lose its appearance, which cannot be said about other materials. Therefore, when making lighting with your own hands, just such a box is most often used.
Expert opinion
It-Technology, Electrical power and electronics specialist
Ask questions to the “Specialist for modernization of energy generation systems”
Homemade LED profile. Subtleties and nuances of installing unusual practical lighting. Discussion on LiveInternet - Russian Online Diaries Service The optimal placement option was determined using an LED flashlight, which was applied to the cabinet, focusing on the direction of the light and the area illuminated by the proposed backlight. Ask, I'm in touch!
Application
The scope of application of LED diffusers is quite wide:
- Specialized lighting in living spaces for bookshelves, kitchen work areas, aquariums, and interior elements.
- Additional lighting of special areas in stores, shopping and exhibition centers.
- Highlighting important areas in street design, billboards, decorating squares and gardens.
- Creating a general background glow in public institutions.
With the help of colored diode strips and software control of their parameters, rooms, shop windows, interior and exterior elements, buildings and structures are decorated in honor of various events, events and holidays.
Principle of operation
The principle of operation of the diffuser for LED strip is to increase the angle of light distribution due to a special design made of light-refracting material. Its own geometry and location relative to the light source is designed in such a way that the luminous flux falling on it is effectively distributed over its entire area and passing through the body of the diffuser, ensuring uniform illumination of the entire room.
The photo shows the LED diffuser disassembled and assembled.
LED Strip Installation Guide
Step-by-step installation instructions:
- The total length of the tape is determined. To do this, the laying route is planned and the full length is measured, including the sections approaching the connectors and the controller.
- Pieces of tape are connected into 1 line using connectors (or a soldering iron).
- The assembled tape is connected to the controller, and the controller to the power supply. The main nuance: the poles must be connected correctly, otherwise the duralight can be damaged when turned on.
- Connect the assembled line to the outlet and the lighting from the remote control for testing. If the backlight comes on, check the brightness and color settings (if provided).
- Disconnect the tape from the controller and mount it in the desired location.
When the duralight is attached, it is connected to the controller again and checked again. If the backlight works normally, the work is completed.
Attaching the diffusers
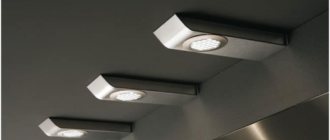
To mount an LED or LED strip, aluminum profiles are made. A diffuser is also attached to them, choosing it in accordance with the needs of the customer. The light diffuser can be made in the shape of a ring, in which each LED is located on a strip in a circle. Such profiles are used in car headlights, in some models of lanterns and lamps.
For large ceiling light sources, profiles are made in the shape of rectangles. In principle, nothing limits a manufacturer or a self-taught craftsman from making a lamp of any shape. And all this is due to the fact that the LED has a very small size with a high light output.
It is important that the diffuser, which is installed on street lamps, can withstand large temperature changes, is not afraid of frost, high humidity, and has anti-vandal properties. Innovative materials meet all these requirements and make it possible to create reliable and durable lighting devices. Taking care of consumer convenience, today they produce sets of LED lamps, which include the necessary elements for installation, for controlling brightness and even color.
Source: le-diod.ru
How to make a diffuser for LEDs
Light transmittance of materials (transparent)
It would be possible to buy ready-made material with a matte tint, but this will not always give an acceptable result. Even factory diffusers have light transmittance in the range of 60-90%. This is caused by the reflection of light. The thicker the diffuser, the higher the likelihood that light will fall “inappropriately”.
Reducing the thickness of the material will not have the best effect on strength and durability. You can make a reliable light diffuser for LEDs with your own hands from transparent materials by creating a matte texture on one of the surfaces.
How to get a matte surface
A matte surface structure is obtained by matting. There are two types of matting:
- Chemical;
- Mechanical.
With the chemical method
A special paste is applied to the surface. It destroys the crystalline structure of the material, forming a uniform matte layer.
Advantages of the method:
- Minimum time spent;
- Homogeneous surface structure
Disadvantages of the method:
- Relatively high cost of pastes;
- When matting, toxic substances are released.
Mechanical method
involves treating the surface with an abrasive material, usually fine sand.
Advantages of the method:
Fast, uniform processing.
Disadvantages of the method:
- Sandblaster required;
- Unsuitable for home use.
The easiest and most affordable way to make a matte surface is to sand the glass with sandpaper. This method is not suitable for silicate glass due to the high strength of the material, but polycarbonate and acrylic glass lend themselves well to such processing. We use only fine sandpaper as an abrasive; coarse grains may cause scratches.
For home lamps based on low-power elements with low heat release, it is possible to use ordinary compress paper glued to the inner surface of the glass as a diffuser.
In most cases, the brightness of a lighting fixture can be increased by applying a reflective coating. Silver has the highest reflectance, followed by aluminum. It is from this that the reflective layer for mirrors is made. These coatings are not particularly inferior to ordinary food foil and white paint.
You can make a reflector for an LED by covering the circuit board for LEDs or the inside of the lamp with these materials yourself. This simple method will allow you to increase light output by 10-15% without much expense.
To give the light flux uniformity and directionality, it is necessary to attach a characteristic optical design to the lamp. For an LED strip, its role is played by a special diffuser. However, as a rule, ice strips are not supplemented with such devices when sold - they need to be made independently or ordered separately, depending on the conditions of use and the parameters of the lighting device based on them.
Let's consider what the operating principle of such a device is and what its function is, what types exist and where they are used, as well as how to make them yourself and what materials are required for this.
The peculiarity of the LED strip is that the luminous flux from it extends to an angle of no more than 120 degrees. This significantly impairs their practical usefulness. To correct the situation, it is necessary to place a material that refracts and scatters light in close proximity to the lamps.
This is exactly the function that the LED diffuser performs. Its internal structure is based on a disordered arrangement of particles of matter. As a result, light, when passing through such a material, deviates significantly from its original trajectory - and in different directions. As a result, the light flux simultaneously weakens somewhat and expands evenly.
Glass frosting options
Chemical method
A layer of special paste is applied to one side of the diffuser. It literally “etches” the glass, changing its crystal lattice to a certain depth. The result is a matte surface.
Pros - high speed of work, uniformity and homogeneity of the resulting layer.
Cons – matting pastes are expensive; In addition, you will have to practice on several fragments to get a good result. The difficulty lies in determining the required thickness of the applied paste and the uniformity of its placement. It’s not difficult to do everything correctly with your own hands if you have experience in such work. But a beginner will have to spend a fair amount of time.
Read about how to connect LED strips with connectors here.
Mechanical method
Glass can be processed with any abrasive. To make matting better and more uniform, it is necessary to use materials with fine fractions. For example, sand.
Pros – good speed; It is quite difficult to make a mistake, since the result of processing is immediately visible.
The downside is that regular sandpaper (for sanding) cannot achieve high quality matting on some types of glass. In addition, this work is quite labor-intensive and will require a lot of time. For ordinary silicate glass (window glass), you will need a sandblasting machine. It’s not difficult to make the simplest option with your own hands, but you will have to look for a source of compressed air.
It is unlikely that anyone will purchase a compressor to make a diffuser. But if it is possible to get it, at least for a while, then it is better to work with it rather than with paste.
Plus - no hassle; everything you need is at hand.
The downside is that it will take not only time, but also extreme care and accuracy.
All the technologies discussed above are suitable for cases where there is some kind of box through which the LED strip is laid.
Or if it is mounted inside a piece of furniture, which requires additional glazing. But such methods of making a diffuser are hardly suitable for motorists. There is a more advanced technique that is applicable to any type of LED devices, regardless of their power, geometry and installation location.
Types and purposes of profiles according to installation method
Today, experts distinguish only three types of profiles that can be used for mounting LED products. Directly based on the installation method, contours can be divided into the following interesting types:
- corner;
- mortise or built-in;
- invoices.
As modern practice shows, corner profiles, which are made of aluminum, are sold complete with a special diffuser, which can be removed if necessary or desired. The diffuser is used to protect the eyes from too bright light emitted by LED-type products
While you are designing your project, it is very important to remember that using a diffuser can lose up to 40% of the light, although in most cases this figure does not exceed 25%
In turn, built-in profiles are very often used to implement certain design solutions. With their help, you can quite simply connect together parts of drywall or chipboard. Directly in the place where the profile was installed and the LED strip itself is installed. In some cases, it may protrude slightly above the surface of the profile, and in others (which is most common) it may be located in this recess and not go beyond the surface level.
If we talk about the mortise profile for the LED strip, then the distinctive feature of such a product is that it has an edge that can easily cover all the uneven places, and they are very often present at the edges of the groove. Using a mortise profile, you can illuminate the room in such a way that the LEDs do not stick out from a flat surface. It is very easy to use such products. It is enough to cut a recess in the chipboard or drywall, which would have the shape of a direct mortise element. Its depth should be such as to completely hide the LED product.
A recess is cut into the chipboard in the shape of the mortise element, which completely hides it. As a result, it turns out that the wall cabinet itself glows from below.
DIY aluminum profile for LED strip video
The overlay profile can be mounted on a wide variety of surfaces. An interesting fact is that it can be glued or attached using self-tapping screws. If the overlay profile is made of plastic, then it bends quite well. Thus, this type can be used without problems on any surface that is at least slightly curved. Quite often, an overhead circuit is used for mounting LED products in an arch or along its circumference.
Kinds
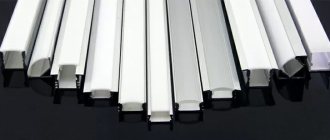
The diffuser or diffuser used for LED strips consists of two main elements - a housing and a light-transmitting plate. In modern models, the first part of the device is presented in the form of a plastic, aluminum or stainless steel profile of the following shapes:
- Corner.
- U-shaped.
- S-prominent.
Its geometry is determined primarily by the place where the diffuser is used, the types of brackets for it, features and operating conditions. An LED strip is glued to the base of the profile, and then the top is covered with transparent or matte material. The former are used when strong illumination of any selected areas is required - for example, display windows in a store, the latter - when it is necessary to create general unobtrusive lighting, for example, in a restaurant.
Popular models
As an example, consider the characteristics of two popular models of LED strips.
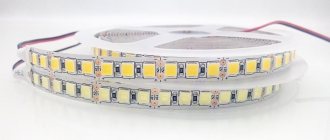
SMD3528 (60 LED/m) IP65 class A
The tape produced by Rishang is a lighting module on a flexible printed circuit board with six dozen diodes per linear meter. The tape is characterized by protection class IP65, control elements - IP20. The tape can be used in damp areas as well as outdoors. The letter A indicates that the device is premium. This is expressed in a high degree of protection, increased brightness of the device, as well as a 12-month warranty period.
SMD3528 is offered in coils, each of which contains 5 m of tape. The cutting pitch is 5 cm, includes 3 LEDs. The connection to the electrical network is made through a transformer. The device power is 4.8 W per linear meter. Operating current - 0.4 A/m. Color characteristics: white (7100K), warm white (3100K), red, green, blue and yellow.
SMD 5050 (30 LED/m) IP65 class B
The device is manufactured by SONG. There are 30 diodes and control components per linear meter. Protection class - IP65. The tape is supplied with double-sided tape, which significantly expands the possibilities of its installation.
The cutting pitch of the tape is 10 cm. There are 3 LEDs on each section. The tape is offered in 5-meter rolls. The connection is made via an LED transformer. The device power is 7.2 W per linear meter. Voltage - 12 V. Operating current - 0.6 A/m. The light beam dispersion angle is 120 degrees.
The device is multi-color (RGB). Basic colors: white 7100 K, warm white (3100 K) and red.
To give the light flux uniformity and directionality, it is necessary to attach a characteristic optical design to the lamp. For an LED strip, its role is played by a special diffuser. However, as a rule, ice strips are not supplemented with such devices when sold - they need to be made independently or ordered separately, depending on the conditions of use and the parameters of the lighting device based on them.
Let's consider what the operating principle of such a device is and what its function is, what types exist and where they are used, as well as how to make them yourself and what materials are required for this.
Purpose
The LED strip is structurally composed of individual LEDs with high brightness, so the diffuser is designed to evenly distribute the light flux. Using it is important not only from the point of view of aesthetics and the beautiful appearance of your lighting system, but also for creating a soft light in the room.
The figure shows a profile for an LED strip with a diffuser
Features of choosing LEDs
Requirements for lighting elements
Before you make an LED lamp with your own hands, you definitely need to decide which emitting diodes are optimally suited for these purposes.
Additional Information. In general, it is possible to make a lamp based on LEDs only if their efficiency exceeds 50% (compare: for a conventional incandescent lamp this figure is only 3.5-4%).
Features of the selection of these elements require taking into account the following determining factors:
The ability to obtain a do-it-yourself lamp made from LEDs (red, yellow, green or white) suitable for given conditions. A sample of a product with a white glow is shown in the photo below;
Spotlight with daylight (white) spectrum
- High luminous efficiency of a homemade lamp;
- Low power consumption when powered from a household network;
- Long service life (at least 30,000 hours) and environmental friendliness;
- Reliability of the LED design (ability to withstand an unlimited number of switches on and off).
These products must provide the ability to control the intensity of the light flux, as well as ensure low temperature in the area where the emitting elements are located.
Selection order
All the above conditions are fully satisfied by modern LED lamps for the home, the range of which is widely represented on the domestic market.
Let us add to this that the manufacture of a homemade structure will not require the expenditure of additional material resources. For these purposes, old electronic components and products containing the corresponding parts may well be suitable.
An excellent example of a rational approach to their manufacture can be a lamp from a TV with an LCD screen (not working for some reason), from which you can “borrow” working LED backlights. An example of such a display is shown in the photo below.
Display with LED backlight
How to make light diffusers for lamps
Today, many lighting fixtures are equipped with diffusers.
With their help, the formation of a luminous flux of the required quality is ensured. Many lamps sold in lighting stores today are already equipped with such elements. But if desired, anyone can try to make such an element with their own hands. This way you will not only spend time with interest and benefit, but you will also be able to equip any home lamps with this kind of addition. And you won't have to run to the store.
DIY LED diffuser
All LED lamps sold in stores are equipped with diffuser shades. They allow you to evenly illuminate the surface and make the light from the lamp softer.
What to do if you have an LED lamp of your own making or want to make additional lighting for a car headlight? You need to make a diffuser for the LED strip with your own hands.
Operating principle of the diffuser
Light from point light sources, in particular from LEDs, has a relatively small divergence angle - up to 120 degrees. At a short distance from the source, you can see a sharp change in illumination beyond this angle. How to diffuse light from an LED? Any light-refracting material can solve the problem.
In the factory, transparent or matte plastic is used for this, on the surface of which a special texture is formed during casting. It is clear that such technologies are not available at home.
At these angles the light from the LED falls
The simplest light diffuser for LEDs can be constructed in a few seconds from an ordinary food-grade cellophane bag, only it should not be transparent, but matte. Wrap the diode in one layer of cellophane and see the result. Why is this happening?
In transparent materials, the crystal lattice is ordered, and photons from light sources, passing through it, do not change their trajectory. In the case of a matte shade, each microlayer has its own structure.
This is how light passes through transparent and matte surfaces
When choosing a material, there are several important points to consider. If the power parameters are correctly calculated, an LED lamp can operate for many years, so the reflector material should not lose its properties during this time. We must not forget that the lamp will heat up; we immediately exclude the option with a plastic bag.
https://youtube.com/watch?v=M4CQeXKI2yA
Optimal materials for light diffuser:
- silicate glass;
- polycarbonate;
- acrylic glass;
- polystyrene
Light transmittance of materials (transparent)
What percentage of light does each material transmit?
It would be possible to buy ready-made material with a matte tint, but this will not always give an acceptable result. Even factory diffusers have light transmittance in the range of 60-90%. This is caused by the reflection of light. The thicker the diffuser, the higher the likelihood that light will fall “inappropriately”.
Reducing the thickness of the material will not have the best effect on strength and durability. You can make a reliable light diffuser for LEDs with your own hands from transparent materials by creating a matte texture on one of the surfaces.
How to get a matte surface
A matte surface structure is obtained by matting. There are two types of matting:
With the chemical method, a special paste is applied to the surface. It destroys the crystalline structure of the material, forming a uniform matte layer.
Advantages of the method:
- Minimum time spent;
- Homogeneous surface structure
Disadvantages of the method:
- Relatively high cost of pastes;
- When matting, toxic substances are released.
The mechanical method involves treating the surface with an abrasive material, usually fine sand.
Advantages of the method:
Fast, uniform processing.
Disadvantages of the method:
- Sandblaster required;
- Unsuitable for home use.
The easiest and most affordable way to make a matte surface is to sand the glass with sandpaper. This method is not suitable for silicate glass due to the high strength of the material, but polycarbonate and acrylic glass lend themselves well to such processing. We use only fine sandpaper as an abrasive; coarse grains may cause scratches.
For home lamps based on low-power elements with low heat release, it is possible to use ordinary compress paper glued to the inner surface of the glass as a diffuser.
In most cases, the brightness of a lighting fixture can be increased by applying a reflective coating. Silver has the highest reflectance, followed by aluminum. It is from this that the reflective layer for mirrors is made. These coatings are not particularly inferior to ordinary food foil and white paint.
You can make a reflector for an LED by covering the circuit board for LEDs or the inside of the lamp with these materials yourself. This simple method will allow you to increase light output by 10-15% without much expense.
Please rate the article. We tried:) (25.00
Materials for making the diffuser
A modern range of ready-made optical materials allows anyone to make their own diffuser for an LED strip. Among the most suitable options are:
- Acrylic and plexiglass.
- Polystyrene.
- Polycarbonate.
Let's consider their main characteristics and application features.
Acrylic and plexiglass
Types of plastic such as acrylic and plexiglass are characterized by the same light-scattering abilities as traditional glass (they transmit about 90% of radiation). At the same time, they are characterized by maximum anti-vandal characteristics and do not crack from constant changes in climatic conditions, sudden changes in temperature from plus to minus sixty and mechanical influences.
Advantages:
- Light weight.
- Possibility of processing.
- UV resistance.
- Waterproof.
- Non-toxic.
- Not susceptible to aging processes.
Interesting! Among the disadvantages are flammability in direct contact with fire and low resistance under high impact loads.
Polystyrene
One of the thermoplastic polymers is characterized by high light transmittance, greater than that of standard glass (about 98%). Polystyrene is versatile and easy to process, resistant to thermal changes and localized strong impacts.
Its main advantages are low cost and significant color variety - from completely transparent to rich, bright shades. However, in general, a plate of such material is quite fragile and can ignite when exposed to open fire.
Polycarbonate
The characteristic properties of polycarbonate are strength, light weight and good light transmittance. In practice, a diffuser for LED strips made of such material is not afraid of contact with open fire, strong winds, heavy rain, hail and attacks from vandals. Moreover, in structure it differs into two subtypes:
- Cellular.
- Monolithic.
Pros and cons of each type
The features, advantages and disadvantages of Edge LED or Direct LED technologies are directly related to the design of the TV and the characteristics of the formation of the light field for the TV's LCD matrix.
The advantages of the Direct LED backlight type include several main factors:
- a uniform light field for the entire area of the liquid crystal matrix, which is determined by the distributed nature of the arrangement of the LEDs;
- uniformity of luminescence implies a complete absence of glare;
- the placement of LED blocks on the back surface of the TV body increases its maintainability; The direct nature of LED emission determines lower energy consumption than options with end-mounted light sources.
Among the disadvantages of TVs with Direct LED technology, it is necessary to note the increased thickness of the television receiver housing and lower brightness than models with Edge LED.
Among the advantages of TVs with Edge LED backlighting, the following factors are worth noting:
- the total luminous flux of the LED block determines the increased brightness of the liquid crystal matrix, which has a positive effect on visual perception;
- side installation of backlight LEDs forms a thinner matrix of the screen and TV body (200 mm is considered to be the standard value for reducing thickness).
Among the disadvantages of thin television receivers with side-mounted LED technology, it is worth noting the high likelihood of glare and higher energy consumption compared to Direct LED.
Model characteristics
In addition to the material of manufacture, a ready-to-use diffuser has other features related to color, shape, and surface structure.
For chandeliers and lamps, the diffuser may differ from other models in its design and is intended for installation:
- on suspended ceilings;
- in an overhead housing;
- be universal.
There is also a light diffuser for LEDs installed in car headlights, spotlights, lanterns and other lighting devices.
The most expensive models have a matte surface. They can transmit a little more than half of the light (about 60%), which makes the lighting very soft. The light becomes warmer and more comfortable for the eyes.
A diffuser with a prismatic structure is capable of transmitting and evenly dispersing maximum light (up to 90%). This is achieved due to the transparency of the material and the corrugated surface. The light produced by the LED is refracted in hundreds of small prisms and thus dispersed throughout space.
There is a diffuser made of 3D polymer material. It is installed on an Armstrong type lamp and is produced in a variety of patterns and colors.
Design
The LED strip is a flexible printed circuit board. It has evenly spaced diodes and current-limiting resistors. The width of the device varies between 8 and 20 mm. The power of the light flux is determined by the size of the diodes mounted on the board.
Other characteristics of LED devices include the following:
- Chroma. Monochrome (white and color) as well as multi-color (RGB) models are available. Multicolor devices are capable of creating any shade by mixing the colors of the three available light diodes.
- Supply voltage. The device operates on 12 Volts or 24.
- LED type. There are low-power modifications (SMD3528) and high-power devices (5050, 5630). The numbers indicate the sizes of the diodes. For example, in model 3528 they are 3.5x2.8 mm.
Do it yourself
To make a light diffuser, you will need the starting material from the list above. In addition, you will need the following tools:
- cutter;
- glass cutter;
- nichrome thread;
- drill with a set of drills for working with various types of glass;
- construction hairdryer
Note! The choice of material and tools depends on the end result you want to achieve.
You will also need a constant light source to check the finished homemade product. The manufacturing procedure consists of the following sequential operations:
- choose frosted or transparent glass;
- We cut out a light diffuser of the required diameter from the original material. The size of this element is determined by the dimensions of the lighting fixture. And to be more precise - a lampshade and a light source;
Glass cutouts
Now all that remains is to attach the light diffuser to the lamp. For large lamps, such as Armstrong, this element is attached to aluminum profiles. The profile frame can have a round or rectangular shape. The first type is often used for home lamps and car headlights, but the second option is for office spaces and corridors.
For street lamps, it is important to make a diffuser so that it can withstand the different climatic conditions of the place where it is used. As you can see, making a light diffuser for LED lighting fixtures is not so difficult. The main thing here is to decide on the type of source material, as well as the final result, what kind of light you need to make - diffused or dim. After this, the matter remains small.
Source
Installation methods
After choosing the profile material, you need to decide on one more point, namely: how it will be installed. There are three main ways that differ from each other. This determines which of the three models we will buy.
- Overhead installation. It is very easy to install it yourself, with your own hands - it is placed outside, and on any surface. Such a model can have various functions: you can install frosted diffusers to create soft lighting, or you can create hard, directional light. This effect is achieved using a transparent coating. The overhead installation is used mainly on furniture: lighting in various cabinets - compartments, showcases, and where the imagination will tell you.
- Mortise design. The name itself speaks for itself - this design is designed to be installed inside the structure, so that nothing is noticeable from the outside. Sometimes this is a matter of not only beauty, but also safety: for example, floor lighting. It is clear that the overhead method is inappropriate here, since you will have to trip over the structure all the time, breaking it. Mortise profiles are very durable and airtight. This allows them to be installed not only indoors, but also outdoors, where precipitation is possible. A box made of aluminum is ideally suited for such extreme conditions, because this material is resistant to moisture, does not corrode, and is quite durable, despite its low weight.
- Corner model. It is worth purchasing if you plan to install lighting in the corners. From the name it is clear: one of the sides of this design is made in the shape of an angle, which allows it to be installed inside cabinets, arched openings, under canopies near the wall. In addition, this model is widely used instead of baseboards on the floor or ceiling, which also looks very stylish.
Features of materials
Modern materials, such as polycarbonate, PMMA (polymethyl methacrylate, in particular acrylic glass), polystyrene, are an alternative to conventional silicone glass and are successfully used for devices in which the light source is an LED. They are represented on the market by many European and Eastern brands, giving us the opportunity to choose.
Polycarbonate can withstand very high temperatures and is less fire hazardous than acrylic glass. In addition, it is not afraid of strong impacts and other mechanical damage.
If we talk about PMMA, it has high transparency, in some cases better than glass. The material is resistant to aging, which is important for LED lamps, because the LED can also work for a very long time (about 50 thousand hours).
Typically, so-called opal (matte) diffusers are made from PMMA, and prismatic models are made from polycarbonate. To ensure strength, monolithic polycarbonate is used, which is several times stronger than glass, and for indoor lamps, acrylic glass is used, which makes it possible to create lamps of an original design.
Lamp base
Let's move on to the connection diagram and wires. In order for the lamp to be able to adjust the brightness, you will need a 12V dimmer like this.
Where to hide it and what to secure it to? We will make special legs for this.
Two power wires with a plug connector and two free wires are pre-soldered to the dimmer, with which we will later connect the LED strip.
The dimmer itself will be walled up in a cement solution (don’t be surprised, you’ll see everything later). Therefore, it needs to be insulated as best as possible by wrapping it with adhesive tape.
For greater reliability, the contacts on the board can be filled with a glue gun.
The legs of the lamp are made from two small plastic boxes.
Place a dimmer inside one, bring two wires out, and glue the power connector tightly to one of the walls.
To prevent this place from becoming clogged with mortar, it is better to cover the hole with something.
After this, fill the entire box with cement. Make sure that there are no voids left anywhere and that the cement fills the entire container tightly.
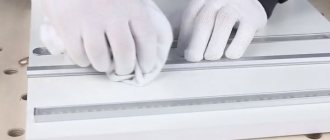
Until the solution sets and hardens, place one of the ends of the aluminum strip in the middle of the box.
So that it sits securely inside and then does not jump out, tighten a couple more screws at the end. They will increase grip.
To give a designer shape to the entire structure, place several pebbles on top of the solution.
You do the same with the other end of the aluminum, only without any wires and dimmers.
Once the cement has hardened, remove the plastic mold.
To give the pebbles a glossy look, apply a little varnish or paint to them. They will look like they were just pulled out of the sea.
As a result, you should end up with fairly heavy lamp legs. Don't forget to remove the plug from the power connector.
To prevent the legs from scratching the table, glue four rubberized pads on the bottom.
The general view of the lamp will look like this.
Next, stick the LED strip on the inside of the aluminum busbar.
For such a lamp, use only high-quality tape without flickering effect and with good CRI>90 parameters.
When the tape is glued, you can solder two free wires from the dimmer to it.
Do not confuse the polarity of the plus and minus output.
Connect the power supply through the connector in the leg and adjust the brightness. As you can see, the lamp looks very cool.
Everything under such a table “lamp” will be illuminated with soft light, with virtually no shadows.
This backlight is very pleasing to the eye and provides fantastic visibility.
Flexible
There is also a flexible profile of LED diffusers. It is fundamentally different from the designs described above. This type of component product is a silicone tube in which an LED strip is placed.
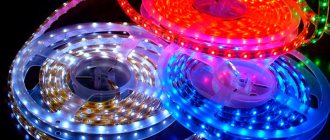
The photo shows LED strips of different colors in flexible silicone profiles
To choose the right diffuser for an LED strip, you need to consider the conditions. This includes a study of the surface to which you will attach the system, the overall dimensions of the LED strip itself and the climatic conditions of the room (or outside it, which is also possible).
It should be noted that despite the fact that diffusers are often made of fusible materials, there is no need to worry about their toxicity. During operation, the LED emits a very small amount of heat, which practically does not heat the surface of the diffuser.
Diffuser
Acetate paper or guitar sheet comes to the rescue. This transparent film of different densities is used in cooking to create decor.
However, due to the fact that the sheets are initially transparent, you will have to sand them on both sides with sandpaper, thereby giving them a matte tint.
You will need two sheets in total. Bend their ends and glue them to the aluminum backing on the back side.
In this case, one sheet is bent a little further, the other a little closer. So that in the end they end up at different distances from the LED strip and there is a gap between them.
Now your lamp is really ready. With the diffuser sheets, it looks like an expensive wall lamp.
Drill holes in the back and hang it on any surface in the house. Vertical positioning is preferable.
In the dark, the lamp looks chic, modern and expensive. You can assemble not one, but two, three, four such lamps, connect them in series through connectors and completely illuminate the entire room.
Fastening
Fixing the LED strip should not cause any difficulties. For this purpose, “liquid nails”, self-tapping screws or double-sided tape are used. If desired, you can create a corner mount and mount the lamp using special brackets. Also, the tape is sometimes built into one plane or another, for which a groove in the wall is prepared in advance.
For arches or similar curved surfaces, a flexible profile is used. Most often these elements are aluminum.
How to make a lamp from a ribbon with your own hands: diagram and photo
Preparation of materials and parts
You will need the following tools and materials:
- A finished board or frame made of a heat-resistant material (not metal) that does not conduct electricity.
- Decorative elements.
- LED strip.
- Soldering iron.
- Tweezers.
- Power unit.
- A capacitor, the capacity and voltage of which must correspond to the electrical circuit used in the device and the number of LED elements used in this circuit.
Tip You can solder the tapes with a soldering iron or special connectors. Soldering with acid is strictly prohibited, as this can lead to damage to the elements or a short circuit.
Tape selection
The following types of diodes are popular:
- SMD 3528 - high brightness, since one linear meter of tape uses from 60 to 240 light elements located close to each other.
- SMD 2835 Premium - less brightness, but the same dense arrangement of elements (60-120 diodes per linear meter). This tape can be cut into small pieces of 5 cm. You can create spot lighting or highlight small interior items.
- SMD 3014 is an analogue of the previous model.
- SMD 5050 is a popular model with a reasonable price, where there are 30–120 elements per linear meter.
The “IP” mark indicates how protected the board is from dust and moisture:
- IP 44 - good level of protection protection from dust and dirt.
- IP65 - protection from dust and moisture in low temperatures while maintaining elasticity.
- IP67 - there is a protective coating - silicone tube.
- IP68 - high level of protection. The protective coating is a two-layer silicone tube with filler.
Features and stages of installation work
How to collect:
- To reduce the voltage, the power supply is placed as close as possible to the diodes. The longer the wiring, the more voltage is lost, reducing lighting levels.
- If the platform is metal, then a layer of insulation is laid between the strip and the LEDs.
- If the strip for a DIY LED chandelier is connected via a capacitor to a 220 V network, then you will need to cover it with two layers of silicone sealant. Any installation operations with such a board must be performed with the voltage completely turned off.
- When connecting a home-made sconce or chandelier, it is better to use multi-core wiring. A 0.75 mm ferrule is placed on one end of the wire and connected to the controller, and the other is soldered to the ends of the LED board.
No. 4. Pringles can be a diffuser
Using empty Pringles cans is a popular "lighting trick" for macro photography. Making your own modifier from a can of chips is not only a good excuse to snack, but it's also an easy and effective option.
Usually people cut a rectangular hole in the bottom of the can so that they can insert a flash into it:
Macro light diffuser made from a Pringles can
This method works well, but you can make so much more out of jars. It is an ideal material for creating macro diffusers; Durable tubes with a reflective interior and the perfect diameter to fit virtually any flash.
By cutting out the bottom of the can using a can opener, you can slide the tube directly onto the flash and then adjust its position. This is very useful when working with lenses of different sizes.
However, this is just the beginning. Next we'll make an L-shaped reflector to further direct the light and concentrate it in the area where it's needed most - right in front of the lens.
Simple L-shaped diffuser
"Beauty plate" for macro
Both modifiers mentioned do an excellent job of scattering and redirecting light. The L-shaped diffuser is especially effective and practical. Its light is even and casts more glare than many other diffusers. The beauty dish creates a soft, dreamy light over a larger area, but therefore requires more flash power and takes up quite a lot of space in your bag.
Flash without modifiers
L-shaped diffuser
"Beauty Plate"
In the series of photos below you can see how these modifiers were created. I hope this inspires you for a new craft project:
Open the bottom of the can using a can opener
Shape the jar into a square shape
Cut a piece so the can can be bent
The basic diffuser is almost ready. To make a "portrait plate", cut a small piece at the bottom. This will reduce the diameter and allow additional pipe to be inserted.
Secure the shape with electrical tape. Make sure not to overdo it, otherwise the second can will not fit into the resulting corner.
Attach a short pipe to an empty yogurt glass. This part will be the "lamp".
Cut a round hole in a tin can or plastic plate and glue everything together.
Cover the resulting structure with reflective material. This could be foil, a silver thermal blanket, or even a packet of chips turned inside out.
Insert the inner diffusion layer. I use packing foam for this.
Finally, add another layer of diffusion for maximum softness of light.
And voila!
If you want your modifier to be adjustable, you can use two cans, cutting one lengthwise so you can slide it over the other and adjust the length if necessary. This will also allow you to tilt the light source.
The result will be something like this:
This photo was taken with an L-shaped diffuser.
When we hear “flash modifier,” we tend to think of diffusers in the context of macro photography. But they are not the only way to influence the character of light. Let's look at a few more creative modifiers:
Connecting LED strip
Let's move on to the tape itself. Measure the LED strip of the required length according to the dimensions of your aluminum sheet.
In total you will need two segments. Solder them together in parallel.
Then glue it onto an aluminum backing.
Please note that for greater safety in places where contacts are soldered, it is advisable to place paper tape under the tape.
It will act as an insulator and prevent a possible short circuit to the housing.
Technically, the lamp is almost ready. You can apply voltage to it and turn on the toggle switch.
However, it all looks rather unattractive. Additionally, direct light from LEDs without diffusion is not very good for the eyes.
Main functions of the diffuser
Since the LED emits a fairly pure and narrowly focused light, it is not entirely comfortable to look at. To correct this situation, a diffuser is simply necessary. In addition, sanitary standards and rules require the use of a light diffuser, making an exception only for street lighting fixtures and for illuminating architectural structures.
In more detail, the diffuser should:
- protect the LED from the external environment;
- ensure correct light distribution that is most comfortable for the eyes;
- be durable and resistant to chemical attack;
- be durable;
- have certain aesthetic properties.
As you already understand, you cannot simply replace a fluorescent lamp with an LED. Along with installing a new light source, you need to use a diffuser, then you will get a modernized, economical and eye-friendly lamp.