A dimmer for an LED strip is an electrical device that combines a switch and a dimmer in a single housing, installed in the LED strip control circuit. Its operation is based on smooth adjustment, the rheostat principle, of the voltage level supplied to the lighting circuit. Due to this, the brightness of the lighting is adjusted from 0 to 100%. The dimmer is installed and connected to the network in the same way as the switch.
Some manufacturers install a choke in the dimmer chip, which can be used to cut off interference and noise created during operation.
Equipment features: types of modern dimmers
There is one of the important reasons for the popularity of LED strips - the ability to connect additional elements and dimmers to this type of equipment, which can easily help you change the brightness of the lighting yourself. The dimmer can only be integrated into a lighting system with LED strips; for example, conventional energy-saving lamps cannot be equipped with the device. The store offers several types of dimmers. After studying their features, you can choose the one that suits you:
- Passive. Variable resistors can be used as these elements. These types of dimmers provide the simplest method of adjusting the intensity of the glow. What do you need to remember for those who are going to give preference to this method? When using it, lighting equipment may lose power during operation, which will lead to rapid depletion of its resource. Energy efficiency decreases.
- Active. This type is based on semiconductor devices. Thus, devices can be analog or pulse. The first option allows you to maintain the level of electric current at the same level. As a result, if power loss occurs, it will be negligible. However, when dissipating power, LEDs can become very hot. The second option is a more modern modification, for the creation of which the shortcomings of previous models were carefully worked out.
Thus, from the above we can conclude that the most effective and reliable option, free of disadvantages, is a pulse dimmer. By purchasing it, you can be sure that the service life of the tape will not decrease.
Operating principle of pulse width modulators
Pulse-width modulators used to change the glow parameters of crystals operate on the principle of changing the duration of the supply of rectangular current to the product while maintaining its parameters. The pulse current width varies from zero to maximum level relative to the network voltage.
The output signal of the device is maintained at the specified values, which ensures the preservation of the spectral composition of the radiation of the tape crystals. Connecting a dimmer in pulse mode does not cause power loss and is best suited for choosing an electronic method of controlling the system.
The disadvantage of budget models is the flickering effect, which negatively affects the organs of vision. Priority should be given to expensive products that do not have such a drawback.
Features of dimmable LED products
The LED strip has a semiconductor LED in its design. To dim an LED strip, you need to understand how it works and how it should be connected to the power supply.
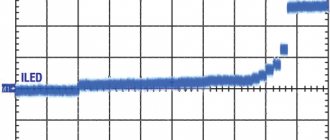
Note! Such a semiconductor has a nonlinear current-voltage characteristic or I-V characteristic. This means that the current flowing through it only starts from a certain threshold value
In this case, the current increases very strongly, which can lead to burnout of the LEDs.
LED current-voltage characteristic
To avoid such negative developments, it is necessary to connect LED strips to the power supply only through a transformer (that is, a power supply).
Note! In this situation, a transformer or power supply will reduce the network voltage from 220 volts to the required value for adequate operation of the LED strip (up to 12 or 24 volts). Such devices can be called “stable current sources”
Power supply for LED strip
In the simplest situations, a regular resistor can be used for these purposes. But remember that its resistance must be high for stable operation of LED strips. The EMF of the voltage source must also be high. Despite its apparent simplicity, creating such a scheme is not easy. In this situation, a loss of electrical power will occur. Therefore, to compensate for such losses, LED strips must be connected to a low-voltage source, which at the same time can stabilize the output current. The role of such a low-voltage source is a power supply or transformer. For LED lamps, the power supply is already built into the design, but for strips it has the form of a separate module.
At the output, such a transformer has an output voltage of 24 or 12 volts (depending on the type of LED strip). In this case, limiting resistors for it will be placed on the tape itself.
Note! If you are dealing with a dimmer or control unit, then they also need to be selected according to the power of the purchased tape. Proper dimming implies the correct connection of all components, including the power supply (also known as a transformer), control unit or dimmer, as well as the lighting products themselves
Proper dimming implies the correct connection of all components, including the power supply (also known as a transformer), control unit or dimmer, as well as the lighting products themselves.
LED strip connection diagram
Only in a situation where the connection diagram is followed will the glow of the tapes be bright and full. If something was connected incorrectly, the backlight simply will not work until the installation inaccuracies are corrected.
Advantages and disadvantages
The advantages of regulators include:
- the ability to change the brightness of the backlight to your liking or according to the conditions of the lighting effect;
- if there are several LED strips of different brightnesses, it becomes possible to even out their glow;
- Many dimmers are capable of creating various lighting effects, enriching the decorative design of the room.
The disadvantages of the devices should be considered:
- many circuits create a noticeable flicker, which for sensitive people can create very adverse effects;
- cheap samples do not provide many effects and are not of high quality. More efficient devices cost significant amounts, often exceeding the entire cost of LED backlighting.
Despite the existing shortcomings, the popularity of dimmers is constantly expanding. Attractive lighting effects and the ability to regulate the operating mode of LED strips attract a large number of users.
Installation and soldering of wires on LED strip
You can proceed to installing the tape itself. To do this, you need to measure it and cut it into the required pieces. This can not be done in any place, but only where the dotted line is applied or scissors are drawn.
After cutting, the wires can be soldered to special contacts on the tape. For the same purposes, as well as for connecting individual pieces of tape to each other, connectors can be used.
Look for the negative terminal and connect black wires there. Accordingly, another wire goes to the plus contact - red. Do not heat the soldering iron to maximum, otherwise you will easily burn the substrate. Recommended soldering time is up to 10 seconds.
The opposite ends are also cleaned and NShVI tips are installed on them.
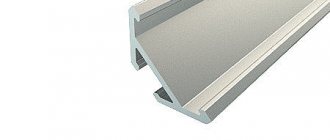
Remember once again that for better cooling, you only need to lay the LED strip on an aluminum profile. It is installed in advance.
After all this work, all wire strands are brought out to one place and connected to the corresponding supply wires, observing the phasing (positive and negative contacts).
Connections are best made using Wago terminals.
At this point, the installation can be considered complete and the entire structure can be covered with a ceiling molding.
Sources - https://cable.ru, Kabel.RF
Which shade is best for ceiling lighting?
External lighting has a direct impact on the human psyche, his emotional state and ability to work. This fact has been confirmed by numerous studies by psychologists.
When choosing lighting, you need to take into account the functional purpose of a particular room. So, for a bedroom or children's room, neutral lighting in soft colors is best suited, which will not tire your eyes. There are no restrictions when organizing lighting in dining rooms and living rooms.
These premises are primarily intended for spending time together with family, for parties and receptions. The brightness and color of the lighting is selected based on the design of the room, the presence or absence of natural light
There are no restrictions when organizing lighting in dining rooms and living rooms. These premises are primarily intended for spending time together with family, for parties and receptions. The brightness and color of the lighting is selected based on the design of the room, the presence or absence of natural light.
For large living rooms, it is recommended to use uneven lighting to create a comfortable, lively atmosphere. In such premises it is customary to distinguish several functional zones. To delimit the space, different sets of furniture are used; for each zone you can create your own lighting scheme. For example, bright lighting is organized above the work desk, while in the relaxation area it is better to use light in muted tones.
LED strips with the required level of light intensity can be purchased in advance, or you can buy a standard model, subsequently adjusting the brightness using a dimmer. As for the backlight color, the choice of LED strips is individual and depends on the design of the room.
RGB strip connection diagram
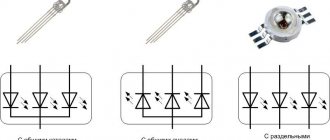
The multi-color tape can be connected to a PC using an RGB controller. This is a specialized device designed to control the glow of three colors of diodes:
- green;
- blue;
- red
As a result of mixing the glow of three colors, different shades of light are obtained. To connect multicolor diodes you will need four wires. Paired with a controller, you can use a remote control to control color rendering from a distance. The circuit uses 12 Volt power and a tape length of up to 5 meters. To simplify the assembly of the circuit, you can purchase ready-made detachable connectors designed for strip lights.
LED dimmer circuit board drawing
The board drawing can be downloaded in the archive. The circuit is powered by a 12V power supply voltage from connector CN2, this connector is standard, with which there will be no problems connecting to a special power supply that exists on the market. LED D1 is an indicator of power supply and device operation.
The circuit diagram has several parts - a generator with adjustable PWM pulse width, a driver, and a power amplifier with a MOS-FET transistor. The maximum load power can be more than 200 watts, since the RFP50N06 transistor holds current up to 50 amperes.
Parts for assembling the dimmer circuit are not in short supply, they are on sale, this also applies to such radio elements as CD40106BE and TL081 microcircuits, field-effect transistors RFP50N06 and BS170.
If replacement is necessary, look at the datasheets and select analogues. No tags for this post.
Power supplies for lighting devices
The variety of lighting devices, including floor lamps, chandeliers, table lamps, etc., amazes even those people who have a rich imagination. The emergence of the latest technological developments not only provides high-quality lighting, but also saves energy resources to the maximum extent.
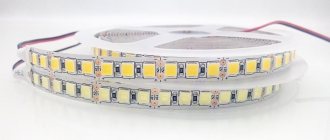
Alternative products are LED strips, which are energy-saving lighting devices. The choice of lamps, the production of which is based on progressive LED technology, is quite wide. These devices have a good design and high-quality technical characteristics.
The use of LED lighting is widespread in advertising, landscape and interior design, car interiors, equipping household appliances, etc. A large assortment of such lamps allows you to choose the appropriate option, be it 40w by 300w or 24w by 250w.
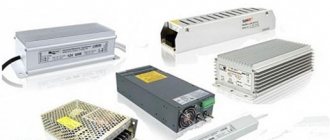
For many it may raise a lot of questions. The power supply is the main component of the LED system, which is a compact transformer capable of providing power to the LED strip. Miniature dimensions ensure discreet placement of this device in various suitable places.
Dimmer classification
There are two types of dimmers - monoblock and modular. Monoblock systems are made as a single unit and are designed to be installed in a box as a switch. Due to their small size, monoblock dimmers are popular when installed in thin partitions. The main area of application of monoblock systems is apartments in multi-storey buildings.
There are several types of all-in-one devices on the market:
- With mechanical adjustment. Control is carried out using a rotary disk. Such dimmers have a simple design and low cost. Instead of a rotary control method, a push version is sometimes used.
- With push-button control. These are more technically complex and functional mechanisms. Multifunctionality is achieved by grouping regulators controlled from a remote control.
- Touch models. They are the most advanced devices and the most expensive. Such systems fit well into the surrounding interior, especially those decorated in a modern style. Commands are transmitted using an infrared signal or radio frequencies.
Modular systems are similar to circuit breakers. They are installed in junction boxes on DIN rails. Modular devices are used to illuminate stairwells and corridors. Modular systems are also popular in private homes where it is necessary to illuminate the surrounding areas. Modular dimmers are controlled by an external button or a key switch.
According to design features, single, double and triple modifications are distinguished. In most cases, consumers choose single dimmers.
Tips for choosing
We have already talked about the need to select a dimmer strictly in accordance with the voltage consumed by the lighting device. Also, when choosing, you should take into account that the tapes are either monochrome, or RGB, RGBW. In accordance with this, dimmers can be:
- Single channel;
- Multichannel;
When you connect a multi-channel dimmer to an RGB strip, you will be able to not only adjust the overall brightness of the diodes, but also each color individually. You also need to decide on the set of functions that you need. It could be:
- Exclusively dimming;
- Dimming and flickering mode, color music, support for the DMX protocol, the ability to control several lighting zones.
determine the power reserve,
- If in the future you do not plan to increase the length of the LED line, then the power reserve of the dimmer should be at least 20-30% higher than the power of the strip;
- If an increase in the length of the tape in the future is not excluded, then it should be understood that at the same time its power will increase. Therefore, to the above 20-30% it is necessary to add another 20-50% as a reserve. In the event of a lack of power, the device will either simply not turn on, and therefore not perform its functions, or premature wear and failure of the entire line will occur.
In addition, do not forget to decide on the preferred method of controlling the dimmer. If finances allow, it is better to prefer models that have the ability to be controlled by a remote control. This will make operation as comfortable as possible.
DIY dimmer on a chip
Despite the fact that you can find many types of dimmers on sale, some craftsmen prefer to assemble such devices themselves. As an example for assembly, consider a dimmer on a microcircuit, which is quite easy to configure and has protection functions.
The reference voltage at the control electrode is created using resistor R2. The output value is adjustable from 12V (maximum) to any minimum, down to a tenth of a volt. For optimal cooling of the integral stabilizer (KREN), the installation of an additional radiator is necessary, and this is perhaps the only serious drawback of such a homemade lighting controller.
Connecting RGB LED strip
The correct order of connecting the circuit elements is as follows:
Correct connection order
Remember. Sections of tape longer than 5 meters must only be connected in parallel.
What happens if you connect it in series?
Firstly, you will noticeably lose brightness at the end of the section. Although LEDs have very low resistance, there are losses. With such a length, the voltage at the end will be about 10V. Reduced voltage will result in reduced brightness, already noticeable to the eye.
Incorrect connectionCorrect connection
Secondly, the conductive tracks of the tape are designed for a maximum length of 5 m. By connecting 5 more in series, the tracks will overheat and the lighting will most likely burn out at the very beginning of the section.
RGB connector
The tapes can be connected to each other using soldering or terminals. For single-color options, two-pin terminals (connectors) are sold, for RGB - four or five. Please check this point when purchasing.
Learn more about how to connect rgb tape to each other.
The power supply is connected to a 220V network (AC terminals, polarity is not important), converts alternating voltage to direct 12V (terminals V+, V-)
When connecting the following circuit elements, it is important to observe polarity
Connection terminals on the power supply
The RGB controller is connected after the power supply (maintaining polarity), and the RGB strip is connected to it. Each pin on the case is designed for a specific LED output. If you mix them up, nothing bad will happen, just the colors will be mixed up.
Terminals for connecting the controller to the LEDs
As a result, the finished circuit assembly should look like:
Complete circuit
The amplifier is similar in appearance to the controller, it is connected separately to the power supply, only it has not one die with terminals, but two. Most often labeled as Led Amplifier, it is installed in the tape gap. Connects according to the diagram:
The procedure for connecting an RGB amplifier to a circuit. Purpose of the led amplifier terminals
Let us now analyze the connection diagrams for tapes of different lengths with and without an amplifier, with one or more power supplies.
Connection diagram for RGB LED strip without amplifier
This is the simplest scheme for switching on an RGB LED strip up to 5 meters long through a controller with a remote control.
Electrical connection diagram for RGB lighting
To connect an RGB LED strip 10 or 15 meters long, make sure that the controller and power supply have enough power (with a reserve), and connect according to the following diagram:
Connection diagram 10 or 15
Connection diagram for strip with RGB amplifier
We use an amplifier if the controller power is not enough. If the power of the power supply allows you to connect the controller and amplifier, we use the following circuit:
When the total power of the controller and amplifier is higher than the power of the power supply unit or it is irrational to use a block of such power (large, very hot or noisy), then we connect the led amplifier to a separate power supply according to the following diagram:
Connection diagram for amplifier with 2 power supplies
Using this scheme, you can increase the total length of the tape as much as you like. All of it will be controlled from one remote control.
In addition to serial connection, as in the examples above, amplifiers can be connected in parallel.
Diagram of parallel connection of several RGB amplifiers with one power supply.
Scheme: one power supply several amplifiers
Circuit with several parallel amplifiers with separate power supply.
Scheme: several parallel amplifiers with separate power supplies
If there are no terminals, use a soldering iron and mounting wire, BUT do not overheat the contact pads. Learn more about how to connect the tape.
The correct connection diagram for 20 meters of RGB tape is shown in the video.
Types of light bulbs
Dimmers use a variety of types of light sources: incandescent, halogen (regular and low-voltage), fluorescent, and LED bulbs. Options for connecting a dimmer with a switch differ depending on the type of lamps used.
Incandescent and halogen lamps
These light sources are rated for 220 volts. To change the lighting intensity, dimmers of any model are used, since the load is all active due to the lack of capacitance and inductance. The disadvantage of systems of this type is the shift of the color spectrum towards red. This happens when the voltage decreases. The power of the dimmers is between 60 and 600 watts.
Low voltage halogen light bulbs
To work with low-voltage lamps, you will need a step-down transformer with a regulator for inductive loads. A distinctive feature of the regulator is the marking with the abbreviation RL. It is recommended to purchase the transformer not separately from the dimmer, but as a built-in device. For an electronic transformer, capacitance indicators are established. For halogen light sources, the smoothness of voltage fluctuations plays an important role, otherwise the life of the bulbs will be sharply reduced.
Fluorescent lamps
The standard dimmer will have to be replaced with electronic ballasts (electronic ballasts) if the start is carried out by a switch, a starting glow charge or an electromagnetic choke. The simplest diagram of a system with fluorescent lamps is shown in the figure below.
The voltage to the light bulb is sent from a frequency generator of 20–50 kHz. The glow is formed due to the resonance of the circuit created by the inductor and capacitor. To change the current (which changes the brightness of the light) you need to change the frequency. The dimming process begins immediately after reaching full power.
Electronic ballasts are manufactured on the basis of the IRS2530D controller, equipped with eight outputs. This device acts as a half-bridge 600-volt driver with triggering, dimming, and anti-failure functionality. The integrated circuit is designed to implement all possible control methods due to the presence of multiple outputs. The figure below shows a control circuit for fluorescent light sources.
LED light bulbs
Although LEDs are economical, there is often a need to reduce their brightness.
Features of LED light sources:
- standard bases E, G, MR;
- ability to operate with a network without additional devices (for 12-volt lamps).
LED light bulbs are not compatible with standard dimmers. They simply fail. Therefore, to work with LEDs, special switches with brightness controls for LED lamps are used.
Regulators suitable for LEDs are available in two versions: with voltage control and with control via pulse-width modulation. The first type of device is very expensive and large (it includes a rheostat or potentiometer). Voltage dimmers are not the best choice for low-voltage light bulbs and can only operate on 9 and 18 volts.
This type of light source is characterized by a change in spectrum in response to voltage adjustment. For this reason, the adjustment of light diodes is carried out by monitoring the duration of the transmitted pulses. This way it is possible to avoid flickering, since the pulse repetition rate reaches 300 kHz.
There are such PWM regulators:
- Modular. Control is carried out by remote controllers, remote controls or using special buses.
- Installed in an installation box. They are used as switches with rotary or push-button control.
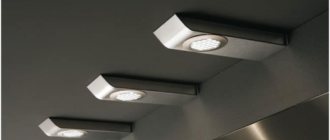
- Remote systems installed in ceiling structures (for LED strips and spotlights).
Pulse width control requires expensive microcontrollers. Moreover, they cannot be repaired. It is possible to independently manufacture a device based on a microcircuit. Below is a dimmer circuit for LED light bulbs.
Normal frequency of oscillations is achieved through the use of a generator, which contains a capacitor and a resistor. The intervals for connecting and disconnecting the load at the output of the microcircuit are set by the size of the variable resistor. A field-effect transistor serves as a power amplifier. If the current is higher than 1 ampere, a cooling radiator will be needed.
Dimmers for LED strips. Types and features. Application
Dimmers for LED strips are needed to change the brightness of the light. The change occurs due to a decrease in power supplied to the tape. By reducing the light intensity, you can extend the life of the lighting fixture, create a more comfortable environment for relaxation, or, conversely, simulate festive dynamic lighting.
Application
Dimmers were popular during the incandescent era, and many thought that with the rise of LED sources, they would gradually disappear from the market. But that did not happen.
Light dimmers have been learned to be applied to energy-saving and even LED lamps. They are also installed on LED strips, achieving beautiful effects.
Lighting designers love to use dimmers for LED strips when placing accents on the details of a room or architectural structure.
Lighting controllers can be built into elements of wall and ceiling structures, making them invisible. There are overhead versions and modules powered by batteries.
Many models have control programs, which makes them similar to controllers for LED strips.
To control RGB strips, a three-channel dimmer is required, which changes the supplied power to each channel separately. Such a device controls not only brightness, but also color. By pressing the adjustment button a certain number of times, you switch the lighting fixture to the desired mode.
What types of dimmers are there for LED strips?
For LED strips, devices designed for 12 V and 24 V are produced
There is a difference in power, and this should also be taken into account. Dimmers control monochrome and multicolor strips. Adjustment happens:
Adjustment happens:
Mechanical using buttons or a wheel.
Remote using the remote control.
Acoustic, when the device reacts to a sharp sound (click, pop).
Touch, when the device responds to touch.
Remote control is convenient because it allows you to control the brightness at a distance of 10-30 m from the switch. The operating range depends on the design features of the remote control. Mechanical control is the simplest in design, therefore inexpensive and reliable.
Since LEDs are special lighting elements, it is difficult to adjust their brightness with conventional dimmers for incandescent lamps. PWM circuits (pulse width modulation) are used, in which the pulse width changes the intensity of the glow.
The sizes of different dimmer models also differ. The length of the miniature device is only 3 cm, while the radio wave controlled unit reaches 10 cm or more in length. The dimensions are relevant if the task is to make the device invisible to the eye and hide it in a box from moisture and dust.
Popular device types
In fact, there are no standards or strict norms regulating the division of dimmers. Therefore, any such procedure is considered conditional. Nevertheless, for convenience, two main subtypes of modern brightness controllers are distinguished.
Namely, they are divided into the following:
- analog - allow you to change modes by slightly decreasing/increasing the voltage;
- digital - in this case, pulse width modulation is used to control the LED strip, which is a sequence of command signals of varying durations, which leads to a change in brightness.
Since each of these options has its own advantages and disadvantages, manufacturers sometimes supply the market with combined analog-digital dimmers. They are more effective and have fewer disadvantages than devices belonging to certain types. But the cost is significantly higher, so such products are far from the most popular.
When using a dimmer, the tape becomes a more economical light source. In addition, their combined use often provides the lighting fixture with greater durability. Additionally, it is possible to obtain various lighting effects
Devices belonging to both subtypes can solve various problems, which, in addition to controlling the brightness of the LED backlight, include reducing energy consumption.
Moreover, tangible results are achieved in premises for various purposes: commercial, residential, any other. In any case, you can reduce energy consumption by a significant 30-35%.
In addition, dimmers for LED devices have the following advantages:
- They increase the service life of the LED strips used - reducing the load reduces the likelihood of lighting fixtures overheating, which is one of the main reasons for reducing their service life. But only digital models can please owners with such opportunities.
- They provide convenient control of the LED strip - remote controls are often used to increase comfort. Additionally, various signal transmission options are available.
- They make it possible to create color effects and illumination.
- Allows the tape to be used in conjunction with security systems for buildings and premises. For example, brightness controls are often connected to volume sensors and if they are triggered, the LED strip immediately turns on, which scares off intruders.
Often, dimmers with lighting devices are used to simulate the presence of owners in an apartment or house - this is done to mislead criminals.
An important factor is the possibility of programming and durability with proper use. At the same time, analog and digital dimmers have a number of features unique to them that you should know. This will help make a choice that the buyer will not have to regret.
Mechanical rotary, push and turn-push models are simple, efficient and moderate in cost, so they are in demand
Analog devices provide LED strips with a stable supply current. In this case, power losses will be relatively small. This type has only one drawback, but it is a very important one - they, unlike digital analogues, significantly heat the LED strip, which does not contribute to durability.
In addition, increased temperature leads to a decrease in the quality of lighting, which results in a change in the color temperature provided by the manufacturer. This fact will not please the owner, who chose the tape taking into account his taste.
Combining the advantages of different types of control makes regulators more convenient, functional and practical, although at the same time their cost increases
Digital fixtures provide any LED strip with ideal operating conditions. As a result, power loss will be minimal, and the supply current is stable.
The same can be said about the characteristics of the glow spectrum. That is, a person who bought a strip with LEDs can be sure that its color temperature will not change during operation. And this has a beneficial effect on its durability.
Only cheap regulators of this type can have a significant drawback. The reason is that they cause LEDs to flicker, which leads to eye fatigue, headaches, and a noticeable decrease in performance. That is, you should not skimp on quality.
Although mechanical overhead products are the simplest of all types, well-known manufacturers are able to give them a modern and impressive look, as evidenced by the photo
In addition, devices are divided according to a number of important characteristics. This is done in order to make the choice easier, so the future user should familiarize themselves with such information.
PART 1
When we talk about light control, the first thing that comes to mind is the classic “click” switch.
Yes, this hard worker has served us faithfully for centuries. And even now we can’t escape it. But it has one significant drawback: it cannot adjust the brightness of the lamp that is turned on. The time has come to call upon modern technologies to help him, allowing him to place a brightness adjustment device - DIMMER - in the compact housing of a standard switch. In the classic version
, when we talk about controlling the brightness
of an incandescent light bulb
or a chandelier with such bulbs or
halogen lamps
- all we need is to replace our switch with a dimmer. And so, our quality of life has improved!
But what happens to the current flowing through the lamp at different positions of the control/lamp brightness:
Here the part that does work in the lamp to produce light is highlighted in gray. Thus, the larger the gray part on the graph, the more light is released in the lamp. T1 – t3 different positions of the dimmer control. This type of dimming is called “phase dimming” or, as it is also called by the English name of the key element, “TRIAC dimming”. Since it is the phase change that is controlled.