How to get 12V from improvised means
The easiest way to get 12V voltage is to connect 8 1.5V AA batteries in series.
Or use a ready-made 12V battery marked 23AE or 27A, the kind used in remote controls. Inside it is a selection of small “tablets” that you see in the photo.
We looked at a set of options for getting 12V at home. Each of them has its own pros and cons, varying degrees of efficiency, reliability and efficiency. Which option is better to use, you must choose yourself based on your capabilities and needs.
It is also worth noting that we did not consider one of the options. You can also get 12 volts from an ATX computer power supply. To start it without a PC, you need to short-circuit the green wire to any of the black ones. 12 volts are on the yellow wire. Typically, the power of a 12V line is several hundred watts and the current is tens of amperes.
Now you know how to get 12 Volts from 220 or other available values. Finally, we recommend watching a useful video on the topic:
You probably don't know:
- How to desolder radio components from boards
- How to check a diode bridge
- How to determine the capacitance of a capacitor
- Marking resistors by power and resistance
Published: 05/08/2018 Updated: 05/08/2018
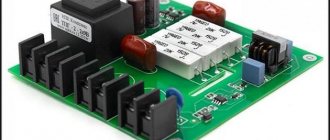
Schematic diagram of the generator module
The PWM module generates pulse width modulation (PWM) oscillations at the outputs S1, S2, this signal is proportional to the real intention in the VSF points of the output circuit (source output voltage) and the module record, these points are on the positive feedback of the module, a certain value is achieved by changing its value by resistor P1 in the PWM module. The printed circuit board is in the archive.
The temperature control module is responsible for maintaining the temperature of the MOSFET amplifier. You can not use it at all, but supply power to the cooler directly.
The master oscillator signal amplifier is assembled on a driver for MOSFET - IR2111. PWM oscillations after mixing on diodes have a resulting signal - a square wave with a fixed frequency of 70kHz, pulse width from 0% to 98%. Next, the output of the square wave signal is amplified by cascades at T1, T2, T3, and filtered by inductor L2. After L2, it is rectified by a group of diodes D10 and D11 - these are high-performance Schottky type, suitable for use in switching power supplies. And finally, the 12V voltage is filtered and stabilized by two electrolytic capacitors C10, C11. As a result, the supply voltage is very stable.
Originally posted 2019-04-08 02:57:11. Republished by Blog Post Promoter
How to reduce transformer voltage
How to reduce the voltage on a transformer.
Hello colleagues!
In this article I will tell you how to make a transformer with a 12 V output from a transformer with a 32 V output. In other words, reduce the voltage of the transformer.
For example, I’ll take the trance from the Chinese b/w TV “Jinlipu”.
I think a lot of people have met him or similar.
So, first we need to define the primary and secondary windings. To do this, you need a regular ohmmeter. We measure the resistance at the terminals of the transformer.
On the primary winding, the resistance is greater than on the secondary and is usually at least 85 ohms. Once we have identified these windings, we can begin to disassemble the transformer. It is necessary to separate the W-shaped plates from each other.
To do this, we will need some tools, namely: round nose pliers, pliers, a small screwdriver for “picking up” the plates, wire cutters, and a knife.
To pull out the very first record, you will have to work hard, but then the rest will go like clockwork.
You need to work very carefully, as you can easily cut yourself on the plates
On this particular transformer, we know that it has 32 V output.
In the case when we do not know this, we must measure the voltage before analysis, so that in the future we can calculate how many turns go to 1 V.
After the plates have been removed, you need to remove the plastic case from the windings. We do this boldly, since this will not affect the operation of the transformer in any way.
Then we find a contact on the secondary winding that is accessible for unwinding and use wire cutters to “bite it off” from the soldering point. Next, we begin to unwind the winding, and be sure to count the number of turns. To keep the wire out of the way, you can wrap it around a ruler or something similar.
Since this transformer has 3 terminals on the secondary winding (two extreme and one middle), it is logical to assume that the voltage at the middle terminal is 16V, exactly half of 32V. We unwind the winding to the middle contact, i.e. to half, and count the number of turns that we unwound.
(If the transformer has two terminals on the secondary winding, then unwind it “by eye” to half, count the turns while doing so, then cut off the unwound wire, strip its end, solder it back to the contact and assemble the transformer, doing everything the same as when disassembling, just in reverse order.
The number of turns you unwound is 105. This means 105 turns per 17V (35V-18V=17V). It follows that there are approximately 6.1 turns per 1B (105/17 = 6.176). Now, in order for us to reduce the voltage by another 6V (18V-12V=6V), you need to unwind approximately 36.6 turns (6.1*6=36.6). You can round this figure to 37.
To do this, you need to disassemble the transformer again and do this “procedure.”). In our case, having reached half of the winding, we got 106 turns. This means that these 106 turns are at 16V. We calculate how many turns there are per 1V (106/16=6.625) and unwind about 26.5 more turns (16V-12V=4V; 4V*6.625 turns=26.5 turns).
Then we “bite off” the unwound wire, strip the varnish from its end, tin it and solder it to the contact on the transformer from which it was “bitten off”.
It remains to measure the voltage that we got:
Congratulations, colleagues, everything turned out great!
In the next article I will tell you how to make a 12V DC power supply from this transformer.
24/12 converter for car.
Sergey Nikitin
I somehow needed a powerful converter for a car with a 24-volt on-board network in order to power devices in this car with a supply voltage of 12 volts.
There are similar devices on sale, but I decided to assemble it myself, because I am interested in the creative process itself, and I had on hand a large number of parts from uninterruptible devices and other various disassembled office equipment that needed to be put to some use. In the previous article, I introduced you to the laboratory power supply. The converter for a car is assembled according to a similar scheme. Since in the above-mentioned power supply, the inductor used there buzzes under heavy load - a small change was made in this circuit, with the use of devices that will form steep edges and therefore in this circuit it will be possible to use chokes of lower inductance, and therefore they will work for b O
higher switching frequencies. In particular, to form steep edges, this converter uses one logical chip K561LE5. In the end, this is the diagram we got.
Just as with the power supply assembly, the MJ15004 output transistors for this converter were taken from an uninterruptible power supply. A MOSFET with an N-channel was taken from some kind of printer, but almost any transistor with approximately the same parameters will work there. The main thing is that the drain current is at least 1 Ampere (more is possible) and its operating voltage is not lower than the input voltage. You can even try installing transistors from the motherboard. The inductor is made of a magnetic circuit from a monitor's switching power supply. It can be clearly seen below in the photo of the converter installation.
You can use any suitable core for this inductor, for example, the cores of pulse transformers from computer power supplies, or the like. Under load, it rustles quietly. If you use a core from computer power supplies for the choke, carefully disassemble it. To make it easier to disassemble, we heat the magnetic core of the transformer, I do this with a hot-air station, the glue softens and it can be disassembled perfectly. Also, if you don’t have a hot-air station (hair dryer), you can boil it in water for a few minutes. Other methods of disassembly only break it. We disassembled it, waited until it cooled down, and we wound the entire wire from the original coil, and in its place we wound a new winding, with a wire of 1.8 - 2.0 mm until the frame (window) was filled, this will be about 30 turns. We assemble a magnetic circuit with a gap of about 0.1 mm, which, as we know, is one layer of ordinary writing paper. The appearance of the assembled converter is shown in the photograph below.
Yes, just in case, I added protection to the circuit, if the output transistors suddenly fail, or for some reason the output voltage is higher than 14.5 Volts, then it will not reach consumers. The protection circuit is made on transistor VT6, zener diode VD4 and relay K1. The relay in the circuit uses a regular one from a car, 12 Volts, with normally closed contacts. But in principle, it (the protection circuit) does not need to be installed; it has been working for several years now, and so far there have been no problems. The load current of this converter is 10 Amps, it pulls it without problems. The output transistors are installed on a radiator with an area of about 150 sq.cm. The radiator is mounted on the outer wall of the device.
Quenching capacitor instead of resistor
Sometimes the task arises of reducing the alternating voltage of a 220 volt network to a certain specified value, and the use of a step-down transformer (in this case) is not always advisable.
Let's say, a low-frequency step-down transformer, traditionally made on transformer hardware, capable of converting a power of 200 Watts, weighs more than a kilogram, not to mention the high cost.
Therefore, in some cases, it is possible to use a quenching resistor that will limit the current, but in this case, power will be released in the form of heat at the quenching resistor itself, and this is not always acceptable.
For example, if you need to power a 200 Watt lamp to only half its nominal value, you would need to dissipate 100 Watts of power into a quenching resistor, and this is an extremely dubious solution.
A very convenient alternative, for this example, can be the use of a quenching capacitor with a capacity of about 14 microfarads (this can be assembled from three metal film type K73-17, 4.7 microfarads each, designed for 250V, or better yet, 400V) this will allow you to obtain the required current without the need dissipate significant power as heat.
Let's consider the physical side of this solution. As is known, a capacitor connected to an alternating current circuit is a reactive element having capacitance associated with the frequency of the alternating current in the circuit, as well as with its own capacitance.
The greater the capacitance of the capacitor and the higher the frequency of the alternating voltage in the circuit, the greater the current passes through the capacitor, which means the capacitance of the capacitor is inversely proportional to its capacitance, as well as the frequency of the alternating current in the circuit where it is connected.
| This can also be seen from the formula for the capacitance of a capacitor: |
| If a resistor (resistive load) and a capacitor are connected in series to an alternating current circuit, then their total resistance can be found using the formula: |
And because
| So, knowing the voltage at the load, the load current and the voltage at the quenching capacitor, you can determine the capacitance of the quenching capacitor, which must be connected in series with the load to obtain the required power parameters: |
| Consider an example: you need to power a 100-watt incandescent lamp rated at 110 volts from a 220-volt outlet. First of all, let's find the value of the lamp operating current: |
We obtain a lamp current value of 0.91 A. Now we can find the required value of the quenching capacitor capacitance, it will be equal to 15.2 μF.
It should be noted that this calculation is valid for a purely resistive load when the effective value occurs. When using a rectifier, it is necessary to take into account that the effective current value will be slightly less due to the action of ripples. It should also be remembered that polar capacitors should never be used as quenching capacitors.
The best combination of vacuum and solid-state characteristics is a single-ended hybrid audio amplifier.
We do not create illusions, We make the sound alive!
Divider on capacitors
Here C1 and C2 are the capacitances of the capacitors, U is the voltage in the supply network, f is the current frequency.
When designing electronics, it is often necessary to reduce the voltage of the existing power supply. We will also look at several typical situations.
In the next video, the author demonstrates such a modification, but not to reduce, but to increase the output parameters.
On chargers of a more advanced design, an adjustable zener diode TL431 is used, then adjustment is possible by replacing the resistor or the ratio of a pair of resistors, depending on the circuit design. They are marked in red in the diagram below.
In addition to replacing the zener diode on the charger board, you can lower the voltage using a resistor and a zener diode - this is called a parametric stabilizer.
Another option is to install a chain of diodes in the open circuit. Each silicon diode will drop about 0.6-0.7 Volts. So you can lower the voltage to the desired level by dialing the required number of diodes.
To power more powerful consumers, it is convenient to use pulse converters to reduce and regulate the voltage from the power source. An example of such devices are boards based on LM2596, and in English-language online stores they can be found by searching for “DC-DC step down” or “DC-DC buck converter”.
Reduce the voltage from 12 to 5 volts - How to reduce the voltage from 12 to 5 volts (resistor, microcircuit)
One option is to connect it in series through a non-polar powerful capacitor to the network and select the capacitance. Another option is on the stabilizer board, next to the zener diode there should be a control resistor, perhaps it is variable. For permanent residents, the first option is not suitable. I didn't read it right away.
Expert opinion
It-Technology, Electrical power and electronics specialist
Ask questions to the “Specialist for modernization of energy generation systems”
How to get a non-standard voltage - Practical Electronics A huge plus of the board is that the 3-pin configuration is similar to the LM7805 ldo stabilizer regulator, so the inverter is intended as a replacement for the old series power supply chip, which can also provide much higher current and accept higher input voltage. Ask, I'm in touch!
Two simple ways to reduce voltage on light bulbs
If you're tired of constantly changing burnt-out lamps, use one of the tips below. But in all cases, success is achieved through a significant reduction in tension.
During the day and especially at night, the voltage in the network often reaches 230-240V, which leads to accelerated burnout of the filaments of electric lamps.
It is estimated that an increase in voltage by only 4% compared to the nominal (that is, from 220 to 228V) reduces the service life of electric lamps by 40%, and with an increased “power” of 6%, this life is reduced by more than half.
At the same time, reducing the voltage on the lamps by only 8% (to 200-202V) increases the “experience” of their operation by 3.5 times; at 195V it increases almost 5 times
Of course, with a decrease in voltage, the brightness of the glow also decreases, but in many cases, in particular in office premises and in public areas, this circumstance is not so important
How to reduce the voltage on electric lamps? There are two simple ways.
First
- turn on two lamps in series (Figure 1). What kind of lamp should I take as an additional one? It can be the same as the main one. But then both lamps will shine weakly.
It is best to select a lamp so that the power of the lamps differs by 1.5-2 times, for example, 40 and 75 W, 60 and 100 W, etc.
Then the lamp of lower power will glow quite brightly, and the more powerful one will glow weaker, acting as a kind of ballast that dampens excess voltage (Fig. 2.).
At first glance, there is no gain - after all, you have to use two lamps at once instead of one. But this is what the simplest calculation shows; The voltage drop across lamps when connected in series is distributed inversely proportional to their power.
Therefore, with a network voltage of 220V (let’s take a pair of lamps of 40 and 75 W), the voltage on a 40-watt lamp will be about 145V, and on its 75-watt “partner” it will be slightly more than 75V.
Since longevity depends on the voltage, it is clear that you will mainly have to change the lamp of lower power. And even that, as practice shows, in the worst case, lasts at least a year.
Under normal conditions, during the same time it is necessary to change from 5 to 8 lamps (this means daily operation for 12 hours). As you can see, the savings are quite significant.
Another
method - sequential connection of a lamp and a semiconductor diode. Due to its small size, it can be installed in the switch cone between the terminal and one of the supply wires. With this option, a barely noticeable flickering of the lamps occurs (due to half-wave rectification of the alternating current), and the average voltage across them is about 155V. Now about choosing the type of diode. It must have a certain allowable current reserve and be designed for a voltage of at least 400V. Of the miniature diodes, the KD150 and KD209 series meet this requirement. However, diodes of the KD105 brand should be used with lamps whose power does not exceed 40 W, and KD209 diodes (with any letter index) should be used in conjunction with 75-watt lighting devices. Of course, you can use more powerful diodes of other types, but then they will have to be installed outside the switch. A properly selected diode lasts almost unlimited time. Now let's look at one more question. What should you do if the house has a common switch for the entire entrance? In this case, install one high-power diode. It is mounted on a metal corner, screwed with screws to the wall next to the switch, and covered with a casing with ventilation holes. Recommended types of diodes: KD202M, N, R or S, KD203, D232-D234, D246-248 with any letter index. When choosing the type of diode, remember that its maximum permissible operating current (indicated in the passport of the semiconductor device) should be 20-25% higher than the total current consumed simultaneously by all lamps related to this switch. If the diode allows the current of all lamps (it is easy to calculate by dividing the total power of all lamps by the network voltage of 220V) it should not exceed 4A.
Step-down voltage converter with output current up to 20A
For one of my projects I needed a powerful step-down voltage converter and I decided to test it a little before using it. A small inspection, tests, conclusions. In fact, my task was to obtain a current of up to 40A at a voltage of 4.8-5 volts, and the load can be divided and 2 converters of 20A each can be used. But I didn’t really want to risk ordering a pair at once and decided to take one to try first.
By the way, in general, this is the second converter of this kind ordered, some time ago I already tried to order it, but they sent me a 10A version and the most offensive thing is that I noticed this after all the protection deadlines had passed. I had to repeat the order, but in a different store.
The packaging is simple, an envelope and an antistatic bag, the converter is compact, dimensions 60x52x28mm.
Declared parameters (from the product page)
Input voltage: 6V to 40V DC (10V to 40V suggested) Output voltage: 1.2V to 36V DC Output current: 20A (max), 15A (recommended) Efficiency: 95% ( 24V to 12V, 20A) Output ripple: ≤ 50mV Connection method: terminal Short circuit protection: self-healing (can't long-circuit) Size: 60x53x27mm/2.36x2.08x1.06″
Outwardly it looks relatively neat, nothing is loose or hanging, the radiators are fastened with small screws and do not hang on the terminals of the components. There are four mounting holes.
1. On the input side there is a screw terminal block, a switch and a power-on LED. The switch switches the PWM controller control signal, the terminal block is so-so, kind of “thin” 2. On the output side there is the same terminal, next to two trimming resistors for setting the output voltage and limiting the current. 3. Input capacitors 2 pcs 470 µF 50 volts 4. Output capacitors 3 pcs 270 µF 35 volts with a custom design, although it may well be the same as the original, it’s hard to say so. 5, 6. A converter with synchronous rectification, respectively, two field-effect transistors are installed on the radiators, and not a transistor + diode assembly. The transistors are the same - NCE8290, N-channel, 82V 90A 8.5mOhm, which in principle is not bad.
The layout is not very dense, but nevertheless, it is not very successful; the capacitors are located close to the power choke, which usually gets quite hot during operation.
The PWM controller, operational amplifier, shunt and other little things are located at the bottom of the board.
At the top right you can see the PWM controller - LM25116, below is a 4 mOhm shunt and an op-amp to amplify the signal from it - LM321
The key features of the PWM controller are synchronous rectification, a built-in driver with a current of up to 3.5A, power supply up to 42 volts, adjustable current limiting and output voltage in the range of 1.21-36 volts. In short, a very interesting controller.
The datasheet contains a typical connection diagram, but there is nothing unusual here, both the controller and power transistors are visible, as well as a current-measuring shunt. I note that in the datasheet there are two examples of switching on and in both the controller and the power unit are powered from different sources, the converter under review has one source, which is also allowed, but the input voltage range is limited to the maximum for the controller, i.e. 42 volts.
In reality, with the output voltage everything is a little worse. 1, 2. If the minimum generally corresponds to what is stated, although without load it hangs in the range of approximately 1.24-1.45 volts. 3. So the maximum I could get was only 30 volts. 4. Despite the fact that the maximum stated in the description was 40 volts at the input, so this is not a limitation due to the input voltage, but a not entirely correctly calculated feedback divider.
Consumption when turned off is almost zero. When turned on, but without load in the range of 12-24 volts, the current is about 20 mA, but with input 36 it rises noticeably and is already 60 mA. The measurement in this case is rough, but I don’t think it’s critical.
The current limitation works, but the minimum can only be set to about 700mA, the maximum I could test was 12.2A, I didn’t raise it higher, fuses for a multimeter are expensive. At certain current values the converter beeped quietly.
Next was checking the accuracy of maintaining voltage at load currents from 5 to 20A. To begin with, I set the output to 5 volts.
And then I measured the output voltage at currents of 5, 10, 15 and 20A. The multimeter was connected to the conductors of the printed circuit board under the terminal block. In the current range 0-20A, the voltage drop was 0.12 volts. I won’t say that this is bad, but at low output voltages it is already noticeable.
The same check, but with the output being 12 volts, the input was 24 volts. First without load
Then at currents of 5, 10, 15 and 20A. We have the same difference of 0.12 volts, I assume that there is a problem with the correctness of the printed circuit board layout.
While I was running the converter in different modes and taking photos for review, I noticed that heating appeared and was surprised that the temperature was quite high, although I would not say that the preliminary tests took a lot of time.
In addition, I drew attention to the noticeable dependence of the efficiency on the input voltage, or more precisely, on the input/output difference. For example, the input is 12 volts, the output is 5 volts and the current is 20A, while the converter consumes 114.5W.
At 24 volts the input is already 117.3W, and if you raise the input to 36 volts, then even more, 121.6W. Those. with an output of 5 volts 20A and a change in input voltage in the range of 12-36 volts, we have from 114.5 to 121.6W. In my case, the input will be 10-14 volts, so everything is fine, but perhaps it will be critical for someone.
The efficiency was measured in several modes, below are three graphs for output 5 volts and input 12, 24 and 36 volts, horizontal load current from 2.5 to 20A, a multiple of 2.5A.
The results are quite rough since the input power was estimated based on the readings of the power supply, which means that the drop on the wires from it to the converter was affected, I think the actual efficiency is about 1% higher.
There are also three graphs, but in different modes, a pair with an output of 12 volts and an input of 24 and 36 volts, as well as an option with an output of 24 volts and an input of 36 volts (top graph). I note that in the 36-24 volt test there was a load current of 15A and, accordingly, an output power of almost 360W with a maximum declared 300W.
As I wrote earlier, the converter heats up noticeably; to check, I conducted a test at an output voltage of 5 volts, an input voltage of 12 volts and load currents of 10 and 15A. I note that this is one of the most optimal modes; in others the heating may be even greater. 1. At the start of the test, the converter was already slightly warmed up. 2. After 20 minutes at a current of 10A, heating is within normal limits. 3. After another 20 minutes at a current of 15A, the heating became more noticeable; the input transistor had a maximum temperature of 106 degrees.
Based on the test results, I recommend either limiting the output current or thinking about active cooling.
Ripple. In general terms, it’s not bad at all, I somehow expected the worst. Output voltage 5 volts, input 12. 1. No load 2, 3, 4. At currents 5, 10 and 20A
In fact, there were “needles” in the pulsation spectrum, but since the test was carried out with an attachment on a measuring probe (1 µF + 0.1 µF), they are not visible. Below is an oscillogram with direct connection of the probe at a current of 20A and an input-output ratio of 12-5.
The same load currents, 5, 10 and 20A, but the input/output ratio is different, on the left 30-5 volts, on the right 24-12 volts.
If you look closely at the above oscillograms, I think you can see that “the horizon is blocked,” i.e. each subsequent impulse is higher or lower than the previous one. I was interested in this moment and I increased the scan time, eventually getting this not very pleasant picture. It can be seen that the total ripple range is about 80 mV, this appears at an output voltage of 12 volts and above, as well as at currents of about 15A or more, the lower oscillogram was made at an output voltage of 12 volts, an input voltage of 24 volts and a current of 15A.
At the end of the review, a comparative photo of other converters in the same form factor, a step-up one in the middle, a step-down one on the right, but at 10A. I'm also thinking of writing short reviews if anyone is interested.
As a summary, I will say that in general terms the converter works, but there are quite a few comments. 1. Heating, more than 15A, cannot be removed from it for a long time without additional cooling, but this is indicated in the description. But even 15A is already working close to the limit values, especially with a large input/output difference. 2. Current adjustment only from 0.7A 3. Output voltage up to 30 volts at the stated 36. 4. Low quality input capacitors. 5. The terminal blocks are weak, especially for the stated 20A.
In short, the manufacturer took, in general, a good element base, but in the end received an average converter, I think that part of the problems lies in routing errors.
That's all for now, I hope it was useful.
How do you increase and decrease voltage?
Increasing and decreasing voltage is carried out using transformers
.
The transformer consists of two coils of insulated wire wound on a common steel core (Fig. 16.4).
One coil (called the primary winding) is supplied with alternating current of one voltage, and the other coil (called the secondary winding) is supplied with alternating current of a different voltage.
Rice. 16.4. Step-up and step-down transformers.
It is concentrated mainly inside the steel core, so both windings are threaded with the same
variable magnetic flux.
Therefore, due to the phenomenon of electromagnetic induction in each turn of each winding
the same induced emf occurs.
The total emf in each of the coils is equal to the sum of the emf in all its turns, since the turns are connected to each other in series. Therefore, the ratio of voltages in the secondary and primary windings is equal to the ratio of the number of turns in them: For example, if the secondary winding has 10 times more turns than the primary, the voltage in the secondary winding will be 10 times greater than in the primary.
If the voltage in the secondary winding of the transformer is greater than in the primary, it is called step-up
, and if less, then
downward
.
The main consumers of electricity are manufacturing and transport. Domestic needs account for no more than 5-10% of all electricity produced.
Rice. 16.5. The main stages of production, transmission and consumption of electricity.
Encyclopedia articles
volts used in tractor electrical systems
MTZ in the electrical equipment systems of tractor equipment, voltage converters, together with an increase in direct current from 12 to 24 volts, perform a number of protective functions aimed at preserving both the converter device itself and battery protection.
PN 15A 12-24
The PN 15A 12-24 device is used in charging circuits of an additional battery of tractor vehicles, the starter is equipped with a device for starting with a power voltage from the installation of 24 volts and the remaining on-board electrical appliances are designed for current consumption of 12 volts.
The PN 15A 12-24 input converter changes the current with a force of 12 amperes at 13.5 V to the output with a force of 8 amperes at 24 V.
- Switching off the current supply when the battery reaches 16.5 volts;
- Disabling the converter when the device is incorrectly connected to the battery;
- converter Shutdown when the battery is less than 10 volts;
- The device switches off when the output current parameters are significantly exceeded.
The device weighs 0.48 kg with dimensions 18x8x4 cm only works with a correctly assembled battery connection circuit. The device is designed to operate in temperatures ranging from 10 to 80 degrees and is equipped with an automatic system to turn it off and on when these temperatures are reached.
Converter device PN 14-28 V-8A
Device PN 14-28 V-8A, used for charging 24 volt batteries of tractor equipment equipped with 12 V electrical equipment.
Converting a direct input current of eight amperes with a voltage from 18 to 32 volts into an output of the same volts with 24 power, the device weighs 0.4 kg with dimensions 16.0x4.5x8.5 cm, has an efficiency of 88% and is equipped with a protection system that turns off the device when current reaching a power level equal to 8 amperes.
During the interfering operation, the device is also equipped with protection against short circuits and increased output Source.