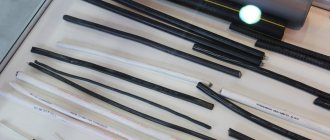
Heat shrink
This is a more durable wire repair tool. True, it is more expensive and will not work if both ends of the cable are much larger than its main part. Heat shrink tubing comes in different diameters, lengths and colors. One piece will cost from one hundred to several thousand rubles. Having found the right size, all you have to do is put the tube on the cable at the break point and activate it using high heat, such as a hairdryer. The tube will shrink and wrap around the wire, immobilizing the frayed area and preventing the damage from spreading.
fb.ru
How to connect headphone wires without a soldering iron
There are situations when you need to make headphones if they are torn and you don’t have a soldering iron at hand. In such a situation, the method of twisting wires is used. This allows you to temporarily restore the functionality of the audio device. To twist the headphone wires, they need to be cleared of insulation, and the copper conductors must be cleared of varnish. The conductor insulation is thin and fragile. If you don’t have a tool, you can even remove it with your fingernails. The flame of a lighter or match burns the varnish coating of the copper conductors. Then the soot is removed from the thin veins with any cloth. It is good to use perfume or nail polish remover for cleaning. The cleaned and degreased strands are tightly twisted together. The twist should not be too long. The normal length of conductors for twisting is 0.5-0.8 cm.
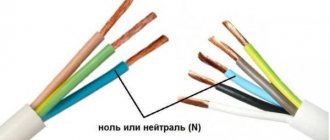
You need to twist the headphone wires in accordance with the color marking. Places of twists need to be insulated. If a vinyl chloride tube is not available, insulating tape and even regular tape are used. You can wrap each twist separately with electrical tape. Since the tape is very sticky, winding will not be possible. In this case, two strips of adhesive tape are placed at the junction of each pair of conductors and pressed against each other. The conductors are not grouped at one point, but are routed in different directions to avoid possible short circuits between them. After this, the entire group of twists is insulated with a common layer of electrical tape or adhesive tape.
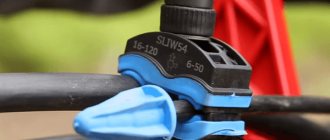
Tread
Since cable damage is a very common problem, special devices have been invented to protect wires. In fact, they are needed to prevent ruptures, but they are also suitable in case of wiping that has already begun. On the same AliExpress, upon request “cable protector” or “cable protector” you can find many options for such devices: both for chargers and for headphones. They are mainly designed to protect the most fragile part of the wire - one of its ends, but there are also options for strengthening the entire cable.
www.aliexpress.com
Damaged chargers and headphones will be able to last for some time if you use any of these methods. This is especially true if buying a new cable is quite expensive: for example, a charger for a MacBook.
Main causes of breakage
If the wires are broken near the plug, it must be replaced.
What can cause a breakage:
- careless user actions that led to mechanical damage;
- frequent deformation and bending during operation of the device - for example, the cord on headphones in the area where the plug is connected;
- damage from pets or rodents.
If you find a broken wire, the electrical appliance connected to it must be immediately disconnected from the network or the connected device.
How to prevent breakdown
Since the most common failure is damage to the insulating layer (and as a result, the cable), it is better to protect the wire from excess load for preventive purposes. To do this, you need to provide for depreciation. To do this, a simple spring from a ballpoint pen will do, which will protect the cable from deformation. You need to do the following:
- taking the spring in your hands, screw it onto the cable all the way to the connector;
- secure the spring so that it cannot fly off.
Of course, the appearance of the cable will not be entirely aesthetic, but the likelihood of it breaking will be several times reduced.
Also keep in mind a few tips.
- No need to twist wires or fold them. This can lead to rapid wear and failure of the wire.
- Additionally, you can equip yourself with a workstation where you secure the cable so that it is not subjected to frequent loads, so you can create an entire docking station that will protect not only the cable, but also the phone.
- Also avoid contact with water and other substances that may damage the cable.
These few simple tips will help maintain the integrity of the wire.
Silicone for repair
This is not exactly silicone, but a material that is distinguished by its quality and complete electrical safety. This polymer clay can be formed into any shape and attached to any surface. If you decide to insulate the cable with this material, leave it for 24 hours until the material is completely dry and takes the correct shape. Unfortunately, silicone is expensive and difficult to find in regular stores, so you have to order it online.
My conclusions
- Simple repairs that anyone can do at home
- Costs are minimal (FUM tape, from 24 to 40 rubles)
- Original charger with you
- It’s clear that someone won’t bother and will go and buy a new, original charger
- Someone a simple cheap one, but it will charge worse than the original one
- Here everyone chooses and decides for himself
I’m not calling for anything, I just described my experience and shared it with you. Whether it is useful or not is up to you to decide. Maybe you know another way, share your experience and opinion in the comments to the post. I will definitely answer everyone! All the best to you and good luck!
How to fix headphones if one comes off
You can repair headphones if the wire comes off at home. The technique is no different from restoring a broken wire. The end of the cable is stripped of insulation, and the copper conductors are fired, cleaned of carbon deposits and coated with a thin layer of tin.
This is done with a well-heated soldering iron using flux. The capsule body is opened depending on its design. The remains of the soldered wire are removed from the contact. The sound line is introduced into the capsule body through a hole. A knot is tied at its end, then the prepared cord is soldered onto the contact pads of the capsule. Before assembling the case, you need to check the functionality of the sound system by listening to a piece of music.
How to find a damaged area?
It is almost impossible to visually find the location of a wire break inside the cable, since the outer insulation remains intact.
But it is still possible to determine the approximate location of the fracture. To do this, connect the headphones to any sound source, for example, a mobile phone, and turn on the melody on it, bend the cable along its entire length.
We look for the place of damage by bending the wire
When bending in a problem area, the sound should change its character, and it should change when bending in different directions or stretching the cable. As practice shows, most often the wire breaks near the entrance to the plug - in this place it is more mobile. If this happens, and the wire is indeed damaged in the location indicated above, the problem can be solved by cutting off the damaged section and re-soldering the plug.
Prevention
The following simple rules will help prevent wire breaks in headphones.
- If you need to remove the headphone cable from the jack, you should grab the plug and pull it. Do not pull the wire as this may damage it.
- The headset should be kept in a safe place where it cannot be reached by children or animals. It should not be left on the floor where the accessory could be accidentally stepped on.
- When headphones are not in use, they should be disconnected from the sound source and removed from the head or ears. Otherwise, when trying to stand up or make any movement, they can get caught on something and accidentally damage them.
- It is recommended to store accessories rolled up, especially if the cable does not have a braided winding, but regular insulation. If the wire becomes kinked or tangled, it may be damaged.
- It is not recommended to keep the headset crumpled in a clothing pocket. A special clamp should be provided for the wires. An interesting solution would be an old bank card with an expired date. You can make notches on it for more durable winding of the wire. The headphones are also stored in a special case or case.
- Don't sleep with headphones on. During rest, they can be damaged due to negligence. In addition, listening to music while sleeping harms human hearing.
- When purchasing, you should choose more expensive headphones, preferably with a braided winding. It will not allow the wire to get tangled or knotted, which will extend its service life. It is also worth purchasing headphones with protection against breaking the wire near the plug. This is a special flexible part that prevents the cable from bending in this place.
- Some users wrap headphones around an MP-3 player. In this case, it is recommended to pull the plug out of the connector, otherwise the cable may break off at the bend.
- Before loading clothes into the wash, remove the headset from your pockets.
So, if the headphone cable has been damaged due to careless handling, do not throw away the accessories and purchase new ones. With a little time, you can repair the cable, regardless of where it is deformed - in the middle, near the plug or speaker. To restore the integrity of the wire, you can use a soldering iron, but if you don’t have such a tool, you can apply solder or solder paste without it. You can learn about other headphone malfunctions from our article “how to repair headphones with your own hands.”
FUM tape
This material is available at plumbing supply stores and is commonly used to insulate and seal pipe joints. The cost usually does not exceed 25-40 rubles per skein. FUM tape is more convenient than electrical tape due to the following advantages:
- thin and flexible, which ensures a reliable and durable fit;
- FUM tape does not contain glue, so it is more reliable and does not dry out or crumble over time.
You can repair a damaged area using FUM tape using the simplest steps:
- find the location of the wire damage;
- cut off the required amount of tape;
- wrap with tension over the damaged area, capturing entire areas around it.
For repairs, a small layer is enough: the material sets well and reliably holds the contact area. Both electrical tape and FUM tape are temporary measures. You will subsequently need to buy a new charger.
Finding the break point
To repair a headset with a broken wire, the owner needs to stock up on suitable tools and the determination to see the job through. Having discovered a breakdown, the first thing you need to do is find out in which of the wires the gap has formed . In this case, specialists resort to a multimeter, tester or voltmeter.
Checking for wire breaks is carried out as follows.
- Make two small cuts in the insulating material: one near the plug and the other near the speaker.
- If you carefully examine the core of the cable, you will notice a transparent protective layer. It must be carefully removed, being careful not to damage the wire itself.
- To establish a wire break or continuity, select one of the devices described above. When working with a multimeter, you need to place the black and red sensors in the slits. The squeak you hear will signal the integrity of the copper core.
- Make another cut a short distance from the original one and use the sensors again. Repeat the procedure until the device stops beeping. Remember that you need to cut the insulation very carefully.
- Once you have located the break, gradually narrow your search until you reach an area two centimeters long.
There are times when the device does not stop sending signals - this means that the problem lies not in the cable, but in the speakers themselves.
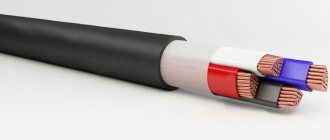
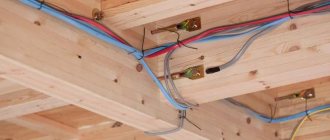
Connecting broken copper wires
Connecting a broken copper wire in a wall by soldering ensures reliable contact of the wires no worse than an undamaged one and allows you to close the connection with plaster without installing a junction box.
One of the two copper wires is broken
An autopsy showed that one copper conductor was broken, the second wire was not touched and the insulation around it was not damaged.
To repair, you first need to remove the plaster to the sides of the damaged area 3-5 centimeters to a depth of a centimeter under the damaged area of the wire. This is necessary to create conditions for connecting the wires. Next, you need to disconnect the wires and cut the insulation along the center.
10-15 mm of insulation is removed from the damaged ends of the conductors. If the electrical wiring was made a long time ago, then its insulation becomes very hard and it is difficult to remove it with a knife in cramped conditions without damaging the wire. In this case, it is better to remove the insulation by reflow.
The ends of the copper conductors are coated with a layer of solder using a soldering iron. The conductors must be tinned carefully and on all sides. An insulating tube slightly longer than the bare wires is placed on one of the conductors.
Take a piece of copper wire with a cross-section no less than the cross-section of the broken wire. This piece of wire is also covered with a layer of solder. The length of this insert must ensure an overlap of at least 10 mm over the connected ends of the wires.
The insert is soldered to the connecting ends. Solder should not be skimped. Next, the insulating tube is moved so as to completely cover the joint. If a sealed, moisture-resistant connection is required, then before putting on the tube, the soldered joint must be generously coated with silicone.
If silicone was not used, then to eliminate the possibility of displacement of the insulating tube and to ensure greater tightness of the joint, one layer of insulating tape should be wound. Since a large roll of tape cannot be threaded behind the wires, and a strip of electrical tape from the roll will stick together during insulation, it is better to unwind the required length from the roll and wrap it around any rod, such as a match.
As a result of the work done, a connection was obtained from the broken wire of the hidden electrical wiring, whose technical characteristics are practically not inferior to the neighboring surviving conductor.
Such a connection can be safely covered with plaster and forever forget about the trouble that happened.
Both of the two copper wires are broken
If both wires of the hidden electrical wiring are broken at once, then each of the conductors can be connected using the technology described above. But to achieve maximum quality, it is better to splice them in a slightly different way. One of the broken conductors is spliced as described above, and for the second, the insert is made from a wire on which the insulation is partially left.
With this connection method, direct contact of adjacent wires under the most unfavorable circumstances is completely eliminated.
First, one end of the conductor is spliced by soldering, then the other. All that remains is to put on the insulating tubes
Please note that in order to reduce the risk of exposing the wire in the wall, the lower insulating tube is made of two pieces, which are put on the right and left wires before soldering
Before putting on the tubes, in order to obtain a sealed, moisture-protected connection of the hidden electrical wiring, the soldering area must be generously lubricated with silicone.
All that remains is to screw a layer of insulating tape onto the restored connection.
Three out of three copper wires are broken
Three broken electrical wires are connected using the same technology as two. You can place a long jumper with insulation one in the middle, and connect the outer conductors with a short one. But then installation will be more difficult.
After soldering, silicone is applied to the unprotected sections of the wires and insulating tubes are put on. The resulting connection is then wrapped with insulating tape.
You can see how I made double copper wire when moving a socket from one wall location to another.
A legitimate question arises: how to heat a soldering iron for soldering if there is no voltage in the electrical wiring? If the electrical wiring in the apartment is double-circuit, then you can connect the soldering iron to an outlet in another room through an extension cord. You can power the soldering iron from the distribution panel in the entrance, or connect the carrier from your neighbor. As a last resort, you can use a mobile soldering iron, which is described in the site article of the same name.
Top articles: 10 original ways to use bananas
Charger cable does not work on mobile phone
If we are at the point where our cable is not even charging and we can see the cables inside, we will have to get to work in a more complex way. These measures that we are about to follow require extreme caution and must be carried out together with an expert or specialist in the field, keeping in mind, of course, that if the process is not successful, we will at least try.
How to fix a broken charging cable
To get the charger cable to work again we must start by cutting about 5 centimeters below the break to find the part of the cable that is not damaged. We then remove these ends using pliers to carefully expose all the cables that are inside.
At this point comes the most difficult process because we have to remove all the cable that is left in the charging port of the charger to expose all the tin contacts. We will then very carefully remove the small cables from the charger to expose the conductive copper and solder them to the charging port.
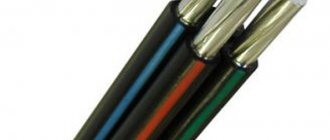
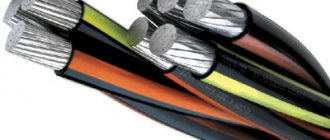
In the image we see a USB Type C cable on the left, a Micro USB and Lightning cable on the right, which separate the colors. We need to be careful when soldering them and not make mistakes, so we will detail in which position each cable goes below:
- USB Type C cable Black left of C1
- Green
- White splits into R1.
- Positive or G: red
What to pay attention to before repair
When repairing a cable at home, you must be careful and maintain a certain length of wire for a reliable connection
Repairing a broken cable at home
- The main reason for cable breakage is frequent movement of the cable. This often happens with portable devices such as headphones.
- Here the inner conductor is usually damaged and contact is broken. This can be detected by simply moving the cable.
- Such a cable break can only be repaired by cutting out the area of the cable break and reconnecting its ends, and often only by replacing the cable.
- Please note: the high voltage power cable must be completely replaced immediately and not repaired.