Nowadays, many people, during home renovations, lay network cables (twisted pair) along the walls. So that in the future they will have the Internet through an outlet built into the wall. This is due to the fact that a large number of our population prefer to access the World Wide Web via cable rather than wireless technologies. I consider this method more reliable and stable. Therefore, in today’s article we decided to show you how to connect an RG 45 Internet socket with a twisted pair cable.
The need to install an outlet
Most of us live in multi-room apartments and private houses. For each individual room of such dwellings, it is necessary to solve one small but rather “insidious” problem: in any available way, create a “point” for connecting devices of different types to the Internet.
It would seem that the answer is obvious - buy and install a Wi-Fi router and there are no problems. But some people, to put it mildly, are not happy about the negative impact of electromagnetic waves from medium- and low-power generators on their own health, the health of their loved ones and especially young children.
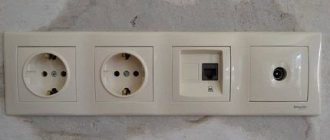
When choosing an Internet socket, you need to remember that a single or double will be enough for a living room. And for the office it’s worth thinking about modular sockets
Therefore, it is worth thinking about reducing electromagnetic “smog” in our houses and apartments.
One of these methods is to install Internet sockets directly in the walls of the room.
Installation of sockets for connecting to the Internet is carried out according to the rules common to all electrical installation products. By analogy, they are produced for hidden and open wiring
You must understand that this is only one of the options for providing multipoint Internet access for laptops, desktop computers, mini-servers and personal data storage in a home/apartment/office.
The process of connecting an outlet with your own hands is given in the form of step-by-step photo instructions below.
Preparing to install a power outlet
First you need to buy the computer socket itself. You can take any one. If you want something of higher quality, beautiful and usually easy to install, don’t skimp (don’t buy the cheapest ones). I have a Makel socket. Inexpensive. Something around 130 UAH. (340 rubles). There are many more good options from Schneider, Legrand, VIDEX, VIKO, Werkel, Lezard. There are double sockets, with and without frames. Here's mine:
A twisted pair cable of category CAT5E, or the more advanced Cat.6, is laid to the socket. This is a four pair shielded cable. The socket must correspond to the cable category. The outlet has this information. I have a CAT5E cable and the socket is also CAT5E. The maximum cable length is 100 meters.
This means that on one side the cable is connected to a computer outlet, and on the other side it is usually crimped into an RJ-45 connector and connected to a router, modem, or switch.
In this article I will not write about how to crimp a network cable. We already have two instructions on this topic:
- How to crimp a twisted pair cable into RJ-45? DIY network cable
- How to crimp a network cable without a tool (screwdriver)
And this article may also be useful: how to extend the Internet cable (network cable).
All this network equipment can be purchased in specialized stores. Also, computer sockets, network cables, and connectors are usually sold in digital equipment stores.
The network cable must be laid in a regular socket box. In which, after connection, our socket will be installed and secured. If you have not yet laid a network cable, but are planning to do so, then leave a supply of cable. It seems like 1 meter is recommended. But it seems to me that this is too much. I think 50 centimeters will be more than enough.
One more thing: the way you connect the power outlet may vary depending on the manufacturer. It is the process of connecting a twisted pair cable and fixing it (clamping) in the socket module. To connect such sockets, no special tool is needed.
Application options for Internet sockets
In addition to “home” use projects, there are still a sufficient number of options.
In which the installation of such sockets for the Internet will not only be relevant, but sometimes simply an original way out of a special, security-demanding situation, taking into account the technical conditions for providing access to the Internet.
Depending on the type and purpose of the building, technical requirements are put forward for the arrangement of apartments in such buildings.
There are several main categories of such premises:
- offices, classrooms and server rooms;
- Internet clubs and electronic libraries;
- IT stores and computer equipment maintenance workshops;
- structures with increased protection against penetration.
For most offices and classrooms, in addition to having wireless Internet access points, it is mandatory to equip the walls and office furniture with RJ-45 sockets, which ensure the connection of “working” computer stations to the Internet, as well as to local networks.
Not a single server-type room can do without twisted pair connectors installed in/on the walls. This is a mandatory requirement of every IT engineer who has undertaken the construction of a “server room” or data warehouse.
The design is an ideal way to provide in a limited space the entire list of necessary interfaces for connecting a laptop, phone, printer, etc.
The rapid development of technology affects all aspects of our lives and in particular education.
Now it is very “hard” to imagine an educational institution of any level, from school to university, without the presence of auxiliary search tools (computers). Who search and provide the necessary information in a huge “knowledge bank” - an electronic library.
If you are a private entrepreneur or the owner of a business that is involved in the sale and/or repair of computer and office equipment, then the presence of socket structures is simply “vital” for the normal working conditions of your employees.
And another example of mandatory equipment with Internet sockets and structures is premises for corporate and government security services.
As well as banking and other storage facilities, with increased protection against penetration, where any significant electromagnetic radiation is actually prohibited or interception of packet information via wireless data transmission is possible.
Cable laying features
Coaxial cable for external installation
When laying cable for Internet outlets, certain rules must be followed, the content of which depends on the type of cable, as well as on the location of the connections. The following types of cable products are traditionally used to organize Internet networks:
- twisted pair UTP;
- fiber optic lines;
- coaxial cable.
In addition to the type of connection, when making it, it is important to pay attention to the type of core and the method of shielding of the entire cable product.
Rules for laying any type of cable are regulated by the requirements of current standards ISO/IEC 11801 and ANSI/TIA/EIA-568A. They take into account the following features of the installation procedure:
- UTP twisted pair may be laid with a maximum bending radius of at least 8 outer diameters. Violation of this requirement will lead to destruction of insulation and an increase in external noise.
- When laying a shielded cable, it is important to ensure that its protective braiding is intact.
Failure to comply with these rules will negate all efforts to establish a reliable Internet connection.
Laying twisted pair cables in an apartment
Connecting a twisted pair cable
Laying a line from the access point towards a PC or distribution device is carried out using a single cable without forming butt connections. The twisted pair cable is introduced into the apartment through a hole in the wall adjacent to the common corridor. It is made out of a plastic sleeve cut from a pipe of suitable diameter.
On the section of the route from the floor panel to the entrance to the apartment, the cable is laid in a box. In the same way, its open wiring is designed inside on the walls of the apartment. In this case, instead of a box, standard cable ducts or specially designed plinths (with voids for laying wires) can be used.
They have removable covers that, once placed in the twisted pair niches, simply snap into place. Next, the cable is routed to the point where it is connected to the RJ 45 socket.
Types and types of Internet outlets
To understand what type of sockets we need to use in this or that case, we need to understand the general classification of sockets for the RJ-45 connector.
But first, RJ-45 is a unified standard for physically connecting computers and network switches using standard 8-conductor shielded wire, often called “twisted pair.”
Because by making a cross section of the cable, you can easily see 4 intertwined pairs of wires. This type of wire is used to build the vast majority of information transmission channels in local and public networks.
You may also be interested in information about the types of Internet cables and recommendations for selection.
Countless local and corporate networks, as well as the wired part of the Internet, have been built based on the RJ-45 interface. This is a generally accepted connector standard for transmitting data over a network.
Experts suggest the following classification of sockets:
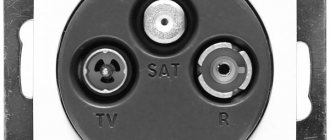
- By the number of connectors. There are single, double and terminal sockets with 4-8 connectors. In addition, there is also a separate type of combined sockets. Such modules may contain additional types of interfaces, including audio, USB, HDMI, and RJ-45 itself.
- By data transfer speed . There are many varieties and categories, the main ones being category 3 - data transfer speeds up to 100 Mbit/s, category 5e - up to 1000 Mbit/s and category 6 - up to 10 Gbit/s over a distance of up to 55 meters.
- According to the principle of fastening. By analogy with power electrical installation products, there are internal and overhead computer sockets. For an internal socket, the mechanism (contact group of terminals) is recessed into the wall, while for an external socket it is laid along the surface of the wall.
For a socket with hidden wiring laid in the wall, it is necessary to have a protective plastic “cup” in the wall where the terminal block is attached. An external socket is usually mounted using an overhead panel on the wall surface.
As for manufacturers: there are many of them, domestic and foreign. Recently, “Chinese” companies producing network equipment have begun to “even out” in terms of the quality of finished products relative to others.
The products are clearly distinguished by their high quality from such world brands as Digitus, Legrand, VIKO, etc.
It is worth mentioning separately about “keystones”.
The peculiarity of keystones is that with their help you can provide almost every computer with any set of interfaces. Recently, HDMI keystones have become widespread.
This is a fairly flexible and scalable system for providing interfaces to the end user.
Connecting the Internet cable to the outlet
Now we come directly to how to connect the Internet outlet. Let's start with the varieties. Like regular electrical sockets, information sockets come in two modifications:
- For indoor installation. A plastic mounting box is built into the wall. The contact part of the socket is then inserted and secured into it, and everything is covered with a plastic decorative panel on top.
- For outdoor installation. This type of socket is very similar in appearance to the usual telephone sockets: a small plastic case that is mounted on the wall. It also consists of several parts. First, the housing with the contact plate is mounted, then the wires are connected, and then everything is closed with a protective cap.
According to the number of connection points, there are single and double computer sockets. Although computer sockets differ in appearance, the principle of connecting conductors is the same. There are special contacts equipped with microknives. The protective sheath is cut through the inserted conductor. As a result, the metal of the microknife contacts fits tightly to the metal of the conductor.
For any wired or wireless Internet equipment, a single standard for connecting to the system unit has been adopted. No matter how the Internet is supplied to the apartment, there is always a twisted pair cable - a cable used to connect the router and modem (with rare exceptions, an optical cable is used).
The network cable contains eight copper wires twisted into four pairs. They cancel out any electrical interference, providing impressive (up to 1000 Mbps) Internet speed. The twisted pair ends with a special connector called a “jack”. The housing of the 8P8C connector is transparent, and inside it there are wires of different colors.
Similar connectors are used on other connecting wires, for example, between the modem and the PC. The only difference is in the location or, in the terminology of computer scientists, in the pinout of the wires. Previously, to make a connection, some of the wires were crossed in a certain order, only in this case the equipment worked.
Since 2001, it was decided to introduce two main connection standards - TIA/EIA-568-B and TIA/EIA-568-A. Currently, the first standard (B) for connecting twisted pair wires is in use. This is what you need to remember. Two- and four-pair cables for networking are available.
For high-speed data transfer (1–10 Gb/s), a four-pair cable is recommended; for transfers up to 1 Gb/s, a two-pair cable is recommended.
Now lines with Internet speeds of up to 100 Mb/s are installed in the premises. Naturally, the quality and speed of data transfer will increase in the future. Therefore, with a view to the future, it is preferable to initially expand the network to four pairs, so as not to lay a new wire later. If the network is already connected with a two-pair wire, then the same connectors are used, but after the first three (see diagram above), two contacts are skipped, and the green one should be the sixth.
Internet socket connection by color
There are two connection schemes: T568A and T568B. The first option is not practiced here, and the connection is made according to scheme “B”. Therefore, you need to familiarize yourself with the arrangement of colors according to this scheme.
A very important point is the number of wires in a twisted pair. As a rule, cables with 2 pairs or 4 pairs of wires are used. 2-pair cables are used to transfer data at speeds up to 1 Gb/s, and 4-pair cables are used to transfer data at speeds from 1 to 10 Gb/s.
Internet cables are installed in private houses and apartments, where data transfer is carried out at speeds of up to 100 Mb/s. Despite this, there is a steady trend towards increasing the speed of transfer of Internet resources. Therefore, it is better to play it safe and install a 4-pair cable with the future in mind. Moreover, the connectors and sockets are produced for connecting 4-pair twisted pair cables.
When using a 2-pair cable, after laying the first 3 wires according to diagram “B”, the green wire is connected to the sixth contact, skipping two contacts. This can be seen in the corresponding photo.
Laying "twisted pair" in/on walls
Let's move from theory to practice. If we are talking about laying cables and wires in a new building, then no special questions should arise: we put the twisted pair next to the rest of the communications, usually in corrugated tubes, and them in the cut-out hollows.
It is imperative to remember the number of wires inserted into the channel and their average diameter, and also take into account the channel diameter + 25% of the total sum of all cable diameters.
It’s another matter if we are renovating an existing room and creating new channels. It is necessary to take into account the material from which the walls are made: frame gypsum panels, brick, concrete, etc.
The hardest thing is to make channels in concrete/brick without damaging other communications .
To detect wiring in walls, you can use any available building electromagnetic wiring detectors.
If it is not possible to remove the furniture from the premises, then it is recommended to cover it with a protective construction film. Its thickness is no more than 1 mm, and the quantity is calculated by the formula: (height of the room * perimeter of the room) + 10%
It should be noted that there will be a lot of dust if you work in concrete. As a result of gating, abrasive dust and small pebbles will cover everything in the room: walls, ceiling, floor, furniture, equipment.
Therefore, you need to initially vacate the room or cover everything with plastic film.
We strongly recommend that the master wear the following set:
To create grooves (forming channels in foam concrete or brick walls), you need to use the following tools: wall chasers, wall chasers, furrow makers.
As an option, it is still possible to use powerful “grinders” with cutting discs (diamond-coated). The cutting depth of the channel should be 30-35 mm, the width up to 25 mm exclusively for one or more twisted pair wires.
Absolutely all channels and gutters must be made at right angles - this is a mandatory rule for any construction repair.
To reduce the time for installing sockets and reduce labor costs, you can use plastic mounting boxes - cable channels
As for cavities for sockets, they are made using a bolt, an electric hammer or a drill/hammer with a socket attachment.
But initially, you need to determine the approximate placement of Internet outlets in the premises. As a rule, holes for RJ45 sockets are drilled at a height of 1000-1200 mm from the floor or 150-300 mm.
For residential premises, one or two sockets on opposite walls of the room are sufficient. For offices, they usually place one outlet near the future workplace.
In server rooms and rooms with similar functions, a different strategy is used - make 3-4 holes for modular socket blocks, two blocks on one wall and one on all other walls.
And the last thing you need to pay attention to regarding the laying of wires is that sometimes it is possible to lay communications under the floor or in the ceiling of the room.
In such a situation, the question of gating the walls does not arise; it is enough to run the wire under the floor or into the ceiling and bring it out in the area of the socket hole on the wall.
When connecting an Internet outlet, it is extremely important to perform the correct pinout. In the diagram on the left, two different options for wiring a socket with clamping contacts are indicated in different colors. In the right diagram, fixation is carried out using knife mechanisms
Algorithm for laying Internet cables in walls
The most correct, but at the same time difficult to implement solution for laying an Internet cable in a home (office) environment is to install it inside the walls. The advantages of such wiring are obvious: the cable does not get tangled underfoot and does not affect the decorative design of the room. A significant disadvantage of in-wall installation is that in the future there may be problems with access to the cable for repair or maintenance. But with proper cable routing along grooves in a corrugated PVC pipe, you can not only minimize the risk of a malfunction, but also provide relatively easy access to the twisted pair without complex dismantling work.
Before you start laying the Internet cable, it is worth marking the places where it will be located. Remember that unshielded twisted pair cable is made of copper, which is very sensitive to electromagnetic interference. Try to keep the distance between computer and electrical wiring at least 50 cm.
- We outline the route. When planning a place for a groove for future wiring, keep in mind that the Internet cable has a certain limitation on the bending radius. Specific values can be found in the specifications of the selected cable.
It is better to lay the twisted pair in a protective corrugated hose, and make the groove taking into account its size
- Choosing a cable. The most significant quality characteristic of a twisted pair cable is reliability. Access to the cable after its installation will be significantly difficult, so it is advisable not to skimp on quality. To connect to the Internet, UTP of the fifth category and higher is most often used. You need to select a specific cable model based on its main technical characteristics:
- minimum permissible bending radius (the smaller it is, the easier it will be to install in the walls);
- maximum permissible tensile force (the higher this value, the easier it is to insert the cable into the corrugation, and in case of technical problems, subsequently remove it from the groove);
- warranty (for quality products the warranty period can be up to 25 years).
- We do installation. The cable is placed in a corrugated pipe of the required diameter (it must move freely inside it). Then the corrugation is secured in the groove with a plaster screed. Next, you can begin finishing work. As a result, an Internet socket will appear at the cable output. However, before that it is worth pinouting it.
At the exit from the wall, a standard socket box is installed, in which the housing and socket mechanism are fixed
Features of RJ-45 cable pinout
Before connecting Internet sockets, you need to clearly know and understand where and what color to mount each individual twisted pair wire. To do this, you need to know the crimping scheme and the rules for crimping RJ-45 cables with your own hands.
There are two main types of RJ-45 wire pinouts: straight and crossed. The first type of cable is used to connect end devices (computer/PC, smart TV/Smart TV, switch/Switch) to the so-called router.
The second type of cable is used to connect devices with similar functions (computer - computer, router - router, switch - switch) to each other.
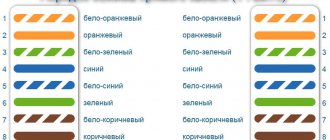
For a direct scheme, the color matches the color in this order: white-orange, orange, white-green, blue, white-blue, green, white-brown, brown. For the cross, everything is the same, but the green ones change places with the orange ones, respectively
First, we leave about 100-150 mm from the plane of the wall along the length of the cable, and cut off the rest of the cable. This length will be sufficient for possible subsequent rewiring of the wiring.
Now you need to free 4 pairs of wires from the outer sheath and from the foil (it acts as protective shielding), if any.
Inside the twisted pair there is also a special thread with which you can easily release all the necessary wiring. You can also use a regular knife or a special cutting surface, which is equipped with almost all crimping pliers.
Crimping pliers will help you easily mount any RJ-45 and RJ-11 connector, the main thing to remember is that if the tool itself does not press the wires enough, then you can press it with a knife or a thin screwdriver
At the next stage, we straighten all twisted pairs of multi-colored wires and carefully “seat” each individual color into its niche according to the color pinout in the socket terminal block.
This must be done in such a way that the rest of the wire with “untouched” insulation falls under the fixing clamp of the terminal block. Now we tighten the fixing bolts with a screwdriver on the terminal block and at the same time press the remaining wires so that they do not come out of their seats.
Finally, with a “feeling of strength,” we recess the clamping connectors on the terminal block with a screwdriver and separately secure each core in the terminal group, while cutting through the braid of small wires. Then we cut off the remains. The wiring must all be located at the same height from the base of the terminal block.
You may also find information about ways to extend twisted pair cables useful.
Crimping twisted pair connector
The multi-colored wires of the Internet cable are crimped into the connector using special pliers. They allow you to simplify the connection of a twisted pair cable to a connector. Their cost varies from approximately 200 rubles to 1500 rubles. If you don’t plan to crimp connectors every day, feel free to take the cheapest option or you can ask your friends.
The process of connecting an Internet cable to a connector is as follows:
- Insulation with a length of 70 to 80 mm from the end of the wire is removed from the twisted pair.
- Multi-colored conductors connected in pairs are untwisted, straightened, separated on different sides and laid out in accordance with the “B” standard. If a shield wire is present, it is not used. You just need to bend it to the side.
- The spread out multi-colored conductors are clamped between the index finger and thumb. The wires must be laid out evenly and tightly.
- Aligned conductors are cut with wire cutters. Their length should be from 10 to 12 mm. It is recommended to attach the connector to check. This will ensure that the internet cable insulation starts above the tab-like latch on the connector cover.
- The conductors cut to length along with part of the twisted pair insulation are inserted into the connector. In this case, the connector must be kept with the latch down, and each core must be located in its own separate track. The multi-colored wires are inserted into the connector all the way. They should rest against its opposite edge.
- The connector is inserted into special pliers. In this case, you need to hold the Internet cable at the edge of the connector.
- Without sudden movements, the arms of the pliers are brought together. If the RJ-45 is positioned correctly in the tool, no excessive force will be required. Otherwise, it is necessary to rearrange the connector in the pincer socket.
As the handles are brought together, protrusions in the tool push multi-colored conductors toward the microscopic blades of the connector. Sharp edges cut through the insulation on the conductors. The result is a reliable connection. If problems arise with it, which happens extremely rarely, the fixed “Jack” is simply cut off and a new connector is installed by performing the steps described above.
Video tutorial on crimping a connector:
Checking Wiring Signals
It is worth mentioning separately the possibility of checking the presence, and most importantly the correctness, of signals passing through the 8 cores of a twisted pair cable. This can be done using a regular electrical tester.
But first you need to have a patch cord (ready-to-use wires at both ends of which are mounted, again according to a direct pinout pattern, RJ-45 connectors) and a second unmounted Internet socket or keystone.
You can buy a regular patch cord either in a store or make it yourself (connectors using a direct pinout diagram). Standard length patch cords range from 0.3 m to 5 m
We first mount the second end of the laid wire into an unmounted socket/keystone, into which we insert one end of the patch cord.
We switch the tester to the sound signal mode and compare the corresponding channels of the connectors on the patch cord and in the Internet outlet. We receive a sound signal that indicates the presence of a connection.
Not every electrical tester has a beep mode. Therefore, to check, you can switch to resistance mode and monitor the data on the digital panel
There is also the option of checking signals using special cable testers, but this requires another ready-made patch cord that works in a direct manner. We insert one end of each patch into sockets (new and temporary), and insert the other two into the tester cable.
Light and sound on the tester panel indicate the presence or absence of a signal on a particular twisted pair core. We look and check the signal.
Some cable testers, in addition to checking the presence of a signal, provide information about the cable category. This function is quite useful for premises certification
Ideally, we will receive 8 light and sound signals in sequence on the cable tester. In these two ways, you can check the correctness of the pinout and the presence of a full signal for data transmission via twisted pair.
Detailed connection instructions
Let's start with the tool that you will need to seal twisted pair sockets. Ideally, it is advisable to purchase a universal extractor (shown in Figure 9). It allows you to press and cut the rest of the wire in one movement. Thanks to Chinese manufacturers, such a universal tool costs about 3-4 dollars. The price of branded products can be 2-3 times more expensive.
Rice. 9. Universal extractor
This tool has a special mechanism that allows you to press the wire between two contact knives and cut off its excess (3 in Fig. 9). In addition, it is equipped with a flat screwdriver (2) and a hook (1), which allows you to remove the wire if it is incorrectly terminated. The cost of a universal extractor is relatively low, but the benefits are quite tangible.
No less useful are universal insulation stripping pliers. They cost about the same as an extractor and can cut Ø3.5-9 mm cables such as UTP, STP, FTP. It is possible to adjust the depth of the cut.
Universal stripping pliers
It is not advisable to use a knife to strip the insulation, since in this case there is a high probability of damaging one of the twisted pair wires.
Having dealt with the necessary tools, let's move on to the algorithm for embedding a twisted pair cable into a switching device. We will assume that the cable has already been laid and the outlet space has been prepared. The procedure is as follows:
- Using universal pliers, cut off the outer insulation layer from the end of the wire. It is enough to expose 4-5 centimeters. You need to act carefully so as not to damage the wires. If this happens, trim the damaged area, adjust the depth of the cut and repeat the operation.
- After removing the insulation, level each pair. Please note that there is no need to clean them. Each pad contact has special micro knives that cut the insulation and ensure reliable contact and fixation of the wire.
- We disassemble the socket. To do this, remove the front panel. To do this, you will need to unscrew the fixing screw or unfasten special latches (depending on the design). If you are using a modular socket, you will need to remove the modules from it.
- We fix the cable on the module using a tie (E in Fig. 1) or another method provided by the design.
- We insert the wires into the clamps, and it is necessary to adhere to the color markings of the selected standard. Do not try to recess the veins deeply; it is enough to simply fix them with a little force (A Fig. 11).
- Using an extractor, we perform pressing (B in Fig. 11).
Rice.
11. A – cable with wires routed through clamps, B – pressing with an extractor. At this stage, we will make a small digression regarding the use of improvised means for pressing. Sometimes you can find advice in which, in the absence of the necessary tool for pressing, it is recommended to use a utility knife or a thin slotted screwdriver. This approach can only be used as a last resort, when access to the network is urgently needed, but there is no tool at hand. But in the future, such a socket must be clamped. Otherwise, there is a high probability of losing contact between the wire and the latch after some time.
We also note that many branded manufacturers include a simple plastic extractor for each socket, which allows you to securely seal the wire, after which all that remains is to carefully trim off the excess.
- After pressing, the module is installed in place. If the socket is external, then its base is screwed to the prepared area, so that the cable is supplied from above, and the connector is from below. When installing an internal socket, its base is installed in a prepared glass and fixed in it.
- We fasten the front panel and then check its functionality. This can be done using a special tester, but it’s easier to connect a computer and check for a network connection. If problems arise, first of all check the correctness of the pinout; as practice shows, in 90% of cases the reason lies precisely in this.
Pinout diagram for rj45 socket according to scheme B (by colors B)
Computer sockets are crimped according to the option in which you crimped the connectors, the main thing is that they completely match, and since in Russia crimping twisted RJ-45 pairs according to “option B” (standard T568B) is most widespread:
Then, accordingly, we crimp the computer socket using the same option B. In accordance with the colors of option B on the socket body - photo on the right. We crimp it with a special device. First, as a rule, we decide on the place where the socket body will stand (if the socket is internal, then place it accordingly - it snaps inside the box body in the place where it will be most convenient for connecting equipment.
If it’s external, then immediately next to the end of the box we attach the socket with a pair of self-tapping screws or double-sided tape (often the sockets come with low-quality tape, so there is a significant chance that the socket will come off over time). Then we remove the outer braid from the twisted pair with a margin as in the photo. Let's unravel the wires. And we unbend it in accordance with option B by color. Then carefully press it with an extractor - press it until it stops and the tool clicks. At the same time, do not forget to make sure that when crimping the wires into the grooves, the extractor simultaneously cuts them off from the outside of the groove - the extra tails of the wires - as in the photo of the extractor on the right.
The operating procedure for crimping the extractor crimp is as follows:
By pressing the wire, the escrator presses the wire into the groove of the socket, at the same time it pierces and tears off the braiding of the wire against the groove of the socket when pressed and at the same time wedges it at the very end, as a result we get a well-fixed bare twisted pair wire at the very end of the groove.
What to do if there is nothing to crimp - crimp a computer socket for rj-45
If you can’t get an extractor (crossing knife), in principle you can, of course, do without sockets by directly crimping the main wires brought into the room - the main thing is that they have an appropriate length reserve in advance, and such “minimalism” - the option of installing a local network was encouraged by the management or the customer.
In some cases described below, not using sockets with patch cords will be the only correct option.
Those. in severe cases - such as the use of LAN in restaurant kitchens and their summer areas, in fish and sausage departments of supermarkets - I wholeheartedly recommend not using sockets in principle - but simply throwing in a spare wire and making the appropriate tails - crimping the RJ 45 connector directly on the main one wire without using a category 5E socket with a patch cord.
Thus, we get rid of the real weak link in aggressive environments, i.e. This is where, as a rule (in fact, after a year - 100%), the connection is often lost, due to the fact that no matter how hard you try, fat and oil will get into the socket and gradually accumulate (simple steam from constant cooking is enough in restaurant kitchens), splashes of brine, marinades - salted fish and other goodness.
Soldering a computer socket - twisted pair socket using a soldering iron
Another option is when you need to install 2-3 sockets, but you do not have an extractor at hand, or in case of unfavorable external conditions in the room in which you need to install sockets - as described above, we can install a computer socket using a soldering iron. A photo of this installation is also provided. Soldering the twisted pair contacts to the socket in the photo on the left. At the same time, of course, soldering is guaranteed to ensure ideal contact.
But if you crimp with an extractor, then on average it will take 5-10 minutes for one socket (attaching the socket, preparation - removing the outer braid, unbraiding pairs of wires, crimping the extractor itself into the grooves of the socket), then when soldering it will take much more time, and this is in any case, a more labor-intensive undertaking. Cheap twisted pair - copper oxide in the vast majority of cases is very poorly soldered - and without the help of acetylenic acid, or normal soldering acid (nowadays very rare), normal rosin, as a rule, you cannot do it - twisted pair simply does not stick.
In general, as you can see, installing a computer socket is quite simple, anyone can do it and requires only a little skill.
Popular brands of internet sockets
If you are going to install an Internet outlet at home, you need to know which manufacturers produce these devices:
- French products produced by a reliable manufacturer. The devices are considered one of the best on the electronics market. Equipped with the best wire fixation mechanism. The connection diagram does not differ from standard standards. Legrand sockets are universal. They can be connected according to schemes A and B. The color schemes are located on the device terminal.
- The cost of the models is lower than the products of the previous brand. These are high quality products. The body of Vico Internet sockets is made of high-strength polymers. The internal assembly is ergonomic. Vico products are considered the best solution for the price. For some users, there is a significant drawback - the lack of hints in the form of a connection color scheme. Pinout must be done extremely carefully.
- Made in Türkiye. In addition to sockets, the company produces high-quality switches. You can connect and install devices yourself. The sockets of this brand are extremely easy to use.
- Connecting devices of this brand is done in the same way. The product line includes double models. In this case, you will need to run two wires from the router. Since network devices do not support parallel connections. The most popular Schneider models are equipped with two outputs.
Wired Internet is now considered the highest quality. For the convenience of organizing such a network, special Internet sockets are used. Thanks to these devices, the cable will not get tangled under your feet. Despite all the possible difficulties, users prefer to do the installation themselves.
Wall socket installation
A computer socket can be installed either hidden or externally. How to install this element depends on personal preferences and the advisability of using a particular model of such a device. If we install the device in a room that is designed to accommodate a large number of computers, then the most suitable option would be to use an external device. To fasten such an element, you need to install the cable into the connector, then use two dowels to fasten the inside of the socket to the wall. The next, final stage will be the installation of the decorative part of the computer socket. Installing the internal structure will require a significantly larger amount of time. Such a device is connected to the cable in the manner described above, but the actual installation of this element to the wall is done completely differently. Installation of the internal model is carried out in the following sequence:
- A cutout is made in the wall using a hammer drill with a crown attachment, the inside of which is then removed using a chisel and hammer.
- A groove is made to the wall from one computer outlet to another. If you are connecting a high-speed Internet connection or telephone cable to the rj11 connector, you will need to lead the strobe to the communication junction box.
- A socket box is installed in the hole made and fixed with gypsum mortar.
- The cable for connecting the computer is fed through the groove, taken out into the installation box and connected to the outlet.
- The socket is installed in the installation box and is securely fixed using screws.
- A decorative plastic trim is installed.
Types of cables for the Internet
Shielding provides better protection from electromagnetic interference, both external and internal, etc. The entire length of the screen is connected to a non-insulated drain wire, which unites the screen in case of division into sections due to excessive bending or stretching of the cable.
- Unprotected twisted pair (UTP - Unshielded twisted pair) - there is no protective shield around an individual pair, most often this is UTP category 5 and higher;
- Foil twisted pair (FTP - Foiled twisted pair) - also known as F/UTP, there is one common external shield in the form of foil;
- Protected twisted pair (STP - Shielded twisted pair) - there is protection in the form of a screen for each pair and a common external screen in the form of a mesh;
- Foil shielded twisted pair (S/FTP - Screened Foiled twisted pair) - an external shield made of copper braid and each pair in a foil braid;
- Unprotected shielded twisted pair (SF/UTP - Screened Foiled Unshielded twisted pair) - double external shield made of copper braid and foil, each twisted pair without protection.
Installing a rj-45 computer socket
It should immediately be noted that products of this type are installed to ensure the operation of low-current electrical circuits. Therefore, working with them does not pose a danger to life and health.
To connect a computer to such a device, you may need a special tool for crimping contacts.
A peculiarity of the operation of computer sockets is the almost complete impossibility of their repair. If the module, which is the main part of the rj-45 cat 5e product, fails, the entire device must be replaced.
Installation of rj-45 occurs according to the algorithm that is used when installing overhead or built-in electrical sockets. The main difference is the connection of such a device to a network cable.
To connect the rj45 cat 5e socket to the network, a cable is used, which is called “twisted pair” and consists of several insulated copper conductors, twisted in pairs and placed in a common plastic sheath.
What is a rj45 socket for?
This element of the fitting is designed to transmit a computer signal from one system unit to another. One of the most frequently installed devices is a combined computer-TV socket. The ease of use of this element is achieved by installing an rj11 telephone connector in one housing. Such a device allows you not only to connect your computer to your home network, but also to connect your landline phone to the network.
Before you find out how to connect such a device, you need to understand what models of computer fittings exist.
Wiring
But first I’ll write a few words about the cable used. Most often, in apartments, offices and other organizations inside the building, CAT5e cable is used. It's fairly cheap and has great features, but we essentially only need two:
- Maximum distance: 100 meters.
- Supported speed: from 100 to 1000 Mbps.
Some people are starting to purchase cheaper CAT3 cable, which is essentially the same wire, only it has 4 cores. In this case, the maximum supported speed will be only 100 Mbit per second. Perhaps this is quite enough for now, but in the future it is best to take an 8-core CAT5e.
It is best to route the cables in advance of the repair. Otherwise, you will need to use cable ducts or run wires through baseboards. The socket used in the future will also depend on this, but I’ll talk about this below. Next, I will talk about 3 sockets that you may encounter in the future.
I advise you to read more about twisted pair here.