What kind of outlet should there be for an electric stove?
For an electric stove, you should buy a grounded outlet. The power supply in the house can be single-phase, three-phase and rarely two-phase. Based on this feature, you need to select a socket that has the necessary contacts and lay the appropriate power cable.
Interesting materials:
How to clear the built-in memory on Android? How to clear the built-in memory of an Android phone? How to clear the built-in memory? How to clean grease from a kitchen hood? How to clear a clogged file? How to clean a dirty sofa? How to clean Suede from a ballpoint pen? How to clean suede sneakers? How to clean suede sneakers? How to clean suede on sneakers?
Removing the old socket
First of all, we need to remove the socket from its old location. During this action, we must decide on the possibility of reusing it in a new location, as well as on its connection diagram. After all, sockets for an electric oven can be of two classes - for voltage 220V and 380V.
Removing an old electric stove socket
So:
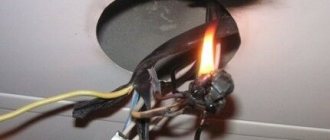
- Any work in electrical installations begins with removing the voltage from them, as well as adjacent wires and sockets that may be accidentally touched. An electric furnace usually has a separate circuit breaker in the electrical panel.
Note! If you have turned off the circuit breaker, this is not a reliable fact that there is no voltage. Don’t be lazy and check for its absence directly in the socket, preferably with a two-pole voltage indicator.
- Now we remove the old socket. A very important point is to check the connection of the wires directly into the outlet. This is especially true for 380V sockets. After all, for an electric stove, the location of the phase, neutral and protective wires is important. If they are reconnected incorrectly, a short circuit may occur.
- If the electrical network is made in accordance with clause 1.1.30 of the PUE, then the neutral wire will be blue, and the protective wire will be yellow-green. If this is not the case, then we advise you to label each wire and terminal on the outlet.
- After the socket is removed, our instructions advise checking it for reuse. To do this, we inspect the contact part and check for the absence of traces of metal tempering, shells and tarnish on the contact part. The presence of such comments should make you think about buying a new outlet. Minor scorching of the contact part can be easily removed with sandpaper and is not a serious problem.
What does an induction cooker consist of?
The induction panel device consists of several parts, most of which are electronic. Well, let's take a look:
What does an induction cooker consist of?
- Induction coil.
- Power microcircuit.
- Control chip.
- Fan.
- Ceramic plate.
- Frame.
The operating procedure of an induction electronic cooker is as follows. The user turns on the device, dials the desired option through the control chip, which transmits the desired program to the power unit. And he, in turn, sets the required operating rhythm for the induction coil.
What is an adapter for an induction cooker?
This is a steel disk, usually of different diameters, that serves as an adapter from the stove to non-magnetic cookware. There are several adapter models today:
Smooth thin steel disc
But a thin and even steel disk will be the best solution of all these options, provided that you do not place small dishes on it, otherwise you will end up with an ordinary electric stove that heats the air.
inductive adapter
Smooth disc made of thick steel
In the case of the thick stove adapter that we get, the disk heats up first, then the disk distributes all the heat to the cookware, and that in turn to the contents. The heating time increases, thereby wasting electricity. And if you put dishes with a smaller diameter on this thick iron pancake, then you will also heat the air. Thus, your economical stove becomes a regular electric one, if you take into account energy costs.
disk adapter for induction
Disc with grooves and holes
An uneven disk with grooves and holes also does not promise much savings, because it does not fit tightly to the stove and dishes. In this case, through the holes and unevenness, a lot of heat is lost, which will play on your pocket.
induction disk adapter
But not all discs are suitable for induction hobs, in terms of economy. I'll explain now. The stove heats steel cookware in a matter of seconds, and consumes only about 400 watts in 1 hour. All the energy goes into the dishes; the induction panel does not heat the air like a regular electric one. Heating goes directly to the object.
an induction adapter costs
and saw a completely uneconomical amount from 150 rubles to 7,000 rubles.
It seems to me easier to make an adapter yourself or buy induction cookware
at Ozone, where the minimum price is 277 rubles per frying pan.
But all these manipulations will not fit into the line - savings. After all, you need to buy an induction hob, adapter or cookware.
Relocating an existing electric stove socket using cable extension
PICTURE
This method combines the two previous ones, combining all their advantages and eliminating their disadvantages. With a significantly lower cost of work and the necessary materials and labor, this method is not much more expensive than the method using an extension cord, but is almost as reliable as completely replacing the cable.
The procedure for extending the power cable for an electric stove socket and laying it to a new location for installing the power socket is as follows:
— The electricity supply to the installation site in the electrical panel is turned off. Most often, an electric stove has an automatic switch of the highest rating - 32-40A; most likely, there will only be one of these, not counting the introductory one, and it needs to be turned off. Then, carry out a control check, for example, with an indicator screwdriver, to ensure that there is no voltage at the transfer site.
— The old socket for the electric stove is removed, the type and cross-section of the power cable is determined. In addition, the connection method is selected, depending on the selected installation option (points below), the method of connecting the conductors, etc. After which, the appropriate electrical materials, cables, fasteners, etc. are purchased. Most often, a VVGng-LS cable 3x6 for a single-phase network and 5x2.5 for a three-phase network is used for an electric stove. Then there are two main options:
— If in the future the place where the old outlet for the stove was and the route from it to the new installation location is closed, for example, by a kitchen unit, then you can install an external distribution box, and from it, for example, into a cable channel or corrugated pipe fixed to the wall with clips, already stretch the cable.
— If you need to make a hidden wire, then a built-in distribution box is installed at the connection point (if it does not already exist), in which the cores of the old cable are connected by color to the new one. Select one of the permitted connection methods - terminals, welding or crimping. To the new installation location of the power outlet, a groove is made into which the selected cable is laid.
Ideally, it would be, of course, to raise or lower it strictly vertically, move it either on the floor or along the ceiling, and then lower it vertically to the desired location. But most often, in domestic conditions, it is enough to move the cable, wiring it horizontally along the wall and fix the location of the cable for yourself by taking a photo or drawing a plan.
— After which all that remains is to install a new power socket for the stove; it can be either surface-mounted or built-in, whichever is more convenient for you. If you have a hob, then it will be enough to leave a cable outlet of the required length, which can then be immediately connected to the stove without purchasing an additional power cord.
Here I see no reason to describe the disadvantages or advantages of this method of transfer, they are already in plain sight. This is something in between the first options:
– such a solution will be much cheaper than completely replacing the cable, but will still cost more than using an extension cord
- will be almost as reliable as a solid cable, but there will still be a connection that, in order to approach the properties of a solid cable, must be made in compliance with all rules and regulations
— the speed of such a transfer will be faster than replacing the entire cable to the switchboard, but much slower than simply installing an extension cord.
In any case, if you do everything carefully and correctly when installing, choose a good cable and other materials, then the socket for the electric stove in the new place will serve you for the entire service life without any problems.
If you know how else you can move the socket for an electric stove or you have any questions or comments, be sure to write in the comments to the article, I will try to answer everyone promptly.
How to move a socket for an electric stove to a new location? This question often arises during a kitchen renovation. After all, an electric oven is a fairly powerful energy consumer, and improper handling of it can lead not only to its breakdown, but also to a fire. Therefore, this issue should be approached in good faith, and we will help you do everything correctly.
Preparatory work
After moving the stove socket to a new location, you should perform a number of preparatory work. It is necessary to select a new cable for connection, and also choose the correct method for connecting the old and new wires.
Electric oven power supply diagram
So:
- First of all, you need to decide on the new location for installing the outlet. According to clause 12.29 of VSN 59 - 88, the installation height and the distance between the socket and the stove are not standardized. According to this point, the main argument is the ease of use of the outlet and the prohibition of its installation under and above sinks, as well as in kitchen cabinets.
- We will not describe in detail how to make walls, make recesses for embedded boxes and install them. This dusty and hard work without special equipment needs no explanation.
- After the socket box is installed and the groove for the wire is prepared, you need to think about the wire itself. The easiest way is to use a wire with a cross-section no smaller than the cross-section of the old wire.
- This is quite logical, but not entirely correct. The fact is that in Soviet times they often did it without giving a damn about the norms and rules. If you want to know how to move the stove socket correctly, we advise you to select the wire cross-section according to the table. 1.3.4 and 1.3.5 PUE. You can learn more about the section selection process on other pages of our website.
- Now regarding the connection of wires. Ideally, there should be no connections and you should replace the wire from the circuit breaker to the outlet. But alas, this is quite difficult to implement and often simply adds a wire to an existing one.
- According to clause 2.1.21 of the PUE, any connection of wires must be made by crimping, welding, soldering or squeezing. And if the first three options for doing the work yourself are not very suitable, then using clamp terminals is quite possible.
- To connect flexible copper conductors, we use quick-release terminals, or special brass lugs for connecting with screw terminals. Any terminals can be used to connect rigid copper conductors. For aluminum wire we use self-clamping terminals.
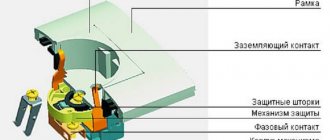
Operating principle of induction panels
The induction surface is a regular ceramic panel with induction coils located inside. In each of these coils, when turned on, an electromagnetic field is generated, which causes the movement of molecules in the bottom of the dishes installed on the panel. At the same time, the high speed of molecules generates heat, which is used for cooking. If you remove the cookware from the hob, the movement of molecules in its bottom stops.
An induction surface from any manufacturer (AEG, Hansa, Gorenje, etc.) must be connected to a separate home electrical wiring line, which must be led directly from the switchboard and a specially installed machine. This line should end with a socket with a grounding contact, designed for a current of 32 to 40 A. The distance from the floor to the socket should be less than 0.9 m.
Before installing the induction hob and connecting it to the power supply, you must determine:
- its location:
- connection diagram;
- contents of delivery.
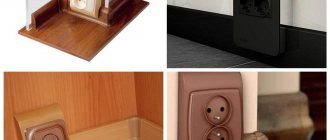
Types of power points for electric stoves
@strojdvor.ru
Ordinary people may think that a standard socket can be installed for the stove, but this is a mistaken opinion. Under the best circumstances, it will simply melt, but it can also cause a fire in certain parts of the home energy network.
You need to choose a power outlet based on this type of network, in fact, like the supply cable itself.
What kind of lighting do you prefer?
Built-in Chandelier
In order to correctly install the power connector, it is important to check with electricians for information about the type of network and the possibility of grounding. Now you can go to the hardware store and purchase the necessary materials.
Relocating an existing electric stove socket using cable extension
PICTURE
This method combines the two previous ones, combining all their advantages and eliminating their disadvantages. With a significantly lower cost of work and the necessary materials and labor, this method is not much more expensive than the method using an extension cord, but is almost as reliable as completely replacing the cable.
The procedure for extending the power cable for an electric stove socket and laying it to a new location for installing the power socket is as follows:
— The electricity supply to the installation site in the electrical panel is turned off. Most often, an electric stove has an automatic switch of the highest rating - 32-40A; most likely, there will only be one of these, not counting the introductory one, and it needs to be turned off. Then, carry out a control check, for example, with an indicator screwdriver, to ensure that there is no voltage at the transfer site.
— The old socket for the electric stove is removed, the type and cross-section of the power cable is determined. In addition, the connection method is selected, depending on the selected installation option (points below), the method of connecting the conductors, etc. After which, the appropriate electrical materials, cables, fasteners, etc. are purchased. Most often, a VVGng-LS cable 3x6 for a single-phase network and 5x2.5 for a three-phase network is used for an electric stove. Then there are two main options:
— If in the future the place where the old outlet for the stove was and the route from it to the new installation location is closed, for example, by a kitchen unit, then you can install an external distribution box, and from it, for example, into a cable channel or corrugated pipe fixed to the wall with clips, already stretch the cable.
— If you need to make a hidden wire, then a built-in distribution box is installed at the connection point (if it does not already exist), in which the cores of the old cable are connected by color to the new one. Select one of the permitted connection methods - terminals, welding or crimping. To the new installation location of the power outlet, a groove is made into which the selected cable is laid.
Ideally, it would be, of course, to raise or lower it strictly vertically, move it either on the floor or along the ceiling, and then lower it vertically to the desired location. But most often, in domestic conditions, it is enough to move the cable, wiring it horizontally along the wall and fix the location of the cable for yourself by taking a photo or drawing a plan.
— After which all that remains is to install a new power socket for the stove; it can be either surface-mounted or built-in, whichever is more convenient for you. If you have a hob, then it will be enough to leave a cable outlet of the required length, which can then be immediately connected to the stove without purchasing an additional power cord.
Here I see no reason to describe the disadvantages or advantages of this method of transfer, they are already in plain sight. This is something in between the first options:
– such a solution will be much cheaper than completely replacing the cable, but will still cost more than using an extension cord
- will be almost as reliable as a solid cable, but there will still be a connection that, in order to approach the properties of a solid cable, must be made in compliance with all rules and regulations
— the speed of such a transfer will be faster than replacing the entire cable to the switchboard, but much slower than simply installing an extension cord.
In any case, if you do everything carefully and correctly when installing, choose a good cable and other materials, then the socket for the electric stove in the new place will serve you for the entire service life without any problems.
If you know how else you can move the socket for an electric stove or you have any questions or comments, be sure to write in the comments to the article, I will try to answer everyone promptly.
Often, when renovating and remodeling a kitchen or when purchasing a new kitchen set, there is a need to move the socket for the electric stove. Since there is only one such outlet, we are strictly tied to the place of its installation and cannot mount an electric stove or electric hob in another place, although, often, in order for the kitchen to be as convenient and practical as possible, this needs to be done.
There are several different ways to move an electric stove socket , including simple ones that you can handle yourself, but such solutions are less reliable and even, often, dangerous. More complex, thorough, correct methods of moving a power outlet will require certain experience and tools, but will ensure maximum reliability, ease of maintenance and operation, and in addition, such installation will not spoil the appearance of the kitchen.
Now we will look at the three most common methods of moving an electric stove socket , and it’s up to you to decide which one to choose. By the way, even if you decide to entrust the relocation of the outlet to a professional by calling an electrician for this, be sure to familiarize yourself with all the options in order to check its operation.
Connecting the socket
When all the preparatory work has been completed and the cable has been routed, you can proceed directly to the connection. Depending on the voltage 220V or 380V, there may be several connection options.
If you do not know what voltage your stove is connected to, then you can determine this by looking at the plug. If it has five contacts, then it is 380V, if it has 3 contacts, then it is 220V. If there is no plug, then look at the article on connecting an electric oven on the pages of our website.
Connecting a 220V socket
If, before moving the socket from the stove, you did everything according to our recommendations, then the connection process will be quite simple. Otherwise, you will have to take an indicator and call the phase, neutral and protective wires.
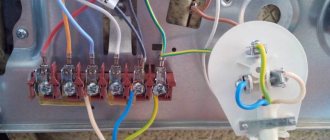
The photo shows a diagram of connecting an electric oven to a 220V network
So:
- First we connect the phase wire. We do this according to the markings made during dismantling of the socket. Usually the phase wire is located on the left contact of the socket.
- The neutral wire is usually located on the right contact of the socket. But if you carried out the markings, then we make the connection according to it.
- We connect the protective grounding wire to a separate contact. But again, we do this with an eye to the labeling.
- Now we can apply voltage and check the functionality of our outlet and all stove burners. If something does not work, then remove the voltage and check the correct connection directly at the terminal block of the electric furnace.
Connecting a 380V outlet
Since moving an outlet from a stove to 380V is somewhat more difficult due to the larger number of wires, you should be even more careful here. And correct labeling will help you a lot with this.
Connection diagram for an electric oven to a three-phase 380V network
- First of all, we connect the phase conductors. We have three of them, and they are connected to three socket terminals located next to each other.
Note! When connecting phase conductors, observing their connection order is not so important. The order here does not matter at all and will not affect performance.
- When connecting to a two-phase 380V network, you will have two phase wires. This connection option also has a right to exist, although it is used somewhat less frequently. In this case, we simply do not use one of the socket contacts. Here it is important to match the unused contact on the socket and plug. This can be done by a simple visual inspection of the wiring in the plug.
- The neutral wire is usually connected to a terminal located above the three phase contacts. If this is not the case according to the marking, then it is better to make the appropriate switch in the socket and on the furnace terminal block.
- The protective conductor is connected to the bottom contact of the socket. Usually it has a rectangular rather than a round shape, which makes it quite easy to identify visually.
- After the connection is completed and the socket is secured in the installation box, voltage can be applied. If you did everything as demonstrated in our video, then everything should work without any comments.
How to choose?
In the context of the fact that there are many models of such a disk, you should figure out how to choose the best solution, which will allow you to cook food as quickly, efficiently and efficiently as possible. Before purchasing, you should carefully study the characteristics of the model you are planning to buy.
You should pay attention to its size, or more precisely, thickness, the material from which the layers are made, the presence of paint and some important details
The first important point will be the diameter of the disk. After all, different models will have different sizes depending on the burner on which they will be used.
The main rule in this matter is that the bottom of the dish must cover at least 80 percent of the disk area. If for some reason the diameter of the cookware is larger, this will increase the cooking time.
Expert opinion Ekaterina Anatolyevna Smirnova has been engaged in interior design for 7 years, a professional architect
That is, the disk should be selected for the burner, taking into account the requirements for the smallest bottom diameter, and the kettle, frying pan or saucepan - to the dimensions that have a ferromagnetic circle.
The stores offer three categories of such goods:
Another important criterion is the presence of a handle. Models with a removable handle will be much more convenient, because thanks to it you can quickly remove the hot adapter from the hob and move it to another place on the stove.
Typically, handles are made from materials that are not prone to heat, which is why they can be handled without gloves or grips. The metal version of the handles also does not heat up, but only when they are made of several metals, so it can also be a good solution.
It would be extremely nice if the handle had a special hole for hanging, which would solve the problem of storing the adapter. And if the handle is removable, then it can be removed for washing or for separate storage.
But you should also pay attention to the thickness of the product in question. This parameter will depend on the specific manufacturer
The thinner such a solution is, the cheaper it is likely to be. On the question of which thickness is best to choose, everything will depend on the activity and conditions of use.
If an adapter is required for a couple of vessels and not used too often, then you can purchase a thin version. If you plan to use the disk frequently, then it is better not to save money and purchase a thicker version.
A number of manufacturers make protective coatings for discs using heat-resistant paint. There is no significant practical benefit from such a coating, but thanks to it the metal does not darken, which is inevitable if the bottom of the selected cooking utensils is smaller or does not fit too tightly to the disk.
Another factor that may influence your choice is whether the adapter is dishwasher safe. Usually the manufacturer indicates this in the accompanying documentation for the product.
As a rule, it is better to perform disk cleanup manually. A number of manufacturers even sell special brushes for these purposes.