The use of point light sources in the home space is justified not only from the point of view of creating better lighting conditions, but also to highlight certain specific features or individual areas of the interior. Therefore, we will analyze what schemes it is possible to connect spotlights with, what these lighting devices are, what their structure is, pros and cons, what types there are and what are their features, what schemes are best to connect, and also what are the specifics of their installation.
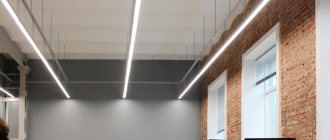
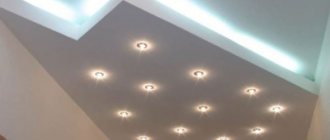
Spotlights create more even lighting than a traditional chandelier Source cozzyroom.com
Spotlight - what is it, design, features
A source of artificial lighting is called a point or spot lamp when its connection and installation involves operation in a certain general scheme in conjunction with similar devices within the same working area. For example, a classic chandelier can be installed in the same room. However, the flow of light it creates will be distributed so that some areas will be well lit, while others will remain in the shadows.
Moreover, the farther you are from the light bulb, the more the light intensity will decrease. Point sources, in contrast to this scheme, create a more uniformly directed distribution of light flux - due to the fact that they are located in different parts of the ceiling, and their light fluxes overlap and complement each other. In addition, they differ from conventional lamps in their design, which usually includes the following main elements:
- The housing in which the main working elements are located.
- Fastening - the design depends on the location and method of installation. It can be a built-in, surface-mounted or rotary system.
Built-in spots have special devices for fixing to the finishing material Source katlavan.ru
- Light source – modern models of spotlights can be equipped with incandescent, halogen, fluorescent and LED lamps.
- Optical element - for better focusing or dispersion of the light flux.
- Elements of external decoration.
- Wiring.
Most of the spotlights available on the market today are designed for installation on ceilings or walls, as well as for decorating furniture and interior elements. Installation of such emitters requires the presence of a small free space behind the overhead panel. The cavity houses not only the rear part of the device, but also brackets, wires and other mounting parts.
On a note! The external decorative trim for spot lights is made of plastic, wood or metal. Its main task is to limit the device and decorate. The external shape, size and color are determined by the design of the room and the choice of the installer.
A special decorative overlay creates a special optical effect Source elektrika.expert
Advantages and disadvantages
Like any other types, spot lighting devices have their own specific pros and cons. So, their advantages are mainly manifested in the following:
- Possibility of assembling the circuit both in group and individual versions. This makes it possible to adjust the brightness of the lighting without using special dimmers, and also creates the prerequisite for saving electricity, since it allows you to turn on the light not for the entire room at once, but only in a specific part, for example, in a spacious dining room, only the dining area.
- Formation of a given set of spots at the same time as full lighting and decorative lighting.
- Minimizing losses in illumination when one device burns out. The brightness level in the room will remain virtually unchanged if only 1 of 10 light bulbs burns out.
- When installing recessed spotlights in a suspension system, the useful ceiling height does not change, as happens when hanging a standard chandelier.
Compared to chandeliers, recessed spotlights do not reduce the usable height of the room Source folksland.net
- The spots are quite simply designed and do not contain complex elements, so they are easy to maintain, repair and last a long time.
The disadvantages of spot lights are associated with the need for initial financial costs, as well as the correct selection of parameters when installing in a specific room. Directional lighting can also create shadow areas if fixtures are not properly rated to begin with.
How to correctly position and connect lamps
After the ceiling is sheathed, the lamps can be distributed, since the location of the spot spots has already been taken into account when designing the frame.
It is necessary to take into account the passage of seams on a suspended ceiling, especially when choosing plastic or aluminum cladding for the ceiling frame. It is best not to install lamps at joints.
Main lighting
As the main lighting in living rooms, lamps are arranged in a checkerboard pattern. Experts recommend longitudinal installation of spotlights in straight lines strictly perpendicular to the windows, the interval between lamps is from 80 to 100 cm, at a distance of 60 cm from the walls. In order to achieve the required lighting brightness, you can combine both spot installation schemes.
Backlight circuit
When choosing a layout of lamps to illuminate individual zones, it is necessary to install spots with a maximum distance of 80 cm between them, and 40 cm from the wall. Most often, lighting is performed zonally in places of relaxation, for reading books, periodicals, or for practicing hobbies: knitting, drawing, sewing, etc.
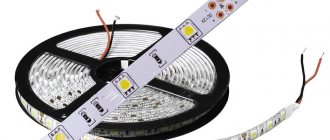
LED strip
The LED strip provides room illumination in selected areas, that is, it is installed in the room in rest areas, creating dim light. The light from LED strips is very useful and gentle on tired eyes if a person works a lot at the computer.
Choosing an installation location
When installing lighting, you can install it around the perimeter of the room. For a more convenient lighting arrangement, it is best to consult a specialist.
Varieties
First of all, spot lights are classified according to the method of installation into such varieties as:
- Embedded . The device does not require a housing. It is mounted into a pre-made hole in the finishing material and is completely buried in it. In addition to the socket with a light bulb, their design includes a mount and a decorative frame located on the outside of the ceiling. Additionally, a diffuser or lampshade can be installed outside it.
Recessed spot lamp with an additional external lamp Source nikastroy.ru
See also: Catalog of companies that specialize in electrical work of any complexity
- Invoices . Unlike the above, the decorative part of this variety completely protrudes outside the surface on which it is installed. At the same time, for installation it contains a special clip for mounting on a plane. Therefore, installation does not require empty space behind the finishing coating.
- Hanging . The installation of ceiling lamps of this modification is similar to a classic chandelier. The device is simply suspended on a special mount.
- External . They are analogues of small-sized spotlights for creating directional lighting of a selected area. Mounted on brackets.
Important! In most cases, plastic, canvas, and MDF are used as finishing materials for suspended and suspended ceiling systems. All of them have a high degree of flammability. Therefore, for connections and electrical wiring in such conditions, it is necessary to use high-quality and reliable components, and the installation must be carried out in compliance with the rules of electrical installation work.
Fastening of wiring and lamps must comply with safety rules Source sdelai-lesnicu.ru
Types of light bulbs
The second important characteristic by which spot lighting devices differ is the type of light source. To equip modern models of spot lamps, the following types of light bulbs are used:
- Halogen.
Advantages of devices using halogen lamps:
- Bright intense glow, similar in characteristics to natural light.
- Half the size compared to conventional devices.
- Versatile use - suitable for reading, working, relaxing, etc.
- Environmental Safety.
- Long service life compared to a conventional incandescent lamp.
The disadvantages are associated with rapid damage due to voltage surges and insufficient energy consumption.
- Luminescent.
Advantages of fluorescent models compared to classic light bulbs:
- The best energy saving – savings reach 80%.
- Durability.
- Compactness.
However, it is best to select, install and connect such fluorescent spotlights for lighting and decoration outside residential premises. Because they contain a toxic substance - mercury.
Fluorescent spot lights are best used outside a living space - for example, to illuminate a loggia or balcony Source balkonica.ru
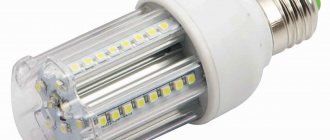
- LED.
Positive characteristics:
- Long service life - several tens of thousands of hours.
- Fire safety – minimum operating heating.
- Maximum luminosity with minimum power.
- Economical.
- Large range of color temperature selection.
- Good resistance to power surges.
- Resistance to humid air.
Negative properties - high cost, possibility of flickering with low quality components.
Helpful information! 12V bulbs are safer and therefore preferable for installation in damp areas, such as the bathroom. However, it must be borne in mind that when switching from a standard 220 V light source to a 12-volt analogue and the need to maintain the same power, the current increases several times. This will require the use of a larger cross-section conductor, which will greatly increase the cost of the system. This can be avoided by choosing very bright, but low-power ice lamps for replacement.
LED lamps are optimal in terms of brightness, durability and energy efficiency Source sdsvet.ru
Instructions for installing the lighting fixture
The ceiling chandelier must be installed according to certain standards, otherwise you will not be able to achieve the desired result. An incorrectly installed chandelier to this type of ceiling can cause damage to it, which will lead to a loss of quality and attractiveness of the entire structure. It is these factors that should be considered before proceeding with the installation and selection of the lighting product itself.
Do-it-yourself work may not provide the level of quality required for this complex activity. This is due to the fact that installing a chandelier on a suspended ceiling is not as easy as it seems, so professional workers with the necessary experience are often necessary. Thanks to their work, all processes will go through as quickly as possible and the end result will satisfy even the most demanding clients. In any case, installing a chandelier on the ceiling requires compliance with certain rules.
As a result, it is possible to provide high-quality lighting in any room, and the organic use of all elements creates the most attractive interior that meets all the individual preferences of the customer.
Regardless of the type of lighting device purchased, its installation begins with the installation of a profile for fixing the suspended ceiling cover. Then two lines are stretched between the profiles, at the intersection of which the chandelier will be located. After this, the fastening element is installed in the concrete base. As noted earlier, the product can be suspended using different fasteners. Below are step-by-step instructions for installing the chandelier with each installation option.
Connection diagrams for 220 V
Modern spotlights can be connected directly to a 220 V network - both in series and in parallel. Moreover, each scheme has the following characteristics:
- Sequential.
The easiest connection scheme to implement, requiring a minimum of consumables. Its essence is that the phase is transmitted in order to the lamps from the first to the last, and the zero conductor is connected to the last one.
The scheme has a number of features:
- The number of lamps is limited - as a rule, no more than 5-6 pieces.
- The light bulbs do not shine at full strength.
- If one of the lamps fails, all the others will stop glowing. In this case, to restore the operation of the circuit, you will have to check each spot device.
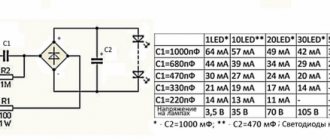
The advantage of this method is that it allows you to connect a large number of low-power light bulbs without including a step-down transformer in the electrical circuit. For example, this could be a chain of 22 lamps of 10 volts each, which will give a total of 220 V.
Diagram of serial and parallel connection of light bulbs Source svetilov.ru
- Parallel.
The essence of the parallel connection method is that both phase and zero are supplied to each lamp. Therefore, the scheme involves a large consumption of materials. However, thanks to this approach, each light bulb shines at full brightness, and the burnout of one of them will not affect the operation of the others.
If sequential connection of lamps implies only one way of connecting light bulbs - next to each other, then in the case under consideration there are at least two options:
- Trailed.
Initially, from the switchboard, the wires are supplied to the 1st device in the circuit, and then from its output in separate sections the voltage is transmitted to the 2nd, from it to the 3rd, etc. The method is used when there are a lot of participants in the circuit, and conduction for each individual wire is not economically feasible.
The downside is that if one of the lamps fails, the others will also stop working. However, it is easier to detect a failed participant than in the sequential method - it will be the one that is located immediately after the one that is working properly.
Diagram of loop and beam connection of lamps Source elektroznatok.ru
- Radial.
A phase and a zero are supplied separately to each lamp. Therefore, the breakdown of one device does not affect the others. Disadvantages - maximum consumption of conductors and the presence of a large number of connections.
Remote lighting control
You need to connect a remote lighting control system. What a great solution for dividing lighting into multiple zones without putting extra wires on the base switch. Such a controller does not require the console to be in line of sight. The radio signal encryption program reliably protects against interference from other consoles. Several controllers can be installed in one room. Each controller responds only to its own console. The maximum console coverage is 8 meters.
Switching modes are also carried out by a switch without using a remote control. Instantaneously turning off and on the circuit breaker leads to sequential switching of modes. Continuous shutdown resets the controller to its original state. Maximum load: 3×1 thousand watts. When connecting fluorescent or energy-saving lamps, the load power must be calculated based on the output power. The initial power of fluorescent lamps exceeds the nominal capacity by 2-3 times.
Let's say you need to install a new lamp somewhere, in a place where there are no special connections for it, and this happens quite often. In such cases, it is enough to connect this lamp to the nearest outlet and install a compact remote control included with the control panel. After this, you will be able to use the lamp, controlling its operation using this control panel.
In addition, with the help of an LED system, you can divide existing lighting groups into several, change the operating modes of lighting fixtures, and much more.
The difficulty in creating a remote control system for connecting a chandelier lies in where the controller should be installed. The controller is one of the most important elements of the remote control system. It receives signals sent from the remote control or fixed switch and executes the switching signal that is presented for the set lighting mode.
The parameters can be very different:
- turning on separate groups of lamps on a chandelier;
- adjusting the brightness of the lighting.
The stationary remote control has search functions on the remote control - the corresponding button is pressed and a signal is sent, including a melody or tone on the remote control, which greatly facilitates its search. As a rule, the controller is small in size and can be easily placed under the decorative cover of the chandelier, which covers the wiring on the ceiling.
You can install the controller in the wall using a fixed switch or in another place, for this you must run wires to it from the chandelier and the fixed control panel. Different controller models have differences in connection diagrams.
Features of 12 V connection
In order to connect to the electrical network and connect spotlights with LEDs at 12 volts or even lower voltage, circuits similar to those discussed above are used - in series with each other or in parallel - with a loop or beam. However, a significant technical nuance in such an electrical circuit is the presence of a transformer, which is installed at the input immediately after the electrical panel.
When choosing such a voltage converter, the total power of all circuit participants that are planned to be connected through it must be taken into account. For example, if there are 10 5-watt bulbs in the circuit, the total will be 50 watts. However, so that the transformer does not operate at peak all the time and does not burn out, it is necessary to take a margin of about 20-30% of the calculated value. That is, to 50 W you need to add 15 W to get 65 watts.
Wall lamp: install, connect
The mission of a wall lighting fixture is local illumination of any area in the room or emphasizing light flows on an object. Such devices look impressive and attractive, creating calm, romantic and relaxing streams of light in the house.
Having determined the installation location, it is advisable to first position the electrical cable inside the wall. It can be placed in a groove or behind drywall.
Installation specifics
Failure-free operation and durability of spot lights is ensured by proper installation procedures. Depending on the type of structure and materials of the ceiling covering, there are the following features of their implementation:
- Stretch ceiling.
The wiring is mounted in advance on the base-ceiling, after which spotlights based on LED technology or another type of lighting are suspended, then the functionality of the circuit is checked before they are finally connected. Next, the circuit is opened and pre-installation preparation is carried out.
Electrical wiring device for ceiling lighting
When mounting a lamp on the ceiling with your own hands, you need to carefully approach the electrical wiring equipment for it:
- Initially, you need to calculate the distribution of lamps on the ceiling, that is, their exact number, as well as the estimated power. How many spotlights will be located on the ceiling usually depends both on the footage of the particular room being equipped and on the power rating of each lamp. So, for 1 m² of a room a device with a power of 35 Watt will be enough, and for 3 m² - two devices with a power of 59 Watt.
- During the work process you will need the following set of construction tools: - pliers; - screwdriver; - drill; - construction knife; - drill; — branch boxes; — terminal blocks; - cable of the required length.
- When connecting ceiling lights, the work scheme involves installing branch boxes for each group of spotlights. It is best to keep these boxes in accessible places as they may need to be accessed during their service life.
Video description
Video review of connecting LED lamps in a suspended ceiling:
To do this, the light bulbs and all easily damaged structural elements are removed. After the canvas is installed, holes are cut in it for the spots. Then the sealing elements are installed, the devices are assembled and connected.
- Suspended plasterboard ceilings.
Equipment installation is carried out according to a similar scheme. That is, first, conductors are connected and secured to the installation sites of the devices, then the plasterboard covering is installed. However, before starting work, be sure to draw up an exact plan for the location of the wire exits - the places where the spots will be located.
When the ceiling is puttied, holes are cut in its surface - exactly where the conductors exit. Next, the lighting fixtures are mounted and connected. Then their functionality is checked.
Advice! As electrical wiring for connecting spots, it is recommended to use wires of a cross-section sufficient for the load being created with a heat-resistant insulating sheath made of non-flammable material.
How to install
To install the lamps, you need to drill holes and prepare the necessary tools. In addition, there is a big difference in making holes in tension ceiling systems and special care is required so as not to break through the fabric outside the selected area.
Hole preparation
To make holes for spots, you need to prepare the following tools:
- a crown that is used for woodworking with a diameter of 68 mm;
- screwdriver or electric drill;
- thin drill for metal or wood;
- stationery knife.
In a suspended ceiling
Glue thermal rings to pre-designated points on the stretch ceiling fabric and very carefully cut the fabric inside the ring. The lamp is attached to a special bracket installed on the ceiling frame in the area of the hole.
In a plastic suspended ceiling
In a plastic ceiling, holes for spots are made with a crown, just like in a wooden one. Be sure to treat the cut areas with sandpaper, sanding them well.
In a wooden ceiling
Holes for installing lamps are most often made using a special device - a crown. The diameter of the hole should be almost identical to the diameter of the selected electrical lighting device. For a more durable installation, it is best to drill a hole slightly smaller than the diameter of the front part of the spot, by 3-4 mm, but slightly larger than the inside of the lamp. The spot's fixation springs securely press it to the ceiling.
If you don’t have a crown, you can make holes as follows: draw a circle of the required diameter on the ceiling. It is necessary to drill holes along the line of the circle with a drill without going beyond the outer contour. Then, using a stationery knife, cut out the outlined circle along the drilled holes, and cut off the jumpers and burrs in the same way.
In drywall
The plasterboard plates produce even holes, which makes it possible to securely mount the spots on the ceiling. When working with drywall, you can use the second method of cutting holes using a utility knife.
Problems
When making holes for mounting lamps, you must be careful, since any suspended ceiling material has its own characteristics. Wood can crumble, drywall can wrinkle, plastic can crack, and tension fabric can break in the wrong place due to strong tension.
Wire pulling
The wire puller must be made of rigid steel or copper wire; it is used to pull the wires through the holes. Make the broach as straight as possible and bend it with a hook at one end. If it’s not very convenient to use one broach, you can make two by inserting them into the holes at the same time and pulling out the wiring.
Types of wire fastening
The end of the wire, secured with electrical tape in the form of a loop, is easily pulled out by pulling it out. The cables are attached to the ceiling frame, similar to the diagram for connecting them to lamps.
Wiring diagrams
When the frame of the suspended ceiling is formed, it is necessary to distribute the wiring, securing it to the frame in advance, in order to then remove the loops from the drilled holes. After all, if you secure the wires in advance according to the selected spot installation scheme, this will greatly facilitate the installation of lighting.
The loop-arc on the wiring at each hole is secured with plastic ties with slight sagging of the wire, to facilitate installation and prevent its strong tension from the possible effect of thermal changes in length during operation.
How to route wiring by placing it in the frame
This wiring is carried out at the frame installation stage, at predetermined installation points for lamps, to prevent possible difficulties. By bringing the wires to the installation points of the spots, a kind of wire loop is made, with a small supply of material.
You can lead it to one hole and then simply extend it to each lamp gradually. In this case, the wiring will lie on the ceiling itself inside the frame, since it is not fixed.
Connection features
Spotlights are installed after the finishing coating has been applied to the plasterboard ceiling sheets. The ends of the de-energized wires must be pulled through the holes and connected to spotlights.
Installation of spots may differ slightly, be sure to read the instructions.
How to connect spots
Necessary:
- Bring the antennae of the lamps together and forcefully insert the lamps into the holes; the springs of the antennae will firmly press the body of the lamp to the drywall.
- After checking the operation of the lamps, finally fix them in the housing.
When installing spots, it is important to position the wiring correctly so that it does not get caught under the clamping tendrils, since a stretched wire poses an increased fire hazard, since the electrical wiring may heat up during operation.
Connection to a two-gang switch
A three-core wire located on the frame is connected to a two-key switch in such a way that it is possible to turn on the lamps in groups. Each of the 2 keys is assigned to certain groups of lamps.
Correct serial connection between each other
The connection is very simple, the phase approaches all lamps one by one, in a chain, and the zero is connected to the contact of the last lamp in the circuit. Connecting spots in series saves consumables, that is, electrical wire, but has significant disadvantages, because if one lamp burns out, the next ones stop working. In addition, the lamps do not operate at full power, since each subsequent lamp in the circuit receives a reduced voltage.
How to assemble a lighting circuit using other connection diagrams
According to a parallel circuit, the lamps are connected in two ways:
- beam method - a separate wire and phase and zero are suitable for each lamp;
- loop method - for each unit there is both a phase and a zero in series from lamp to lamp.
How to assemble a lamp together
Spotlights have the same structure:
- cartridge;
- protective shade or glass.
Insert the lamp into the socket removed from the housing and secure it in the housing, securing it with a ring. The housing is attached to a special bracket, which is screwed to the ceiling.
For accurate and correct installation of spotlights, the main thing is to follow the installation sequence. The installation process itself is not labor-intensive and does not take much time, but the quality of room lighting is significantly improved.
Briefly about the main thing
Spotlights create more uniform and directional lighting in a given area compared to a classic chandelier. Their design includes a housing, a mount, a light source, a diffuser, a decorative panel, and wiring. The main advantages of spots are the ability to create both individual and group lighting, the formation of basic and decorative lighting, maintaining a useful ceiling height, minimal impact on the light level when one device burns out, and the simplicity of the device.
Disadvantages - high cost of equipment, the need for correct selection of parameters. Depending on the installation features and scope of application, there are the following types of spot lights:
- Built-in.
- Invoices.
- Hanging.
- External.
Based on the type of light source, they are divided into LED, halogen and fluorescent. In this case, there are 2 main ways to connect a ceiling lamp. These are serial and parallel options used for 220 and 12 volt circuits. The installation procedure has its own specifics depending on the type of ceiling structure and finishing materials.
Installation instructions for the chandelier
The following accessories are provided for installing the chandelier:
- a hook fixed in the floor slab;
- linear or cross-shaped strip (linear products are used to fix track lamps).
The hook is a hardware with a rounded bracket, screwed with a screw end into a dowel hammered into the floor slab.
This method of fastening is suitable for light chandeliers, and for massive products it is preferable to use hooks with butterflies, to secure which you will need to drill the slab into the void, where the petals are straightened.
To tightly fix the chandelier cap, it is necessary to prepare a plywood base. A hole for wires and a hook is drilled in the middle of this base, and this structure is attached, following the example of a support platform for point light sources, to punched tape.
Installation of a chandelier is carried out according to the same scheme as the installation of spotlights:
- a plastic ring is glued to the place where the lighting fixture is attached;
- inside the ring, the fabric is removed with a stationery knife;
- pull the plywood base to the surface of the stretch ceiling;
- connection to the power supply is made;
- the chandelier is attached to a hook;
- the decorative plug rises until it comes into contact with the fabric, resting on the plywood base.
The technology for hanging a chandelier using a strip is more complex, but the general installation principles remain the same:
To attach the overhead strips, it is necessary to provide a base in the form of bars. If one plank is used as a suspension, a block 15-20 mm larger than the plank is attached to the floor slab on punched tape. If a cross suspension is provided, two sections are attached to the main beam at an angle of 90 degrees using corner fasteners. A hole for the mounting bolt is drilled in the middle part of the base;
- The bar is attached to the bars, and at the same time it is connected to the power supply;
- The chandelier body is mounted to the slats;
- The decorative trim rises to the attachment point, masking the wires and strip.
Characteristics and technical parameters
There are several main characteristics based on which you should choose LED ceiling lights:
- Luminous flux strength. Affects the quality and quantity of lighting. Often the packaging indicates the characteristics of an equivalent incandescent lamp.
- Power consumption . Typically varies between 1-10 W. This indicator determines how energy saving the lamp will be.
- Life time . LED lights are extremely durable, but the power gradually decreases over time. The average service life starts from 25 thousand hours.
- Divergence angle . Characterizes the distribution of light flux throughout the room: the wider the angle, the more uniform the light. Lamps with a small angle are suitable for creating accents, and a wide angle - for full illumination of the room.
- Color rendition . Each lighting device has its own coefficient, which must be indicated by the manufacturer. The optimal indicator is more than 70.
- Emission color . Depends on the color temperature of the lamp. For the home, lighting of a yellowish tint is considered the most comfortable, because too cold and white a color is not very suitable for residential premises.
- Ripple . Any light flux pulsates during its propagation. Such fluctuations are invisible to the human eye, but can contribute to increased fatigue if the reading is too high.
Types of LED Ceiling Lights
The scope of use of LED ceiling lamps is vast and varied. Due to this, different models may differ significantly in technical parameters, design features and installation methods.
Based on their purpose , lamps are classified:
- General purpose . Their task is diffused, pleasant light, close to natural. This is the best option for homes and offices, allowing you to do without traditional massive chandeliers.
- Directional light . Mainly a decorative element that is used in interior and design to highlight individual areas or create accents.
- Linear . Lamps in the form of a tube with a rotating base, allowing you to change the lighting angle. Such models are popular in offices, retail premises, when organizing stands and exhibition areas.
Different types of ceilings require different designs. The following deserve special attention:
- Tensioners;
- Hanging;
- Rack and pinion;
- Armstrong ceilings;
- Grilyato ceilings;
- More rare and specific varieties.
They all require a different method of installation and fastening, which is extremely important to consider when choosing.
Most often, LED ceiling lights are presented in two categories:
- Recessed or recessed (built-in), which are ideal for suspended ceilings or plasterboard structures. They are easy to install or replace, and also practically do not heat up during use.
- Invoices involving preparatory work with the surface. They are distinguished by a varied design and unusual design, allowing you to embody interesting and original ideas.
Advantages
Before we consider the installation procedure for various types of lighting fixtures that are mounted on the ceiling, let’s take a look at their advantages and disadvantages.
Benefits include:
- A wide variety of lampshade designs. In this case, you can use various materials, from glass to fabric and metal. If we compare this type of lamps with street lamps, the latter do not have the ability to use various materials to create a lampshade.
- Small size.
- Possibility of use in any type of premises.
- They can be securely fixed to the ceiling.
- A considerable number of installation methods.
- They can provide full illumination of the room, and at the same time light rays do not enter the eyes.
Disadvantages of LED Ceiling Lights
- A cost that is several times higher than the prices of other models of similar efficiency.
- Gradual loss of brightness , which decreases over years of intensive use. Most often this happens if you buy inexpensive options. However, even such lamps pay for themselves in full due to energy savings.
- Narrowly focused light , due to which you will have to install more lighting points.
- Unpleasant radiation spectrum, not sufficiently suitable for comfortable living. But this often applies to either cheap or incorrectly selected models.
Scope of application of LED ceiling lights for home
LED lamps in the home are suitable for illuminating almost any room.
- Bedroom . It is necessary that the light is not too bright or harsh, because such lighting contrasts with the very purpose of the room.
- Living room . You should select models that will fit into the design. LED lamps in the living room are great for both complete lighting and the implementation of unusual design ideas.
- Bathroom . Various variations allow you to achieve the most comfortable lighting or highlight individual areas, such as a mirror.
- Kitchen . For the kitchen, directional lighting above the work surface, sink or stove can be an indispensable find. Do not install lamps near the stove burners to avoid the negative influence of heated air.
LED ceiling lights can be installed not only inside the house, but also outside it: in workshops, garages and other outbuildings.
Connecting a halogen lamp
Chandeliers with halogen-type lamps do not always operate from a 220 V alternating voltage network - these can be products designed for an alternating voltage of 6, 12 or 24 V. Therefore, in the second case, a step-down transformer will be needed.
Sometimes the manufacturer in each model of a lighting device operating on halogen lamps builds in special transformers to reduce the current.
In this case, the circuit is already assembled and all that remains is to install it. 2 cables remain unused, which are connected to the ceiling wiring, and the connection is made arbitrarily.
The diagram shows the principle of connecting a chandelier with an electronic transformer. This variation of the lamp has a controller unit. On the back of its case there is a connection plan. In the diagram: PE – ground, N – zero, L – phase
Chandeliers, which include a remote control, can be of various modifications: with halogen, LED or incandescent lamps.
There are also models of combined type. This device is complicated by the presence of a radio control unit. Essentially, this controller is a wireless device that is controlled via a remote control or a standard key switch.
Connecting such a lighting device is carried out similarly to the previous model, however, another wire will be added here, the thinnest of all.
This is an antenna through which the communicating actions of the remote control and controller are reproduced. It remains unchanged inside the glass of the chandelier.