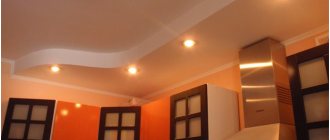
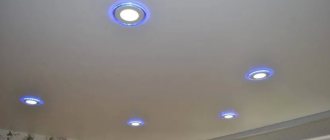
Designs of lighting systems in modern residential premises most often involve the installation of spotlights in plasterboard.
Spotlights for plasterboard ceilings allow you to obtain high-quality general light or accentuated lighting of individual areas of the room.
The features of spotlights installed behind plasterboard sheets will be discussed in this article.
Types of spotlights
Lamps for plasterboard coatings are classified according to the following parameters:
- voltage level;
- type of lamps;
- design features.
From a performance point of view, these parameters are not critical, but they are important when it comes to design ideas, the purpose of the light and the number of bulbs required. Below we will look at the features of choosing a lamp according to the above parameters.
Voltage level
There are three types of devices on the market that operate at different voltage levels:
- 220V;
- 12V;
- 3V (we are talking about LED lighting devices, for which voltage is not a defining characteristic, since their operation is related to the current driver).
The level of voltage required directly depends on the type of light bulbs. You need to decide on the type of lighting device in advance, since the design of lamps for plasterboard ceilings is characterized by some features.
A transformer is used to reduce the voltage, and the driver already mentioned above is used to operate LED lighting devices.
Note! When replacing one type of lamp with another, it may be necessary to change the wiring diagram.
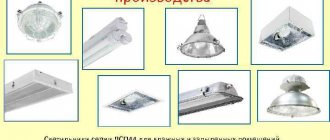
Lamp type
The following types of light bulbs are used for plasterboard ceilings:
- incandescent;
- luminescent;
- halogen;
- LED
Spotlights for plasterboard ceilings that work with conventional incandescent light bulbs do not require special devices for connecting them.
However, lamps with standard incandescent lamps have a number of disadvantages. The main one is the large size of the spotlights, since you will need a 7-8 centimeter gap between the drywall and the floor slab, and this will reduce the height of the ceiling.
In addition, incandescent lamps are prone to increased heating (especially if their power is higher than average), which will force you to take additional fire safety measures.
The advantage of incandescent lamps is their low cost and easy installation. The lighting circuit makes it possible to use a dimmer, thanks to which you can create more comfortable conditions for lighting different areas of the room.
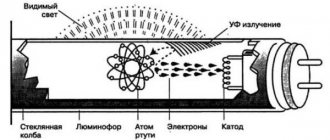
Fluorescent lamps save electrical energy. However, like incandescent lamps, fluorescent light sources are not small in size. In terms of eye comfort, fluorescent lamps are inferior to their competitors.
And most importantly: the use of plasterboard systems implies the smallest possible number of protruding parts, and fluorescent lamps are intended for open use.
The fact is that due to insufficient dispersion (inevitable in the conditions of a lamp placed in a plasterboard ceiling), the luminous flux deteriorates, even despite the presence of reflectors. It should be noted that dimmers and fluorescent light sources are incompatible due to the technological characteristics of the latter.
Halogen bulbs are the most common spot lighting option for plasterboard ceilings. This is due to the favorable proportion between electricity consumption and the level of comfortable lighting.
Halogen bulbs produce a fairly powerful and accentuated stream of light. In addition, halogen light sources have higher efficiency compared to incandescent lamps, and this allows you to save on energy consumption.
Note! Due to their low operating voltage, halogen bulbs can be used in rooms with high humidity.
Halogen light bulbs are compact - from 3 to 4 centimeters in height, which makes it possible to avoid a significant reduction in the height of the room. Most often, for the operation of this type of light source, you need a step-down transformer that supplies 12V. Halogen light sources can be controlled using a dimmer.
LEDs in spotlights are considered the most modern method of lighting. An LED is a semiconductor that emits light when current passes through it.
Among the advantages of LED bulbs, low electricity consumption should be noted. When using LEDs, you can choose the color of the lighting, which allows you to diversify the designer's options when planning the interior. Like halogen lighting sources, LED light bulbs are compact in height - from 3 to 5 centimeters.
The disadvantage of LED devices is the relatively high cost of the equipment. Although it must be said that in the future the costs will be paid off by saving electricity.
Design Features
Spot lighting is classified according to design features:
- rotary;
- irrevocable;
- open;
- closed.
Rotating lamps, unlike non-rotating lamps, can illuminate a room from different angles. This feature may be needed for accentuated lighting of a particular area at a given moment.
Open appliances lack moisture protection, but this is not necessary in ordinary rooms such as a bedroom or living room.
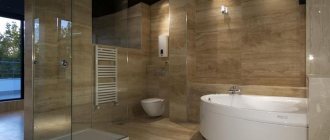
Built-in plasterboard ceiling luminaires, which are of the closed type, are protected not only from moist air, but also from direct ingress of water. Such lighting devices are used in wet areas (baths, saunas, swimming pools, etc.).
Modern products are classified according to a protection class designated as IP (Ingress Protection). In addition to this abbreviation, the code contains two numbers.
The first digit indicates the degree of protection against dust:
- 0—no protection;
- 1 - protection from particles up to 50 millimeters in size;
- 2 - up to 12 millimeters;
- 3 - up to 2.5 millimeters;
- 4 - up to 1 millimeter;
- 5 - less than 1 millimeter;
- 6 - full protection.
The second number indicates the degree of protection from moisture:
- 0 - no protection;
- 1 - protection from vertically falling drops of water;
- 2 - protection from splashes falling on the lamp at a slight angle;
- 3 - protection from drops falling at a significant angle;
- 4 - operation is possible despite water splashes;
- 5 — the lamp continues to work even under running water;
- 6 - direct exposure to water;
- 7 - short immersion in water;
- 8 - long-term immersion in water is possible.
It should be remembered that we are talking specifically about the security of the lighting fixture, but not the ceiling structure as a whole. Of course, drywall is not intended for use in conditions of constant contact with water. For an ordinary room, IP2 protection class will be quite sufficient.
Work order
The work flow is very simple. You need to mark the ceiling, create a metal frame, make wiring, cover everything with plasterboard and install lamps.
Creating a wireframe
The first step is to mark the places on the ceiling where the lamps will be installed. It is advisable to draw a diagram for yourself, indicating all sizes. After this, the place on the wall where the perimeter profiles will be attached is determined. You need to know how much the suspended structure will recede from the ceiling. Its height depends on whether additional insulation or sound insulation will be used. If not, then you can retreat by the standard 8 cm. Otherwise, you need to calculate the thickness of the insulating layers.
After creating the frame, wiring is done
When the lower level at which the illuminated plasterboard ceiling will be located is determined, you need to make marks on the walls. Along these lines, UD profiles will be attached to all walls parallel to the floor plane. Installation is carried out using dowels. When the guides are attached to all four walls, CD profiles are inserted into them in increments of 40-50 cm. They go from one edge of the wall to the opposite, parallel to each other. There is no need to attach them yet.
Suspensions are attached to the ceiling (they act as load-bearing structural elements) in increments of approximately 50 cm. They should be located above each CD profile. This profile is attached to them with metal screws. The hangers themselves are secured with dowels.
Wiring for lamps
The easiest way to do wiring for lamps is to power it from a chandelier. This is easily done using a regular terminal block. Recessed plasterboard ceiling lights can also be powered from another unit. To do this, the wire is laid from the outlet. But in this case, you need to trench the wall, and this is a completely different level of repair, affecting the entire room, and not just the ceiling.
The lamps can be powered from 220V, which is very convenient
All wires must be hidden in corrugation. It protects wiring from mechanical damage and is also an additional means of fire safety. This is a basic protective measure that many people neglect for some reason.
If a wooden frame is used for drywall or there are other wooden structures that will be located near the wiring, then the corrugated sleeve is not used. In this case, it is necessary to take a more expensive metal hose or metal pipe.
The wire cross-section should be 0.75 mm. If you use LED spotlights, then 4 W for each will be enough. The wiring should not hang or lie on anything. It needs to be attached to the ceiling. To do this, special clips are attached to the ceiling, into which the corrugated wire is very easily clamped. The wire for the lamps is connected to the wire from the chandelier.
An example of how wires for lamps should be drawn
The illuminated plasterboard ceiling will have special holes where the lamps will be mounted. Two clips are attached in the designated places for the lamps, and they are also mounted along the entire path of the wire. After this, the wire is fixed under the ceiling, and where there will be lighting, tongues (a loop of wire) are lowered below the level of the suspended ceiling. After this, the wire is led to the place of the next lamp, where a loop is made again, and so on until all the points are completed. At the end the wire is cut so that it also hangs below the level of the frame.
Final stage of work
Sheets of plasterboard are hemmed to the frame. They are attached with self-tapping screws in increments of 15-20 cm. It is important here not to forget where the wiring for lighting is connected. A previously created diagram with all dimensions will help with this. If it is available, it will be easy to make holes in the right places so that the prepared lamps for the plasterboard ceiling are in their place.
The hole itself is made using a drill with a special attachment. There are crowns that allow you to cut a circle of a given diameter in drywall (to fit the purchased spotlights).
Excellent option for connecting a lamp
The loop is pulled out and the lamp is attached to it. You can attach them by simply twisting the wires, which are then necessarily insulated. But if the wires are multi-core, then it is undesirable to twist them, since such fixation weakens over time, which leads to sparking and burning. It would be ideal to use a terminal block to connect all the wires.
The lamp itself has special clamps with which it is attached to the ceiling. At the end, all that remains is to check whether everything was connected correctly, after which you can proceed to finishing work.
If you have already assembled a suspended ceiling from plasterboard, and then wanted to create lighting using spotlights, then this can be done. It is not advisable to do this, but in the absence of a better option, you can resort to the method shown in the video.
Selection of components
Installation of spotlights requires the presence of the necessary components, including:
- Electric cable with a cross section of 1.5 square millimeters. The length is selected based on the wiring diagram of the current-carrying conductors.
- Terminal blocks. These parts are used to connect cable sections.
- Copper sleeves. Necessary for crimping twists, if necessary.
- A step-down transformer. It is used when operating halogen lighting devices.
- Current driver. Used in LED light sources.
Note! When choosing a transformer, you must proceed from the required total power of all lamps. In this case, the power of the transformer should be 20–30% higher than this indicator.
The driver must have a power reserve if a serial connection type is used. However, it should be borne in mind that in a sequential circuit, the failure of even one LED will disable the entire system. That is why parallel connection is more reliable, although it requires a dedicated driver for each LED.
Note! Many spotlights for plasterboard ceilings are equipped with their own driver.
Variety of designs
Today, ceiling devices of a wide variety of complexity are made from plasterboard. Moreover, they are all quite accessible for DIY assembly. For such a ceiling you can do:
- one level. Suitable for lovers of rigor and simplicity. This ceiling will fit perfectly into a room with low ceilings. Here you won’t get much in the way of complexity and pretentiousness of the designs, but you can play around with the lighting fixtures. Spotlights of LED or fluorescent models, as well as a central ceiling-type chandelier, will fit perfectly here;
Single level ceiling
- two or more levels. This design is good for large rooms. Hidden lighting in boxes or niches (placed between levels), as well as spotlights of any type, are suitable here;
Multi-level ceiling
- curly. Such ceilings need decorative lighting for their figured elements. As a result, here in the center you can install a chandelier, and on the figures - LED hidden lighting.
Figured ceiling
Deciding what to do with your own hands - a single-level or multi-level type of ceiling structure should be based on the purpose of the room and its dimensions.
Wiring
Laying the electrical cable is a key step when installing fixtures in a plasterboard system. Lay the wires correctly not after, but before installing the drywall - this is the only way to perform the wiring efficiently.
The wire cross-section should not be less than 1.5 square millimeters. It is recommended to opt for a parallel connection diagram, which will ensure autonomous operation of all light sources.
When laying wires, loops (20–30 centimeters each) are left in the areas connected to the chain of lighting fixtures, which will ensure future maneuverability when creating connections.
It is recommended to hide the wires in special corrugated channels with a high level of fire safety. If the ceiling is already installed, then holes are drilled in the drywall and wires are pulled through them to the lighting fixtures.
The wires are connected in accordance with the colors of the cores. For example, blue color is phase, brown is zero. When the colors have been sorted out, the supply wire going to another lighting fixture is clamped in the terminal box. In this case, only wires of the same color can be combined with each other.
The switch can only open a phase. If the circuit has a transformer, it is placed between the floor slab and the plasterboard ceiling. Twists of wires are pressed using a sleeve and insulated.
Open twists are not allowed. Wires cannot be placed diagonally relative to each other, no matter what installation diagram of electrical appliances is used. If the circuit is complex - with an abundance of wires, you will need distribution boxes in which there is a main supply wire, and all other wires are its branches.
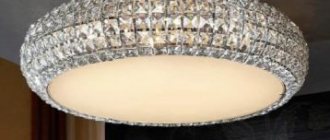
Chandeliers and light bulbs for plasterboard ceilings
Ceiling chandeliers are traditional lighting fixtures; they can be found in many apartments. And today they are the most popular light source. Install them in the center of the ceiling. There are two ways to mount chandeliers.
Compact and lightweight devices are attached through plasterboard to special embedded profiles. You cannot attach a chandelier directly to the casing, since the material may not support even a lamp that is not too heavy. If you need to attach a chandelier specifically to drywall, then it is advisable to choose the lightest model, and carry out the fastening itself using a special butterfly dowel, which will distribute the load over the sheet area.
When the room is large and you need to install a heavy, bulky chandelier, it must be attached to a concrete base. To do this, drill through the drywall and make a hole 10 centimeters deep in the ceiling. A fastening anchor with a diameter of more than 10 millimeters is inserted into it and an extension pin is attached. After this, the chandelier is attached to the ceiling using this pin.
Holes for lighting fixtures
The areas where there will be holes must be marked in advance on the drywall. This approach will allow you to avoid future inconsistencies between hinges and prevent damage to the fasteners of plasterboard sheets when drilling holes.
When preparing holes, it is recommended to follow these rules:
- Lighting fixtures are placed no further than 1.2 meters apart. It is important to observe the intersection of the angles of the light streams. At the same time, ceilings are characterized by insignificant dispersion angles.
- The distance between the place where the lighting devices are fixed to the plasterboard sheet and the wall should not exceed 60 centimeters.
- The holes are drilled using a wood crown or a circular adjustable drill. The latter option is optimal, since drills with adjustable cutters allow you to achieve better drilling quality.
- It should be kept in mind that the hole is blocked by the front side of the lighting fixture. In this case, the hole should not be larger than the internal cross-section. This is the only way to securely secure the device.
- Drilling is carried out at low speeds - this will avoid destruction of the finishing material.
Design features in different rooms
Making a simple single-level plasterboard ceiling with lighting with your own hands is not that difficult. This design is relatively simple, because only one frame is made for it. It is also not customary to use LED strips and neon tubes, which are usually used for hidden lighting.
Plasterboard ceilings with lighting for the living room are usually multi-level. In these cases, hidden lighting is used. If a single-level design is used, then care must be taken to ensure that the lamps are at an equidistant distance from the center of the room. The light should not hit the eyes, so there should be no lamps above the TV.
With the living room, due to its large size, there are two options: with a chandelier in the center and without it. If there is a chandelier in the center, then it is better to make the lamps at the edges not very bright and place them zonally so that the light from them is directed to certain areas of the room. If there is no chandelier, then brighter lamps are needed to compensate for the lack of a central light source.
When planning a place for lamps on the ceiling, you need to consider the possibility of using sconces
A kitchen ceiling made of plasterboard with lighting is needed to illuminate specific areas. The greatest emphasis should be placed on the dining table and work surfaces (stove, cutting table, sink). That is, the light needs to be directed to those places where you spend the most time.
The plasterboard ceiling with lighting in the bedroom is made in such a way as to create an atmosphere of comfort. In other words, the light should be dim, but there should be a lot of it. A lot of spotlights located above the bed look beautiful. You may also want to consider additional lighting above your desk, bookshelves, and closet.
It is definitely worth providing several switches for such lighting. This will allow you to turn on the lighting for the currently needed areas of the room.
A properly made suspended ceiling made of plasterboard with lighting with your own hands will be able to adjust the proportions of the room. If the light is directed along the walls, it will visually expand the room.
Installation of lamps
When the wiring is ready, the installation of lighting fixtures begins. There are spacer springs on the sides of the lamp that need to be compressed, after which the body will freely fit into the niche. You need to start the device carefully so as not to damage the wiring.
It is not recommended to pre-compress the springs using ropes or pieces of wire. The housing should fit through the hole without problems, since in the future it may be necessary to remove the device from its niche.
After installing the luminaires, they are immediately checked for proper functioning.
Installing spotlights for plasterboard structures is not a complex job. However, here, as in any other matter, it is important to strictly adhere to a certain technology.
It is recommended to pay special attention to the correct selection of components, such as light bulbs, transformers and drivers. The efficiency and operational life of the entire system depend on the compatibility and quality of these products.
Lighting design
They begin to work on lighting even during the creation of a suspended plasterboard structure. First, electrical wiring is laid over the frame; the wires lead to the places where light bulbs will be installed in the plasterboard ceiling in the future. Before sheathing the frame, holes are made in the sheets of material for the lamps.
The disadvantage of plasterboard ceilings is that after the sheathing is completed, access to the wiring will be difficult. To remodel a plasterboard ceiling lighting system or carry out repairs, the plasterboard will have to be removed. Therefore, before covering the ceiling, you need to decide on the type of lighting (general, spot, complex) and the type of lamps suitable for the chosen solution. Then you need to decide where the lighting fixtures will be located and connect the wires to these places.
Some types of lighting require special conditions. For example, LED strips can only be installed in multi-level ceiling structures with a partially open area between levels.
It is permissible to use several types of devices simultaneously. For example, spotlights and a chandelier, or an LED strip with spotlights. Combinations can be different, so it won’t be difficult to come up with interesting and effective lighting. Properly selected, it can transform a room, highlight the interior, and make the room visually larger. Lighting options can be seen in the photo.