After completing the work of covering the walls with plasterboard, the last stage remains - installing sockets in the plasterboard. The work is simple and does not require great knowledge and skills in electrical engineering - it can be done on your own, without inviting a specialist, even for an untrained person. But the installation of sockets must be carried out carefully and efficiently, since the level of fire safety of the home depends on this.
The principle of attaching socket boxes to a box
in drywall is carried out according to the prepared marks, and begins only when all dimensions are checked and correspond to the required ones. To begin installation, you need to prepare all the tools that may be required: a drill with a hole saw for the box, having a diameter of no more than 67 mm, wiring, if it has not yet been laid, a Phillips screwdriver and the housing itself for the socket or switch.
- We connect the drill to the power supply and carefully drill a hole in the drywall (you have already marked it and prepared it in advance). Since the wall is made of fragile material, make sure that the crown does not fall inward and damage the entire installation.
- You can also use a regular paint knife to cut out circles where the diameter of the future hole is marked, but such installation is not reliable as it can damage the drywall and over time it will begin to collapse and disrupt the fixation of the electrical appliance.
- After all the holes are made, we make the cap for the device. Cut any hole you like in it (there are markings there). Then we place the body in the hole and begin to press it with the screws, which are slightly pressed into the body (they are responsible for the movement of the mounting tabs). Don't forget to pull the electrical cable through the hole.
- When the socket box is fixed, it is necessary to connect the mechanism of the electrical appliance using a wire to the corresponding contacts, and then secure the entire device.
Installation Tools
In order to install sockets without interruption while searching for the missing tool, you need to prepare it in advance. You will need the following:
- tape measure and marker for marking holes;
- a drill and a special cutter (crown) for drilling a hole in drywall. The diameter of the working part of the cutter should be equal to the diameter of the standard socket cup - 6.8 cm. If you don’t have a drill, you can use a screwdriver for this task;
- air bubble level (short enough to 0.3 m);
- a screwdriver with an indicator for the presence of voltage in the wires being tested;
- a screwdriver (Phillips or standard depending on the shape of the slots on the bolts) necessary when attaching the socket box, wires and the socket itself;
- a stationery knife necessary for stripping insulation from wires when connecting them to terminals.
- Preparatory activities
The locations of the sockets are determined before the start of wall covering work.
You also need to lay the wires before you start covering the walls in order to hide them under the drywall.
Installation is carried out in the following sequence:
- First, a frame is assembled for attaching drywall sheets and attached to the wall. Its ends are attached to the floor and ceiling of the room.
- If a partition is being built, one side is sheathed at once. Wiring will be laid along it.
- A wiring diagram is created and the locations of the socket boxes are marked on it.
- In the vertical parts of the frame, holes are drilled with a drill for wiring.
- Wires laid to the locations of the socket boxes should be placed in a corrugated plastic sheath and routed through the holes prepared in the frame.
The cost of the protective shell is low, and it perfectly protects against possible damage and high humidity, so there is no reason to save on its purchase.
- The most optimal would be a cable with 3 cores in double insulation (with a core diameter of 1.5 to 2.5 mm). If you plan to use electrical appliances with high current consumption, the cross-section of the wires must be increased.
- Wires laid under the casing should be securely secured with pieces of wire or plastic clamps.
Once you have finished laying the wires and marking their exit points on the plan, you can begin attaching the gypsum board to the frame.
Hole cutting
After marking, in the marked centers of the circle it is necessary to make a hole using a drill with a slightly larger diameter than the crown drill (for example, an 8-10mm drill). We drill a hole with a margin, taking into account the length of the drill bit of the crown itself (but do not forget about neighbors and thin walls). This method is also suitable when working with a diamond core bit in drilling mode.
The process of gating. After drilling holes in the center of the future circle, you need to use a crown to go deeper into the wall a few millimeters (this only applies to the method of working with a hammer drill!). Along the intended circle, you need to drill the maximum possible number of holes to make it easier for the crown to “gnaw” the concrete.
With a diamond crown, you just need to drill - without chiselling, periodically letting the crown cool. It is worth noting that if a diamond bit gets on the reinforcement, its service life is significantly reduced.
When working with an angle grinder, the whole task comes down to making cuts in the wall to the required depth and hollowing out the area where the socket boxes will be located.
Marking the installation location of the socket box block
Let's move on to my example. I need to install a block of three socket boxes in this plasterboard partition.
The socket block is installed above the cabinet and is intended exclusively for sockets. They are planned to include a decorative lamp and phone chargers. In my case, the height of the cabinet is 45-50 (cm). We need to install socket boxes at a height of approximately 62-63 (cm) from the floor level.
Soon I will publish several articles where I will tell you in great detail about the options for the location of sockets and switches in different rooms (bathroom, bedroom, kitchen). So don’t miss the release of new articles - subscribe to the site’s newsletter.
So let's get back to the markup. Using a self-leveling laser level LD-SL-01, I mark a horizontal line at a height of 63 (cm) from the floor.
I really like the LD-SL-01 level, but sometimes I use the simpler and more compact Black Deсker LZR-310 laser level, although its beam is projected in only one plane and the level is adjusted manually using bubbles.
It doesn’t take much longer with the markings, but nevertheless it’s also convenient. I will write a separate review about it.
Then along the laser line using a ruler (you can use a flat block or profile) we draw a horizontal line with a pencil. After this, we no longer need the level and can turn it off.
We hope that the block looks symmetrical on the wall and mark the first center of the socket box on the line.
Then, using a ruler or tape measure, set aside 71 (mm) from the first center and mark the center of the second socket. Then from the center of the second socket box we set aside 71 (mm) to the center of the third socket box.
The distance between the centers of the socket boxes is exactly 71 (mm) and it must be measured as accurately as possible, otherwise the overhead frame may fit either tightly or with gaps, depending on your “miss”.
Yes, I forgot to mention that when marking, take into account where and in what place your profiles are located, otherwise such a ridiculous incident may arise (I took the photo from the Internet).
Hole for electrical outlet
The easiest way, which does not require the purchase of power tools, is to cut a hole for the socket box with a sharp construction knife.
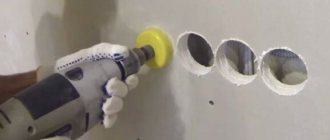
To do this, simply outline the product along the contour, attaching it to the wall, then carefully cut a hole with a knife. The edges using this method may turn out uneven, which is its big disadvantage. Often drywall breaks, forming large chips. The ideal option is to use a drill with a cutter (crown) on drywall for sockets. The diameter of the cutter is 6.8 cm, it is also used for installation work on installing spotlights. The procedure for creating a hole in the wall is as follows:
- Install the attachment on the drill.
- Drill the center of the future hole with a hand drill.
- Place the crown in the area of the finished hole.
- Cut a hole, do all work without strong pressure.
Dimensions of socket boxes for drywall
Before starting to describe the installation process, it makes sense to understand the features of the product. Let us immediately note that a regular socket box is not suitable for installation in plasterboard partitions; only a certain type of product intended for such cases is used here. Among the reputable manufacturers, the following brands can be distinguished:
- — Hegel;
- — Schneider Electric;
- — Legrand;
- - IEK;
- — Kaiser.
These products are classified by planting depth and outer diameter. These parameters are labeled H and d2 respectively. The standard diameter of the socket box for plasterboard is 68 mm. In addition, models with external diameters of 60, 64, 65, 70 and 75 millimeters are available.
If we talk about planting depth, here you can find the following sizes: 40, 42, 45, 60 and 62 millimeters
Please note that you can find products with non-standard fit dimensions on sale, but this is the exception to the rule rather than the norm.
Socket boxes are selected individually, depending on the installation location. If possible, and the thickness of the partition allows, we recommend choosing models with a seating depth of 60-62 mm. Such designs are much more convenient when disconnecting wiring, especially if the circuit excludes the installation of junction boxes. In this case, the wires are disconnected in the socket box, so every extra millimeter will play a decisive role.
In addition, in products with a large planting depth it is much easier to connect wires and install electrical equipment.
In today’s article, as an example, I will use socket boxes for plasterboard Schneider Electric modification IMT35150. These products have a standard outer diameter (68 mm), the seating depth is 45 mm.
The housing of the Schneider Electric IMT35150 socket box is made of non-flammable plastic. It uses a combined polypropylene + fire retardant material that can withstand temperatures up to 850°C. The case is quite durable, equipped with a wide front edge. There are plugs of various diameters designed to accommodate wires of any cross-section.
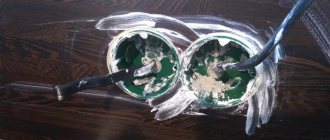
To fix the socket box in the partition, two metal tabs are used. The use of metal clamps provides a large area of adhesion to the surface, without damaging the plasterboard coating. To fix the legs, screw self-tapping screws are used, which, when tightened, securely press the box to the surface.
For variety, let’s look at Polish socket boxes for plasterboard from Pawbol Euproduct. The plastic feels very dense and reliable. Only here thin metal legs (similar to antennae) are used, fixed with plastic stoppers.
Please note that in both modifications the mounting tabs do not protrude beyond the external dimensions of the socket box. This greatly simplifies the installation process
When the box is installed in the seat, the tightening screws tear off the plastic stopper, moving the clamps beyond the boundaries of the socket box. Please note that Pawbol Euproduct are equipped with mounting screws with small and shallow slots, which causes some difficulties during the installation process.
How to choose the right one
Before purchasing this or that model, you need to decide on some features. Firstly, in which wall you plan to install it:
- Solid walls (concrete, brick, gas, foam blocks). For such floors, the most ordinary concrete socket box is suitable, without any additions.
- Hollow walls (plasterboard, chipboard, plywood, etc.). They will require socket boxes with special clamping claws.
There are also universal models that, if necessary, can be used for any walls.
Secondly, you need to calculate how many sockets will need to be installed at one point. In addition to single socket boxes, you can buy double, triple, etc.
Third, choose the desired shape and size. The standard shape is round, but square ones are also available. You need to know the following about sizes:
- Diameter of the outer part. There are 60 and 68 mm.
- Installation depth. There are also two types - 40 and 45 mm.
The most popular dimensions are 68x45. They accommodate most manufactured sockets and switches.
How to make the right choice
The socket box or installation box is an integral element of the installation of built-in electrical equipment carried out for hollow walls. With its help, you can reliably secure and protect electrical installation devices: switches, sockets, underfloor heating controls, dimmers, etc. At the same time, installing socket boxes in drywall is quite simple and can be done independently. Today, the socket box for drywall has a variety of variations, which differ in size. The most common installations are standard boxes with a diameter of 60-65 mm and a depth of 40-45 mm. The maximum diameter of such a box can reach 68 mm. The socket box for drywall can be:
- single;
- block. Most often used. Allows you to secure several mechanisms in one place vertically and horizontally, which are united by a common frame.
Block socket box
A socket in plasterboard can only be attached to a hidden socket box, which is installed in the wall cavity. Also, depending on the type of socket chosen for drywall, its manufacturer and design, the type of box assembly is carried out in two ways:
- the box and connecting tunnels are one piece. The ability to combine a device for connecting an outlet under drywall into blocks if necessary. The disadvantage of such a socket box is the need for mechanical removal of unnecessary connecting elements, since they will interfere with the fastening of the boxes;
- a socket box for plasterboard, having separate connecting elements. Installation of this option is very easy. It is used in places where a single socket will be placed in drywall. But in such a situation, you need to accurately calculate the required number of connectors.
The selection and installation of sockets in drywall is carried out on the basis of the material used to create this product. It is recommended to use devices made of self-extinguishing plastic. Buying products from other materials will not be practical, as the boxes will often fade. In addition, when choosing a socket for drywall, you should take into account the distance of the cavity
This should only be taken into account if there are small voids in the walls. In this case, the box must have a mounting element of the required size, and not the usual 50 mm. The remaining sizes and the type of socket box itself should be selected separately for each specific situation.
Preparatory work before installation
Installing a socket on drywall requires little preparation. This includes choosing the location, brand of wire and its size, laying the wiring at the right point and, first of all, measures related to safety precautions.
Only after completing these steps can you begin installing the socket box and the socket itself.
Safety precautions when working with electric current
The first thing you should know when starting any electrical installation work, even something as simple as installing an outlet in a plasterboard wall, is safety precautions.
The electric current supplied to our electrical networks is quite dangerous for humans. For domestic needs, a current of 0.2 A and a voltage of about 220 V is supplied
Safety rules will help you not to feel the effects of electric current.
In fact there are few of them:
- Never begin electrical installation work until you are sure that the network is de-energized.
- Use tools with insulated handles (plastic, rubber, wood). If this is not the case, wrap the handle of the existing one with several layers of electrical tape.
- Have an indicator screwdriver with you. Before reaching into the outlet, check it for voltage with an indicator.
- Do not use broken, repaired, or soldered sockets or their parts. Materials must be new and of proper quality.
- Select the correct wire cross-section.
- fridge;
- washing machine;
- TV;
- boiler;
- air conditioner.
If you follow these basic rules, your work will be safe.
How to choose a location to install an outlet
In fact, choosing where to place the outlet is not so simple. There is no need to focus only on accepted standards. According to European standards, the ideal height of the outlet is 30 cm from the floor level.
This arrangement is quite convenient, but there are exceptions to electrical appliances, for example:
These appliances require a different height to connect to electricity. Therefore, when planning repairs and electrical installation work, it is important to first think about where large household appliances will be located and where there will be public sockets. This way you won't have to run an extension chain to the air conditioner.
It is better to install a special waterproof socket with a lid at a height of 100 cm under the washing machine. The same model is suitable for a water heater. Electricity and high humidity are a dangerous combination, and such protection will make the use of household appliances safer.
A socket with an RCD is an excellent solution for a bathroom or kitchen. The residual current device protects the user from possible electric shock
Many refrigerators are equipped with a connection cord that is too short and require a power outlet at a height of 60-120 cm.
All kitchen appliances that are used from time to time and placed on the work surface should be connected at table level. It will be strange to pull the wire of an electric kettle or blender to a low socket at a height of 15 centimeters.
LCD TV requires special attention. If it will be located on a plasterboard wall, you need to decide in advance on the exact mounting location. The outlet should be hidden behind the screen, as should the unsightly black power cord.
Agree, it doesn’t look very aesthetically pleasing to have a TV on a bracket from which a wire runs down or to the side to the socket.
If you plan everything in advance, the wires from the TV will not be an eyesore when watching, but will be laid very compactly behind the bracket
The remaining universal electrical connection points should be located in areas where they will not be blocked by furniture, such as a closet.
Think through to the smallest detail what will be used where, distribute power points, select switches and sockets. This will allow you to count the number of single, double or triple power outlets.
How to choose wire markings
The main requirement for hidden wiring under drywall is fire safety.
For this use:
- fire-resistant boxes;
- corrugated sleeve;
- non-flammable pipes;
- special wire in double insulation.
The wire or protective pipe is attached to the wall using special clips. Where necessary, distribution boxes are installed. The height of the distribution boxes above the floor level is 20-25 cm.
Many wires can go to the distribution box at the same time: from sockets, switches and lighting fixtures. This insulation deprives the ignition source of oxygen and prevents the spread of flames.
According to marking, the following cables are most often used:
- NYM;
- VVGng - non-flammable;
- PVS.
The NYM cable is used to equip power wiring to an electric oven, a powerful water heater, and an apartment electrical panel. Copper conductors insulated with chalk-filled rubber will prevent fire from spreading.
The VVGng cable is most often used to connect other sockets. Its insulation is made of polyvinyl chloride, as is the sheath connecting the individual cores. The marking “ng” means “non-flammable”, which means it can be safely used when installing sockets in drywall.
Detailed marking of the VVG wire shows how many cores a specific type of cable has (first digit) and what is the cross-sectional area of each of them (second digit)
PVS – flat multicore cable. Often used in hidden wiring, it is not inferior to other types of wires in terms of safety. Polyvinyl chloride insulation and shell are fire resistant.
The cross-sectional area of the cable must be selected based on the load. Ideally, you need to estimate the current that will be consumed by an electrical appliance connected to a specific outlet. Then, according to the table, select the required diameter of the wire core.
However, in practice, any household appliance can be connected to the outlet without restrictions, and it must withstand the load. According to standards, for apartment wiring, 4 squares (4 mm2) of copper wire are sufficient, that is, the diameter should be 2.26 mm. If the cable is multi-core, the area of each core is summed up and the total cross-section is obtained.
Rules for laying wires behind drywall
Before installing sockets, you need to lay a cable connecting the electrical panel to each connector. This is done in advance, even at the stage of finishing the walls or erecting partitions, since after the drywall is screwed in, it will be impossible to lay hidden wiring.
There are 2 types of situations here:
You can save on the wire and lay it along the shortest path, that is, at an angle, diagonally, and generally in a free order. Why is it better not to use this method?
Properly installed electrical wiring under drywall will look like strictly vertical and horizontal cables. Diagonal connections are allowed only in extreme cases
When making renovations, you probably thought about everything. But after a few years, you may need to install an additional switch, change the location of wall lights, or hang a picture on the wall, after all.
To avoid such surprises, we recommend placing the wiring parallel to the floor, adding a few right angle turns. It’s better to document the layout diagram: draw a plan, a drawing, or just take a photo on your phone.
So, after a few years, you will be able to drill into walls anywhere without any problems or fears without consequences for the electrical wiring.
Adviсe
- You cannot install points near the floor; you must raise the markings up the wall by at least 20-50 cm.
- The size of the crown for a standard socket box is 68 mm.
- If, having created a hole, there is a metal or wooden profile, it is “cut down” and drilled out.
- Before installing the box, you need to insert the cable into it. It can come out from the top of the plasterboard structure or from the side. Accordingly, remove the plugs on the box (top or side, bottom).
- If several holes fall on the profile. It is “exposed” with the same crown. Finally cut with metal scissors.
Installing a firebox into a plasterboard surface does not take much time and effort if the markings are done correctly, you have power tools and high-quality materials (crowns, boxes) at hand. Socket boxes are made from plastic by various companies.
It is worth paying attention to the quality of the plastic used, the thickness of the socket
Installing socket boxes
After cutting the holes, we prepare the electrician’s tool and install the socket boxes. But before that, you need to make a hole in them for drawing the wiring.
Next, we pull the wire through the mounting box, place it in the hole and fix it with the help of paws.
But there are some nuances regarding the design of socket boxes.
In some types of boxes, the groove along which the foot moves has a smooth transition.
In the extreme position (near the bottom of the socket box), the foot turns out to be completely recessed into the groove.
But as you move (when you tighten the screw), due to the transition, it begins to protrude above the body, which allows you to fix the socket box (on the outside side, the edge around the circumference of the body acts as a stop, and on the inside there is a tab pressed to the sheet with a screw).
It is not difficult to secure such a socket box - we install it in the hole and fix it. In this case, the position of the paws does not matter.
The second type of box differs in that its groove is even along its entire length. But so that when installing the socket box in the hole, the tabs do not interfere, special niches are provided for them, in which they hide (by turning on a screw).
This type of socket box is mounted like this: we make sure that both legs are in the niches and install it in the hole.
Then, rotate the box so that the screws of the legs are positioned vertically.
In this case, the foot of the lower screw will come out of its niche (will protrude above the body).
If you tighten it a little with a screw, it will no longer be able to change its position.
To pull the second tab out of the niche, turn the socket box 180 degrees so that the top screw is at the bottom.
And then we attract both legs, fixing the box. But we note that you should not immediately clamp the tabs completely; it is better to leave them unstretched for now (so that you can rotate the box).
Installation of a socket box
After purchasing materials, you can outline the installation location. The technology used for installation differs depending on the type of wall. Working with concrete, aerated concrete and brick is almost identical, but working with drywall is different. Differences are also observed in the set of tools that are required.
Installing a socket box in concrete, aerated concrete or brick
Working with such wall materials requires specialized tools. You will need to prepare:
- perforator;
- core drill 68 mm;
- chisel or pick for a hammer drill.
Core drill
Prices for socket drills (core drill)
Core drill
First you need to make a mounting hole in the wall to install the socket box using a special core drill. It is installed on a drill or hammer drill. Crowns come in different price segments and differ in cutting edge material. They come in diamond and carbide. Drills also differ in operating mode. Some are used only with a drill, while others are impact, so they are suitable for drilling with chiselling included.
If you need to drill reinforced concrete, you will need to use a more expensive diamond-coated bit on the segments, since cheap equipment breaks. You also need to set the optimal number of revolutions recommended in the instructions for the drill.
There is a concrete drill in the center of the cylindrical crown. It is used for alignment. The protruding drill is placed in the center of the future socket box and deepened into the wall until the ring begins to be drilled with a crown. After this, you need to stop drilling and remove the alignment. This will prevent the protruding part of the tool from making a through hole. The centering drill is removed by knocking it out with a wedge or unscrewing a special clamping bolt.
Drilling into the wall
If you need to install a block of sockets, then you need to look at their instructions, as well as the parameters of the socket boxes and determine the center distance. Usually it is 71 mm. To make everything smooth, ideally, immediately after removing the crown to remove the centering drill, it is necessary to make markings from the small hole along a horizontal line in increments of 71 mm. The resulting points will be used in the future to center subsequent drillings.
Marking for a block
After drilling, a circular hole will remain. All that remains is to knock out its central part. This can be done conveniently using a hammer drill with a lance. You can get by with an ordinary hand chisel and hammer. You need to insert the tool into a narrow strip of a larger drilled circle and strike. As a result, the central part will fall out. When working with aerated concrete or brick, this is not difficult. It will be more difficult to knock out concrete if it is reinforced with steel reinforcement.
Installation sequence
Having a hole ready, you can cut a groove in the wall to the ceiling, where the junction box is located, in order to make a branch of the power cable. To compensate for the error, the laid cable is taken 30-40 cm longer. In the future, the excess can be cut off. When moving on to laying the cable and connecting to the junction box, you will need to turn off the power to the room.
Junction box
After preparing the groove and the hole itself for the socket box, you need to insert the installation box into it and check the depth so that nothing sticks out. Next, you should prepare a thick mortar. It is most convenient to use alabaster and gypsum plaster.
To insert the power wire into the box, you need to break out the window using pliers or cut it off with a knife. In such places, manufacturers make the plastic thinner to allow mechanical extrusion. Next, you need to place a little solution deep into the hole, and then insert the box with the wire inserted into it.
Gluing socket boxes
The socket box should be leveled using a level. If it has only two vertical or horizontal fasteners, then their orientation must be selected depending on the characteristics of the purchased outlet. If there are 4 fasteners, this does not matter.
Socket box with two fastenings
The side cavity between the box and the wall is also filled with solution. If alabaster was used, then after 3-4 hours the installation box will sit securely. You should wait until the solution is completely dry and stops evaporating. Under no circumstances should foam be used to secure the socket boxes, as it is a flammable material.
Work as an angle grinder
Laying additional wiring for ready-made gypsum board finishing
How to stretch the wire and install a socket box under the mounted drywall? It all depends on what is between the wall and the sheets.
- If the drywall is glued to the wall, you will have to cut through the finishing surface and make shallow grooves. In this case, it will be necessary to restore the front layer (paint or glue a strip of wallpaper).
- When mounted on a profile, the task is simplified. Of course, you need to know the layout of the metal guides. In order not to spoil the upper part of the wall, the power cable can be routed from below, from under the baseboard. First, a hole is drilled for the socket box. Then, the plumb line determines the location of the cable entry (the plinth in this place is temporarily dismantled). A rope with a plumb line is lowered into the prepared hole, which is pulled out from the lower hole for entering the cable. The wire is attached to a rope and pulled up.
Next is the usual scheme: installing the box in any way. The input cable is pulled under the baseboard to the distribution panel.
If there is soft insulation between the drywall and the wall, you can use steel wire instead of rope (which remains after installing the corrugation). This method does not work with rigid insulation boards.
Considering the uncontrolled position of the cable under the plasterboard, it is recommended to use corrugation. As a last resort, a wire with three layers of insulation.
After installing additional wiring, be sure to make changes to the current power supply circuit. Otherwise, during repairs you will damage the new cable.
Marking, drilling holes
When laying wires, their ends are brought to the installation site of the fittings and left with a small margin, without passing through the casing. Usually the end is tied to the nearest profile or jumper.
Marking for holes begins with a common horizontal line raised above the finished floor about 30–40 cm for sockets and 80–100 cm for switches. In general, switches are mounted at the same height as door handles. Marking is carried out only in the place where it is guaranteed that the frame profile will not be found.
Expert opinion
Viktor Pavlovich Strebizh, lighting and electrical expert
Any questions ask me, I will help!
This method contradicts the modern concept of repair, in which all engineering communications should be hidden from prying eyes. If there is something you don’t understand, write to me!
Installation of socket boxes in drywall: stages of work
It is worth noting that it will not be possible to install socket boxes in plasterboard the same way as in concrete, since the fittings are very different. There are four screws in the socket for drywall, two screwed in and two sticking out.
Each builder installs them in his own way, but the meaning does not change: the 1st pair is intended for installing a socket.
Required Tools
No installation is complete without a tool, so it’s worth preparing it in advance:
- drill;
- ballerina nozzle or crown;
- knife;
- screwdriver;
- roulette;
- pencil;
- level;
- iron ruler.
Applying markings for installing a socket box
We take a tape measure and measure a certain distance to the place where, by definition, the fittings will be located. We mark these places with a marker. At the next stage, we make holes in the gypsum board. There are a large number of variations on how to do this, but as clean and good as possible - only with a crown on drywall or wood. The diameter of the nozzles is different; the optimal one, of course, is the typesetting modification.
Applying markings for the socket box
Before installation work, you need to draw a wiring plan indicating the installation and dimensions of the apartment’s furnishings. Spend a little time to draw up this plan, decide where and what will be in the interior, otherwise, if something does not go according to plan, you will have to redo it. And after finishing it will be problematic.
Cutting a hole for the socket box
The standard hole caliber is 68 mm. If the bits are set, then you need to select the desired blade size, then install it on the attachment, and attach the assembled structure to the chuck of a conventional drill. A powerful tool is not needed here, since drywall is cut very easily. All actions are performed from the outside of the plate, and a hole can be drilled in any position of the sheet.
Drilling a hole for a socket box
Do not press too hard on the drill, let the bit itself make the hole, otherwise there is a chance of breaking the drywall.
Installation of a single socket box
If the preliminary stage is carried out correctly, installation of socket boxes in drywall will take place instantly and without questions.
We insert the fittings into the gypsum board in the following way:
- We take the wiring out into the hole made and thread it into the socket box.
- We unscrew the special fasteners to fix the rosette frame.
- We tighten the screws until the fittings are motionless.
- We install the frame in the socket box in special clamps designed for this purpose and secure it with screws.
- In addition, you need to tightly tighten the wire that secures the tabs to the fittings. In this case, the twisting process continues until complete immobility.
The socket box is installed, all that remains is to install the socket and secure it with a screw. We will describe below how to install a socket in a socket box in drywall.
Installation of a double socket box
The principle of installing a double socket box is not much different from the option described above, the only difference is that two holes are made, each of which is routed through a wire. They will subsequently be attached to each outlet.
But there are some nuances in applying times
- Measure the required distance from the floor.
- Place a mark and draw a line using a laser level.
- Then you need to determine the center of the second hole; to do this, you need to measure 72 mm from the center of the first socket and draw a vertical line.
- If you want to install a group of sockets, then mark all other centers in a similar way.
Video instructions
We recommend watching the following videos:
Perhaps, when installing the first socket, some difficulties may arise due to not knowing how to install the socket, but installing the next ones will be much easier. The main thing is to follow the recommendations and exercise maximum care when carrying out electrical work. The above technology will not only allow you to install a socket in drywall - it is also applicable when installing switches and double sockets.
The final stage of work
At the final stage of work, the installed socket boxes are adjusted. Possible defects are eliminated, dust is removed, and the cable is cut to the required size.
If there are a lot of cables, then when cutting, you need to remember their markings. Stickers with signatures are transferred to a new place so that there is no confusion later.
If during drilling and installation a drywall chip appears somewhere, it must be eliminated using gypsum putty (Uniflot, etc.). To increase strength and prevent cracking, the putty areas are pre-glued with mesh bonding.
Difficulties that may arise and their solutions
One of the most common problems that arise when making a seat for a socket box is getting into the profile to which the plasterboard sheet is attached.
In this case, it will not be possible to install the mounting box, since its height is much greater than the thickness of the drywall.
That is, for installation you need additional space under the sheet so that the socket box goes all the way.
This problem can be solved very simply - using a chisel (chisel, screwdriver) and a hammer, we cut out the interfering section of the profile. This will not affect the bearing capacity of the profile in any way.
The situation is worse if the drywall is glued to the wall without using a frame made of a metal profile (such installation also occurs, although it is rare).
In this case, you will have to make a recess in the wall using a hammer drill with a chisel or a hammer with a chisel.
Another situation concerns the installation of a block of sockets (several of them are located in a row, one next to the other).
For reliable fastening of each socket box, it is necessary that there are jumpers between the holes for them.
And this is where correctly executed markings will help.
It is done like this: select the location for installing the outermost socket, and mark the center of the hole.
Then draw a straight horizontal line through the marked point.
Next, measure 72 mm from the center of the first hole and make a mark (this will be the center of the second hole).
We make a few more marks on the line (according to the number of sockets in the block), observing the specified length between the points.
It's simple - the diameter of the hole is 68 mm, and between the centers we have 72 mm, and after cutting the holes we will get jumpers 4 mm thick in the thinnest place.
POPULAR WITH READERS: Smart sockets, what they are, types, design and principle of operation, how to install and connect to mobile devices.
Selecting installation locations
The installation location of sockets is not regulated by modern rules, so the socket can be installed where it is convenient to use it.
According to the standards established in Europe, the socket must be located at a height of 0.3 m from the floor. In some cases, this is justified, but, for example, in the kitchen, such an arrangement will force the housewife to make a lot of bows when turning on and off kitchen electrical appliances while cooking.
It is also better to install the outlet behind the aquarium higher for ease of connecting the backlight, filter, and compressor. And the electrical cords will not lie on the floor and interfere with movement around the room.
Installation and connection of sockets and switches
The devices must be fastened carefully so that all connections are correct and extremely reliable. House wiring is most often divided into two or three main wires:
- working zero – N (mostly blue);
- phase – L (brown);
- grounding (protective zero) – PE (yellow-green).
But you can rely on color only if the distribution was initially carried out according to this rule. To do everything without errors, each device has its own connection sequence.
If the switch is built in series with the light bulb, then the sockets are usually connected in parallel
It is also necessary to first determine the type of wiring. The fact is that in old apartment buildings there is no separate outlet for grounding, but there is a ground connection. In such a situation, the PE connection terminal remains free, and the green-yellow core (if any) is bent and insulated.
The easiest way to install sockets. Standard technology:
- The wires removed from the box are cut to the required size, and the ends are stripped. It is taken into account that everything must fit freely inside the module.
- The outer plastic cover is removed; to do this, the central screw is unscrewed.
- The internal base most often combines a metal plate and an element with contacts. To connect the cores, screws are unscrewed, which release the connectors.
- Phase and zero are connected in any order and attract well.
- Next, you need to attach and align the frame and fix the overlay with openings for the fork on top.
Before connecting the socket, all 3 wires should be checked for voltage with an indicator
Switches on plasterboard walls should be installed slightly differently. The main difference is that it is the phase that is supplied to the break (to the contacts). The device will also work when the zero is connected, but in this case the lamp will always be energized.
When installing the switch, a phase wire is placed on the break; it can be detected using an indicator; under voltage, the indicator light should light up
What should you pay attention to?
Before you carry out the installation, be sure to select the type of electrical outlet that you will use. The modern market is ready to offer you the following types of glasses for sockets and switches:
Plastic structures that do not have presser feet. This type must be used in a concrete or brick wall.
Socket box with presser feet. This type of construction is perfect for drywall or plastic panels.
Metal structures with and without bottom. Previously, these structures were used in old houses. Today, these structures can be used to conduct wiring in a wooden house. In the PUE rules you can find information that installation of sockets and switches in wood can only be done using metal socket boxes.
If you have already decided on the type of structure you plan to choose, then begin the preparatory work.
Popularity of drywall
Nowadays, plasterboard sheets are very often used for interior decoration and leveling the walls of rooms and creating partitions.
This material greatly facilitates finishing work, has a fairly large list of positive qualities, for which it has become widespread.
After fixing the sheets of drywall, it’s time to complete the next stage of work related to the electrification part - installing sockets and switches in the walls.
The installation work is not complicated, so it is quite possible to do it yourself, without resorting to the help of anyone.
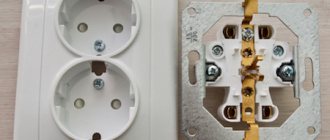
Preparing the socket box for installation
A high-quality socket box has plugs in the openings for the cable. Holes of various sizes are designed to accommodate electrical wires of a certain thickness. And the products also have metal fastening tabs for fixing the socket box on the other side of the plasterboard sheet. They are attached using self-tapping screws. The working surface and socket box need to be prepared beforehand. This process involves the following steps:
- choosing the optimal socket box that matches the type of sockets and switches. And also a whole block is often used to install a complex of devices;
- The surface is marked and the installation location of the socket box is determined. Above the floor level, sockets should not be located below 30 cm, and in the bathroom and kitchen this figure is from 100 cm;
- The markings are carried out directly on the walls with a simple pencil. This method ensures accurate and correct installation of electrical system parts.
During installation, the rules for placing sockets are taken into account
Before installation, it is necessary to remove the plugs in the cable entry area. In this case, the wire with optimal parameters is selected in advance.
Installation of the box
First you need to make sure that the gap between the wall and the plasterboard sheet is at least 45 mm, which will allow you to easily install the socket box. If the distance is smaller, you will have to chisel the base surface with a pick or a concrete crown to achieve the desired size.
The installation process will look like this:
A wire is pulled to the hole just made in the drywall, to which the socket will subsequently be connected (it should already be under the drywall at the installation site)
For convenience, it would be better to pull it out of the hole a certain distance. Then you need to pick up the electrical outlet box and remove the plug from the most convenient side for threading the cable and pull the wire through it. Now the glass is extremely carefully installed in the hole. As a rule, the antennae of the fasteners are located horizontally, and the screws securing the socket itself to the box are located vertically
This rule is flexible; in fact, it is much more important that the socket box stands level. Again, you need to take the time, and, armed with a level, “measure seven times.” When there is no doubt about the correct position of the box, you need to use a screwdriver to rotate the screws responsible for the fastening tabs. You shouldn’t be too zealous; if you overtighten, they will destroy the plaster; after all, the material is very soft. But at the same time, it is also impossible to fasten it weakly: the socket will “dangle”. So you need to find some kind of “golden mean”.
Correct fixation of the socket box
This is what the correct installation of the socket box looks like
When the hole is drilled, it’s time to figure out how to install the socket box into the drywall. Place the glass in the hole and see how tightly it is clamped. There may be an error with the dimensions and you will have to drill additionally into the wall. The glass must be installed flush with the wall. If everything is fine, then we connect the wires.
Everything is ready to connect and install the outlet itself
A special hole is broken out in the socket box through which the cables are inserted. When the socket box is inserted into the drywall and adjusted, it is necessary to fix it there. Using a screwdriver, special bolts are tightened, which bend the petals so that the glass is tightly fixed in one place.
This is what the fixed glass looks like from the back side
If the box does not wobble and is fixed tightly enough, then you can proceed to installing the socket itself.
Installation of socket boxes in drywall
We have made the markings. It needs to be done very carefully, and given that our wall is plasterboard, it will be very easy to do, imagine what you are drawing on paper.
Let's start making holes for the socket box
If you doubt that you can do everything accurately enough, you can first drill holes along the crosses using a drill with a smaller diameter. Crowns usually use a 6mm drill bit. This means we need to take a diameter of 3 - 4 mm and make our task a little easier. Now take a drill or screwdriver with a pre-installed bit. Carefully install the centering drill into the hole and, pressing lightly, crown the hole. You should not do this with high speeds and strong pressure, the drywall is already corroded very well, and with the right approach, the holes turn out to be of high quality and do not shift from the centering holes. We have made the holes, the last preparatory touch remains. If you look closely at the plasterboard socket box, you will see a lip along the edge of the socket box. After installation, it will protrude half a millimeter above the plane of the drywall and it will not be very convenient for finishers to putty the wall. We take a stationery knife and very carefully remove the chamfer from the holes. Try it on one hole first and periodically try on the socket. We need to ensure that the side is flush with the sheet of drywall. Having achieved a positive result, we do this with all the holes and insert all the sockets into the holes. We remove all the wires from the prepared holes. We punch holes in the socket boxes for cable entry
We insert the cable into the socket box and install it.
When installing the socket boxes, pay attention to the fact that the presser feet should be at the top and bottom. Alternately, set the socket box level and tighten the screws that press the socket box to the drywall
We carry out this operation with all sockets.
without junction boxes
high-quality disconnection
During the marking process, care should be taken to ensure that the holes do not hit the metal guides. It would be best to discuss in advance with the installers who will install the partitions so that the partitions are installed taking into account the location of the socket boxes
Adequate and competent finishers always meet halfway needs and the work is completed quickly and efficiently. The markings primarily determine how your frame with rosettes will look later. Try to maintain horizontal and vertical lines. All marking, as well as subsequent work, must be carried out carefully and accurately, and then one after the other, everything will be neat, simple and beautiful. Choose high-quality socket boxes; installation is easy. Although you will never see this socket box again after installing the socket, the installation products must be of high quality, like all electrical wiring. When tightening the clamping screws, do not use excessive force; if you overtighten them, you can break the plasterboard sheet and it will be very difficult to install the socket box into it.
This concludes the article about installing socket boxes in a plasterboard wall. Any man can do this kind of work, the main thing is to do everything carefully and slowly!
Wall preparation
It is necessary to properly prepare the plane itself for installing the socket box into it. It is best to pre-putty the gypsum board so that the surface holds its shape well when drilling with a drill with a fitted crown of the appropriate size. You can also use a preliminary primer, since as a result, the drywall will not crumble during the work. We select the diameter of the crown for the socket box in accordance with the dimensions of the socket being installed.
And as soon as the coating dries after putty and primer, you can directly begin drilling the hole itself. Attention: drilling in plasterboard is best done with a special drill attachment called a crown. But if you are not such a professional, and this attachment simply was not at hand, then you can do the work using a regular drill and a construction knife
Then we use the product itself as a template for marking. The hole must be drilled and made end-to-end, without visible gaps (it is better to drill a millimeter smaller in diameter in order to drive the socket box into the hole that is drilled with some effort) - then installation of the box under the socket will be successful. Professionals recommend treating the hole made with putty and primer, which will allow the socket to better secure itself in the socket.