Sooner or later, any owner of this device will have to replace a burnt-out heating element in a storage electric boiler.
Don’t think that it will serve you for decades, no matter how high-quality and expensive the model is. Heating elements fail for two reasons:
- scale formation and burnout of the working element (heating coil)
- corrosion and mechanical failure
Scale and cleaning of heating elements
Scale forms primarily in the presence of hard water. Just 1mm of scale gives 75% additional thermal insulation. Thus, the heating element under such a large layer of salts simply begins to overheat.
The first sign of scale formation is a distinct hissing or whistling noise.
When the noises become louder, but the boiler continues to work properly, do not delay cleaning, otherwise it may be too late.
Disassemble the boiler, as shown below, and begin cleaning. This can be done in two ways:
- a regular knife or wire brush
- if the scale is very hard, then use citric acid or special products
Cut off the neck of a 1.5 liter plastic bottle and dilute the solution in it:
- warm water 60 degrees
- 7 teaspoons citric acid
Soak the heating element in it overnight. After which, in the morning you clean off all excess. The result is sometimes simply amazing.
How to change the heating element in a water heater
Before you start replacing the heating element, you need to read the operating instructions for the water heater. It contains all serial numbers of parts. Using this number you can easily select a new spare part.
Professionals recommend installing a new heating element only if it is intended to operate your model. The heater is mounted inside the boiler and secured tightly with screws. Install other removed parts and connect wires.
Then the water heater is again attached to the wall, and the water supply system is connected. The boiler tank is filling. If the seal is not broken, there are no leaks, you can supply electricity and turn on the heating.
Corrosion of the water heating element
Why does the heating element body corrode and collapse? The fact is that the heating element in the boiler is equipped with a magnesium anode.
Without it, a galvanic couple is formed inside the titanium:
- tank - heating element
And with a magnesium anode:
- heating element - anode
Through this anode, all stray currents flow to the ground, gradually taking with them some part of the anode body. When it is completely destroyed, these currents begin to flow down the body of the heating element.
The growths on the heating element do not form evenly. Because of this, different parts of its copper shell acquire different expansion coefficients. As a result, surface tension is created, which breaks the shell of the heating element.
In many service centers, if the boiler breaks down completely, you may even be denied a warranty if you do not have a receipt for timely replacement of the anode.
Ultimately, corrosion becomes through and the working element burns out.
By the way, with the anode intact, the water from the tank may have a slight odor. When the smell disappears, this may be some kind of sign of corrosion of the electrode.
Modern models have special sensors that monitor the condition of the anode.
With timely replacement of the anode and mandatory cleaning, your heating element will actually last several times longer. Grounding the housing also increases the service life of the heating element by at least two times.
However, for some reason many people lose sight of this point. Meanwhile, during intensive work, it is recommended to clean the boiler at least once a year.
It cannot be said with certainty that some models, for example Electrolux, Ariston or Gorenje, have a longer service life than Thermex or Indesit. It all depends on many factors:
- amount of water consumed
- the average heating temperature of this water, its chemical composition
- how the plug is inserted into the socket (where the phase comes and where the zero)
- is there grounding or not?
Boiler design features
The design of the heating apparatus is similar to an electric kettle. Only here the lid is equipped with a safety valve to control the fullness of the tank. The functional components of the equipment are considered:
- Frame . This is the outer shell of the product, which has insulation to prevent heat loss. For this, polyurethane foam, basalt wool or other analogues with a minimum thermal conductivity coefficient can be used.
- Buck . Internal sealed water tank. The volume, depending on the model, can reach 15-200 liters. For production, stainless steel or steel coated with a protective alloy with high corrosion resistance is used.
- heating element . Heating element in open or protected by a ceramic shell. Installed inside the tank, in direct contact with the liquid.
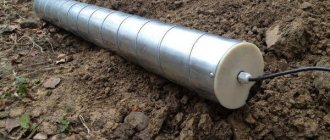
- Magnesium anode . It is made of steel in the form of a rod 14-66 cm long, has an outer shell of magnesium about 10 mm thick. An element for electrochemical protection of the tank and heating element from corrosion processes and the appearance of scale. The part also helps reduce water hardness levels.
Magnesium anode with heater included Source samodelkin34.ru
- Pad . The sealing seal is located at the junction of the heating element and the tank.
There is also a boiler control unit and a thermostat. A sensor is needed to adjust the temperature and maintain the water in the desired thermal state. The recommended value is +60 degrees Celsius. Once a month you need to change the installation for a one-time disinfection of the internal walls of the tank.
For long-term proper operation of the device, periodic cleaning and updating of the heater and anode is required. These elements, compared to other components, fail faster due to direct contact with water and the principle of operation. Let's figure out how to change the heating element in a water heater, what you need to know for this.
Checking the serviceability of the heating element
How can you understand that the heating element has burned out and it’s time to change it? If the indicator lights light up and show that the boiler is on, but it does not heat, this is only an indirect reason.
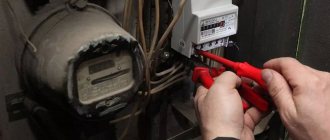
The issue may be wiring, poor contact, or a thick layer of scale. The main check should be carried out with a multimeter by measuring the resistance. How to do this is described in detail in the article “Connecting the boiler to the electrical network - errors and rules.”
You can also check the presence of potential between zero and the body of the device. When the heating element is destroyed, its current-carrying spiral comes into contact with water, and through it the voltage reaches the boiler body.
It is better to take measurements with a multimeter in AC voltage measurement mode. The dial can show either a couple of tens of volts or all 220V. This already indicates a 100% malfunction and the need to change the heating element.
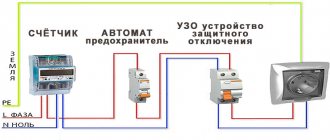
If you have an RCD, as it should be in a normal circuit, then it starts to knock out when you try to turn on and supply power.
A correct RCD (not 30mA, but max 10mA) is a mandatory element of the circuit when connecting any boiler, otherwise the voltage can easily appear on the faucet, tap water in the kitchen and in other unexpected places.
Features of installing a “dry” heating element
Design feature - the electric heater does not come into direct contact with water. It is placed in a metal flask, which directly heats the liquid, removing heat from the heating element. “Dry” devices work longer, especially if they are inserted very tightly into the flange. Therefore, they have to be changed less often. All aspects of interaction with water are taken over by the flask.
Hard water, entering into an electrochemical reaction with the surface of the flask, covers it with a layer of limescale. Over time, a layer of lime prevents normal heating of the water. Heat transfer decreases, thermal protection is activated, the electric heater burns out, and the time comes for replacement.
Installing a “dry” heating element is even easier than a regular one. You don't even need to drain the water tank to do this. As an example, let’s look at replacing an inexpensive boiler model with a simple “dry” device.
- Disconnect the boiler from the power supply.
- Remove the water heater cap.
- Disconnect the terminals from the boiler terminals.
- Dismantle the heating element fasteners and remove it.
- Install new one. Pin.
- Connect the wires in the same order.
- Replace the cover.
The situation with high-end equipment is somewhat more complicated. In order to save energy resources, they are equipped with sophisticated versions of “dry” heating elements. The internal space of the flask is filled with mineral oil and quartz sand. Considering the design, replacing the electric heating element is more difficult, with preliminary emptying of the flask.
Despite the difficulties of replacement, these water heating devices are characterized by high energy efficiency, quality, and reliability.
Draining water and disassembling the water heater
And so, when you decide that you still need to open it, the first thing you do is turn off the power by unplugging the plug from the socket. Then drain the water from the titanium. To do this, turn off the hot and cold water supply taps.
Unscrew the cold water hose, placing a suitable container for drainage.
If water does not flow from the removed hose, this indicates an air lock. We need to remove it. To do this, just slightly loosen the nut at the point where the hot water pipe connects to the pipe.
Next, open the safety valve and release water through it. If the valve suddenly becomes clogged, you will have to twist the entire valve. Water will flow out of the boiler in a continuous stream.
After draining, completely unscrew both valves from the titanium (hot + cold) to open the bottom cover and gain access to the heating elements.
There are modern models where the bottom cover is collapsible and to remove it, it is not necessary to touch the valve. It comes in the form of a plastic insert secured with several screws.
Disconnect the power wires, first remembering or marking with a marker which one is connected where. Better yet, draw a diagram. As a rule, all wires are colored and this will be easy to do. Otherwise, you can get confused in such a pile of wiring.
If you don’t want to draw anything, then just take a couple of photos on your cell phone. You will know exactly the location of all elements and wires.
After this, unscrew the nuts or screws securing the heating element itself around the perimeter.
You can unscrew them in any order, but you need to screw them in the same way as the engine head or the wheels on a car, that is, crosswise.
If you immediately tighten a nut all the way, this will cause the flange to bend and there will not be the required tightness. Consequently, the gasket will not hold and will leak.
Carefully pull the heating element out. It will be all covered in rust, and from the magnesium anode, except for a thin burnt piece of iron, there may be nothing left at all.
Do-it-yourself Termex boiler repair
Before you begin the repair, first gather the necessary tools: a set of wrenches, an adjustable wrench, electrical tape, various screwdrivers, pliers. After this, turn off the water by closing the inlet and outlet valves to the water heater. Then drain the water from the boiler tank and disconnect it from the power supply.
The next step is to remove the protective cover. If you have a vertically located boiler, then the lid is located at the bottom, and in the case of a horizontally located one, it is on the left or in front.
When removing the cover, pay attention to the stickers. Often the screws for fastening it are located under these stickers
If you have unscrewed all the screws and the cover still does not come off easily, check the stickers again.
Replacing the heating element
First, perform all of the above steps and remove the tank cap.
To make it more convenient to work, you can even remove the tank from the wall.
It is worth noting that most Thermex models have not one, but two heating elements. Therefore, it is imperative to remember how and in what sequence the parts need to be connected. It’s better to photograph the whole process.
To remove the heating elements from the Thermex water heater, remove the top cover by unscrewing the bolt; disconnect all plugs and unscrew the bolts securing the heating elements.
The heating element itself is turned off as follows:
- After removing the cover, find the protective thermostat, remove the tips from it;
- also remove the tips (3 pieces) from the heating element;
- cut the plastic clamp;
- Unscrew the screws, removing the sensor;
- now disconnect the cable and unscrew the four screws;
- then you need to dismantle the nut on the clamping bar and pull out the heating element.
After dismantling the heating element, it is necessary to clean the surface of the tank from dirt and scale. Only after this can you install a new heating element and put everything back together.
Do not forget that the heating element does not always need to be changed. If the water in the tank still heats up, but it happens slowly, then, most likely, scale has formed on the heating element. Then dismantle it and descale it. Then install. The problem should go away. Also, do not forget that it is advisable to clean the heating element with chemicals rather than scrape off the dirt. In the latter case, there is a possibility of damage to the part.
To clean the heating element, you can use a solution of citric acid or vinegar (its percentage in the solution should be about 5%). The part must be immersed in liquid and wait until the scale falls off. Then you need to wash the heating element.
Faulty thermostat
The thermostat in Termex water heaters is located under the cover, next to one of the heating elements, and its sensor is located inside the tank.
Sometimes the thermostat fails. This element cannot be repaired; it must be replaced. To perform the replacement, you need to do all the preparatory steps, remove the cover, then remove the thermostat. But before dismantling, we recommend checking this part. To do this, use a lighter to heat the tip of the sensor (copper). If the thermostat is working properly, you will hear a characteristic click, which means that the protection mechanism has activated and the circuit has opened. Otherwise, you will have to replace the part.
Tank leak
No matter how trivial it may sound, but first you need to find where the water is coming from. A lot depends on this, since if the tank is rotten, you will have to buy a new water heater. So:
- if water oozes from the side seam, then the container is rusty and repairs will not be possible;
- If water comes out from under the lid at the bottom, then you need to disassemble the tank.
If traces of leakage are found in the places where the heating elements are attached, then your water heater is not hopeless and can be saved by replacing the gasket.
In the case of the second option, complete all preparatory steps, then remove the plastic cover. Next, take a close look at where the water is leaking. If it comes out near the flange, then the rubber gasket has deteriorated (less often this is a problem with the heating element). Otherwise, the tank is rusty and the boiler can be thrown away. To replace the gaskets, you need to remove the heating element. But it is necessary to carefully examine the heating element itself. If it is cracked, it is also better to replace it.
Flushing
After the heating elements are removed, the boiler itself must be rinsed with clean water to remove all the rust and dirt that has accumulated inside. Therefore, for a quality replacement, the water heater still has to be removed from the wall.
Rinse the insides with an ordinary tap hose. Pour only a little water, since the boiler with a volume of 50-80 liters will still have to be lifted manually to drain all the scraps. Some people add citric acid when washing, others don’t.
Washing tip: It is best to rinse the tank in the bathroom, placing it vertically on a linen board. Twist the watering can from the mixer shower and insert the hose into the hole where the heating element was.
Conclusions and useful video on the topic
A detailed video on diagnosing the condition, maintenance and self-repair of household water heaters can be viewed here:
Repairing a water heater is not so difficult if we are talking about replacing some of its elements. In the event of a serious breakdown, it would be wiser to contact a specialized service center. Proper operation of the device and its timely maintenance will save you from many problems and expenses.
Have you been repairing water heaters for a long time and want to supplement our material with useful tips and professional secrets for eliminating various types of breakdowns? Or is this the first time you’ve encountered a malfunction and can’t find its cause? Write your comments, ask questions, share your opinion below the article.
Replacing heating element and anode
After all cleaning procedures, proceed to reassembly. Keep in mind that the anode may not be included with the new heating element. Be sure to buy it separately and screw it into your seat.
It is especially worth noting that if two heating elements are installed in the boiler, then it is not always necessary to install two anodes.
One is enough for one electric titanium, even if you have at least five heating elements inside. An anode is not an accessory or component of a heating element. This is an element of protection for the boiler.
Please note that in the factory version, during the first disassembly, there is no place at all on the second heating element for attaching this same anode.
Some claim that on tanks with stainless steel you can do without an anode, the main thing is to have them in specimens with walls made of glass porcelain.
However, the pattern of failure of boilers is usually the same: first the anode, then the heating element and then the housing.
You can install heating elements not only from the direct manufacturer of the boiler. For example, there is a company called Thermowatt, which produces some of the best heating elements on the market. The main thing is that the power, overall dimensions and seating fit.
It is also recommended to install stainless steel heating elements on stainless steel tanks. If you cannot find any, then use copper ones.
Practice has shown that there is not much difference. The main thing here is the quality of the product (China or Italy).
When repairing, be sure to change the flange gasket. Here are some of their varieties for boilers Thermex, Ariston, Indesit, Gorenje, Electrolux:
ThermexAristonIndesitGorenjeElectrolux
Some people are trying to save money here. Remove the old one and replace it with the new element.
However, a leak that will inevitably form in a month or two will make you regret such savings.
The flange nuts, as mentioned above, are tightened in a cross pattern. In this case, there is no need to use excessive force; you can inadvertently break the thread or tear the pin out of the body.
According to the marks sketched in the diagram, connect the power wires and replace the protective casing-cover. Before closing the cover, be sure to check all terminal blocks again, they should fit tightly and not loosen.
Visual inspection of the heating element
Having disconnected the household electrical appliance from the network and drained the water from it, they begin to disassemble it. Having taken out the heating element, clean its shell from scale, if any.
When carefully examining the heating element, pay attention to the integrity of the part’s shell. If a visual inspection reveals the presence of cracks or ruptures in the outer shell, then the part can be safely thrown into the scrap yard, since it will not be possible to repair it
In this case, the water heater can be restored to service only by installing a new heating element.
The outer shell of the overheated heating element is torn to shreds. This is usually how heating elements made from low-quality materials fail.
Filling with water and checking functionality
Hang the electric titanium in place. Connect the hoses and open the cold water and begin to fill the tank. The hot water tap must also be open to allow air to escape.
At the same time, make sure that there are no leaks anywhere. As soon as water comes out of the “hot” tap, the boiler is full. There is no need to close the tap immediately; let all the “slurry” spill out and finally flush the tank and pipes.
Only when clean water comes out do you turn off the mixer.
After this, the water heater must stand for at least half an hour or an hour so that condensation leaves all surfaces and there is confidence that there are no leaks.
You can then apply voltage by plugging the titanium into an outlet. To check the operation of the thermostat, use the control knob to force the adjustment to maximum and minimum.
In this case, the boiler on/off light should light up.
If the boiler operates quietly, without making any sounds, and it is not clear to you whether it is heating or not, you can check the energy consumption using the meter.
At maximum heating power of the heater, the counter will spin or blink much faster. This means that the heating elements work as they should.
The entire repair with the purchase of spare parts will cost you around 1500-2000 rubles. In any workshop that calls a plumber to your home, they will ask for at least 3,000-5,000 rubles for such work, and this does not include materials.
So self-repair can save you a significant amount of money, the main thing is not to make some mistakes.
Starting the water heater
Before full operation of the unit, you need to test the work performed. First you need to reinstall the taps and connect the equipment to the water supply. Then the tank is filled with cold water. In this case, the “hot” tap must be left open to expel air from the enclosed space of the tank. When the liquid begins to flow out, the tap can be closed. If the walls have not been washed, it is better to run some water for cleaning.
The first thing you need to monitor at this stage is leaks. This will take about an hour. Here you need to wait for the evaporation of condensate, which appears in any case. If there is no leak, you can test run the boiler. The absence of failures in the usual work indicates a high-quality repair. The water heater can be used as usual.
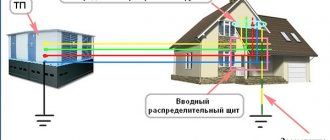
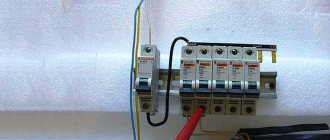
How to connect a boiler, diagram of connecting the boiler with a cable to the apartment panel
Diagram of connecting the boiler with a cable to the apartment panel
This is the most common option, since usually the boiler power is chosen to be more than two kilowatts. Here you also need to follow all the recommendations for a secure connection, as in the previous case. A separate cable will need to be laid from the apartment panel to the boiler. It must reliably transmit current loads. It and the boiler are protected by a circuit breaker and an RCD or a circuit breaker.