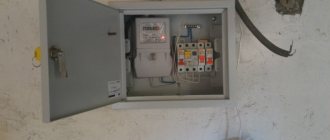
Any electrical device has a certain service life. Its completion may cause the circuit breaker to fail. This device has a complex circuit, so it cannot be repaired or restored. To maintain the electrical safety of the premises, the faulty protection device must be replaced with a new one. Usually such work is performed by specialists. In some cases, if you have certain electrical skills, you need to know how to change a circuit breaker in a live panel yourself.
Reasons for replacing machines
The circuit breaker circuit includes two protection circuits - thermal and electromagnetic. The first ensures safety during network overloads, the second - during short circuits. Situations are possible when the machine fails after the thermal protection is triggered, without any external signs. Determining the cause of such a malfunction can be quite difficult. Most often, a circuit breaker is replaced due to partial or complete burnout of the clamping contacts. This happens due to insufficiently reliable and good contacts. If the wiring is made with a cable with an aluminum core, then over time, due to the softness of this metal, the contact connections become loose.
In rare cases, the reason for replacing machines in the panel is a manufacturing defect. When choosing this device, preference should be given to well-known and trusted manufacturers, because their characteristics comply with electrical safety requirements.
How to move an electrical panel and what you need for this
- In certain situations, due to an imbalance of phase loads, some potential appears on the neutral conductor relative to the ground wire;
- Its value can reach values that are dangerous for a person who simultaneously touches zero and ground (even with a completely disconnected phase);
- Installing input devices on two poles allows you to prevent consequences possible due to installation errors (when phase and zero in the access panel are accidentally swapped).
Replacement technology
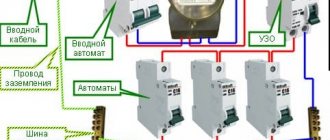
Usually, when replacing, a new device is chosen with the characteristics that the failed one had. Before replacing the circuit breaker in the panel, it is necessary to disconnect the electricity from the line to which they are connected. This is done using the input switch located in the electrical panel of the entrance. Sometimes these protection devices also need to be replaced. Such work must be coordinated with the energy company, because These devices are located before the metering devices and are sealed.
Violation of the seal is punishable by a fine. If a replacement is agreed upon, it must be carried out by a specialist. An energy company inspector checks the quality of workmanship and seals it. Before starting work, use an indicator screwdriver to make sure that the network is de-energized.
Tools and materials
To replace plugs, you can use different types of input panels. The main thing is that all elements of the reconstructed circuit are installed in them technologically correctly. According to the new requirements, the meter readings must be read without opening the box.
Basic tools and devices for replacing electric meter plugs with circuit breakers:
- indicator;
- wire cutters with dielectric handles;
- a set of screwdrivers with dielectric handles;
- round nose pliers with dielectric handles;
- electric screwdriver with self-tapping screws;
- flashlight;
- insulating tape;
- circuit breaker 10–15 A;
- DIN rail 150 mm;
- "0" - bus;
- PPE caps.
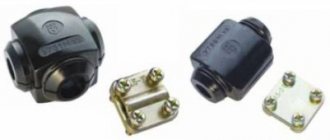
When performing installation work, you may need to extend some wires. Existing standards in electrical engineering prohibit connecting wires using simple twisting. They can be connected using special protective PPE clamps, spring terminal blocks, or welding and soldering methods.
Removing the old circuit breaker
In modern electrical panels, circuit breakers are mounted on DIN rails. The work of replacing them can be done in the shield yourself. Start by disconnecting the wires that connect this protective device to the network. To do this, you need to unscrew the screws that provide the contact connection. If the contacts are burnt and the housing is partially destroyed, performing this operation will require certain experience and skills. After the screws are unscrewed, the wires are pulled out of the contact clamps and taken to the side. If the screws cannot be unscrewed, the wires are “bitten off” using side cutters.
To remove the machine from the DIN rail, insert a screwdriver into the hole in the latch located at the bottom of the switch and press down. The lower part of the circuit breaker must be pulled towards you, and then removed from the rack upwards.
Older houses have devices that are attached with long screws. When dismantling them, a problem may arise - it is difficult or impossible to unscrew the screw, which over time sticks to the wall of the shield due to rust.
What to do with old floor panels?
What to do if you have to replace the machine in an old panel with your own hands? In that same “ancient” floor distributor with circuit breakers blackened by age, there is no DIN rail, and outdated devices are held on by bolts: they are screwed to the rear wall of the switchboard. One mounting strip is on the top, the other is on the bottom, and all switches are held at the same time.
All wires from the machines must be removed so as not to do this hanging. When removing the old circuit breaker, unscrew the top bar and loosen the bottom one; however, you should not try to completely unscrew it, as the circuit breakers may fall. If the screws on the top bar are rusty, you may need WD-40 and possibly even drill them out.
When the old circuit breakers are removed, there is a free area for the DIN rail. To install it correctly, measure the vacated distance and cut the DIN rail to a specific length using a hacksaw. Where the middle axis of the former AB ran, a 35 mm wide DIN profile is placed horizontally in the center for modular equipment.
To drill a couple of holes, you will need a screwdriver with a 1 - 2 mm2 drill bit. If you have an electric drill, it will not work and the apartment will lose power, so you need to arrange for power from your neighbors using a carrier. But a better option is a battery-powered screwdriver. The fastener for the panel DIN rail is a pair of metal screws. Replacing a circuit breaker is carried out according to the standard scenario: we put the device on the rail, press it from below and snap it into place.
Installation of a new protection device
You can do the work of installing the machine in an electrical panel yourself if you have certain skills. If there was a temporary pause after removing the switch, you need to check with an indicator screwdriver that the supply wires are de-energized. To install the device on a panel, installation begins by mounting it on a DIN rail. The upper part of the grip must be inserted onto the edge of the rail, and the lower part must be pressed until it clicks. Move towards yourself to ensure the quality of fixation. The cable cores, stripped of insulation, are inserted into the contact connectors and clamped with screws. When connecting wires, be sure to pay attention to their condition.
If traces of burning of the core or melting of the insulation are visible, such part of the wire must be removed to an area where these defects are not observed. This will ensure the necessary reliability of electrical contact. If the damaged wire does not have a reserve length, its secondary use may cause the contacts to burn. The ability to install circuit breakers in an electrical panel with your own hands allows you to solve the problem in the most emergency cases.
To check the correct operation of the circuit breaker, special equipment is needed. It allows you to determine whether the operation of thermal and electromagnetic releases corresponds to the declared characteristics. Without this control, a situation is possible when the fact of a malfunction of the protective device will be detected due to an overload or short circuit, which can lead to a fire.
In residential premises, circuit breakers are not checked. Therefore, the apartment protection scheme is duplicated by the input machine and machines on separate lines. This allows you to create additional protection in case one of the switches fails.
How to remove a machine gun from the rack
Almost all modern modular machines are mounted on a DIN rail. It may differ in size and profile, but the principle of installing any switching devices on it is the same.
Locate the U-shaped eyelet on the bottom of the switch. Insert a small flathead screwdriver into it and pull down.
If you have a two- or three-pole circuit breaker, an RCD or a differential circuit breaker, there may be two such eyes. Each of them will have to be pulled back.
Next, without removing the screwdriver, use it as a lever to make a slight upward movement and release the lower part of the machine from the Din-rail.
Then lift the machine body itself up and completely remove it from the fasteners.
It seems that everything is simple and elementary, but in the cramped conditions of a small switchboard, all these fragile eyes often break. This is not a problem on old switches, but a new one is worth taking care of.
Another caveat is that some of the lugs are spring loaded. Once you pull the screwdriver out of them, they immediately come back.
In addition, the above-described dismantling is easily carried out on single machines or devices connected both from above and from below using a regular single-core wire. But there are switches that are located inside the whole assembly, powered through the so-called phase comb.
This is a very convenient and reliable thing that all electricians have been using for a long time. So, if you need to change the machine in exactly this row or chain, you will have to unscrew all the contacts, all the switches where this comb goes.
Then pull it out and only after that dismantle the desired switch. You won't be able to do this any other way.
If you have an old-style machine gun, which is tightly attached with threaded screws directly to the metal base, then the main problem here will be related to unscrewing these same screws.
Over a long period of time they may rust. Therefore, stock up on WD-40 in advance. You may even have to drill them out.
Instead, it is recommended to install already modular instances. To do this, attach a short piece of DIN rail to self-tapping screws, and then install a new switch on it.
Why do you need to replace traffic jams with automatic ones?
In older houses you can find meters in which the protection device is electrical plugs. The task of the protective element in them is performed by a fuse-link, which melts at certain current values. These inserts are not manufactured by industry. Accordingly, to replace them, owners have to use various handicraft elements that do not meet electrical safety requirements.
If an overload or short circuit occurs in the network, these devices will not perform protective functions, which can cause a tragedy. Therefore, they must be replaced with circuit breakers.
Design and purpose of the machine
Despite the name - “automatic”, this type of switch operates only in one direction - it opens the electrical circuit (if the nominal value is exceeded or there is an overload associated with the simultaneous activation of several powerful electrical appliances). There is only one way to turn on, that is, close the circuit - manually.
Unlike a simple single-key switch, an automatic device has a more complex structure. Schematically, the classic version (without an electronic unit) looks like this.
The terminals are located at the top and bottom, with the top one connected to a fixed contact, and the bottom one closely connected to a metal plate that acts as a thermal release. When the temperature of the material increases, the plate becomes deformed
There are several ways to start the tripping process:
- manual control (on/off) using a small lever;
- exposure to short circuit currents;
- excessive load – exceeding the rated current parameters.
To prevent the powerful thermal effect from burning the switch, an arc chamber (a set of insulated copper plates) is provided, which cools and breaks the electric arc.
How to change a machine in a live panel
Situations arise when, when carrying out work to replace a faulty protection device, it is impossible to de-energize the network to which it is connected and you have to work under voltage. Repairing electrical equipment under voltage is dangerous because... may cause electric shock. Such types of work must be carried out by qualified specialists with experience, the necessary tools and protective equipment.
To reduce the likelihood of circuit breakers tripping due to overloads, it is recommended to replace incandescent lamps in the apartment with energy-saving ones.
What's up with the neighbors?
In such cases, I try to touch less wires that are not relevant to my business. Otherwise, an unpleasant incident may occur. Adding spice to the work are the curious grannies-neighbors, who strive to ask stupid questions and make pessimistic forecasts. Some even start pulling live wires!
The neighbors' wires and automatic machines are complete chaos and inconsistency.
The lower terminals of the machine are burning
Here the contact will soon disappear completely, for the reasons described above.
View of the same machines from above. Almost untouched Soviet rarities. Twisting under PPE - total zero(((
The terminals are burning, I can’t look at this mess
Masterpiece. Zero tires. The main thing is not to touch anything!
The general working zero was done “coolly” - twisting wires of all kinds through PPE. I remembered my article about the differences between the consequences of a zero break in a single-phase and three-phase power supply network.
Please note that TDM circuit breakers are equipped with PVS3x2.5 to power new loads. This was done during a major renovation in a neighboring apartment. Despite the fact that here, too, one can pour negativity, everything is strategically correct - when the load increases and powerful appliances appear (such as an electric stove, air conditioner, boiler), the best solution is to lay a new line and connect it through a separate machine.
Installation of a new switch
To install a purchased device, the sequence of work is reversed. First, the upper part of the device is placed on the DIN rail. Use a screwdriver again: pulling out the eyelet, press the bottom one into place until it clicks. There are no problems with connecting contacts when stranded conductors crimped with lugs are used. In this case, they are inserted back into the clamps - upper and lower, and the screws are tightened.
If the core does not have a tip, then there is a risk of its deformation, so the old tip is bitten off when there is a sufficient supply of wire. When it is missing, it is better not to reuse it, since the necessary reliability of the electrical contact is not guaranteed. In case of any reasonable suspicion of defects (melting of electrical tape, traces of burning), these areas are also removed. The wire is stripped and clamped with a screwdriver.
After completing the connection, voltage is applied to the machine by returning the input switch to the operating position. The last step is to check the operation of the device under load. At home, they plug power plugs into sockets, turn on electrical appliances, and then make sure that there are no cracking, sparking, or signs of heating on any contact of the machine. Electricians test the last symptom with a pyrometer, which allows them to determine the correct operation of the device - compliance with the response characteristics of the releases.
