Today it is difficult to imagine a bathroom without lamps, sockets, automatic ventilation systems and other equipment that consumes electricity (boilers, washing machines, etc.). And just a few decades ago, the overall load on electrical wiring in such rooms was minimal.
However, the installation of electrical wiring in the bathroom is specific for a number of other reasons. For example, conditions of high humidity prevail in the room. Therefore, in this case, safety precautions, norms and rules must be followed verbatim and carefully.
Bathroom wiring requirements
To ensure safe wiring in the bathroom, follow a few rules:
- the wire should be laid perpendicular to the walls, floor and ceiling - vertically or horizontally (this will simplify the search for the desired area in the event of a break);
- the cable should be hidden in high-quality corrugation;
- the socket and switch must be located at a height of 900 mm from the floor (above a bathtub, sink or water supply - at a height of no less than 700 mm);
- the presence of separate wiring for each device or power supply point;
- protection class of the equipment used is not lower than IP44;
- no twists or connections of multiple wires (only one-piece cable for each wiring);
- The installation of distribution boxes is strictly prohibited;
- functional grounding required.
Basic requirements for electrical wiring in the bathroom
Work order
Proper planning of work helps to complete installation quickly and correctly. It includes the preparatory stage, installation itself and quality control.
List of necessary tools and materials
The wiring diagram will help you prepare all the materials. It is used to calculate how many and what kind of sockets, switches, lamps, RCDs, and circuit breakers will be needed. Lamps and sockets are waterproof, IP44 and more. It is better to choose spotlights that operate on 12 V.
They measure the length of sections of the electrical circuit and buy wiring. Its cross section depends on which consumer is powered. The cable is only three-core with waterproof insulation, preferably copper. Corrugations and sleeves are purchased if necessary. To equalize the potentials, you will need a copper wire and lugs for connection.
To mark the wiring installation locations, you will need a 5 m long tape measure and a level. Grooves in the plaster are made with a wall chaser; you can use a grinder, a hammer drill, a hammer, or a chisel.
To install sockets, use a drill with a crown. For installation you will need a knife, pliers, screwdrivers, and electrical tape.
Removing old wiring
If the apartment has old wiring, it is removed to avoid frequent knocking out of machines, overheating and fires. Two-core aluminum is not suitable.
If 20 or more years have passed since the installation, it is difficult for it to power modern devices: the cross-section is insufficient, the twist is weakened.
Cabling
Using the diagram, strictly horizontal and vertical lines are drawn on the walls, indicating the wiring route. If there are voids between the panels and the wall or suspended ceiling, the cable is inserted through the holes, placed in a corrugation, or dispensed with without it. If the gap is small or there are no panels, the walls are chipped.
The cavities are cut in width and depth sufficient to accommodate the wiring. If you plan to use corrugation, take its dimensions into account. The distance between each groove is at least 10 cm.
Wiring is started from external distribution devices to devices. Each line consists of a single piece with continuous insulation.
Splicing and junction boxes are not permitted. They try to avoid laying the cable along the wall in zone No. 1. In the grooves, the wiring is secured with dowels with clamps every 50 cm or with cement or gypsum mortar every 20-30 cm. At the points of output to the consumer, a free end 15 cm long is left.
Installation of sockets, switches and lamps
Recesses are made for sockets and switches using a drill with a crown. Socket boxes are installed in the holes and fixed with plaster mortar. After 5-10 minutes, the ends of the conductors, cleared of insulation, are inserted. Install the cores of sockets and switches. Lamps are most often mounted on dowels.
Wires are connected to the contacts. They are different colors:
- phase brown or red;
- zero blue;
- grounding yellow-green.
A phase is supplied to the switches for opening. Sockets and lamps have a phase terminal on the right, a neutral terminal on the left, and a ground terminal in the middle.
Drawing up a plan and electrical circuit diagram
Before you begin installing electrical wiring in the bathroom, you need to draw up and outline a work plan. Decide where the main objects will be located - a bathtub or shower stall, a sink, and so on. Having done this, you can decide at which points large household appliances will fit (if they are in the bathroom): a washing machine and/or a boiler.
Then you need to figure out the lighting of the room. The main lighting fixture can be installed on the ceiling or wall. Additional lamps are usually placed above the sink. The next step is to calculate the required number of sockets and switches. You cannot go overboard with such electrical elements: there should be a minimum of them, but enough to power the main devices. In addition, remember to protect against dust and moisture.
Wiring diagram for electrical equipment in the bathroom
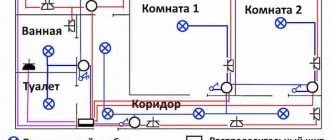
Once you have a detailed plan for the location of large objects, household appliances and electrical points, you can begin to draw up a wiring diagram in the room. You need to calculate the total power consumed by all electrical appliances in the bathroom. If possible, move one or two outlets and switches outside the bathroom. You can install them near the entrance. The distribution box should be organized exclusively outside the premises. For each household appliance, a separate automatic switch should be allocated.
Tips and tricks
Wiring installation experts advise considering the following points:
- upon completion of the main installation work, the laid cable routes are checked for the absence of short circuits and other faults;
- To do this, you can use a simple multimeter turned on in the “Dial” mode;
- if no defects are found, move on to the next stage of work (finishing the walls of the room).
Important! A mandatory element that guarantees reliable protection for bathroom users is a potential equalization system (it was already mentioned earlier).
After checking the electrical wiring, they proceed to installing circuit breakers and RCDs with rated parameters corresponding to the line being protected.
Tools and necessary materials
To install electrical wiring in the bathroom, you will need:
- wall chaser or drill (as a last resort - hammer drill);
- Screwdriver Set;
- screwdriver with indicator;
- tape measure from 5 m;
- building level;
- pliers;
- hammer and chisel;
- insulating tape;
- stationery knife.
A hammer and chisel are used in rare cases when, due to cramped conditions, it is not possible to make grooves using specialized equipment or a hammer drill.
Wiring Tools
Pay attention to the selection of materials. You need to choose high-quality products from trusted manufacturers that meet a given level of protection: waterproof sockets, triple-insulated copper cable with a certain cross-section depending on the power consumption. Carefully inspect the wiring before and after installation to ensure there are no severe bends or cracks in the insulation.
Wire cross-section
Modern electrical equipment for bathrooms does not have a high electrical power consumption, so wiring may not be carried out using the most expensive wires with minimal cross-sections.
Rosette lines
As mentioned above, the total load on one outlet line should not exceed 16 A or 3.5 kW. Wires with a cross-section of 2.5 square meters or more have this load capacity. mm - however, using wires with a large cross-section (4 or even 6 sq. mm) for a bathroom is simply not practical from an economic point of view: they cost significantly more, and the maximum permissible current for sockets is the same 16 A.
The only justified case of increasing the wire cross-section to 4 square meters. mm – use for wiring “TU-shny” multi-core wires of the PUGNP type or their clones of the ShVVP series. Such a “cable”, manufactured according to technical specifications, and not according to GOST, is widely and notoriously known for the discrepancy between its cross-section declared by the manufacturers and the real indicator - the difference can reach up to 60%! Naturally, in the direction of underestimation. Manufacturers of VVGng brand wires also sin with this; it is better to take a wire of the required cross-section, made according to GOST, rather than a larger cross-section, made according to specifications. GOST wires are always marked, “TU-wires” are almost never marked.
Installation instructions
Below is a step-by-step installation of electrical wiring in the bathroom.
Removing old wiring
New electrical wiring may be required in two cases: the apartment was put into operation without communications or the old wiring in the residential premises no longer satisfies electrical and fire safety. Every year the load capacity of household appliances increases. What was relevant 10 years ago today seems absolutely unsafe and inappropriate, and can lead to overheating and fires.
Replacing electrical wiring in the bathroom
The advisability of replacing the wiring can be judged by how often the machines are knocked out. Also, new electrical wiring is necessary when combining a bathroom and toilet. At a minimum, you need to study the old lines.
Dividing space into zones
The list below is the zonal division of the bathroom (WC) into areas according to the criterion of “electrical danger” (from most to least dangerous):
- Zone 0. Bathroom and shower - the area of maximum risk.
- Zone No. 1. Imaginary walls located along the edges of the bathtub or shower tray. The threat level is slightly less than in the zero zone.
- Zone No. 2. A buffer area 60 cm wide from the edges of zone No. 1.
- Zone No. 3. The rest of the area is from zone No. 2, up to 240 cm wide. The place is considered the safest.
An example of zoning space in a bathroom
Mark the bathroom in accordance with the zonal division above. Each individual zone has its own electrical safety requirements:
- In the “zero” zone, devices and materials with the highest degree of protection from moisture are required (IP*7, the first digit is protection from dust). It is strongly recommended to use devices (for example, an additional light may be needed) with voltages up to 12 V. The 220 V power source should be located outside the area. Make sure there is no galvanic connection.
- In the first zone, it is enough to install devices with IP*5 moisture protection. In this area you can place equipment for heating water. It is enough to ensure that the protection class complies with the specified standard. In this case, the operation of the devices will be safe.
- In the second zone, IP*4 class products will be required. In terms of protection, they are practically no different from the previous ones.
- In the third zone, a minimum protection of IP*1 is acceptable, since the likelihood of splashes and drops is minimal. Sockets can be installed in these areas.
Degree of protection of luminaires depending on the zone
Laying cables and sockets
When drawing up a plan, you must decide where the sockets, switches and lamps will be located, and only then draw up a wiring diagram. Cable installation may be affected by certain conditions where there is or is no void in the wall and ceiling, or where walls without panels are used.
If there is a void, then you can hide corrugated pipes with cable inside it. It is attached along the profile using pre-drilled holes. It is located strictly vertically. If there is no void, you will have to make grooves. The corrugation with the cable is laid in them, and grooves are used for fastening. In the third case, when using walls without panels, large grooves will be needed to accommodate corrugated pipes. After placing the electrical wiring, the grooves are covered with alabaster, and after leveling the walls, they are hidden under the tiles.
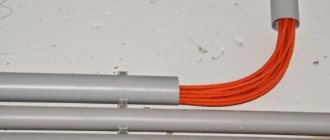
In the bathroom, the cable is laid in corrugated grooves
When the wiring is ready, the socket boxes are installed. Alabaster is used to fix these devices. Sockets with grounding protection should be installed. You need to run a three-core cable to them.
Wire cross-section
Manufacturers of electrical appliances for the bathroom try to produce equipment with minimal power consumption, so small cross-section wires can be used.
Rosette lines
Each point or device must have separate wiring. A total load of up to 3.5 kW is allowed per outlet. This value corresponds to copper wires with a cross-section of 2.5 square meters. mm. It is not advisable to use a cable with a larger cross-section in the bathroom. It costs more, but does not carry any semantic meaning (you still do not have the right to connect several household appliances to the outlet through a tee).
The only option is when the wire cross-section can be increased to 4 square meters. mm - electrical wiring using cable type PUGNP or analogues of the ShVVP version. This wire is produced not according to GOST, but according to technical specifications. Therefore, often the cross-section declared by manufacturers may not correspond to the real one, which means you have to take a reserve. A similar situation is observed with the VVGng wire. Ideally, you need to buy products manufactured in accordance with GOST.
Electrical wire PUGNP 3*1.5
Lighting lines
The lighting line can be powered using a wire with a cross-section of 0.75-1.5 square meters. mm. In this case, each line segment must have the same characteristics. It is impossible to draw the main line from the junction box using a cable of one section, and then feed wires of a different section to the lighting fixtures. This will lead to incorrect functioning of the circuit breaker: a device designed for large-section wires simply will not work with a cable of a smaller diameter. Lack of protection will lead to overheating.
The purpose of the circuit breaker is to protect electrical wiring from overloads and fire. It does not affect the operation of household appliances. Thus, the power of the machine is selected depending on the cross-section of the cable being laid. For a wire of 1.5 sq. mm, a machine with a nominal value of 10 A, 2.5 sq. mm is suitable. mm - 16 A.
A similar method is used when connecting electrical equipment in the bathroom from a common line. Focus on the highest consumers, which include sockets. If the sockets are connected with a 2.5 sq.m. cable. mm, then all other wires on the line (including those connected to lighting devices) must have an identical cross-section.
Wiring in the bathroom on the ceiling for lamps
If a hopeless situation arises and you need to switch from a larger cross-section to a smaller one, then an additional machine of the required rating (corresponding to a cable of a smaller cross-section) must be installed at the transition point. For lighting, a machine with a nominal value of 6 A is usually used, and sockets - 10 A. But in a bathroom this is difficult to implement: installing an additional machine is a labor-intensive process, so it is recommended to avoid it.
Ceiling lights
A bathroom with a suspended ceiling should be equipped with ceiling lighting devices. They will be much easier to connect to a common network cable, and this type of lighting is generally considered more efficient and attractive.
In the bathroom it is preferable to use ceiling lamps
A modern ceiling lamp is a multifunctional device that, among other things, can have an adjustable lighting angle. But even with this layout, the cable should be hidden in a corrugated sleeve, and terminals should be used to fix it to the ceiling.
Safety sockets
For sockets, an additional RCD with a rated current corresponding to the machine (or slightly higher) is required. If the difference in rated voltage is excessive, the equipment will not operate correctly. For modern washing machines, 16 A sockets are suitable, which are equipped with a ceramic surface to protect them from splashes.
Waterproof sockets for wet areas
RCD, difavtomat and grounding
The bathroom must meet the highest electrical safety requirements. The likelihood of death from electric shock is high, so lines with sockets should be protected by an RCD. To ensure correct operation of this device, you must use a grounding loop connected to the corresponding cell of the distribution panel.
There are no problems with this in modern residential buildings. In high-rise buildings, wiring with N and PE conductors is pre-installed, which makes it easy to connect to the ground loop. But the bathroom requires a potential equalization bar. The design of this element is a simple metal plate to which several contacts are attached. Such a bar can be created manually. The most primitive option is to weld M6 bolts onto a piece of plate and screw nuts on them. The grounding conductors of every metal object installed in the bathroom, including the bathroom itself, must be connected to it. One exception would be an electric dryer, where the outside of the dryer is automatically connected to ground via the power cord.
Grounding appliances in the bathroom
The situation is much worse with grounding loops in old apartment buildings (for example, Khrushchev buildings). Instead of grounding according to former electrical safety standards, grounding was used. The neutral and grounding circuits were combined into one. There is simply no grounding in the distribution panels at the entrance to the house. Without carrying out major repairs to the entrance, it will not be possible to do such work with your own hands. This will be especially difficult if the apartment is on the third floor or higher.
In such situations, if you do not want to spend a lot of money on grounding the entrance, you will have to replace the RCD with a difavtomat. It is triggered instantly as soon as it detects the appearance of a leakage current. But unlike an RCD, it does not require a ground loop to operate. The disadvantage of the difavtomat is that it is a less sensitive and more “rough” device for protecting the electrical line. But in most cases, such a replacement is completely justified, and often it is the only alternative option.
Connecting a washing machine
It is difficult to select the rating of the RCD. To carry out correct calculations, you need knowledge of the basics of electrical engineering and a clear understanding of the principles of operation of modular machines.
It is important to remember the following:
- There are several types of RCDs. The main classification is the rated value of the leakage current for the device to operate.
- Household electrical appliances and exposed wiring in the house are protected by AB (more expensive) and AC circuit breakers (available, but may not operate correctly if a device with switching power is connected to the line).
- RCDs are triggered by a certain amount of differential current. For the bathroom, devices rated at 10 mA are suitable.
A residual current device, unlike a circuit breaker, cannot de-energize the entire line. However, each device can operate at a certain amount of current, providing the line with the electrical parameters of the desired value. In this mode, the RCD can function for a long time. The maximum current value for the RCD must be identical or greater than the sum of the ratings for all machines on a given line.
To determine the rated current of the RCD, the following sequence is used:
- If the total power of all electrical devices connected to the same line does not exceed 3.5 kW, then a device with a rating of 10 mA is suitable.
- If the power is higher than 3.5 kW, then you should connect equipment at 30 mA (the fact is that there are no RCDs designed for any currents between 10 and 30 mA).
But this is a “double-edged sword”: an RCD rated at 30 mA itself is a risk of electric shock, so try to get by with the minimum value. The same principle should be used when replacing RCDs with difavtomats and choosing their nominal value.
Dividing space into zones
Installation and installation of electrical wiring in the bathroom begins with creating a diagram of the locations of lamps, sockets, switches and other regulators. For rooms with high humidity levels, this task is not as simple as it seems - the project must be drawn up taking into account several requirements at the same time:
- dividing the room into zones according to the level of humidity and the degree of danger of electric shock;
- the impossibility of using steel pipes, metal corrugated hoses and wires with a metal sheath (“armored wires”) for electrical installation;
- wiring in the walls must be hidden, overhead installation is permissible only in cases where hidden wiring is physically impossible - in this case, the laying of wires must be carried out on a non-combustible base;
- External installation of wires on the ceiling is permissible only if the installation height is higher than 225 cm from the finished floor level.
All these requirements are described in detail in three official documents - PUE, SP 256.1325800.2016 and GOST R 50571.7.701. Compliance with all these standards is mandatory for government organizations; no one has the right to force a “private owner” to comply with them. No one except common sense and concern for your life and the lives of your loved ones.
The division of the bathroom space into zones is carried out in accordance with GOST 50571.7.701, which takes into account all conceivable nuances, for example, the presence and location of windows, the horizontality of the ceiling, the presence of flooring and partitions, taking into account their height. The main and, accordingly, the most common options in life are shown in the figures below:
Zone boundaries for rooms with a bathtub or shower with tray.
This distribution of zones is valid for typical bathrooms in apartment buildings. However, owners often get rid of rather bulky bathtubs and arrange a simple shower room in the vacated room - in this case, the distribution of zones will be slightly different:
Delineation of zones in rooms with a shower without a tray.
The zone boundaries extend upward to a height of 225 cm, although usually in residential premises the ceiling height is noticeably higher - and this makes it possible to route electrical wiring in the bathroom along the ceiling without violating any rules.
Zone 0
In the zero zone, that is, directly in the bathtub or shower tray, wiring and placement of electrical appliances and electrical installation products is strictly prohibited. An exception is the units provided by the factory design, included in the bathtub kit and having appropriate protection from direct exposure to water flow, as well as a low-voltage (no more than 12 V) supply voltage.
Zone 1 In zone 1, it is permissible to install instantaneous and storage water heaters, but with the obligatory observance of the following conditions: the protection of the housing from water penetration must be at least 5 according to the IP rating.
In other words, very close to the maximum possible. Sockets, switches, regulators and lamps are prohibited from being installed in the first zone. Zone 2 Permission to install electrical installation products begins to apply from the boundaries of zone 2 - however, all installed devices must have moisture protection of at least 4 according to IP, that is, not be afraid of strong splashes and accidental ingress of water jets. Lamps, as well as exhaust fans in this area, are installed only when switched on using a cord (“pull”). Installing switches within the second zone is not directly prohibited, but it is not recommended. Zone 3 All restrictions are lifted after the outer boundaries of zone 2, in a space that is considered to be zone 3, in which it is permissible to install electrical installation products even with minimal protection IP*1. Apartment bathrooms rarely have a volume sufficient to accommodate a third zone, but in private cottages it is quite easy to create suitable room sizes. However, even with a very large bathroom area, it should be taken into account that the main lighting switch and the temperature controller for an electric heated floor are usually located OUTSIDE , and not inside a room with high humidity.
Ideally, installing electrical wiring in a small bathroom should not involve any “electrics” at all, except for low-voltage lighting - this is especially true for very modestly sized combined or separate standard bathrooms in apartment buildings. But, unfortunately, the reality is far from ideal, and in a modern bathroom there should be at least two sockets - one for a washing machine, the other “household”, for a hair dryer or similar low-power consumers.
Precautionary measures
When installing, operating and maintaining electrical wiring in the bathroom, the same precautions apply:
- The room should be completely de-energized.
- Only use tools that are in good working order and are protected against electric shock.
- Use protective equipment, including construction gloves and goggles.
Protective equipment for electrical installation work
Any work related to changing electrical wiring must be carried out by qualified personnel. It is highly undesirable to get involved in this process on your own without the necessary knowledge and work experience. Especially in the bathroom, where even the slightest mistake can lead to tragic consequences.
Wiring Tips
If power equipment is being installed, you need to think about the connection in advance.
For example, a boiler with a capacity of 3.5-5.5 kW operates and operates constantly. Then preference is given not to power outlets, but to direct connection. It is assumed that a separate machine is installed for the device. A hidden module is an interesting solution for bathrooms with countertop sinks. The block with sockets is hidden inside the table. Only the element remains outside through which other parts can be reached.
With retractable modules, protection from water is complete.
The use of an RCD for the line in the bathroom is a prerequisite. It is better to make separate circuit breakers for each device.
Electrical work requires skill. You cannot do without following safety rules. But with the right approach, a home master can handle the process. The main thing is to draw up a diagram in advance; it will contain preliminary calculations that will make it easier to solve many problems.
Safety when using sockets
Safety sockets for the bathroom
Do I need to install a bathroom machine? Certainly. Such devices, which are low-voltage switching devices, are necessary to disconnect the electrical network connected after the machine, thus protecting it from short circuits and overloads. However, the circuit breaker itself does not protect against current leakage.
How to make bathroom wiring safer? To reliably use sockets and power tools, you need to consider two points during electrical installation:
- For the bathroom you can install only closed type sockets.
- For sockets you need to install an RCD.
Interesting to know! What is an RCD? The full name is residual current device. The main purpose of the RCD is to protect a person from the effects of current if certain electrical appliances are faulty, when the insulation is exposed on the wire, or simply when touching live parts.
You need to decide which RCD to install in the bathroom. Usually a 10 mA RCD is installed in this room. However, it may have false alarms, for example, from a hair dryer overheating. Therefore, another option could be a differential circuit breaker, that is, an RCD that contains a machine. This RCD is designed for 25 mA and is less sensitive to false alarms.
Which socket is suitable for the bathroom? Wet area installation requirements and installation
The RCD and the automatic device (or a group of automatic devices for the bathroom) are installed in a special panel either inside the bathroom or outside it. It is better when such a shield is built into the wall, and not just hung on it.
Laying cables and sockets
First, it is necessary to determine with maximum accuracy the locations of electrical points, then mark with lines on the walls the routes for laying the cable, the principle of vertical - horizontal laying is observed.
The cable should be laid behind the decorative finish of the bathroom. The groove and the size of the groove must take into account the size of the corrugated sleeve.
After the cable is laid, it is covered with gypsum/alabaster mortar.
Next, the socket boxes are installed so that they extend to their full depth and their edge coincides with the surface of the front finish. They are also fastened with alabaster mortar.
Checking correct installation
When everything is installed, the machines and RCDs are connected, you can check the electricity in the bathroom. All sockets should work, and the lamps should be turned on and off without problems with their switches. If the RCD knocks out, it means there is a short circuit somewhere. It must be found and eliminated.
Of course, everyone decides for themselves which connection diagram to choose, since the one given here is not universal and is given as an example. The main thing is that the correct electrical option is used in the bathroom, then the new electrical network will work for a long time.
To better understand how to wire a bathroom, we recommend watching the video at the end of the article, which will show in detail the entire electrical installation process from start to finish.