Programming Features
Instructions for setting up a socket with a timer are included in the technical manual; when purchasing, be sure to make sure that it is included in the kit.
Setting up a mechanical outlet
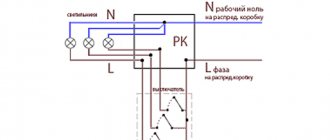
In mechanical devices, the main element is the drum; special markings are applied to it. With its help, the consumer can independently set the time interval and specify the cyclicity. For example, you need to program the filter pump for the pool, which should operate for 15 minutes every three hours.
According to the scheme, the device works like this:
- From one to two o'clock in the morning there is no voltage supplied to the device.
- At two o'clock in the morning, power is supplied to the outlet for fifteen minutes. The pumping device with filter is activated.
- From four to five o'clock in the morning the device does not receive power, the pump is turned off.
- At six o'clock in the morning the device will be automatically activated as a result of voltage supply.
- Then it is turned on at 9 and 12 o'clock with an interval of three hours.
- At three o'clock in the afternoon the timer is set to go off for thirty minutes.
- Then at six and nine o'clock in the evening the pumping device is activated twice, each for half an hour.
- Finally, the system will be activated at 12 o'clock at night. The device will operate for fifteen minutes.
Mechanical timer operation diagram
Setting up an electronic outlet
We will look at the instructions for setting up an electronic socket using the TM24 model as an example. When using such a device, the current time is first programmed. To set a parameter, hold down the Set button on the device and hold it for a few seconds. To select a day, press the Left and Right buttons; when it is set, press Set again, this will take the device to the time setting menu. Here the hours and minutes are changed in the same way using the Left and Right buttons.
After setting the time, the main operating parameters of the device are adjusted:
- If you need to see one of the timers, then click on the “Right” button. The digital screen will display indicators 1_On, 2_On, etc. The number in front of the inscription indicates the selection of a specific timer - the first, second, etc.
- Then click on the Set button. By clicking on it, you can see the programmed day of the week for the timer to operate.
- Pressing this button again will take you to the time programming menu by minute.
- Then click and hold the Right key again and select the 1_Off option. This will disable the first timer. To deactivate the second counter, select 2_Off, for the third - 3_Off, etc.
- To leave the setup menu, click on the Clk button.
Cn101A timer capabilities
- Real-time clock to control the switching on and off of the load at specific times of the day;
- Internal backup power supply—short-term power outages are not a problem;
- Load control via relay - galvanic isolation of load and timer; the ability to connect both mains and low-voltage loads;
- Programming of up to 17 pairs of events (on/off), indicating for each - a day of the week or a series of preset days and times;
- The independence of each event from others, i.e. You can program one event to turn on only, for example on Monday at 7 am, and the second only to turn off, for example on Friday at 8 pm.
Thanks to the ability to select not only a specific day, but also many preset lists of days (only weekdays, weekends, every other day, etc. - discussed below), the number of events can be increased many times, since one entry can cover the events of the entire week at once or several certain days. Events act as triggers that switch the current state, so they can be stacked on top of each other, giving you great flexibility in load management.
The minimum relay response interval is 1 minute. The maximum is a day minus 1 minute. If you set the on and off times to the same value, the timer will not work. Programming will be discussed in more detail below.
The timer has 4 outputs. The connection diagram is drawn on the back of the case. One pair of contacts, designated as “Power“, is supplied with 220V mains voltage, and the other is connected to a load “in the gap”. By default, or in the de-energized position, the relay contacts are open.
Installation and configuration of an outlet with a timer
In the case of mechanical sockets, setting them up is quite simple. But with electronic ones everything is a little more interesting and complicated.
Mechanical timer
First you need to set the current time.
Using minimal segments you can set any time value
This can be done using a rotating disc with divisions. You need to rotate it clockwise to the desired value. There are segments to set the operating time and duration of action. Depending on the model, each segment can be 15 or 30 minutes long. It needs to be pressed and fixed in the desired part of the dial over time. By clicking adjacent segments, we can vary the total operating time of the device. For example, by pressing three segments in a row, we activate 45 minutes.
Electronic timer
The electronic socket is a little more difficult to set up. But this is only the first time. Then everything will seem simpler. To begin with, the timer is usually reset using a paper clip or a needle to its initial state, from which adjustments can be made. For this purpose, there is a hole on the device with the inscription Reset.
The hole labeled Reset resets and activates the outlet settings
Now you can start setting the current time. Usually the Clock key is used for this. In the Russian adaptation it may be called “Time”. Basically, it works like this: the button is pressed and the Hour and Minute buttons are pressed together with it, which are responsible for setting the hours and minutes. There may also be a Week button. It sets the day of the week.
Setting the timer is also quite simple. The button is most often called Timer. Each press of it activates a timer mode. For example, by pressing once we will proceed to setting the first timer and its start time. By pressing again, you can set the shutdown time for the same timer. The next press will take us back to setting the on time, only for the second timer. In each specific timer, you can set the minutes, hours and day of the week of activation. The number of timers can vary depending on the model from 1 to 99.
Features of the electromechanical timer
A mechanical socket with a disk timer is programmed using a rotating actuator disk and buttons (petals) located around its circumference. The disc is marked with marks at 15 or 30 minute intervals. Using the buttons you can turn the load on and off. Models are produced in which a raised button will turn it off, while for others it will turn it off. On the side of the timer there is a button to switch the operating mode - continuous voltage supply and adjustable.
These devices allow you to switch the load at intervals of 15 minutes without limiting the number of switchings. But installing programs with complex algorithms here, much less arbitrary ones, is almost impossible. Mostly daily and weekly cycles are used.
TOP 7 popular models of sockets with a timer
Theben Timer 26
The simplest but most reliable model from the German manufacturer Theben. It is characterized by high reliability and durability. When completing the on-off cycle, it notifies you with a characteristic click. Unlike Chinese analogues, it works completely silently when the timer is set. There is no light indication, but given its other advantages, this is not critical. Maximum load – 16A.
The company has proven itself to be the best and produces high-quality equipment of European quality. Naturally, the price for this rather simple model is not the lowest and is about 1800 rubles.
Theben Timer 26 IP44
The model is identical to the previous version, but with one important property – protection from moisture and dust according to IP44 certificate
Which is important when you use such an outlet outdoors. Otherwise, the characteristics are identical: mechanical control, and current maximum 16A
As already mentioned, the quality of the products from this manufacturer is very high quality, so the price is also appropriate. You can buy Timer 26 IP44 for about 3,000 rubles. Materials and assembly fully correspond to the cost.
Among the features, we highlight silence and a sound signal upon completion of a given cycle.
E.Next e.control.t11
Also an extremely simple socket model with a domestically produced mechanical timer, but of European quality. The E.Next company produces a wide range of electrical equipment: light bulbs, cable products and various types of switchboard equipment.
The company's partners are leading manufacturers of electrical products: SGC (Belgium), ASCO (USA), LIFASA (Spain), ARDIC (Turkey), KIWA (Slovakia), POWER (Poland), OLMEX (Poland), CETINKAYA PANO (Turkey), CWS (Czech Republic).
Unlike the previous version, the cost of this outlet is very low, which, given its 16A load, is very good. The price is only about 400-500 rubles.
E.Next e.control.t14
Another model of a smart socket with a timer from E.Next only with electronic control for a week. A very good device with all the necessary functionality and extremely simple controls. Set the required schedule for turning the power on and off for every day throughout the week. The maximum current is 16A.
The build quality for the money, as we have already reported, is at a fairly high level. Domestic production using developments and components from leading European manufacturers of electrical products.
Feron TM22/61925
A Russian manufacturer that produces inexpensive products that are perfect for conditions in Russian realities. Quite good devices, but not the most reliable. The manufacturer provides a warranty period of only 14 days, which is somewhat alarming, but sellers usually know which batch has the fewest returns, so be interested.
Otherwise, the model has a maximum load of 16A and is equipped with an electronic programmer with a weekly life. There is a simple LCD display that displays the time and the entire settings process.
For the money, this is a pretty good model, so if you want to save money, you can buy an outlet with a timer for about 700-800 rubles.
DigiTOP PB-1C
Although the model has electronic control, the maximum timer operating time is only 24 hours. But the electronics greatly simplifies setting the timer and expands its capabilities. You can set a variety of time intervals, and not a specific cyclic one, as happens with models with mechanical control.
The maximum current level is 10A, which is more than suitable for an average apartment. The manufacturer is domestic and produces quite good devices with high quality and reliability. The prices are not the cheapest, as for our manufacturers. This outlet costs 900-1000 rubles, which is not cheap compared to the previous options and its capabilities.
HS Electro T-10ts
Another interesting manufacturer of domestic relays, timers and related electrical equipment. This model is similar in characteristics to the previous one and has a daily programmer, but with electronic control, which, unlike mechanical ones, makes it more reliable and durable. The settings are more flexible; you can set completely different on and off cycles. Maximum current – 10A.
Quite a popular model with high build quality and a decent manufacturer’s warranty. You can purchase the model on the Russian market for 1,300 rubles.
Timer characteristics
Frame
Instructions for setting the water pressure switch
Readers understand: one of the most important characteristics is the design of the case. It will determine whether it will be possible to install a timer in the distribution board or not, hang it on the wall, or mount it in a socket box. In many cases, the installation method will be decisive. For example, for a private apartment, the wall-mounted option looks, to put it mildly, ugly. On the other hand, not everyone has a switchboard hanging at home. What remains is the option of a socket box. The type of housing design determines the IP protection degree, which is decisive when choosing the installation location.
Load current
The parameter shows how much Watt the timer can carry. Ideal for establishments that operate according to a schedule. Let's say that at the right time the main lighting is turned off by a timer, leaving auxiliary lighting that requires less energy. The mind remembers the barracks, however, if you think about it, any cafe works synchronously with the schedule. If you need to service the company outside of the plan, you can provide a separate changeover switch. Automation will play a positive role, measuring a fixed time before the end of working hours, turning off part of the load, signaling the approach of hour X. Convenient for banks (dimmed lights from a distance will make it clear: the office is closed), and offices. The load current cannot be exceeded without causing equipment failure.
Working method
The designation is not separately marked in any way. We have seen that in parallel with automatic timers there are models controlled remotely. In fact, the manufacturer’s ability to predict consumer tastes will determine the degree of popularity of the product. Clearly, the design factor is unique, maintainability. In the case of TO2 from Apel, the entire board is changed. The filling is formed primarily by a microcontroller; it is not possible to reprogram it at home.
Operating temperature range
This parameter will instantly allow you to separate indoor options from outdoor options. If the manufacturer's requirements are ignored, the equipment will fail. The temperature range of outdoor timers is large; the range of indoor devices is included within the range of products.
Time delay range
Controlled timers use the concept of a time delay range. The interval after which the device will turn off automatically. Similar mechanisms are used in bathroom exhaust fans, as was mentioned when starting the review.
Connecting a timer
The connection of the lighting control timer is not always carried out by contactors, as one might think. The torque is closely related to the peak load current. Most timers are simply no match for powerful devices. A good contactor is not included in the case by default, reducing the cost of the timer: it is clear that not every house has 5 kW of light bulbs.
Setting the timer
Methods for setting the lighting control timer are important. We have seen that many algorithms have been invented. In front are externally programmable timers, where the algorithm is loaded via the I/O port interface (COM, USB). Obviously, the second option is ideal for large companies where there will be a need to change the lighting conditions of a large area. It’s clear that running around clicking buttons is costly, but that’s not the main thing – the possibility of making a mistake increases. And what the consequences will be is determined by the specifics of the location of the event.
An electronic time relay is designed to count time intervals, automatically turn on/off various electrical equipment (lighting, heating, etc.) after a specified period of time during a repeating weekly cycle.
For example: to turn on and off the lighting of a courtyard, park or street; to turn on and off the night lighting of staircases of apartment buildings; to turn on and off advertising signs and display windows at night; to control the inclusion of electric heating in a house; for automatic watering of plants; for creating the effect of presence in the house
Powered by a household power supply, voltage 220 Volts (it is possible to order relays for voltages of 12, 24, 36, 110 Volts). You can program it for the whole week or any day of the week, turning it on and off one or more times during the day. All data are displayed on the liquid crystal display. When the power supply is turned off, it retains the programming mode due to the built-in battery. The service life of the time relay is from three to five years.
About the socket with a timer
A socket with an on/off timer is a device that represents a standard socket that is already familiar and familiar to every average person for connecting various devices to the electrical network. Inside the socket itself there is a relay that is responsible for the operation of the timer. It can be either mechanical or electronic.
In the first case, the user is given the opportunity to use the dial to adjust the time intervals of work, and in the second case, the built-in system, perhaps even with a digital display, should be used to set the days of the week, the current time, etc.
Types of timers
The devices under consideration are divided according to the principle of operation of timers into mechanical and electronic.
The simplest version of a mechanical timer is a countdown timer made on the basis of a clock mechanism, which is wound by turning the handle.
The greatest demand is for sockets with mechanical daily programs. Because the electric motor of a clock mechanism requires electrical energy to operate, they are sometimes called electromechanical timers. Batteries are used as backup power. The load control program is created mechanically through a series of segments at 15-minute intervals.
An electronic timer for a household outlet makes it possible to set programs for the week and month, as well as display the real time and parameters of the specified programs on a liquid crystal display.
How to make a timer yourself: diagrams and recommendations
Electrical devices for controlling current supply have different designs. Relays are considered the most reliable. Triac and thyristor are also found. The connecting element on the general diagram can be located in several places:
- front;
- side;
- behind;
- connect using a separate connector.
To set the time, a potentiometer, switch, or buttons can be used.
How to create a time relay in a 220V socket with your own hands
If the device is intended to be operated under a 220V load, you need to take diode options that are equipped with a magnetic starter. The controller is assembled from the following elements:
- thyristor;
- diodes (4 pcs.), 1A and 400V output;
- resistance (3 pcs.);
- start button;
- capacitor with a capacity of 0.47 mF.
Relay circuit with one transistor
The operating principle of this scheme is quite simple. After pressing the start button, the network closes and the capacitor begins charging. At this moment, the thyristor is in the open state. When the charging of the capacitor is completed, it closes. As a result, the power supply stops and the device turns off.
To adjust the operation, you can select the appropriate capacitor power and resistance resistor (R3).
You can also use this option:
- Connect one of the contacts of the diode bridge together with the switch to 220V.
- The second contact of the diode bridge is connected to the switch.
- Thyristor VT 151 is connected to resistance resistors (1500 and 200 Ohms), as well as to a diode.
- The remaining contacts of the diode and 200 Ohm resistor are connected to the capacitor. In parallel with it, a resistance of 4300 Ohms is switched on.
Relay on a chip
Making your own time relay on the 555NE timer
Many electrical circuits are based on the NE555 integrated timer. Such a system is easy to create at home. The controller is assembled from the following elements:
- screw type terminal blocks;
- diode;
- board size 65x35;
- resistor;
- soldering iron for point connections;
- Sprint Layout program file;
- NPN type bipolar transistor.
A board is used as the basis for mounting the elements. The resistor is attached to the top or removed using wires. There are special places on the board for screw terminal blocks. After all the components are soldered according to the diagram, the excess at the connection points must be removed and the reliability of the contacts checked. To protect the transistor, you need to install a diode. It is installed parallel to the relay. Then the response period is set. If the relay is placed at the output, it will allow the load to be adjusted.
DIY timer
How this system works:
- Pressing the button starts.
- The circuit closes and voltage is supplied to the device.
- The light comes on and the countdown process starts.
- When the set time has passed, the light goes out and the power supply is interrupted.
This scheme allows you to adjust the response period within 4 minutes. If a capacitor is installed, the adjustable time increases to 10 minutes.
These are simple circuits that require minimal circuit board and electrical skills to create. A diverse and rich assortment of modern devices allows you to choose a connector for any need, so there is no need to independently manufacture sockets equipped with a timer. To find a suitable model, it is enough to compare its capabilities with the conditions in which it will be used, and also study reviews about manufacturers and the quality of their products on the Internet.
Operating principle of the weekly outlet
Electronic weekly timer socket Woods 50009WD
It is important that there are electronic weekly timer sockets. That is, such a device can be programmed for a week (or more) of operation in a given mode
For example, the device can be made to work:
- only on a specific day of the week;
- with a given break of 1 day;
- with a given break of 2 days;
- with a given break of 3 days;
- with an arbitrarily specified break.
Some timer sockets are equipped with a smartphone control function
In parallel with the weekly operating mode, such sockets can be made to work at specific times. Thus, for each operating mode, the start and end time of work can be set. The duration of the working period can be specified by the manufacturer. In this case, usually the minimum value is only 1 minute, and the maximum can be several hours or almost a whole day. The only problem with this can be that for comfortable use you will need instructions for the electronic socket timer.
Indeed, sometimes it can be difficult to figure out such devices on your own, but in fact, just a few minutes spent with the device and instructions will solve all possible questions, and further use of the socket timer will not seem so difficult, because the menu does not contain buttons, and information is on a monochrome display is sufficient.
Setup instructions
The instructions for the device clearly show how to correctly set up a mechanical timer for an outlet. It all comes down to the following steps:
- set the mode switch to the constant voltage position;
- by rotating the actuator disk, set the real time - a mark with its value opposite the fixed one;
- to configure the connection and disconnection time periods, you need to press or release the buttons corresponding to the desired period;
- insert the plug of the connected device into the timer plug;
- connect to a power outlet;
- move the mode selection button to the “Adjustable” position.
When operating, the device makes a low buzzing sound. The established mode can be performed every day. When editing it, the socket with the timer must be disconnected from the power supply.
For more information about setting up a mechanical socket, see the following videos:
Electronic
Using the TM24 model as an example, let's look at how to set up an electronic socket with a timer.
When you turn it on for the first time, you must leave the device in the outlet for 12-14 hours to charge the built-in battery.
Button functions:
This programmer has the ability to configure twenty on and off programs.
As can be seen from the diagram - point 1, it is possible to install the program from Monday to Sunday. That is, it turned on and off at the same time. Setting up individual programs by day of the week from 2nd to 8th point. Combination of the program on weekdays from Monday to Friday, paragraph 9, or only on weekends (Saturday and Sunday), paragraph 10. For six days a week, point 11. Every other day, Monday, Wednesday, Friday, point 12. Tuesday, Thursday, Saturday, point 13. Three days in a row, points 14 and 15.
To start using the outlet, you must first set the current time. You must hold SET for 5 seconds until the day of the week flashes. Use the RIGHT or LEFT buttons to set the desired day. Pressing and holding SET again takes us to setting the clock. Using RIGHT or LEFT we set the desired time. We repeat the same procedure to set the minutes.
Now you can start setting up the program. You can do this as follows:
- Press and hold RIGHT until “1_ON” appears, this is the first timer.
- After this, press and hold SET until the days of the week flash, use the RIGHT or LEFT buttons to select the desired day or combination of days.
- Next, using SET, select the hours and RIGHT or LEFT the desired value, and so on with the minutes.
- Then we repeat the operation while holding RIGHT until the value “OFF_1” appears.
- We repeat the setting similar to the point above, set the day, hour and minutes.
- To exit programming mode, press CLK.
Press the MANUAL button to reset the current program settings to set new parameters. To force the timer to turn on or off, there is a “MANUAL” function, which has three modes: “MANUAL-OFF”, “MANUAL-ON”, “MANUAL-AUTO”. In OFF mode, the timer does not execute programs and is in the off state. In ON mode, the device is in the forced position, and in AUTO mode, programs are executed.
To simulate the presence of a person, there is an interesting RND button on the socket. This function has a floating advance timer that randomly varies from two minutes to half an hour. The time interval is processed taking into account the advance. The switching on of electrical appliances is not strictly tied to a specific minute, which can confuse thieves trying to find out whether people are at home or not.
Instructions for setting the parameters of an electronic socket are provided in the video below:
Setting up the remaining sockets with a timer is no different from the installation algorithm described in the example and should not cause difficulties. Do not forget to change the clock to winter and summer time for more correct operation of the device.
We hope our instructions were clear and useful for you. Now you know how to set up a socket with a mechanical and electronic timer!
It will be interesting to read:
- Setting up a motion sensor for lighting
- There are two phases in the socket - what to do?
- How to save energy in a private home
Photo of sockets with a timer
Benefits of use
Daily socket-timer HPM with mechanical control
Many users are surprised at how much time an electronic timer can save. But, in fact, everything depends solely on the frequency of its use and the quality of the operations performed with its help.
In the end, it all comes down to not minutes saved, but nerve cells that are protected from worries, since you can always be sure that the timer will work on time and turn off the device. Therefore, turning off an electrical appliance with its help, be it a TV or an iron, while you are already on the way to work, will not force you to return halfway home and check whether the cord is pulled out of the socket.
Electronic socket-timers ORVIBO S20 Smart Socket
As for other joys that such a device will bring you, these include its compact size. They will allow you to forget about remodeling rooms for the sake of installing a “smart home” system, and the functionality will be quite sufficient to provide basic household needs.
On the other hand, the compact dimensions provide sufficient mobility, which will allow you to move the socket with a timer not only from room to room, but also from one house to another, for example, when you need to go to the country, where the use of electricity becomes especially important.
The timer socket will allow you to automatically control the home heater, create a warm microclimate in the apartment and at the same time save energy
Timer sockets with Smart control function are becoming very popular
Another advantage is long service life. The number of starting cycles is almost unlimited, and with careful use this household appliance will serve for many years.
Pros and cons of electronic and mechanical sockets with a timer
When purchasing a timer socket, the question arises: which one is better to buy, mechanical or electronic? The main advantages of the first are the low cost of the product and ease of use. But the second option has more working functions.
You can choose a good socket with a time setting for turning it on and off by looking at all the advantages of a mechanical and electronic connector.
| Socket with mechanical timer | Socket with electronic timer |
| Quick settings and program changes | The presence of ten timers in one device |
| Ease of control | |
| Relatively low cost | You can set a program for every day of the week |
| No noise when the timer is running | |
| The socket can operate on a timer, both in automatic mode and without it | |
| Accurate adherence to the specified on and off periods | |
| Availability of various additional functions |
| Socket with mechanical timer | Socket with electronic timer |
| If there is no power supply, the settings are lost | Quite complex timer programming |
| If the voltage is too low or too high, malfunctions may occur in the clock dial | The device does not respond well to inductive loads - power supplies or fluorescent lamps |
| Quite large dimensions of the product | |
| No built-in battery | |
| When working they create noise - ticking |
Using sockets with a timer, you can significantly simplify your work process and save energy consumption.
Electronic models with a rechargeable battery can operate independently of the power supply. Some devices may continue to function at the previously specified settings for more than four days.
Improved electronic sockets have the additional ability to simulate the presence of occupants in the house. More expensive products have a two-year software installation.
Mechanical timer sockets can operate without programming. Such devices have a key that blocks the timer and switches the connector to normal mode. Such a device just needs to be turned on, set the working time for the day, without resorting to additional settings.
When purchasing a timer socket, you should pay attention not only to all the technical characteristics and configuration functions specified in the passport. The main selection criteria are the extended programming range, duration of operation, load capacity and accuracy of the device.
Correct setup will help to fully automate the workflow of electrical appliances in the house.
Electronic timer CN101A - assistant in the country house and more.
Hello to all Muskovites. This review will be devoted to the CN101A electronic timer, purchased on AliExpress. I bought this timer to automatically control watering at the dacha. The timer is designed to turn on and off, according to a given program, electrical equipment with a current consumption of up to 16 A, an operating voltage of 220-240 V. The timer can be used to turn on and off street or indoor lighting (light control), control technological processes, electric heating devices, and various household appliances (aquariums, ionizers and humidifiers), agricultural machinery (mechanisms for feeding and watering animals), management of production processes, management of advertising signs, information stands (billboards, etc.) and in many other cases where control by current time is required days, days of the week or cyclic control. Specifications. Model CN101A Rated operating voltage: AC 220-240 V, 50/60Hz (There are modifications for different supply voltages - 220V, 110V, 48V, 24V, 12V) Maximum load: 16 A at 220V Built-in battery 1.2V 40mA Number of channels: 1 Minimum switching time: 1 minute Time range: 1 minute -168 hours Number of programs: 17 Operating temperature: from – 10 °C to +40 °C Humidity: 35-85% RH Mounting: overhead Dimensions: 60x60x32 If necessary, can be purchased separately installation box.
This timer has the ability to program 17 different programs for automatically turning on and off the load. Since the relay is weekly, each program will work at intervals of a week. For each program we set on and off times. Also, each program is tied to certain days of the week. It is possible to select not only individual days of the week, but also a choice from several preset values: 1) each day separately 2) the whole week 3) the whole week except Sunday 4) from Monday to Friday (working days). 5) Saturday and Sunday (weekends). 6) Monday, Wednesday, Friday 7) Tuesday, Thursday, Saturday 8) Monday, Tuesday, Wednesday 9) Thursday, Friday, Saturday
The LCD display shows the following information. current time current operating mode - “auto” at the top of the display - day of the week. The days of the week are displayed in abbreviations: “MO” – Monday, “TU” – Tuesday, “WE” – Wednesday, “TH” – Thursday, “FR” – Friday, “SA” – Saturday, “SU” – Sunday. The “Manual” button allows you to switch between three different states: turn on the main timer mode - auto. The display shows - auto. The timer executes the programs. manually close the relay. When the relay is closed, the red indicator lights up and a glowing light appears on the display. open the relay. The display shows a crossed out light and the indicator does not light up.
View inside the CN101A timer
220V load connection diagram.
Before we start configuring the device, we will reset it; to do this, press the “C” button. First you need to set the current day of the week and time. To do this, press and hold the button indicating the hours. By pressing the “D+” button, select the current day of the week. Then use the “H+” (hours) and “M+” (minutes) buttons to set the current time.
To enter the relay programming mode, press the “P” button. After pressing it, the message 1 ON will appear on the screen. It means setting the start time of the first program. Use the “D+” button to set the days when the program operates, and use the “H+” and “M+” buttons to set the time. Then press the “P” button again. After pressing it, the message 1OFF will appear on the screen. We went to the settings to turn off the first program. We set the program shutdown time in the same way. The next time you press the “P” button, we will see 2 ON on the display. This will continue until the 17th program, and then you can exit the programming mode. If necessary, configure the necessary programs. To quickly exit the programming mode, press the clock button. In order to delete an individual program, you need to enter the programming mode, select the program and press the “C/R” button. You can see the setup and operation of the timer more clearly in the video www.youtube.com/watch?v=_MBL5zpd-Vo The advantages of this CN101A timer are: quality workmanship, good functionality, small dimensions, relay contacts not connected to the network allowing switching low-current loads, built-in battery (saving timer settings in the event of a power failure), simple setup and low cost (350 rubles). This timer has been working properly for me for more than six months for watering plants at the dacha.
Disadvantages of use
GlobeTeck smart socket timer
As for the shortcomings, there are really few of them. The main drawback, which is not common to all models, is the difficulty of use. It is also associated with another drawback - the lack of instructions or user manual. The last drawback is more typical for Chinese products, which are present in huge quantities on radio beams and electrical markets.
Garden socket-timer MK IP66 Masterseal Plus
Another disadvantage that many users pay attention to is the cost of sockets with a timer. To be frank, not every pensioner is able to afford such a new product, as well as understand how to use it, but for an adult it is quite easy to evaluate the benefits received with its help, you just have to remember the tariffs for electricity supply
1 4
It is worth noting that some models are equipped with built-in batteries. They can become a limitation on the number of cycles of use of this household appliance.
Accordingly, when choosing, you should give preference to manufacturers with reliable suppliers of components.
Electronic
Electronic sockets with a timer come in two types:
- daily allowance
- weekly
The daily allowance has the same principle as the mechanical allowance.
But weekly ones can be customized to suit your individual work schedule for all seven days, including weekends. Therefore, such sockets can be recommended to owners of country houses and people who often go on business trips. Electronic sockets are programmed for 140 on-off operations. There is a so-called presence function. Through it, the lighting in your apartment will turn on spontaneously throughout the day.
Most models have built-in batteries inside. They allow the clock mechanism of the socket to operate even without mains voltage. If the voltage suddenly disappears in your home, the previously set program is saved and the device works as if nothing had happened.
After purchasing a timer, immediately plug it into a power outlet. The batteries must be charged within 15 hours. Only after this the device is ready for use.
For the convenience of users, paired sockets are produced. One of which works constantly in normal mode, and the other through a timer. An example of such a design is the Expert E-TE model.
Its characteristics:
- minimum on-off time interval - 1 min
- number of timers – 10
- 24/7 programming system
- operating temperature – from minus 10 to plus 40 degrees
- degree of protection – IP20
In fact, timer sockets are programmable electronic switches.
Please note that electronic models have functions for changing winter and summer time. Therefore, when setting and setting the clock during a certain period of the year, be more careful.
Timer setting example
Let's assume that you need to configure the device so that it turns on every day for 4 hours from 19:00 to 23:00. Below we will tell you how to achieve this.
Go to system settings. For this we need the Timer key. After clicking on it, the message On 1 appears. Next, select the day of the week, and since we need to configure the device to turn on daily, we press the Week button until all days of the week appear on the monitor. Then select the desired time by turning on the Hour key. In this case, we are not interested in minutes, so we do not touch the Min button.
We save the turn-on time indicator by clicking on the Timer button. After pressing, the information is saved, and the message Off 1 appears on the monitor, with which you need to set the shutdown time. Set the desired parameter (in our case we are talking about 23:00). Using the Week key, select the days of the week, click on Hour and set 23:00. The programming mode is exited using the Clock button.
Buying an electronic socket timer can be considered a fairly simple task. Electronics and household supply stores have a fairly wide range of similar products. If you still have any questions, the sales assistant in the store will give advice on connecting and using a particular device.
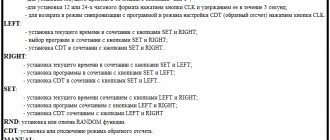
Button labels
MASTER
CLEAR: Clears all data from memory, including current time and all programs.
RANDOM: Sets or cancels the random function.
CLOCK: used
-to set the current time in combination with the “ WEEK”, “ HOUR”, “ MIN” buttons;
-to set the 12 or 24 hour format - with the “ TIMER” button;
-to switch to summer time – with the “ON/AUTO/OFF” button.
TIMER: setting programs in combination with “ WEEK”, “ HOUR”, “ MIN”; change to summer time - with the “ CLOCK” button.
ON/AUTO/OFF: Select the operating mode of the timer.
WEEK: Sets the day(s) of the week in combination with “ CLOCK” or “ TIMER”.
HOUR: Sets the clock in combination with “ CLOCK” or “ TIMER”.
MIN: Sets the minutes in combination with “ CLOCK” or “ TIMER”.
RST/ RCL: Cancel programs or restore canceled programs.
Mechanical
The simplest ones are mechanical. They have plastic sectors around the perimeter of the dial. By clicking on them, you can set the desired operating time of the device.
Each sector segment is divided into 15 or 30 minutes (depending on the brand of outlet). Thanks to this, a maximum of 96 programs can be set per day.
Setting up a mechanical outlet
set the checkbox to the current time on the socket
press the plastic sectors for the period when the device should turn on and work
turn on the socket and connect the plug of the equipment being configured through it
the device is ready for use
There are mechanical sockets with a timer and a different type, similar to those found in washing machines. By turning the lever you set the timer for a certain shutdown time.
Mechanical type sockets can operate continuously without a timer; for this they have a lock button on the side.
The maximum power that can be connected through such devices reaches 3.5 kW. Some unscrupulous manufacturers exaggerate these data. Therefore, I do not recommend immediately connecting the maximum possible load. Especially considering the fact that they will work without your presence and supervision, and the contacts inside are not so thick.
It should be noted that mechanical sockets are only available in daily versions. This means that the same program will work the same way throughout the day. The next day the cycle will repeat.
Design and principle of operation
Before installation and configuration, it is important to study the device and how it works. Here a lot depends on the chosen model.
Mechanical
Mechanical sockets with a timer are a design with two holes for a plug and a time regulator (push-button or disk-shaped). Voltage is supplied by closing or opening the contact group. Older models use a mechanism that is very similar in operation to a watch.
New devices are equipped with pulsed electric motors. They are characterized by quieter operation and power dependence. If desired, mechanical sockets can be set to two operating modes - constantly or with a timer.
How to use a socket with a timer
How to choose exactly the model that is useful specifically for you? To do this, let’s look at what criteria and functions are used to select a socket with a timer. They differ in the type of control that we mentioned, the complexity of the programmer, the load and other parameters.
Programming time – depending on the type of socket, the maximum time for which you can program the on-off switching of the necessary devices is selected. Typically, the minimum is 24 hours, and the maximum is a week or even a month. The latter is quite rare and refers to very expensive devices that are used in smart home systems.
Timer accuracy is more relevant to mechanical options, since inexpensive models may not show the most accurate reading. Although for simple actions, such as watering and turning on the filtration pump, special accuracy is not required, only correct cyclicity.
We advise you to choose trusted manufacturers with a good reputation. Sockets with a German-made timer work great, although some Russian and Chinese manufacturers also produce very good products: Theben and Brunnenstahl (Germany), Feron and Camelion (Russia).
Load - usually the standard load parameter for most models is 16A, you can also choose 10A, 7A, or, if powerful throughput is required, there are 40A devices. Depending on the load you need, the type of device is selected. That is, if the device consumes 5 kW of electricity, which corresponds to 25A, then naturally, 16A will clearly not be enough.
Number of programming lines - in simple inexpensive sockets with a timer there is usually one line to which only one device can be connected. More expensive models support 2 or more lines for connecting and programming the operation of several electrical devices.
Moisture and dust protection - some models have a level of protection against moisture and dust so that you can use them outdoors - the choice is yours. If you plan to frequently use the device outside the home, then it is advisable to choose a socket with a protection certificate of at least IP40.
Cost – depending on the complexity of the functionality, type of outlet and country of origin, the price changes. It is not always that the more expensive is better, but for the most part, more expensive models have good functionality, high-quality assembly, are more reliable and durable, and such timer sockets are more convenient to use.
How smart plugs work
Automation of an individual function or an entire process involves the use of sensors that react and transmit information about operating parameters to the central control mechanism. But not many people can afford to purchase this expensive equipment.
Partially solving the issue of automation and power management is the installation of switchable sockets.
The method of switching electrical contacts in such devices is based on the fact that when the relay is activated, the conductors close.
Depending on the type of model chosen and its technical parameters, the smart socket can provide configuration of two types of programs:
- Daily – when the process is limited to a period of time of 24 hours.
- Weekly – provides the ability to program the start and end of the operation of electrical appliances separately for each day of the week.
Any home is full of equipment that may require delayed activation using a 220 V timer. Timer sockets help solve several problems at the same time, i.e. realize:
- Electrical equipment management. Including a washing machine, pump, boiler, multicooker... Automatically switched sockets can also be used to turn on the lights and heat an aquarium, chicken coop or barn with animals.
- Lighting control. Automatically turning on music and lights will help create the impression and effect of the presence of the home owners in the room, thereby protecting the home from the penetration of uninvited “guests”.
- Automation of agricultural work. All processes that do not require direct human participation can be successfully automated, for example, ventilation of greenhouses, caring for pets, watering plants.
The use of smart sockets when installing a two-tariff electricity meter allows you to reduce your monthly payments by 30-40%.
During peak tariff hours, at which the price per kilowatt of energy consumed is one and a half times higher than usual, the consumer will simply turn off, while consuming electricity at night during the hours of minimum tariff tariff.
A timer socket will help in garden plots to automatically start a security device, greenhouse lighting and area lighting at night
Devices of this type are very relevant for those who like to watch TV late into the night, who often fall asleep in front of the screen. Indeed, in addition to the fact that a switched-on TV will continuously consume electricity for several hours, it will also act as a generator of electromagnetic waves, which have a very negative impact on the quality of sleep.
A socket with a timer operates in many ways similar to a time relay: after the time interval specified by the program has expired, it closes/opens the contacts
How to set a daily mechanical timer
Since mechanical devices are among the simplest, setting them up should not be a problem. Each timer has a rotating dial to set the current time. Next, by turning it clockwise, you need to set the time intervals through which energy will be supplied to the selected device.
PHOTO: i.ebayimg.com Setting up a mechanical device involves setting time intervals by turning the dial
In almost all models, each hour is divided into equal sections of 15 minutes. After setting the required frequency, the timer is simply plugged into the outlet, after which the device is connected to it.
PHOTO: stroy-podskazka.ru The instructions contain tips on setting the timer
What can you "burn" on?
Almost all models are designed for a current of 16 amperes . At least that's what it says in their passport. However, a common disadvantage of timer sockets may be the manufacturer’s desire to save money. In this case, he uses a trip device (electronic relay or mechanical switch) in which the conductors have a very small cross-section and are not designed for high inrush current.
Therefore, to control high-power consumers (heaters or motors with a power of more than 1.5 kilowatts), it is worth doing this through an intermediary . For example, use a mechanical magnetic starter.
In this case, the retractor coil circuit is connected to the timer socket . And switching of the controlled device is carried out by the contact group of the magnetic starter.
In conclusion, we bring to your attention a video instruction about electronic and mechanical timer sockets:
Mechanical setting
The heart of such a timer is considered to be a special drum, which has a switch lever. The actuator is a special microswitch. At the moment, devices that have a daily timer are very popular. As a rule, one hour in such devices is divided into 4 markers of 15 minutes.
As you can see, the design of the socket is considered quite primitive. Using this outlet will not be difficult since you will need to set the time on the timer yourself. When the arrow reaches the required indicator, then the device will automatically turn off or turn on the power. Now you need to learn how to set up a mechanical socket with a timer, model Feron TM50.
In this diagram you can see the operating time of the pool filter pump:
- From one to two in the morning there will be no power supplied to the pump.
- After two in the morning the pump will automatically turn on for 15 minutes.
- From 4 to 5 am it will be in off mode.
- At 6.00 the filter will turn on automatically.
- Now until lunch, automatic switching on will be performed every 3 hours for 15 minutes.
- At 15.00 there will be a peak of swimmers and therefore the pump will turn on for 30 minutes.
- Now at 18.00 and 21.00 the pump will turn on again for 30 minutes.
- The final cycle is when the pump is turned on for 15 minutes at midnight.
As you can see, the process is considered quite rational. If you set up your timer socket correctly, you can save significant money. If you are using a two-tariff meter, then you should remember that the setup should be done differently.
As you can see, in this diagram the user can easily configure the meter so that it turns on during peak hours. It is during the period of the night tariff that the pump will turn on. The rest of the time, the timer socket will keep the device in the off position. If you plan to find out detailed and detailed information, then you should watch the video. Here you can also read about special sockets with child protection.
Setting up an electronic socket timer
Setting up a timer is quite simple, like all, in general, modern technology. Electrical appliances used today often have very laconic controls, for example, the I-pad, a miracle of computer technology, has just one button for everything.
Here we are dealing not with computers, but with electrical outlets, so we have one mode selection button and many, many buttons that are used to set exact times. Programmable sockets are no joke!
All control and setting of the timer is regulated by the instructions. However, it is not that difficult. As you can see in the image above and in the next beautiful picture, the mode switch has two positions - ON or I, that is, starting the timer to work and the time setting mode, which is indicated by the dial icon º.
Electronic socket-timer Electronic socket-timer
An example of how an electronic timer socket can be programmed to control the activation of a pump that filters water in a swimming pool.
The program of the timer that controls the activation of the pump on the water filter in the pool
The filter pump is turned on every three hours for 15 minutes during the time someone is using the pool. If there is an increased flow of swimmers during rush hour, it can be turned on for 30 minutes. And when there are no visitors, make it work for an hour, and then turn it off completely.
The second example shows the use of a socket timer to save electricity in a network with two tariffs. The program works to provide power to the device only during periods when an economical tariff is used, and during peak hours the power is blocked.
A program that allows you to save energy
Everything that seems complicated at first glance may turn out to be simple if you take it apart and see what’s inside the device.
Timer from inside
This socket timer is the simplest and most mechanical. Of course, digital timer sockets have been developed and sold that have a little more modes. But the principle of setting is almost the same, only the time is set on the display using the movement buttons (Left-Right, Set) and everything is saved in memory. A battery is used to power the digital timers. It needs to be recharged sometimes: after resetting, just leave it “without operation” for 12–16 hours.
Electronic timer socket Button functions
Here, as we see, you can more accurately specify the on/off time, there is a countdown mode (obviously inspired by films about gangsters), and there is the possibility of accidentally turning on the timer. Digital timers can operate not only on a daily cycle, but also on a weekly one. An electronic weekly timer is used when you have to leave for several days. For example, if you go to your dacha only on weekends, and live in the city the rest of the time. So you need such a clever little timer to do some work for you in the country, which it is desirable to do continuously.
What to look for when choosing an electronic timer
When purchasing, you should decide not only on the type of device, but also pay attention to the main technical characteristics and parameters that affect the operation of the device:
- Programming time frames. Everything is simple here. If you need to control the voltage only throughout the day, a simple mechanical model is selected. If weekly or even monthly management is required, an electronic option with the availability of appropriate options is selected.
- Accuracy. This characteristic is more relevant for mechanical models. Although for most tasks that are assigned to timers, accuracy down to seconds is not important. For optimal performance, it is necessary to choose products from trusted manufacturers.
- Load. Depending on the network load, you must select the appropriate device. There are models that can withstand a load of 7 A, 10 A and 16 A. The choice of indicator will depend on the power consumed by the device powered through this outlet.
- Number of programming lines. This parameter shows how many devices can be shorted to the timer. The simplest samples support only one device, more advanced models have 2 or more lines.
- Dust and moisture protection. Some devices may have additional protection against the negative effects of environmental factors. This is typical for timers intended for outdoor use.
PHOTO: images.esellerpro.com There are samples that have reliable protection from external factors for street use
How to use?
Connecting an assembled socket with a timer is no more difficult than an ordinary 220 volt socket - the circuit is completely similar.
For simple use in everyday life, there are even adapter models that resemble tees - with such an accessory you can even change the location of the “smart” outlet every day, and not only without an electrician, but also without a screwdriver. At the same time, you can purchase a separate timer that works as part of a more complex system into which it is built separately. It may not be connected to a socket, but to a switch, or sometimes it doesn’t seem to be connected to anything at all. When integrating into a complex power supply system with a large number of different devices, it makes sense to call a specialist, and the information from the attached instructions will also be useful.
In terms of setup, it is also best to refer to the instructions, since models of different types may have completely different controls, and more expensive timers may have such useful functions that a naive consumer would not even suspect
To be honest, you need to pay attention to the instructions even before making a purchase, at least in order to understand how well a potential purchase can solve your problems
Before using a socket with a timer, it is important to study the instructions also because this is an electrical device, careless handling of which can provoke extremely bad consequences. In addition, if violation of the timer's operating mode could adversely affect the living beings it helps to care for, you should study not only the safety section, but also the necessary preventive measures that will protect the product from premature wear and prolong its service life
For an overview of the Expert timer socket, see the following video.
Socket with timer: capabilities and scope
There is no need to talk much about the purpose and scope of application of this device - a socket with an electronic or mechanical timer is a highly specialized product and is used exclusively for controlling the operating modes of household electrical equipment. Let's give a simple example, from which everything will immediately become clear and understandable - let's take a regular fan heater and see how you can configure its operation using a socket with a timer. Everything here is quite simple - on the control panel we set the on and off times. Let's say, at 5:00 it turns on and heats the room, and when you leave for work (let this happen at 9:00), it turns off automatically.
With the same success, you can program the outlet for a whole day or even a week in advance and not touch the issue of controlling the fan heater for a long time. You ask, what does such control of an electrical appliance provide? Why spend extra money on purchasing an outlet with a timer? I will answer simply - this is saving energy resources and comfort in the house, which is ensured by automatic control. In fact, a socket with a timer is an integral element of a modern smart home system. By and large, using this device you can control any electrical appliances - take, for example, street lighting. With a little modernization and adding a socket with a timer to the street lighting circuit, you can program the time to turn the lights on and off - for example, at 20:00 the park lights are turned on, and at 5:00 they are turned off, so as not to waste electricity. In general, the time to turn the lighting on and off can be set based on personal needs.
Socket with electronic timer photo
With the same success, you can program the lighting in an aquarium, the operation of a water heating tank - in the latter case, this, of course, is not very practical, but when you leave the house for a long time, such an outlet will show what it is capable of. She will turn on the water heater a couple of hours before your arrival, and you can easily enjoy the benefits of civilization immediately upon arriving home. This is how a timer socket works. By the way, another area of its application is electric heating systems, which are assembled from electric convectors independent of each other.
Where can I use it?
The main area of application for sockets with timers is automatic control of equipment in a house or apartment. With their help, you can power household appliances, heating systems, irrigation pumps, heating and lighting systems.
Before connecting, the user makes the settings himself and sets the response intervals.
For a better understanding, here are some application examples:
- Turning on and off the lighting inside the house and in the local area. After selecting the mode, the outlet will itself supply or remove voltage from the lighting devices. The owner does not need to waste time performing these actions. The periodic on/off feature can be used to prevent intruders from entering. Periodically turning on the light will signal to thieves that the owners of the house are present.
- Indoor heating. Another way to use an outlet with a timer is to connect heating equipment to it. Electrical appliances will turn on and off at the specified time.
- Management of agricultural equipment. Devices help optimize agriculture. With their help, you can set up watering, organize the switching on of lighting and heating, resolve issues with feeding and perform other tasks.
- Turning on the water heater. Alternatively, you can turn on the boiler through an outlet with a timer and ensure timely heating of the water. This way you can avoid a situation where you forget to turn on the equipment and are left without the opportunity to buy.
The scope of application of the products is very wide, and an additional advantage is the opportunity to save up to 30-40% on electricity.
Rating of popular models
Model E.Next e.control.t11
The leading places in the rankings are occupied by German devices from Theben. They have proven themselves to be reliable, durable and high-quality devices.
Theben Timer 26 is available in a regular and waterproof housing with IP44 rating. These are simple electrical sockets that signal the end of the cycle with a characteristic click. They are silent, made of durable and high-quality material. The disadvantages include the lack of light indication. The price of a regular device is 1,800 rubles, with protection against dust and moisture – 3,000 rubles.
The domestic model E.Next e.control.t11 has European quality, despite the low price of 400-500 rubles. Has minimal functionality. The maximum current is 16 A. Additional options are available for E.Next e.control.t14 with electronic control.
Budget devices include another domestic development, Feron TM22/61925. Costs about 700 rubles. The characteristics are not the most reliable; the seller’s warranty is only 14 days. The parameters are standard - 16 A, the presence of an electronic programmer for a week, an LCD display.
How does a timer socket work?
Not everyone can guess what it is – a timer socket. In fact, this is not just an electrical appliance, but a unique way to control energy consumption. It is a convenient way to save electricity, and the number of ways to use it is practically unlimited. However, the main feature of this new product is its design.
Electronic Timer Socket for Outdoor Use
The design of this compact device is so simple that even a schoolchild can use it, and there are no more problems when installing such an outlet than when turning on any lamp or even an iron.
The socket timer has an electronic control method, which is especially important in modern living conditions. This means that there will be no problems in its operation due to user awkwardness, since the built-in controller will ensure the specified operating time and not a minute more
Consider, for example, such an option as the Kanlux electronic socket-timer. It provides the most complete functionality available to such devices. Its button menu allows you to set the current time, date and, in accordance with this, set the further operating schedule of the device.
1 4
In addition, a number of programmable modes are stored in the device’s memory, which contain the settings most used by users.
Advantages and features of use
Using a socket with a timer (RT) allows you to benefit from the following:
- convenience. The user is not tied to home due to the need to turn on any device;
- saving time. By connecting a kettle or water heater via RT, the user will receive hot water by the time he wakes up or returns from work;
- energy saving. If electricity consumption is paid at a differentiated tariff, it is worth setting up the operation of powerful devices so that they turn on at the beginning of the grace period and turn off at its end. RT will also be useful for citizens who watch TV shows late and often fall asleep. The TV will turn off at the appointed time, which will extend its service life and save energy;
- imitation of the presence of the owners. During a period specified by the user, for example, from 19-00 to 24-00, the RT randomly turns on the device for 2-30 minutes. Burglars watching through the windows will get the impression that someone is at home;
- safety. Often, a user, distracted by communication on the Internet, forgets to turn off an appliance, for example, an electric stove, in a timely manner. This leads to damage to the dish, burning of the pan, and possibly a fire. When using RT, such troubles are excluded;
- low cost. RT is much cheaper than the “smart” socket – microprocessor controller combination used in “smart home” systems.
At the same time, you need to understand that sockets with a timer cannot be compared with “smart” ones in terms of functionality. They are unable to independently make decisions based on the analysis of environmental parameters through sensors and do not involve remote control via a smartphone or Wi-Fi.