The indicator screwdriver, despite its simplicity, is a functional tool. It is used with equal success by professional electricians and people far from this field. Using the device, they determine the polarity of the battery, find a breakdown of electrical wiring in the wall, check the voltage on a hidden cable, determine the phase and neutral wires at the connection point of a key switch, household appliances, and eliminate the risk of overheating and failure of equipment from improper installation.
Types and design of indicator screwdrivers
The tester includes a metal tip that acts as a conductor and a resistor that converts electricity to a safe value. The indicating element in the electrical circuit of a screwdriver is a neon light bulb or LED, which is installed after the resistor. The indicator is connected to a conductive contact on the end or body of the handle.
The operating principle of the probe is simple. The tip of the device is applied to the wire, the current, if it is a phase, passes through the tester, a resistor (resistance) to a lamp or diode, and then to the ground. When working with the device, a person acts as a grounding element. When current passes through the resistor, its value drops to safe values, the user does not feel when the current passes through the body.
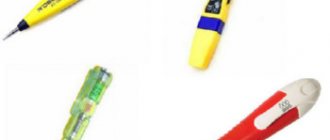
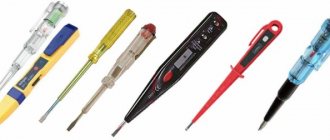
This design is the basis for the simplest and most universal tester models. There are several types of indicator screwdrivers:
Simple
A working electrical circuit is installed in the case, with a standard set of elements: transistor, resistor, indicator - neon bulbs. The zero phase is the person who closes the contact plate. The tool is not functional - it detects the voltage on the wire, but often does not work when the network voltage is less than 60 Volts. Not suitable for searching for network breaks.
With LEDs
The models have design and functional differences from the primitive model. An LED is installed as an indicator, allowing you to check the circuit at a voltage not exceeding 60 Volts. Probes of this type contain a bipolar transistor and batteries, which make it possible to perform contactless testing. LED probes are suitable for determining breaks in an electrical circuit and testing electrical equipment circuits.
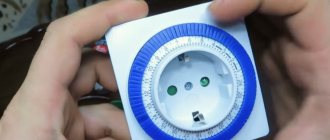
Universal
Portable devices with a wide range of capabilities. An instrument of this type performs contact and non-contact testing, determines open circuits and short circuits using “ringing” of networks, and light and sound warnings help with this. Universal probes are used when repairing or setting up electronic devices and vehicles; they are designed to work with direct and alternating current. The tester operates on a battery, the charge of which is monitored. If the battery loses charge, the universal screwdriver will not work.
The type of indicator screwdriver is selected depending on the intended work. For everyday use, a simple model is sufficient, but for working with electronic devices, choose a universal device.
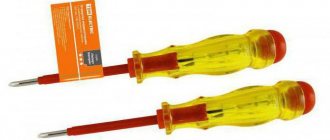
Indicating instrument with LED and power supply
The appearance and principle of operation of a screwdriver with an LED is the same as the previous version with a neon light bulb. The main difference is the lower indication threshold. LED devices are capable of detecting voltages below 60 volts.
A conventional voltage indicator with an LED is most often used in everyday life to determine phase and neutral wires. Among professional specialists, multifunctional indicator screwdrivers with a battery, equipped not only with LED indicators, but also with their own replaceable power sources, have become widespread. The standard circuit is supplemented with a bipolar transistor.
Devices of this type belong to the category of multifunctional ones, characterized by an expanded set of technical parameters. In addition to the ability to determine voltage, you can determine the fact of an open circuit and accurately locate the damaged location. In addition, the indicator is used to determine the polarity of DC sources and the location of wires. In the latter case, a non-contact method is used, and the wires themselves must be energized.
Detection of conductors is carried out due to induced magnetic fields recognized by the device. The wire itself should be located in the wall at a depth of no more than 1.5 cm. This device can also check the battery.
Considering the low cost of these screwdrivers, the number of useful functions in them exceeds all expectations. The main thing is to use the tool correctly and monitor the condition of the batteries, which discharge quickly. In order to keep the tool in working condition for as long as possible, it is advisable to insulate the probe to create a kind of dielectric curtain. During breaks between jobs, it will play the role of a kind of protective cap.
Where can I buy
To purchase a screwdriver as quickly as possible, you can visit your nearest specialty store. The optimal option, in terms of price-quality ratio, remains purchasing from the AliExpress online store. Mandatory long waits for parcels from China are a thing of the past, because now many goods are in intermediate warehouses in destination countries: for example, when ordering, you can select the “Delivery from the Russian Federation” option:
| 3 in 1 Digital Multimeter Voltage Indicator Tester Voltmeter | Screwdriver with voltage tester | Indicator screwdriver NAVIGATOR 155941 |
| Multi-digit test pencil AC DC 12-250V | Voltage indicator 100-220 V | ANENG Digital Indicator Screwdriver with LCD Display, 12-250V |
Indicator screwdriver diagram: main elements of the device
The tool is small in size and has a shape that is easy to grip with the palm of your hand. The main elements that make up the design of an indicator screwdriver include:
Elements of an indicator screwdriver: plastic body, tip, resistor, light bulb
- a plastic body consisting of a handle and a tip, the latter housing the sting;
- resistor;
- indicator light (lit when voltage exceeds 50 volts);
- metal spring for retracting the tip;
- metal plate to ensure contact with the human body.
Listed above are the main details that are typical for the simplest devices. To understand how to use a tester screwdriver, you should study the design of the tool, which may differ depending on the type of product. For example, the industry produces devices with LED lamps, sound indication, and an additional board that allows switching between different modes.
The design may not have a spring. In such a device, the tip is not retracted into the body and does not extend, but has a constant position and is closed with a cap during storage of the device. If the indicator is powered by batteries, there is an additional compartment in the housing. Some models are equipped with a holder similar to that found on writing pens. This detail greatly simplifies the portability of the device.
Helpful advice! When choosing a screwdriver, it is worth considering that the indication will be more noticeable on a device with a light or translucent body, especially if the device is used in a well-lit room.
Standard circuit used in most indicator screwdrivers
Tester. Operating rules
When and how to use an indicator screwdriver correctly, what are the requirements for the user’s personal safety?
Before checking hidden electrical wiring, the room should be de-energized. Exposed electrical wires should only be checked with a tester; do not touch them with your hands or conductors. Do not use the device in damp rooms, check the serviceability of electrical circuits with wet hands, the current passing through the body will be felt.
There should be no cracks, crevices or other damage on the tool body. If there is even minor damage, the device must be replaced. Repairing a damaged tester is not profitable; buying a new one will cost less.
Smart electronic screwdrivers
The electronic indicator screwdriver, due to its technical characteristics and wide functionality, is called a mini-multimeter. However, such devices do not belong to the measuring category, so the results obtained should not be considered absolutely accurate.
Depending on the modification, measurement data can be displayed on a liquid crystal display or recorded by LED lights on a voltage scale. Various combinations of LEDs with several colors are often used. The most commonly used colors are green and red. Some models have an audible alarm to let you know when voltage is present. Measurements are made in the range of 12-220 volts. The principle of operation is generally the same as that of conventional screwdrivers.
There are two operating modes of indicators – contact and non-contact. In the first case, the device operates according to the usual scheme, and in the second, it can operate in modes of increased or decreased sensitivity.
Checking the functionality of the device
Before you start working with a screwdriver, you should make sure that the tool is in good working order.
A simple and quick way to check the device is to insert the conductor probe one by one into each hole of the socket. The electrical socket must be live. If the tool is working properly, then when it hits a phase, the indicator will light up, indicating the voltage at the contact. The absence of a light signal and a sound signal, if it is a universal type, indicates a malfunction of the tester; they cannot test electrical equipment.
Plain (simple) with neon lamp
The simplest indicator screwdriver is only suitable for checking the presence of a phase. You can also call it an electrical probe (electric probe), since nothing else can be done with this device - just “try” whether there is voltage or not. Zero is “found” only by elimination. You can also determine the location of the break (or lack of contact in relay circuits), but for this the device must be energized.
There are two types of simple indicator screwdrivers. They can be distinguished by their appearance. Some have only a tip and a plastic handle, others have a metal contact pad at the end of the handle. The first type (without contact) is “self-sufficient”. To detect voltage, you just need to touch the current-carrying conductor with the tip - if there is voltage, the light bulb will light up. But such probes are rare; more often they can be found for working in a low voltage network - 12-36 V. When using indicator screwdrivers of the second type, in order to see the presence of a phase, you must additionally touch the contact pad on the handle with your finger. Without this, the indicator will not light up, since no electric current flows through it.
Simple indicator screwdriver device
Before using an indicator screwdriver, it is advisable to know how it works - this will make it easier to use in the future. The device of a simple screwdriver for testing electricity is not at all complicated. The circuit is created as follows: a screwdriver probe, a resistor (1 MOhm), a neon lamp, a spring and a contact plate/sensor in the form of a button on a handle. When you touch a button, a circuit is created, of which your body is a part. As a result, the neon light comes on. The current flow is very small as it is limited by the resistance.
If you only need this functionality (check the phase and find a break) - this is one of the best options. Moreover, it is the most inexpensive. Such an indicator screwdriver costs from 20 rubles. The disadvantage is that it will not show anything at low voltage. If the voltage is below 70-60 V, it is useless.
Rules for working with different types of testers
The principle of testing electrical networks and equipment with simple, LED and universal screwdrivers has some differences. To obtain reliable results, you must follow the basic rules for working with probes.
Checking with a simple indicator
This type of device helps to quickly determine the presence of a phase or load on a cable or socket.
The tester is taken in the hand and the contact surface is clamped.
Important! You cannot touch the tip of the device; a voltage of 220 volts will pass through it if you are checking an outlet, lampshade or switch.
The probe is applied one by one to the contacts, and the result is determined by the indicator.
The probe of the device is brought to one wire, contact, so that zero and phase are not shorted. The result is superficial - such a test shows the presence or absence of voltage. For a more accurate result, use a more universal type of tester.
Checking with a screwdriver with LED
You need to know how to use a screwdriver with an LED indicator in order to obtain accurate data when checking equipment and the electrical network.
The search for a phase wire is carried out by analogy with a simple tester - a finger closes the phase detector circuit, and the tip is applied to the contacts.
The LED device, unlike a primitive probe, supports the non-contact testing function. With this test, there is no need to close the contact; they just need to apply a screwdriver to the wire, box or wall where the hidden wiring runs. The sensitive device will respond with a diode signal to the presence of voltage in this area.
The non-contact testing method has a disadvantage - a sensitive device can show the presence of voltage if the network is interrupted. The advantages include the brightness of the light signal, it is very convenient in bright lighting and the ability to work with low voltage.
Rules for checking with a universal indicator screwdriver
The principle of testing with a universal device is almost no different from previous types of testers. Many models have a display that displays digital voltage values. It is easier to work with such a device, but they are more expensive than simpler probe models.
On the tester body there is a contact pad for closing the internal circuit and a toggle switch for switching the operating modes of the device. If necessary, you can set contact, non-contact and sensitive modes. All models have standard letter designations for modes:
O - the work is carried out according to the classic version: the network is closed with a finger, the conductor (tip) is applied to the element under test.
L—non-contact mode. A contact part is brought or applied to the object being tested, usually this is the end of the tester handle. If the device is exposed to an electric field, light and sound signals indicate the presence of voltage.
H - highly sensitive operating mode. The test is non-contact, with a low response threshold. This feature helps you quickly find hidden electrical wiring.
Types of indicators
The main function that the voltage indicator should perform is checking the integrity of the electrical circuit - this is what determines whether the device plugged into the outlet will work or not. Different devices cope with this task in different ways - a standard screwdriver voltage indicator uses to check the current that is already in the network (passive), and inside a multifunctional voltage tester-probe there is a whole circuit with a separate power supply (active), which allows you to dial even de-energized electrical circuits.
All these devices work on a similar principle, but have some differences in the rules of use.
Passive screwdriver indicator
This is a single-pole household phase indicator that performs one single task - to show the presence or absence of voltage at a certain point in the electrical circuit. It is not used by professional electricians due to its extremely limited functionality, but at home among a set of tools “just in case” it can come in handy.
Main types of verification
Depending on the type and functionality of the indicator screwdriver, contact and non-contact testing of equipment, equipment, and electrical networks is carried out.
Contact method
- When checking the cartridge, you must be careful not to short-circuit the contacts of the base, which are located very close to each other. The phase comes to the internal contact, and not to the thread, otherwise leakage may occur to the body of the lighting device.
- If the light bulbs in the chandelier light up incorrectly or not all, then you should check the connection of the switch. If the indicator lights up at the zero terminal, this means that the phase reaches the switch zero, passing through the chandelier bulb. In this case, the installation error must be corrected.
- A test for voltage leakage is carried out when the hand tingles or pinches from touching the equipment. The electrical device is connected to the network, its operation is started and the tester is applied to the housing. Leakage to the housing occurs if the indicator lights up at the floor of the channel. The indicator will light up in full force if there is direct contact of the phase wire with the device body. In these cases, the equipment should be repaired or replaced.
Contactless method
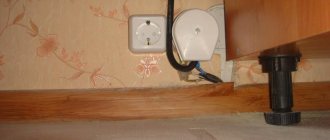
Finding a Cliff
It happens that when connecting a device through an extension cord, it does not work; to prevent damage to the mechanism, you need to check it for a possible break.
The indicator screwdriver is taken by the tip, the end of the handle (heel) is applied to the insulation of the extension cord plugged into a working socket. The diode lights up, the probe is led along the entire length of the wire. In the place where the light goes out, the cable has broken.
When a break is not found after the first test, you need to unplug the extension cord from the socket, turn it over, then plug it in again, and repeat the test. If the actions do not reveal a faulty extension cord, the problem is in the device.
Hidden wiring
The ends of the wire embedded in the wall are applied to the “heel” and probe of the screwdriver. If the indicator gives a signal, there is no break in the wiring; if the wire is damaged, the diode will not light up. The wire can be extended if it is impossible to reach the probe from one end to the other. Before extension, check additional wiring by analogy.
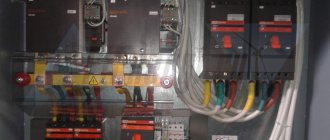
Using Voltage Indicators
The use of indicator screwdrivers makes it possible to find the phase wire, neutral and ground in sockets, switches, lighting fixtures, verify the presence of voltage in the electrical network, identify voltage breakdowns on the body of household appliances, and also detect wiring in the walls under tiles or a layer of plaster with a finishing finish coating. Work with testers begins after their verification. The test is performed on a stressed area. Its presence on the network will be indicated by a light signal from a neon or LED indicator lamp. After checking the suitability of the device, breakdowns and malfunctions of electrical networks, household appliances, and lighting devices are eliminated. The main types of work using voltage testers include:
- Searching for phase and zero is necessary if electrical wires are not marked. The work begins by turning off the circuit breaker on the input panel, from which the electrical network is supplied at the test site. After stripping the wires being tested and then separating them from each other to a safe distance, eliminating the possibility of a short circuit or electric shock to a person, they begin to identify the phase cable. If, after turning on the electric current and touching the voltage indicator to the stripped end of the wire, the lamp lights up, then this conductor is phase. The second wire is zero. If the indicator lamp does not light up, then the first conductor is without voltage. The second wire can be considered a phase, which must be verified using an indicator.
- Determining voltage leakage on the body of an electrical device involves simply touching the tip of an indicator screwdriver to its metal (unpainted) part. The appearance of a glowing lamp on the indicator after connecting the household appliance to the network indicates the presence of a phase on the device body, as well as the need to urgently eliminate this problem. The bright glow of the indicator screwdriver indicates direct contact of the phase conductor of the cable with the body of the electrical appliance, touching which can cause electric shock.
- Checking the quality of the conductivity of the circuit is carried out by touching the ends of the wire, stripped of insulation, to the tip and finger contact of the indicator. An audible signal or a glowing lamp indicates that there are no problems with the integrity of the conductor.
- Detection of hidden wiring in walls is based on the appearance of a light or sound signal from a voltage indicator in the area of the electromagnetic field created by a cable connected to the network power supply. Its boundaries will be determined by slowly moving an indicator screwdriver along the wall in different directions. The activation of a sound or light signal indicates the location of conductive wiring under a layer of plaster or finishing coating.
- Finding broken wires is based on the cessation of functioning of the indicator screwdrivers. In places of damage, the voltage probe will not light up or emit sound signals. His work will be stopped. The use of indicator screwdrivers is a prerequisite when carrying out voltage-related repair work. Their correct use is a guarantee of safety, eliminating the risk of electric shock.
Electrical circuit trick
It happens that when testing an outlet, the probe shows the presence of voltage on two wires at once. This result occurs if a zero break occurs, and the phase moves on in the closed circuit. Possible reasons:
- Breakage of the neutral wire in the entrance panel. The problem is resolved quickly - the terminal on the panel is disconnected, cleaned and reconnected.
- Knocked out machine gun (plug).
- Weak contact, increased load in the distribution box of the apartment.
- Damage to electrical wires by rodents, repair work.
Indicator screwdriver with hidden wiring detection function
The term “dialing” has already been used in the article. This is one of the functions that the tool can have. These devices are LED and are powered by a battery. Precisely because a test screwdriver requires a battery, many people prefer simple options that, in fact, last forever.
Using an indicator screwdriver you can find hidden wiring
A device with dialing may be based on the following circuits:
- with field effect transistor;
- with bipolar compound transistor.
The control coefficient of both types of element is quite high. Even circuits with high resistance, enclosed between the contacts of a screwdriver, unlock the transistor, and the LED is triggered - it lights up. A similar thing happens when the tip gets into an electromagnetic field.
Related article:
How to connect copper and aluminum wire: tips and detailed guide
Installation options and features of outdoor work. Common mistakes and possible problems, important rules and useful tips.
If the broken wire is connected to a phase, then when the tip is passed along the place where it is placed and when you hold the top of the screwdriver with your hand, the light will glow. After the break, the glow will disappear.
Important! When using a voltage indicator as a continuity test, it is necessary that there is a zero parallel to the phase, and that the end of the wire being tested has a load.
A device such as a detector will determine the location of hidden wiring more accurately
When moving the indicator along the cable under the plaster, the LED will also light up. In this case, be sure to ensure contact with the top point. If the screwdriver is moved 2-3 cm relative to the wire, it will go out.
The function of detecting an open circuit, including under plaster, is inherent only to indicator screwdrivers - such operations cannot be performed with a multimeter.
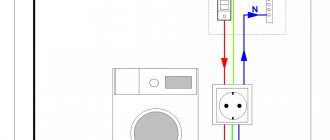
DIY phase detector
How to make an indicator screwdriver with your own hands to use it for examining electrical equipment.
This can be done using a simple electrical circuit. The assembled tester will allow you to determine the presence of voltage in the socket, socket and other electrical devices.
To assemble the circuit, you need to take a 2.5 MOhm resistor, a 100 Ohm resistor, a transistor, KT-312 will do, an LED and a 3.5 volt voltage source (batteries). When assembling the probe, take into account that the base of the transistor is located on the right, the emitter on the left, and the collector in the center.
The negative of the LED is soldered to the collector of the transistor. A 100 Ohm resistor is soldered to the positive side of the diode. The minus of the power supply is soldered to the emitter of the KT-312. The positive lead from the power supply is soldered to the terminal of the 100 Ohm resistor. A 2.5 MΩ resistor is soldered to the base of the transistor; it will act as a probe.
Testing with a homemade tester is performed according to a well-known algorithm. Instead of a contact pad, a finger is placed on the plus or minus of the power source. The free terminal of the resistor is applied to the switch terminal, the cartridge contact, and placed alternately in the holes of the socket.
When a contact is hit with voltage, the LED will light up, nothing will happen if the resistor contact hits zero.
Product selection criteria
Knowing how to determine phase and zero with an indicator screwdriver, you can always quickly fix problems with the power supply of your home with your own hands. When choosing a voltage indicator, it is recommended to consider a number of characteristics. Their list includes:
- body size and shape;
- color shade and ergonomics of the handle;
- functionality;
- availability of a power source for autonomous operation of the screwdriver;
- type of indicator light: neon or LED;
- presence of display and sound signal;
- manufacturer company;
- cost of the product.
The optimal choice of voltage indicator determines the successful use of the products and the absolute safety of repair work.
How to check the phase without an indicator screwdriver
How to determine the phase without an indicator? There are several ways. They are sometimes the only way to correctly install a switch or replace a burnt out socket.
The first of them is the fastest, simplest and most reliable. It is based on a visual inspection of the wires. The fact is that the multi-colored braid is not random. It is the color that indicates neutrality or being under the phase of the vein. Remembering the correspondence is difficult, and it is not necessary. If necessary, just look at the marking table.
The second option allows you to determine the presence of voltage using the same control. One wire should be attached to the metal of the heating system, cleaned to a shine, and the other should touch the conductors where the phase needs to be determined. If you touch a live wire, the light bulb will light up. If you don't have an incandescent lamp on hand, you can use a neon lamp.
The third method, which tells you how to find a phase without an indicator screwdriver, may make you smile, since the diagram includes... potatoes. In addition, you will need two wires about 50 cm long and a 1 MΩ resistor. One cable must be connected to the heating metal, and the second cable must be probed for the core of interest. The ends of the wires must be inserted into the cut of the potato. If after a few minutes traces of darkening appear, it means the vein is phase. If not, then zero is determined. It is worth noting that the holding period should be 5, maximum 10 minutes. There is no point in drawing conclusions before the expiration of the extreme time threshold.
You can determine the phase without an indicator screwdriver by the color of the wire