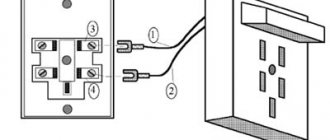
Today in this article we will look at three types of sockets for an Internet cable. I’ll tell you how to crimp each one on the go when you don’t have enough tools. And also which outlet is better to choose for home use and connection. I hope you have already installed the cable. Next, the wires usually go into special mounting boxes if you are going to use internal sockets. Or they are laid separately in cable ducts in an external socket (“Box” type).
Try to leave as much wire as possible, preferably 15-20 cm. Just in case you have to re-crimp the wires. Now let's turn our attention to the pinout or crimp color that currently exists.
There are two types of them “A” and “B”. If anyone has ever crimped wires, then they know that it is the “A” system that is used for crimping cables. But for sockets it is the “B” scheme that is used. And we will use it exactly. Now I will tell you how to connect an Internet cable to an outlet using the example of different models.
ATTENTION! If you have a network socket on one side, and on the other side you want to crimp a regular RJ-45 connector. Then we crimp the socket according to “B” type, but the wire as usual according to “A”.
RJ-45 connector crimping
The Internet cable that enters the apartment is called twisted pair and is connected to a plastic connector. This plastic connector is called a connector, designated RJ-45. Professionals call such devices “Jacks”.
Basically, the plastic connector is made of a transparent material through which all the different colored wires are visible. Exactly the same parts are used to connect computers, a modem to a computer, and other computer hardware. In this case, the arrangement of colored wires may not be the usual one. This is the connector that is inserted into the information socket. The most important thing here is to understand the order of all the wires and then the problem with crimping the connector will be solved.
Checking with a dial multimeter
This is almost the easiest way to ring a cable, since such a device is found in almost every home. To check, take green and orange pairs of veins. The procedure is as follows:
- switch the device to search for resistance;
- touch the orange veins with a chisel;
- the resistance should be set at several ohms;
- touch the green veins and carry out a similar check;
- touch the orange and green veins and get a resistance value of 100 Ohms and above.
If the measurement was successful and showed the same numbers, then this indicates the excellent condition of the wires. If pairs do not ring through, it is necessary to replace them with unused ones, for example, brown or blue.
Wiring diagram by color
There are two connection schemes: T568A and T568B. We do not practice the first connection option, and the connection is carried out according to scheme “B”. Therefore, you need to familiarize yourself with the arrangement of colors according to this scheme.
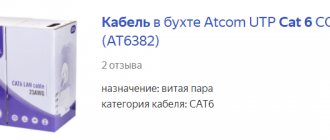
A very important point is the number of wires in a twisted pair. As a rule, cables with 2 pairs or 4 pairs of wires are used. 2-pair cables are used to transfer data at speeds up to 1 Gb/s, and 4-pair cables are used to transfer data at speeds from 1 to 10 Gb/s. Internet cables are installed in private houses and apartments, where data transfer is carried out at speeds of up to 100 Mb/s. Despite this, there is a steady trend towards increasing the speed of transfer of Internet resources. Therefore, it is better to play it safe and install a 4-pair cable with the future in mind. Moreover, the connectors and sockets are produced for connecting 4-pair twisted pair cables.
When using a 2-pair cable, after laying the first 3 wires according to diagram “B”, the green wire is connected to the sixth contact, skipping two contacts. This can be seen in the corresponding photo.
Using verification software
Review and configuration of the D-Link Dir-320 modem
Users often start searching for software online, but do not realize that they already have these programs as standard on their PC. This is not only a diagnosis of network errors, but also a program responsible for the Internet icon. If she detects its absence, then the picture changes to the appropriate one. This symbolizes problems associated with a broken or shorted twisted pair cable.
No program will show you exactly where the cable is damaged, but there are solutions that have more functionality than standard ones.
An example is a good software solution called Network Traffic Monitor. It is completely free and has wide functionality, including:
- Measuring network speed in case of problems and instabilities;
- Analysis of network speed changes;
- Saving all reports on your hard drive;
- Making deep settings;
- Possibility of using useful services;
- Many languages supported.
Installing the software doesn't take even a minute. All you need to do is run the EXE file and agree to the installation. After this, the program will install and be ready to use. Network Traffic Monitor is considered one of the best testing and diagnostic programs. This is evidenced by numerous user reviews.
Crimping a twisted pair cable into a connector
To crimp the ends on the connector, special pliers are used, which can cost from 6 to 10 dollars, depending on the manufacturer. When using such a tool, high-quality contacts are obtained, although this can be done using wire cutters and a screwdriver.
First, you need to remove the protective insulation from the cable, at a distance of 7-8 cm from the end of the cable. The cable contains four pairs of wires of different colors, twisted in pairs. There are cables with a thin shielding braid. It won't be needed, so you can simply bend it to the side. All pairs are untwisted, and the wires are aligned, spread apart and laid out according to pattern “B”.
The separated wires are clamped between the thumb and forefinger. At the same time, you need to make sure that the wires are straight and tightly pressed to one another. If the wires are of different lengths, they can be aligned with wire cutters, leaving a total of 10-12 mm in length. If you take the connector and try it on, the insulation of the wires should start slightly above the latch.
How to connect an RG45 internet socket yourself
Nowadays, many people, during home renovations, lay network cables (twisted pair) along the walls. So that in the future they will have the Internet through an outlet built into the wall. This is due to the fact that a large number of our population prefer to access the World Wide Web via cable rather than wireless technologies. I consider this method more reliable and stable. Therefore, in today’s article we decided to show you how to connect an RG 45 Internet socket with a twisted pair cable.
Versatility and practicality
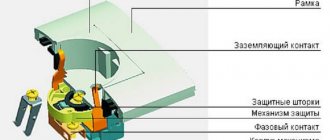
If you have chosen Schneider sockets and switches of the same series for the entire apartment, then you can safely install the supports right away. They are equally suitable for all electrical installation devices. This approach saves a lot of time, because... It is more convenient and faster to install separate calipers than ready-made sockets, and even with connected wires. You simply tighten two screws and the metal frame is securely fixed in the socket box.
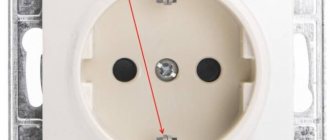
Helpful Hint: When choosing outlets, give preference to outlets with grounding. You can plug in any device into this outlet.
Further work is connecting the outlet. Everything happens very quickly. Depending on the model, you either screw the wires into screw terminals or simply push them into screwless terminals. We recommend that you use screwless terminals because... they guarantee proper operation for the entire service life of the socket without periodic tightening of the thread. The mechanism is inserted into the caliper without additional screws, just on the latches
In the same way, the socket cover is placed on the latches, and on top there is a decorative frame with the colors and shape of your choice. No additional screws, nuts or fasteners. Everything is done by hand without tools. Purely. Reliable. Beautiful.
What types of internet sockets are there?
Internet socket rj 45 can be found in two different versions:
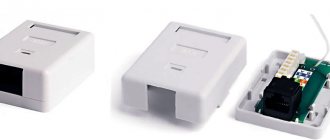
- Outdoor. This type of socket is installed on the wall. These sockets are used when the network cable runs along the wall.
- Internal. These sockets are installed in the wall. If your twisted pair wire is hidden in the wall, then for convenience and beauty use an internal socket.
Both options can be easily disassembled into several parts. One half of the case performs a protective function, the second half is designed for mounting on or into a wall. There is also an internal part, it is needed to connect the socket to the wire. It is equipped with thin contacts, with their help, with a slight pressure, the insulation of the twisted pair is cut and a reliable contact appears.
You can find single and double RG-45 sockets on sale. Internet sockets, depending on the manufacturer, will differ visually and in quality, but functionally they are all the same.
How to properly dismantle a socket
So, having examined the main technical characteristics of sockets and their types, you can proceed to the main thing, how to remove the socket from the wall. To do this you should need:
- small screwdriver with plastic handle,
- insulating tape,
- latex gloves,
- tester.
Here are the step-by-step instructions:
- The first step is to turn off the power to the apartment. In this case, you should check several times that the electrics are actually de-energized. You can use a tester for this.
- Depending on the type of outlet, the decorative cover is removed. It can be secured with screws or latches. Domestic sockets use a screw.
- Then the socket fastenings are unscrewed. If the legs are movable, then when the screw is unscrewed, it will become accessible for removal.
- Carefully pull out the entire structure of the socket and see how the wires are secured.
Note!
If the wiring is old or aluminum, then it is important to be careful not to break the wire. Otherwise, it will be difficult to replace and you will have to build up the wires, which will not have a very positive effect on the overall design.
That's all the instructions for removing the socket. After this, you can hang wallpaper or install a new socket. If you have experience working with sockets, be sure to leave your comments at the end of this article.
We connect the RG-45 internet wall socket
When you open the lid, you will see a diagram for connecting the Internet outlet. At least, conscientious manufacturers and more expensive options definitely have it.
First, you need to vertically attach the case to the wall so that the network cable comes in from the top and the RG-45 connector is plugged in from the bottom. Although this condition is optional, if it is more convenient and beautiful for you to position the body horizontally, then do so.
We connect the RG 45 socket with the wire:
- Once you have installed the chassis, grab the edge of the twisted pair cable and cut off 4-6 cm of protective insulation. Be careful not to damage the wires.
- Twisted wires in pairs, untwist and align. Next, take one core at a time and insert it with force into the slot, adhering to the color scheme of the connection. If you can’t do this with your hands, then take a knife or screwdriver to help. Place one core into the slot and press it with a knife. The core should drop a few millimeters into the slot. In the photo below you see an example.
- After inserting all the wires into the slots, bite off the excess length of each wire.
- Done, close the lid.
Two options for connecting any RG45 internet socket
As you can see, connecting the external socket rj 45 turned out to be quite easy. This procedure can be performed by anyone, spending 10-15 minutes. If you don't succeed the first time, don't despair, try again.
Classification
The classification of overhead sockets is carried out depending on their purpose, namely:
- Regular network (power) electrical sockets;
Viko surface-mounted electrical socket with grounding
- telephone (RJ 11);
Single telephone socket ABB (RJ 11)
- socket for computer networks (RJ 45);
Computer surface-mounted RJ-45 Electric socket with casing removed
- TV sockets (television).
Electrical waterproof overhead socket Legrand (Legrand) protection class IP66
If in an ordinary room it is quite possible to install devices with a protection class of IP20 (that is, unprotected surface-mounted sockets), then in wet rooms, for example, in a bathroom or kitchen, this option will be unacceptable. External (street) sockets must be resistant to dust and moisture.
Let's see how to connect an internal Internet socket RG-45
Before you start connecting the Internet outlet, you need to disassemble it correctly so that you have normal access to the contacts. This is perhaps the most important task. In the future, you will connect the Internet cable to these contacts. Different manufacturers have done the disassembly and assembly methods differently.
Legrand internet socket
- To connect the Legrand internet outlet, you must first remove the front cover.
- Further inside you will see a white impeller; it must be turned in the direction the arrow points to.
- After turning, the front panel is removed. On this panel you will see a color scheme of where to connect which wire.
- Now you can thread the wires into the hole on the plate and start connecting. See photos and video below.
You may be interested in an article on how to change the external and internal IP addresses of a computer. You can see more details by following the link.
Lezard Internet socket
If you buy a Lezard socket, then you will need to disassemble it in a different way.
- To remove the front panel you will need to remove several screws.
- Then use a screwdriver to release the latches so that the inside can be pulled out.
- After this, you will have in your hands a small box with a lid on top. We pry off the lid with a screwdriver and open it.
- Done, start inserting each wire into the slot, one color at a time.
- The last thing to do is close the lid, assemble the entire internet outlet and mount it into the wall.
Disassembling sockets from different manufacturers differs, but the principle is the same for all. Whatever company you choose, you can handle the disassembly, the main thing is not to make a mistake in the color scheme. Otherwise, you will not only have to spend a lot of time, but also disassemble and reassemble in a new way.
Using the example of two Internet sockets from different companies, we showed you how to properly connect an Internet socket. But if you don’t know how to connect computers into a local network, you can look at us.
Socket_schneider_how_to_disassemble
For your attention, detailed step-by-step photo instructions - Installing an external (surface) outlet .
The power cable for connecting an external outlet can be laid either openly (in a corrugated pipe, cable duct, directly with a wire) directly on the surface of walls or ceilings, or hidden (located in grooves, wall cavities, etc.).
In our example, to install an external outlet, the wiring is done externally. The power cable is located in a corrugated pipe, which is attached to the wall surface with clips. There is an external switch located directly above the socket and the wiring for it is made in the same corrugation. You can read more about connecting it and pulling the power wire through it to a surface-mounted socket in the article “Installing an external (surface) switch.”
For installation, we use an external Schneider Electric from the “Etude” series with a cover, with a degree of protection IP44.
We have divided the entire installation process into simple steps, the sequential implementation of which will allow almost anyone to install an external outlet independently.
1. Turn off the electricity supply.
The very first step is to disconnect the power cable going to the outlet. To do this, in the electrical panel, you need to move the circuit breaker levers to the “off” state, usually this is the position in which the lever is pointing down. Which machine needs to be turned off, if they are not signed, is determined empirically by turning them off one by one and checking, for example, with an indicator screwdriver, the presence of voltage in the wiring for the switch. As a last resort, turn everything off. But then be sure to make sure again that there is no electric current at the installation site!
2. Open the socket cover to gain access to the latches holding the front panel of the socket.
3. We press the latches with a screwdriver, and then disconnect the front part of the socket from the body.
4. We disassemble the socket.
An outdoor socket consists of: a front panel with a cover, the socket mechanism itself and the housing (base). After removing the front panel, the socket can be disassembled into these components.
5. Mark the position of the mounting holes.
To do this, we apply the socket body to the installation site, align it strictly horizontally and mark the positions of the mounting holes.
6. We attach the base of the socket to the wall.
Depending on the type of base used, the appropriate type of fastener is selected. We use regular dowel nails because... We install the socket on a brick wall.
7. Cut out the inlet hole in the socket plug.
In our case, under the corrugated pipe in which the power cable is located. The external installation socket of Schneider Electric (Schneider Electric) from the “Etude” series has a convenient plug, with several possible options for inlet diameters highlighted on it, equal to the standard sizes of protective corrugated pipes used in electrical wiring. Therefore, it is not difficult for us to accurately make an inlet hole of the required diameter using a stationery knife (cutter).
8. We place the corrugated cable with the power cable inside the socket as shown in the image below.
9. We remove the insulation from the cable and strip the ends of the cores by 8-10mm.
10. We connect the wires to the mechanism.
To do this, we place the phase (white) and neutral (white-blue) wires in the outer terminals of the external socket mechanism, and the ground wire - the protective zero (yellow-green), in the central - middle terminal, with the corresponding marking.
How to determine which wire is phase, neutral, and which is ground yourself, our detailed instructions will help you - HERE.
There are more and more low-current cables in home network wiring every year. This includes:
- UTP internet cables and telephone wires
- cable for the “Smart Home” system
- wires for acoustics
- alarm and video surveillance
- TV cable
If earlier all this was simply thrown along the floor, behind furniture, in baseboards, today when renovating an apartment, walls are also tapped for low current and special sockets are installed.
Let's take a closer look at the installation of TV sockets from companies such as Schneider Electric (Unica series) and Legrand.
Technical characteristics of television connectors from Schneider Electric:
The decibel value indicates the weakening or attenuation of the signal.
The installation of all sockets must begin with cutting the coaxial cable. Leave a reserve of 10-15 cm in length in the socket box, cut off the rest.
Now the most important thing is to decide how much insulation needs to be removed. To what depth and how many centimeters?
It is best to take measurements directly on the outlet itself. To do this, take it in your hands, place the wire just below the inspection hole and mark with a marker or knife the cutting line at the level of the plastic central insert.
You can cut off the top layer of insulation using a specially designed tool.
as well as with a simple knife.
You can find an inexpensive stripper for coaxial cable on Ali Express here.
The screen under the insulation in television cables is found in different designs:
- only aluminum foil
- foil with copper braid
- one braid in the form of thin wires
If the total wire diameter is less than 7mm, the screen is often turned outward to ensure sufficient contact with the metal socket cover.
Therefore, at least half of its layer should be turned upside down. Otherwise, you simply will not have contact and no TV signal.
Also pay attention to the icons and inscriptions on the case. There should be a symbol in the form of an arrow facing inward.
There is another arrow pointing upward.
If your model has 2 arrows facing in different directions, then this is a pass-through TV socket. That is, you run one cable from the antenna into the connector with a downward arrow, and with the other you release a cable or continue to pull the line to another connector, to another TV.
In general, there are 3 types of television sockets:
- single
- terminal - they have an additional resistor with a resistance of 75 Ohm (terminator)
- checkpoints
Single and terminal ones will transmit a signal of similar quality, provided that a TV is connected to them.
If you do not connect a TV to a single socket without resistance, then other TVs will experience interference and signal distortion. The terminals do not have this problem.
However, keep in mind that all this applies primarily to an analog signal. If you have digital TV, or are planning to switch to it, then problems may arise due to this resistor.
You will either have to throw out this outlet and replace it with another one, or connect it directly. These resistors dampen the signal very strongly. Some channels will show poorly or there will be no image at all.
Crimp the network cable yourself
After installing the RG-45 outlet, you will need a patch cord to connect the Internet to the computer from it. It’s good if your computer is located a meter from the outlet, then you can simply buy a ready-made patch cord. But if the distance is 5 meters or more, buying such a length will be problematic.
Therefore, we recommend that you crimp the patch cord yourself; our article will help you with this: the procedure for crimping a twisted pair cable, all the diagrams. You can also watch on our website detailed instructions with a video on how to crimp a twisted pair cable yourself with and without a tool.
Double Simon socket without grounding, white hidden installation
| vendor code | 1590457-030 |
| Brand | Simon |
| Series | Simon15 |
| Socket type | electric |
| Number of sockets | double |
| Grounding | without grounding |
| Installation type | built-in |
| Current strength | 16A |
| Color | white |
Helpful information
If you want to buy a built-in double Simon socket for hidden installation without grounding, 16A, white, at an inexpensive price, leave a request in our World of Electrics store. The company has been focused on supplying electrical products for over 15 years and has acquired close relationships with the best domestic and foreign manufacturers. This allows us to maintain fairly cheap prices, the required quantity of the required products in the warehouse, ready for shipment to the customer at any time, regardless of the day of the week.
We carefully monitor the quality of supplied electrical goods, require quality certificates from manufacturers and check all sockets for compliance with GOST requirements. When shopping on our website, you are perfectly protected from defects.
Professional consultants will answer your questions in detail, provide maximum useful technical information about the double white Simon socket for hidden installation without grounding, and place an order for the required amount of electrical materials from 9 a.m. to 7 p.m. on any day.
Common mistakes made when connecting RG45 sockets
When someone connects for the first time, it is possible to make a mistake. As a result, there will be nothing to work. Below we present the most common mistakes that many make.
- If you decide to install according to the “ B ” color scheme, then do not forget that the purchased network cable is usually crimped according to the “ A ” scheme. This scheme is the most common in our country.
- When cutting the protective sheath of the cable, be careful not to damage any of the wires. There are often cases when the core does not seem to have been cut, but is damaged, and when installing the socket into the wall, the damaged core breaks.
- There is a possibility of purchasing a defective internet socket. No one is immune from this. We recommend purchasing from trusted companies; the seller will advise you at your request.
- The wire was inserted poorly into the slots. Many simply don’t keep up. Therefore, do not be afraid to use force; the wire should fit well into the gap.
Types and standards of connections
Modern telecommunications equipment from one manufacturer is used in different countries around the world. It would be very inconvenient if everyone had their own communication and connection standards. Therefore, uniform standards were adopted that make it possible to automate most tasks.
RJ-45
The Internet has ceased to be a curiosity today and many people receive it in their homes using the “optics to every home” technology or via a wireless network. But in any case, when connecting a router or modem, a cable appears, which is called “twisted pair”. Usually it has 8 cores. An 8P8C connector is connected at each end. They used to call it RJ-45, but if we want to be precise, this is not entirely true. RJ-45 is the standard, and the connector is called 8P8C.
EIA 568-B standard
Previously, to connect to equipment, it was necessary to cross some wires with each other in order for it to become operational. This issue was resolved when in 2001 the American Association approved two standards for connecting twisted pair wires. These are the TIA/EIA-568-B and TIA/EIA-568-A standards. Most often today the connection according to the first option is used. It implies the following sequence of veins: white-orange - orange (1-2), white-green - blue (3-4), white-blue - green (5-6), white-brown - brown (7-8). In the second option, instead of green-white, orange-white is connected, and instead of green, orange is connected. This option is required for a 10BASE-T and 100BASE-T network. If you suddenly confuse something, then don’t worry, modern routers are designed for both options, so they automatically transfer the signal.
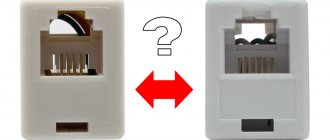
Difference
Inserting the cable into the socket
All Internet sockets come in external and mortise versions. Each manufacturer may slightly change the cable fastening mechanism, but the principle itself remains the same.
Legrand
Legrand internet socket connection diagram
The socket from this manufacturer has a pleasant appearance and one of the best mechanisms for fixing the cores. To connect it we need to do the following:
- Using the blades in the handles of the crimping tool, we remove the outer insulation of the cable. All 4 pairs should appear. We level them so that it is convenient to work with them.
- Take the socket and remove the front panel. To do this, you need to unscrew just one bolt that secures it.
- We unfold the internal mechanism. A white locking handle is visible on the back edge. It must be turned counterclockwise. After this, part of the fittings is removed.
- The main body can be put aside for now so that it does not interfere. There is a hole in the part we removed. We insert the cable so that the white clamp faces away from us.
- On the top edge you can see two printed schemes with colors under each number. Scheme A is the second connection option, which was mentioned earlier. Scheme B is the one we need.
- In accordance with the color, we insert each individual core into the clamp. It doesn't matter if they don't go in all the way.
- Next, we take the main part, connect to it the element into which we just inserted the cores and turn the handle clockwise. When the latch fits tightly, additional notches will push our veins into the space left for them.
- Now we install our socket in the socket prepared for it and unscrew the spacers.
- We attach the front panel.
Possible connection options
Viko (Viko)
Vico internet socket
With this outlet, everything is not as simple as with the previous one:
- Remove the front panel.
- We turn it over so that the sockets for the twisted pair wires are at the top, and the front part is looking at us.
- At this stage a surprise awaits us. There are absolutely no markings or clues here. You will need the information that was given in the article under the T568-B standard.
- We clean all the veins. The manufacturer did not provide a piercing mechanism.
- We will insert them in pairs, as described earlier. We will move from right to left, in the position in which we placed the socket.
- We clamp each cable with a bolt.
- We check the correct connection using a tester. If this is not the case, then you can, without installing the socket in the socket box, plug in the cable that goes into the computer. The connection properties should show functionality.
- If everything is in order, then screw the front panel and fix the socket into the wall.
Lezard
- We start with the standard unscrewing of the front panel.
- Now you need to pull out the connector itself. To do this, you need to press the latch.
- Take a screwdriver and insert it into the hole for the cable and lift it up. The top cover should open.
- In accordance with diagram B, we insert the cores. There is no need to clean them. To recess them deeper, you can use the back of a utility knife.
- We cut off the excess parts of the cores and close the lid.
- We put the latch back and screw the panel.
- We install it in a socket box.
We disassemble the Lezard Internet outlet
How to connect an internet outlet
Well, guys, remember, I wrote about sockets behind the TV, there were three of them - a regular electric one, for an antenna, and the last one is the Internet, which is very popular nowadays. I already wrote about the first two, just follow the links, but about the last one, “tailored” for computers, I somehow kept putting it off. Today I want to correct this injustice and post complete instructions for connecting. I have a LEZARD socket, but it will be useful for everyone to look at it, because the principle is the same for everyone. As usual there will be photo and video instructions. So bookmark it...
CONTENTS OF THE ARTICLE
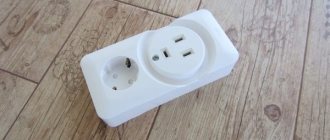
First, let's look at the Internet outlet itself. This is a plastic type that is inserted into a regular socket box, but is connected to an Internet cable, that is, there are no electrical wires there.
On the outside of this socket there is a connector for an RJ45 connector, which is where we then insert the wire from the network card of a computer, laptop or TV (SMART TV). Hangs on the wall to hide wires (which are embedded in the wall) and make it more aesthetically pleasing. Everything is hidden, everything is beautiful - this is the main purpose. I think now it becomes clear why it is needed!
What to look for when choosing
First of all, you need to select an outlet depending on its purpose, no matter how trivial it may sound. And if the device for connecting the antenna cable is difficult to confuse with an electrical outlet, then the RJ11 and RJ45 sockets are similar in appearance.
Next, you should pay attention to the body of the electrical outlet. The plastic base is not resistant to heat that can occur as a result of poor plug connections or when connecting powerful equipment.
Surface-mounted ceramic sockets are more resistant to temperature loads, but their price is slightly higher.
Protective shockproof plastic will provide high resistance to mechanical stress, which significantly increases service life.
When choosing a mechanism for fixing wires, you should take into account that key clamps, although they simplify the installation process, over time they can weaken, which will cause poor contact and lead to heating of the socket. From this point of view, screw clamps are more reliable.
Depending on the number and type of electrical appliances to be connected, you should decide whether to install a single, double, triple or combined socket, for example, electric and telephone.
We disassemble the LEZARD internet socket
Before we mount it, we need to disassemble it. This is done in order to connect it to the Internet cable, and then attach it to the wall. Here we go:
- Unscrew the body. Unscrew it and all the plastic decorative protection will come off. We don't need it yet.
- After this we need to remove the central part with the main contacts. It sits on the latches, just press on top and everything will come off.
- The central part is in our hands, it is this that we will connect to the Internet cable. To do this we need to remove the top “small” cover.
- We need to “plant” the already stripped cable into these contacts. However, another question arises - how to plant it? Where should any colors be? See the diagram below.
Connection diagram
As you can see, different colors are applied to the “sides” of the outlet; it is by them that you can determine how to make the connection correctly. However, there are two rows of colors: row “A” and row “B”, which one should you use?
- It’s all simple guys, the first row “A” is for independent connection, so to speak, here the colors are not in the generally accepted configuration, as if for their own needs. It’s worth connecting this way if you did the wiring yourself. Scientifically, this configuration is called T568A, I do not advise you to use it, because now in Russia they use a slightly different configuration.
- T568B, “ Option B ” - this is a generally accepted configuration; if installers ran a wire into your apartment, they will “crimp” it this way! I myself, as an experienced IT specialist, use only this method so that everything is in order in my head. So, everything is simple - we combine the wires according to the colors.
That is, “white-orange” is marked on the body, insert the “white-orange” wire into it, if it’s blue, insert blue, and so on. I think there is no need to explain here. Watch the video version below for more details.
I would also like to note that you need to connect all 8 wires! Of course, there is an option with “four”, but it works at speeds of up to 100Mb/s. But all “eight” can withstand up to 1Gb/s, and this is serious!
How to Install a Dual Indoor Grounding Receptacle
In many ways, the comfort of living in an apartment or house depends on the type and quantity of household appliances and electrical appliances installed in it. The lack of sockets is becoming a common phenomenon, causing the use of many extension cords and tees. These actions help solve the problem, but have side effects - wires get tangled under your feet, additional pads spoil the interior of the room. In some cases, a double socket will help solve the problem of a lack of connection points. Modern products are compact, sufficiently powerful and presentable in appearance. There is no need to invite specialists to carry out the re-equipment of electrical equipment. You can do the work yourself after familiarizing yourself with the safety precautions and the rules for selecting and installing electrical appliances.
When it becomes necessary to install a double socket
Double socket In some cases, a socket with 2 sockets is a necessary measure, especially for apartments built in the mid-late last century.
Their peculiarity was an extremely inconvenient arrangement of electrical appliances. In most cases, one of them ended up behind cabinet or upholstered furniture, and the owners had one point at their disposal in the corner of the room. Installing long external pads in such places is neither practical nor aesthetically pleasing. This will lead to the fact that over time a trail of wires will stretch to them that do not fit into the interior. The best solution in such situations is to install double recessed sockets. The advantages of this solution are the following:
- The products have one body. There is no need to make inserts and jumpers using twists. The cable retains its integrity after installation and connection of the device.
- Common cover for both sockets. This is not only aesthetically pleasing, but also practical. To install covers when installing dual outlets, you will need to widen the holes in the wall to increase the distance between the mounting blocks. In any case, there will be a gap between the outer linings, which will not decorate the wall in any way.
- There is no need to drill a hole for a double socket box. Double designs fit perfectly into standard glasses in the walls. Their mounting blocks correspond to the dimensions of single products.
- Easy to install. Connecting a two-socket outlet is as easy as connecting a device with one input. The caliper and spring-loaded feet ensure precise positioning and strong fixation of the mechanism.
If the cable has a grounding wire, it is recommended to purchase internal double electrical sockets that have the appropriate contact. It is recommended to ground electrical appliances not only for safety reasons. Connecting this wire will allow you to get rid of the background noise and crackling noise produced by the speakers of household appliances.
Connecting a double socket with grounding
The procedure for connecting a double socket is exactly the same as for a regular socket, if it is a model for one socket. It has one grounding contact for both sockets, so the part that is inserted into the socket box is no different from the standard device.
How to start a wire
Many people wonder how to connect a cable to an Internet outlet? Does it need to be cleaned, etc.?
There is no need to clean anything! We simply take a piece of the required length and push it inwards with force. The socket has “incisors” on the sides; they are made like “teeth” with a point downwards. They cut through the cable braid to the metal and prevent it from coming back out.
Thus, the connections are very strong, and there is also an additional cover on top that will not allow the wires to escape.
Installation of an external (surface) outlet
For your attention, detailed step-by-step photo instructions – Installing an external (surface) outlet.
The power cable for connecting an external outlet can be laid either openly (in a corrugated pipe, cable duct, directly with a wire) directly on the surface of walls or ceilings, or hidden (located in grooves, wall cavities, etc.).
In our example, to install an external outlet, the wiring is done externally. The power cable is located in a corrugated pipe, which is attached to the wall surface with clips. There is an external switch located directly above the socket and the wiring for it is made in the same corrugation. You can read more about connecting it and pulling the power wire through it to a surface-mounted socket in the article “Installing an external (surface) switch.”
For installation, we use an external Schneider Electric socket from the “Etude” series with a cover, with a degree of protection IP44.
We have divided the entire installation process into simple steps, the sequential implementation of which will allow almost anyone to install an external outlet independently.
Final connection
Well, we have completely figured it out, most importantly with the wiring. Now comes the final connection. We cut the cable (to the required length, I advise you to leave 10 - 15 cm) - we strip it and insert it into our connectors and close the plastic “small” cover.
Then we insert the resulting “block” into the window of the metal frame.
Now we mount the socket to the socket box. You may need both side locking bolts and standard ones from the socket box. This is what it looks like without the decorative “plug”.
Now we take and put on the “plug”, screw it onto the “bolt”. This is the final stage, in fact you can already use the Internet.
Now we are watching the video version of the article, in which I tried to tell in more detail.