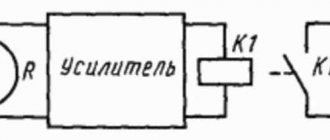
Dimmer connection diagram
The dimmer switching circuit is incredibly simple - it couldn’t be simpler. It turns on in the same way as a regular switch - through an open circuit in the power supply circuit of the load, that is, the lamp. In terms of installation dimensions and mounting, the dimmer is identical to the switch. Therefore, it can be installed in the same way as a switch - in a mounting box, and installing a dimmer is no different from installing a regular switch.
Turning on a light bulb via a switch
Physics textbook for 5th grade... But this is for consistency of presentation.
What to look for when choosing?
Selection criteria are an equally important point when purchasing dimmers. Knowing the advantages and disadvantages is good, but it is important to use this information correctly. This way, a person will only buy a product that will last for a long period and will not break after a short-term power surge.
There are 4 types of devices in the store, which differ in how they are controlled:
- Rotary – classic models that can be found in the most budget segment and in premium versions. They are based on a rotary mechanism that allows you to regulate the process of turning off and turning on by simple rotation. Popular with 70% of buyers.
- The push-and-turn device is a more modified product. So, to illuminate a room, you must first press the button, and then change the position of the mechanism, achieving a certain intensity.
- The keyboards are presented in the form of two buttons: + and –. There are also models where the change in the intensity of the light flux occurs through a long press. Such devices are not particularly widespread; I often use them to emphasize the individuality of the apartment.
- Touch devices occupy a separate niche. This is a modern mechanism that will impress the user with its unique design and ease of operation. To adjust the lighting, just touch the product and set the desired parameter by moving left or right. There are no extra buttons, everything is simple and easy. Installation will take the same amount of time as the standard version.
When choosing a dimmer, you need to look at the following parameters:
- Compatibility of the dimmer with a light bulb used indoors. This is the main factor; failure to comply with it leads to the uselessness of the purchase. After all, not all light bulbs support changing light and can quickly burn out, because they are not designed for this.
- Design also affects convenience and comfort. It’s nicer when the switch emphasizes the room, rather than looking intrusive, which is why guests begin to pay attention to it when examining it. It is important to choose a product that will fit perfectly into the interior and match the design of the room.
- There are models on the market for 500 rubles, and maybe for 5,000 rubles. Therefore, it is important to calculate your budget. This way, people won’t overpay for unnecessary features.
- The manufacturer is an important criterion. It is he who is able to influence the final choice of a person. This is especially noticeable when choosing from a certain price range. Stores often sell only popular models, because they have proven themselves over the decades.
How to connect a dimmer instead of a switch
Recently, people are increasingly replacing conventional switches with dimmers. Changing a switch to a dimmer is very simple. The switch has two outputs (two terminals), and the dimmer also has two terminals. We simply connect the dimmer instead of the switch, using the same wires that were connected to the switch.
Polarity doesn't matter. However, if you have determined where the phase is using a phase indicator (indicator screwdriver), then it is better to connect the phase conductor to the L terminal of the dimmer. Just for order.
Turning on a light bulb through a dimmer
The only condition that the manufacturer imposes is to comply with the connection of the terminals to the phase and to the load. Although, as practice shows, you don’t have to worry about this - everything works well with any connection.
If previously the chandelier was turned on through a two-key switch, then through the dimer all the bulbs will light up (glow) simultaneously. We connect a phase to one terminal of the dimmer, and the other two wires to the second.
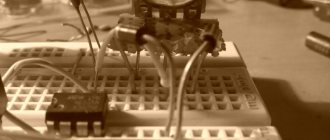
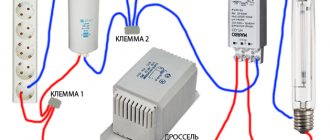
DIY brightness control
Buying a regulator does not put a big strain on the family budget, but sometimes you have to make such equipment yourself. The main reason is problems finding a model that is suitable for the lighting fixture. The presented option is designed to regulate the brightness of an incandescent lamp operating on a 220 V network.
What will it take?
To make a simple model you need:
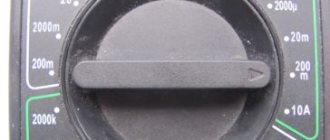
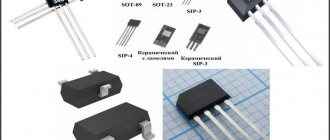
- Dinistor DB3.
- Triac VT134 for 700 watts, it is also possible to select other options, for example, VT138, MAS212-8.
- The resistor is 10 kOhm, its permissible power is 0.25-2 W.
- Compact variable resistor, resistance from 470 to 500 kOhm.
- Soldering iron and consumables.
- Wire cutters.
- Cable cut, with a cross-section of 1 sq. mm.
- Electrical tape or HERE of suitable diameter.
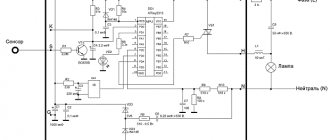
The elements should be connected according to the diagram below.
Types of dimmers
All dimmers that are currently on sale can be divided into 2 groups - rotary (with a regulator - potentiometer) and electronic, controlled using buttons.
When adjusting (dimming) with the potentiometer knob, the brightness depends on the angle of rotation. And one rotary dimer works like one switch; it is impossible to achieve more from it. I'm talking about pass-through switches, parallel-series connection, etc. My not entirely successful experience is described on SamElectric in the article Connecting two dimmers in parallel.
A push-button dimmer is more flexible in terms of control flexibility. You can connect several buttons in parallel and control the dimmer from any number of places. Of course, this is theoretical, in practice the number of control places is limited to 3-4, and the maximum length of wires is about 10 meters, and the circuit can be critical to interference and interference. There are also remote dimmers controlled via radio or infrared.
The price of dimmers with a regulator and with buttons differs by an order of magnitude, because a button dimmer (for example, a Legrand dimmer) is usually assembled using a microcontroller. rotary dimmers are much more common , which we will consider below.
There are also industrial varieties of dimmers in the form of solid-state relays with resistor control; this type of dimmer is discussed in the article about solid-state relay connection diagrams.
Dimmers: advantages and disadvantages
The advantages of dimmers include:
- Comfortable control of lighting brightness. In some cases, this can be done remotely or using an acoustic signal.
- Possibility of using regulators as switches for igniting and extinguishing lamps.
- Reducing the load helps to extend the service life of lighting fixtures.
- Modern models often have a programming function, which allows you to simulate the presence of the owner in case of departure.
The assortment of specialized stores offers a wide range of devices that differ in their design, design, cost, and set of various options.
An extremely convenient device is a remote dimmer, which allows you to turn on and off the light, as well as change its brightness from a distance using a remote control.
At the same time, these devices have a number of certain disadvantages. First of all, they are sensitive to overheating, so it is recommended to install them in rooms with a temperature no higher than +25°C.
When using dimmers, a minimum load level of 40 W must be observed. If this indicator is often violated, the regulatory mechanism will fail prematurely.
The supplied pulses may cause radio interference. To compensate for this not very pleasant effect, coils with capacitors (LG filters) are sometimes introduced into the circuit.
If powerful lamps with long filaments are included in the circuit, you should be careful about applying the minimum voltage to them, since the devices may begin to “sing”.
It is strictly forbidden to connect televisions, computers, tablets, or radios to the power circuit. Connecting electronic ballasts (electronic ballasts) and fluorescent lamps is not allowed.
According to expert calculations, a 50% reduction in the power of an incandescent lamp using modern dimmers can save 15% of electrical energy
A controversial issue is energy savings when regulating the operation of incandescent lamps.
Research by scientists has shown that the use of modern types of dimmers contributes to some reduction in power consumption, but this figure can hardly be called impressive.
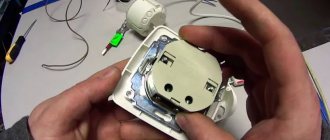
Dimmer device for incandescent lamps
Here are some photos of rotary dimmer designs.
Gunsan dimmer device
Gunsan dimmer – view from the soldering side
Makel dimmer device
Makel dimmer device - view from the soldering side
As you can see, the dimmer device is very simple, but may differ from one manufacturer to another. The main difference is the quality of assembly and components.
Dimming a table lamp
If you need to dim a table lamp or night light rather than a ceiling light, then this whole complicated procedure can be avoided.
It is enough to disconnect and throw away the factory power cord and connect a special dimmer on the cord in its place.
There are plenty of models in stores and on Ali. Separate boxes without wires are also sold.
You will need them if you do not want to throw away the factory cord from the table lamp.
For those who don’t want to go into such a jungle at all and rework wiring diagrams, dimmers for sockets are sold.
You plug this structure into the nearest outlet, and through it you connect the plug of the table lamp. And everything is perfectly regulated.
Triac dimmer circuit
The circuit of triac brightness controllers is basically the same everywhere, differing only in the presence of additional parts for more stable operation at low “output” voltages and for smooth regulation. Also, details are introduced into the circuit to reduce the level of interference generated by the dimer into the network.
The simplest dimer scheme
The operating principle of the circuit is as follows. In order for the lamp to light up, the triac must pass current through itself. This will happen when a certain voltage appears between the electrodes of triac A1 and G (which one - see in the datasheet, can be downloaded at the bottom of the article). This is how it appears.
At the beginning of the positive half-wave, the capacitor begins to charge through the potentiometer R. It is clear that the charging speed depends on the value of R. In smart words, the potentiometer changes the phase angle. When the voltage on the capacitor reaches a value sufficient to open the triac and dinistor (see datasheet for dinistor), the triac opens. In other words, its resistance becomes very small, and the light bulb burns until the end of the half-wave.
The same thing happens with the negative half-wave, since diac and triac are symmetrical devices, and they do not care in which direction the current flows through them.
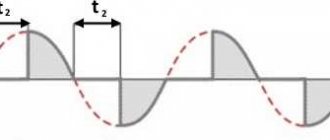
As a result, it turns out that the voltage on the active load represents “stubs” of negative and positive half-waves, which follow each other with a frequency of 100 Hz. At low brightness, when the lamp is powered by very short “pieces” of voltage, flickering is noticeable. The same cannot be said about rheostat regulators and regulators with frequency conversion.
This is what a real light controller circuit looks like. The parameters of the elements are indicated taking into account the variation among different manufacturers, but this does not change the essence.
Practical diagram of a rotary dimmer
More details about the operation of the dimmer can be found in the video:
The best modular devices
Hager EVN100
An excellent universal dimmer with automatic control, which is suitable for installation in the Smart Home system. The adjustment is smooth and does not require operator intervention. Suitable for working with any type of lamps, including LED and gas-discharge lamps. To ensure greater reliability, there is electronic protection against overload and overheating. Maximum power – 1000 W.
Sold at an average price of 13,000 rubles.
Hager EVN100
Advantages:
- Reliability;
- Many additional features;
- High-quality assembly;
- Works with the Smart Home system;
- Automatic adjustment.
Flaws:
- Dimensions.
Niko Modulaire 350W
A universal option that is suitable for working with all types of lamps. Installation is carried out on a DIN rail. The device is capable of operating in phase and reverse control modes. The assembly is done with high quality.
Maximum voltage – 350 W. When installing a dimmer, it is important to check the temperature of the electrical cabinet; if the value exceeds 35 degrees, then you must first install additional ventilation, only then install the product in the prepared place.
Sold at a price: from 10,000 rubles.
Niko Modulaire 350W
Advantages:
- Professional assembly;
- Reliability;
- Durability;
- Quality.
Flaws:
- Hard to find in a regular store, only online.
RFDEL-71M/230V
A universal product that is suitable for any home that uses an electronic cabinet. The device quickly and smoothly changes the brightness level, adapting to the user's preferences. There is also the possibility of remote adjustment, which will simplify use significantly.
The average cost is 8,400 rubles.
RFDEL-71M/230V
Advantages:
- High-quality assembly;
- Reliability;
- Universal application;
- Durability;
- Value for money.
Flaws:
- Not found.
Attention!
Another, more detailed dimmer diagram and a manual for repairing dimmers are given in another article - repairing a rotary dimmer on a triac.
And if you are at all interested in what I write about, subscribe to receive new articles and join the group on VK!
You can install any triacs in this circuit, depending on the load power. Voltage - not lower than 400 V, since the instantaneous voltage in the network can reach 350 V. Dinistor - DB3, in extreme cases DB4. The starting and ending points of ignition and the stability of the lamp’s combustion depend on the size of the capacitors and resistors.
At the maximum resistance of resistor R1, there will be minimal lamp burning, since the triac will open at the end of the half-wave, or will not open at all.
On thyristors
This model of a thyristor dimmer is identical in principle to the previous version, but instead of a triac, thyristors act as a key. Due to the characteristics of the thyristor, it is more expedient to install such an electronic device for each half-wave of the voltage sinusoid.
An example of such a dimmer circuit is shown in the figure below:
Thyristor regulator circuit
Let's start analyzing the operation of the circuit with the positive half-cycle of the voltage curve - capacitor C1 is charged through a circuit of current-limiting resistors R3 - R4 - R5. When the charge reaches the threshold value for dinistor V3, it opens and supplies a control pulse to thyristor V1. In switch mode, V1 begins to pass voltage to the load, producing a certain portion of the voltage curve.
With a negative half-cycle of the sinusoid V1 is locked, no current will flow through it, and a charge will be supplied to the capacitor C2 through the current-setting circuit R1 - R2 - R5, which will eventually open the dinistor V4. Current will flow through it to the control electrode of thyristor V2; after the transistor opens, the same part of the half-cycle of the sine wave will flow to the load, but with the opposite sign.
Such a luminous flux power regulator can be used not only to change the brightness of lamp illumination, but also to control the heating temperature of a soldering iron and other devices.
Alternative uses of a dimmer
The fact that a dimmer can only regulate the brightness of incandescent lamps is the narrow-mindedness of marketers; it has many more applications.
A dimmer is not only a lighting regulator, it can be used as a voltage regulator in general, connecting any active load through it - an incandescent lamp, a soldering iron, a kettle, an iron. But the main thing is that the maximum power of the dimmer (in other words, the maximum current of the triac) must correspond to the load.
It is not a fact that the load will behave adequately and will not be in danger of failure. For example, try dimming your TV) No, better not!
In addition, you can, for example, regulate the temperature of underfloor heating. This eliminates the need to purchase a temperature controller, which costs 3-5 times more.
The downside is that there is no feedback and protection against overheating, but in many cases this is tolerable. After all, there is no feedback from the chandelier either - only through the eyes. And from the warm floor - through the legs, right? I installed dimmers on heated floors, they work great for many years.
Tips for choosing dimmers
When selecting a regulator for incandescent lamps, it is important to take into account all the features listed above. In addition, experts recommend paying attention to a number of additional nuances.
If you plan to place the device in a room whose temperature exceeds +25 °C, it is better to use a model equipped with built-in ventilation or a fuse.
Light control using a dimmer is done using the “phase cutoff” method. In this case, part of the sinusoid is cut off, which leads to a decrease in the voltage supplied to the lighting
Dimmers are designed for a certain power of lighting fixtures, which cannot be exceeded. If the control device is planned to be connected to a chandelier or group of lamps, the total indicator must be taken into account.
The cost of products varies widely. The most budget options are keyboard and rotary models, but electronic ones provide more options. If you wish, you can assemble a simple dimmer model with your own hands.
Since the operation of electrical equipment is directly related to home safety, it is better to give preference to products from reputable brands whose products are highly rated in user reviews.
Installing a dimmer
Almost always, connecting a dimmer to a lighting system circuit occurs in the same way. The dimmer has two or four terminals; special markings contain information about the purpose of these terminals. Two terminals are present in monoblock dimmers. Only the broken phase of the lighting circuit is connected to such regulators. As for dimmers that have four terminals, the broken phase of the lighting circuit is connected to two terminals , and a control button is attached to the remaining two.
About device manufacturers
The following companies are popular among dimmer manufacturers:
Legrand
Legrand is a French company engaged in the production of electrical products. The high quality of products and their wide range have allowed the Legrand Group to take a leading position in the global market of electrical products.
Dernek GROUP (Lezard)
Dernek GROUP produces electrical products under the Lezard brand. There are five Dernek GROUP factories located in Russia. The Lezard trademark was created for the production of a mass product of high quality. Products of this brand cannot be called exclusive. Their design includes conservative parts - ceramic cores, conductive elements made of phosphor bronze, contacts containing silver. The rotary mechanism of the dimmers uses stainless steel, and the dimmer itself is equipped with a fuse.
Simon
Simon is a company of Spanish origin. Its factories are open on all continents. They also exist in Russia. Simon produces touch-sensitive, rotary dimmers. There are models equipped with backlight. The company's products are often used in buildings built using Smart Home technology.
ABB
ABB is a Swiss-Swedish company that occupies a worthy place among organizations working in a similar field. Dimmers from this manufacturer are distinguished by their manufacturability, durability and high aesthetic properties.
Modern dimmer from ABB
Legrand dimmer with remote control
Dimmer from Siemens (rear side)
Price comparison table
| Trademark | Dimmer power, W | price, rub. |
| Valena (Legrand) | 400 | 4083 |
| Simon 15 | 500 | 1924 |
| Lezard | 800 | 800 |
For complete information provided, watch the video. The media video clearly shows how a dimmer can be used (using the example of the “London” model from EKF) to extend the life of an incandescent light bulb for decades.
Connecting LED strip
Through special dimmers you can connect not only light bulbs, but also LED strips or low-voltage LED lamps.
When connecting dimmable LED lamps with remote power supply, keep in mind that the dimmer is placed in front of the driver, and not after it.
But on LED strips, in the connection diagram it goes after the 12-36V power supply.