This pressing topic began to emerge in people’s minds more and more often. And for good reason, since there are much more routers that distribute a wireless network and feed people the Internet. Just 10 years ago, no one had heard of such technology, but now every neighbor and grandmother has this simple box with antennas on their bench.
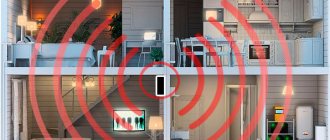
Strengthening the signal level of a router is a common problem in large private houses, when it is necessary that the signal be on all floors and preferably on the street (for CCTV cameras). But even in ordinary apartments this problem arises quite acutely. These are all nasty neighbors who bought themselves routers and are ruining your wireless network.
Let me explain it more simply - the more neighboring routers around you, the more difficult it is for yours to work and distribute Wi-Fi. Because of this, the speed drops, interference may appear, or even the connection may be interrupted. In the article, I will tell you step by step how to strengthen and improve a bad Wi-Fi router signal at home, and I will also tell you why it drops and why. Everything is in simple language.
Changing the location of the router
This point is one of the most important, since a weak signal from a Wi-Fi router can be influenced by many factors. First of all, it is best to place the device as close to the center of the house or apartment as possible.
If this is not possible, then install it in such a way that there are as few walls and obstacles as possible in the path of the wave. Good location in the corridor where all the rooms and the kitchen meet.
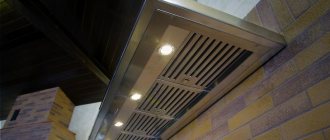
Also, along the path of the Wi-Fi signal there should be no mirrors, metal fences or plates that would permanently kill the wave. Move radios and microwave ovens that operate at the same frequency away from the router. Another tip: do not install it on the floor or ceiling. The router should be positioned approximately centered between the ceiling and floor.
You've probably seen a lot of videos where supposedly amplifiers are installed from beer cans and foil. But in reality, they do not amplify, but simply redirect the signal, reflecting from the metal surface. They also reflect neighboring waves, which can interfere, although only in the range of this metal device.
I can’t say anything about this method, since I haven’t tried it. But you can make this design and then share your experience in the comments. In theory, there should be an effect, but it should be minimal.
Another point is the correct location of the antennas. They should be at an angle of 90 degrees. This way the waves will spread over a longer distance. If you have three of them, then tilt the two on the sides at an angle of 45 degrees, and set the central one at 90.
What affects the range of a Wi-Fi router?
How to strengthen the Wi-Fi signal
The standard range of a wireless device covers an area of 30 m. Some factors can reduce the range and cause interference in the transmitter signal.
Experts focus on several main sources of unstable network functionality. Common causes include walls, other routers, household appliances and radio devices.
Walls
The transmitter must be in an open area with easy access. Attempts to send it behind a closet or sofa, or take it into a room with solid walls will cause problems with the uniform distribution of the signal throughout the house.
Obstacle options
Interference from other radio devices and routers
Mobile phones and similar devices operating near the router may reduce the coverage radius. The only solution is to switch to another free channel.
Important! You cannot install the transmitting device next to a radio point, use the same socket to recharge mobile and cordless phones, etc.
Interference from household appliances
Placing a microwave oven, refrigerator or stabilizer too close may cause interference. Experts advise installing the device in a central room, free from constantly functioning household appliances.
Changing the communication channel
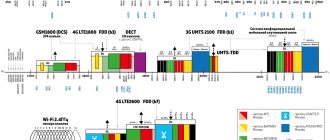
So, let's first figure out what kind of channels these are. Routers operate in the 2.4 GHz and 5 GHz frequency range. Most routers have a default frequency of 2.4 GHz. This means that all your neighbors use this particular frequency, and most likely you have the same frequency in your router. This frequency has 14 channels.
So, if, for example, your router is set to channel 5, and your neighbor is sitting there, then the transmission speed drops, there may be gaps and other problems. Our task is to configure it in offline mode, so that the device itself looks for a free channel and connects to it. To do this, you need to go to the admin panel of the router.
- The IP or standard URL of the router is located on a label under the case. There is also a login and password for the admin panel.
- We connect to the network directly or via Wi-Fi from a phone, laptop or computer, launch the browser and enter the address. Enter the authentication data. The most commonly used addresses are 192.168.1.1 and 192.168.0.1.
- Now we need to go to Wi-Fi settings. Here are the paths for different models:
| Firm | Path | |
| Old models | New models | |
| TP-link | Wireless mode | 1. Additional settings 2. Wireless mode 3. Wireless mode settings |
| D-link | WiFi | 1. Advanced settings 2. Wi-Fi 3. Basic settings |
| ZyXEL Keenetic | Ladder icon at the very bottom (Wi-Fi network) | Wireless mode |
| Asus | Wireless network | 1. Advanced Setting 2. Wireless |
| Rostelecom Sagemcom [email protected] 2804 and 3804 | 1. WLAN setup 2. Additional information | |
- You need to set the country, if there is such a field. This is necessary so that the router understands what communication channels, mobile operators and television are used in your region.
- Set channel detection to “Auto” mode.
- Save the settings and reboot the router.
Find out a free channel
If this does not help, then most likely the router was unable to select the optimal channel itself. It's okay, we'll do it for him.
- Download the Acrylic program – https://www.acrylicwifi.com/ru/.
- Go to the download section and download the Home version.
- We install.
- After launch, you will see lines with different networks of your neighbors. You need to see who is sitting in the same channel as you. If so, then simply select a free channel. Please note that the majority are on channel 1, two are on channel 11, and only 2 of them use an unoccupied channel - 3 and 5. In my case, I will simply move from channel 1, for example, to 7 or better yet to 13 - since it is last and rarely used.
Switch channel to free
All routers process signals on channels 1-11. If you change the channel number, the router will be able to transmit a strong signal, bypassing other devices and not receiving interference from them. To find out which channel your wifi router uses, install the free Acrylic program on your computer. This is a set of programs for analyzing WiFi on a router, studying the level of WiFi coverage and security. In addition, Acrylic can create layouts for equipment placement in the coverage area.
Install the free Acrylic program on your computer.
After opening the program, you will see your network and the channel on which your router is operating, as well as the 802.11-n broadcast mode. In the graph on the right, your coverage on the working channel will be indicated in pink. If your signal is overlapped by a blue graph, this means that the router is being interfered with by another device operating on the same channel.
As a result of network research, you can find out which signal is interfering with yours. Next, choose a different channel for your router to operate, with fewer or no connections.
Interesting: the default settings on the router are set to automatic channel selection, but this does not mean that the channel is not occupied by other devices. You can find a free channel(s) using another program - inSSIDer.
Change the standard to N or AC
Modern Wi-Fi routers work with several IEEE 802.11 standards - this is one of the most common radio communication standards. It has varieties. Modern devices that distribute the Internet and network work with the following standards:
- IEEE 802.11b – the radius in the house is up to 38 meters, in open areas it can be up to 138 meters. Speed up to 10 Mbit per second.
- IEEE 802.11g - the speed is already higher - 54 Mbit per second, the radius is approximately the same as that of b.
- IEEE 802.11 n is a steeper standard with a radius of 65 meters in a house or apartment, and up to 240 meters outdoors. The speed is generally colossal - up to 600 Mbit per second.
- IEEE 802.11ac is simply a titanium of waves, has a colossal radius of up to 110 meters inside and up to 380 meters outside. Speed up to 6 Gbps.
If you look at the characteristics of routers that were released 5 years ago, they mainly support b, g, n. Modern machines can operate in the "ac" range. After reading the specifications, we can assume that we will try to switch our router to IEEE 802.11n mode, and, if possible, IEEE 802.11ac.
This is done in the same section as in the last chapter. Let me remind you that “ac” will work with 5 GHz, and “n” with 2.4. Set these values. Please note that you need to install IEEE 802.11n, and IEEE 802.11b/g/n. Next, save the settings and reboot.
NOTE! Old phones and laptops may not support this standard and will no longer connect, so you may need to purchase another external module for the laptop or set the standard range to the old one.
Buying a more powerful router
Here we need to take into account the support of the standards that I mentioned above. For example, old routers only work in the IEEE 802.11b/g/n range, but the problem arises precisely in the configuration. For example, a friend of mine has support for IEEE 802.11b/g/n, but he was unable to switch only to the N standard, and then it turned out that this was impossible.
If you buy a modern router, it will most likely have a newer standard that has higher bandwidth and range. I recommend taking a dual-band one with support for 2.4 and 5 GHz, and of course the IEEE 802.11ac standard. The price for them has fallen over the past 5 years, and you can get an excellent device for 5,000 rubles. I don’t recommend taking a very cheap one, as they will overheat and freeze due to weak hardware.
Repeater installation
This is a device that is installed at the very end of the Wi-Fi network range. In this case, the wave must fully reach this place. A repeater or signal repeater simply catches the wave and amplifies it. For example, you have a router on the first floor of your house. You place a repeater near the stairs of the second floor, and it distributes the same network to the second. A great way and a good option.
They are also called repeaters. They have from 1 to 3 antennas and are plugged into an outlet. They cost from 1000 to 4000 rubles. Be sure to make sure that it supports the same standards as your main router before purchasing. A second router can also act as a signal repeater. So if you have an extra device lying around, you can configure it as a repeater. This is done there in the settings. Just look for the name of the “Mode” item.
Types of amplifiers
Like any other gadget, wireless network amplifiers vary in power and design qualities. There are several types of repeaters on the domestic market:
- Portable or personal. This option is suitable for strengthening the signal when using one or two mobile devices. They are compact and low-power Can be connected via a USB port;
- Homemade. A similar technique is used at home to strengthen wireless networks to which up to 5 devices are connected. In this case, the range can reach 20 meters;
- Office. This category includes powerful repeaters that can be used as a full-fledged access point. The key advantage is a wide range of antennas that provide a stable signal when using up to 50 connected devices.
Antenna change
In theory, installing a more powerful antenna should increase the network coverage radius, but in reality I have not tested this myself. Standard antennas are set at 2-3 dB. If you have a large apartment, then 7dB will be enough. For a large house, you can take a 14 dB antenna or make it yourself. In stores, such antennas cost from 1000 to 8000 rubles, depending on the signal amplification power. For a large village, you can fold and buy one 30dB antenna, the radius will be huge.
NOTE! Routers without an antenna or with an internal transmitter work much worse than antenna ones.
We amplify the signal using additional hardware.
If you have poor reception quality and low speed even after you have configured your router to the maximum signal level, do not worry, not all is lost. There are a number of other actions that can be used. Their purpose is to improve or modernize your wireless equipment.
We change or modify antennas.
There are many different ways on the Internet to boost the signal from your router’s standard antenna. Most advice boils down to turning an omnidirectional antenna into a directional antenna. And they do it as best they can. Some people make screens from beer cans:
Others are simply made of foil:
Still others are generally too lazy to invent anything and simply broadcast pieces of tin to the antennas:
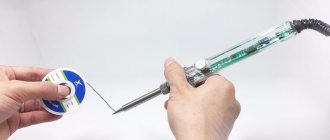
Out of curiosity, I tried similar methods to strengthen the signal and did not get practically any obvious or significant effect from it. But a really effective result can be achieved by replacing the antenna with a more powerful one. Here, for example, are two devices: one is D-Link with a gain of 2dBi, and the second, white, is Zyxel with 8 dBi antennas:
Of course, the coverage area of the second will be at least 2 times larger. At the same time, the cost of an 8dBi antenna is somewhere around 300 rubles apiece. Agree - not expensive! As an option, you can buy an antenna with a stand and an extension cable. This will allow you to move the antenna around the room to find the best location without touching the router.
Note: This replacement will be effective if you are replacing a 2dBi or 3 dBi antenna with an 8 dBi antenna. From my own experience, I will say that replacing 5dBi antennas with 8 dBi ones did not bring a significant effect. Perhaps in an open space the effect would have been noticeable, but in a city apartment I did not feel any real improvement in the level of reception on client devices.
It’s another matter if your router has 3 antennas, like the Zyxel Keenetic Ultra. In this case, the cost of antennas will be around 1000 rubles. It is more efficient to buy a repeater (repeater). Or an inexpensive router that can work in WDS mode. I would recommend the same solution to owners of devices with non-removable antennas or with internal antennas.
Installing a repeater to increase the coverage area and improve the level of network signal reception.
This method is extremely effective and allows you to obtain acceptable coverage quality through the use of special repeater devices or, as they are also called, WiFi repeaters.
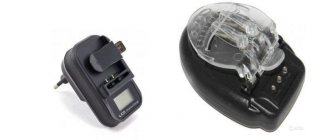
The point of this device is that it connects to the existing network as a client and further expands its coverage to the radius that its antennas can cover. Wi-Fi repeaters are small and inexpensive devices. As you can see from the picture above, the repeater is made the size of a small power supply that plugs into an outlet. Its settings are simple. The price in Russia is about 900-1000 rubles. If you order a device in China, its price will be about 600 rubles including shipping. There are devices on sale that perform only repeater functions, and there are routers that support WDS technology (Wireless Distribution System - allows you to expand the coverage area of a wireless network by combining several WiFi access points into one network without the necessary presence of a wired connection between them). An example of such a universal and inexpensive device is the Asus RT-N12 D1:
The advantage of buying just such a device for use as a repeater is that it is a universal device: you can connect it to an existing network either via WiFi or via cable. In addition, today you use it as a repeater, and tomorrow, perhaps, you will connect the Internet through it from another provider. To find out whether a particular model can work in repeater mode, look at its characteristics on the manufacturer’s website; it must have support for WDS technology.
Upgrading the adapter on the computer.
You can also improve signal reception on the client device. True, this advice is more relevant for computers to which adapters are connected via USB or a PCI slot. For laptops, tablets and smartphones with an integrated adapter, this advice will not work, because Their antennas are non-removable and hidden in the housing. The point of the advice is that firstly: if you buy a wireless adapter, then it is better to take one that has a large external antenna. Pay attention to the photo:
I think it is clear that on the same standard at the same data transfer rate, the adapter on the right will have a better reception level than the adapter on the left, due to the use of a large external antenna. If you have already bought an adapter and it has a weak Wi-Fi signal reception level, then you can do the following: if you can replace the antenna, you can change it to one that has a gain of 5 or 8dBi. If you bought a small USB adapter (the so-called “whistle”), then in this case you can try connecting it not directly to the computer, but through a USB extension cable.
Using an extension cord, you can move the adapter around the room and select the areas of best signal reception. Please note that the maximum cable length will not exceed 3 meters. Nevertheless, when moving the adapter along such a radius, you can find a point with a higher level of WiFi signal reception.
Which is better to choose: 5 GHz or 2.4 GHz
This is a difficult question, as these two standards have their pros and cons. Let me remind you that the IEEE 802.11ac standard, which has the largest radius, operates at a frequency of 5 GHz. But as we remember from physics, the higher the frequency, the more difficult it is to pass through various obstacles and the faster it fades.
2.4 GHz has a higher range and does not decay as quickly, so in a large house it is better to use 2.4. But at 5 GHz, due to the high frequency, the data transfer speed is much higher. For example, for gamers, it is better to use 5 GHz, but the laptop or computer should be located close to the router, since the signal is strongly attenuated by walls, doors and other obstacles. Less ping, higher speed.
5 GHz also has a big advantage - most neighboring modems operate at 2.4. This means that 5 GHz channels are freer, cleaner and more stable. Sometimes changing the frequency greatly improves communication and Internet speed. But you need to understand that not all old phones, TVs, and repeaters will be able to operate at the 5 GHz frequency. Let me give you a few options for different situations:
- 1-2 room apartment – 5 GHz
- 3 room apartment – 2.4-5 GHz
- Large House - 2.4 GHz or 5 GHz with 2 repeaters.
Make a directional wave Wi-Fi
This method is aimed at narrowing the direction vector of the signal from the router. That is, the modem should distribute Wi-Fi not over 360°, but in a narrow direction. When implementing this technology, the rest of the signal will be reflected and redirected in the required direction, so that you get the maximum effect from the router.
In practice, this method looks somewhat primitive: you need to cover the back of the antenna with a metal screen. The simplest option is to cut an aluminum cola can, bend it into a semi-arch, and install the structure directly behind the antenna.
WIFI signal reflector
To understand: the area behind the screen made of aluminum or tin will be non-working. The signal will be reflected from the foil and redirected in the form of a beam from a concave directional parabola to the PC.
How to strengthen signal reception?
If the signal on the laptop is weak, but on other devices it is quite normal, then most likely the problem is in the adapter of the laptop. To do this, you can purchase an external Wi-Fi module with an antenna. It will pick up the signal much cleaner. This thing is also suitable for computers that do not have a built-in Wi-Fi module at all.