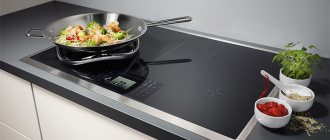
Installing a hob (gas or electric) into a kitchen countertop made of chipboard is a simple matter. Especially for a man whose hands grow from the right place.
However, if you are encountering this for the first time (that is, you have never installed a hob before), we recommend that you read the step-by-step instructions in this article.
The information will be useful to those who assemble a kitchen with their own hands, novice assemblers, as well as customers, so that they can personally monitor the progress of the work being performed.
We will consider in detail the entire process of installing a hob into a countertop with your own hands - from marking to connecting to a gas supply or electrical network in an apartment or private house.
In addition, we will tell you what to look for and share useful tips.
And we’ll give you the first advice right now. If you do not have experience in connecting household gas or electrical equipment, then entrust this work to specialists, because the cost of an error can be very high.
All other work on installing the hob into the countertop can be done independently. But again, it is advisable to have at least some experience with power tools.
In general, if you follow the step-by-step instructions, there is nothing complicated here. The main thing is to make the markings correctly. And here you need to adhere to a simple but important rule: measure seven times - cut once.
Installing the hob: instructions
Manufacturers produce panels powered by electric or gas energy. Installation features depend on the type of device. But there are also general requirements for the process:
- safe installation of a finished kitchen hob should only occur with ventilation or an exhaust hood;
- It is allowed to use cooking surfaces with a heat resistance of at least 100 degrees and a thickness of 25 mm;
- when installing between sections of the headset, it is necessary to maintain a distance from the walls to the slab of at least 1 cm;
- the hob should not be closer than 5 cm to the load-bearing wall of the room;
- thermal insulation is placed between the wall and the equipment;
- The stove is placed only on a thick tabletop - from 38 mm.
Advice! If exhaust hood is not possible, place a very powerful fan on the windowsill.
Necessary materials
To install the hob you will need the following tools:
- jigsaw or hand router;
- screws and clamps;
- silicone-based sealant or nitro varnish;
- roulette;
- self-adhesive seal or thin aluminum tape;
- pencils, ruler and meter board.
Important! In some cases, you will also need a drill.
Taking measurements
How to install a new hob correctly so as not to damage the set? Refer to its dimensions from the instructions. If the brochure is lost, use the following technique:
- Turn the product over onto the table;
- Measure the width and length along the inner edges;
- Measure the parameters of the protrusion for fixation and draw it with a pencil on the surface;
- Mark these parameters on the table with a pencil;
- Find the center of the segments and make markings;
- Check clearances carefully. For a protrusion with a length of 15 mm, a retreat of 10 mm is sufficient. To install the cooker itself, a 5 mm indentation is required.
Installation opening dimensions
Important!
You can simply trace the tabletop with a pencil, but there are risks of inaccurate dimensions and damage to the furniture. Experts recommend making calculations step by step and sequentially:
- Marking the cabinet based on the dimensions from the instructions by drawing a rectangle;
- Determining the center using a tape measure. You need to draw a cross on the table so that one line corresponds to the front edge of the tabletop, and the second is perpendicular to it;
- Painting tape is glued to dark table surfaces and markings are made on it;
- Taking measurements of the panel itself with a margin of 1-2 mm;
- Drawing lines - there should be 4 of them.
At the last stage of marking, the evenness of the figure is checked with a ruler or level.
Advice! If you doubt the measurements are correct, make a cardboard mockup and use it.
Cutting holes
For ease of work, you need to drill the central point with a drill with a drill diameter of 8-10 mm, which is held perpendicular to the surface. Through this hole, further insertion and installation of the kitchen hob into your countertop will take place. The optimal tool is an electric jigsaw or a saw with fine teeth. Elements must fit freely into the material.
Important! The sharper the saw teeth, the smoother the edges of the cuts will be.
Further work is carried out according to the following algorithm:
- Several holes are made with a screwdriver or drill in the corners of the figure;
- Painting tape is glued to the tabletop so that no traces of the jigsaw remain;
- A jigsaw or file is inserted into one of the holes on the blade;
- An incision is made according to preliminary markings with the tool pressed;
- When working, the bottom of the tabletop is supported or fixed with tape;
- Sawdust is removed and the quality of the cut is checked in accordance with the dimensions. The plate can slide in freely, so it needs to be moved a little.
Check the quality of the cut according to the dimensions
Advice! Place a stool under the bottom of the set - this way you will not damage the furniture and maintain the evenness of the edges.
Sealing and sealing
To prevent moisture from entering and deformation of the countertop material, the holes are treated with sealant and sealed. The use of silicone sealant has several nuances:
- The surface needs to be prepared - wiped off dirt, dust and treated with a degreaser;
- Place mounting tape on the sides of the seams with an indent equal to the line of the material;
- Cut off the spout from the tube and put a syringe attachment on it;
- Load the tube into the gun and press the lever to release the pressure;
- Gradually squeeze out the sealant, spraying the seam with a solution of soap and water;
- Smooth out the seams with a spatula and remove the tape.
The edges need to be sealed
Laying a seal along the seam will prevent moisture from reaching the countertop and temperature changes. Use a special aluminum tape, which is glued to a degreased and dried surface, pressing slightly.
Before applying the sticker, it is important to check the consistency of the thickness of the seal and the internal depth of the panel sides. If the tape is thin, a gap will form through which moisture will flow. A single strip is laid around the perimeter of the cutout from the front of the cabinet. Ideally, the seal should protrude 1 cm below the side.
Advice! For sealing, polyethylene tape for plasterboard with a width of 30 mm is suitable.
Installation and fastening of equipment
How to properly install a new hob into a prepared countertop? Experts recommend working in stages:
- Try on the product and see if it matches the cut niche;
- Special metal corners are screwed onto the panel until it stops;
- The plate with fasteners is lowered into the cut rectangle;
- The product should fit easily, without being pressed down. Glass ceramics that fit tightly into the niche may crack when heated;
- The fastenings at the top, bottom, left and right are tightened and trimmed;
- On the front part, the metal tab is recessed into the furniture so that the cabinet does not warp;
- The fastening screws are tightened;
- The cut line is once again sealed with a sealant or silicone agent;
- The protruding parts of the materials are cut off with a stationery knife;
- The quality of fasteners is checked.
Advice! If the joints were uneven, they can be trimmed or additionally treated with sealant.
Possible problems with fasteners
The dimensions of the slab are almost completely equal to the width of the set, so it is difficult to fix the side parts. Correct installation of a finished hob into a kitchen countertop made of chipboard, MDF and wood with your own hands should provide for reliable fastening. The surface must be fixed so that there is no shift even by 1 mm during use.
The surface must be fixed so that during use there is no shift even by 1 mm
The problem can be solved very simply:
- Complete spring strips are attached to 4 sides, clamping the slab on the sides;
- The back and front parts are connected to the bottom of the tabletop using a metal plate, which is mounted on a 5 mm screw;
- The self-tapping screw must be installed in the hole, and the resulting structure must be screwed to the bottom of the cooking pot;
- The screw will rest against the bottom of the table, and thus fix the product.
Important! It is better to use complete springs. Others may increase the distance between the cut and the panel.
Sealing process
The sections that were formed after cutting should be treated with sealant. This is necessary so that the tabletop does not swell, and also to prevent dirt from getting into it.
Important! You can always use aluminum tape to seal the edge. In addition to its basic protective qualities, it can protect the countertop from sudden temperature changes. Pay special attention to the choice of sealant, since the preservation of the appearance of the countertop and its functionality depends on it.
The installation method will also depend on which hob you purchased - electric or gas. Let's consider both options separately.
Connecting the hob to the mains
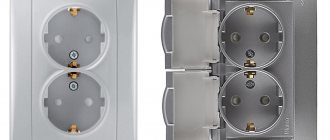
Experts note how to correctly and quickly install a new hob into a kitchen countertop and connect it to communications. The device can be connected to a separate power line if there are RCD circuit breakers for the stove on the panel. In houses with a power supply of 380 volts, you need to make a uniform load per phase.
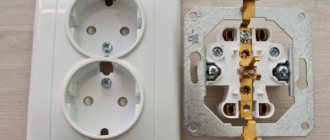
The panel may require a separate outlet, so first you will have to dismantle the headset. The canal is prepared, strengthened, and covered with a layer of putty or cement. After this work, they move on to cutting holes and installing the slab.
The hob may require a separate outlet
Safety precautions when dismantling heating surfaces
When removing the hob, be sure to do everything correctly. During this process, you must follow the safety precautions listed below:
- operation of a built-in electrical appliance involves only cooking and heating food;
- It is prohibited to use the induction panel for defrosting and cooking food packaged in metallized packaging;
- Full protection from contact with live elements is ensured by compliance with current electrical safety standards;
- if the device does not work correctly or operates with deviations from the specified parameters in the factory instructions, contact the service center;
- if cracks, chips, or crevices appear on your hob, you must turn off the power to the device to avoid electric shock;
- During the cooking process, dishes and burners become very hot, it is necessary to limit access to the device for small children and ensure complete safety in relation to thermal and electrical burns;
- Contact of the electrical cable with the hob is strictly prohibited;
- It is not recommended to place any flammable or combustible materials on the surface of the cooking structure, as this may lead to a fire;
- It is also prohibited to remove blockages and contamination with alcohol-containing liquids;
- It is prohibited to repair equipment independently or by persons who do not have a special license to perform this type of work.
Connecting gas communications
The gas supply is completely shut off. To simplify the installation process, the gas hose is immediately connected to the panel. The paronite gasket is secured using a union nut. It is screwed tightly onto the pipe at the bottom of the panel. To ensure a reliable connection, the gasket is treated with grease. You can check for leaks by applying soap to them. If there are no leaks, foam does not appear.
On combined panels, a thermal shut-off valve is advisable, shutting off the gas supply when heated by more than 60 degrees. The supply valve must be located in a place convenient for control.
On gas hobs, the burners must be adjusted. The flame should burn without yellow reflections.
How can you tell if there is a gas leak?
Cover the joints with soap and water. The presence of bubbles is an indication that there is a leak . This is also indicated by a characteristic odor.
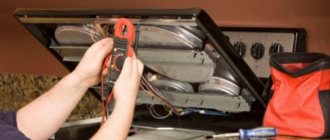
On electric cooktops, the wire is connected to an outlet or electrical panel. Therefore, the energy source must be nearby. And since the stove consumes a lot of electricity, the wiring must be reliable .
You can connect your induction hob by plugging it into a socket or using terminals and an external cable. To begin, remove the protective cover on the back of the panel and insert the cable. Then, according to the manual, connect the cord to the terminal.
What do experts advise when connecting hobs?
- The film from the seal must be torn off gradually;
- The equipment is tried on in a niche until it lies flat and beautiful;
- The fewer gaps, the safer it is to use the panel;
- Before installation begins, the stove must be connected to the electrical network according to the complete circuit;
- Gaps on the front part can be masked with silicone;
- You can place drawers and metaboxes under the panel, so indentations should be made so that they do not touch the device;
- Two-burner models are installed along the countertop if they correspond to the dimensions of the box;
- The minimum installation depth is indicated in the equipment passport;
- The sole of the jigsaw should be placed at a right angle - this way the surface of the tabletop will not be scratched;
- The hob should be installed only after assembling the kitchen, so as not to deform the table;
- You need to apply sealant over absolutely all end cuts - this will save the material from delamination.
Watch the video about installing the hob
Sealing and sealing
Before installation, it is necessary to treat the tabletop sections with silicone sealant or nitro varnish. This way, you will protect the surface of the countertop from water, dirt stains, swelling and extend its service life. You can also use a sealant for installation, since it is self-adhesive and performs the same role.
The self-adhesive sealant is placed on top, the edges of the surface should lie on it. You can also use aluminum tape for sealing, which, by the way, protects against temperature fluctuations. If the seal is of high quality, then the hole in the countertop will serve you longer; it will not need repair or replacement.
Also, installation differs depending on the type of panel - there are gas and electric, plus individual fastening characteristics. You can secure the fastening parts with screws.
Types of electric stoves
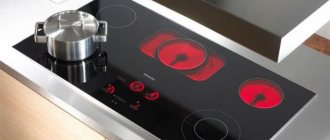
Modern household electric stoves are divided into two categories, each of which is characterized by the type of hob:
- products with enameled countertops and cast iron burners;
- models with glass-ceramic hobs.
The disadvantages of any models outside their category include some thermal inertia - their cooking surfaces slowly reach operating temperature and also cool slowly. Therefore, setting the desired temperature can be quite difficult. Because of this, budget options provide a fixed adjustment of thermal power - three...6 positions.
The undoubted advantage of products with cast iron burners is their more affordable price. Models with a glass-ceramic surface have a flat cooking surface. The heating elements of these products can be tape, halogen or induction devices, which are much easier to adjust the power.
Therefore, cheap glass-ceramic electric stoves have a simple rotary control, while expensive models can be equipped with electronic or touch controls. In addition, the design of hotplates evolved decades ago and today is determined by the type and size of the heating elements. The appearance of stoves with glass-ceramic hobs is constantly being improved; they have a more stylish appearance and greater ergonomics.
The disadvantages of glass-ceramic models include the discrepancy between the size of the hob and the bottom of the cookware. However, this disadvantage is compensated by the use of several individual heating elements.
Today, the most popular brands of household kitchen electric stoves are “Beko” and “Vestel” (Turkey), “DeLuxe” (Russia), “Gefest” - “Gefest” and “Atlant” (Belarus), “Ardo”, “Candy”, “ Indesit and Zanussi (Italy), Blomberg, AEG and Bosch (Germany), Electrolux (Sweden).
Of course, the quality of operation of any product, regardless of the brand, depends on compliance with operating rules. Moreover, the correct connection affects not only the performance characteristics, but also the safety of use.
You should know that electric stoves are available with a supply voltage of both 220.0 volts and 380.0 volts. For a city apartment, you should choose products of the first category. If a person lives in a private house and has a three-phase supply, then preference should be given to electric stoves designed for a voltage of 380.0 volts.