Before physically installing a switchboard in your apartment, you need to accurately determine on paper the electrical panel diagram.
What modular equipment should I install, how many and what rating will the circuit breakers be, should I install differential circuit breakers and RCDs? What price will this or that equipment cost? Most of these questions, along with the diagrams themselves, will be displayed in the article. It is worth noting that all the diagrams below are intended specifically for single-phase apartment panels directly located in your apartment. It is assumed that the metering panel with a meter and an input machine is already installed in the floor panel. Accordingly, its image is not present on the diagrams.
Do-it-yourself electrical panel for a summer residence: installation and recommendations
Summer cottage construction has recently become very popular.
Many homeowners try to do as much work as possible on the construction, finishing and connecting to communications of their cottage themselves. This also applies to the installation of electrical wiring in all buildings of the summer cottage.
Electrifying a home is impossible without installing an electrical panel. A metering device is mounted on it - an electric meter, an RCD (residual current device) and electrical circuit breakers in the required quantity.
Installation Requirements
All requirements related to the installation of distribution panels are specified in the PUE (Electrical Installation Rules), Chapter 7.1. Let's look at the main ones.
- The location for installing the switchboard should be chosen away from heating boilers, gas stoves or cylinders, stoves, and flammable objects.
- The room where the electrical panel is located must be well ventilated, preferably naturally.
- The location where the switchboard is installed should be well lit with natural light . This is important for maintaining the structure.
- There must be constant free access to the shield. Therefore, its installation in storerooms and other utility rooms is not allowed.
The number of distribution cabinets depends on the size of the building and the number of light bulbs, electrical outlets and other electrical points. This number affects the layout and complexity of wiring throughout the building. For a country house with an area of up to 200 m2, one panel is enough .
What a do-it-yourself outdoor electrical panel for a dacha looks like, look at the photo:
Elements installed on the panel
The electrical panel is installed at the entrance to the house. It can be either internal or overhead . It is easier to install the invoice, so for a country house where it will be located in any utility room, this design is recommended.
No special preparation is required to install an outdoor switch cabinet. It just needs to be secured to the wall with dowel nails. Also, the external electrical cabinet can be mounted outdoors, for example, on a pole .
Some tips for choosing an electrical cabinet:
- Take a cabinet with a supply of installation spaces . It is better if there is free space left after assembly rather than the elements being installed end-to-end.
- Don't skimp on the cost of the case. Check that the material from which it is made is self-extinguishing .
- The best option is cabinets with removable walls. This provides easy access to structural elements.
- Make sure that the DIN rails can be easily moved or removed .
Switchgear components
As a rule, the following elements are used for electrical distribution panels for 220 V voltage and their operation in small country houses:
- Introductory – 30-60 A
As can be seen from this list, before calculating the number of distribution board modules, you should find out how many groups of energy consumers are at the site, and what is the total power consumption for each group.
Technical characteristics of boxes
When choosing a box for slot machines, you must be guided by its technical characteristics. They determine the number of protective devices that can be placed in each specific cabinet, under what conditions it is permissible to operate it, and how safe it is from the point of view of electric shock.
Insulation reliability class
Chapter 2 GOST 12.2.007.0-75 defines 5 classes of electrical products according to the method of protecting people from electric shock. Electric boxes for automatic machines belong to classes I and II. Their properties are:
- class I - electrical devices equipped with working insulation and an element for grounding;
- class II - devices equipped with double or reinforced insulation, but without elements for grounding.
Additional Information. Working insulation is the electrical insulation necessary for the normal operation of the device and to protect people from electric shock. In other words, this is the thinnest and weakest insulation, without which normal operation of the electrical box is impossible. Double and reinforced insulation have greater thickness and electrical strength. Accordingly, they guarantee lower risks of electric shock to humans.
Material of boxes for vending machines
The material of the case of the vending machine box mainly determines its operating conditions and safety of use. From this point of view, there are 2 types of products on sale:
- Plastic boxes. Usually these are small apartment panels. They are made from heat-resistant ABS plastic that can withstand temperatures up to 650 °C. This material does not support combustion well, does not rot from moisture and is easy to machine. These factors contribute to the fact that experts prefer plastic boxes.
- Metal boxes. These products are characterized by class I protection against electric shock. Metal models are coated with a polymer coating that protects them from the harmful effects of moisture and chemically aggressive environments. Metal boxes for machine guns must be grounded. They can withstand blows more easily. Therefore, they are installed in places where mechanical damage from the outside is possible.
Boxing for automatic machines with a grounding bus
Number of rows for machines
Another important characteristic of the box is the number of rows for slot machines. Circuit breakers are installed on DIN rails. Each rack is a horizontal row on which a line of machines will subsequently be located. The wider this row, the more protective devices can be placed in the shield.
One electrical panel may have several rows. On each of them, depending on the shield model, you can place from 2 to 180 standard machines with a width of 17.5 mm.
Permissible stresses
The characteristics of electrical panels are indicated in the technical documentation. When selecting this product, please consider its maximum operating voltage.
In a typical apartment box there is a voltage of 220 V AC. In a general floor box it reaches 380 V. In electrical cabinets of industrial equipment, the voltage can reach 600 V DC.
Assembly diagram
This is a very responsible occupation that requires strict adherence to safety precautions.
The electrical panel is assembled in the following order:
- Install 35 mm DIN rails for:
- Zero bus - on insulators;
- Grounding bars - directly to the housing;
- Paketnikov;
- Counter.
- Place the input cable in the upper left corner of the cabinet.
- Install an introductory machine there.
- Install two busbars for zero and grounding.
- If there is a PEN conductor, make a jumper from the zero bus to the ground bus.
Install machines. Start with the introductory one, and then take the wires to the group fuses of the outgoing lines. Make sure that the wires in your shield intersect as little as possible .
When stripping the insulating layer on the wires, make sure that the exposed part of the core does not protrude beyond the terminal of the package. If this happens, install a special insulating tip on the exposed part of the wire.
A sample diagram for assembling an electrical panel in a country house is shown in this photo:
Connection
First of all, you need to connect the input automatic fuse. If it is single-pole, connect the phase. If it is bipolar, connect both phase and zero.
For the convenience of further installation of the phase on the introductory package, it is better to start from the bottom .
- Combine all RCDs and packages with comb buses or jumpers. The jumper wire must have the same cross-section as the input wire.
- Connect the outgoing electrical wires to the machines.
Zero (N) always goes to machines and RCDs from the zero bus. Phase (L) – from the input cable through jumpers or a “comb”.
To avoid confusion during installation and connection, select neutral, phase and ground wires in insulation of different colors. Most often it happens:
- Zero N – blue
- Phase L – red
- PE grounding – yellow with green dotted line
Make sure the connections are secure and carefully tighten the bolts on the fuses and busbars.
- Connect the electric meter in accordance with the diagram attached to it.
- Apply voltage to the shield
- Using a multimeter, check for voltage on the outgoing lines and packets
- Mark each machine in accordance with the switching diagram
- If the device body is not transparent, a copy of the diagram should be attached to the electrical cabinet door from the inside. In addition to complying with energy supervision requirements, this will significantly facilitate preventive and repair work on the switchboard.
IMPORTANT! After checking the load on the outgoing lines, do not forget to turn off the input automatic fuse to safely complete the work.
Installing an electrical panel in a household is not a difficult task. It is quite possible to do it with your own hands. The main thing is to follow safety rules, carefully follow all instructions and not skimp on consumables.
Make sure that the assembly of your electrical distribution panel meets all the requirements of the PUE . Otherwise, energy supervision may not allow you to connect your dacha to the power grid or indicate any violations punishable by a fine.
When assembling, check the rigidity of each element. Do not allow unnecessary crossings of wires, and even more so, their improper twisting. Correct assembly of the switchboard functionality guarantees safe connection and trouble-free operation of your household appliances under various types of loads.
Scrupulousness and adherence to standards are the key to the fire safety of your home, and therefore your comfort and peace of mind.
In conclusion, we invite you to watch a video on how to install and assemble an outdoor electrical panel for your dacha yourself:
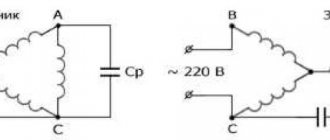
Selecting a three-phase electrical panel assembly diagram
Grounding connection diagram
Assembling a 380 shield for a home is carried out according to several schemes. Unlike an apartment, in houses, in addition to protective automatics, an RCD is installed, through which the lighting is turned on. The purchase of an element affects the work budget, but the power supply system is reliable and safe.
Installation of the distribution box involves the organization of a grounding line. A private house is grounded according to the following schemes:
- TN-CS. Recommended by PUE, but suitable only for new highways with regular maintenance.
- TT. Mounted on the basis of protective devices and a ground loop.
The functionality of the components of the grounding circuits is maintained by the user.
Using a cross-module for a three-phase shield
Cross module
To simplify the assembly of a 380 V switchboard and the ability to reconnect machines to other phases, a cross module is used. It is placed after the counter. A special feature of the device is the presence of three outputs for three phases and several outputs with similar phases.
Through the cross-module, the load is divided into automatic machines. The connection is made like this:
- The termination cable is inserted into the socket.
- The core is fixed using a clamping screw.
- To reconnect the phases, the screw is unscrewed, the wire is removed and connected to the free terminal of the desired phase.
Wires need to be swapped only when one of the phases is overloaded.
Assembly of 380 V switchboard only on differential circuit breakers
Difavtomat with an electronic differential protection unit
Difavtomat is a device for a separate line that operates as a conventional circuit breaker and a current leakage protection device. You can install a separate device for each group of consumers, distributing the load without phase imbalance.
Advantages of the assembly diagram of a three-phase switchboard on difavtomat for a country or private house:
- protection of each line from leaks, overloads, short circuits using one device;
- quick search for problem areas in case of breakdowns;
- absence of zero buses;
- selection of the number of automatic machines according to the number of branch lines;
- independent choice of the principle of grouping elements in the box;
- ease of distribution of phase load.
Disadvantages of connection - you will need a large distribution board, more than 72 modules, which is very expensive.
Models with indication of the cause of operation determine why the differential machine turned off.
Scheme with two RCDs
Scheme with two RCDs
Assembling a panel according to the connection diagram with two RCDs at 380 Volts involves installing powerful devices at the input. Near each group of consumers there are neutral and grounding buses. Zeros are supplied via a separate mounting bus:
- the element is painted blue with nail polish or acrylic paint;
- Teeth are removed from the tire after 1;
- the neutral wire is connected from the bus;
- the teeth are inserted into the grooves and tightened with clamping screws.
After the RCD, a cross-module is installed where the phase is connected. Circuit breakers for lines are thrown at the exit.
The benefits of the scheme include:
- affordable cost of consumables;
- small dimensions of the box;
- ease of switching one or two consumers from a group.
There are many more disadvantages of the assembly:
- high costs for three-phase RCD models;
- difficulties with reconnecting group consumers;
- long search for the cause of the problem;
- disconnecting 50% of consumers from the network at the time of operation of one machine;
- problem with load balancing and separate placement of “wet” and “dry” zones.
The scheme is suitable if you have a wooden country house that is used periodically and not year-round.
To avoid mixing up your tires, label or label them.
One RCD for each phase
RCDs and single-pole circuit breakers
You can assemble a circuit from two-pole RCDs and cross-modules after each. The load distributed among the phases is applied to the outputs of the residual current devices. There will be three neutral and grounding buses - according to the number of RCDs.
The benefits of connection include:
- logical distribution of consumer groups;
- switching off 20-25% of consumers when one RCD is activated.
The disadvantages are the difficulty of separating “wet” rooms into a separate group without phase imbalance, and the time spent searching for breakdowns. To eliminate the disadvantages, you can assemble each group on a separate DIN rail, install an RCD, and then place the machines in series.
Install individual RCDs on dangerous lines.
RCD at the input and single-pole circuit breaker
RCDs at the input and single-pole circuit breakers
The simplest and most popular assembly of a three-phase shield, which does not allow changing the order of the elements in the future. The load on the phases is distributed only once. The scheme has a budget cost and is implemented in a small panel with 54-72 modules.
An RCD is installed at the input, and single-pole models are used to distribute the load. The PUE limits the user in the number of connection lines. The basis is clause 7.1.83, which states that the total leakage current should not be more than 1/3 of the nominal value. The current leakage of the PUE network means 10 µA per 1 m of wire.
The scheme is advantageous in terms of the cost of the elements, the small size of the box, which contains approximately 32 modules. Its disadvantages include problems with grouping, the inability to change the phase load, and the presence of zero buses. To equalize the voltage, you will have to almost completely reassemble the shield. Otherwise, there may be a strong voltage imbalance, heating of the bus with zero burnout and overloading of the machines.
The RCD often trips in false mode.
More than three group RCDs
Protection system with individual RCDs
Electricity in a country house and cottage flows through a large number of lines. In the case of installing 3 protective devices, problems arise with searching for damage, separate group wiring of wet rooms and the street.
A multi-level protection system with individual RCDs after group ones will allow organizing separate power supply for “wet” and “dry” zones. The number of groups per phase is determined by the number of consumers, the characteristics of the load distribution and the size of the distribution panel.
Before work, you need to calculate the costs for each unit, taking into account the cost of the DIN rail, bus, and cable. The implementation of an input panel with more than 3 RCDs, designed for 380 Volts, has several nuances:
- in order not to get confused, you need to sign or mark each wire, machine and RCD;
- indicate which phase the conductor is connected to. For example, three RCDs are connected to the first phase. The first indicates L1-1, the second indicates L1-2, and the third indicates L1-3.
Despite the complexity of the scheme, the system turns out to be personalized. If one RCD has tripped, the damage can be detected on a specific line. When the device is activated, a small amount of equipment is turned off.
How to assemble a 220V electrical panel yourself in a private house - assembly diagram
A well-designed and high-quality electrical panel in a private home is a guarantee of the safe operation of the entire power supply system. Since metering devices, as well as distribution and protective equipment are located inside the cabinet structure, increased attention is paid to its selection and independent production. According to the main provisions of the PUE, the input panel must meet the most stringent requirements regarding operational safety and the possibility of expanding its functionality.
What is the shield for?
Previously, in private homes, separate entrance cabinets, which took up space in the premises and did not fit into the interiors, as a rule, were not made. They were traditionally installed outside the building in separate booths on a high-voltage pole. Today the situation has changed dramatically, so distribution boxes alone cannot be used. The need to assemble a 220 Volt electrical panel for a private home is caused by the following reasons:
- an increasing number of users prefer to independently monitor the condition of equipment that provides control of energy consumption, as well as protection against overvoltage and short circuits;
- the number of devices used for these purposes is steadily growing every year and requires more space for placement;
- Cabinet products have appeared that do not spoil modern interiors with their design: they have an attractive appearance and are easy to use, and are characterized by increased safety.
In a wooden house, the importance of the distribution cabinet increases significantly, since in private households the possibilities for expanding electrical equipment are great. They are limited only by the limit of electricity counted in kW/hours.
Types of shields for a private home
Electrical panels are designed for safe supply and distribution of electricity throughout a private home. Depending on their functional purpose they are divided into the following types:
- Input devices installed at the point where the power cable is connected.
- Boxes for installing a remote electric meter.
- Distribution boards mounted directly in the house and designed for distributing internal supply lines, as well as protecting them.
They are practically no different from the same products installed in apartments in urban buildings. The difference usually manifests itself only in the fact that significantly more samples of control, protective and distribution equipment are installed in them. In private households, it is also possible to make a separate panel designed specifically for servicing lighting lines.
Simplified diagram of an apartment panel
Scheme No. 1
This scheme is suitable for small one or two room apartments. Where the total length of all wires and cables does not exceed 300-400m.
There is a load switch at the input, not a circuit breaker. If you already have protection installed on the floor switchboard, after or before the meter ( check this before assembling this circuit ), then it is not necessary to install a machine at the input. The better the load switch from the machine can be found in the article Modular load switch or incoming machine.
The rated current of the input device for apartments with electric stoves and single-phase load should be from 40A and above.
Below are group cables feeding certain groups, indicating the cable brand and its cross-section depending on the load. Outgoing lighting circuits made with a 1.5mm2 cable are protected by a 10A circuit breaker, socket groups with a cross section of 2.5mm2 are protected by 16A.
The bathroom is connected to the differential machine, i.e. sockets, lighting and all consumers in the bathroom are combined into one group. Moreover, the leakage current on the diff is selected to be 10 mA.
Some electricians set it to 30mA, citing possible false alarms. There is no specific prohibition in the rules; it stipulates that this protection should not exceed 30 mA . Why it is still better to set it to 10mA can be understood by familiarizing yourself with how a current of a certain magnitude affects your body:
True, in order to purchase 10mA differential automatics in stores, you will most likely have to place an order. Basically, devices with a leakage current of 30 mA predominate on the free market.
The hob and oven are powered in separate groups, implying that these are two different consumers. If you have an electric stove, that is, when the hob and oven are combined, you need to change the power cable and circuit breaker:
Scheme No. 2
If you are concerned about power outages and want to protect your equipment from power surges, then you can slightly increase the cost of the circuit by adding a voltage relay to the input. Here is a schematic representation of a relay of the UZM-51M brand, as the easiest to connect (input-phase + zero and output-phase + zero).
Scheme No. 3
The advantages of these schemes:
- ⚡
inexpensive - ⚡
the best option for small apartments - ⚡
easy to install and connect
The big disadvantage of the circuit is that if there is a current leak in lines other than the bathroom, the protection will not work.
This circuit can be improved by placing an RCD at the input. Before doing this, make sure that a circuit breaker is installed in the floor panel where your meter is located, since it is prohibited to install an RCD without a circuit breaker. If there is already an RCD or automatic circuit breaker there, then it makes no sense to duplicate the protection. The circuit with the RCD at the input will be like this:
Scheme No. 4
One caveat - if your total cable consumption in the wiring of an apartment is 400 m or more, then false alarms of the input RCD are possible due to total current leaks. Here it is already advisable to apply the RCD to separate groups, removing the introductory one from the apartment panel diagram.
Choosing an installation location
Before you make an electrical panel for your dacha or home with your own hands, you should worry about choosing a place for it. It is most convenient to hang the cabinet on a section of the wall near the front door in the hallway area. In this case, the distance from the post with the outlet will be minimal, and the length of the cable to be laid will be short. It is placed in height so that it is convenient to take meter readings and switch distribution (linear) machines.
Unlike old panels with open plugs and switches, new products do not necessarily need to be placed high under the ceiling.
The product body reliably covers elements of switching equipment that are dangerous to children. The main thing is to ensure a reliable lock that can only be opened with a key.
When determining the location for installing the shield, it is also important to consider how and where exactly the power cable is inserted. When electrifying a new building, data on the layout of external networks can be obtained from specialists of the local branch of Energosbyt.
Buy a ready-made electrical panel for installation in an apartment or assemble it yourself
Standard cabinets and panels for single-phase or three-phase networks are produced in a wide variety of configurations, often their design is developed to order. You can buy a ready-made cabinet that is already fully equipped with everything you need and then add the necessary equipment to the DIN rail. It’s even easier to purchase only the body of the future shield with all installation accessories, and then assemble it yourself almost from scratch.
The positive aspects of this approach are:
- significant cost savings;
- the ability to install installation elements and devices at your own discretion, without going beyond the fundamental limitations;
- a clear understanding of how the circuit of an electrical panel assembled in-house works.
A competent approach to choosing the right solution also takes into account factors such as ease of equipment maintenance and its maintainability. It will be much easier to carry out these operations with a self-equipped closet.
Electrical Panel Components
The distribution board consists of many devices. For reliable operation of the home electrical network and protection of household appliances, it is necessary to use circuit breakers, RCDs and differential circuit breakers, voltage control relays, buses and much more.
Circuit breakers
Devices for automatic protection of the line that is connected to them. They interrupt the power supply if the current in the line is significantly higher than the rated value. Protection against cable heating is also provided.
RCD and diffautomatic devices
The residual current device (RCD) switches off the load if leakage currents appear. First of all, people can suffer from them. The leak also negatively affects the wiring, causing the wires to heat up and catch fire.
Differential circuit breaker - protects against short circuits, overloads, and current leaks. It is often used instead of a combination of a pair of RCDs and a conventional machine. The main advantage is short circuit protection.
Voltage control relay
The device is used to measure the incoming voltage and maintain a given value. In case of sudden surges in the network, the device turns off the power supply. The electrical circuit is closed only after the indicator and time delay have been restored. The main purpose is to protect electrical appliances from power surges.
Grounding and grounding buses
Busbars for grounding and zero are used for ease of installation, as well as compliance of the shield with all the rules of GOST and PUE. The number of DIN rails depends on the number of machines and other modules, so it is necessary to draw up an installation diagram in advance.
Comb tire
It is used instead of cable jumpers, which were previously made by electricians themselves. The comb looks like a solid plate with protruding teeth and is designed to connect machines standing in the same row.
Other equipment
As additional equipment in the distribution panel, modular contactors, load switches, DIN rail sockets, timers and much more are used. Other devices increase the convenience of managing the power supply network.
Shield elements and assembly order
A properly assembled switchboard circuit is the basis for the normal operation of the entire home energy supply system. Therefore, it is important to immediately understand the composition of the future switchgear. You will need to place the following elements:
- DIN rails used for fixing electrical devices.
- Grounding bars, made in the form of strips with a set of mounting holes.
- Introductory machine.
- Electric meter mounted next to it.
- Residual current devices (RCDs).
- Linear circuit breakers.
- Surge protection relays and other devices.
As a rule, there are no particular difficulties with installing and connecting most of the listed devices. The only thing you should pay attention to is the validity of using RCDs and voltage relays. The circuit diagram of an electrical panel in an apartment with an RCD and a voltage relay guarantees its user protection from electric shock and potential surges. Therefore, their installation in a private residential building is considered mandatory.
When assembling the shield with your own hands, follow the documentation supplied with any samples of products of this type. It provides step-by-step instructions on the installation procedure for all components and how to fix them.
Electrical panel diagram in an apartment with an RCD in separate groups
Scheme No. 5
This scheme is already more advanced. It can be used both in small apartments and in apartments with a total wiring length exceeding 400m. There is no input RCD here, since a load switch is sufficient (do not forget about the circuit breaker in the floor panel with a meter).
The rated current of the input device was selected based on the permitted power for apartments with a single-phase load equal to 11 kW and the demand factor for luxury apartments - 0.8.
There is protection against current leakage on individual groups of sockets and split systems (air conditioners). Moreover, one RCD protective device is located on combined groups, each of which in turn is protected from overloads by automatic circuit breakers.
It is especially worth noting that each individual RCD needs its own busbar for zero. Otherwise, they will all trigger synchronously in the event of a leak in any group of cables. And in order to find damaged wiring, you will have to physically disconnect the neutral wires from the busbars.
It is advisable to protect lighting lines from leaks if you use wall lamps with metal casings and periodically wipe them or change light bulbs without turning off the voltage. In most cases, you can get by with simple automatic machines.
The same circuit, but with a voltage relay:
Scheme No. 6
Calculation of the number of modules
Housings are sold with DIN rails already attached to them, designed for a given number of devices, which is indicated in the product name. This characteristic refers to the number of elements with a multiple of one module (18 mm), freely placed on the fixing rail. To determine their exact number, you will need to add up the dimensions of all installed products in the modules, taking into account the margin for gaps between them (3-4 mm).
The descriptions of some cabinets mention mounting rails with end caps, after removing which it is possible to free up another seat. When assembling yourself, it is better to plan the number of such modules with a small margin. If approximate calculations give the figure 66, it is advisable to choose a box with 72 module spaces.
How to calculate the number of places in an electrical panel?
All equipment for the switchboard is standardized and installed on a special DIN rail. The unit of measurement for space is considered to be a “module” with a width of 17.5 mm. All panels are sold depending on the amount of space: for 8, 12, 24, 36 modules.
Reference! To calculate the number of seats, it is necessary to take into account all devices, including RCDs, automatic machines, voltage relays, and differential automatic devices.
Circuit breakers have a standard width of 17.5 mm. The remaining devices have the following characteristics:
- two-pole circuit breaker - 2 modules and 35 mm;
- three-pole circuit breaker - 3 modules, 52.5 mm;
- single-phase RCD - 2 modules and 35 mm;
- three-phase RCD - 4 modules and 70 mm;
- diffautomatic - 2 modules and 35 mm;
- voltage relay - 3 modules, 52.5 mm;
- DIN rail socket - 3 modules, 52.5 mm;
- terminals for DIN rail - 1 module 17.5 mm.
Case selection
The housings of the shields differ in the material used for their manufacture (metal or plastic), as well as the degree of tightness. Metal cabinets are highly durable and can withstand significant loads. They are suitable in situations where three-phase power is supplied to the house, which requires the installation of a large number of protective devices.
Since in private households such a cabinet is usually installed within the house, taking care of its tightness is not so important. The exception is the case when it comes to a box for a remote electric meter placed on the front wall of the house. Depending on the method of installation within the boundaries of the building, cabinets can be wall-mounted or built into a special niche in the wall.
In the first case, they will protrude outward, occupying some part of the living space, and in the second, they will be completely recessed into the thickness of the walls. The choice is made at the discretion of the homeowner. Plastic cabinets are available in both versions and are usually chosen to accommodate small-volume assemblies serving country houses or small cottages. In terms of strength indicators and IP degree of climate protection, they are not inferior to their metal counterparts.
Types of equipment according to GOST
According to legislatively adopted documents, both small boxes for 2 modules and large distribution cabinets-stations belong to distribution panels responsible for connecting electrical groups. The standards can be found in the edition of GOST 32395-2013 .
The panels are divided into apartment boxes and floor boxes - according to the place of installation. The next division is into distribution and accounting and distribution. The latter differ in the installation of the counter.
Thus, two broad categories can be distinguished:
- apartment - group and accounting-group;
- floor - distribution, accounting-distribution, accounting-distribution-group.
According to the installation method, all of the listed types can be wall-mounted or built into a specially prepared niche.
If the wall box is simply fixed with dowels on the wall or partition, then for the built-in box it is necessary to cut or hollow out a niche of a certain depth
Distribution boxes are protected from electric shock. According to this indicator, they can belong to class I or II.
Some floor products are equipped with special compartments for low-current equipment. Apartment boxes come with or without an input device, designed for single-phase or three-phase circuits.
Useful tips
When selecting, installing and subsequently disconnecting a panel in a private house, it is recommended to take into account the following nuances:
- the dimensions and number of mounted DIN rails should be taken with a reserve, this will be useful if it is necessary to place new equipment;
- with a three-phase power supply, it is advisable to power the lines of power sockets and lighting control from a separate panel;
- In order to increase the reliability of the operation of such systems in the cabinet, it will be necessary to provide for a breakdown of devices into groups and levels of protection.
If all rules and recommendations are followed, anyone can independently assemble and dismantle the cabinet that serves the electrical network of a private home.
Assembly and installation of an electrical panel in a house, apartment, or country house
Installation and assembly of an electrical panel is a complex job that requires a clear sequence, where every action is important and cannot be neglected.
The main qualities of the device are safety and ease of use.
- accounting for electricity consumption;
- circuit management;
- protection of the circuit from fire due to overload.
It is possible to install an electrical panel in a house, apartment or country house on your own, but to do this you need to have basic knowledge and skills as an electrician.
Why do we need boxes for machine guns?
Circuit breakers contain many copper electrical contacts and moving mechanical parts. These design elements work properly as long as they are in frequency. If moisture or dirt gets into the protective device, problems begin. Copper conductors become coated with oxide, heat up and burn. The mechanics of the machine jam and become unusable. This is the main reason why electrical breakers need to be installed in protective boxes. As a result, the following purposes of the boxes are highlighted:
- protection of machines from dust and moisture;
- reducing the risk of fire spreading when switches catch fire;
- the ability to lock protective devices with a key (for example, from children at school);
- aesthetic appearance of switchboard equipment and ease of use.
Protective box for electrical circuit breakers
Consumer calculations
A complete list of consumers is compiled. To do this, you do not need to take into account devices like a fan or a table lamp, but write down and number each wire connected to the panel. Sockets must be recorded separately, lighting - separately. High-power appliances (boilers, washing machines, air conditioners, electric stoves) require wiring protection from overload, so they are connected not through distribution boxes, but directly to the panel.
The list of consumers for a three-room apartment usually looks like this:
- sockets:
- bedroom;
- living room;
- children's;
- kitchen;
- bathroom;
- entrance hall and corridor.
- Washing machine;
- boiler;
- air conditioner;
- electric stove;
- lighting:
- bedroom;
- living room;
- children's;
- kitchen, bathroom;
- hallway, corridor.
All consumers are divided into groups (circuits) in accordance with power consumption: sockets for household appliances in one room such as an iron, sconce, TV and others can be combined into one group (sockets in one room - one group, in another - another), lighting - to the next one, also by room. Each group has its own circuit breaker (or just a circuit breaker) on the panel, and for high-power appliances - washing machine, boiler, electric stove, air conditioner - there is one separately for each. Machines may also be called fuses or bags.
Next, the list is converted into a table where the ratings of the machines and RCDs are entered.
Specifics of assembling a shield in a wooden house
The increased degree of flammability and the risk of fire situations require a special procedure for installing the shield in wooden houses. Initially, the lumber is impregnated with fire-retardant agents, which can hold fire for up to 20 minutes. To eliminate the possibility of fire, you will need to adhere to a strict sequence of work.
Nuances of choosing materials
Wiring in a wooden ceiling in metal corrugation
When selecting materials, the following nuances are taken into account:
- A wooden house can only be electrified with copper cable. The wire must be marked “ng” and LS – two-layer non-flammable insulation.
- Selecting the conductor cross-section. You can calculate using formulas or use the PUE table.
- All wiring points, including sockets and lighting, are grounded.
- It is allowed to use three- or four-wire wire.
- Mandatory installation of an RCD to protect against breakdown of the body and fire of logs.
- Installation for each line or group of a separate machine with power in accordance with the total load on the network.
- Separate switching device for each group. For a two-story building, a 25 A model at the input and a 16 A device separately for the group is sufficient.
- The choice of sockets depends on the wiring method - hidden or open.
The metering device should be located in front of the introductory machine for ease of sealing.
Requirements for the switchboard
The correct electrical panel for a wooden house is metal, which does not come into contact with the lumber. The wall thickness of the product is from 1 to 2 mm, but during a short circuit the electric arc burns through the metal. In this case, you can decorate the wall with bricks and place a box on the finished surface. The second option for the layer is an asbestos-cement board or laying a piece of asbestos fabric folded several times under the box.
Drawing up an electrical panel diagram
The electrical panel is a housing - a metal or plastic box - with modules inside. A module is a component that occupies one installation “space” (within one DIN rail). Some devices can take up two or even three “places”.
For clarity, you should create a diagram according to which the shield will be assembled.
Examples of 220 V switchboard circuits:
- introductory machine;
- electric meter;
- RCD (residual current device);
- ground bus;
- "zero" bus;
- automatic sockets for high-power devices at 25 A;
- automatic socket group for household appliances of low and medium power at 25 A;
- automatic lighting 16 A;
- L—phase;
- N - zero;
- PE - grounding.
Each house or apartment will have its own layout in accordance with the preferences of the owners.
Regulatory documents and rules for shields
All diagrams and apartment panels must be assembled in accordance with regulatory documents and not contradict the instructions and rules prescribed there. First of all, this is, of course, the PUE, but there are two more documents that are worth paying close attention to:
- ⚡
GOST 32395-2013 Distribution panels for residential buildings. General technical conditions. () - ⚡
Code of rules for design and construction SP 31-110-2003 “Design and installation of electrical installations of residential and public buildings” ()
Requirements from the rules for apartment panels
Notes and requirements from the above GOST that you should pay attention to when assembling and choosing an apartment panel: