Types and features of meters
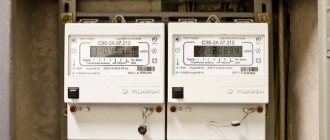
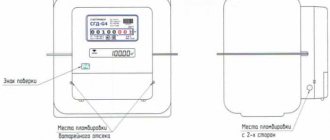
Single-phase, single-tariff electricity meter Taypit Neva 103.5 1S0
Electricity meter is a special device that allows you to keep track of DC or AC energy costs. It is intended for installation in an apartment or house. There are several types of devices.
According to the operating principle
Manufacturers produce the following modifications:
- Electromechanical. An induction electric meter operates on the principle of generating a magnetic field by two coils - current and voltage. The field ensures the rotation of the disk, and it activates the counting mechanism. As the current and voltage parameters increase, the disk spins faster. The guaranteed service life of the products is 15 years.
- Electronic. The device is compact and calculates according to several tariffs. The electronic device displays readings and stores them in memory. It can be connected to the smart home system.
The accuracy of induction models is 2.5. Electronic ones often fail.
By number of tariffs
There are models:
- single-tariff – keep records using one system;
- multi-tariff – calculate energy costs according to day and night tariffs.
Devices with multiple tariffs are optimal for rooms with a large number of household appliances.
By mounting method
The devices are installed on fixing bolts or DIN rail.
The power of the device must be selected according to the power of all equipment.
What is a two-tariff meter, how it works
The essence of a two-tariff meter is simple. Unlike a standard meter, it controls consumption in two zones - daytime (from 7.00 to 23.00) and night (from 23.00 to 7.00), which allows you to split the payment for electricity.
In the first case, the standard tariff applies, and at night it is significantly lower. If you plan to use powerful consumers at night, using a two-tariff meter is the way to save money.
The relevance of the transition to such devices is easy to explain. It is important for power plants and substations that the load on equipment is uniform throughout the day. In practice, it is higher in the morning, afternoon and evening hours than at night. As a result, equipment operates at its limit and breaks down faster.
The widespread use of two-tariff meters allows for load balancing, that is, transferring part of the load from peak hours to night time. As a result, fuel consumption is reduced and the service life of equipment at power plants increases.
Legality of self-connection
Connecting a residential electricity meter without sealing it is classified by the legislation of the Russian Federation as unmetered consumption. This means the absence of an agreement with the provider, independent installation or shutdown of the device, and failure to provide information about the amount of energy resources consumed. Sanctions in the form of a fine in the amount of 4 thousand rubles are applied to the violator. Basis – Art. 7.19 Code of Administrative Offences.
According to clauses 81 (8-9) and clause 81 (14) of Government Decree No. 354, citizens contact the energy sales office to sign an agreement and install a control seal. Only after installing the seals is it possible to connect the meter.
Sealing is a free procedure.
Rules and requirements for meter installation
The electricity meter screen must be easily viewed by representatives of the supplier company.
Before connecting the metering device, you need to study the standards. They specify the following connection conditions:
- transfer of the device on the basis of Government Decree No. 354 is carried out at the user’s expense, if this does not contradict the requirements of the PUE;
- installation of the device is carried out in rigid cabinets, switchgear, on panels, walls, in niches;
- calculation nodes are placed at the border of the operational responsibility of the consumer and the provider - input of the apartment, ASU, main switchboard;
- the screen of the accounting tool must be easily viewed by representatives of the supplier company;
- for a network with voltage up to 380 V, the rule applies - the distance of the electric meter to the switching devices is no more than 10 m;
- installation of the metering device on the street is carried out in a sealed case at a temperature of +5 degrees;
- the counter is placed at a height of 0.8 to 1.7 m. The optimal height is 1.4 m.
The period of the manufacturer's seal on a three-phase electrical device should not exceed 2 years, on a single-phase device - 1 year.
Which electric meter should I choose for my apartment?
The first question that arises when installing the device: should I install a single-phase or three-phase electric meter? The apartments have a single-phase network, and connecting a three-phase meter will not affect the power, because the sum of the powers of conventional pantographs is distributed over one phase. It is more practical to connect a three-phase meter at the dacha.
There are only 2 types of electric meter designs:
- Induction. Their main advantage is their low price. Also resistant to voltage surges, which slightly reduces the recording of readings.
- Electronic
They are distinguished by their absence of noise, small size, and resistance to sub-zero temperatures. There are also several tariffs set in electronic meters. The choice of meter should be made taking into account the recommendations of the energy supplier. The power level indicates the current range in which the device can operate. There is no strictly defined denomination, so you should calculate the amount of power of the apartment, and based on this data, select a meter with the nearest higher value. Let's consider 1 example: With a maximum power consumption of 8 kW, the approximate level of current passed, if you connect 220 volts, will be 36 Amperes, from which a 5-40 Ampere meter should be used.
Attention! It is recommended to install equipment with a power reserve.
Electronic meters have an additional tariff change. It is intended for people who use electricity at certain times of the day. For example, a day/night tariff reduces the price per kilowatt charged at night. The accuracy class of the device indicates the measurement error in percent. This indicator affects the accrual. The error can either undercount kilowatts or overestimate in the range of 0.5-2.5%. The recommended error should not be higher than 2 percent.
Important! You should not rely on a kilowatt shortage in case of an error, since it is impossible to specifically select such a device.
6 main types of work and their average price:
| Type of service | Cost, in rub. |
| 1. Single-phase. 2. Single-phase multi-tariff. 3. Three-phase direct connection. 4. Installation or replacement on a pole/support (of any device). 5. Dismantling. 6. Removal on a pole/support. | 1500-2000 1500-2000 2500-3000 5000-7000500 3500 |
Energy company employees will issue special technical conditions, which indicate the installation location of the device and its characteristics. Then they will carry out installation and sealing, which will take no more than one day.
How to connect the old meter
Outdated type metering devices include single-phase models that count electricity at a general tariff. They are installed in an apartment or private house.
Scheme selection
The sequence for connecting a single-phase electricity meter is indicated in the passport, instructions or form from the manufacturer. You can find the diagram in the instruction manual or on the back of the terminal cover.
Stages of work
The correct action depends on understanding the diagram. In the center there is a single-pole device, to which the power wire (zero and phase) is connected to the left. On the right are the load output cables. Current flows through them to the lighting system, sockets, and electrical appliances.
The terminals are connected to the wires as follows:
- terminal No. 1 – white/brown/black phase input cable;
- terminal No. 2 – white/black/brown input phase wire from which the apartment is powered;
- terminal No. 3 – neutral blue/blue-blue conductor of the input cable;
- terminal No. 4 – blue/blue-blue neutral load output cable.
Additional terminals are used for connection to service equipment.
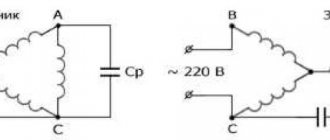
Design and principle of operation of the electric meter
The principle of electricity metering is the same in devices of different types, but according to their design they are divided into induction and electronic.
Induction or electromechanical meter
Induction meters contain an aluminum disk that is rotated by two coils:
- voltage, connected in parallel to the load and measuring the network voltage;
- current connected in series with the load.
The higher the current or voltage, the faster the aluminum disk rotates, transmitting rotation through a worm gear to a mechanical digital display. To reduce the rotational inertia of the disk, there is a permanent magnet inside the device, which slows it down with its field.
Through various manipulations, such metering devices can be made to rotate in the opposite direction. Therefore, power supply companies are replacing them with new, electronic ones.
Electronic meter device
An electronic electricity meter converts the measured power into an analog signal and, subsequently, into a digital one.
The main part of this device is a microcontroller that keeps track of consumed electricity. It transmits a signal to a liquid crystal display or electromechanical display, as well as to the ASKUE system (automated system for monitoring and accounting for electricity).
These meters have built-in reverse rotation protection and anti-magnetic seals.
Features of the connection diagram for a single-phase meter in the panel
Location of the meter in the electrical panel
For the home electrical network, the electricity meter is connected in conjunction with protection devices. All nodes are located in SCHUR. To connect a single-phase electricity meter you will need:
- Install a single-pole switch and insert the phase input cable into it.
- From a single-pole circuit breaker, bring the phase to terminal No. 1 of the metering device.
- Connect the working zero to terminal No. 3 and the protective zero to the neutral bus.
This scheme is recommended by the PUE and is suitable if an old accounting device is installed in the house.
At whose expense?
Yes, all this costs a lot.
The first cost item is the metering devices themselves. If earlier it was possible to install a cheap Energomera in an apartment for 500 rubles, now it will take 5-6 thousand rubles. Prices are still preliminary, “smart” metering devices are still being produced in small batches and production is just being established. For volumes, the price tag will, of course, be reduced. And it's still very expensive. The growth is almost tenfold.
But the counter itself is just the tip of the iceberg. Servers, communication channels, service specialists. Yes, runners with notepads will become a thing of the past, but this is such a saving. Who will pay for everything?
Energy workers were allowed to use several sources:
- Include in the tariff. The most logical solution. The problem is that tariffs for individuals have a ceiling. They cannot grow by more than the official inflation figure. You won't show off. But the lawyers, as usual, will pay for themselves and for that socially protected guy. Don't rush to rejoice if you live in an apartment. Prices on your payroll may not increase, but they will increase in a store that suddenly began paying more for electricity and refrigerators.
- Due to federal and regional programs. Subsidies are provided from the budget, although it is not yet very clear what percentage of the costs they will be able to cover.
- Due to savings. Wait, what? Where's the savings?
And here we come to the most interesting question.
Features of connecting three-phase meters
The three-phase meter circuit is implemented in a direct or indirect way. The first option is suitable for low-power consumers, the second - for equipment in a three-phase network.
Specifics of direct connection
Direct connection of a three-phase electric meter
Connect the device directly as follows:
- Stripping the cable of insulation and connecting it to a three-phase machine.
- Connecting three phase cables to terminals No. 2, 4 and 6 of the meter.
- Output of phase wires to terminals No. 1, 3 and 5.
- Supply of input (terminal No. 7) and output (terminal No. neutral wire.
- Installation of 3-pole automatic protective switches.
For single-phase connection of single-phase devices from the outgoing phase, wires from the ground neutral are used. Several groups of single-phase consumers are powered evenly through switches of different phases.
Indirect connection
If the load exceeds the rated current consumption, a special separating device is used. The transformer is available with two windings. The first is a tire threaded through the middle that serves to protect the break of power wires. The secondary winding in the form of turns of a thin cable is fed to the meter.
An indirect connection scheme for a three-phase electric meter is implemented by fixing the transformers to the back of the cabinet. The primary windings are connected after the input switch and fuses protecting the phase cables. The connection is done like this:
- Connecting one end of a cable with a cross-section of 1.5 mm2 to the section from the A-phase power wire to the transformer.
- Output of the second end of the cable to terminal No. 2 of the meter.
- Similar connection of phase B and C wires, their output to terminals No. 5 and No. 8.
- Laying wires with a cross-section of 1.5 mm2 in the direction from the secondary winding terminals to terminals No. 2 and 3 of the electric meter.
- Similar connection of the windings of devices B and C to terminals No. 4, 6 and No. 7, 9.
- Connecting terminal No. 10 to the common neutral grounding bus.
Without observing phasing, the device will give incorrect readings.
When is installing a two-tariff meter beneficial?
To determine the relevance of installing a two-tariff meter, it is important to take into account a number of parameters - the presence of powerful equipment in the house or apartment, as well as the electricity tariff in the region.
To calculate efficiency, a number of steps are required. First, let's find out the price of 1 kW for a standard and two-tariff meter. After this, the amount of energy consumed at night is measured.
Once the declared parameters are in front of your eyes, you can substitute them into the following formula:
Mon = 100 x (Td - T1)/(Td - Tn), where:
- Mon—energy consumption at night;
- Тд — price of the daily tariff;
- Тн — cost of the night tariff;
- T1 – the price of a 24-hour tariff (on the meter this is a day zone, do not confuse it).
The final result is given as a percentage. For example, if it turns out to be 30%, this means that to get the effect you will have to increase the level of consumption at night by 30%. Only with this approach can we talk about the relevance of the new two-tariff meter.
If consumption at night is higher than the calculated parameter, this is only a plus.
Let's look at an example. We take the numbers from the photo below.
We get (6.19-5.38/6.19-1.92) x 100 = 18.9%.
Installation materials
DIN rail made of aluminum
The electrical metering device is connected after selecting a circuit and purchasing materials. To connect your apartment meter correctly and efficiently, you will need:
- auto switches taking into account the maximum current rating;
- insulating devices;
- instruments with handles coated with insulation;
- fastening elements – screws and nuts;
- wires;
- din rail.
Further work is carried out according to a strict algorithm.
Connection steps
Installing an electric meter
Initially, you need to calculate how many phases are in the home electrical network. The number of circuit breakers is selected for them. In the future, the device will be connected like this:
- Fastening the device in the panel with special clamps.
- Installing the rails onto the insulators with screws into the box.
- Mounting circuit breakers on a rail and fixing them with a latch.
- Fixing the earth and protection buses onto the rail or insulators in the shield so that there is a gap between them.
- Connecting the load to the switches.
- Connection of the machine with the meter.
- Load connection.
- Installation of connecting jumpers.
- Connecting the meter to consumers.
- Mounting the panel housing to the wall.
- Inspect the wires for correct connections.
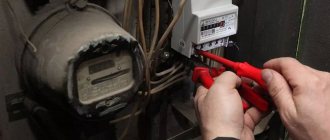
Only after checking the cables can you turn on the power to your residential building or garage. At the last stage, the user contacts energy sales to test the equipment and install seals.
Characteristics of some models of electricity meters
CE 102M
When choosing a meter yourself, you need to consider how electricity will be consumed. Manufacturers produce models that can accurately track energy costs:
- SRZU-I 70D. A pulse device that simultaneously transmits, collects and analyzes information. A measuring transformer is used to power the sensor. The receiving node, through an electrical circuit, receives an LED signal about energy consumption over a certain period of time. The data is displayed on the screen;
- Mercury 234 ARTM – RO PB. The three-phase multi-tariff model is designed for a network with a current of 5-10 A. It is installed outdoors, because works without failures at temperatures from -40 to +70 degrees. Device accuracy class – 0.5;
- PSCh-4TM.0.5 MK. A multi-tariff single-phase device operates at a current of 5-10 A. The accuracy of the readings is 0.5. Designed for operation in the temperature range from -40 to +60 degrees;
- CE 102M S7145-JV. Designed for 4 tariffs, has 1st accuracy class. The universal multi-tariff device is suitable for a 220-230V network with a current from 5 to 60 A.
The presented models are intended for apartments, residential buildings and cottages, because... allow you to plan energy costs and calculate fees for them.
The algorithm for connecting the meter yourself is based on its type and number of network phases. Before starting work, it is necessary to coordinate the installation and conclude an agreement with the energy sales company. The device must be sealed.
How to connect an electricity meter with your own hands in a private house or apartment
I will not educate you about concluding contracts for the supply of electricity to you and receiving a current account for payment. You will have to do all this with the relevant authorities.
Let's start right away with the purchase, installation and connection of meters.
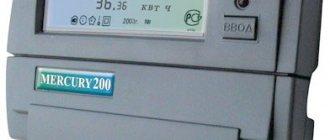
First you need to purchase the necessary device. There are many models on sale, for example, “Mercury 201”, “Energomera”, “Mars”, “Neva”, “ABB” and many others.
Please look at your passport before purchasing. The passport will indicate the date of manufacture, method of fastening, operating conditions (for example, temperature conditions). Everything must meet your requirements.
Important! No more than 1 year should pass from the date of manufacture to the moment of connection and registration of the electricity meter with the relevant authorities.
Single-phase electricity meters for residential premises, as well as for shopping pavilions, stalls and other similar premises, are used with a power of up to 12 kW and a current of up to 60 A.
First, let's prepare the installation tool. We will need:
Materials you will need:
- DIN rail (see meter type);
- plastic dowels;
- self-tapping screws;
- box or shield for the meter, RCD and circuit breakers (if necessary);
- wires or cable (for connecting the meter to the RCD and circuit breakers);
- terminals (neutral and ground).
Before connecting the electricity meter, you have probably already decided on the installation location. The counter can be installed either inside a box or shield, or separately.
If inside, then start by installing a box or shield. Attach it to the wall using dowels and screws.
Then all equipment (meter, if there is no separate bracket, RCD, circuit breakers), cables and wires are installed on a DIN rail in the panel (box).
Then all the wires are called up and connected to the required electrical equipment according to the diagram proposed below.