Modern power supplies
Today's power supplies are somewhat different from their predecessors, not only with modern designs, increased power and improved performance, but also with new connectors for devices that were not previously found in most conventional computers. This is due to the development of new devices or modification of old ones, increasing the technical characteristics of existing ones and, as a consequence, the need for additional power.
In addition to conventional power supplies, there are modular or partially modular units. The difference between the blocks is that in modular ones, in whole or in part, the cables are replaced with appropriate connectors for connecting them and fully comply with the connector standards of conventional blocks. This is good because unused wires will not be in the computer case and interfere with its modernization, as well as with the air circulation inside.
There are certification standards for the energy efficiency and efficiency of a standard power supply, to measure the efficiency of power delivery and distribution of power to the computer's internal devices. It is the consumption of additional power that causes the appearance of new connectors, the presence of additional wires and contacts.
Modern power supplies still contain the basic connectors used in earlier models, supplying devices with the standard voltage of 12, 5 and 3.3 volts. So, to connect to the motherboard, a 24 pin connector is used (from the English pin - pin, contact), which has undergone some changes. In older models of motherboards, and accordingly in power supplies, a 20 pin connector was used. Therefore, in most modern PSUs (power supply units), the connector is made in the form of a collapsible model, which is a standard 20 pin connector + an additional 4 pin connector for modern motherboard models.
When using only 20 pin, the additional 4 pin connector is removed (slides down along the plastic rails) and remains separately in reserve. Further, the power supply necessarily contains molex type connectors (after the name of the company that developed Molex) in 4 pin, for “powering” optical drives and other types of drives with the PATA (Parallel ATA) interface, replaced by the more modern SATA (Serial ATA) interface. To power SATA drives, there are usually two special 15 pin connectors (or PATA HDD –> SATA HDD power adapters).
And also in a modern power supply there should be power connectors for the central processor 4 or 8 pin (can be collapsible), a connector for powering the video card (6/8 pin, can also be collapsible and contain 6 pin + 2 separate contacts). Some models may have a Floppy connector (4-pin) to power floppy drives, some card readers and other devices that use this outdated connector.
What is a power supply in a computer? Replacing the power supply yourself
Good time! You are trying to turn on your computer. The indicator on the system unit lights up. The fans began to rustle; You wait patiently and look at the monitor, but it remains dark and the indicator on it glows in standby mode.
If earlier during startup there was a short squeak from the speaker (which is located in the system unit), now there is silence... The system does not start. One common reason for this is a faulty computer power supply.
As always, “yesterday everything was fine, but today”... we will find out what power supplies there are and how you can replace them yourself at home. We will not repair them, we will quickly diagnose and replace them.
What does “power supply” mean in a computer and where is it located?
The vacuum cleaner did not help, rebooting, replacing the battery and resetting CMOS and it was time to test the power supply. Like any household device, the computer is powered from a 220 volt outlet. But its filling works with much lower voltages - from 12 volts and below.
To reduce the voltage to the required values and ensure reliable and safe operation, power supplies are installed in computers. These are smart devices equipped with various protection circuits - short circuit, power surges, incorrect connection. If there are malfunctions on the motherboard regarding power supply, the unit may not turn on and will go into protection.
But most often the unit itself has to be replaced due to failure of its internal elements. It all depends on the quality of the parts and in what conditions the equipment is operated. Over time, parts lose their performance characteristics and, although it starts, it no longer produces factory characteristics. And all we get is a dark monitor and spinning fans.
In IBM-compatible computers, the power supply can be easily replaced with a new one. They are removable, compatible and easy to change. On monobok devices, or from Apple, you need to look for blocks for a specific model.
So, the power supply on a regular home system unit can be seen on its rear panel. It is secured with four or five bolts for a Phillips screwdriver. Full size looks about the same everywhere:
Power supply in a laptop - what does it mean and where is it located?
The laptop's power supply is an external part that is included in the kit and supplies voltage to the connector from 18 to 20 volts. It looks like a black rectangle that always lies on the floor, or like in new models a kolobakh that plugs into an outlet.
Quite reliable devices. They rarely fail, they always heat up during operation. This is normal, as it should be.. Inside the case there is a full-size metal plate that removes heat.
If you have any doubts about its functionality, measure the voltage with a multimeter on the connector that is inserted into the laptop. It should be 18-24 volts. In my practice, the most common cause of failure was worn connectors or wires bitten by a dog. The power supply will fit into another laptop if the power connector fits. As a last resort, you can cut off the wire with the connector and screw it onto the working unit.
Another source of power for a laptop is the battery. It is vulnerable and has a certain service life. After the expiration date, it stops holding a charge and needs to be replaced. It happens that the laptop does not start due to a faulty battery. In this case, it is enough to remove it from the case and turn on the laptop from the power supply.
When choosing a laptop, pay attention to its battery. On modern cheap ultra-thin devices, it can be located inside the case and can only be replaced in a workshop.
Computer power supply characteristics and choice of replacement
I’ll just tell you how to choose the right one in case of replacement. If you have a standard home computer, then it most likely has a “regular” full-size power supply. If the form factor of your computer case is something exotic, then you need to look for a compatible model from the corresponding line of cases, because the overall dimensions of the unit can be individual - depending on the model.
When we have visually determined the dimensions of the block, we move on to the next important characteristic - its power. It is always indicated on its body:
Therefore, we choose a power supply that is the same (or a little more powerful) if you plan to upgrade the hardware in the future. The more powerful the better. The next important point is the block connectors. Consider the used number and type of connectors that are on the “native” power supply:
And also the type and number of connectors feeding hard drives and DVD drives, because there may simply not be enough of them. You can use a used, but known-to-be-good unit from another computer that meets the specifications. And if you still don’t have enough connectors for connecting hard drives, we’ll buy the necessary adapters (molex/Sata):
I would especially like to mention power supplies for servers. Server blocks are always expensive and tailored to a specific server model. Sometimes there are two. They also change in pairs and are purchased to order.
How to quickly check the computer's power supply for functionality and replace it?
Now that we have decided, it’s time to check our power supply. We disconnect the system unit from the network and place it on the table. First you need to open the case by unscrewing the bolts in the back. Look at the video, I filmed the replacement process on my action camera:
If possible, we use a used unit for diagnostics, even if it is old, even of less power, but obviously working. We will temporarily connect it instead of the faulty one. The main thing for us is to make sure whether the computer will start with this block or not. And you don't need any complicated measurements.
We carry out all operations with the system unit completely disconnected from electricity; the power cables must be disconnected!
After opening, we sequentially disconnect the connectors of the “native” unit from the motherboard and immediately connect the connectors from the test unit in their place. We are not removing the old block yet! First the largest 24 pin connector. Press the latch and pull it out:
The following connector is near the processor:
Disconnect power from the hard drives and CD DVD drive...
If the power supply is connected to the video card from the power supply, we also disconnect it. If the board has ATX 12 volt power connectors
By the way, due to a faulty video card, the power supply goes into protection. You can try to remove the video card from the slot and if the computer starts, congratulations, you have found that the video card is faulty, and so far everything is in order with the power supply.
We connect all the connectors of the test block to their places and check the quality of the connection. Everything should click, in the right places and to the end. Connect the monitor. After that, connect the power from the outlet (don’t forget about the switch on the back wall).
Turn on the power. If the system starts, you will hear a joyful squeak, and the boot script will appear on the display. Hooray! Turn it off and you can check it again. Then you need to remove the “original” unit by unscrewing the bolts on the rear panel of the system unit.
If there are ties, carefully cut them with scissors so as not to damage the wires and elements on the motherboard. Let's not rush! If necessary, remove another cover of the system unit.
If possible, we take the faulty power supply with us to the store and choose the same power supply, size and number of connectors. We install everything in reverse order. There is no need to throw it away; you can send it for repairs - it will still serve, and not only in the computer.
Computer power supply, what is the pinout of wires on it, jumper for starting. How to turn it on without a computer?
Our craftsmen adapt old but functional blocks for domestic needs. Radio amateurs make laboratory power supplies from them, and some car enthusiasts modify them into battery chargers. Schemes for various modifications can be found on the Internet.
You can stretch a nichrome thread and cut foam into fancy shapes with a hot thread. For such a modification, you need to install a jumper between the contacts of the block in one of the connectors. Then it will turn on when operating from a 220 volt network without a computer.
We make a jumper from a paperclip and connect it between the black and green wires (it is next to the lock, pins 15 and 16 in the figure), firmly inserting the jumper into the connector contacts. We isolate just in case. That's it, the unit turns on itself, without a computer. You can take the required voltages from other contacts and connect the load!
And for your reference, I provide a picture with the most complete description of the types of connectors that you may encounter during the replacement process on ordinary home PCs. Nothing complicated or supernatural. It is difficult to connect a new unit incorrectly. Good luck!
Author of the publication
offline 2 hours
admin
0 Comments: 58Publications: 303Registration: 09/04/2015
fast-wolker.ru
Computer power supply pinout - how it works
The power supply for a desktop computer is designed to convert alternating voltage 220v into reduced direct voltage with a nominal value of ±12v, ±5v, +3.3v. Power supply ±12v is used to operate connected computer components, usually the cooling system and drives. All microcircuits installed on the motherboard receive power via ±5v, +3.3v buses.
The pinout of the computer power supply from early years of production is not fundamentally different from modern power supplies. Of course, the current generation of power supplies are equipped with connectors for modern components.
Peculiarities
It's no secret that modern power supplies (PSUs) have become more powerful, have improved characteristics and, of course, a modern design than their predecessors 10-15 years ago. Also, many of you know (or are learning now) that modern power supplies have new connectors for components not previously used in personal computers (PCs). The presence of new connectors is associated with the emergence of new (or modernization of old) computer components, improvements in their performance characteristics and, as a result, the need for additional power.
A modern power supply meets energy efficiency and efficiency certification standards that are used to distribute power and efficiently deliver power to computer components. Due to the “greater gluttony” in power supply of the same video cards and motherboards, the power supply contains additional wires, contacts and connectors.
PSU connectors
The power supply contains the main connectors (electrical connectors) previously used in old power supplies, supplying voltages of 3.3, 5 and 12 Volts. Each connector pin is one Pin.
The motherboard is connected to the power supply via a 24 Pin male connector (the so-called bus), which has undergone changes with the improvement of motherboards. Previous generations of motherboards were connected to the power supply via a 20 Pin bus.
Because of this, in order to support any type of connection to the motherboard, the connector is made in the form of a collapsible design with a 20 Pin main and 4 Pin additional power connector.
If the motherboard only needs 20 Pin, the 4 Pin connector is removed (pull down along the plastic rails) and bent to make it easy to install a 20-pin bus.
To power optical drives and other drives with a PATA (Parallel ATA) connection interface, molex 8981 connectors (named after the manufacturer's company) are used.
Now they have been replaced by the modern SATA (Serial ATA) connection interface for drives of all types.
The central processor requires power from a 4 or 8 Pin connector (can be detachable).
The video card needs 6 or 8 Pin power. The connector can be dismountable to 6+2 Pin
Some modern power supplies may contain an outdated 4 Pin connector for floppy drives, card readers, etc.
Also, 3 and 4 Pin connectors are used to connect coolers.
Marking for power supply wires
To prevent maintenance and repair of motherboards and power supplies from being a terrible pain, a uniform color coding standard is used. Each wire is assigned a color that is tied to the voltage applied to that wire. Letter marking is used only in technical documentation, where it is possible to compare a color with its letter value. For convenience, all pinout information for each connector is presented in tables.
Connector mat. boards
The ATX form factor has been the dominant standard for all desktop PCs since 2001. Based on this form factor, below I will give a table of the pinout of the contact (bus) of the PC power supply that connects to the motherboard.
| Motherboard connector | ||||
| No. Pin | Meaning | Color | No. Pin | Meaning |
| 1 | 3.3V | Orange | 13 | 3.3 V/ +3.3 V sense |
| 2 | 3.3V | Orange | 14 | -12 V |
| 3 | GND | Black | 15 | GND |
| 4 | +5 V | Red | 16 | Power ON/PC ON |
| 5 | GND | Black | 17 | GND |
| 6 | +5 V | Red | 18 | GND |
| 7 | GND | Black | 19 | GND |
| 8 | Power Good | Grey | 20 | -5 V |
| 9 | 5VSB (standby mode +5 V) | Violet | 21 | +5 V |
| 10 | +12 V | Yellow | 22 | +5 V |
| 11 | +12 V | Yellow | 23 | +5 V |
| 12 | 3.3V | Orange | 24 | GND |
GND - ground;
Contacts 8, 13, 16 - control signals;
Pin 13 has 2 wires at once, one of them is a tap. These two wires are of smaller gauge.
The table is universal and suitable for all ATX form factor motherboards.
Advice!
By shorting pins 15 and 16 or 16 and any black GND, you can start the power supply without connecting the motherboard.
Molex connectors
Outdated, but not lost to history, the 4 Pin PATA connector is a universal product. If the required connector is missing, then a molex + 4 Pin to 6 Pin adapter will allow you to record the video card. A molex + 4 Pin - 3 Pin adapter will allow you to connect another cooler in the system unit.
Why is it universal? Because the “demanded” voltage is used at the contacts.
The pinout of the molex connector is as follows.
| HDD IDE (ATA) hard drive power connector - Molex | ||
| No. Pin | Color | Meaning |
| 1 | Yellow | +12 V |
| 2 | Black | GND |
| 3 | Black | GND |
| 4 | Red | +5 V |
Also, using a molex connector, several devices, components, splitters, adapters can be connected to the power supply, but limited in quantity by the power of the power supply and the cooling system in the PC case. With the help of splitters, you can get from one to two or three molex connectors.
SATA connectors
SATA connections are primarily used in hard drives and optical drives for power and information transfer. Power is supplied to the 15 Pin connector pins using five wires. This is where the rumor came from that SATA is 5 Pin, although this is a wrong statement.
The pinout is presented in the table.
| SATA | ||
| No. Pin | Color | Meaning |
| 1 | Orange | +3.3 V |
| 2 | Orange | +3.3 V |
| 3 | Orange | +3.3 V |
| 4 | Black | GND |
| 5 | Black | GND |
| 6 | Black | GND |
| 7 | Red | +5 V |
| 8 | Red | +5 V |
| 9 | Red | +5 V |
| 10 | Black | GND |
| 11 | Black gray | GND - Signal |
| 12 | Black | GND |
| 13 | Yellow | +12 V |
| 14 | Yellow | +12 V |
| 15 | Yellow | +12 V |
The pinout indicated in the table refers to pre-installed SATA power connectors, because it has a gray signal wire and an orange one with a voltage of 3.3 V. This type of wire is necessary for the correct operation of RAID arrays (combining several physical disks into one logical element) and replacement hard drives “on hot” (with the machine turned on, to turn on - first the interface, then the power, to turn off - first the power, then the interface).
By the way, modern hard drives powered by a SATA connector can also be powered by 4 Pin PATA. Hard drives have voltage converters, so you can power the HDD without any problems using a PATA (molex in mind) - SATA adapter if there are no SATAs or the power supply has run out.
Graphics card connectors
Modern power supplies have 6 and 8 Pin connectors for connecting graphic cards. As mentioned earlier, 2 more contacts are needed for additional power supply to a powerful video card.
The video card receives power from the PCI-E bus, with a power of up to 75 Watts. If you have a gaming video card, ala GeForce GTX 1050 Ti, then it needs additional power (in this case, one 6 Pin connector is allocated).
6-pin connectors add 75 watts of power to video cards.
8 pins - 150 watts.
Graphic monsters in the gaming industry, design, rendering and mining can use 6 and 8 pin connectors at once, which will give a total of 300 Watts of power for one video card.
Here's a fact for you!
The GeForce GTX 1080 Ti video card uses two additional 8+8 Pin power connectors. You can calculate how much power is allocated for it yourself.
| 6 Pin PCI-E connector | ||
| No. Pin | Color | Meaning |
| 1 | Yellow | +12 V |
| 2 | Yellow | +12 V |
| 3 | Yellow | +12 V |
| 4 | Black | GND |
| 5 | Black | GND |
| 6 | Black | GND |
| 8 Pin PCI-E connector | ||
| No. Pin | Color | Meaning |
| 1 | Yellow | +12 V |
| 2 | Yellow | +12 V |
| 3 | Yellow | +12 V |
| 4 | Black | GND |
| 5 | Black | GND |
| 6 | Black | GND |
| 7 | Black | GND |
| 8 | Black | GND |
Such video cards require more powerful power supplies. You also need to take into account that when connecting several graphics cards on the same graphics chip via SLI (NVIDIA technology) or CrossFire (AMD technology), heat transfer increases, which must be regulated by additional cooling in the case. Additional power supply capacity will be required for cooling.
In some power supply models (may be indicated in the instructions or written on the packaging), the +12V supply lines may be separate.
Eight-pin connectors are also used to connect additional power to the central processor. However, 8 Pin for the video card and 8 Pin for the processor differ from each other in form factor and pinout, although they seem to be similar to each other.
Important!
If power for the graphics card is not supplied through the additional six or eight Pin connector (it is not connected or has stopped working), the video card may refuse to start on the computer or the PC itself may not start.
CPU connectors
For additional power supply to the central processing unit (CPU), there are 4 Pin and 8 Pin connectors. Which one to use depends on the power of the CPU (and on the connector, respectively). 4 Pin for the middle class, 8 for demanding ones.
These connectors may be present in power supplies:
- two at once;
- one of them;
- one collapsible eight-pin, consisting of two four-pin.
Increased power is mainly required for multi-core CPUs and for overclocking.
| CPU Connector 4 Pin | ||
| No. Pin | Color | Meaning |
| 1 | Black | GND |
| 2 | Black | GND |
| 3 | Yellow | +12 V |
| 4 | Yellow | +12 V |
| CPU Connector 8 Pin | ||
| No. Pin | Color | Meaning |
| 1 | Black | GND |
| 2 | Black | GND |
| 3 | Black | GND |
| 4 | Black | GND |
| 5 | Yellow | +12 V |
| 6 | Yellow | +12 V |
| 7 | Yellow | +12 V |
| 8 | Yellow | +12 V |
Other connectors
Other connectors mainly include the old 4 Pin floppy and 3-4 pin connectors for coolers.
The floppy connector is generally not included in the configuration of a modern power supply, but we will provide a table of its pinout. Just in case.
| FLOPPY 4 Pin | ||
| No. Pin | Color | Meaning |
| 1 | Red | +5 V |
| 2 | Black | GND |
| 3 | Black | GND |
| 4 | Yellow | +12 V |
3-4 Pin connectors are an undying classic. Cooling in powerful stationary PCs was, is, and will be. There can be quite a lot of space for a cooler in a PC case, so you can’t do without adapters.
Also, the motherboard must have at least one cooler power connector (CPU FAN), which usually powers the CPU cooler. In modern motherboards, there are usually about 4 such connectors.
Let's go through the pinout of cooler connectors in the power supply. There are 2 options for 4 Pin and one for 3 Pin.
| Cooler, option 1 - 4 Pin | ||
| No. Pin | Color | Meaning |
| 1 | Black | GND |
| 2 | Yellow | +12 V |
| 3 | Green | Tachometer signal |
| 4 | Blue | PWM (PWM) |
| Cooler, option 2 - 4 Pin | ||
| 1 | Black | GND |
| 2 | Red | +12 V |
| 3 | Yellow | Tachometer signal |
| 4 | Blue | PWM (PWM) |
| Cooler connector 3 Pin | ||
| 1 | Black | GND |
| 2 | Red | +12 V |
| 3 | Yellow | Tachometer signal |
There is also an old two-pin option (ground - power), but now this option has practically become obsolete.
Let's go through those indicated in the table. The 3 Pin connector supplies power and rotates at maximum speed, the yellow wire acts as a tachometer and displays information about the number of revolutions per minute.
The 4 Pin connector has the same properties as the 3 Pin plus 4 PWM wire, which allows you to programmatically control the number of revolutions of the connected cooler.
If you have a 4 Pin cooler, but a 3 Pin connector, you can safely connect. The cooler will work, you just won’t be able to control the number of revolutions.
Pinout of the main power cable connector
The pinout of a computer's power supply starts with the largest and most important power cable - this is the cable connected to the motherboard. On old-style motherboards, the ATX connector is designed for 20 pins, while new generation motherboards already contain 24 pins in their connector. It is for this reason that new generation power supplies have cables with a 20+4 pin plug.
When pinouting a computer's power supply, it is important to know that the ATX plug is only suitable for powering the motherboard. This can be checked by looking closely at the contacts in the plug and connector - each of them is unique and suitable for only one purpose.
Computer power supply pinout under load
To check the functionality of the power supply, you can connect it without affecting the system as a whole. This is done so that in the event of a defective power supply, all components of the computer are not damaged. To start the power supply for the first time, you need to close contacts 6 and 7. If everything is done correctly, the power supply should signal an operation in the form of a spinning fan.
Note: Pin counts do not include the additional four pins for the ATX connector.
Description Molex
One of the most popular in desktop computing equipment is the 4-pin power connector for all PATA hard drives and optical drives, entry-level SCSI drives, various peripherals and case fans larger than 50 mm. There is an equivalent manufactured by AMP (now part of Tyco Electronics) and designated AMP Commercial MATE-N-LOK 2.13 mm pin connector.
The connector uses a MOLEX 8981-04P (or equivalent) plug with AMP 61314-1 (or equivalent) contacts. The 18 AWG wire has three colors of insulation (yellow - +12 volts, red - +5 volts, black - ground).
The plastic connector, 21 millimeters wide and 6 millimeters high, has clear edges on the top side, which serve as a kind of “key” that prevents the connector from being misoriented when connected.
The connector does not have additional latches; fixation is carried out only due to the friction of the plug and socket contacts and their bodies - as a result, a new connector can be difficult to connect, and over time, under the influence of vibration, the connector gradually becomes loose and requires the insertion of a seal or periodic tightening. In addition, the disadvantages of the connector include a design feature - insufficiently rigid fixation of the contacts in the housing of both the plug and the socket, and as a result, in the case of insufficiently high-quality manufacturing, their mismatch in a row makes installation difficult.
Source
Power pinout for SATA
To update the IDE interface, a new SATA cable was introduced, which contained 15 pins. A total of five wires are connected to the plug, each of which occupies three contacts. The first three orange contacts operate with a voltage of 3.3 volts. The second three are COM contacts, that is, “ground”. The middle pins have an input voltage of 5 volts. The fourth triple is identical to the second. The last three contacts are already with a voltage of 12 volts.
Older versions of this cable had four wires of three pins, but with the interface update, support for 3.3 volt input voltage was added, which is indicated by the orange wire.
15-pin SATA power connector pinout
A pinout is an interface map that describes the pins that connect an electrical device or connector.
Below is a diagram of the layout of a standard 15-pin SATA power connector for version 2.2 of the ATX specification. If you use this pin chart to test power supply voltages, keep in mind that these voltages must be within ATX tolerances.
15-Pin SATA Connector Reference
| Pin | Name | Wire color | Description |
| 1 | +3.3VDC | Orange | +3.3 VDC |
| 2 | +3.3VDC | Orange | +3.3 VDC |
| 3 | +3.3VDC | Orange | +3.3 VDC |
| 4 | COM | Black | Earth |
| 5 | COM | Black | Earth |
| 6 | COM | Black | Earth |
| 7 | +5VDC | Red | +5 VDC |
| 8 | +5VDC | Red | +5 VDC |
| 9 | +5VDC | Red | +5 VDC |
| 10 | COM | Black | Earth |
| 11 | COM | Black | Land (Additional or other use) |
| 12 | COM | Black | Earth |
| 13 | +12VDC | Yellow | +12 VDC |
| 14 | +12VDC | Yellow | +12 VDC |
| 15 | +12VDC | Yellow | +12 VDC |
There are two less common SATA power connectors: a 6-pin connector called the slim connector (+5 VDC power supply) and a 9-pin connector called the micro connector (+3.3 VDC and +5 VDC power supply). current). The pinout tables for these connectors are different from those shown here.
What is a power supply and how does it work?
Standard power supplies operate from 220V, and may also have a mechanical input voltage switch of 110V or 220V AC (alternating current). The computer power supply is designed to convert alternating voltage 220 volts DC into direct current +12 volts, +5 volts, +3.3 volts, then the direct current is used to power the computer components. 3.3 and 5 volts are commonly used in digital circuits, while 12 volts is used to run drive motors and fans.
PCI-E
It is this connector that is designed to power video cards; power supply manufacturers often make them red (and some blue) in color; there are 6-pin and 8-pin. In modern power supplies, the 8-pin can be composite, just like the connectors described earlier.
The PCI-E connector is the most popular in mining. Its purpose is to provide additional power to devices (video cards, in our case) connected to the PCI-Express bus of the motherboard. According to the specifications, the 6-pin provides 75 watts of additional power, and the 8-pin provides 150 watts. At the same time, the video card receives another 75 watts from the motherboard (or from the riser).
The video card may have several connectors for additional power. For example, you can take the NVIDIA GeForce GTX 980 Ti video card; its maximum power consumption, according to the manufacturers, is 250 Watts. Of this, the device receives 75 Watts from the motherboard, and connectors for at least 175 Watts are required. One 6-pin is not enough (up to 75 Watt), one 8-pin or two 6-pin (up to 150 Watt) is also not enough. Requires one 6-pin and one 8-pin (total 225 watts). Look at the picture below - that’s right, everything is correct.
Molex Mini-fit Jr
Another popular connector that is used to supply power to PCI Express motherboards that consume 75 watts. There are modifications for 20 and 24 pins.
Other Molex connectors used in PCs:
I also advise you to read the article “MemOK button - what is it for on the motherboard and how to use it?” I would be grateful to everyone who shares this publication on social networks. See you soon!
Source
Molex
Initially, this connector was designed to power hard drives and floppy drives, but currently for modern devices this function is performed by SATA connectors (about them below), and Molex connectors are used to power various additional equipment.
The advantage of Molex is the presence of 5 and 12 Volt lines at the same time, and a current of up to 11 Amps can flow through each line, that is, the power of a 12-Volt line is 132 Watts, and a 5-Volt line is 55 Watts. You can often find information on the Internet that Molex provides 187 watts of power. This is true, but the additional power connector for video cards has only 12 Volt lines, and the 5 Volt line is not used. In mining rigs, Molex connectors are used to connect risers, cooling fans, additional power to the motherboard, and as a replacement for missing PCI-E connectors.
Many adapters have been invented using Molex. And some of them pose a real fire hazard!
The top most fire-hazardous adapters are headed by the MOLEX->8-pin PCI-E adapter. The power consumption of the video card via the 8-pin connector, as I noted above, is up to 150 Watts. Molex is rated at 132 watts.
Molex->6-pin PCI-E and 2xMolex->8-pin PCI-E adapters should be used with caution. There is no excess in power here, but you shouldn’t relax. Adapter manufacturers often use low-quality materials - thin wires, cheap plastic, unreliable metal parts. This may also cause a fire. After installing such connectors, regularly monitor their condition.
The safest option is 2xMOLEX->6-pin PCI-E adapters. A good power reserve allows you to avoid fire due to overheating, but there is still a danger of problems arising due to poor contact, as a result of which this adapter will actually turn into a 1xMolex->6-pin PCI-E, and this is the first step to big problems.
It is advisable to avoid using Molex adapters to connect video cards. However, it is relatively safe to use Molex connectors to power risers (let me remind you, their consumption is no more than 75 Watt), including using adapters.
Molex pinout
- Conclusion
- Color
- Purpose
| 1 | Yellow | +12 volts |
| 2 | Black | Ground One black wire serves as ground for +5 volt power, the second for +12 volt power. |
| 3 | Black | Earth |
| 4 | Red | +5 volts |
Molex connectors
This type of 4 pin PATA connectors (Molex 8981) is the most common and universal. If the required connector is missing, using a Molex 8981 connector and a special adapter (for example, 4 pin —> 6 pin) you can supply power to the video card, or using another adapter (for example, 4 pin —> 3 pin) you can connect an additional fan.
The versatility of the connector is explained by the presence of the most “demanded” voltages on the contacts, the pinout of which looks like this:
- Yellow – +12V;
- Black – GND;
- Black – GND;
- Red – +5V.
Using the Molex 8981 connector, several different devices, adapters, adapters and splitters can be connected to the power supply, the number of which is limited by the power of the power supply and the cooling system inside the case. The splitters allow you to get two or three (tee) connectors from one Molex 8981 connector at once. Adapters are designed to replace the missing connector on the power supply by connecting to the Molex 8981 connector.
It will be interesting➡ How to make a pass-through switch out of an ordinary switch with your own hands
SATA connectors
Most modern storage devices, including hard drives and optical drives, use the SATA interface for both power supply and information transfer. Power via SATA is supplied through a 15-pin connector, to which 5 wires are connected, which is why the connector is called a 5-pin connector. But this definition is incorrect.
The connector pinout looks like this:
- Orange – +3.3V;
- Orange – +3.3V;
- Orange – +3.3V;
- Black – GND;
- Black – GND;
- Black – GND;
- Red – +5V;
- Red – +5V;
- Red – +5V;
- Black – GND;
- Gray – signal;
- Black – GND;
- Yellow – +12V;
- Yellow – +12V;
- Yellow – +12V;
This pinout is correct for the supplied SATA power connectors, since there is a gray signal wire and an orange one with a voltage of + 3.3V. The presence of these wires is required for correct operation in RAID arrays and for hot-swapping hard drives.
Different types of connectors.
Modern storage media powered by a SATA connector can also operate on four wires, like 4 pin PATA connectors. The devices have built-in voltage converters that help you use a PATA (Molex 8981) -> SATA power adapter to work with the drive, in the absence of a pre-installed SATA connector.
Computer power supply pinout
Connectors for video cards
Standard and higher-level power supplies use 6 and 8 pin connectors, or both may be present at once, for additional power supply to video cards. Modern video cards are designed to be installed in the PCI-E slot of the motherboard. Budget and entry-level video cards do not require additional power, but receive it from the PCI-E bus up to a maximum power consumption of 75 watts.
Gaming and professional video cards, possibly several cards connected using CrossFireX or SLI technology, depending on the “filling”, require increased power and power supply.
If the video card has average power consumption requirements, then an additional 6 or 8 pin connector is installed on it. The 6-pin connector adds 75 watts of power, and the 8-pin connector adds 150 watts. On very powerful video cards, two connectors can be used at once, and the total power consumed will be 300 watts. The pinout for these connectors looks like this:
- 8 pins: 1-2-3 – yellow +12V, 4-5-6-7-8 4 – black GND.
- 6 pins: 1-2-3 – yellow 12V, 4-5-6 – black GND.
Such components require increased power from the power supply, and it should also be taken into account that when operating in CrossFireX or SLI modes, increased heat dissipation will occur, and accordingly additional cooling power will be required. Depending on the model of the power supply, the lines for supplying +12V voltage may be separate, as written on the power supply casing or in its technical data sheet. 8 pin connectors are intended not only for powering video cards, but also for additional power supply to the processor.
Video card connectors.
It is worth noting that the connectors themselves are very similar in appearance and at first glance seem the same. In fact, the connectors have different pinouts and form factors; you should not try to insert the processor power connector into the video card connector or vice versa. If the video card requires additional power, but for some reason it is not connected or not supplied, then the card itself and the computer as a whole may fail to start.
Pinout
PSUs, regardless of power, are equipped with connectors for connecting to the chipset, HDD/SSD disk devices, video adapter, Molex, etc. I propose to consider each connection type separately so as not to get confused.
Motherboard
The main connector used here is 20-pin, the color designation of wires of which is generally accepted throughout the world. And if you look at the documentation for the chipset, you can find a letter designation there that makes it easier to understand the situation. Please note that the abbreviation GND (Ground) is “ground”, grounding. And the eighth, thirteenth and sixteenth pins are responsible for sending control signals. If you close contacts No. 16 and No. 15, the power supply will start even without connecting to the computer.
Motherboard connectors.
Computer Power Supply - Molex Wiring Diagram
It is a 4-pin connector, which is used to provide power to the graphics adapter, coolers and other devices. Two of the four wires supply 12/5 Volt DC power, and the pinout diagram looks like this:
It will be interesting➡ How to check the serviceability of a triac
Power for drives
Modern hard and solid-state drives, as well as optical drives, are connected to the power supply via a 15-pin connector, to which five wires of different colors are connected. In some devices, a different SATA connection scheme is possible - “4+1”, where instead of five wires there are four + one separate one for power.
Interesting on the topic: How to check a zener diode.
Color pinout for video cards
Budget video adapter models can be powered by the chipset, but if you have powerful equipment with additional cooling and a large amount of memory, you will need to connect wires directly from the power supply. Nowadays both 8-pin and 6-pin connectors are actively used:
CPU power
If your computer is highly equipped, then its needs correspond. In some cases, it is necessary to provide additional make-up for the process handler and the cooling system.
PC processor connection.
The most commonly used connectors are:
- 8-pin – all black wires are GND, and all yellow wires are 12 Volts;
- 4-pin – similar to the previous scheme.
But for coolers, so-called 3- or 4-pin FAN connectors are used:
- 4-pin: black – “ground”, green – signal for the tachometer, yellow – current 12 Volts, blue – PWM (PWM) – ability to control the rotation speed of the cooling fan;
- 4-pin: an alternative pinout is distinguished by the presence of a red wire - 12 Volts, and instead of green, a yellow wire is used - tachometer;
- 3-pin: GND grounding – black, power – red wire, yellow cable – tachometer. There is no cooler control.
So we figured out the issue of “pinout of wires in a computer power supply.” If you have questions about more modern models, leave messages under the article in the comment section.
How a modern computer power supply works - the pinout of wires is of interest to many users who want to understand the principle of operation of one of the most important hardware components of a desktop PC. Modular power supplies are becoming increasingly popular, where it is possible to disconnect unused elements, which will allow you to remove unnecessary cables. But in this publication I will talk about the wiring diagram of a conventional power supply installed in the vast majority of computers.
PC processor connection.
Pinout
PSUs, regardless of power, are equipped with connectors for connecting to the chipset, HDD/SSD disk devices, video adapter, Molex, etc. I propose to consider each connection type separately so as not to get confused.
Motherboard
The main connector used here is 20-pin, the color designation of wires of which is generally accepted throughout the world. And if you look at the documentation for the chipset, you can find a letter designation there that makes it easier to understand the situation.
Please note that the abbreviation GND (Ground) is “ground”, grounding. And the eighth, thirteenth and sixteenth pins are responsible for sending control signals. If you close contacts No. 16 and No. 15, the power supply will start even without connecting to the computer.
ATX P4
A 4-pin processor power connector and a 6-pin additional power connector for PCIe
ATX P4 graphics cards were introduced by Intel for the Pentium 4 processor. It connects to the motherboard and powers the processor.
Today, most motherboards have between 4 and 8 pins. The new power supply standards use an 8-pin connector (sometimes called 12V EPS) made up of 2 x 4-pin blocks, ensuring compatibility with older motherboards and the classic ATX P4.
Molex connectors
Molex PC peripheral power connector is an electrical connector designed and manufactured by . The connectors have been actively promoted by the manufacturer since the 50s of the last century and found a place in the first computers.
Connectors of this type meet the accepted standard for constructing electrical circuits: the plug has an outer shell, the socket is inserted inside the connector. For the first time, the Molex connector was used to supply power to a floppy drive manufactured by Shugart.
The number of contacts can be from 2 to 24. There are also 3 contact diameters: 1.57 mm transmits current up to 5 A, 2.36 mm no more than 8.5 A, 2.13 to 8 A. The connector body usually has a flat shape and made of nylon.
ATX 20, 20+4, 24
Main 24-pin power connector and 20+4 pin power connector
If the video cards do not have enough power received through the PCI-Express connector, then use an additional 6-pin cable from the power supply. The additional power connector for PCI-Express video cards is similar to the additional power connector for the processor.
ATX 20 pin pinout
Conclusion- Name
- Description
- Color
| 1 | +3.3v | +3.3v | Orange |
| 2 | +3.3v | +3.3v | Orange |
| 3 | GND | (Housing, Common wire) | Black |
| 4 | +5v | +5v | Red |
| 5 | GND | (Housing, Common wire) | Black |
| 6 | +5v | +5v | Red |
| 7 | GND | (Housing, Common wire) | Black |
| 8 | PowerGood | Power supply ready signal | Grey |
| 9 | +5v Standby | +5v, Make-up in Standby mode | Lilac (Purple) |
| 10 | +12v | +12v | Yellow |
| 11 | +3.3v | +3.3v | Orange |
| 12 | -12v | -12v | Blue |
| 13 | GND | (Housing, Common wire) | Black |
| 14 | Power ON | Starting the power supply. | Green |
| 15 | GND | (Housing, Common wire) | Black |
| 16 | GND | (Housing, Common wire) | Black |
| 17 | GND | (Housing, Common wire) | Black |
| 18 | -5v | -5v | White |
| 19 | +5v | +5v | Red |
| 20 | +5v | +5v | Red |
style="width: 100%; color: black; height: 1px; background-color:gray;">
Game port pin assignments
| № | Signal |
| 1 | +5V |
| 2 | Button 4 |
| 3 | Position 0 |
| 4 | Frame |
| 5 | Frame |
| 6 | Position 1 |
| 7 | Button 5 |
| 8 | +5V |
| 9 | +5V |
| 10 | Button 6 |
| 11 | Position 2 |
| 12 | Frame |
| 13 | Position 3 |
| 14 | Button 7 |
| 15 | +5V |
FLOPPY
The FLOPPY connector, used to power a floppy disk drive (FMD), is also obsolete, but unlike Molex, it is practically not used. Therefore, as a rule, new power supplies do not have it. Nevertheless, we present its pinout.
| FLOPPY connector pin assignments | ||
| Contact | Signal | Wire color |
| 1 | +5 V | red |
| 2 | general | black |
| 3 | general | black |
| 4 | +12 V | yellow |
Since float drives are still used on outdated computer models, as noted above, there are MOLEX/FLOPPY adapters that can be purchased in addition, or even found in the box with a new power supply.
So we figured out what connectors are equipped with ATX power supplies, and we also know the pinout of each of them. Now we can independently select a suitable power supply, and, if necessary, we can find the voltages that interest us on its connectors.
Motherboard expansion slots
(not really about cables, but useful)
8 bit slot
| Installation side | Solder side | ||||
| № | Signal | Meaning | № | Signal | Meaning |
| A1 | I/O CH CK | I/O channel monitoring | B1 | GND | Earth |
| A2 | D7 | Data line 8 | B2 | RES DRV | Reset signal |
| A3 | D6 | Data line 7 | B3 | +5V | +5V |
| A4 | D5 | Data line 6 | B4 | IRQ2 | Interrupt request 2 |
| A5 | D4 | Data line 5 | B5 | -5V | -5V |
| A6 | D3 | Data line 4 | B6 | DRQ2 | DMA request 2 |
| A7 | D2 | Data line 3 | B7 | -12V | -12V |
| A8 | D1 | Data line 2 | B8 | RES | Reserved |
| A9 | D0 | Data line 1 | B9 | +12V | +12V |
| A10 | I/O CN RDY | I/O channel readiness monitoring | B10 | GND | Earth |
| A11 | AEN | Address Enable, bus control with CPU and DMA controller | B11 | MEMW | Data is written to memory |
| A12 | A19 | Address line 20 | B12 | MEMR | Data is read from memory |
| A13 | A18 | Address line 19 | B13 | IOW | Data is written to the I/O port |
| A14 | A17 | Address line 18 | B14 | IOR | Data is read from the I/O port |
| A15 | A16 | Address line 17 | B15 | DACK3 | DMA-Acknowledge 3 |
| A16 | A15 | Address line 16 | B16 | DRQ3 | DMA 3 request |
| A17 | A14 | Address line 15 | B17 | DACK1 | DMA-Acknowledge 1 |
| A18 | A13 | Address line 14 | B18 | IRQ1 | Interrupt request 1 |
| A19 | A12 | Address line 13 | B19 | REFRESH | Memory regeneration |
| A20 | A11 | Address line 12 | B20 | CLC | System clock 4.77 MHz |
| A21 | A10 | Address line 11 | B21 | IRQ7 | Interrupt request 7 |
| A22 | A9 | Address line 10 | B22 | IRQ6 | Interrupt request 6 |
| A23 | A8 | Address line 9 | B23 | IRQ5 | Interrupt Request 5 |
| A24 | A7 | Address line 8 | B24 | IRQ4 | Interrupt request 4 |
| A25 | A6 | Address line 7 | B25 | IRQ3 | Interrupt request 3 |
| A26 | A5 | Address Line 6 | B26 | DACK2 | DMA-Acknowledge 2 |
| A27 | A4 | Address line 5 | B27 | T/C | Terminal Count, signals the end of DMA transformation |
| A28 | A3 | Address line 4 | B28 | ALE | Adress Latch Enabled, address/data uncoupling |
| A29 | A2 | Address line 3 | B29 | +5V | +5V |
| A30 | A1 | Address line 2 | B30 | O.S.C. | Clock frequency 14.31818 MHz |
| A31 | A0 | Address line 1 | B31 | GND | Earth |
16 bit slot
| Installation side | Solder side | ||||
| № | Signal | Meaning | № | Signal | Meaning |
| A1 | I/O CH CK | I/O channel monitoring | B1 | GND | Earth |
| A2 | D7 | Data line 8 | B2 | RES DRV | Reset signal |
| A3 | D6 | Data line 7 | B3 | +5V | +5V |
| A4 | D5 | Data line 6 | B4 | IRQ9 | Cascading the second interrupt controller |
| A5 | D4 | Data line 5 | B5 | -5V | -5V |
| A6 | D3 | Data line 4 | B6 | DRQ2 | DMA request 2 |
| A7 | D2 | Data line 3 | B7 | -12V | -12V |
| A8 | D1 | Data line 2 | B8 | RES | Memory communication without latency |
| A9 | D0 | Data line 1 | B9 | +12V | +12V |
| A10 | I/O CN RDY | I/O channel readiness monitoring | B10 | GND | Earth |
| A11 | AEN | Address Enable, bus control with CPU and DMA controller | B11 | SMEMW | Data is written to memory (up to 1M byte) |
| A12 | A19 | Address line 20 | B12 | SMEMR | Data is read from memory (up to 1 MB) |
| A13 | A18 | Address line 19 | B13 | IOW | Data is written to the I/O port |
| A14 | A17 | Address line 18 | B14 | IOR | Data is read from the I/O port |
| A15 | A16 | Address line 17 | B15 | DACK3 | DMA-Acknowledge 3 |
| A16 | A15 | Address line 16 | B16 | DR Q3 | DMA 3 request |
| A17 | A14 | Address line 15 | B17 | DACK1 | DMA-Acknowledge 1 |
| A18 | A13 | Address line 14 | B18 | IRQ1 | Request IRQ 1 |
| A19 | A12 | Address line 13 | B19 | REFRESH | Memory regeneration |
| A20 | A11 | Address line 12 | B20 | CLC | System clock 4.77 MHz |
| A21 | A10 | Address line 11 | B21 | IRQ7 | IRQ 7 request |
| A22 | A9 | Address line 10 | B22 | IRQ6 | IRQ 6 request |
| A23 | A8 | Address line 9 | B23 | IRQ5 | Request IRQ 5 |
| A24 | A7 | Address line 8 | B24 | IRQ4 | IRQ 4 request |
| A25 | A6 | Address line 7 | B25 | IRQ3 | IRQ 3 request |
| A26 | A5 | Address Line 6 | B26 | DACK2 | DMA-Acknowledge 2 |
| A27 | A4 | Address line 5 | B27 | T/C | Terminal Count, signals the end of DMA transformation |
| A28 | A3 | Address line 4 | B28 | ALE | Adress Latch Enabled, address/data uncoupling |
| A29 | A2 | Address line 3 | B29 | +5V | +5V |
| A30 | A1 | Address line 2 | B30 | O.S.C. | Oscillator clock 14.31818 MHz |
| A31 | A0 | Address line 1 | B31 | GND | Earth |
| C1 | SBHE | System Bus High Enabled, 16-bit data signal | D1 | MEMCS 16 | Memory Chip Select |
| C2 | LA23 | Address line 24 | D2 | I/O CS 16 | I/O card with 8 bit/16 bit carryover |
| C3 | LA22 | Address line 23 | D3 | IRQ10 | Interrupt request 10 |
| C4 | LA21 | Address line 22 | D4 | IRQ11 | Interrupt request 11 |
| C5 | LA20 | Address line 21 | D5 | IRQ12 | Interrupt request 12 |
| C6 | LA19 | Address line 20 | D6 | IRQ15 | Interrupt request 15 |
| C7 | LA18 | Address line 19 | D7 | IRQ14 | Interrupt request 14 |
| C8 | LA17 | Address line 18 | D8 | DACK0 | DMA-Acknowledge 0 |
| C9 | MEMR | Reading data from memory | D9 | DRQ0 | DMA request 0 |
| C10 | MEMW | Writing data to memory | D10 | DACK5 | DMA-Acknowledge 5 |
| C11 | SD8 | Data line 9 | D11 | DRQ5 | DMA 5 request |
| C12 | SD9 | Data line 10 | D12 | DACK6 | DMA-Acknowledge 6 |
| C13 | SD10 | Data line 11 | D13 | DRQ6 | DMA 6 request |
| C14 | SD11 | Data line 12 | D14 | DACK7 | DMA-Acknowledge 7 |
| C15 | SD12 | Data line 13 | D15 | DRQ7 | DMA 7 request |
| C16 | SD13 | Data line 14 | D16 | +5V | +5V |
| C17 | SD14 | Data line 15 | D17 | MASTER | Busmaster signal |
| C18 | SD15 | Data line 16 | D18 | GND | Earth |
About the cross-section of wires coming out of the computer power supply
Although the currents that the power supply can supply to the load amount to tens of amperes, the cross-section of the output conductors, as a rule, is only 0.5 mm2, which allows current transmission through one conductor of up to 3 A. You can find out more about the load capacity of the wires from the article “On choosing a wire cross-section for electrical wiring.” However, all wires of the same color are soldered to one point on the printed circuit board, and if a block or module in a computer consumes more than 3 A of current, voltage is supplied through the connector along several wires connected in parallel. For example, voltage +3.3 V and +5 V is supplied to the motherboard via four wires. This ensures that up to 12 A of current is supplied to the motherboard.
- Color marking of PSU ATX
- ATX power supply repair
- BP ATX load block
Molex connector
Let's start with the most ancient connector, which has reached our times almost unchanged, having appeared on the first “personal devices”. This is the well-known 4-pin connector called Molex.
Today, the scope of application of this connector has narrowed to powering case fans, front panels of PC cases, splitters and power adapters for video cards and drives. For example, video card power adapters “Molex - PCI-E 6 pin”. Despite the fact that the connector produces up to 11 A per contact, which means it can give the video card, in theory, 132 watts of power, it should be used with extreme caution.
It must be taken into account that the thickness of the wires may not correspond to such power, and the contacts themselves may be loose, with a loose fit. As a result, this is fraught with heating of wires, contacts and melting of insulation.
If you absolutely need such an adapter, choose a model with two Molex connectors.
Be sure to check the quality of the adapter contacts and insert it securely until it stops. To protect against incorrect connection, the connector has two bevels.
Attention! Despite the fact that the bevels do not allow you to insert the connector on the other side, with a certain force and loose sockets there is a possibility of inserting a connector turned 180 degrees, which will lead to equipment failure.
Installing an additional video card connector in the computer's power supply
Sometimes there are seemingly hopeless situations. For example, you bought a modern video card and decided to install it in your computer. There is the necessary slot on the motherboard for installing a video card, but there is no suitable connector on the wires for additional power supply to the video card coming from the power supply. You can buy an adapter, replace the entire power supply, or you can independently install an additional connector on the power supply to power the video card. This is a simple task, the main thing is to have a suitable connector, it can be taken from a faulty power supply.
First you need to prepare the wires coming from the connectors for the offset connection, as shown in the photo. An additional connector for powering the video card can be connected to the wires going, for example, from the power supply to drive A. You can also connect to any other wires of the desired color, but in such a way that there is enough length to connect the video card, and preferably nothing to them was no longer connected. The black wires (common) of the additional connector for powering the video card are connected to the black wire, and the yellow wires (+12 V), respectively, to the yellow wire.
The wires coming from the additional connector for powering the video card are tightly wrapped with at least three turns around the wire to which they are connected. If possible, it is better to solder the connections with a soldering iron. But even without soldering, in this case the contact will be quite reliable.
The work of installing an additional connector for powering the video card is completed by isolating the connection point, several turns, and you can connect the video card to the power supply. Due to the fact that the twisting points are located at a distance from each other, there is no need to isolate each twist separately. It is enough to cover only the area where the wires are exposed with insulation.
Molex 8981
A common connector of this type, used in AT and ATX computers, is the four-pin Molex 8981 4 pin for PATA hard drives and optical drives, case fans and other peripheral devices (shown in the picture above).
It uses a 4-pin plug and a wire with three-color insulation. Pinout:
The connector is 21 mm wide. It has clear edges on the top edge, forming a kind of key. It is physically impossible to insert the plug incorrectly.
There are no additional latches - the plug is fixed in the socket due to the frictional force of the mating parts. Because of this, the new connector may be difficult to connect.
Over time, due to vibrations, the components may become loose, so a sealing gasket will be required (this has happened before, but now you are unlikely to encounter this).
What to look for when choosing
At the beginning of our article, we said that most power supplies have the value of their maximum power in their name. In simple terms, electrical power is voltage times current (for example, 12 volts x 20 amps = 240 watts). Although this statement is not entirely technically accurate, for our purposes it is satisfactory.
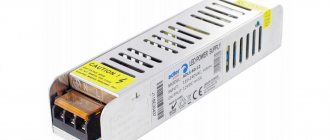
Like most models, our power supply has a nameplate that contains basic information about how much power each voltage line can provide.
Photo source nix.ru
Here we see that the total maximum power of all +12 V lines is 624 W. Adding all the other powers, we end up with 760 W, not 650. What's wrong with that? The simple fact is that the +5 V lines (except for the standby line) and +3.3 V are created through the VRM using one of the +12 V lines.
And of course, all output voltages come from one source: the wall outlet. Thus, a power of 650 W is the maximum that the power supply can provide overall across all lines. That is, if you have a load of 600 W on the +12 V lines, then you have only 50 W left on all other lines. Fortunately, most equipment takes most of its power from 12V lines anyway, so the problem of an incorrectly selected power supply is rare.
To the right of the table with power specifications, there is an “80 Plus Bronze” icon on the nameplate. This is the efficiency rating used by the industry to meet requirements for power supply manufacturers. Efficiency also reflects the amount of total load the power supply can handle.
20%, 50% and 100% – percentage of load in relation to maximum power for standard systems
If our Cooler Master is loaded at exactly half of its maximum power, that is, 325 W, then its expected efficiency will be in the range of 80-85% depending on the network voltage (115/230 V).
This means the actual load of the power supply on the network is from 382 to 406 W. A higher 80 PLUS rating doesn't mean the power supply will give you more power, it's just more energy efficient - it wastes less power in all stages of filtering, rectification and conversion.
Also note that maximum efficiency is achieved between 50 and 100% load. Some manufacturers provide graphs showing what efficiency can be expected from their device at various loads and line voltages.
Official image from Cooler Master.
Efficiency graph for the Cooler Master V1300 Platinum power supply. The vertical scale is efficiency (efficiency), the horizontal scale is % of load relative to maximum power.
Sometimes it is useful to pay attention to this information, especially if you are going to fork out for a kilowatt power supply. If your computer draws close to this power limit, the efficiency of the power supply will be slightly reduced.
You may come across some “single-channel” and “multi-channel” (or combined - equipped with a switch) power supplies. The term "channel" in this case is simply another word for the specific voltage output by the PSU. Our Cooler Master has one 12V channel and various power connectors providing +12V line from this channel. A multi-channel power supply has two or more systems providing 12 volt lines, however there is a big difference in how this is implemented.
Multi-channel power supplies are widely used for servers or data centers for fault tolerance purposes - if one of the channels fails, the system’s functionality will not be affected. For regular computers, multi-channel PSUs may also be offered, but most likely you will encounter pseudo-multi-channel, when the manufacturer simply splits a single channel into two or three supposedly independent channels. For example, our test subject produces up to 52 amps along the +12V line, which is equivalent to 624 W of electricity. A cheap “multi-channel” version of such a power supply will supposedly have two +12 V channels in the specification, but in reality these are only two half-channels, each of which will provide only 26 A (or 312 W).
A good desktop power supply that uses quality components doesn't require multi-channel +12V at all, so don't worry about it!
Refinement of the power supply connector for connecting the motherboard
When the motherboard fails or a computer is modernized (upgraded) and involves replacing the motherboard, I have repeatedly had to deal with the lack of a 24-pin power supply connector on the power supply.
The existing 20-pin connector fit well into the motherboard, but the computer could not work with this connection. A special adapter or replacement of the power supply was required, which was an expensive pleasure.
But you can save money if you do a little work yourself. The power supply, as a rule, has many unused connectors, among them there may be four, six or eight pins. The four-pin connector, as in the photo above, fits perfectly into the mating connector on the motherboard, which was left unoccupied when installing the 20-pin connector.
Please note that both in the connector coming from the computer's power supply and in the mating part on the motherboard, each contact has its own key, which prevents incorrect connection. Some contact insulators have a shape with right angles, while others have cut corners. You need to orient the connector so that it fits. If you can’t find the position, then cut off the interfering corner.
Separately, both the 20-pin and 4-pin connectors fit well, but they don’t fit together and interfere with each other. But if you grind down the contacting sides of both connectors a little with a file or sandpaper, they will fit in well.
After adjusting the connector housings, you can begin connecting the wires of the 4-pin connector to the wires of the 20-pin connector. The colors of the wires of the additional 4-pin connector are different from the standard one, so you do not need to pay attention to them and connect them as shown in the photo.
Be extremely careful, mistakes are unacceptable, the motherboard will burn out! Near left, pin No. 23, black in the photo, connects to the red wire (+5 V). Near right No. 24, yellow in the photo, is connected to the black wire (GND). The far left, pin No. 11, black in the photo, connects to the yellow wire (+12 V). The far right, pin No. 12, yellow in the photo, is connected to the orange wire (+3.3 V).
All that remains is to cover the connection points with a few turns of insulating tape and the new connector will be ready for use.
In order not to think about how to correctly install the assembly connector into the motherboard connector, you should apply a mark using a marker.
How the computer's power supply is supplied with power from the mains
In order for constant voltages to appear on the colored wires of the power supply, supply voltage must be applied to its input. To do this, there is a three-pin connector on the wall where the cooler is usually installed. In the photo this connector is at the top right. It has three pins. The outer ones are supplied with supply voltage using a power cord, and the middle one is grounding, and when connected through the power cord, it is connected to the grounding contact of the electrical outlet. Below on some power supplies, for example this one, there is a power switch.
In old houses, the electrical wiring is made without a grounding loop; in this case, the grounding conductor of the computer remains unconnected. Experience in operating computers has shown that if the grounding conductor is not connected, this does not affect the operation of the computer as a whole.
The power cord for connecting the Power Supply to the mains is a three-core cable, at one end of which there is a three-pin connector for connecting directly to the Power Supply. At the second end of the cable there is a C6 plug with round pins with a diameter of 4.8 mm with a grounding contact in the form of metal strips on the sides of its body.
If you open the plastic sheath of the cable, you can see three colored wires. Yellow - green
– is grounding, and along brown and blue (may be of a different color), a supply voltage of 220V is supplied.
Yellow - green
the wire in the C6 plug is connected to the grounding side strips. So if you have to replace the plug, don't forget about it. You can learn everything about electrical plugs and the rules for connecting them from the website article “Electric Plug”.
Additional power connectors for video cards
At the beginning of the 2000s, the power consumption of video cards increased sharply, which required special power connectors for them, adopted in the ATX12V 2.x specifications.
The PCI Express x16 Graphics 150W-ATX Specification 1.0 was adopted by the PCI-SIG working group in 2004. She introduced a 6-pin connector that can provide 75 W of power to the video card. And another 75 W are taken from the PCI-E x16 slot. The resulting total of 150 watts is sufficient to power mid-level video cards, for example, GeForce GTX 1650 SUPER .
But these power options quickly became insufficient and soon the PCI Express 2.0 specification was adopted, which already provided an 8-pin power connector for video cards. The 8-pin power connector made it possible to transmit 150 W of power and, together with 75 W coming from the PCI-E x16 slot, the result was 225 W, which was already enough for high-performance video cards.
Video card manufacturers usually try to unload power on the PCI-E x16 slot and provide power reserves for overclocking, so video cards with a consumption of 120 watts and higher, for example, GeForce GTX 1660 SUPER , are increasingly equipped with an eight-pin power connector.
The design of the connectors allows the connection of a 6-pin power cable to an 8-pin connector. But, most likely, you will need a special adapter, because in this case the video card will recognize by the signal contacts which cable is connected to the power connector.
The 8-pin connector is usually made collapsible, which allows it to be connected to a 6-pin socket.
It is impossible to insert connectors of this type incorrectly: the bevels on the pins are located in a strictly defined order. But you need to connect the power all the way - until the safety tab snaps into place.
Power for drives
Modern hard and solid-state drives, as well as optical drives, are connected to the power supply via a 15-pin connector, to which five wires of different colors are connected:
In some devices, a different SATA connection scheme is possible - “4+1”, where instead of five wires there are four + one separate one for power.
Useful content:
Conversion
As we said, the power supply needs to change the AC voltage, which in American outlets is usually around 120 volts (technically, this is 120 volts rms, but we won’t break our tongue like that), giving the output a constant voltage of 12, 5 and 3. 3 volts.
The first step is to convert AC to DC, and our unit uses a bridge rectifier for this. In the photo below it is a flat black element glued to the radiator.
Photo source techspot.com
This is another place where the power supply manufacturer can cut costs, since cheaper rectifiers perform worse (eg run hotter). Now, if the peak input voltage is 170 V (which is the case for a 120 V network), then after passing through the rectifier bridge, it will become 170 V, but already DC.
In this form, it enters the next stage, and in our block it is an active power factor correction module (APFC or Active PFC, Active Power Factor Correction converter). This unit also stabilizes the voltage, smoothing out “dips” due to storage capacitors; In addition, it protects against output power surges.
Passive correctors (PPFC or Passive PFC) do essentially the same job. They are less efficient, but good for low-power power supplies.
Photo source techspot.com
The APFC in the photo above is represented by a pair of large cylinders on the left - these are capacitors that accumulate equalized current before sending it further along the chain of processes in our power supply.
Behind the APFC there is a PWM, pulse width modulator (PWM, Pulse Width Modulator). Its purpose is to convert direct current back to alternating current using several fast-switching field-effect transistors. This needs to be done because in the next step a step-down transformer awaits us. These devices, based on electromagnetic induction, consist of two windings with different numbers of turns on the metal core needed to step down the voltage, and operate transformers with alternating current only.
The frequency of the AC current (the rate at which it changes; in Hertz, Hz) greatly affects the efficiency of the transformer - the higher the better, so the frequency of the original 50/60 Hz supply increases by about a thousand times. And the more efficient the transformer, the smaller its size. This type of device that uses these ultra-fast DC frequencies is called a Switched Mode Power Supply (SMPS).
In the photo below you can see 3 transformers - the largest one has 12 volts at its only output, and the smaller one has 5 volts (we'll talk about it a little later). In other power supplies you can find one large transformer for all voltages at once, that is, with several outputs. And the smallest transformer is designed to protect PWM transistors and suppress its interference.
| Photo source techspot.com
You can implement in different ways obtaining the necessary voltages, PWM protection, and so on. It all depends on the budget segment and the power of the device. However, everyone equally needs to remove the voltage from the transformers and straighten them again.
In the photo below we see an aluminum heatsink for the low-voltage diodes that perform this rectification. And also, specifically in this PSU, we see a small additional board in the center of the photo - this is a node of voltage regulation modules (VRM, Voltage Regulation Modules), providing outputs of 5 and 3.3 volts.
Photo source techspot.com
And here we should talk about what pulsation is.
In an ideal world, with ideal power supplies, alternating current will be converted into absolutely smooth, without the slightest fluctuation, direct current. In reality, such 100% accuracy is not achieved, and the DC voltage has, albeit minor, fluctuations.
This effect is called ripple voltage, and in our power supplies we like to keep it as low as possible. Cooler Master does not provide information about the ripple voltage value in the specification for our experimental PSU, so we resorted to third-party testing results. One such analysis was performed by JonnyGuru.com and they found that the maximum ripple voltage of the +12V output was 0.042V (42 millivolts).
The graph below shows the deviation of the actual voltage received (blue curve; its shape, of course, is not such an ideal sine wave - after all, the ripple itself is not constant) from the required flat voltage of +12 V DC (red straight).
This deviation is largely the responsibility of the capacitors throughout the PSU. Low-quality, cheap capacitors lead to an increase in this unnecessary ripple. If it is too large, then some electronic components of the computer that are most sensitive to power quality may begin to work unstable. Fortunately, in our example, 40-plus millivolts is normal. Not great, but not bad either.
But the matter does not end with obtaining acceptable output voltages. It is necessary to ensure control of the outputs so that the power at each of them is always full and stable, regardless of the power of the loads at other outputs.
Photo source techspot.com
The chip you see in this photo is called a supervisor and it makes sure that the pins do not have too high or low voltage and current. It works simply - it simply turns off the power supply when such problems occur.
More expensive PSUs can be equipped with a digital signal processor (DSP), which not only monitors voltages, but can also adjust them if necessary, and also send detailed data about the state of the power supply to the computer using it. For the average user, this function is quite controversial, but for servers and workstations it is highly desirable.
A little theory
But before we start digging into the internals, let's ask ourselves, is a power supply really that necessary? Why can't you plug your computer directly into a power outlet? The answer is that computer components are designed for a completely different voltage than the mains voltage.
The graph below shows what the grid electricity should be (US = blue and green curves; UK = red curve). The X axis represents time in milliseconds, and the Y axis represents voltage in volts. The easiest way to understand what voltage is is by looking at the energy difference between two points.
If a voltage is applied to a conductor (such as a metal wire), the difference in energy will cause electrons in the conductor material to flow from a higher energy level to a lower one. Electrons are the constituent atoms that make up a conductor, and metals have many electrons that can move freely. This flow of electrons is called current and is measured in amperes.
A good analogy is with a garden hose: voltage is akin to the pressure you use, and water flow is akin to current. Any restrictions or obstacles in the hose are essentially like electrical resistance.
We see that the electricity in the network varies over time, which is why it is called alternating current voltage (AC, alternating current). In the US, line voltage varies 60 times per second, peaking at 340 V or 170 V, depending on location and connection method. In the UK the peak voltages are lower and the frequency of these fluctuations is also slightly different. Most countries have similar mains voltage standards, with only a few countries having lower or higher peak voltages.
The need for a power supply is that computers do not work with alternating current: they need a constant voltage that never changes, and also much lower. On the same graph it will look something like this:
But a modern computer requires not one constant voltage, but four: +12 volts, -12 volts, +5 volts and +3.3 volts. And since these values do not change, such a current is called constant (DC, direct current). Converting current from AC to DC (so-called rectification) is one of the main functions of the power supply. It's time to open it up and see how he does it!
Converting current from AC to DC is one of the main functions of PSU. It's time to see how he does it!
Here we must warn you that the power supply contains elements that accumulate electricity, including deadly electricity. Therefore, disassembling the PSU is potentially dangerous.
Official photo of the Cooler Master power supply.
The principle of operation of this power supply is similar to many others, and although the markings on various parts inside will be different, this does not make any fundamental differences.
The power cord connector is in the top left corner of the photo, and the current essentially flows clockwise until it reaches the output of the power supply (bundle of colored wires, bottom left corner).
Photo source
techspot.com
If we turn the board over, we can see that compared to the motherboard, the conductors and connections on it are wider and more massive - this is because they are designed to handle higher currents. Also, a wide stripe in the middle catches your eye, like a river flowing across the plain.
This again suggests that all power supplies have two clearly separated nodes: primary and secondary. The first is to adjust the input voltage so that it can be effectively stepped down; the second is all the settings for the already rectified and reduced voltage.