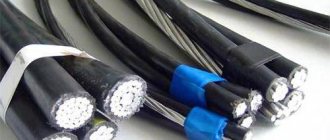
Any professional installer can handle the installation of electrical wiring indoors, but laying cables over the air almost always causes certain problems and difficulties.
There are two main methods that allow communications between buildings - by air and underground. In each case there are certain advantages and disadvantages.
Installation of SIP wires over the air
Advantages of the method:
- less labor-intensive work;
- in comparison with underground communications, it is almost always possible to lay a cable over the air;
- shorter cable length.
Aerial cable laying is simpler and cheaper than underground
. Disadvantages:
- poor resistance to static electricity and lightning discharge;
- the need for high strength and resistance to severe weather conditions;
- the likelihood of timely failure, which may be due to friction against other objects or cracking due to moisture accumulation.
However, there are special recommendations for the selection of materials, installation and operation technologies that make it possible to eliminate all of the listed disadvantages.
Application area
Cable laying over the air is possible in electrical networks whose voltage does not exceed 1000 V, which complies with the rules of the PUE. Most of these procedures are performed to connect two buildings or a building to a power line, and the distance between objects should be small. This option is suitable in all cases where it is not possible to place power line supports or dig trenches, or customers want to save money, since installing underground wiring will never be feasible from a financial point of view.
Air laying is usually used when the distance between buildings is short
These technologies can be used to equip lighting systems indoors with high ceilings, which include production workshops and huge warehouses. Special cable braces allow you to organize high-quality street lighting.
Owners of country or private houses can avoid the labor-intensive work of digging trenches, since it is much more economical and easier to stretch the cable over the air from the main distribution board to many outbuildings, including a workshop, garage, summer kitchen or bathhouse.
Air supply of electricity to a private house
Thanks to the presence of the cable, it is possible to lay both three-core electrical wiring of low power and a cable with a large cross-section designed to power powerful equipment.
Preparatory work
Any installation work begins with a preparatory stage, including calculations. First you need to calculate the required wire cross-section. This characteristic directly depends on the total power of the switched electrical devices. After this, you need to measure the distance from one connected object to the distribution panel. It is important to take into account the rises and turns of the cable line.
As soon as the previous calculations are completed, you can proceed to the selection of the cable. This element of the system must withstand the load of the installed cable on each section of the route. To avoid line breakage during external installation, to calculate the strength of the cable and other fasteners, take the weight of the cable multiplied by three. It is almost always enough to take a galvanized cable with a diameter of 4.5 or 6.7 mm. For the string method, steel or hot-rolled varnished wire with a thickness of at least 5 mm is suitable.
Laying the cable along the support cable
For cables with remote cable
For cables with remote cable. Spans up to 70m. Support wire diameter 2-5 mm
| For cables with a remote cable. Spans up to 100m. Support wire diameter 2-6 mm |
For cables with a remote cable. Spans up to 100m. Support wire diameter 2-6 mm
For cables with a remote cable. Spans up to 130m. Support wire diameter 2-7 mm
For cables with a remote cable. Spans up to 150m. Support wire diameter 2-7 mm
For cables with a remote cable. Spans up to 150m. Support wire diameter 4-7 mm
For cables with a remote cable. Spans up to 170m. Support wire diameter 4-7 mm
For cables with a remote cable. Spans up to 110m. Support wire diameter 2-6 mm
For cables with a remote cable. Spans up to 70m. Support wire diameter 2-6 mm
For cables with a remote cable. Spans up to 100m. Support wire diameter 3-6 mm
For cables with a remote cable. Spans up to 200m. Support wire diameter 4-7 mm
- For cables with remote cable. Spans up to 70m.
Support wire diameter 2-5 mm
Support wire diameter 2-6 mm
Support wire diameter 2-6 mm
- For cables with a remote cable. Spans up to 130m.
Support wire diameter 2-7 mm
- For cables with a remote cable. Spans up to 150m.
Support wire diameter 2-7 mm
- For cables with a remote cable. Spans up to 150m.
Support wire diameter 4-7 mm
- For cables with a remote cable. Spans up to 170m.
Support wire diameter 4-7 mm
- For cables with a remote cable. Spans up to 110m.
Support wire diameter 2-6 mm
- For cables with a remote cable. Spans up to 70m.
Support wire diameter 2-6 mm
- For cables with a remote cable. Spans up to 100m.
Support wire diameter 3-6 mm
- For cables with a remote cable. Spans up to 200m.
Support wire diameter 4-7 mm
Recently viewed
There are no viewed products yet.
lanset.ru
Selecting the diameter and material of the cable
Galvanized steel wire is suitable for supports located at a distance of no more than 6 m. Provided that the weight of the wiring is small, its diameter can be 2-3 mm. If the distance between supports is higher, especially more than 10 m, and a heavy cable is used, it is imperative to choose a galvanized cable with a diameter of about 6 mm. It is able to withstand cable loads with a cross-section of up to 10 square meters. mm. Large-sized products are rarely used in private homes, which is due to the lack of need for high power. The above cable can be used to install a heavy cable followed by fastening 5-6 street lights equipped with a lightweight housing.
To calculate the weight of the cable, wind it and use a regular scale. This value can be calculated based on the product brand indicated in the technical data sheet. There you will find the cable weight per 1 m length. It remains to multiply this value by the length of the cable route, as a result it will become known what load it will exert on the steel wire or cable.
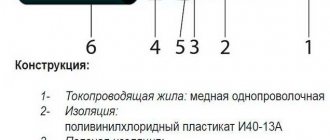
Weight and other technical characteristics of the SIP-2 cable
In domestic conditions, a hidden wiring cable can be used. To protect the insulation, it is enough to hide it in a light weight corrugated pipe. The Internet and various reference books are full of tables that allow you to determine the weight of a cable based on its brand. There are also special calculators.
For high current loads, it is recommended to use products designed for air installation:
- AVT and ART brand cable with built-in support cable;
- АВРГ, АПВГ and АВВГ, attached to a steel cable.
Asymmetric wedge clamp
The use of asymmetrical wedge couplings is popular with mobile cranes. They are easy to install on site and also easy to remove, which is a big advantage.
Clamp with a short piece of cable
The end wedge sockets are reused after the cable has been discarded. They withstand fatigue tests until the steel rope fails and without damage.
Standardization
There are many options on the market, with minimal requirements for asymmetrical wedge mounts. The length of the clamp between the coupling and the wedge must be at least 4.3 times the nominal diameter of the wire rope. The asymmetrical wedge coupling can withstand 75,000 tension-extension cycles from 15% to 30% of the minimum tensile strength of the wire rope without permanent damage.
Working mechanism
Using a wedge, the end of the cable is wedged into the cone mount. As the load increases, the wedge is drawn deeper and deeper into the socket and exerts a clamping force on the steel rope.
The traction force in the cable is transmitted due to friction between the metal rope and the wedge and friction between the cable and the coupling. The figure shows a cross-sectional view of an asymmetrical wedge socket.
Sectional view of an asymmetrical wedge socket
Installation
Depending on the design and type of rope, their efficiency varies from 75% to 80%. Please contact your wedge mount manufacturer for details.
When installing a wedge socket , the end of the metal rope is first fed through the tapered socket, then bent into a loop and returned from the socket. After this, the wedge with the cable is placed inside the loop, and the protruding ends are pulled further out of the socket, so that the wedge is well retracted into it.
Then the “dead” end of the cable should protrude from the fastener by at least a few centimeters. Directly at the outlet, the tail end should be protected with a cable clamp . This will prevent the wedge from weakening and falling out.
Here's a quick rundown of the dos and don'ts:
- Always check the socket, wedge and pin before installation;
- Align the end of the metal cable with the center line;
- Use a hammer to seat the wedge and cable as far into the mount as possible;
- First apply a load to completely seat the wedge and cable in the socket;
- Make sure the end is properly secured before inserting the wire rope.
Failure to comply with this requirement will result in core slipping or weakening of the strands, which will lead to serious damage to the steel cable.
Secure the dead end of the cable.
Incorrect connection between the live and dead part of the cable
Incorrect cable installation
At the scene, it was discovered that the end of the steel cable on the crane was not installed correctly. Before work began on the ground site, the 30-tonne mobile crane was inspected and it was discovered that the rope clamp (bulldog) attached to the "dead end" of the hoist ropes was incorrectly installed , which caused the destruction and damage to the "live end" of the rope (part of the rope , which takes the load).
Incorrect installation of cable grips
Incorrect selection or installation of wire rope grips will dramatically reduce the effectiveness of wire rope leads and cause the metal cable to slip through the grips. This may result in personal injury and equipment damage.
The clamp bridge is installed on the working part (current end) of the rope, and the U-shaped bolt is installed on the tail cable (dead end) of the steel rope.
Methods for fastening the ends of a steel rope
The following lessons were learned:
- Make sure that when tying a metal cable, the correct type of clamp is selected;
- Make sure the cable grips are installed correctly.
Beware of signs that indicate a cliff; for example, reduction in rope diameter, corrosion or deformation of the steel rope.
How to use clamps correctly
Some rules require that the dead line be clamped together with another short piece of rope.
Clamp with a short piece of cable
However, the best solution is to let the stub stick out further and bend it back into a loop. The “dead” line can be cut off, along with its own end at the exit from the fastening.
Bend back into a loop
This procedure has the advantage:
- bending the line around a small radius of the wedge creates permanent deformation inside the wire rope;
- Bend-like plastic deformation makes it difficult to push the end of the rope through the hook block.
If the asymmetrical wedge socket is installed correctly , the cable line is in the straight direction (Fig. 1). The tensile tension line runs straight through the mounting pin. Therefore, when the connection is loaded, it will not bend and bend the live line at its output.
If installed incorrectly , the traction line will be misaligned; therefore, whenever the joint is loaded, it tilts to equalize tension with the clamping pin, thereby strongly bending the "stress" line at the clamp exit (Fig. 2).
Installation
Special designs
The number of special designs, wedge clamps for cables, is extensive. Types vary depending on material, manufacturing processes (cast and welded construction), geometry (wedge angles ranging from 14 to 30), and method of securing the dead rope line.
The asymmetrical wedge fastening design secures the dead rope line to the rope socket body.
Attaching the “dead” part of the cable to the socket body
A wedge socket with an extended wedge to which the “dead” end of the rope is attached.
Attaching the “dead” part of the cable to the wedge
When using rotation-resistant steel ropes , it is recommended to install a swivel between the end connection of the rope and the point of attachment to the crane. However, the lifting height of the device will be reduced by installing a swivel. Here it is recommended to use an asymmetrical wedge socket with an integrated swivel.
This end connection reduces lift height slightly and has the added benefit that the swivel always automatically aligns with the cable.
Wedge socket with integrated hinge
Symmetrical wedge socket, used as an end connection for elevator ropes. It can be easily attached and also easily removed , which is a great advantage when manually adjusting the length of the lifting ropes.
Symmetrical wedge socket
Fastening the cable to the cable: support and tension elements of the air wiring
There are several fasteners used for mounting on the walls of buildings and other objects to secure guy wires. The design of the future fastening depends on the material and overall dimensions of the cable.
Let's list a few varieties:
- Tension bolt, hook and anchor. This configuration is suitable for a flexible multi-core cable, which can be laid using rolled steel wire with a diameter of 6 mm.
- Several anchors for tensioning strings of small diameter are suitable for a light cable, the cross-section of which does not exceed 6 mm, and the distance between the switched objects is 10 m. In this case, the installation of lighting devices is unacceptable.
- Special cable and wire rod anchors can support heavy electrical wiring connecting objects at any distance with support spacing up to 12 m.
Installing a tension coupling for the support cable
There are also fasteners that allow you to connect two parallel lines. One is used to organize power supply, the other is used to install lighting fixtures. In the first case, a power cable with a cross-section of 10-35 square meters is installed. mm, in the second - lighting devices and distribution boxes containing copper wires 2.5-4 mm.
In the figure below you can see the variety of fasteners used for installing overhead wiring:
Methods for attaching aerial cable
Laying cables in the air on cables
It is recommended to install cables on cables in cases where other types of cable laying cannot be used for technological, design or economic reasons. Laying power cables on cables is used in networks with voltages up to 1 kV, both indoors and outdoors. Cable wiring on cables indoors (workshops) is carried out along columns along and across the building, as well as between walls, and outdoors - as a rule, between the walls of buildings.
For power lines laid on a cable, the same cables are used as for laying inside buildings and structures. The choice of cable brand is determined by the project. Cables laid outside buildings, including under open sheds, must have a protective non-flammable outer covering.
The choice of cable is made depending on the load-bearing load. As a supporting cable, ropes woven from galvanized steel wires are used in accordance with GOST 3062-80 or GOST 3063-80, hot-rolled round steel in accordance with GOST 2590-71.
Laying the cable on cables: a - along columns, b - the same with fastening the cable to the wall, c - between walls 1 - final girth; 2 — tension coupling; 3 — cable suspension; 4 — supporting cable: 5 — intermediate girth; 6 - cable; 7 - column; B - anchor; 9 - wall; 10 — cable clamp.
The distance between the anchor fastenings of the supporting cable is determined in the project and should be no more than 100 m. The distance between intermediate fastenings should be no more than 30 m when laying one or two cables with a cross-section of up to 70 mm2, 12 m when laying more than two cables with a cross-section of 70 mm2 and in all cases of laying cables with a cross-section of 95 mm2 and above. The distance between cable hangers should be 0.8... 1 m. Anchor end structures should be attached to the walls or columns of buildings; fastening them to beams and trusses is not allowed.
Procurement of supporting ropes and cables, assembly of factory products and production of structures according to drawings should be carried out at assembly and procurement areas. Prepared sections of ropes and cables must be marked and wound on inventory drums.
Anchor devices must be attached to the walls of buildings using studs and bolts or a rotating folding strip, which is laid through a prepared hole in the wall. End and intermediate girths are secured to building columns with tie rods.
The lifting and securing of the supporting cable, rolled out along the route, is carried out from aerial platforms, hydraulic lifts, scaffolding, scaffolding, etc.
Installation of a tension coupling or a hand winch attached to the end of a supporting cable on an anchor, when the second end of the cable is fixed to another anchor, should be done by tensioning the cable with mounting blocks (pulley hoist). To do this, the cable must first be pulled out manually and secured in the block.
Installation of anchors on the wall and clamps on the column: a, b - on the wall with bolt fastening; c - on the wall with a folding bar; d, e - on a column on studs 1 - anchor; 2 — cable clamp; 3 - support cable; 4 - bolt; 5 — tension coupling; 6 — anchor with a folding bar; 7 — end girth, 8 — pin; 9 - column; 10 — intermediate girth.
The final tension of the supporting cable and adjustment of the sag are carried out using tension couplings or hand winches. The sag of the cable after laying the cables should be equal to 1/40... 1/60 of the span length, which for a span of 6 m is 100... 150 mm, and for a span of 12 m - 200... 300 mm.
It is recommended to roll out, lift and lay cables into suspended cable structures using special mechanisms and devices. Installation of one cable can be carried out together with installation of the supporting cable. For this purpose, the cable to the cable is fixed directly to the ground, with the help of mounting blocks or a winch they are lifted together with the cable and tensioned on the supporting cable, and then the cable is secured in anchor devices.
Special hand winch
Installation of a tension coupling on the anchor: 1 - supporting cable; 2 — mounting clamp; 3 — chain hoist; 4 - anchor; 5 — coupling connecting strip; 6 — tension coupling; 7 — cable clamp.
All metal products that are not painted or galvanized and bare areas of the steel cable indoors, as well as the entire length of the steel cable when laid outdoors, regardless of the presence of coating, must be coated with a lubricant (for example, grease). Indoors, a galvanized steel cable is coated with lubricant only in cases where it may be subject to destruction under the influence of an aggressive environment during operation.
Protection of cables laid openly in the air from sunlight must be carried out in accordance with the instructions given in the project.
An electrical cable line is a steel support cable from which insulated unprotected or protected cables are suspended. Methods for attaching wiring to a cable are universal: using special cable hangers, fastening directly to the cable (string hanger) and on suspended and supporting structures with insulators, as well as on slats, boxes, trays, pipes and other structures suspended from the cable.
In addition to the supporting cable and cables, the cable wiring line includes anchoring, tensioning and supporting devices, parts for attaching the cable to the supporting cable. To complete cable lines on cables, the following factory products and parts are used, necessary both for the preparation of lines and for their installation: tension couplings for steel cables with a screw stroke of 50, 100 and 300 mm; anchors for end fastening of steel cables to building elements; clamps for connecting hangers, guy wires and guy ropes with a supporting cable (including clamps fastening loops at the end of a steel cable), earrings for fastening cables to steel trusses.
A steel cable is used as a carrier, the diameter of which is selected according to the table.
Cable tension anchors, which serve for the end fastening of the supporting cable, adjusting its tension and sag, are attached to the building elements using bolts, folding strips, etc.
Supporting devices are intermediate string suspensions and longitudinal and transverse guys attached to the lower chords of trusses, columns, and ceilings. Intermediate fastenings are installed for large spans and the mass of the installed wiring every 18...24 m, reducing the sag and giving the line significant stability and mechanical strength.
Intermediate cable fastenings can additionally be made directly to beams, trusses, columns and floors using separate parts or wrapping structures.
Cable tension anchor: 1 - tension coupling; 2 — thimble; 3 — cable bolt clamp; 4 - cable.
To hold the cable in intermediate sections, three-bolt clamps are used, with the help of which the ends of the hangers and braces are terminated with loops using sleeves and clips. In some cases, for example, when there is a large distance from the cable suspension line to the floor trusses, a second unloading cable is used, which is pulled above the load-bearing cable, and to which intermediate fastening strings are attached.
The main scope of installation of cable electrical wiring is carried out in the MEZ. For delivery to the site, the end and intermediate fastenings are assembled into containers, and the prepared complete cable lines are rolled into coils with a diameter of 1...2 m or wound on special inventory cassettes or drums.
The main scope of installation of cable electrical wiring is carried out in the MEZ. For delivery to the site, the end and intermediate fastenings are assembled into containers, and the prepared complete cable lines are rolled into coils with a diameter of 1...2 m or wound on special inventory cassettes or drums.
Installation of anchor and tension structures, vertical suspensions, transverse and longitudinal braces, laying routes for supply lines is classified as the first stage of installation and is carried out with a certain readiness of the building elements to which the cable wiring is suspended and attached. The distances between the intermediate hangers, as well as the diameter of the cable, hangers and guy wires depend on the load on them and are determined by the design.
Metal parts of all elements of cable wiring without painting or galvanic coating, as well as exposed sections of the cable and anchor devices at the points of contact, must be lubricated with technical petroleum jelly. Metal brackets and flat strips for fastening cables should have a protective coating against corrosion and soft glassine pads.
Prepared cable lines: a - on inventory cassettes; b - in bays.
It is recommended to lift long (more than 15 m) and heavy cable cables to the design site using simple lifting devices (blocks, winches, etc.). In this case, one end of the support cable with a loop is put on an anchor hook fixed in the wall. The second end of the supporting cable is connected to the pulley with a wedge clamp or cam grip, located at some distance from the end loop, and the pulley is suspended on another anchor hook installed on the opposite wall of the room. In this case, the end of the cable with the tension coupling mounted on it is in a freely suspended state.
The cable cable suspended between the anchors is pulled with a pulley or winch.
After tension is completed, the free suspended end of the supporting cable with the tension coupling is put on the anchor hook, the pulley is loosened, disconnected from the cable and removed from the hook.
Intermediate cable fastenings are made on steel rope strings.
The final adjustment of the suspension of cable cables is carried out using a tension sleeve.
The supporting cables are grounded at two points at the ends of the line. On lines with a neutral wire, the supporting cable is connected to it with a flexible copper jumper with a cross-section of 2.5 mm2, and on lines with an insulated neutral - to a bus connected to the ground loop. It is not allowed to use a support cable as a grounding (neutral) conductor.
It is allowed to ground the support cable by welding the free end of a loop or a flexible steel jumper PGS-35 600 mm long to the grounding network of the room.
With a small amount of work, cable cable wiring can be prepared directly at the site where it is to be installed.
The preparation of cable wiring assemblies is carried out according to measurements taken at the installation site, or working drawings without preliminary measurements on site. In the first case, the electrician-measurer draws up sketches of cable cable lines, on which he records the exact dimensions between the end fastenings to walls or columns, and intermediate hangers. In the second case, a sketch order is drawn up based on the working drawing. The length of the cable is determined by the dimensions of the room indicated in the drawing. The standard sketch also indicates the type of anchorage, cable brands and their required lengths for installation.
Harvesting, processing of cables and their fastening to the cable are carried out on production lines. Unprotected cables are secured to the cable with plastic clips designed for intermediate fastening of a cable weighing up to 5 kg. The distance between the clips is usually 1.5 m. Direct fastening of the cable to the cable (in dry and wet rooms) with polyvinyl chloride perforated tape with buttons or buckles every 0.5 m is allowed.
Protected cables are attached to the cable with clasps, steel strips with buckles and plastic strips with buttons.
In table Cables with impregnated paper insulation recommended for installation in the air are shown.
Fastening wires and cables to the cable: a - with clips; b, c - steel strips with buckles, d - plastic strips with buttons.
Recommendations for the primary use of cables with impregnated paper insulation when laying in the air*
* Cases of laying in the air in general premises.
** Used in the presence of a chemically active environment.
Requirements for installation of end fastenings and installation features
It is highly not recommended to fix end/fasteners to the roof or decorative cladding of a building. If a cable is used that must withstand significant loads, then for fastening you should use steel plates installed on load-bearing walls and then tightened using through bolts.
Above pedestrian areas, cable lines should be laid at a height of no lower than 2.7 m, on roadways - 6 m. String anchors for light loads can be tightened with simple concrete screws.
The best option is to install tension anchors in the walls of the building during its construction, but in practice this approach is used extremely rarely. Therefore, in the future you have to create holes in the walls using a hammer drill. A metal plate equipped with a bolted contact for grounding is mounted below the end fastening. It usually drops by 20-30 cm. The plate is connected to a rolled wire for grounding by welding. Grounding can be done using a copper conductor with a cross section of 2.5 square meters. mm.
Fastening to a concrete wall with anchor bolts
JUTE CABLE
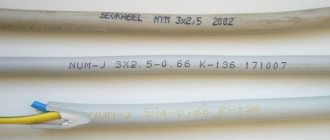
Electric cable in fire retardant braid made from natural fibersjute decorative braiding 3x1.5mm and 3x2.5mm
Copper electric power cable NYM in a decorative jute fire-bioprotective braid made of natural fibers with insulation and sheath made of polyvinyl chloride plastic for a voltage of 300/500 V, number of cores - 3, cross-section 1.5 and 2.5 sq. mm.
Diameter 13 mm - cross-section 3x1.5 in decorative braiding (linen, cotton, jute)
Diameter 14 mm - cross-section 3x2.5 in decorative braiding (cotton, linen, jute)
Bay 50 and 100 m
Laying electrical cable wiring in a decorative braid allows you to create electrical networks, preserving such advantages of external electrical wiring as mobility, installation flexibility, low cost of installation, configuration changes, and adding to them increased electrical fire safety and aesthetic appearance.
An electrical cable in a decorative braid is used for open/external, finishing installation of electrical wiring routes, repeating the lines of walls, floors and ceilings of rooms and buildings. One of the main advantages of a retro cable is its ease of installation and relatively affordable price. An excellent replacement for traditional cable channels. For open wiring in a wooden house.
You can make changes to the wiring configuration at any time (for example, add sockets, switches, etc.), which is not possible with internal wiring.
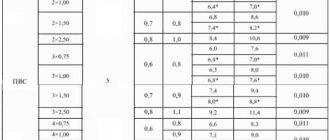
| Name | Retail up to 200m Whole reels/cut by meter 1 meter without VAT, from a warehouse in Moscow | From 200-500m, | From 500m |
| Cable 3x1.5mm, 100pm | 170,0/190,0 | 160,0 | 150,0 |
| Cable 3x2.5mm, 50pm | 170,0/190 | 160,0 | 150,0 |
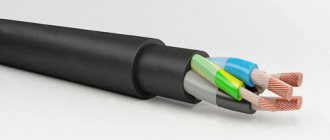
The presented NYM copper power cable, which is a cable with a copper stranded core, with PVC insulation, in a PVC sheath filled with a rubber compound. Due to the chemical properties of the materials, the electrical wire of this brand does not spread fire when laid alone. This type of cable is intended for the transmission and distribution of electricity in stationary installations, as well as for power supply in installations that require cable sealing during entry.
The retro braided cable is attached to the wall using special mounting brackets/clips or hot melt adhesive. Hot-melt adhesive has good adhesion to wood, metal, glass, plastic, and on painted (but not bleached) walls. It is enough to squeeze a drop of glue onto the surface, press the cable against it and wait a few seconds until the glue cools slightly. The natural braided cable has good flexibility.
Retro wiring is recommended for installation in dry and wet industrial premises, in residential buildings and structures (wooden housing construction), on special cable racks and in blocks. Can be used outdoors (out of direct sunlight).
NYM cable is not recommended for installation in the ground (in trenches); it cannot be used for laying in open ground or for embedding in wet concrete.
Attention!!! Due to growing demand, it has become possible to customize your cable. This can be a television, telephone or cable with a different cross-section available to the customer. Minimum volume 100 meters. The price is negotiated after a calculation by a specialist. Production time is 3 - 4 weeks.
| Phone\fax office in Moscow: +7-495-364-34-62 , +7-495-2110415,+7-495-973-50-64, +7-495-973-86-08, phone: +7-901-553-50-64, +7-903-197-05-71 Moscow, 6km MKAD, Kosino, Saltykovskaya str. 6, building 12 From Novokosino metro station: exit from the last car on the street. Gorodetskaya, then take bus 792 and 14 to the Vetluzhskaya street stop. Turning right at the traffic light at the intersection of Nikolai Starostin Street and Saltykovskaya Street, We continue moving ~ 1200m to the orange sign “forge, forged products”. We turn left onto the secondary road. We drive ~250m to a fork with a sign “oak, ash” board. At the fork we go to the right. We enter an area with two one-story white brick buildings. We continue moving between the two buildings and then turn right. Entrance from the end of the right building. | ||||||||
| Email or | ||||||||
| SKYPE-jutepanorama, viber-+79852110415 |
Installation technology
After carrying out calculations and purchasing materials with the necessary technical parameters, they begin to install anchors and other fastening elements of electrical wiring. In most cases, they make do with steel plates, which are tightened with special pins. The rings necessary for fastening the cable are welded to them. Tension avoids sagging by evenly distributing the load along the wall.
One end of the cable is secured using loop clamps. Then screw couplings are attached to the second end in order, for example, to tension the cable between posts and bring it to the state of a string. A special bandage is used to tie the cable to the strings. For installation of cable wiring outdoors, ordinary plastic clamps, strips of galvanized iron or wire are suitable. The distance between the wire fastenings to the cable should not exceed 0.6-0.8 m.
Cable wiring
Home » Electrical wiring » Electrical wiring installation » Cable wiring
Sometimes each person may be faced with a situation where it is necessary to supply electricity to a separate room. Quite often you can also encounter a situation where it is simply not possible to lay a cable underground. In this case, cable wiring will help you.
Cable wiring today is considered the most optimal type of wire laying. In this article you will learn the technology of laying a cable on a cable with your own hands.
Application
If you study the rules of the PUE, then you can understand that this installation method can only be used for networks in which the voltage does not exceed 1000 Volts. Most often, this installation method can also be used in places where organizing overhead lines is simply impossible. It will be much easier to simply attach the cable to the cable and stretch it to the required structure.
Almost every home craftsman may be interested in this laying process. Thanks to this method, it is now easy to electrify outbuildings. If necessary, thanks to cable wiring, you can also easily conduct light from the house to a bathhouse, garage or gazebo.
Preparatory work
When installing cable wiring, you will definitely need to go through the preparatory stages. First you will need to calculate the cable cross-section. Now you should measure the length from the house to the building. When choosing a wire, you need to consider the weight of your wire. The safety margin must be exceeded three times. Thanks to this, you can avoid rupture in case of bad weather.
Typically, many electricians use galvanized steel cable from 4.6 to 6.8 mm. If the length of the suspension is short, then instead of cable wiring, you can use string wiring. She can easily cope with light loads.
First, you must secure anchors in the selected area. In most cases, they will resemble metal plates that are pulled together on both sides. To ensure fastening, special rings are welded to them. Tension fastenings must be made to completely protect yourself from the anchors falling out. This will also help you distribute the load evenly.
Now the cable should be secured with special loop cable clamps. On the other hand, the cable should be tensioned as much as possible and also secured.
The height of the suspension you are constructing should not be lower than 2.75 meters. The height above the car passage should be 6 meters. All standards for overhead electrical wiring can be seen in the diagram below:
After the bandage is completed, the strings simply need to be secured with a bandage. To hang cable wiring outdoors, you need to use special plastic clamps. The distance between the bandage should be 50-80 cm. If you are interested, then read about self-drilling walls for wiring.
Recommendations
If you are using knitted wire, then you need to prevent the wire from cutting into the insulation. To do this, the gasket is usually made between the bandage and the wire. The winding area should be distributed as much as possible by laying 7-10 turns. If you plan to use plastic clamps, then study their performance characteristics. Otherwise, after a cold winter, the clamps will simply fall apart.
If you are laying the cable externally, then it must be protected from external influences. It is best to lay the cable in a corrugated area. This will provide reliable protection for the wire.
If the span is short, then the suspension can be assembled on the ground. Subsequently, you will simply need to secure the finished structure.
Thanks to these instructions, you can easily carry out electrical wiring to separate buildings in your country house yourself. Also below you can see a video that will show how to make a loop on a cable with your own hands.
This is all the information that we wanted to bring to your attention on how to install cable wiring with your own hands. As you can see, laying a cable along a cable is considered quite simple, but the process can take a lot of effort.
Recommendation from practice
If you use a tying wire to secure the cable to the cable, be careful not to over-tighten it so as not to accidentally cut the insulation or strands. To eliminate such situations, you can place a strong gasket made of insulating material between the bandage and the cable.
At all attachment points, you must adhere to the same winding pattern - at least 7 turns of the bandage. If plastic clamps are used, make sure that their operating parameters comply: they must withstand low and high temperatures, otherwise they may dry out and fall apart.
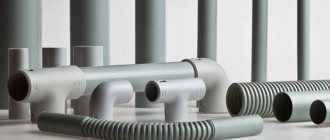
For additional line protection and cable insulation, it is recommended to use corrugated pipes. This will reduce the negative impact of bad weather conditions, reduce the financial costs of operation and subsequent possible restoration of the route.
Carrying wires through the air in a corrugated pipe
If it is not possible to collect the line from above, you can try to do it on the ground. You should attach the cable to the cable right there, and then pull it between the supports.
Features of fastening methods
The use of a design in the form of a tray, box or pipe allows for additional protection of the wires from the harmful effects of the environment. This fastening method is advisable to use where the cable is directly affected by both low and high temperatures. Metal fasteners are less versatile and require additional precautions. They should not violate the insulation of the cable being laid. In other words, it is necessary to use additional elements placed under steel and iron buckles, for example, insulating material.
The cable is fastened directly to the cable using various fasteners - galvanized iron sheets, steel strips, plastic clamps. The first two fastening options are considered preferable. Plastic elements are selected taking into account operating conditions so that they do not require replacement every season.
Homemade sliding suspension
Construction stores sell a variety of hangers for cable wiring. However, with a small amount of work, you can do it on your own by creating a homemade fastener.
For this you will need:
- wire cutters;
- round nose pliers;
- galvanized steel wire (preferably more flexible);
- a rod whose diameter is higher than the given value of the cable being installed.
Using wire cutters, create several pieces of wire 25-30 cm long. Take the pliers and make an air loop in the middle of each of them. Its diameter should be equal to the size of the cable being laid, since the next step is to thread it through the “rings”.
Wrap the wire around the rod to create the components to secure the cable to the cable. First, wind one end, then the other end. The pitch of the resulting spiral should be about 20 mm. With these steps you will create a homemade cable hanger.
To lay the cable through the air, secure the cable, then place the hangers at intervals of 50-80 cm and thread the cable through them. After this, the free end of the cable is fixed to the second building.
Is it possible to replace a cable with a rope?
In short, it’s impossible. The rope does not have the necessary properties and qualities, since when exposed to negative environmental factors, fabric products quickly fail. The rope is stretchable, easily frays and breaks. Due to low strength, sagging occurs, and a wire break will create an electrical and fire hazard.
Cable wiring installation technology
Theoretically, installing cables over the air is easier than organizing underground communications. However, in practice it involves meeting important requirements and performing work that only qualified and experienced electricians can do. The slightest mistakes can lead to a decrease in the safety of the cable line, so it is recommended to contact professional technicians for at least a consultation.
How to properly secure the cable?
The base must be strong and reliable, well secured. The cable and cable are installed using anchor fasteners. They are fixed on both sides of the wall or other base using bolts or studs. This allows you to evenly distribute the load and eliminate the possibility of fasteners falling out of the wall. The distance between anchors that are located in close proximity to each other should be less than 100 meters. To ensure greater reliability of fastening, additional anchors are installed every 30-40 centimeters. Between the cable suspensions the step is from 70 to 90 centimeters. The design provides a special loop clamp and a screw coupling, a manual winch or a pulley. They are located on opposite sides. The presence of these elements allows you to lift and tension the cable, as well as change its strength and stability. He is grounded. Under no circumstances should it be used as grounding. The degree of tension should not be maximum. The cable should not sag. You also shouldn’t be too zealous when pulling the cable. Overvoltage that occurs when exposed to low temperatures can cause it to burst.