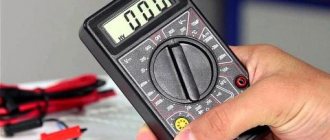
Devices that combine an ammeter, a voltmeter and an ohmmeter are convenient for use at home and in production. It is important for every home handyman to know how to use the DT 832 multimeter, one of the most popular devices. At first, you need to read and remember the instructions. It should be strictly followed, since the slightest mistake may cause the device to fail.
The device is designed to determine the following parameters:
- electric current;
- voltage between two points of an electrical circuit;
- electrical resistance.
The device also performs a number of other operations:
- continuity testing of circuits with digital indication and audio alarm;
- monitoring the serviceability of semiconductor parts;
- measurement of transistor gains;
- temperature measurements with a thermocouple.
Multimeter device
To learn how to use the DT 832 multimeter correctly, you first need to become familiar with its design.
- The liquid crystal display shows the numerical values of the parameters.
- The functions of the device are changed by a switch. When not in use, it is turned off, otherwise the battery will quickly drain.
- Three sockets of the device are used for connection with probes. A pin with a black wire is inserted into the main one (“COM”) with negative polarity. A red probe is inserted into the next socket labeled VΩmA. It is used to measure current, voltage and resistance. Through the third socket (upper) the DC current value is measured from 0.2 to 10 A.
- Panel for measuring the gain of transistors.
- Wires with probes. Compared to the device itself, their quality is much lower, and many home craftsmen make them again for themselves. The wire is taken with a cross-section of 1 mm 2, and the sheath must be thick and elastic. To connect to any place in the circuit through insulation or varnish, instead of probes, needles are installed, soldered to the wires.
Expert opinion
It-Technology, Electrical power and electronics specialist
Ask questions to the “Specialist for modernization of energy generation systems”
How to use a multimeter step by step instructions Thus, using the DT-832 multimeter, as well as its analogue m832, you can measure the most common electrical quantities. Ask, I'm in touch!
Resistance
The function is used primarily when testing electrical circuits, when it is necessary to detect a break or install new wiring. The switch is set in the resistance sector to the lowest level with an audible short circuit alarm. The absence of a signal means there is a gap or the value is exceeded 50 Ohms. Contact may be broken directly between the probe and the socket. To check the functionality of the device, the wires are short-circuited. The device should show zero or several ohms.
Before using the DT 832 multimeter to test electronic circuits, one leg of the resistor must be removed from the board.
Chinese-made multimeters with low quality have a significant error when measuring electrical parameters. The signal is also distorted by connecting wires and probes. Professionals make accessories for the tester with their own hands, since factory ones are usually of low quality.
Checking the health of capacitors
The non-polar capacitor is checked for the resistance value, which should be greater than 2 mOhm on a working part.
The simple, cheap and reliable Ermak digital multimeter DT 832 is suitable for the average user. How to use it? Very simply, it is a regular tester.
The device is turned on by setting the switch to the desired position. The characteristics are no different from the usual ones, and the price is low. Reviews about the Chinese-made model are positive; it is quite suitable for solving household problems with electrical wiring.
Multimeter DT 832
A multimeter is a universal device that combines a voltmeter, ammeter, and ohmmeter. It is also called a tester. We will look at the most versatile and easily accessible device - DT 832.
Instructions for the multimeter DT 832. Its technical characteristics are as follows. The voltage is variable with a range of 200 V, the resolution is 0.1 V, and the accuracy is ±1.2% ±10D. With a range of 700 V, the resolution is 1 V and the accuracy is ±1.2%±10D.
There is overload protection (fuse 200mA/250V);
Let's move on to the DT 832 digital multimeter. Its main difference is the type of indication, it is digital.
Let's look at the instructions for the DT 832 digital multimeter (technical characteristics and parameters).
- Digital type of indication;
- Manual selection of measurement limits;
- LCD indicator 3½ digits
- Provides overload protection
- Size: 126×70×28 mm
- Weight 137 g
- Voltage (DC): 200mV, 2000mV, 20V, 200V, 1000V.
- Voltage (variable): 200V, 750V.
- Constant current: 2000uA, 20mA, 200mA.
- Resistance: 200Ohm, 2000Ohm, 20KOhm, 200KOhm, 2000KOhm.
- Built-in generator: 50Hz.
Now let's move on to the most important thing, how to use the DT 832 multimeter.
DCA is a function that measures DC current. The maximum holding power is 10 A. There are four limits: 2000 microamps, 20 milliamps, 200 milliamps, 10 A. Let's consider, again, an example. Let's take a regular battery. We set it to maximum and measure. By the way, the device will even show you the value of the terminal, that is - or +.
HFE is a transistor gain measurement function. There is a special connector on the device for this purpose. The grooves are designated as E, B, C and the structure is written as PNP and NPN. For this you need to know the base.
Let's measure the resistance. This device has five limits. The values most often used in household measurements are 2000 Ohm and 2000 kOhm.
We have reviewed the main functions that the DT 832 model performs. A few more important notes: if the device shows 1, you have not set the limit correctly, if it shows -, you should rearrange the terminals, and if the battery icon shows, then you should charge it.
Diagram of the DT 832 multimeter. The basis of the device is a microcircuit. There may be various prefixes in front of the kernel, it all depends on the manufacturer. Nowadays, DIE chips are most often used; their crystal is soldered directly onto a printed circuit board.
Resanta DT 832 multimeter. It is used both in households and in scientific laboratories. It is designed to measure both direct and alternating current. Measures resistance, checks diodes, transistors and audio continuity. The temperature range in which this device operates is 18-28C.
What kind of lighting do you prefer?
Built-in Chandelier
Like all novice radio technicians, I started buying the necessary tools for my laboratory
Expert opinion
It-Technology, Electrical power and electronics specialist
Ask questions to the “Specialist for modernization of energy generation systems”
How to use a multimeter phase m832 - VET engineer Depending on the characteristic that is being measured, there are three options for connecting a digital multimeter to the line being tested, or the element being tested. Ask, I'm in touch!
Instructions for use
Now I’ll tell you in a little more detail about how to use a digital multimeter with your own hands to make different measurements of parameters.
In our material we will consider the measurement:
To make everything more clear, I will tell you about each procedure separately. If you have anything to add to this instruction, be sure to write in the comments.
Voltage
Measuring the voltage yourself is not difficult. But detailed instructions for such a case will definitely not hurt.
The sequence of your actions will be like this:
- Move the switch to the appropriate position;
- In a network where there is alternating voltage, the arrow should be located in the ACV zone;
- The MTM probes go into the COM and VΩmA sockets;
- Now set the appropriate approximate range;
- When in doubt, convert to the maximum value;
- When a number appears on the display, you can adjust the position;
- If it is a constant voltage network, MTM applies in the same way;
- But in the second case, it is better to set the switch to the 20 V position;
- The probes should be connected to the circuits strictly in parallel.
You can clearly see that there is nothing complicated in this procedure. Therefore, you can easily measure the voltage that is currently observed in the electrical network with your own hands. Both variable and constant.
The main thing here is not to touch the probe with your bare hands, since it will be under the influence of current.
Current strength
To determine the current parameters, the first step is to answer the question of what kind of current flows through the wiring. It can be variable or constant.
Next, you look at the equipment or device to see what the approximate value may be. The indicator is measured in Amperes, that is, denoted by the letter A.
- Depending on the approximate voltage parameters, the red probe goes into the corresponding Ω socket;
- First, it is better to place the probe where the current value is higher;
- If you see a lower value on the display, you can switch;
- If necessary, reduce the measuring range;
- When the MTM is used as an ammeter, the connection to the circuit occurs in series.
And here, as you can see, you can easily cope on your own. The task of measuring the current strength is completed. Therefore, let's move on to the next point.
Resistance
The simplest and safest measure using MTM is resistance measurements.
Here proceed as follows:
- The switch can be placed in any position in the zone;
- A suitable measurement range is selected;
- Before the operation, the power supply must be turned off;
- Otherwise, the tester will not show the correct value;
- If you see the number 1 on the display, or the values Over and Ol, then you should set a higher range;
- Otherwise, overload will occur;
- When 0 appears, the tester is transferred to a smaller range.
Following these simple rules and consistency in your actions will allow you to quickly and without any problems carry out all the necessary procedures for measuring resistance.
A good multimeter function that often comes in handy when repairing home appliances. For example, I recently fixed my wife’s iron. And the tester turned out to be extremely useful in this work.
Calling
I didn't tell you anything about the back panel of the multimeter. Although there are several more functions there. They are mainly intended for radio technicians who are professional in their work. They will not be needed for tasks at home or when repairing a car.
With the exception of one mode. It is called dialing mode. It is designed to search for breaks in electrical circuits. To do this, the chain needs to be ringed. When it is closed, that is, there is no break, then a sound signal appears. If there is a break, then no sounds will appear. This means that you have found the problem area.
To check, you need to place two probes on both sides of the chain being called. This allows you to find even a minor break in an extended electrical circuit.
But there is an important feature here too. When you are ready to ring the circuit, be sure to make sure that the electricity is turned off. That is, first the machine on the switchboard is turned off, and only then the dialing is done. The same goes for car repairs. You need to turn off the engine and remove the negative terminal from the battery.
I tried to help as best I could. You have comments and questions. Additionally, you can watch a visual video.
I think everyone, if desired, can easily understand the operation of any modern digital multimeter. In addition, the manufacturer always includes detailed instructions for the device. Therefore, you should always start working with the device by studying the instruction manual.
Thank you all for your attention! Subscribe, leave your comments and ask relevant questions!
( 4 ratings, average: 4.75 out of 5)
Did you like the article?
Subscribe to updates and receive articles by email!
We guarantee: no spam, only new articles once a week!
Operating modes
To measure a certain characteristic, you need to set the correct operating mode. Use the rotary switch to select one of the options to find:
- AC voltage - ACV;
- direct current strength - DCA;
- DC voltage - DCV;
- transistor gain - hFE;
- diode test mode - graphic sign “diode”;
- electrical resistance - Ω.
Power is connected by turning the dial or the “power” button. In some multimeters, the buttons activate the backlight or freeze the screen (“hold”). If the main switch does not have separate scales for measuring AC and DC voltage or current, then using a special button you can set the desired mode.
To determine the capacitance of the capacitor, there may be a separate output on the housing. A block marked Fcx is highlighted on the instrument scale.
Dt 832 no voltage measurement
In addition to the tester, the kit includes a power supply, two test leads and user instructions for the DT-832 digital multimeter. The device comes in two versions: boxed version or OEM. The second is thick cellophane, into which only the device itself is placed.
Expert opinion
It-Technology, Electrical power and electronics specialist
Ask questions to the “Specialist for modernization of energy generation systems”
Digital multimeter dt 832 instructions on how to use For example, the DT-830D, purchased by the author on trading platforms in China, is, if possible, more likely DT-832, with a different body marking. Ask, I'm in touch!
D.C
Small currents are measured in the DCA sector. You should be extremely careful here. If you mistakenly measure the voltage in this range, a short circuit will occur.
To measure current up to 10 A, the red probe is switched to the upper socket. It is important to know how to use the DT 832 digital multimeter at high current. Readings should be taken for a few seconds!
How to measure: detailed instructions
The electric power industry produces tester models with various interfaces. Manufacturers describe how to use a multimeter in detailed instructions. But often, especially with cheap products, the instructions are missing or printed in English. Despite some differences, measurements in different instruments are made according to General Principles.
Voltage
When working with a live electrical circuit, safety precautions must be observed.
The first step is to set the operating mode and value range. To do this, you need to know what kind of current in the circuit is direct or alternating. It is recommended to first set the range to maximum (if the voltage is unknown) or above the current potential limit. For a 220 V network this is 600 or 750 V.
The second step is to connect the black probe to the COM socket, the red one to the connector to determine the voltage.
Connecting voltage probes
The third is the actual measurement. To do this, insert the ends of the wires into the sockets of the socket or, for example, to the poles of the battery.
Battery potential measurement
The voltage value in volts will be displayed on the screen. You can fix the number by pressing the HOLD button (if available). This is a very convenient function, especially if there are a lot of measurements.
If the polarity is not observed, the value will have a minus sign. In digital multimeters, unlike pointer ones, this is not a problem.
Resistance
The multimeter allows you to determine the resistance of elements, sections of a circuit or simple electrical devices without applying voltage. Such measurements are not dangerous, since de-energized objects do not pose a danger.
- Set the switch to the desired mode in the maximum range.
- Connect the wires to the appropriate connectors.
- Check the condition of the device. To do this, connect the ends of the probes to each other. The display will show “0” or a slight resistance of the conductors themselves, which is taken into account in high-precision calculations.
- Measure the resistance by touching the terminals of the object being tested. Alligator clips are often used for this. It will be more convenient to work, and the readings will be more accurate.
The device automatically displays the resistance value in Ohms. For the correct result, 2 attempts are enough.
Determination of element resistance
If the circuit is open and there is no contact, the display will show one.
Current strength
In order to measure the current in a circuit, you need to integrate the device into the circuit - in series.
DC and AC voltage
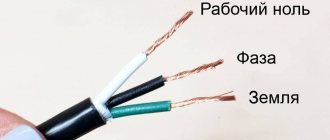
Using the device, you can find out the value of the network voltage, for example, by taking measurements in an electrical outlet. Everyone knows that standard indicators should be within 220 V, so the device needs to be set to ACV mode with a value of 750 V (this is necessary to prevent the fuse from blowing).
The connection must be made in parallel to the terminals with and without consumer. In the case of a socket, you need to insert the probes into the holes. It should be noted that it is forbidden to touch the metal parts of the probe; before starting the measurement, you must ensure the integrity of the insulation.
If the readings are within the range of 220-250 V, then the voltage is normal. To find out how much the values drop under load, you need to connect an iron, kettle or any other household appliance to a nearby outlet.
Everyone knows that constant voltage exists in various devices. Some of them:
- Power supplies;
- batteries;
- batteries.
In this case, the device must be switched to DCV mode. It is imperative to observe polarity, otherwise the multimeter will show negative values. In the same way, you can find wires with plus or minus in the system.
If you need to find out the parameters in the car, it is enough to set the upper limit to 20 V. This way, the voltage of the on-board network and battery terminals is measured.
Operation Guide
Studying the factory instruction manual, one can note that the translation into Russian is not very high-quality. At the same time, very little attention is paid to the sequence of correct measurements.
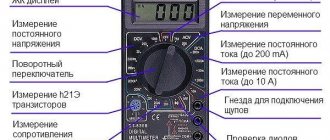
Before proceeding directly to them, you need to be able to navigate the inscriptions on the device. In the middle of the device there is a biscuit-type switch, with the help of which the desired parameter for measurement and its limit are selected. Around it are various segments representing different quantities. Thus, the following signs and inscriptions can be found on the device:
- OFF—turn off the tester;
- ACV - alternating voltage measurement mode;
- DCV - allows you to measure DC voltage;
- DCA - by moving the switch to this range using a tester, you can measure direct current;
- Ω - used to obtain results about resistance;
- hFE - designed to measure the gain of transistors;
- -|>| —))) — in this position of the switch, pn junctions and line integrity are checked.
You might be interested in: The unit of measurement is kilowatt and what is measured in kW
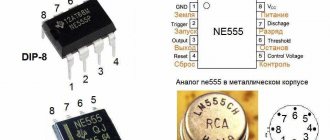
On the opposite side of the multimeter there is a socket for testing transistors. It is usually made in blue. The lamellas of this panel are designated according to the type of element and its pn junctions.
Voltage and resistance measurements
The steps for measuring voltage can be described in the following steps:
- The switch is moved to the area of the device indicated by the icons: ACV - for alternating voltage and DCV - direct voltage.
- The red test lead is inserted into the VΩmA socket, and the black one into the COM connector.
- Two probes touch the points at which the voltage is measured.
- The result will be displayed on the LCD display.
If a unit lights up on the screen, this means that the measured value exceeds the capabilities of the device. If the first digit is zero, then the range can be switched to a lower digit to clarify the data.
You might be interested in Basic and additional means of protection in electrical installations
DC current calculation
The maximum current that the device can measure is 20 amperes. If you try to measure a higher value with the device, the fuse will blow. It only needs to be replaced with a similar one. Violation of this principle will lead to burnout of the sensitive circuits of the device and failure of the microcontroller.
The current is calculated as follows:
- The black measuring wire is connected to the COM connector of the multimeter, and the red one is inserted into the 20A socket.
- The range switch is set to the position corresponding to the ACA region.
- The probes are connected in series to the break in the electrical line being tested.
- The number displayed on the display will correspond to the measured current.
Expert opinion
It-Technology, Electrical power and electronics specialist
Ask questions to the “Specialist for modernization of energy generation systems”
Accuracy of multimeter operation Often in DT multimeters, with the probes open in the resistance measurement mode, the device takes a very long time to reach the overload value of 1 on the display or does not set at all. Ask, I'm in touch!
Tests and comparisons
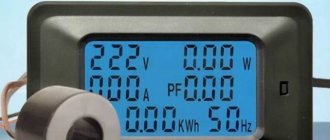
To visually compare the test results, we used a higher-class multimeter - Unit 151B. 3 tests were carried out to measure the value of constant voltage, current and resistance.
A 5 V network adapter was used as a constant voltage source.
The tested device showed a voltage value of 5.16 V, while the control one showed 5.11 V. Moreover, the measurement accuracy was 1%, which is twice as much as stated.
To measure the current, a 24 V car lamp was connected to the same adapter. Both devices were connected in series with the load.
The control multimeter recorded a value of 0.41 A, which is 0.06 A more than the one being tested. In this case, the error was 1.5%, instead of the stated 1%.
When measuring the resistance of a resistor marked 2.7 kOhm, both devices showed the same result - 2.69 kOhm, which fully corresponds to the declared accuracy.
Based on the test results, it can be concluded that the test sample does not correspond to the declared accuracy for all measured electrical quantities. However, at the household level, where great accuracy is not needed, it will perform any measurements with sufficient error.
M832 Specifications
- Constant voltage: Ranges: 200 mV; 2; 20; 200; 1000 V. Resolution (according to ranges): 0.1; 1; 10; 100 mV; 1B.
- Input impedance: 1 MOhm.
- Variable voltage: Ranges: 200 V; 750 V. Resolution (according to ranges): 100 mV; 1 V.
- Constant Current: Ranges: 200 µA; 2; 20; 200 mA; 10 A. Resolution (corresponding to ranges): 0.1; 1; 10; 100 µA; 1 mA.
- Resistance: Ranges: 200 Ohm; 2; 20; 200 KOhm; 2 MOhm. Resolution (corresponding to ranges): 0.1; 1; 10; 100 Ohm; 1 KOHM.
- Continuity of connections: when the circuit resistance is less than 1 KOhm, the buzzer sounds.
- Weight: 0.18 kg.
- Dimensions: 125x65x28 mm.
- The price is about 200 rubles.
Along with the multimeter, the package contains a pair of probes, a 9 V battery type 6F22 “Krona”, as well as instructions for using the device.
Expert opinion
It-Technology, Electrical power and electronics specialist
Ask questions to the “Specialist for modernization of energy generation systems”
Multimeter dt9208a: instructions for use However, there are also devices in which the switch positions do not match, the designations are not identical, and the display is not standard. Ask, I'm in touch!
What it is
Washing machine hw60-bp12758: reviews, operating instructions, specifications, photos
A multimeter is a compact, ergonomic and multifunctional device for measuring the basic parameters of an electrical network for any purpose. All multimeters allow you to measure current, voltage, resistance and even temperature with a certain accuracy using their probes.
There are two types of multimeters:
- Analogue, which display measurement results using mechanical display tools: arrows, bars and division values, showing the quantitative characteristics of the measured value;
- Digital. The most commonly used types of devices, the information is displayed through a built-in display, and all data is calculated digitally.
Appearance of a conventional tester for household use
Multimeter M832 - instructions
As often happens, the instructions for the M832 are universal and are designed for a number of devices with different technical parameters. For example, this model does not provide the ability to measure temperature, although the instructions describe this option. This can be confusing for an inexperienced user.
The battery that was in the package along with the device is of quite high quality and you will be surprised to learn that the new battery costs separately almost as much as the entire device in the kit.
A typical drawback of this device and similar inexpensive multimeters is the unreliable fastening of the measuring probes to the wires. In fact, the probes are held on several thin copper conductors, and after the conductors break, due to the design of the probe, it is impossible to solder them back.
To avoid this, immediately before starting operation, securely fix the wire at the base of the probe using electrical tape or cold welding. We recommend that you immediately buy high-quality ones and use them in all your (this and future) testers.
M832 multimeters: design and repair
It is impossible to imagine a repairman's workbench without a convenient, inexpensive digital multimeter. This article discusses the design of digital multimeters of the 830 series, the most common faults and methods for eliminating them.
To check, take the required battery and, just like with a digital one, connect the terminals to the positive and negative poles.
Don't forget to turn the device to the battery measuring position!
In principle, you can check the battery without a tester. To do this, you will need to place it vertically, lift it 2 cm and release it. If it bounces, it means it has shrunk. A loaded one will not give a strong rebound.
| Tester power supply | 3 V/9 V two AA or crown battery |
| Measured DC current | 200 µA - 200 mA |
| Resistance (Ohm) | 200–2000 k (2 mOhm) |
| DC Voltage Sensitivity | 200 mV–1000 V |
| -/- alternating current | 200–750V |
Expert opinion
It-Technology, Electrical power and electronics specialist
Ask questions to the “Specialist for modernization of energy generation systems”
How to check a phone battery with a multimeter Voltage in volts is determined by connecting the probe in parallel to the circuit, direct current strength by placing it in series in front of the load, and resistance by directly touching the probe contacts to the consumer terminals. Ask, I'm in touch!
Digital multimeter: how to use
When measuring each of the parameters (current, voltage, resistance, and so on), you must first:
- roughly imagine the measurement range. So, for a battery it can be 1.5 V, 7.5 V, 12 V and so on. A value slightly larger than expected is ALWAYS selected. This is a kind of “safety margin” so as not to damage the device;
- choose the correct direction of measurement. In this case, you should move the multimeter pointer to the desired position, focusing on the generally accepted symbols printed on the case;
- connect the probes correctly. For any type of measurement, the negative (black) probe is connected to the common COMMON (COM) socket, the positive one is installed in the socket intended for a specific type of measurement.
General scheme of actions - how to use an electrical tester (multimeter):
- move the instrument pointer to the desired measurement range, setting the value 5...10% higher than expected. If the value is unknown, the maximum value is set;
- connect the probes according to the type of measurement - red into the VΩmA (VΩ, V/Ω) connector for measuring current, voltage, resistance of small values or 10A (20A) for current of large values, black - into the common COM connector;
- bring the probes to the device or network for which measurements are being taken. Accordingly, the red probe is connected to the positive output, the black one to the negative one;
- evaluate the value displayed on the display. If necessary, adjust the position of the pointer to obtain more accurate data.
Detailed instructions on how to use a multimeter tester in different measurement modes are given in the articles “How to check resistance with a multimeter” and “How to measure current with a multimeter.”
Example: It is necessary to estimate the resistance of a device or electrical circuit. The display showed “0”. Therefore, the selected range is larger than necessary, it is necessary to move the pointer to smaller values. When “1”, “OL”, “OVER” are displayed, on the contrary, it is necessary to increase the range - there is an overload in the selected one. If a digital value with two or more digits is displayed, but it is significantly less than the selected range (200 with 700 Ohms selected), the value should be reduced.
Scheme and operation of the device
The range of operating input voltages Umax directly depends on the level of the adjustable reference voltage at pins 36 and 35 and is:
The stability and accuracy of the display readings depends on the stability of this reference voltage. The display readings N depend on the UBX input voltage and are expressed as a number:
Voltage measurement
Rice. 4. Simplified circuit of a multimeter in voltage measurement mode
When measuring alternating voltage, it is rectified by a half-wave rectifier using diode D1. Resistors R1 and R2 are selected in such a way that when measuring a sinusoidal voltage, the device shows the correct value. ADC protection is provided by divider R1. R6 and resistor R17.
Current measurement
Resistance measurement
Dialing mode
Popular models of multitesters
When choosing a model, consider the following factors:
- Special purpose. Here we mean how the device will be used - as needed, for a hobby, for professional work.
- Appearance, dimensions. There are portable portable modifications, and there are stationary ones that are not intended for frequent transportation.
- The range of tasks to be solved. Before purchasing, decide what values you will need to measure and compare them with the list of functionality in the description.
- Accuracy. This parameter is set by needs. A minimum degree of error is necessary for electronic engineers conducting professional activities.
The combination of these factors determines the price. Professional ones are more expensive, household (amateur) ones are cheaper. But the latter are less accurate and have less functionality. Durability and reliability depend on the quality of the assembly. Therefore, when choosing, you need to evaluate many factors, which will be discussed further. The main thing is that the purchase is fully justified.
Multimeter dt 830b: instructions for use
Multimeter dt 832: instructions for use
Multimeter dt 838: instructions for use
Multimeter dt9208a: instructions for use
Multimeter dt9205a: instructions for use
Multimeter dt 61: instructions for use
Expert opinion
It-Technology, Electrical power and electronics specialist
Ask questions to the “Specialist for modernization of energy generation systems”
Calculator for calculating power from supply voltage and current Digital models are capable of generating test pulses or harmonic signals, which makes it possible to check the performance of diodes and transistors. Ask, I'm in touch!
Meet the tester
First of all, we will briefly tell you what is on the front panel of the measuring device and what functions you can use when working with the tester, after which we will tell you how to measure resistance, current and voltage in the network. So, on the front side of the digital multimeter there are the following symbols:
- OFF – tester is turned off;
- ACV – alternating voltage;
- DCV – constant voltage;
- DCA – direct current;
- Ω - resistance;
You can clearly see the front appearance of the electronic tester in the photo:
You probably immediately noticed the 3 connectors for connecting probes? So here we need to immediately warn you that it is necessary to correctly connect the tentacles to the tester before taking measurements. The black wire is always connected to the output labeled COM. Red according to the situation: in order to check the voltage in the network, current up to 200 mA or resistance, you must use the “VΩmA” output; if you need to measure the current value above 200 mA, be sure to insert the red probe into the socket marked “10 ADC”. If you do not take this requirement into account and use the “VΩmA” connector to measure large currents, the multimeter will quickly fail because The fuse will blow!
There are also old-style devices - analog or, as they are commonly called, dial multimeters. The model with an arrow is practically no longer used, because such a scale has a higher error and, moreover, measuring voltage, resistance and current using a dial indicator is less convenient.
If you are interested in how to use a dial multimeter at home, we immediately recommend watching a visual video lesson:
We will talk in more detail later about how to use a more modern digital model of the tester, looking at step-by-step instructions in pictures.