What to do
The following steps will help you understand the reason:
Check that the charger is connected to the power supply correctly and that the polarity of the device and battery terminals is correct.
Checking the memory
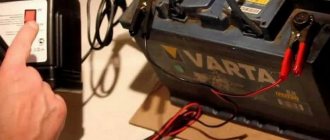
To check the voltage produced by charging, connect it to the battery and turn it on. Then, connect a voltmeter in parallel (a multimeter in DC measurement mode). You should get stable (not jumping) readings of 13-14.5 Volts. Readings that fluctuate or differ from the norm are considered a faulty memory. If the charger readings are adjustable, then adjust them to the normal value.
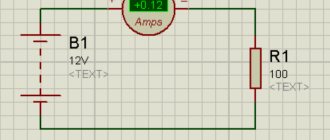
To check the current strength of the charger, connect an ammeter (multimeter in ammeter mode) in series with the charging circuit. One probe is connected to the charging terminal, the second to the battery terminal, the battery is connected to the charger through an ammeter. The readings obtained are compared with the readings of the ammeter of the device. A discrepancy between the readings of the charger and the tester means a breakdown of the charger.
We are looking for a memory failure
To make sure that the memory is faulty, check it this way:
- Disconnect the device from the power supply.
- Disassemble the housing using a screwdriver.
- Visually inspect all parts, blackened ones need to be replaced
- The soldered contact can be simply soldered back with a soldering iron.
The cables are checked by simply “ringing”, connecting the tester with one probe to the plug of the device, the second to the end of the wire inside the device body. Infinite resistance means a break. The second wire and the wires going from the charging to the battery are connected in the same way.
fuse is checked visually; if it is blown, it will be noticeable. Replace the blown fuse.
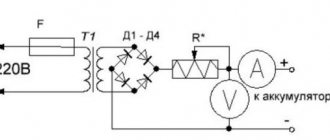
The transformer is checked when the charger is connected to the network and running. Readings are taken from the charging terminals; they should be 13-14.4 Volts.
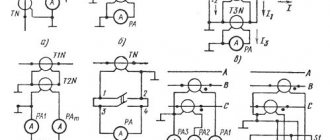
The diode bridge is tested by connecting the tester in the desired output mode. Absence of readings or incorrect readings is a sign of bridge failure. The monolithic bridge is being replaced entirely. Otherwise, you can ring each diode. The tester is switched to resistance mode and the probes are applied to the diode outputs. Swap the probes. A diode allows current to pass in one direction, so one measurement will show no resistance and the second will show infinite resistance. If the readings are different, the diode should be re-soldered. This is done with all diodes in the bridge.
It is not worth replacing the fuse with a wire “Bug”. This threatens to break other components and is dangerous for your life. Disassemble the device only without power, the plug is removed from the socket. Tested when switched on, only in assembled form. Don't forget about the danger of electric shock.
Battery check
When the battery is charging, the ammeter needle does not drop, you have already checked the device, all that remains is to check the battery itself.
Use a tester to check the voltage at the battery terminals. It is better to use a load fork, then the voltage under load is immediately detected. A working and fully charged battery should show 12.6 -13.2 volts. Under load for 3-5 seconds, the voltage should not fall below 9 volts.
A voltage below 12.6 indicates a low battery charge, but a low voltage under load means that the battery is “dying” or requires increasing the density of the electrolyte.
Try charging a battery that is not in service again with a higher current to the required voltage; if this does not work, you need to buy a new one. A severely discharged battery requires a higher charging current, perhaps a more powerful charger will solve the problem.
When being serviced, you should check the electrolyte level inside each jar and its density.
The low level is increased by adding distilled water. By adding tap water, you reduce the density of the electrolyte. The salts contained in such water decompose the acid. By adding acid, you will ruin the battery plates, because you will greatly increase the density of the acid and corrode them.
When the battery is discharged, the acid density drops. When recharging, the process proceeds in the opposite direction. For a working battery, the density in the charged state is 1.27 g/cm3. Check the battery is in a charged state.
The density is checked with a hydrometer.
Work with electrolyte wearing rubber gloves and safety glasses. If acid gets into your eyes, rinse it immediately with water.
How to charge a car battery correctly and with what current?
First of all, let’s figure out in what cases it is necessary to charge the battery.
Most users charge the battery only when it can barely turn the starter. This is fundamentally wrong. The battery should be checked periodically, and not in critical situations. To do this, very little is required - check the density of the electrolyte from time to time.
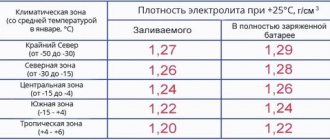
• Initially, even during pre-sale preparation, the electrolyte in the batteries is adjusted to a density of 1.28 g/cm3. (In the northern regions in winter the density is increased to 1.30 g/cm3). When the battery is discharged, the density decreases and if the density drops to 1.25 g/cm3, then the battery must be recharged.
• With a difference of 0.2 g/cm3 of electrolyte density in different banks, recharging is also required.
In addition, the battery needs to be charged:
• after three months of inactivity;
• periodically with low current to remove possible sulfation.
Before charging the battery, be sure to wipe the case, especially carefully around the filler holes, since dirt accumulates most there, the penetration of which into the battery will lead to undesirable consequences.
After unscrewing the caps, pay attention to the electrolyte level - it should be the same in all banks. If the level drops below the plates (and this is already a sign that not everything is in order with the battery), add distilled water (in no case electrolyte!) so that only the plates are covered. The properties of the electrolyte are such that when the charge decreases, not only its density, but also its level decreases, and when the charge increases, the density and level increase. Therefore, if you immediately raise the level to the proper height, then during charging some of the electrolyte may splash out or you will have to constantly monitor its level and pump out the excess.
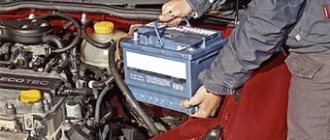
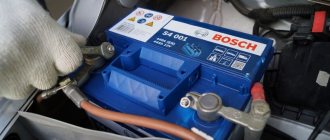
After these preparatory works, you can proceed directly to the charging itself. You can charge without removing the battery from the car, but you must remove both standard wires. When connecting the charger wires, observe the polarity - “+” and “-” of the charger are connected to the battery terminals of the same name.
To charge the battery, a current equal to 0.1 of the battery capacity is taken. That is, if the battery capacity is 60 A/hour, then the charging current will be 6 A.
Some people believe that if you increase the current, you can reduce the charging time. This is wrong - the time will not be reduced, but the battery will definitely be damaged. Increasing the charging current will lead to the active mass falling out of the gratings, and the plates themselves may become warped.
You can reduce the recommended charging current by half. This, of course, will increase the charging time, but will have a positive effect on the quality of charging. To prevent the battery from forming sulfation of the plates (charging with low current), this value is used.
It is important to track the end of the battery charge. A sign of the end of charging will be the moment of rapid release of gases, the so-called. “boiling” of the battery. But it can be difficult to track the moment of its appearance, because... “boiling” from a certain point accompanies the entire charging process, so it is better to periodically check the density of the electrolyte. When the norm is reached, you do not need to immediately turn off the charger, but continue charging with a small current for another hour.
When charging, it may happen that the density of the electrolyte will increase unevenly in all banks, and in some it may stop altogether in the middle of the process. Pay attention to this - this happens if the active mass has spilled on the grates and, as a result, premature failure of these cans is possible.
Pouring electrolyte from one jar to another or trying to increase the density by adding electrolyte of a higher density will not lead to a positive result. As sad as it may be, get ready to replace the battery soon.
What voltage should I set when charging the battery?
Voltage is a potential difference, and the current will flow in the direction where this value is smaller. Therefore, the charger voltage is always selected higher than the charging level of the car battery. The greater the voltage difference, the faster and more fully the car battery will gain capacity after charging.
During charging at a constant voltage, the limit of the parameter set on the charger is lower than the characteristic at which the release of gases from the battery being serviced begins. What potential difference is needed to charge a car battery? The maximum voltage used when charging the battery is 16.5 V. Which parameter should be depends on the type of battery. The time and completeness of battery charging depends on the voltage. The ratio of charge voltage and capacity recovery for a 12 V battery in 24 hours is as follows:
- With a voltage of 14.4 V you can charge the battery by 75-80%;
- Using a voltage of 15 V, the charge level is 85 - 90%;
- With a voltage of 16 V, the battery is charged by 95 - 97%;
- With a maximum voltage of 16.3 -16.5 V, the batteries are fully charged.
When the battery voltage reaches 14.4 - 14.5, the charging end signal lights up on the charger.
It has been established that it is this voltage of the car battery that does not create gas emissions after and during charging. Therefore, during actual vehicle operation, the generator, through a voltage regulator, limits the maximum voltage level to this value. In summer this figure is close to 100% capacity, in winter it corresponds to 13.9-14.3 V, with the engine running, which corresponds to 70-75% capacity.
Charging the battery with pulse current
Pulse charging is the use of a charger with a variable current or voltage, i.e. their values increase and decrease at certain intervals. Pulse current is divided into asymmetric and pulsating.
When charging at an asymmetric current, its polarity changes in each cycle. But the electric charge is greater with direct polarity than with reverse polarity (the ratio of charge to discharge is 10/1, and the duration of their pulses is 1/2). Thanks to this, the battery is charged.
The pulsating current charges the battery by changing its magnitude, while the polarity remains unchanged.
It is more convenient to charge starter batteries with automatic chargers
Let's return to the question of what devices should be used to charge car batteries. Obviously, this procedure is easiest to perform using an automatic memory. The undoubted convenience of most of these devices is that they themselves provide the optimal charging mode and automatically change the voltage and current depending on the state of charge of the battery. By the way, the maximum voltage that such devices produce does not exceed 14.8–15 V, which is also due to safety requirements.
Causes of overcharging and increased voltage in the vehicle’s on-board network
A malfunction of the relay regulator is the most common cause of battery overcharging.
Due to a breakdown, this unit ceases to perform its functions and “passes” all the voltage generated by the generator into the on-board circuit, and it can reach 16 and even 25 V. Naturally, not a single electrical appliance in a car is designed for such a voltage, so the elements of the on-board network are starting to burn out.
Regulator failure can be partial or complete. In the first case, this element still performs its functions, but “passes” a voltage slightly higher than necessary (for example, 16 volts).
In this case, the overcharge of the battery can only be detected by readings from measuring instruments or the on-board computer. Electricity consumers practically do not “suffer” from such voltage, but even such voltage negatively affects the condition of the battery - with a constant process, the battery “boils out” and fails.
If the relay-regulator is completely malfunctioning, high readings (over 16 V) begin to damage consumers - light bulbs and fuses burn out first, then other devices. A significant excess of voltage can cause a fire in the electrical wiring.
Despite the fact that a partial breakdown of a relay does not pose a significant threat to the vehicle’s on-board network (with the exception of the battery), it should not be ignored, since at any moment it can develop into a complete failure of the element.
Since the relay-regulator is the only element that prevents the battery from overcharging, many car enthusiasts, when they detect increased voltage in the on-board network, immediately replace this unit.
But installing a new regulator does not always help; often the problem remains. Naturally, suspicion in this case falls on the generator. This unit can actually overcharge in the event of a breakdown of the diode bridge or a break in the windings, or a breakdown of the armature to the housing.
READ ON THE TOPIC: Car generator voltage, normal at idle and under load.
But if replacing the regulator relay does not help, you should not immediately change or send the generator for repair.
IMPORTANT: Often the reason for overcharging the battery lies in poor contact of the wiring of the battery charging system circuit (described above).
The reason is very simple: at the point where the contacts are oxidized, resistance arises, which the relay-regulator “perceives” as a load in the on-board network. For example, this can happen in the fuse box.
To compensate for it and prevent a drop in voltage, the regulator begins to “pass” large values, resulting in an increased voltage being supplied to the battery.
Therefore, when looking for the cause of battery overcharging, you should first check:
- Relay regulator.
- Charging system circuit (all connections).
- Fuse.
And only after that remove and diagnose the generator.