The lithium-ion battery kit eliminates the need to buy disposable 3.7V batteries for the long term.
In order for lithium batteries to last for several months or even years, in addition to careful handling without shocks at gentle temperatures, timely charging with the proper current is important.
A charger for Li-ion 18650 batteries can be purchased at the store. It costs from several hundred to several thousand. Quality varies, and a high price does not always guarantee high quality.
Find out the charging time of your battery
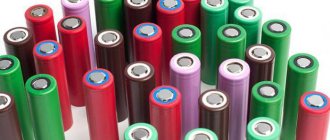
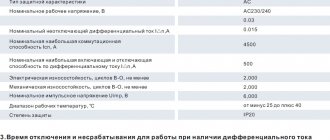
Battery specifications
The 18650 designation on lithium-ion batteries carries the following information:
Li-ion 18650
- diameter 18mm;
- length 65mm;
- the battery has a round cross-section, as indicated by “0”.
The battery capacity is indicated on its case. The maximum value for a lithium battery is 18650 – 3500Ah. Sometimes little-known manufacturers indicate a higher capacity, which indicates the unreliability of the manufacturer and the questionable quality of the batteries. In practice, such batteries have a power of no more than 3000-3400.
The selection of a charger should be based on the described battery characteristics.
Transformers and voltage converters 220 to 110 Volts
Step-down transformers and voltage converters 220 to 100 Volts are needed in order to power American or Japanese appliances from our stationary electrical network. In Japan and the USA, the AC (Alternating Current) standard for fixed power supply is 110 V 60 Hz, and the domestic standard is 220 V 50 Hz. The difference in the network frequency of 50 Hz and 60 Hz is usually not significant, since the difference is small. But the voltage is two times different. Therefore, devices designed for 110 V categorically cannot be connected to a 220 V network. They are guaranteed to fail and “burn out.” This, of course, does not apply to equipment with switching power supplies designed to operate with a network in a wide voltage range from 100 to 240 Volts, which is necessarily written on the device itself.
In order to solve the problem of connecting 110-Volt American or Japanese equipment to our electrical network, you need to purchase a converter (inverter, step-down transformer) 220 to 100 V. However, when choosing an AC/AC inverter 220/110, you need to keep two features in mind:
- The power of the converter must be higher than the power of the connected device.
- The converter socket must be compatible with the power plug of the connected equipment.
- If your device is slightly more powerful than the inverter, it may become very hot and your device will not operate at full capacity. If the power difference is large, the inverter's thermal fuse will trip.
- The 220/100 converter socket corresponds to a 110 V American plug. If your device has a different plug, we recommend purchasing a Rexant universal power adapter or a multifunctional power adapter - USB charging Rock T20.
Universal power adapter - USB charging Rock T20 .
70-Watt converter 220 to 110 Volts - Robiton 3P070 U.
For more powerful 110-V devices, we recommend using a 150-Watt step-down transformer 220/110 Robiton 3P150AV.
Photo of transformer 220 to 110 Volts - Robiton 3P150AV .
Selecting a charger
The optimal charging method is offered by chargers from trusted brands; they monitor the state of the battery and the current supply, and can turn off when charging is complete. Having such a charger, there is no need to delve into the technology of the charging process for Li-ion 18650 batteries.
Devices that offer fast charging reduce the time by increasing the amperage. And although a 3.7 V battery is already considered charged, with a voltage of 4.5 V it will last longer. The charging density is lower than with slow charging. The battery discharges much faster; strong currents overheat the battery, shortening its service life.
How to charge a 18650 battery
Many chargers (chargers) are universal, but when charging lithium-ion batteries you must follow these rules:
0.5-1 A is the optimal charge current for 18650 batteries.
- At the early stage, it is necessary to apply no more than 0.05 V. Finish the procedure by increasing the parameter to 4.2 V. This value is an acceptable safe level for 18650 batteries.
- The charge current should be 0.5-1 A. With a higher value, the charge will be collected faster. However, it is not recommended to immediately supply a current of 1 A. The indicator should increase smoothly.
- Accelerated charging methods should only be used in emergency cases. The procedure time should not exceed 3 hours. Overcharging damages battery components, causing overheating.
- It is recommended to use devices that automatically monitor charging progress. They turn off automatically after the battery reaches the required power. Cheap and homemade devices are not equipped with controllers, so the user will have to independently monitor the progress of the procedure.
Basic Charging Principles
- look for the rechargeable designation on the case of the lithium battery, this is what indicates that you have a rechargeable battery in your hands, and not a disposable battery (non-rechargeable is written on the battery);
- it is important to observe polarity; modern devices and batteries have controllers that protect them from failure, but the charging process will not begin until they are installed correctly; in homemade devices, an error with the poles can cost the battery;
- disconnect from the power supply when the voltage reaches 4.2V;
- the automated device will turn off on its own;
- the lower the current, the more gentle the charging process, the longer the service life of the lithium-ion battery;
- Operating a Li-ion 18650 battery when charging from 25 to 90% capacity prolongs its service life.
Precharge
High-tech devices charge in 1, 2 or 3 stages, depending on the depth of discharge.
Stage 1 – precharging. Relevant at low temperatures. It is also required for lithium batteries discharged below 2.5 volts to avoid overheating.
Low power direct current warms up the battery and charges it to 2.8 Volts.
DC charging
Charging Li-ion battery
With a current of 20 to 50% of the battery capacity, the battery is charged throughout the entire stage. The selected value does not change throughout the entire stage. For example, for a battery with a capacity of 3200 mAh, the value ranges from 640 to 1600 mA.
The accelerated version allows an increase in capacity up to 100%, returning for example, this is up to 3200mA. However, such an increase is less preferable for the battery; it is justified if it is necessary to quickly use the battery.
When the display shows 4.2 Volts, the density will be 70-80%. The slower the Li-ion battery is charged, the closer to 80% the density indicator is at the end of the second stage. Already at 3.7 Volts the battery is considered charged.
Charging with falling current at constant voltage
At a voltage of 4.2 Volts, charging proceeds to the third final stage. The voltage is maintained at the specified level, the current is monitored, it will gradually drop down to 1-5% of the battery capacity.
Reaching this indicator indicates the end of the charging process; the automated device turns off, as is usually indicated by the indication. If you need to turn it off manually, it is better to do this without long delays (we are talking about tens of hours, days) after reaching 1-5%.
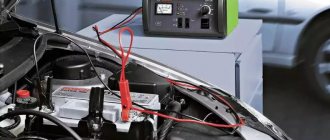
How to charge lithium-ion batteries yourself
The simplest option is to use a mobile phone charger. The devices produce a voltage suitable for restoring the power of 18650 batteries. The method is used only in emergency cases. Its frequent use leads to a decrease in battery capacity.
Homemade charger for a lithium-ion 18650 battery, made from an old phone charger.
To charge the battery, do the following:
- The charger plug is cut off. The wires are stripped of insulation and divided into positive and negative poles. The positive cable most often has a red braid, and the negative cable has a black braid.
- The cleaned wires are attached to the battery poles with plasticine. The USB cable is connected to a computer connector or a special adapter.
- The power source is charged, periodically monitoring the process. It is recommended to charge the battery for no more than an hour. This time is enough to completely restore capacity.
Complex circuits are used to assemble advanced charging. Before starting work, prepare a soldering iron, solder, flux and glue. Separately, purchase the board necessary for the normal functioning of the homemade charger.
The assembly is carried out like this:
- The board is installed in a plastic box prepared in advance. The structure is supplied with positive and negative wires. The box is used to hold the battery while charging. You can make a container from an old charger, an unusable household appliance or a toy. The dimensions must match the battery parameters.
- The board is soldered, taking into account the markings. The markings make it easy to place the wires. The board is equipped with multi-colored indicators that reflect the charging progress. The microcircuit is glued to the box in a convenient place. After this, observing the polarity, connect the wires. Before fixing, they are cleared of insulation and treated with rosin. A small amount of liquid solder is applied to the board.
During the manufacture of the device, short circuits must not be allowed. The above diagram allows you to assemble a simple but reliable charger in a few hours. Using a USB cable, it is connected to an electrical outlet or computer. The battery is installed in the resulting socket. After the green indicator turns on, the device is turned off.
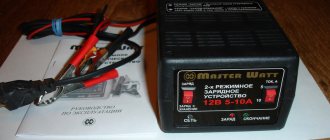
Which charger should you choose?
Charger
The easiest way is to buy a modern charger from a well-known Korean or Japanese manufacturer, which itself monitors, adjusts the charging process of the 18650 battery, and turns off when it is complete.
A less expensive non-automated device can be used. The charging scheme will remain the same, but will require constant monitoring and adjustment by the user.
Considering the simplicity of the circuit as a whole, many, having a basic understanding of how electronics work, assemble the charger with their own hands.
Which device should you use?
Popular electronics stores offer a wide selection of suitable chargers. The cheapest one, with a current level of 1 ampere, can accommodate one 18650 model battery.
more advanced version, with two “sockets” for elements, with a maximum voltage of 4.2 V. This 18650 charger is a little more expensive, but it does have a charge level indicator that monitors how long the battery needs to charge.
There is also a similar option, with the same characteristics - you can insert not only 18650 cells into it, but also charge a 26650 lithium-ion battery.
You can also purchase a universal charger that is suitable for all types of batteries, from nickel-cadmium to lithium-ion.
There are quite a lot of chargers, and most of them are equipped with both indicators and a safety system that eliminates the need to constantly check the voltage or current level. Of course, the quality of the charger directly depends on how much money will be spent on it.
If you have the skill, time and desire not to waste money on buying a charger, you can make it yourself - of course, this will require a certain circuit.
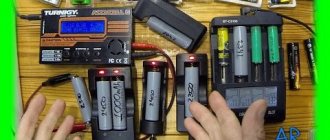
Self-assembled charger
Charger Liitokala
There are different schemes for assembling a charger for 18650 batteries with your own hands. Having decided how many Li-ion batteries you need to charge, you need to buy spare parts for the charger - a converter or converters, a holder for the required number of batteries, wires, bolts and nuts may come in handy. In addition, you will need a soldering iron with solder and glue. Most often, the charger is made for 4 batteries.
A 20 ml syringe is sometimes used as a holder for an 18650 battery. It needs to be modified with a spring from any old remote control, toy, or other equipment, and a hole to be drilled on top for the wire.
We attach the converter/converters with glue to the holder body so that the indication is visible. If possible, secure with bolts and nuts on the sides. After this, we solder the wires according to the diagram. If the design contains several batteries, they are connected in pairs in parallel.
Useful tips for using 18650 batteries
You should not often carry out the popular “pumping” of these batteries in the form of several charge-discharge cycles. It would be better to monitor their charge level: it should not exceed 90%. It is this scheme of action that will help extend the life of any type of lithium battery and preserve its capacity as much as possible.
Also, you should not allow them to be deeply discharged - otherwise, restoring the previous parameters will be very problematic. In order to be sure of purchasing quality items, you should always pay attention to the time of their release. If they are more than three years old, they can be considered expired.
When you have to constantly deal with one or another portable equipment, you always need to know how to charge the battery correctly. If it's an 18650 battery, how can I charge it as productively as possible? Knowing the basic indicators of current and voltage, it will not be difficult to carry out the charging process without damaging the batteries. And if there is a need and desire, you can always make a simple charger yourself.
Charging time
The duration depends on the battery capacity and current strength. Time is calculated as their ratio. For an accurate calculation, it is necessary to take into account that the current strength changes throughout the process.
For example, charging a Li-ion battery with a capacity of 3200 mAh with a current of 640 mA will take almost 5 hours:
- 3200mAh / 650A = 4.92h, which is 4 hours 55 minutes.
Changing the current will require adjusting the calculation.
When choosing a suitable charging cycle, choose the most appropriate one, taking into account your needs (how quickly) and how gentle the process is for the battery (the slower, the more gentle).
Charge controller circuits
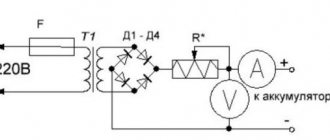
Charger for LM317.
A simple homemade memory can be assembled using the widespread and inexpensive LM317 microcircuit. In this case, it is connected according to the voltage stabilizer circuit, and the battery is charged by the falling current. This algorithm does not allow full use of the battery's capabilities, and this is the main drawback of the scheme. Another drawback is that voltages below 8 volts cannot be supplied to the circuit. Therefore, it will not be possible to power the memory from the USB port.
During the process, the current is monitored in the form of a voltage drop across resistor R1. As soon as it decreases to a certain level, transistor VT1 closes and the LED goes out, signaling the end of charging. The process does not stop, so you need to monitor the condition yourself. You can upgrade the circuit by turning on a relay instead of the LED, which, when turned off, opens the power circuit with its contacts.
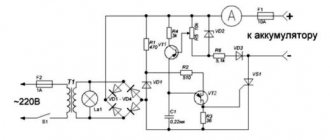
The charger is somewhat more complicated, allowing you to implement a pulse current charging algorithm without any controllers.
Charger circuit with pulse recharging function.
At the first stage, the battery is charged with a stable current, the value of which is determined by the supply voltage and the value of the resistor RD. When the voltage reaches the threshold of 4.15 volts, the comparator is triggered and transistor VT1 is turned off. The voltage across the element will soon drop below the threshold, and the transistor will open again. This procedure will continue cyclically, but as the charge progresses, the pauses will become longer and the pulses shorter. As a result, the battery will be charged to a voltage of 4.15 volts, which is set by resistor R1.
Analysis of the circuit shows that it can be easily simplified without reducing functionality. So, instead of a transformer with a midpoint and a rectifier, you can take any power source with a voltage of 5 volts (there is no need to increase the voltage much, the elements of the power circuit will heat up, bringing the thermal death of the universe closer). The transistor can be replaced with a bipolar one (the domestic KT827 is also suitable).
Simplified memory diagram.
The voltage detector can be replaced with KIA742, KIA719, KIA739. As a result, the diagram will take the following form.
You can also use specialized microcircuits specifically designed to create such chargers. One of them is MCP73831.
Charging algorithm implemented on the MCP73831 (using the example of a battery with a capacity of 180 mAh).
It supports correct two-stage charging mode. The current is set by the value of the resistor connected between pins 5 and 2. The only drawback is the highest current that can be removed from the microcircuit - 500 mA. This is not always enough; high-capacity cells will take a long time to charge.
Typical connection diagram for MCP73831.
You can also assemble the charger using other specialized microcircuits specially designed for a similar purpose. In addition to the classic MAX1555, these can be:
- LP2951;
- LTC4054;
- TP4056;
- LTC1734;
- MCP73812;
- NCP1835;
- other microcircuits.
Each element has its pros and cons. To understand them and make the right choice, you need to read the datasheets.