If an outlet sparks, then first of all you need to look at exactly when the sparking occurs - during operation or when the plug is turned on. It is not difficult to distinguish them - in the first case, it is a long, characteristic crackling sound of an electrical discharge, during which the plug often heats up. In the second case, a loud crack is heard at the moment when the plug enters the socket, and then everything works as usual. Based on this initial diagnosis, a method for further solving the problem is selected.
Crackling noise when plugged in
This phenomenon is observed quite often - for example, if you leave home for several days and unplug electrical appliances from the outlets. Upon returning, everything turns back on and then a noticeable flash is visible in some sockets and a loud crack is heard.
Causes
Despite the fact that this all looks quite threatening and causes many to reflexively pull their hands away from the sockets, there is nothing in this phenomenon that indicates a malfunction. It’s just that when the contacts of the plug approach the contacts of the socket, an electric arc jumps between them an instant before contact. This is the nature of electric current and the higher the voltage at the contacts, the greater the distance such an arc can stretch.
In industrial conditions, special arc-extinguishing chambers are made near the contacts of starting devices, and in particularly powerful devices, devices are even used to extinguish the arc with compressed air or another method.
What’s interesting is that reflexively withdrawing your hand from such an outlet is completely meaningless. And not because this phenomenon is not dangerous, but because of deception of vision and hearing due to the imperfection of these sense organs. The fact is that the microlightning that occurs when contacts touch lasts a hundredth, if not a thousandth, of a second. Given that the human eye perceives everything at a speed of 24 frames per second, it only sees the original image captured on the retina and gradually fades away. It’s the same with sound - an audible crack is thunder in miniature - first the primary disturbances of the air reach the ear, and then the consequences of displacements of its molecules.
What can be done
It would seem that the issue has been resolved and now you can simply not be afraid of this phenomenon, if not for one “but” - not every socket sparks... This is even more surprising if all the installed sockets are the same, which means that this behavior cannot be explained by differences in design.
The reason is simple - plugs from switched-off devices are inserted into some sockets, and plugs from switched-on devices are inserted into others, on the contrary. Take a computer for example - usually all its peripherals are connected to one surge protector with 5-6 outlets. This is the system unit itself, a monitor (or even two), speakers, a printer, a router - maybe something else is connected. When the computer is turned off, in fact, it is not completely de-energized - all its components are in standby mode, so if you unplug the surge protector from the socket, it will “remember” its last state. Accordingly, when the plug is inserted into the socket again, all devices will simultaneously “fucking” the electric current, which will cause a discharge in the socket.
This will not happen if, before leaving, you turn off the power to each device separately - manually turn off the monitors, turn the switch on the power supply of the system unit, flip the toggle switch on the speakers and the printer. Then, when the plug is plugged into the socket, the circuit will not close and there will be no discharge.
How does this affect the outlet?
Theoretically, when even microlightning occurs, the surface of the contacts burns and may become unusable over time - the resulting soot will cover everything with a film with high resistance, this place will begin to heat up and the socket may begin to melt.
In practice, the discharge hits the tip of the plug and the very beginning of the socket contact - when the plug is fully inserted, the working surface of the contacts is completely different. Moreover, if the plug is not taken out of the socket often, then the contact is very far from being damaged.
As a result, when the socket sparks when you turn on the plug, you need to realize that everything has already happened and simply insert the plug further.
The socket is sparking - how to fix it?
Once you have determined why the outlet is sparking, you can begin to fix the problem. Well, if everything is clear with the last point about purchasing only high-quality products, then we will now consider solving the remaining problems.
- To solve the problem of non-compliant sockets and plugs, you will have to spend a little money. You need to replace the old models with Euro standard models. It’s not that much money, but you’ll forget about the sparking of the socket for a long time.
- In order not to overload one outlet, I recommend installing a block of sockets. It’s better to install 2 or 3 than to connect a bunch of extension cords or surge protectors. It would also be advisable to replace the weak version with a more powerful one. So if you have a 10 A socket installed, and there is a significant load on it, then it is better to install it at 16 A or 32 A.
If the socket cracks during operation
If a cracking sound is heard when the plug is in the socket, then this is already a sign of poor contact in some part of the electrical circuit. Often, over time, the surface of the plug or the socket itself heats up, or even all at once.
Causes of crackling noise in a working outlet
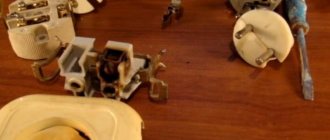
In fact, a working socket makes noise for the same reason as when inserting a plug - the contacts do not touch closely, and in some places they do not reach each other. The consequences are standard: their surface oxidizes, resistance to electric current increases and the metals begin to heat up.
In the same way, a socket cracks if the bolted connections are loosened - the wire inside the contact begins to move and protrusions form, between which sparks appear. The socket begins to make noise, and if the contact is very bad, it can heat up and melt.
Also, the cause of sparking may be a mismatch in the diameter of the pins of the plug and the contacts of the socket; a typical example is when an old Soviet plug is inserted into a modern Euro socket.
Euro plug on the left, Soviet plug with smaller diameter pins on the right
Watch the details in this video:
The fourth common reason why an outlet gets hot is a mismatch between the power of the devices connected to it and the throughput of the wires. If you rub something against each other, both of these things will heat up, and the electrons inside the conductor “run” at the speed of light. As a result, if the wiring periodically operates at the limit of its capacity, then it warms up.
This is not critical for the cores themselves, but the insulation, which constantly softens and hardens, loses its properties over time. It is also necessary to take into account the ability of electric current to straighten the wiring through which it is passed. When a powerful device is turned on through a weak conductor, the heating core heats up the insulation, which becomes soft and is “picked apart” by the wire trying to straighten out. Ordinary vibration, which appears in devices powered by electric current, can also have its say. It may not be noticeable to the naked eye, but such wiring does not always short out immediately. Over time, the core may come out of the insulation and then, at best, there will be a sparking contact, and at worst, it will lead to a short circuit.
Elimination methods
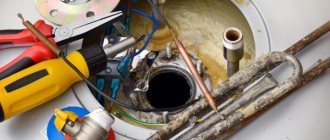
Usually, when sparking occurs, it is enough to sort through the sockets - if you take them apart, then what to do next is usually visible to the naked eye. The place with poor contact is marked with scale from the melting of the insulation, and the insulation itself is hardened and brittle. If there is little carbon deposits, you can simply clean it off and tighten the bolted joints. When it comes to serious melting of the insulation of the wires or the socket body, it is strongly recommended to replace them.
Selection of sockets, plugs and tees
The reason for the incorrect operation of the socket may also be the poor quality of both the socket itself and the plug of the electrical appliance; this problem is discussed in detail in the following video:
How to extend or connect an electrical cable
Breaking an electrical wire can create quite a significant household problem. Therefore, the question of its possible restoration becomes incredibly relevant.
In some cases, there may be an urgent need to extend an existing wire.
Most often, the need to extend or connect cables arises in the following cases:
- While working with an angle grinder, you “managed” to stumble upon a wire embedded in a wall or floor and accidentally cut it. As a rule, such a situation is accompanied by a mass of sparks that occur at the site of damage. The machine installed in the electric meter will immediately turn off or knock out the plugs. In addition, all sockets connected to this section of electrical wiring will immediately be de-energized, and the lighting in the apartment will disappear.
- A wire carelessly laid by craftsmen in a wiring box or under a switch can also break off. In this case, the remaining length for connection is not enough.
- With the purchase of a new or rearrangement of an old electrical appliance, there is a need to move the existing outlet.
The optimal way out of this situation should be considered a complete replacement of the damaged area. In this case, you will have to replace the entire wire connecting the junction box and the outlet (switch). Carrying out such a procedure very often involves gating, which means inevitable damage to a large adjacent section of the wall. In addition to the wire itself, you will most likely have to replace part of the tiles, plaster or wallpaper, which is not always acceptable.
This is interesting: Where to connect the sconce - from an outlet or a distribution box?
As a result
All household electrical wiring is designed with a multiple safety margin, so if a socket sparks, a plug or extension cord gets hot, then this is a signal to quickly find and correct the problem.
The problem may not be found right away - this most often indicates that a device whose power is higher than the wiring can handle is plugged into the outlet. In this case, you need to look for a “weaker” device or make an additional socket.
So, one fine day you noticed that in one of the rooms the socket sparks when you turn on the power plug from the laptop or by itself. You should not immediately seek the help of a specialist or go to the store and buy a new one, because... Perhaps this is not the reason or the device still needs to be repaired with your own hands. Next, we will look at the main reasons for failure, how to fix the breakdown and operating rules so that such a problem does not arise again.
Why does the UPS make sounds: squeaking, clicking, humming and other sounds
Is the uninterruptible power supply beeping? Don't panic - this is a normal situation. The equipment is simply trying to inform its owner about some problem. Which one exactly? You can’t explain anything here in a nutshell, but after reading this article, you can get a clear understanding of the device’s signals and recommendations for troubleshooting problems that arise.
Why does the uninterruptible power supply beep?
The main function of a UPS is to provide uninterrupted power to the consumer. To implement this function, the design of uninterruptible power supplies includes special modules that equalize current characteristics and storage devices (batteries) that ensure continuity of power supply.
Inconsistency of standards
One of the simplest causes of sparking can be considered a difference in standards between the electrical plug and the outlet itself. The fact is that since the times of the USSR there have been two main standards: Soviet (C) and Schuko. The difference between them is the cross-section of the plug electrodes. At first glance, the difference is not too great, but at the same time, this run-up becomes the reason for loose contact between objects. If the Shuko plug fits tightly into the Soviet sockets, there will be no problems, but feedback may cause the socket to spark when the plug is turned on.
The optimal solution can be achieved by replacing old USSR electrical wiring elements with modern standards.
The socket sparks or heats up - we’ll figure out the reasons and fix the problem
If an outlet sparks, then first of all you need to look at exactly when the sparking occurs - during operation or when the plug is turned on. It is not difficult to distinguish them - in the first case, it is a long, characteristic crackling sound of an electrical discharge, during which the plug often heats up. In the second case, a loud crack is heard at the moment when the plug enters the socket, and then everything works as usual. Based on this initial diagnosis, a method for further solving the problem is selected.
Low quality
The second, no less obvious influencing factor is the low quality of products. This reason applies to cheap Chinese fittings. The assembly of the products in this case is quite poor: the contacts are poorly tightened, the metal parts are very thin, the plastic is soft, and the fasteners themselves are unreliable. The result is poor contact between the plug and the power source, which causes the socket to spark when the plug is turned on.
The solution to this problem is simple - replace Chinese products with more expensive ones. We recommend giving preference to manufacturers of sockets and switches such as ABB, Legrand and Jung.
What to do if there is a spark and short circuit from the socket - the causes
For household electrical appliances, the socket is the power source. Behind its plastic front panel there is a base with contacts for connecting a plug. Properly selected and installed devices work for a long time, but problems can happen in any circuit. If the socket is cracking and the noise is accompanied by sparking, you need to turn off the circuit breaker and find the cause of the malfunction.
- Causes of sparks in an outlet
- Overload
- Worn connectors
- Loosening screw terminals
- Mismatch of selected plug parts
- Poor device quality
- How to fix the problem
- Consequences of sparking in an outlet
Worn wiring
The next reason for an outlet to fail is the deterioration of the electrical wiring in the house (or apartment).
If the diameter of the cores is small, then you should not connect powerful electrical appliances (for example, a microwave), otherwise the line will simply not withstand the current load, as a result of which the outlet will begin to spark. Here you need to first inspect the old current-carrying line and, if necessary, replace the electrical wiring in the house. Correct replacement is carried out based on calculation of the cable cross-section for power and current.
How to seal grooves in a wall with electrical wiring
To decide what is better to seal the grooves after laying the wiring, you need to familiarize yourself with the features of working in walls made of different materials. To seal the holes, you need a spray gun, a tank for mixing mortar, a trowel, a brush and a spatula.
Concrete
Before you start sealing the grooves, you need to generously moisten the hole itself and the area around it with clean water using the following working equipment:
- a piece of foam rubber or sponge;
- spray;
- wide brush with synthetic bristles.
The trenches are first primed and then sealed with a building mixture. It is applied using a spatula with wide cross strokes. After the substance has hardened, the excess is removed with an iron spatula. Movements should be stroking and smooth. After complete drying, the surface is puttied.
Brick
Carrying out work in brick walls is accompanied by a large amount of dust. Before you start sealing the grooves, you need to remove dust and treat the working surface with clean water.
It is recommended to seal the furrows with alabaster or gypsum mortar. If the groove is deep, it is acceptable to use small pieces of stones soaked in mortar. Next, the remaining voids are carefully filled with mortar using a trowel.
Monolithic wall
The work in this case is similar to work in a wall made of concrete or aerated concrete. The recess is filled with viscous putty. The solution fills the cavity as tightly as possible.
Screw clamps are loose
Any dismountable product tends to wear out over time. All screws, latches, springs are unscrewed and weakened over the entire period of operation. The result of this, again, is poor contact of the electrodes with the network, as a result of which you can see how the socket sparks on its own (without plugging in the plug).
If the wiring consists of aluminum conductors, then the screw terminals need to be tightened several times a year, because aluminum tends to “leak”, as a result of which the contact weakens, from which it begins to spark. The connectors themselves where the plug is inserted may also be worn out. The plug is fixed using special clamping jaws, which unbend when frequently connected/disconnected. In this case, you need to bend them inward with pliers.
These two reasons are the most popular, and if sparking is detected in time, the situation can be saved by ordinary repairs. If you have already disassembled the outlet, carefully examine all other elements of the structure: perhaps intervention will be required somewhere else.
Video instructions for repairing an outlet that sparks
Troubleshooting procedure and safety measures
Indicator screwdriver
Before you begin repairing light switches in your apartment, it is advisable to thoroughly prepare for this procedure. First of all, you need to stock up on working tools that can be used to repair products of this class. The set includes the following items:
- indicator screwdriver;
- tester (multimeter);
- regular screwdriver;
- side cutters or platypuses.
Disassembling and cleaning contacts
Disabling automatic protection
Before you repair the light switch, you will definitely have to disassemble it to the point where the fault is clearly visible. It is recommended to start repairing a broken device in the following order:
- Completely remove the voltage from the linear branch of the supply line or from the entire apartment at once.
- Disassemble the switch, for which you first need to remove all the keys.
- After removing them, the switching mechanism with the rocker arm will be “exposed”, the condition of which is used to judge the nature of the breakdown.
Switch contacts
If at this stage of dismantling it is not possible to detect traces of a malfunction or the damage is too serious, it is best to completely dismantle the device from its installation location.
Before repairing a faulty switch, you will have to unscrew the mounting screws and pull the box with it out as far as the length of the conductors allows. If they are short, the fastening is loosened, and the device itself is taken out of the plastic case (first you remember which of the conductors was connected where).
After removing the device from its installation site and removing it from the box, it will be more convenient to inspect it for damage. During inspection, several types of faults may be detected:
- the axis of fastening the rocker arm has fallen out, which returns to its place and is slightly flattened along the edges with side cutters; after this the key will be pressed normally, without jamming;
- the contacts of the changeover element are slightly burnt from frequent switching, which can be corrected with the help of sandpaper;
- if the contacts are badly burnt out, the moving part of the mechanism will have to be replaced with a new part (from a spare working switch);
- if there is nothing to replace this part with, you will have to buy and install a new device.
After eliminating all detected faults, they begin assembling the repaired device.
Switch assembly
Setting the switch keys
To assemble the switch and install it in its original place, first its body is secured in the mounting box. After this, the dismantled conductors are carefully connected to the contacts, and the screws securing them are tightened with force. Then the plastic cup is installed back into the niche and fixed there with spacer screws. Next, all that remains is to return the decorative panel to its place and install the switch key back.
Repairing 3-key switches or their two-key analogues is no different from the process already described for a single-key switch. In this case, everything will repeat itself, only perhaps on a larger scale. After installation, the device is checked for functionality.
Restoring rotary and touch models
Touch switches must be repaired in specialized workshops
In rotary-type devices, characteristic malfunctions have approximately the same causes and manifestations as in keyboard analogues. In their working mechanism, the closing and breaking contacts also burn out and completely wear out, which is explained by their intensive use. In addition, by analogy with the samples already considered, it is also possible for them to loosen the contacts at the points where the phase conductors are connected.
Restoring switches of this class is similar to the approach already discussed for key products. Difficulties arise when the cam mechanism breaks down, which is unlikely to be repaired manually. In this case, experts advise completely replacing the device with a new product.
Current overload
Another, no less banal reason that the outlet sparks is carelessness when purchasing a new device. Each product has its own letter marking, as shown in the photo below. The rated current must be indicated on the case (for example, 16 A). This means that the current load from electrical appliances should not exceed 16 amperes. Otherwise, problems may arise, including sparking of the product when a plug is inserted into it. If you connected the sockets together with a cable and noticed that one of them heats up when you remove or plug in the plug, then the electrical installation was incorrect (for example, you chose too small a cross-section of wires or did not tighten the cable properly). It is advisable not to connect adjacent sockets to each other, but to branch wires to each electrical point from the distribution box.
To choose the right electrical accessories, remember the following calculation: 1 ampere can withstand no more than 220 W of power. In total, a 16-amp device can withstand approximately 3.5 kW, which is quite enough to install a washing machine or an electric boiler.
A few more important points should be noted here. If you buy, for example, a double socket and it says 16A, this does not mean that each socket can handle that current. In this case, the rated current is divided between both sockets. The second, no less important point is to take into account the current parameter when connecting the extension cord. Very often, people connect the carrier to 5 outputs, each of which operates a powerful electrical appliance. If the power exceeds the maximum possible, the product will begin to spark and quickly fail!
Why does an induction cooker squeak and how to fix it yourself
Kitchen stoves, gas or electric, are silent devices in operation. During normal operation of these household appliances, the user does not hear any extraneous noise. Another thing is an induction cooker.
Reasons for the squeaking sound of an induction cooker. Can I fix it myself?
A housewife, accustomed to the absence of extraneous sounds, turns on the induction furnace and suddenly notices squeaks or whistles coming from out of nowhere. She has a reasonable question: “Is everything okay with the equipment?” Equipment that is in good working order may produce noise due to improper operation. Let's figure out the reasons for the occurrence of incomprehensible sounds.
Important! If strong sounds are detected emanating from an induction cooker, it is necessary to urgently understand the reasons for their occurrence. Perhaps the equipment needs repairs, and any delay can only complicate the upcoming repairs or necessitate the purchase of new equipment.
Causes of squeaking
Experts say that minor noise - a slight squeak or buzzing - does not indicate the presence of any malfunctions. This is normal operation of the device, and extraneous sound occurs as a result of the interaction of the fields created by the induction coils with the cookware.
One more subtlety must be taken into account - the volume of noise may vary. It depends on the manufacturers. The products of some are characterized by the presence of a barely audible squeak, while others, on the contrary, have a steady buzz.
To get rid of unpleasant sounds, the housewife should buy and subsequently use special cookware for cooking, designed to work with induction cookers.
The cause of the squeaking noise may be improper operation of the oven. Suppose a cook uses a small metal pan with thin walls to prepare food. He installs it on the stove and, not paying attention to the readings of the power regulator, puts the device into operation. As a result, a strong whistling or buzzing sound is heard throughout the kitchen.
To avoid such phenomena, you should set the power required at the moment, use suitable pans and exclude options for cooking in pans with a multi-layer bottom.
How to avoid problems?
Above we have provided the main reasons why the socket sparks when the plug is turned on and how to repair the product yourself. Now I would like to talk about how to avoid these problems, and in other words, about preventive measures.
- Check your electrical wiring at least once a year. A visual inspection will allow you to prevent trouble in time.
- Inserting and removing the plug should only be done when the power to the electrical appliance is turned off. The course of action is as follows (using the example of a TV): connect to the network, turn on the button and vice versa - turn off the button, disconnect from the network.
- Install a circuit breaker on the outlet line, which will prevent current overloads and save not only the power source, but also household appliances.
- In wet rooms (for example, a bathroom or bathhouse), install only waterproof devices.
How to fix a switch: types of devices
If you find out that your switch is not working and decide to fix it, then the device must be disassembled. Before this can be done, the power to the network is completely cut off. To do this, turn off the power at the switchboard automatically, and then check the voltage status at the output.
If you were unable to de-energize the line you needed, then it is best to disconnect the entire apartment from power. Only after this can you begin repairing the switch. But that is not all. Before removing the switch, it is necessary to determine its type.
What could the switch be:
- Single-key;
- Two-key;
- Pass-through, or three-key;
- Spinning;
- Dimmer – switch;
- Touch switch.
Today there is a wide variety of switch models on the market, but most users have conventional key devices.
This is interesting: Scheme of a diode bridge with two diodes and two capacitors: illustrating in general terms
What could be the consequences?
If you do not detect in time that the socket is sparking on its own or heating up, then the result can be disastrous consequences. First, the plastic case will begin to melt, at the same time the contact will slowly burn. In the future, the electrical wiring will ignite, which will cause a fire.
In addition, no one can rule out electric shock and short circuit, the damage of which can be quite large-scale.
That's all I wanted to tell you about what to do if the socket sparks when you turn the plug on and off. Before starting repair work, you must turn off the power to the room so as not to receive an electric shock. We hope that the information was useful to you and was used only for self-development.
Related materials:
- How to disassemble a light switch
- The socket falls out of the wall - what to do?
- Double socket connection diagram
When an outlet sparks, it means it is not working properly. The device must be repaired or replaced before it causes injury or fire.
Why is this happening
There can be several factors for sparking an outlet. Regardless of the cause, sparking is the passage of current through the air from one contact to another, similar to lightning. As a result, the contacting edges of the wires heat up sharply and very strongly, often burn and melt, which leads to breakdown.
Sparking is caused by the following reasons:
- Inconsistency between the standards of the socket and plug of the connected device. For example, if the plug is from a Soviet household electrical appliance, and the socket is of a new standard. Soviet forks have a 0.8 mm smaller electrode diameter, but even such a small gap leads to sparks.
- Low quality materials used in manufacturing, poor quality assembly.
- Worn electrical wires supplying voltage to the socket contacts. The reason may be operation in conditions that do not correspond to the required temperature conditions and permissible current. This reduces the insulation resistance and, as a result, breakdown of the insulating layer occurs. A sign of an insulation breakdown is that the socket is short-circuiting.
- Loose clamps are the most common cause of sparking. The malfunction occurs during operation of the equipment and is caused by poor contact between the electrical wires and the elements of the outlet. This happens when clamping elements are used in the design of the device (the clamping spring weakens), or when the screws in the screw structure are loosened. A sign of loosening clamps is a crackling sound in the socket.
- Current overload often leads to sparking. Overcurrent occurs when connecting devices of greater power than allowed by the parameters of a particular model. For example, when tees or extension cords are connected to a single device. A sign of overload is sparking when the plug is plugged into the outlet.
- Mechanical wear, loose contacts. Occurs if the product is often used, plugs of different devices are inserted and removed. Without being able to replace the device, you need to disassemble the socket and tighten the contacts.
- Carbon formation. In this case, the socket often cracks. If the contacting surfaces are covered with a layer of soot, and it is impossible to replace the product, you need to clean them.
What to do to avoid breakdown
You can prevent a malfunction by fulfilling the following conditions:
- When using a switching connection in the form of a plug connector, use the same type of connection elements; use the socket only for its intended purpose and in accordance with the operating rules.
- If the product is made of poor quality materials, it must be replaced.
- Use tested devices that have certificates of conformity. Purchase in specialized stores, not in markets.
- If the electrical strength of the insulation of wires and cables is low, replace them with new ones that meet the requirements for electrical wiring. The need for replacement is determined during preventive tests or when emergency situations occur in electrical networks.
- If the screw connection of the wires with the contacts is loosened, they must be tightened. When using clamps (spring mechanism) in a specific model, the correct solution is to replace the product with a new one equipped with screw clamps.
- Use devices and devices that correspond to the rated current of the installed plug connection. The rated current value is displayed on the socket body, and on devices - in the passport and on structural elements (housing, inventory plate, tag, etc.).
- If carbon deposits appear on the contacts, you need to thoroughly wipe the connection points with a rag moistened with solvent.
- If the connected device has a toggle switch or an “On/Off” button, always use them, and not just pull the plug of the working device from the socket.
- In wet rooms, use only sockets with an appropriate level of protection.
- Install a circuit breaker on the line of outlet groups that matches the wiring capabilities.
What a malfunction can lead to
The breakdown of any electrical device can lead to negative consequences for both buildings and human health.
The most likely scenarios for this development are:
- A fire occurs in the premises.
- Failure of devices connected to the electrical network.
- Damage to wires and cables that supply voltage to a specific device.
- Electric shock to people using a faulty device.
Everyone should know how to identify a malfunction and how to fix it. Even an ordinary user who does not have special knowledge and skills can prevent such malfunctions.
Consequences of sparking in an outlet
The consequence of the appearance of a spark in the socket
in the socket, the appearance of sparks and melting of the structure can lead to a short circuit. In the worst case scenario, it causes a fire. A bad contact will knock out the machine and melt the insulation of the electrical wiring. Voltage drops lead to breakdowns of household appliances, laptops and computers. A faulty electrical installation is dangerous to human health.
When making sockets, manufacturers include a safety margin. This applies to original products. Counterfeits or goods of unknown manufacture may break in a short time. After the first sparks, crackling or humming noises are noticed, a good socket does not need to be replaced. It is necessary to check its condition and troubleshoot problems.
First reason. The plug is faulty.
The first reason for heating the outlet may not be a malfunction of the outlet itself, but... a malfunction of the plug. The fact is that if the contact inside the plug deteriorates and it begins to heat up, the heat will be transferred to the body of the socket and its contacts. Visually, it may seem that it is the outlet that is heating up, although the reason is the plug.
The solution here is simple! Insert the plug into another outlet (preferably in another room) that has not had any problems until now. Turn on the appliance that is powered by this plug.
Wait 5-10 minutes. Remove the plug from the socket and touch the contacts of the plug. If they are hot, then the problem is in the plug; if they are cold, it is in the socket.
In addition, power some powerful device from the first (suspicious) outlet. For example a heater. Wait 5 minutes and feel the plug contacts. Heating will indicate a faulty socket, because... The default plug is OK.
The socket connectors are worn out
This is especially popular for sockets that are powered by aluminum wires. Over time, aluminum can leak out from under the contact point and therefore all connections will need to be tightened. If this is not done, then the contacts will gradually deteriorate and sparks may form over time.
As you can see, the reasons for an outlet sparking are quite varied. Turning a blind eye to such a problem is quite dangerous. This is why if you notice sparks, then you need to address the problem immediately.
If you are sure that you cannot solve this problem yourself, then it is best to contact a professional electrician. This will not only save the outlet, but also ensure reliable security. We hope this information was useful and interesting.
Expert opinion
Viktor Pavlovich Strebizh, lighting and electrical expert
Any questions ask me, I will help!
This phenomenon is observed quite often, for example, if you leave home for several days and unplug electrical appliances from the outlets. If there is something you don’t understand, write to me!
Sparking occurs due to overcurrent.
Worn wiring can cause sparks to form in the socket. If the sockets spark, you need to call an electrician or try to fix the problem yourself. First of all, turn off the power to the panel and warn the apartment residents about the repair. To inspect the contact part, you will need to remove the front panel. Procedure:
- Check the condition of the wires; oxidation on the copper must be cleaned with sandpaper.
- Tighten the screw terminals with a screwdriver and bend the contact plates.
- Inspect the wiring; if there are exposed areas, cover them with insulating tape.
- Secure the structure with the set screws located on the sides.
You can check the quality of the repaired structure by inserting a plug. A tight crimp of the pins indicates that the main problems have been eliminated. After the electricity supply is restored, the point is checked by turning on a medium-power appliance, such as an iron. If the result is satisfactory, it is recommended to periodically monitor the condition of the plug connector.
If the contacts and plastic are blackened and charred, it is better to replace the socket. If the standards do not meet, you will have to buy a modern electrical installation product of a suitable type. It will ensure normal use of household appliance plugs.
It is impossible to increase the power of the outlet, so to connect electric boilers and furnaces, install a structure with a rated current of at least 16 A. If the power of one point is not enough, several should be installed. The socket block is safer than the tee.
Why the socket sparks: reasons and solutions
If you do not detect in a timely manner that the socket has sparked on its own, then sad consequences may ultimately occur.
Expert opinion
Viktor Pavlovich Strebizh, lighting and electrical expert
Any questions ask me, I will help!
Over time, when different plugs are plugged in and out of the socket excessively, the clamping jaws weaken and cannot compress the electrodes of the plug with sufficient force, as a result of which contact is lost and the plates heat up. If there is something you don’t understand, write to me!