Introduction to Switch Circuit
To increase the productivity of the cooler, it is connected to the electrical network through an autonomous switch.
It is placed on the hood grille or on the wall. This scheme is expensive and labor-intensive, because the total wiring length increases. Methods for connecting a bathroom fan via a switch:
- Using a two-key switch. Lighting and ventilation are activated separately using different keys.
- Using a one-key switch. The key is linked only to the hood.
It is most convenient to place the switch inside the bathroom, however, the PUE standards have a number of restrictions in this regard. As a result, the switch is usually installed in front of the entrance (where the light switch is located).
Installation of the switch step by step:
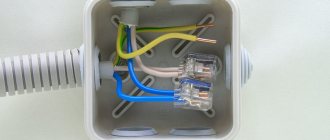
- Route a two-core cable from the distribution box to the installation point. For this purpose, grooves or cable channels are used (if the renovation in the bathroom has already been done). The ends of the wire are led out into the box and into a niche under the switch.
- Install a socket box. This round plastic box is fixed in the niche with alabaster or starting putty.
- Disassemble the switch and connect the supply wires to the contacts of the operating mechanism. The phase of the house network is connected to the incoming terminal. The phase from the fan is switched to the output terminal. Contact connections must comply with the requirements of the PUE.
- Insert and secure the working part of the switch in the socket box using screws.
- Install the protective cover and switch keys.
Two-gang switch
Two keys make it possible to control the cooler and lighting separately. Ventilation can work separately from lighting until the bathroom is completely ventilated.
When installing a two-button switch in the distribution box, additional connections appear:
- contact between the zero phase of the wire and the zero of the lighting;
- connecting the phase core of the lamp to the wire coming from the second output terminal of the switch.
Switching the switch into two keys is carried out as follows:
- the zero from the ventilation is connected to the neutral network wire;
- the exhaust phase is connected to the phase of the wire connected to one of the output terminals of the switch;
- the power supply wire is connected to the input terminal of the two-key switch;
- The bathroom lighting is switched to the second output terminal.
The only drawback of connecting the cooler via a two-key switch is the elementary forgetfulness of the apartment owners. It happens that people forget to turn off the button responsible for the hood. The engine continues to run, wasting electricity.
Single-key switch (separate from light):
If a switch with one key is selected to control the operation of the exhaust fan, the wires are switched as follows:
- the zero of the ventilation device is connected to the zero of the network wire;
- the phase end from the hood is connected to the line laid from the switch;
- The mains phase is connected to the incoming terminal of the switch.
The influence of fan rotation speed on its parameters
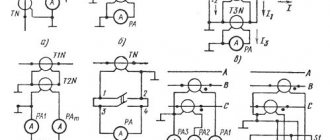
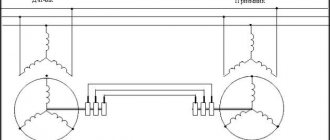
In order to understand the influence of the rotation speed of the fan impeller on its characteristics, consider the 12V series AFB0812 with dimensions 80x80x25 mm from DELTA (https://www.deltaww.com/). The standard flow characteristics of the row are shown below in Fig. 2, in Table 1, and the dependence of the flow rate on the number of revolutions is shown in Fig. 3.
All fans of the series under consideration have the same housing and impeller designs. They differ only in the power of the electric drive and, as a result, in the speed of rotation of the impeller.
They have pressure, flow rate, and noise level proportional to the number of revolutions. To cool devices with variable heat release, we can recommend a fan of the SH, VH series, and to reduce the noise level, an electric drive adjustable according to the temperature of the pumped air.
Figure 2.
Hood connection options
There are several options for connecting a bathroom fan to a switch. All these methods are best organized during the construction or major renovation stage. In this case, all the wires will be hidden under the plaster or tiles, and the appearance of the bathroom will not be affected. You can, of course, organize the installation of the hood after repairs, but in this case the design will be spoiled by installing a box for the fan power wires.
The following hood connection options are used:
- The fan is connected in parallel to the bathroom lighting. In this case, the device will turn on simultaneously with the lighting. The hood will work until the lights are turned off. The advantage of the method: ease of installation, low cost of execution. The main disadvantage is the dependence on the lighting. For optimal ventilation, you will need to leave the lighting on, and this will entail additional energy costs. The disadvantage of this method is the presence of a constant draft, which can affect the health of the person there.
- Basically, the hood is connected via a separate switch (one-key or two-key). This scheme has a clear advantage - no electricity will be wasted on useless lighting, and the fan will only work when necessary. A two-key switch is used when using a ventilation device in conjunction with lighting, when one key turns on the hood and the other switches on the light bulb. The disadvantage of the scheme is a slightly higher cable consumption than in the first option.
- The most modern hoods include a motion sensor, a humidity sensor, and a shutdown timer. A fan with a timer, in addition to the neutral and phase terminals, has a terminal for connecting a signal wire. The signal wire is usually connected to the lighting line. Such a fan can start, for example, after turning off the lighting and run for a specified period of time. The fan can be connected via a switch with any number of keys.
Channel check
Before connecting the fan, you need to check the condition of the ventilation shaft.
Some people recommend this method by holding a sheet of thin paper to the vent. It should be attracted if the hood is good. But it’s more reliable to check with a flame, using matches or a candle. Light a candle and bring it to the hole, the flame should seem to stretch towards the channel. If this does not happen and the flame is even, it means that the ventilation duct is clogged and requires cleaning. To do this, you need to contact special housing and communal services.
Power handling
The ease of use of the installed hood is directly affected by both the technical capabilities of the device and the method of its activation. For each DIY installation method, as a rule, a unique fan connection diagram is required. All the required drawings can be easily found online in various forums.
Before you finally decide on the choice of method for turning on the device, you should study in detail the positive and negative aspects. This way you can simply avoid problems with inconvenience.
Through lighting
Connection diagram via lighting
The most convenient way, in some cases, is to turn on the fan simultaneously with the bathroom lighting. That is, every time a person enters the bathroom, the hood automatically turns on. Thus, when the lights are turned off, the ventilation system is also deactivated.
The main problem with this switching method is the inability to use a timer, due to which the device will not have time to clean the air in the room while it is in the bathroom. In addition, if a non-silent fan is used, it is simply impossible to take a bath at night due to strong noise and vibrations.
Using a cord
Fan with cord
Many fan models initially have their own switch. Often this switch is in the form of a cord extending from the housing. When manipulating the cord (pulling), the fan turns on or off.
It is worth paying attention to the fact that this method of turning on the device is most often inconvenient. This is due to the high location of the ventilation duct (under the ceiling)
In addition, sometimes it is necessary to install the hood in hard-to-reach places, which is why direct access to it is very limited.
This method of switching on and off is most convenient in case of repair work. In addition, you can safely, in addition to the main cord, lay additional wires and install an independent switch for the fan. However, it is worth considering that when laying wiring outside of renovation work, the aesthetics of the bathroom walls may be greatly affected. Also, do not forget about the need to connect the main wiring to the hood.
Automatic (independent) switching on
With this method of turning on the fan, it can be turned on or off manually. However, in the active state, the device itself will analyze the situation in the bathroom and deactivate if necessary. A timer, motion sensor or hydrostat can be responsible for analyzing the room.
Self-contained switch
Scheme of the principle of ventilation
When installing a fan in the bathroom with your own hands, you can install separate wiring for the device by connecting it through a separate switch. The option of turning on the device via a cord is completely similar to this method, but is more convenient due to the absence of the need for direct access to ventilation.
The most common method is to turn it on via a two-key switch, that is, at the exit from the bathroom, instead of a regular light switch, a new two-key switch is installed.
This type of switch is not suitable only in cases of high humidity in the room.
Switches and thermostat
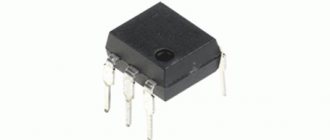
What other electrical elements in the circuit can fail? Immediately after the power wires there is a thermostat and a mode switch.
On the outside of the case there are the familiar “handles and wheels” that are familiar to everyone.
Some people mistake the thermostat for an element that regulates the speed of rotation of the blades. In fact, this is a bimetallic strip, and one of the power wires from the plug comes directly to it.
When you twist this knob, a barely audible clicking sound should be heard. This means the thermostat turns on and off. If the circuit does not have a separate microswitch, then it also performs its function.
But his main task lies elsewhere. When the heater and heater body reach a certain temperature (which you set by twisting the knob), the bimetallic plate inside the thermostat bends and snaps off its contacts - the fan is completely turned off.
The serviceability of this element is also checked with a multimeter. Place two probes on the contacts and turn the knob. In call mode, the sound will appear and disappear.
The mode switch is checked using the same scheme. By turning its handle, you turn on one heater, two, or simply put the fan in fan mode without heating.
Only when you remove the terminals for testing, it is better to take a photo of their initial connection on your smartphone in advance, so as not to confuse the contacts later.
The currents in these elements are not weak - about 10A. Therefore, the loss of a chain in them is not so uncommon. True, the very first check of the thermostat and the 4-position switch can be done “by smell”.
Burnout of contacts under such a load never goes away without leaving a trace. Such things will definitely smoke and stink.
How not to connect and why
The first options have a lot of inconveniences, which are not entirely noticeable at first.
For example, let’s say you set up the hood to turn on using a door opening sensor. At the same time, it turns off according to a timer after 5 minutes. It would seem very convenient.
However, it is quite problematic to install such a sensor on an interior door. Not to mention other aspects of operation. For example, what to do if you stay in the toilet longer than the set time.
Open and close the door again? What if there are guests in the kitchen?
In addition, the cables will have to be routed under the tiles, several extra holes will have to be drilled, etc. Simple motion sensors are sensitive to humidity and fail very quickly.
You will have to select expensive models with appropriate IP humidity protection, depending on the zones in the bathroom.
Some people consider the most convenient option to be installing a switch on the hood directly inside the bathroom. However, the PUE prohibits this.
Why this is so, the relevant links and explanations from Rostechnadzor specialists will be given at the end of the article.
speed controller
into the open circuit +12V, as shown in the figure. Attention! If your fan has 4 terminals, and their colors are: black, yellow, green and blue (for these, the plus power is supplied via the yellow wire), then the regulator is connected to the gap in the yellow wire.
A ready-made, assembled fan speed controller is installed in any convenient place on the system unit, for example, in the front of a plug in a five-inch bay, or in the back of a plug for expansion cards. To do this, drill a hole of the required diameter for the variable resistor you are using, then it is inserted into it and tightened with the special nut that comes with it. You can put a suitable handle on the axis of the variable resistor, for example from old Soviet equipment.
It is worth noting that if the transistor in your regulator gets very hot (for example, if the power consumption of a cooler fan is high or if several fans are connected through it at once), then it should be installed on a small radiator. The radiator can be a piece of aluminum or copper plate 2 - 3 mm thick, 3 cm long and 2 cm wide. But as practice has shown, if a regular computer fan with a current consumption of 0.1 - 0.2 A is connected to the regulator, then there is no need for a radiator, since The transistor heats up very little.
How to properly install a fan in the bathroom
When installing a ventilation system, never forget that the installation determines how the hood will work in the future, whether foreign odors will stagnate in the bathroom and mold will appear.
Are you wondering how to properly ventilate your bathroom? First of all, you should take care of the system of supply and exhaust ducts. Recently, so-called forced ventilation systems, which come complete with a built-in fan, have become popular among buyers.
When carrying out conventional ventilation, it is extremely important that the exhaust and supply ducts are located directly opposite each other. It is advisable to install the exhaust duct in front of the entrance; in this position, moist air will be drawn in as much as possible
What to do if there is an unpleasant smell from the ventilation in the toilet? Most likely, this is due to the spread of mold in the room, which in turn indicates a malfunction in the hood. Malfunctions begin when there is not enough fresh air flow to the ventilation, which can be caused by the following reasons:
- a new door was installed in the bathroom, which fits too tightly and does not allow air masses to enter the bathroom;
- The apartment uses plastic windows and metal-plastic doors that block the flow of fresh air.
It is extremely easy to identify faults in the ventilation system; just hold a burning match to the exhaust duct. If the flame does not fluctuate, there is a problem. To avoid further troubles, it is enough to:
- Leave a gap between the floor and the bathroom door to ensure the natural movement of air masses;
- Use special exhaust valves in window and door openings that will help air pass through;
- In a country house, you can make a small window under the ceiling, which will additionally ventilate the room and prevent unpleasant odors from stagnating.
Flow characteristic of axial fan
There is a relationship between the fan's performance Q, measured in cubic meters per minute (m3/min) or cubic feet per minute (CFM - Cubic Feet per Minute) and the static pressure of its air flow H, measured in mm of water column or, less commonly, in pascals (Pa). It is determined experimentally for each type of fan in laboratory conditions and is called the fan flow characteristic.
Picture 1.
The flow characteristic of an axial fan, given in manufacturers' reference books, is nonlinear, but in technical calculations it can be replaced by a straight line passing from point A with coordinates on the graph (H, Q = 0, which is equivalent to a fan operating in a certain closed volume and creating in this volume pressure H) to point B with coordinates on the graph (H=0, Q, which is equivalent to a fan operating in open space with flow rate Q).
The simplified flow characteristic has three points of intersection with the real flow characteristic and maximum deviations are less than 20% for standard fans.
This simplified characteristic can be described by the expression:
k = Hn / Qn; Hp=Hн – k · Qн;
For example in Fig. 1 (upper curve) has k=2.02
and replace it with a straight line described by the formulas:
HP=4.03-2.02Qn;
where: Qн – rated fan performance,
Hn – nameplate static pressure developed by the fan,
Qp – flow rate for a given H (for example at operating point P),
Hр – static pressure developed by the fan at operating point P,
k – coefficient, which is defined as k=Hн/Qн and determines the angle of inclination of the linearized flow characteristic of the fan.
Based on the nominal flow rate of the fan Q, always specified in the technical characteristics, and the maximum pressure H it creates, it is possible to estimate with sufficient accuracy for technical calculations the static pressure developed by it at any point in the flow characteristic. If necessary, you can use the fan manufacturer's flow characteristics.
The flow characteristics of fans that have a flow characteristic significantly different from that described above (when it is impossible to draw its linear equivalent through three points) can be replaced to estimate costs with a line drawn through points A and B. This will lead to a significant increase in the error in the direction of underestimating costs, but will allow at least estimate the costs.
!!! If the operating point on the fan flow characteristic is known, then the best approximation of the flow characteristic at the operating point is the tangent to the flow characteristic curve at the operating point. In this case, the smaller the deviation from the operating point, the greater the accuracy of calculations!!!
But I would recommend always using the real fan consumption characteristics from the manufacturers, and using equivalent ones only when the manufacturer does not provide the latter.
Fan connection diagrams
There are several different schemes for how to connect an exhaust fan in a toilet or bathroom. The difference lies in the power supply to the device.
The wiring itself should be installed during renovations in the room, since the most correct thing from an aesthetic point of view would be to remove it into the wall. If this is not possible, you should consider decorative overlays or boxes.
There are three ways to connect to the electrical network:
- Using a light bulb. When implementing this circuit, the device is connected in parallel with the light. Accordingly, as long as the lighting in the room is turned on, the fan will work.
- Separate switch. Not the most convenient scheme, since you will have to constantly remember to turn on the hood. On the plus side: if necessary, the device can be turned on autonomously.
- Through automation. For this, a timer or a special sensor is used. Convenient, but more expensive method.
From a light bulb
The question is often asked on forums about how to properly connect a hood in a bathroom, using the method of parallel connection of the fan wiring with a light switch.
The light bulb installation method is the cheapest and simplest exhaust fan wiring diagram. In this case, when the light in the room is turned on, the hood also starts working.
The device turns off only when the light is turned off.
To implement this scheme, it is important to understand how to connect the fan to the light switch, and what the pros and cons of this connection are. The advantages include:
The advantages include:
- ease of installation;
- low cost.
The downside is that the hood works even when it is not needed (for example, during water procedures).
It is also important to remember that often the fan operating time in this case is simply not enough, and you have to leave the light on for a while. This leads to excessive consumption of electricity. In addition, when the device is turned on and off frequently, the life of the motor is exhausted, which leads to its rapid breakdown
In addition, if you frequently turn the device on and off, the life of the motor is exhausted, which leads to its rapid breakdown.
From the switch
Many people, after learning how to connect a bathroom fan to a light switch, as well as the pros and cons of this method, realize that it is not suitable for them. For ease of use, the device must be connected separately from the light.
This is necessary for those cases when long-term ventilation of the room is required after people have left it. For example, after taking water procedures with a lot of steam.
This type of connection for an exhaust fan in the bathroom and toilet is more expensive and difficult to install. To implement it, you will need an additional cable, as well as a device responsible for turning on the device.
In fact, the circuit itself repeats the wiring diagram for a light bulb, only instead of a lighting device there is a fan. All this can be displayed on a two-key switch, one button of which will be responsible for the light, and the other for the hood.
One of the advantages is the possibility of autonomous activation of the hood. The disadvantages include the lack of automatic shutdown (a forgotten device can work for a very long time).
Through automation
The most modern is the connection diagram for a bathroom fan with automatic elements - with a timer and a humidity sensor. The most interesting feature is the ability to connect a timer.
This allows you to program the fan operating time. For example, you can set the settings so that the device works for a while after a person leaves the room, and then turns itself off.
Thus, the room will be sufficiently ventilated, and there will be no unnecessary energy consumption.
The installation diagram itself is quite simple - it is similar to connecting a fan through a switch. The main difference is that, in addition to the neutral and phase terminals, there is also a signal wire that is connected to the light bulb.
The standard operating algorithm is as follows:
- The fan turns on at the same time as the light.
- As long as the light is on, the hood is working.
- After turning off the lighting, the fan continues to run for a while and automatically turns off.
- The main difference between a fan with a humidity sensor is that the device has a built-in sensor that measures the amount of water vapor in the air. When the humidity rises to a certain level, it sends a signal to a relay, which closes the circuit.
The fan starts working. When the humidity in the room decreases, the circuit opens, stopping the operation of the hood.
speed controller
into the open circuit +12V, as shown in the figure. Attention! If your fan has 4 terminals, and their colors are: black, yellow, green and blue (for these, the plus power is supplied via the yellow wire), then the regulator is connected to the gap in the yellow wire.
A ready-made, assembled fan speed controller is installed in any convenient place on the system unit, for example, in the front of a plug in a five-inch bay, or in the back of a plug for expansion cards. To do this, drill a hole of the required diameter for the variable resistor you are using, then it is inserted into it and tightened with the special nut that comes with it. You can put a suitable handle on the axis of the variable resistor, for example from old Soviet equipment.
It is worth noting that if the transistor in your regulator gets very hot (for example, if the power consumption of a cooler fan is high or if several fans are connected through it at once), then it should be installed on a small radiator. The radiator can be a piece of aluminum or copper plate 2 - 3 mm thick, 3 cm long and 2 cm wide. But as practice has shown, if a regular computer fan with a current consumption of 0.1 - 0.2 A is connected to the regulator, then there is no need for a radiator, since The transistor heats up very little.
- Simple scheme
- With temperature sensor
- To reduce noise
- Video
Designs and principle of operation
Depending on the intended tasks and operating conditions, it may be necessary to select a fan model of a certain design. Exhaust fans for premises are classified according to their operating principle and installation option. In accordance with the task, you can choose one of two types of device:
- Axial fan. The most famous variety with the simplest design. The movement of air masses is carried out using an impeller, on which the blades are mounted at an angle. The blades, rotating in a cylindrical casing, capture air and push it in the axial direction. This method is characterized by high productivity, since it allows you to distill significant volumes of air in a short period of time. The main disadvantage of this design is its inability to cope with large aerodynamic loads. Axial models can only work effectively in conjunction with large-diameter air ducts that are not contaminated with a significant amount of waste. If the building is tall, then on the lower floors devices of this design may not cope with the assigned tasks.
- Centrifugal fan. It has a more complex design, which was previously found only as part of industrial ventilation systems. The device body is made in the form of a spiral casing. Inside, a wheel with blades fixed to a cylindrical surface is installed on the shaft. The shape of the casing is of key importance in the operation of the device. During operation, air is captured by the blades and begins to move from the axis of rotation to the periphery. At the same time, pressure increases as a result of compression of the air mixture. Under the influence of rotation and centrifugal forces, compressed air moves along the spiral of the casing and is thrown into the outlet connected to the ventilation duct. This principle of the device cannot provide high performance, but it creates acceptable pressure that allows you to push exhaust air even into a narrow and dirty air duct. Devices of this type are recommended for installation on the lower floors of buildings.
There are also less significant differences in the design of the devices. In centrifugal fans, the blades can be inclined either in the direction of rotation of the wheel or against it. Rear-facing blades will save energy. Forward curved blades provide greater pressure, thereby increasing work efficiency. If energy savings are not necessary, a model with forward-inclined blades may have a smaller wheel diameter or lower rotation speed for the same performance. This way you can reduce the noise level.
The configuration of the device, which is selected in accordance with the intended installation method, is also of fundamental importance. Fans of both operating principles can have two versions:
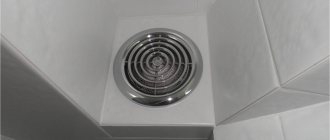
- For outdoor installation. This is the variety that is most often used. The device is placed in the air duct opening. From the outside, the mechanism is closed with a decorative grille. The main disadvantage of this placement method is the increased noise level during operation.
- Duct. The design involves placement inside a ventilation duct. The further the device is from the ventilation grill, the lower the noise in the room. This feature allows you to install higher power devices without the risk of excessively loud noise. The disadvantage of devices of this type is the increased complexity of installation. Sometimes the shape and configuration of the air ducts do not allow the installation of duct models.
Design of a typical floor fan
Do-it-yourself floor fan repair is on the agenda! You should start small: the simplest fans do not have a ground terminal. The device does not have a degree of electrical safety. The floor fan device includes a housing made of plastic. Water will get inside - expect a good shake. This type of floor fan should not be used near water. Starting with an aquarium with fish, ending with a flower vase. Particularly dangerous where small children live. If the thing falls, the child will guess to pour milk inside... Draw your own conclusions:
- the structure is unstable;
- the base breaks easily and bends;
- There is no protection against electric shock.
If a floor fan falls, there is a high probability that nothing will happen. Let's dive inside the structure. Let's leave aside for now the features of regulating the engine speed and buttons. Let's talk about the gearbox. The Krasnodar floor fan carries one asynchronous capacitor motor. The front side of the shaft is connected to the blades through a pin and a nut with a left-hand thread, the rear side goes to a gearbox formed by two gears, one double.
The shaft is equipped with a thread that engages the teeth of a large wheel as it rotates. The moment is transmitted to the small wheel, which drives the flywheel. The gear of the crank mechanism is the diameter of a hand, so the rotation is inferior to the speed of the original shaft of the asynchronous motor.
- The blades spin at full motor speed.
- The crank mechanism, thanks to the gearbox, moves more slowly.
Through the cardan transmission, the crank is hooked onto the leg, and the engine housing is mounted on the axle. When the shaft of an asynchronous motor rotates, the blades move smoothly in one direction or the other. However, you can stop the process. For a double gear, the roller is attached to the larger gear by two balls with a spring inserted into a through hole. If you pull the adjuster knob directly connected to the axle, the latch slides up. The connection between the gear and shaft is lost, and rotation stops. The mechanism provides fall protection: six grooves are cut into the inner mounting hole of the drive gear. Balls fit. There are six positions, the mutual transition is accompanied by a click, the axis rotates relative to the gear, the balls hit the walls, sliding into the grooves.
Clicking sounds are heard, there is a high probability that the floor fan has fallen. The drive is jammed, it works, clicking, a protective mechanism, protecting the motor from combustion.
We believe that the mode is unfavorable for a floor fan; if you do not turn off the device, the thermal fuse of the motor will certainly break. The gearbox is attached to the engine with three bolts and has a pair of lubrication holes through which the plastic gears can be lubricated. Refers to a drive rotating at the speed of an asynchronous motor.
Headache, how to fix a floor fan and assemble it. We see the situation: the relative position of the gearbox is incorrectly set, the legs through the gear, the head of the floor fan will move asymmetrically relative to the frontal plane. Can be annoying. Attach the gearbox, check the product by connecting power. Be careful not to get an electric shock, try to visually determine the correctness of the assembly.
Connect directly
If you initially abandoned junction boxes and use recessed socket boxes for switching, then the third connection diagram will be similar, and the differences here are practically not noticeable.
It’s just that all connections are made directly in the socket box. It can be done by crimping or using the same Vago clamps, if space allows.
There are also expensive, sophisticated models with remote controls.
They are connected in two ways:
directly from the distribution box - forced manual shutdown is performed by a button on the fan itself
via a separate light switch button
Varieties and characteristics
The ERA model is the most popular in our market. Let's look at it in more detail.
Other mechanisms and models with a timer from Vents, Ballu, Electrolux are connected in a similar way.
Here are the technical specifications and detailed data for all popular models:
Electrolux EAFM-100THERA SB D100 OptimaVents 100 KDomovent 100 CERA D 100 E 100SCBallu Green EnergyERA D 100 4C ETVents 100 Quiet
Fan installation
A fan in the bathroom should not be afraid of moisture.
Before installing an electric fan for the bathroom, you need to make sure that several conditions are met:
- the presence of a normally functioning ventilation channel;
- the presence of a gap under the bathroom door for air circulation;
- the fan must be selected correctly.
For the bathroom, preference should be given to waterproof models. The self-installation process consists of the following steps:
- cable laying;
- preparing the installation site, expanding the ventilation channel if necessary;
- connecting the fan to the network through fastening and switching components;
- installing a cooler in the ventilation duct;
- final finishing work - sealing voids with foam, putty.
Connecting a bathroom fan to a switch separate from the light:
- remove the front grille;
- connect the wires to the fan through the terminal blocks, observing the markings (blue - zero, red, white, black - phase);
- fix the fan housing in the hole in the wall;
- install a mesh on the fan.
Ceiling installation
Ceiling hood in the bathroom
In some homes, the electric fan may be mounted on the ceiling. In private houses, the ventilation duct is laid in the attic, therefore the ventilation system is located there.
Installation on a suspended or suspended ceiling becomes more complicated. On a suspended ceiling you will need to make a special stand, and the cooler can be screwed to the plasterboard using dowels. If the ceiling is already installed, dismantling will be required. To avoid dismantling the ceilings, you can use one of two methods:
- pulling wires through a hole that will need to be sealed later;
- run the wiring along the ceiling and hide it with a cable duct.
Carrying out such an installation is quite difficult. The best option is to think over the ventilation system before repair work and prepare the installation site in advance.
Types and purpose of PC fans
The most powerful sources of heat inside a PC case are the CPU on the motherboard and the GPU on the video card. Separate fans are installed for them, structurally combined with heat sinks. Such a system is usually called a cooler (as opposed to a case fan), although there is no such term in the English-language technical literature. There it is called Heatsink and fan .
Fan-heat sink unit.
The remaining components of the PC collectively emit less heat, and to create a comfortable mode, a common system for removing heated air is sufficient. Previously, one device that pumped air inside the case was enough for this. Heated air masses exited through the ventilation holes. Now the supply and exhaust system is considered effective. It consists of one or more injection devices, and one or more exhaust devices that suck heated air out. The possibility of installing one or more coolers depends on the design of the case.
Also, the fan is usually built into the computer's power supply. The cooler is connected to the power supply during the manufacturing process and does not change during operation. But due to the widespread use of the 80 PLUS standard, in the most expensive sources of the 80+ Platinum and 80+ Titanum levels, the electric motor with an impeller, as a powerful consumer, is increasingly excluded from the design of the device. Instead, other measures are used to dissipate heat.
Coolerless power supply.
Hood duct and grille with non-return valve
The first is that instead of corrugation, a plastic pipe is taken (for example, d-125mm), and through one or several bends it is led into the hole in the ventilation duct. In this case, a certain division is made in the hole itself under the ceiling.
An entrance to the pipe is mounted on top, and a small rectangle is left below through a grate with a valve for natural inflow.
Moreover, the grille should be at the bottom, and not at the top. Otherwise, the air flow from the hood will blow upward and lift the so-called non-return valve.
Although, of course, if you have a more advanced valve design - a circle or rectangle with an offset axis, and not simple strips of polyethylene, or there is a solid partition, then you can safely install it as you want - on top, side, bottom.
However, in fact, this whole structure often does not work as intended. When you turn on the exhaust unit and create pressure, a small part of the dust still seeps through the cracks and micro-holes, after which it safely ends up in your kitchen on the dining table.
No check valves are 100% effective. The bulk of the air, of course, goes outside, but the gradual formation of dust inside the apartment is a fact.
And even when the hood is turned off due to the reduction in the diameter of the original hole, natural ventilation through narrow grilles will be much worse.
Everything can be done much better.
The pressure created by the fan and its effect on the parameters of the cooling system
The pressure created by an axial fan is its most important parameter, determining the efficiency of ventilation and cooling systems.
It is enough to simply provide the required air flow in the free space; for this you can use any fan with a given flow rate.
But not every fan can provide the required flow rate in specific structures, but only one whose excess pressure is greater than the pressure drop in the structure (it is better if much more).
The resulting air flow through the structure will be determined at the operating point, where the pressure is equal to the difference between the excess pressure created by the fan and the pressure drop across the ventilated structure. It is determined by the fan flow characteristic for the point with the resulting residual pressure.
This is why a low pressure drop (low resistance) of the object being ventilated is important.
If the pressure drop on the cooled structure is greater than the excess pressure created by the fan, then the flow rate tends to zero, the air flow on the fan blades is disrupted and as a result there is no ventilation, but only additional noise.
Therefore, it is important to use fans in cooling and ventilation systems whose flow characteristics are tested and guaranteed by the manufacturer, and the most important role is played by the pressure created by the fan at a given flow rate.
And for cheap fans, not only are the flow characteristics not given, but often the maximum or static or excess pressure created by the fan is not even indicated. Practice shows that fans where the pressure is “modestly kept silent”, for the most part, have a real pressure much lower than the fans produced by responsible
manufacturers.
Basic faults and repairs
The listed list of microwave oven malfunctions is not exhaustive; it only reflects the most common breakdowns. You can fix all of the listed faults yourself.
| Problem | Possible reasons | Solution |
| Microwave won't turn on | Power fuse blown, replace only | After replacing the fuse, check the serviceability of the transformer and the transformer safety diode |
| The clock is running | Miniature door switch does not operate | Repair or replacement |
| The microwave oven periodically turns off and on every few minutes | Cooling fan malfunction, fan switch relay, vents closed | Minor repair or replacement |
| During operation, sparks are visible and a burning smell is heard. | Breakdown of the mica gasket due to contamination | Replacement |
| Microwave doesn't heat well | low voltage in the network or loss of magnetron emission. Application of a voltage stabilizer | DIY repair by increasing the number of turns or replacing the magnetron |
| The LCD display does not display all segments, highlights and spots | The screen or processor is damaged. If the microwave also doesn’t work, then it’s definitely the processor. | Replacement |
| Touchpad stopped working | Damaged conductive paths | DIY repair by laying wires or replacement |
| The tray rotates jerkily | Roller grooves dirty, motor malfunction | Do-it-yourself repair by cleaning the roller grooves, replacing the engine |
| The light is on, the tray is spinning, the microwave is not heating | Severe voltage drop in the network, a breakdown in the transformer power circuit, a broken magnetron | Installation of a voltage stabilizer, repair by ringing the transformer power circuit with a tester, troubleshooting, replacement of the microwave generator |
| Buttons on the control panel do not turn on | Do-it-yourself repair by checking with a tester, soldering contacts or replacing buttons | |
| There is a humming sound when the microwave oven is operating | The fan, doubler diode or transformer has failed | Replacement |
| Microwave works without turning off | The voltage supply relay is faulty (contacts sticking) | Power off, replace. There may also be a problem with the processor or relay control circuit. Self-repair by checking with an ohmmeter, if the circuits are ok, replace the processor module |
You can repair a microwave oven with your own hands, but you can operate it correctly and thereby significantly increase its impeccable service life.
Every second kitchen uses a microwave to quickly heat up food; it is easy to use and saves quite a lot of time. Repairing microwave ovens Samsung, Panasonic, LG and others can easily be done with your own hands at home, without contacting service centers.
Despite the apparent complexity of the operation, any microwave consists of fairly simple parts: a food heating chamber, a magnetron, a waveguide and a winding, which is necessary to power the device. The camera and magnetron are connected to each other using a waveguide. In addition, a transformer and its winding are also installed in the furnace. The operating principle is as follows: when the microwave oven is turned on, voltage is supplied to the primary winding of the transformer. At the same time, energy is also supplied to the secondary winding, which is responsible for heating the cathode. Both windings are very well insulated.
Photo - microwave oven design
It should be noted that this device uses doubling the voltage, which is why the food heats up at such a speed. For this function, a capacitor is used, to which a rectifying diode is connected in parallel. To control the time, a timer is used on the gears, which helps control the duration of heating. A special temperature sensor also has a similar function.
Photo - diagram
Considering that this device is an increased source of danger, it has a built-in system that is responsible for the safety of use. These include phase and power protection relays that stop the microwave oven when there is a power surge or the door is open.
Photo is a simple device
The most common problems faced by microwave oven owners are:
Video: repair and diagnostics of microwave ovens
Flange problems
Flanges, as a rule, are installed in fans made of plastic. If the device falls, they can easily break. In this case, repairing the fan will have to begin by unscrewing the back cover. If we consider simple models, their flanges are usually located near the electric motor. However, there are modifications where they are located near the shaft itself. In the first case, there is no need to remove the control unit. However, you will have to twist the crank first.
Next it is removed. After this you will need to disconnect the switch. The flange is primarily attached to the panel using screws. If it is severely deformed, then the easiest way to pry it off is with a screwdriver. However, if the damage is not serious, then it can be easily twisted. If we talk about models where the flange is installed near the control unit, then you should do it differently.
First of all, the fan is released. Then the control unit itself is twisted. The next step is to remove the gasket, which is located next to the rotor. In this case, the flange must be secured with two screws. To replace it, you will need to order a similar part from the service center.
Power cord and poor contact
The first thing to do is ring and check the integrity of the power cord and all visible contacts. Maybe you won’t have to climb far into the inside of the device at all, but the trouble will be on the “surface”.
To do this, unscrew and remove the bottom or side cover, depending on your model.
Keep in mind that you should not initially unscrew the central screws, since the motor is attached to them.
Remove them and all the insides will fall apart. It would be better if the engine itself sat secured to one of the covers.
Next, find the contacts where the 220V power wires come. If you're lucky, sometimes without any instruments you can immediately see the burnt-out wiring.
Place it in place and all repairs are completed. If the problem is more serious, then simply probe and tug all the terminal clamps.
Since the fan vibrates during operation, it is quite possible that one of them has simply moved out of its place. Poor contact on the terminal block can also be detected by characteristic signs of burning.
Often such defects cause the fan heater to turn on and off spontaneously. Especially when you move it and move it.
If you find this, clean and then wipe the area with a cotton swab soaked in alcohol.
Next, use pliers to slightly tighten the terminal and put it back on.
Only after all these manipulations can you proceed to checking with measuring instruments.
Switch the tester to the continuity mode, and use the probes to check the integrity of the power wires one by one. To do this, touch the input contacts inside the fan and the metal pins on the plug.
If everything is OK, the tester will make a sound or show zero resistance.
If something works when you plug it into the network, for example a fan spins, but the air is cold, then the cord, of course, has nothing to do with it. In this case, its check can be omitted.
A microswitch, which is sometimes built into the housing, rings in the same way.
Switch its key and check that there is a circuit.
These things very often fail at high currents. The repair in this case is quite simple. Two wires suitable for it are cut out and connected directly to each other.
The connection point is insulated with a protective PPE cap or simple electrical tape.
The only negative is that from now on the fan heater will work immediately after you plug the plug into the socket.
When the switch has nothing to do with it, check the following elements of the circuit. By the way, don’t forget about the mechanical part.
Immediately after opening the case, try turning the blades by hand. They should rotate freely.
Here you need to make sure that nothing is stuck and that there are no foreign objects stuck on the shaft.
Bathroom ventilation
In this room, ventilation is necessary to remove large amounts of moisture that constantly accumulates here. Thanks to the presence of a hood, it is easy to breathe in the room, plumbing fixtures and household items do not deteriorate, and mold and mildew do not appear.
Recommendations from engineers when choosing bathroom ventilation
Engineers recommend not purchasing expensive, large equipment. The main thing is to correctly calculate the required power
Experts advise paying attention to the power of the wiring in the room. Since the hood has considerable power and pressure, the cable may be damaged due to power overload
When purchasing, quality, productivity, and dimensions are taken into account.
How to install a fan in the bathroom
When installing, you must follow the rules:
- remove the cover;
- Lubricate the places that will be adjacent to the wall surface with liquid nails or reliable glue;
- place the product in the hole in the wall (the working part is hidden);
- press the body well;
- install an anti-moxin mesh;
- Place the cover, securing it with dowels or self-tapping screws.
At the end of the work, the wires are laid, and the structure is connected to the electrical network.
The principle of connecting to the electrical network
The ventilation duct is separately wired for automatic activation by programming the device or a motion sensor. If the model has a cord, then you can turn on the system mechanically.
Control by turning the lighting on/off
Often electrical equipment is turned on at the moment when the lights in the room come on. But since an exhaust hood is usually necessary during bathing, this option is not very convenient - electricity is wasted, for example, during washing. Therefore, it is better to automate the system in order to save energy and provide additional convenience.
Why do you need a timer for a bathroom fan?
Equipped with a timer, the hood will turn on when the light is turned on, and turn off a few minutes after the person who took the shower has left the bathroom. During this time, the device extracts moist air. If the stay in the room was short, the structure will not turn on, since there is no need for its operation.
Connecting a bathroom timer
The timer is a compact device. It should be connected using 6 pins. To connect correctly, you need to use the diagram.
Bathroom timer connection diagram
Connection via switch
Before you start connecting the power wires, you need to turn off the switches on the switchboard. Then the front panel of the device is removed and wires are inserted into it through the channels.
How to connect an exhaust fan to a switch
The wires are connected to the terminals of the device located under the cover. In the absence of grounding, 2 wires are enough: phase and zero. The wires are connected to the terminals, secured with bolts, and a protective cover is installed.
Common mistakes and additional tips
Fan connection errors can cause not only incorrect operation of the hood, but also a short circuit or fire.
Do not forget that the bathroom is a room with high humidity, which means it is especially dangerous for electrical appliances and wiring. In order to arrange ventilation without errors on the first try, consider these tips:
- The fewer bends and the simpler the design of the ventilation duct, the better the traction.
- With a single ventilation system for a separate bathroom, air should move from the bathtub to the toilet, and not vice versa.
- Use terminal strips, not electrical tape, for all wire connections.
- Strip exactly the part of the wire that will go into the terminal block.
- Check that there is a mosquito net in the fan. If suddenly it is not there, add it, because mosquitoes and other insects feel great in warm, damp ventilation shafts.
- In a private house, be sure to insulate the part of the ventilation duct or shaft passing through unheated rooms. Otherwise, there will be no traction in cold weather.
- Don't neglect grounding for metal fans.
In addition, to prevent the fan from interfering with natural ventilation when it is turned off, you can use double rectangular grilles, with a hole for the fan at the top and a regular grill underneath.
When connecting the fan power supply, do not mix up the contacts: N – zero, T or LT – timer, phase from the switch, L or Line – phase directly from the box
If it is not possible to install a double grille, you can maintain natural ventilation by placing foam plastic legs 1 - 2 cm under the corners of the body, in the places where they are fastened with self-tapping screws. As a rule, the ventilation window is square and the fan housing is round, and these gaps are enough for air circulation.
Please note that even an ideally installed and sufficiently powerful fan will not work effectively if there is not sufficient supply ventilation. Usually it is provided by a gap of 1.5–2 cm under the door to the bathroom, but for beauty it can be replaced with a special grille that cuts into the bottom of the door.
Also make sure that fresh air gets into your home at all, because after installing plastic windows and new doors, insulating the walls and concrete screed on the floor, the apartment turns out to be hermetically sealed, like a thermos.
How to protect your cooler from damage
It is easier to protect a cooler from damage than to repair it
It is important to carry out preventive sanitization of the entire device to prevent the appearance of pathogenic bacteria inside the system. In addition, when cleaning, the technician checks the functionality of all parts and pipes, which prevents breakdowns.
It is important to transport the device correctly. They are transported only in a vertical position or at an angle of 45°, not leaning against the back wall, so as not to damage the cooling unit. To prevent the heating element from burning out, you need to wait until the water completely fills the heating tank and then turn on the heating
When installing a new bottle, you must wait until air bubbles stop coming out and open the hot water tap (the device is disconnected from the network). When the water flow becomes smooth, you can connect the electricity. There is no need to subject the device to mechanical stress - knocking on it or kicking it. This may cause equipment failure. It is also recommended to unplug it at night.
How to connect?
After identifying the required device and purchasing it, the task arises of installing it all. And at the same time, install everything correctly
Even if the work is done by hired specialists, it is important for the owner to know a few key and important details so that he does not have to change anything later
In addition to installing the fan, sensors and other devices, it is worth deciding how to connect the hood in the bathroom. Namely, when the fan will turn on and when it will turn off.
How not to connect the hood?
And before we talk about the correct ways to install electric ventilation in the bathroom, it is worth considering the wrong options:
- One of the popular ways is to install a door opening sensor, which will turn on the fan, and a five-minute timer, which will turn off the system. It's not even a matter of the complexity of installing such an option. Firstly, a hood is not always needed when a person enters the bathroom. Secondly, five minutes is clearly not enough. During this time, excess moisture or unpleasant odors may not even appear. And the noise of the fan will constantly bother you.
- An even more common option is to turn on the ventilation along with the light and turn it off along with it. Despite the fact that this option can be found almost everywhere, it is difficult to call it correct. Again, ventilation should not always work when the lights are turned on. And it should not turn off along with it, because the moisture will most likely remain or the owner will simply burn electricity.
- Recently, it has become fashionable to use humidity sensors that will automatically turn the hood on and off in the bathroom. But this option has several disadvantages. The first of them is the inability to turn off the fan if necessary, even despite the increased humidity. Also, an unpleasant situation may occur when the hood suddenly turns on and can greatly frighten the person who is washing. Especially if this person is elderly and has a weak heart.
Of all these wrong options, there are several key points that can help you avoid negative consequences. Firstly, the hood should be turned on only when a person needs it, and not the equipment itself. This means that no door opening sensors, humidity or motion sensors are needed to turn on the ventilation system, only to turn it off. Secondly, the system must be able to be disabled at the request of the user. Then you need a separate switch. At the same time, it does not always need to be installed together with a light switch, because it is extremely inconvenient to leave the bathroom or toilet just to turn off the fan. Therefore, it is better to place it indoors. And thirdly, a sufficient amount of time must pass for excess moisture to be removed, which means that the system should not turn off after five minutes or immediately after a person has left the bathroom or toilet.
How to properly connect a hood in the bathroom?
Thanks to compliance with these requirements, there are three optimal options for how to connect a hood in the bathroom:
- The easiest one is to install a switch inside the bathroom. At the same time, he is responsible for both turning the system on and off. Then, when the fan is needed or not, it is turned on and off by the resident independently. A noticeable inconvenience is that the hood does not turn off automatically. And if the user needs to go somewhere and the room is not ventilated, some inconvenience appears.
- The next method is to automatically turn on the hood along with the light, but there is a separate switch for it. It can be located on the wall in the room or on the fan housing. But at the same time, you must not forget to turn it off. Therefore, it is recommended to install a timer or humidity sensor so that the fan turns off only after the bathroom has been completely ventilated.
- If you try to combine the previous two options, you can highlight the third. This is a separate switch for the hood, as well as a timer or humidity sensor to turn it off. If a timer is set, the system should turn off an hour after the start of ventilation. With this option, the user turns on the hood when he needs it, and the ventilation will end automatically, which allows the person not to worry about the level of humidity.
https://youtube.com/watch?v=4wTYyKgYD8Y
By following these simple rules, you can connect the hood in the bathroom simply and competently. At the same time, mold and mildew are unlikely to bother you.
Problems with the blades
Since plastic is used in the manufacture of the blades, this part of the fan is very susceptible to external mechanical influences. As a result, the blades often become deformed and break if any foreign objects get caught behind the mesh. In this case, in order to repair the fan, the owner needs to dismantle the protective mesh. The back cover can remain in place. There is no need to remove it. The protective mesh is held in place by a special clip in the form of a plastic cap. It is easy to turn with just your hands. After the clamp is twisted and the protective mesh is removed, the special lining that secures the blades is detached. This stage of work can be completed without the use of tools. The blades must be replaced if they are very deformed. If during operation of the fan there is slight friction against the protective grille, then they can be easily aligned by hand. According to fan owners, plastic blades bend very easily.