Like any semiconductor device with one-way conductivity, the LED is critical to the correct connection to the DC circuit. For normal operation, the anode and cathode of the LED must be connected to the corresponding poles of the voltage source according to the circuit diagram. To determine the pinout of a light-emitting element, there are several methods.
Determination with a multimeter
Like any diode made on the basis of a pn junction, a light-emitting diode can be checked with a multimeter, using the property of conducting current only in one direction. Modern digital testers have a special diode testing mode, in which the measuring voltage is optimal for this procedure.
To determine the location of the LED pins, you need to randomly connect its legs to the multimeter probes and determine the result from the display readings.
Incorrect polarity of LED connection to the tester.
If the element is connected incorrectly, the result of the measurement will be an off-scale resistance value (OL - overload, overload). You need to swap the multimeter clamps.
Correct polarity of LED connection to the tester.
If the LED is working and connected correctly, then some resistance will be indicated (the specific value depends on the type of emitting element). In this case, the anode will be the lead connected to the plus of the multimeter (red wire), and the cathode will be the minus (black wire).
Some testers in diode testing mode produce a voltage sufficient to ignite the light-emitting element. In this case, the correct connection can be monitored by the glow.
AL307 LED glows when tested with a tester.
If overload is indicated on the display in both connection options, this may mean:
- LED malfunction;
- the measuring voltage is not enough to open the pn junction (the tester is designed for “continuity” of silicon diodes, and most light-emitting elements are made based on gallium arsenide).
In the first case, the semiconductor device can be recycled. Secondly, try a different method.
Device and scope of application
Structurally, RGB LEDs are three LED chips with one optical lens, located in one housing. Color control occurs by applying electrical signals to the terminals of each LED chip, and the combination of emissions from all three LEDs allows you to adjust the final color. For example, below is the most popular RGB LED SMD 5050.
An RGB LED is a full-color LED; by mixing three colors in different proportions, any color can be displayed. For example, if you light all three colors at full power, you will get a white glow.
The areas of application of RGB LEDs are directly related to the development of the advertising and entertainment market. Also, ready-made RGB lamps and strips are used in the field of lighting design of architectural and design solutions - night lighting of buildings or fountains, interior lighting, car indicator systems, etc.
Table of wavelengths of smd 5050 LEDs, different luminescence
The variety of applications of multicolor LED light sources determines the main types of external design of RGB LEDs: low-power products are produced in standard round cases with a spherical lens and leads for conventional soldering; low-power RGB LEDs in surface-mount SMD packages are widely used in LED strips or large-area full-color LED screens; in Emitter-type housings they produce powerful RGB light sources with independent control of each LED crystal; super bright LEDs in housings.
To simplify light control systems, control chips are built into the housings of some series of multicolor LED light sources. Pin Layouts (Pinout) Several standard control circuits determine the structure of the external pins of RGB LEDs and their connection inside the housing. There are three main pinout patterns that are followed on most manufactured products:
- In a common cathode circuit, three independent anode terminals are used for control, and the cathode terminals of the LED crystals are interconnected;
- The pinout with a common anode is controlled by negative pulses to the cathode terminals, and the anode electrodes of the LED crystals are connected together;
- The independent connection circuit has six pins according to the number of LED crystals; no connections are made inside the housing.
It will be interesting What is a transistor
There is no single standard for pinout; the specific type of arrangement of external pins is used depending on the tasks assigned. If there are no documents for the LED product, the type of external pins can be easily determined using a multimeter. In the dialing mode, the LED will glow (high-power LEDs are very weak), and the multimeter will make a connection sound if the red probe of the multimeter is connected to the anode of the LED crystal, and the black one to its cathode. In the case of a reverse connection, there will simply be no visible or audible effects.
Three LEDs and their sizes
The simplest way to connect and control the operating modes of RGB LEDs is implemented using standard Arduino microcontrollers
The common pin is connected to a single bus of the microcontroller, and control signals are supplied to the terminals of LED crystals through limiting resistors. The lighting modes of LED crystals are controlled using pulse-width modulation, where the duty cycle of the pulses determines the light intensity. Programming the PWM modulator determines the final color of the entire device or cyclic operating modes of each color
LED pinout by power supply
The advantage of this method is that it can be used for light-emitting diodes with any parameters (voltage drop and current rating). For such a check, it is better to use a power source with a current limit setting, or at least with its indication for control. Otherwise, the sensitive semiconductor device may be damaged.
Incorrect polarity of LED connection to the voltage source - no light.
If you have an adjustable source, you need to randomly connect an LED to its output and apply voltage, gradually increasing it from zero. The power supply should not be raised above 2-3 V so that the element does not burn out. If it does not light up, you need to remove the voltage and switch the terminals in the opposite way.
The correct polarity of connecting the LED to the voltage source - the LED lights up.
By gradually increasing the voltage, you can visually determine the moment the LED lights up. In this case, the positive terminal of the source is connected to the anode, and the negative terminal is connected to the anode of the radiating element.
If there is no regulated source, then you can try to use an unregulated power supply with a voltage obviously higher than the LED supply voltage. In this case, tests are carried out only through a 1-3 kOhm resistor connected in series with the semiconductor device.
If in both cases the LED does not light up, you can try testing with increased voltage. If the element is faulty, this will not harm it, and if it is designed for increased voltage, then it will be possible to find out the correct location of the terminals.
We recommend: How to find out how many volts an LED is
Connection
As an example, we give a diagram for connecting RGB diodes to the Arduino universal automation unit, created on the basis of the ATMEGA microcontroller. In Fig. Figure 2 shows a connection diagram for an rgb led with a common cathode. The RGB pins in both cases are connected to the digital outputs (9, 10,12). The common cathode in Fig. 2 is connected to the minus (GND), the common anode in Fig. 3 is connected to the power supply positive (5V). Arduino is a simple controller for beginner roboticists, which allows you to create various devices on its base, from ordinary LED color music to intelligent robots.
It will be interesting What is a bipolar transistor
Using a battery
If there is no power source, you can try to determine the location of the leads from the galvanic cell, but you should keep in mind the features of such a test:
- The battery may produce a voltage that is insufficient to open the pn junction.
- household galvanic cells have low power, and the output load current is small - it depends on the initial power of the battery and on the residual charge.
The table shows the parameters of some domestic LEDs. Obviously, common one-and-a-half-volt chemical current sources will not be able to ignite any device on the list.
| Device type | Forward voltage drop, V | Operating current, mA |
| AL102A | 2,8 | 5 |
| AL307A | 2 | 10 |
| AL307V | 2,8 | 20 |
To increase the voltage, you can connect the batteries in series. To increase power - in parallel (only for elements of the same voltage!). The result may be a cumbersome design that does not guarantee the final result. Therefore, it is better to use this method in cases where there are no other ways.
Marking
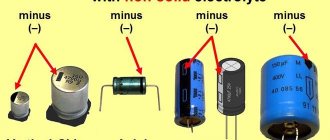
There are three main parameters that characterize a capacitor: the nominal capacity, tolerance and nominal voltage. In most cases, two marking methods are used - alphanumeric and numeric.
In the first case, the letter denotes the capacitance value (μ, nF, pF) and plays the role of a decimal point. For example, if a non-polar capacitor is marked 1 μ, then it is a part with a capacity of 1 μF, and the inscription 3μ3 means 3.3 μF.
A letter encoding can be used to indicate tolerance; its decoding is presented in Figure 8.
Figure 8. Decoding of letter marking of tolerance
The operating voltage of the capacitance can also be indicated by a letter code; its decoding is given below.
Table: explanation of the letter marking of permissible voltage
Small containers, for example, in SMD version, are usually marked with a three-digit digital code.
Three-digit digital code for capacity parameter
In order not to remember all the table values, use the following decoding rule: the values are given in picofarads, the first and second values are the mantissa, the third is a power with a base of 10. For example, the inscription 331 will mean 330 pF (33*10).
By appearance
Sometimes you can tell the polarity by appearance. Some types of LEDs have a key on the housing - a protrusion or mark. To determine which pin is marked with a key, it is better to consult the reference materials.
The key is at the cathode of the AL102 light-emitting diode.
Appearance of the pin layout of the AL307 LED.
For packageless LEDs produced in the USSR, you can find out the pinout by looking closely at the internal structure of the device through the layer of compound. The cathode terminal has a large area and is made in the form of a flag . This principle could become a standard, but now manufacturers do not strictly adhere to it, so this method is unreliable, especially for elements from an unknown manufacturer. Therefore, this definition of conclusions can be used only for preliminary guidance.
The pinout of domestic LEDs can be recognized by the length of the legs - the anode lead is made shorter. But this is true only for elements that have not been used - when being installed in place, the leads can be cut off arbitrarily.
For clarity, we recommend watching the video.
How to determine the anode and cathode of diodes 1W or more
In flashlights and spotlights, 5mm samples are used less and less; they have been replaced by powerful elements with a power of 1 watt or more or SMD. To understand where the plus and minus are on a powerful LED, you need to carefully look at the element from all sides.
The most common models in such a case have a power of 0.5 watts. The polarity mark is circled in red in the figure. In this case, the anode of the 1W LED is marked with a plus sign.
Using technical documentation
Other ways to determine pins can be found in the technical documentation for the elements - in reference books or online sources. To do this, at a minimum, you need to know the type of LED or its manufacturer. The documentation may contain information about the dimensions and pinout of the device.
But even if this information is not found in the specification, the efforts will not be in vain. Technical documentation can become a source of information about the limiting parameters of an electronic device. This knowledge will help you choose the right operating mode, as well as prevent the LED from failing when checking the pin locations.
SMD LED Polarity
At the moment, leadless elements for direct mounting on a board (SMD - surface mounted device) are becoming increasingly popular. Such radioelements, unlike conventional ones, have the following advantages:
- during the manufacturing process of a printed circuit board there is no need to drill holes - the technology becomes cheaper and faster;
- electronic devices are produced in smaller sizes;
- The design of RF devices is simplified - the absence of leads minimizes parasitic interference.
But the desire for miniaturization has a downside - it is more difficult to determine the pins of an SMD LED. It is difficult to connect tester or power supply probes to it. Therefore, it is important to apply clear markings directly to the element body to avoid installation errors. This designation is made in the form of a mark on the body (bevel or indentation) or in the form of a mnemonic drawing.
SMD-LED pinout size 5730.
SMD-LED pinout size 0805.
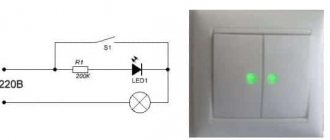
And the simplest case is to connect a light-emitting diode to an alternating current circuit. In this embodiment, the polarity of the LED does not matter.