Aerated concrete is currently very popular in private construction. First of all, this is due to its lightness and large volume of blocks. The second advantage is the foam structure of the material - thanks to it, it perfectly retains heat indoors. Communications are laid inside the finished building, and some of them, especially electrical wiring, are almost always installed in the wall. To make a groove, you need a special tool, and a wall chaser is best for this. In this material we will understand what a wall chaser for aerated concrete is, what types of this device there are, and how to make a wall chaser for aerated concrete with your own hands.
Types and features of furrow machines
There are two types of such tools: electric and manual. Using an electric device, making grooves is much more convenient and faster, but due to its high price and narrow focus, it is almost never bought for home needs. It makes sense for a person who is professionally involved in electrical installation work to purchase an electric furrower. To cut grooves yourself, you usually use a manual wall chaser for aerated concrete, the cost of which is several times lower.
Features of manual wall chasers
Such a device, as mentioned above, costs much less than an electric one, but working with it requires more time and effort. In addition, this wall chaser is intended only for aerated concrete blocks - it cannot cope with brick, reinforced concrete and other hard materials. Its advantage is noiselessness and low dust formation.
Features of electric wall chasers
Using this equipment, it is possible to make electrical grooves not only in aerated concrete, but also in materials such as reinforced concrete, brick and others with high hardness.
In addition, a vacuum cleaner can be connected to the electric furrower, which will prevent a layer of dust from settling on surrounding objects.
The disadvantage of such devices is the loud noise they make during operation. This has a harmful effect on the worker’s hearing, as well as on the nervous system of neighbors if gating is carried out in an apartment building. When working with an electric wall chaser, you must wear special clothing and also use protective equipment - a respirator and goggles.
Why do you need to cut aerated concrete?
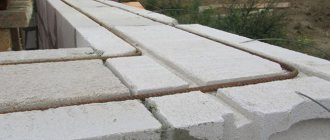
According to technology, when building a house, it is necessary to reinforce the first row, window sill openings and, in some cases, every fourth row. Using a wall chaser , grooves are created, reinforcement is placed in them and covered with aerated concrete adhesive.
also needed for laying electrical wiring or cables in an already built box at home. Since aerated concrete has a porous structure, difficulties may arise in attaching various trays and boxes for laying communications. An alternative is to make grooves in the blocks themselves.
There is no point in trying to do without a wall chaser by using a chisel and a hammer. The recess made in the blocks must be level. This may not matter for laying wires or a corrugated case, but pipes in such a groove can be deformed, and the fittings may not lie correctly. In addition, impact may cause blocks to crack.
Design and types of manual furrowers
This equipment is a piece of metal pipe to which a metal arc is welded, which acts as a cutting element, and two pressing handles. More expensive models are equipped with a diamond tip.
There are two types of manual wall chasers:
- For gating horizontal surfaces.
- For working with vertical surfaces.
There are no fundamental differences between these devices. They differ from each other only in that the clamping handles are fixed at different angles, and the base tubes are bent differently. The difference in the device is due to the goal of correctly distributing the forces applied to the apparatus when gating both vertical walls and horizontal surfaces.
An example of the operation of a horizontal wall chaser in the video:
What are there
This tool comes in two types.
Manual curtain cutter. In private housing construction, I recommend choosing this option. The tool is relatively inexpensive. If you wish and have a welding machine, you can make it yourself. It is a pipe structure with a welded clamping device and a cutting arc-shaped part. In the industrial version, expensive models of such furrow machines have a diamond tip.
With this hand-made homemade tool, with a certain skill and experience, you can quickly and without problems lay all communications. There is little dust during operation.
Hand tools for grating are divided into two types:
- for working with horizontal surfaces, usually for reinforcement;
- for working with a vertical plane, usually when laying communications.
These two types of furrow machines do not have any significant differences. There is only a difference in the curvature of the base (tube) and the inclination of the handles. The first option is shown in the first photo, and the second option looks like this:
An electrically driven furrow maker with several attachments. The electric version of the wall chaser is universal in its application, since it can be used not only for working with aerated concrete, but also for other building materials. The use of this tool ensures an even furrow according to the specified parameters. A high gating speed is also noted.
Externally, an electric furrower is similar to an industrial grinder, only it has an outlet for attachments of a different shape. There is also a terminal that allows you to connect a dust collection device. The main disadvantage of an electric wall chaser is the large amount of dust. On an industrial scale, a special vacuum cleaner is connected to it.
The use of such a furrow machine at home is unjustified due to the high cost and special conditions of use.
Important!
Electric wall chasers are used by professional builders for large volumes of work. When it is necessary to make only a few recesses and grooves in private housing construction, it is not advisable to use such a tool.
How to operate a manual wall chaser
Cutting grooves with such a furrow maker is carried out in the following order:
- Mark the surface so that the groove is level.
- Place the cutting part of the device at the beginning of the marking.
- With your right hand, grab the clamping handle, which is located directly above the cutting element, and with your left hand, grab the handle remote from it.
- Slowly pull the device with your left hand along the markings, while simultaneously pressing the other handle with your right hand.
A manual furrower, although it is not very expensive, does not have to be bought in a store. For a small amount of work, a manual wall chaser for aerated concrete can be done independently without much effort.
You can also make a wall chaser for aerated concrete, which can be used in construction. Video example:
Possible errors and useful tips
- If you have a small amount of work to do, it is better to use a manual wall chaser, but it is important to take into account that on sale today there are single-, double-, multi-disc, milling tools at a price of 4,000 rubles. Aerated concrete does not require powerful equipment, since the density of this material is 5 times less than that of conventional concrete.
- In order to ensure perfect compliance of the new route with the horizontal and vertical, you should use a building level and plumb line. This will not only save money, but also eliminate possible problems.
It is better not to do the work by eye, as the groove may turn out to be uneven, which not only violates all the rules for carrying out such manipulations, but also increases the risk of overheating of the cable, which will be laid with creases. The grooves cannot be placed at an angle. They should only be made parallel to the walls and ceiling. Diagonal grooves are permissible only on attic floors.
Making a manual furrow machine
Let's move on to the question of how to make a wall chaser for aerated concrete with your own hands. To make a simple device, you will need a piece of durable metal pipe, the diameter of which should be approximately 20 mm. Then, measuring 50-60 mm from one of the edges, use a grinder to make a cut, holding the tool at an angle of 45°. When this is done, bend the top of the pipe at an acute angle. A homemade wall chaser designed for aerated concrete is ready. Most of it serves as a handle, and the second is a cutting element for the foam block.
To make a more complex tool, you will have to spend a lot of effort. In addition, you should have a welding machine at your disposal.
This furrow maker is done as follows:
- Weld two pieces of metal pipe (reinforcement) in a perpendicular position at the central points. For the part that will serve as a handle, it is better to take a thicker piece - it will be more convenient to use such a device.
- The length of the piece from which the working part will be made should be 10-15 cm, and the diameter should be 25-30 mm.
- You need to make a cut at an acute angle from one or both edges of the pipe - this will be the working surface.
- Weld the short side of the tube to the base. The corners of the work element must be on the outside.
To facilitate the assembly of the tool and not make mistakes during manufacture, it is advisable to make a drawing before starting work, indicating the angles and dimensions on it.
Visual step-by-step manufacturing instructions on video:
Homemade wall chaser
The disadvantages of a manual furrow maker include not only the fact that it requires much more time and effort to install grooves. But it is also impossible to adjust the width of the groove.
Therefore, we recommend making your own or ordering a welder several of these tools with cutting tips of different sizes. Moreover, to make them you will only need a piece of a metal tube of small diameter, which can be used. Or a thick reinforcing bar.
Pipe wall chaser
The manufacturing process is simple:
- Cut a piece about a meter long from the pipe;
- Bend the pipe at one end to create a pulling handle;
- To the second end, moving 3-4 cm away from it, weld another handle from a piece of the same pipe;
- Cut a 1.5-2 cm wide ring from another pipe of the required diameter, sharpen it, and then weld it to the end of the workpiece.
You can make several replacement tips and screw them to the main part of the tool.
Is it possible to make an electric wall chaser yourself?
If desired, such a device can be made at home on the basis of a simple grinder. However, most masters do not recommend doing this for the following reasons:
- The productivity of a tool made from a grinder is quite low; in addition, it has all the disadvantages of factory-made equipment (it makes a lot of noise when cutting blocks and produces a large amount of dust). It must be used together with a powerful vacuum cleaner, otherwise later you will spend more time cleaning the room than making the grooves.
- If attaching two disks to a single axle fails, the groove will have to be cut in two stages, which will generate more dust and increase time.
- It is impossible to adjust the gap between the disks on a homemade wall chaser with high accuracy, as a result of which the groove may turn out uneven.
- A furrow machine assembled by a non-specialist can be dangerous, since established standards and safety precautions are rarely observed during its manufacture.
Based on this, we can say that if large-scale work is not planned, it is advisable to make do with a manual furrow maker.
But, as already mentioned, it is only suitable for aerated concrete blocks - it is not capable of stronger material.
Do-it-yourself wall chaser from a grinder
Let's look at how to make a device for cutting walls for wiring (or other work), using a grinder as a base.
This homemade product will be useful for those who independently make repairs in an apartment or house (in particular, carry out work on installing electrical wiring) and want to save money.
For example, for one-time work there is no point in purchasing an expensive factory tool, which will then lie idle.
To make a homemade wall chaser from a grinder
, the author will use a welding machine and a lathe.
What you will need
Of the basic materials for making homemade products, we will need:
- thick steel washers (you can buy or turn them on a lathe with your own hands);
- extended couplings;
- long bolt (it is advisable to choose one with a high strength class);
- housing bearing;
- sheet metal;
- discs
designed for working with concrete and stone.
Now let's start making a nozzle for the grinder for gating
.
Stages of work
The first step is to make three washers - using a crown, we cut out three blanks from a sheet of metal. Then the author turns them on a lathe.
Next we need two extended couplings. One of them needs to be shortened. Then the master processes the couplings on a lathe - on one side of each coupling it is necessary to machine a seat for the washer.
After this, in two prepared metal washers, using a step drill, we drill out the central hole to the desired diameter. We put washers on the elongated couplings and scald them.
We clean the weld seams with a grinder. We prepare two ordinary washers, a long bolt and a housing bearing.
All prepared parts will need to be assembled in the following order:
- We put a regular metal washer on the long bolt.
- Then install the housing bearing.
- We put on another washer (regular).
- We put a thick washer on the bolt with a groove for the disc (which we made earlier).
- We install the saw blade on concrete.
- We screw a cut-off elongated coupling with a welded washer onto the bolt.
- We screw on the second extended coupling with a washer.
- concrete
saw blade on the grinder . - After this, we screw the assembled structure onto the gearbox shaft of the angle
.
Making a protective casing
We cut out three parts from sheet metal about 3-4 mm thick: the side walls and the upper part of the protective casing.
We make a fastening clamp. Then we weld it to one of the side walls.
We weld the entire protective casing for the wall chaser - there should be enough space inside to install two disks
. It will additionally be necessary to weld a mount to it to install the handle.
At the last stage, all that remains is to assemble all the parts together: attach the protective casing to the angle grinder
, install the first disk, then install the shaft with the housing bearing, couplings and disk. Everything needs to be secured well.
Details on how to make a homemade wall chaser attachment for an angle grinder
, you can watch the video below.
This idea was shared by YouTube channel creator Sean Beardon. How to make a Wall Chaser using an Angle Grinder
Recommendations for gating
Before ditching the wall, you will need to make a marking and cut along it - this is much more convenient, and the result will be of better quality.
Please note: it is best to cut a wall groove from top to bottom.
The depth of the groove for one cable is at least 15 mm. If several cables will be laid in one groove, the depth of the groove must be increased. The main condition is that the cables fit freely into the groove and do not stick out of it.
The width of the groove must be such that a hammer blade or chisel can fit into it.
When chipping walls, a lot of dust
, therefore it is advisable to provide the possibility of its removal.
For this purpose, a construction vacuum cleaner
, the hose of which is connected to a pipe attached to the protective casing.
Self-production of an electric wall chaser
If you still need an electric furrower, but don’t have the money to buy one, you can try to make one yourself. A simple grinder is used as a base. Additional materials you will need are a pair of diamond discs for aerated concrete that have the same diameter and an additional fastening nut.
The tool is assembled in two steps:
- Install the first disc and tighten it tightly with the nut.
- Then install the second one on top of the first cutting wheel and also carefully secure it with a nut.
When assembling a wall chaser yourself, you need to be very careful. If the length of the threaded part is not enough to securely fix two cutting wheels, it is better not to use such a tool.
Homemade tools and devices for processing aerated concrete
In the articles “How to saw aerated concrete: secrets and nuances”, parts one and two, FORUMHOUSE has already described in detail how to cut aerated concrete manually and using special electric and gas-powered tools.
The topic of manual devices for processing aerated concrete remained uncovered. Practical experience suggests that when working with aerated concrete blocks, one of the most popular assistants is an aerated concrete plane and a manual wall chaser. It is about them that will be discussed in this material.
What to make a plane for aerated concrete from
A planer for aerated concrete is necessary to create a flat surface, eliminate differences, unevenness and roughness on the surface of the blocks. By setting the plane of the laid blocks to “0”, we avoid geometric discrepancies in the surface of the blocks from row to row and ensure a thin joint of the masonry of 1-1.5 mm (when laying gas blocks with glue).
A block plane cannot be considered an expensive or rare tool, but many users of our portal prefer to make it themselves. The calculation is simple - rather than buying a tool, relatively speaking, for 1000 rubles, it is more profitable to make it for 100-200 rubles, spending half an hour of your time.
Among the users of our portal, two designs of homemade planes for aerated concrete, or more precisely, two options for the material of its cutting part, are most widespread. The first is when saw blades are used, the second is when nail plates are used. Both options have the right to life.
WorodewUser FORUMHOUSE
I needed a plane for aerated concrete, and I decided to make it myself.
The design of the plane is captivating because it is simple and can be repeated by anyone. Take a board 5 cm thick, 15 cm wide and 50-60 cm long. You will also need 3 wood files, glue and a handle.
We cut the saw blades in half, then saw grooves in the board at an angle, lubricate the saw blades with glue and insert them into the cuts so that the direction of the teeth is diversified. All that remains is to attach the handle. What happened in the end can be clearly seen in the next photo.
Do-it-yourself gas block grater.
As an upgrade to the plane, you can increase the number of files with larger teeth. According to Worodew reviews, this aerated concrete grater has already ground 40 cubic meters of aerated concrete and has not broken. To increase its service life, you can, instead of files, take a used blade for a band saw.
DiDo18FORUMHOUSE user
I also made myself such a plane. It was necessary to level the aerated concrete D500 B 3.5. The differences in places were about 5 mm, and leveling them with sandpaper was long and tedious. The planer showed its best side.
To increase the efficiency of working with a plane, the user secured 4 files on each side, placing them on glue. The price of the “device” was: the polyurethane foam grater cost 230 rubles, bolts and nuts – 39 rubles. It took 1.5 hours to make the plane (if done slowly).
In terms of the geometric dimensions of the plane, the preferences of our users are as follows: the majority takes a board 15 cm wide, 5 cm thick and 40 to 60 cm long. The files are placed at an angle of 60-65 degrees. You don’t have to buy a handle, but make it from scrap materials - a broken shovel handle, pipe scraps, etc. The main thing is to rummage through your bins and find the thing you need.
This planer design has received well-deserved recognition, and many have decided to repeat it.
Although this planer scheme has proven itself well, it is not without its drawbacks. The main one is the files themselves (their teeth grind down) and a certain difficulty in replacing them.
Timofey Alekseev FORUMHOUSE user
I also made such a plane. It was enough for 10 cubic meters of aerated concrete with a density of D500 and a strength grade of B 2.5. The teeth of the saws were ground down, I wanted to pull them out, but that was not the case! After all, they are glued.
Timofey Alekseev got out of the situation in the following way: he heated the sole of the plane with a gas burner; the metal sheets, due to their greater thermal conductivity, heated up faster than the wooden base. The glue softened and the user was able to pull them out with pliers.
The difficulty of changing saw blades set on glue forces our users to look for ways to improve the design of such a plane.
vic_vUser FORUMHOUSE
I made a plane similar to those described above. I placed 5 canvases at an angle, but did not put them on glue! I came up with a simpler way.
Having made cross-cut cuts in the board and inserted saw blades into them, the user fixed them with self-tapping screws, twisting them perpendicular to the blades. It turned out that the screws jammed the files and pressed them with the head. It took 20 minutes to do everything. Practice has shown that the canvases hold tightly. If necessary, the screws are unscrewed, the files are easily and simply pulled out and changed in 10-15 minutes. The plane turns out to be cheap; it’s not a pity to give it to hired workers.
In addition to blades, jigsaw files, nails hammered onto boards, etc. are used. Much depends on imagination and the presence of certain “unnecessary” things or used metal sheets in the household.
Difficulty in inserting files to replace them. The need to make cuts with a grinder in order to “renew” the saw teeth (this operation is justified if the blade is hardened over the entire surface, and not just 2-3 mm at the teeth), led to the production of a second version of the aerated concrete plane based on nail plates.
TimofeyAlekseev
It is pleasant to work with a plane with saws exactly until the moment when their teeth are ground off, then it begins to slide on the smooth surface of the gas block. The work is not going well. The solution was to make yourself a plane, attaching nail plates to it.
The teeth on the nail plate also wear off, but the speed and ease of replacing them are the deciding factor in favor of this option.
Anton66FORUMHOUSE user
I made a plane from 4 nail plates. It was enough for about 40 cubic meters of aerated concrete.
KovylinUser FORUMHOUSE
I need to treat the D500 gas block. I made myself a megaplane from 3 nail plates, 35 cm each, in 10 minutes, screwing them onto a long PVC trowel with self-tapping screws. The result is great. About 75 cubic meters of aerated concrete have already been laid, the wear of the plates is about 5-10%. Enough for the second floor and garage.
When the plates are ground down, all you need to do is unscrew the screws and “screw in” the new plates. This is done in 5 minutes, and the nail plate, resting on the entire plane of the plane, fits like a glove.
Homemade wall chaser for aerated concrete
Novice developers often ask the question of how to make aerated concrete blocks. Someone chooses a power tool: an angle grinder, a hammer drill or a circular saw. Despite the large selection of mechanical assistants, you can also make grooves in aerated concrete for fittings or electrics manually.
RomanXRomanFORUMHOUSE user
At first I wanted to make the grooves with a power tool, but it turned out that everything is perfectly done by hand.
Having refused a purchased wall chaser, RomanXRoman decided to make it himself. To do this, he took a piece of pipe (you can also use fittings from 12 mm). This will be the handle. For the cutting part, a pipe with a diameter of 15 mm is taken. The pipe must be cut obliquely and screwed to the handle with 4 self-tapping screws. The angle of inclination is selected experimentally. Once the angle is found, the pipe can be welded to the handle.
For ease of use, RomanXRoman equipped both ends of the handle with a cutting part. A round tube is used for cutting grooves for 1-2 wires, and with a square pipe it “cuts” grooves for laying routes for 3 or more wires.
The tool has proven itself to be the best and cuts aerated concrete without dust, like clockwork. It took 0 rubles to make it, since pipe cuttings were used, and the process itself took about 20 minutes.
The following wall chaser design is by a user with the nickname Sublustris.
SublustrisUser FORUMHOUSE
I needed to make grooves in the first row of aerated concrete blocks for laying figure-eight reinforcement. It was not possible to buy a wall chaser. There is no electricity on the site, so the option of a wall chaser made from an angle grinder was no longer available. I made a manual wall chaser, which I don’t regret at all.
Its manufacture required parts that could be found in the bins of every zealous owner. This is a piece of gas pipe, used wood bits (1 piece is needed), a little time and skillful hands.
What happened in the end can be clearly seen in the next photo.
The manufacturing process itself consists of several sequential operations.
We bend the crown so that the narrowest part of the file fits the bend.
We clamp the crown in a vice and anneal the part that we need to bend in order to insert the file into the pipe.
We anneal the crown like this: heat the steel red-hot a couple of times and let it cool in air.
Next, we make a cut in the pipe with a grinder equipped with a 1 mm disc.
The cutting element of the wall chaser (crown) will then be inserted into this groove.
Then we take the annealed crown and, applying it to the pipe, mark the place of the bend.
We bend it in such a way that the file is at a slight angle to the pipe, so the wall chaser will cut better.
Finally, the file is fixed in the pipe with a metal screw.
Sublustris
The wall chaser was a success. Cuts great. There is no need to put pressure on him, just pull him towards you. On average, 2 grooves on one block are cut in 20 seconds. The bottom of the groove is of the correct geometric shape, rounded, the fittings fit into it perfectly.
FORUMHOUSE has topics where you can find out what tools are needed when building a house from aerated concrete, and how to reduce the cost and improve the quality of construction from aerated concrete blocks.
We also recommend reading articles about the construction of an armored belt in a house made of aerated concrete, and how to correctly lay aerated concrete on polyurethane foam.
And from our video you will find out whether it is possible to independently build a house from aerated concrete for 1 million rubles.
How to ensure dust removal?
A homemade electric furrow machine, although it has lower performance than a factory-made tool, produces no less dust when grooving. To save the walls of the room and the objects in it from dust, you need to attach a special casing to the equipment, which will provide an outlet for connecting a vacuum cleaner. Such casings are commercially available, but you can make this device at home, saving money.
To make the casing, you can use a metal sheet or a simple plastic bottle. The most important thing is to equip the protection with a tube to which the vacuum cleaner will be connected. It should be located at the top of the protective device and its connection to the suction hose should be tight. Thus, dust generated during operation will be immediately drawn into the vacuum cleaner.
Nuances of processing aerated blocks
Typically, the following tools are used for processing aerated concrete:
- chisel with hammer;
- hammer drill with a special attachment;
- grinder with a disc for concrete.
Some of the above will probably be found in every owner’s workshop. But high-quality processing of gas silicate cannot be performed with these tools, since they are not intended for such work. Problems encountered:
Handicraft methods of gating have low productivity. The result is low quality of work performed and a lot of wasted time. Careless handling of a chisel can even result in additional repairs to the wall or its complete restoration.
Tool for cutting aerated concrete
Making a manual wall chaser
The working part of a manual wall chaser is a scraper, for the manufacture of which you can use a water pipe or strip.
The diameter of the pipe must correspond to the width of the groove. A piece 100-120 mm long is cut from it, one edge of which is cut at an angle of 45°. The resulting scraper is welded to the handle at an angle of 30-40° to ensure the optimal angle when pulling the tool.
Manufacturing an electric wall chaser
Modifications can be done by extending the existing casing or making a new one using its template. The material for both options is sheet metal 1-2 mm thick, from which the walls of the casing are cut and welded.
Types of wall chasers for aerated concrete
Aerated concrete belongs to cellular concrete, its density is 4–5 times less than that of ordinary concrete. Therefore, for its processing and gating, you can use not very powerful tools (and even manual ones with success).
- Hand-held devices designed for making grooves on horizontal surfaces. They have a shorter and curved handle and are designed for cutting grooves for laying reinforcing rods.
Kawabanga! Primer Concrete-contact Prospectors
- Products designed for cutting grooves on vertical wall surfaces. These devices have a longer and straighter handle.
On a note! The division of manual wall chasers is very arbitrary; everyone chooses their own convenient tool to use.
Both types of manual wall chasers have common advantages: