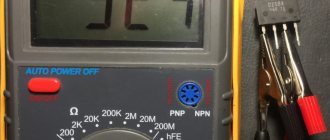
Amps and multimeter: what is it
Ampere is the SI unit that measures the force present in an electric current. Meters for determining it are called multimeters, which can be digital and analog or pointer.
There are differences between them. In the first case, the information is displayed on a liquid crystal screen, in the second there is a dial scale. An analog device has too high a measurement error. When working with it, you need to eliminate the slightest vibrations. Otherwise, the result may not be accurate. Digital more:
- comfortable;
- reliable;
- functional;
- practical;
- universal.
How to connect correctly
In such a question, how to check ammeters with a multimeter, you need to be guided by the recommendations below:
- Calculate the range for measuring indicators. The battery has 1.5V, 7.5V and 12V. The value is set slightly higher than normal. This will be a reserve that will prevent damage to the device.
- Correctly determine the direction of the current, i.e. polarity of the terminals on which the measurement will be performed. The generally accepted designations indicated on the body are taken as a guide.
- Proper connection of the probes is necessary. Black - negative, placed in a general type socket called COMMON (COM). Positive - installed in the red connector.
Scheme of further actions:
- The device is adjusted to the desired measuring range.
- The value is set 10% higher than expected.
- If the indicator is unknown, then the maximum is taken as the extreme value.
- The probes are installed according to the scheme corresponding to the type of measurement being performed. Red to connectors where current, voltage or resistance are measured. Black to common connector.
- The probes are brought to the device being tested or the power supply network. Red is placed on a plus, black on a minus.
- It is necessary to evaluate the obtained indicators. It may be necessary to initially adjust the position of the pointer (“to zero”) to make the information more reliable.
Availability of cables with the necessary connectors
The power supply must have cables with connectors necessary to supply power to computer devices, namely:
1
. The main connector connected to the motherboard. In modern blocks it is 24-pin.
There is only one such connector in the power supply. It is designed to power the motherboard chipset and other devices located on it, as well as control the power supply from the motherboard (starting, stopping the power supply when turning the computer on and off).
Some older motherboards require a 20-pin power connector. This must be taken into account when choosing a power supply. The best option is to purchase a “universal” power supply unit, the main connector of which is made according to the formula 20+4pin (see image).
2
. Central processing unit (CPU) power connector. In most power supplies there is only one, 4-pin. Connects to a special socket on the motherboard.
Some motherboards use 8-pin sockets instead of 4-pin sockets. A 4-pin power supply connector (in one half) can also be connected to such an outlet. The computer will work normally.
And only when the processor is very “gluttonous”, and even overclocked, may it be necessary to supply power to all 8 pins. In this case, it makes sense to purchase a power supply with two CPU power connectors (4+4pin, see image).
3
. PCI-E power connector - as a rule, this is a 6-pin connector designed to power the video card. Typically the power supply has 1 or 2 such connectors.
Some high-end graphics cards require power supply via an 8-pin connector. In this case, you need to purchase an appropriate power supply.
There are also adapters for powering a video card from a MOLEX connector (see the next paragraph).
4
. MOLEX is a 4-pin connector designed to power older hard drives and optical drives with an IDE interface, as well as other devices. This is a "universal" connector. Through adapters, video cards, cooling systems, new hard drives and SSDs with a SATA interface, as well as other devices whose supply voltage is 12 or 5 Volts can be connected to it.
There are usually several MOLEX connectors in the power supply (4-10).
5
. SATA device connector is a connector designed to power storage devices (hard drives and SSDs) connected to the motherboard via the SATA interface.
The power supply usually has several such connectors (2 or more). If they are not enough, SATA devices can be connected via adapters to the MOLEX connector.
Some power supply models may also have other types of connectors, but you can do without them.
How to check amps in different devices?
There are several types of verification.
In the charger
The charger must be checked if there is a need to determine the reason why it is faulty. The current strength is different for each specific device. For example, it is the same on phone and tablet devices, but much more on car devices.
For your information. The permissible limit is indicated on the product label or applied to the body as a marking.
The principle of operation is exactly the same. The difference is that with small pin sizes on the connector, it is difficult to connect probes.
How to measure amperes with a multimeter in a charger if the connector does not include probes:
- Steel sewing needles are inserted into the contacts.
- To do this, use pliers and put gloves on your hands.
- The probes must be connected to the tips of the needle through a load.
- If this is not possible, then you need to disassemble the unit housing. This way you can connect the probes to the output of the charger in the place where each tip of the electrical wire is soldered.
It is necessary to correctly follow safety precautions and pay attention to the recommendations from the manufacturer. In some products it is forbidden to open the lid, while others are completely disposable, that is, they cannot be repaired.
In battery
You can check the lithium-ion battery in your car by doing the following:
- The multimeter is set to voltmeter mode, which tests the voltage.
- Set the range to 0-20V.
- It is advisable to measure the battery only when the vehicle is disconnected from the power supply.
- The red probe is applied to the positive socket.
- The black probe is placed on the negative socket across the load.
- The readings obtained must be recorded.
Now you need to evaluate the result:
- Voltage = 12.6 volts. The device is suitable for use. There is no need to charge.
- The voltage is less than 12 V. The car battery needs to be charged. She was discharged.
- Readings are more than 15 V. Such a device is prohibited from being used. This will damage the generator. You need to purchase a new battery.
For your information. To get accurate data, you need to measure them 6 hours after disconnecting from the car.
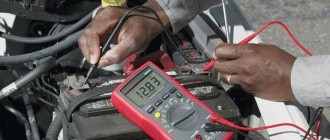
In the power supply
It is quite possible to check the amperes with a multimeter on the power supply. The procedure is performed at break and a load is necessarily applied. The principle of operation is the same as when working with other equipment. It is only necessary to note that the power supply has high power. Accordingly, measurements are taken as quickly as possible, before the probe wires heat up.
As an example, it is worth considering the situation of studying the power supplies of a cash register, camera, cell phone, etc. In this case, a multimeter is needed to measure the current. This is necessary in order to understand whether the device is operational. In some cases, the output voltage may not always guarantee operation.
The study is done in discontinuity with the load:
- The tester mode switch must be set to the maximum value of 10 amperes.
- Measuring a power supply with a power of more than 10 amperes is prohibited with a conventional multimeter.
- Next you need to break the chain. If it is not possible to open the case, one core of the supply wires is cut.
- To complete the circuit, one wire is connected to the tester probe, and the second is connected to the supply circuit - the wire coming from the power supply. This is how the circuit is closed on the device using a multimeter.
- The battery acts as an energy consumer. It's completely discharged. The current strength will be twice the operating current.
- Gradually, with an increase in the charge level, you can observe a decrease in the current strength, tending to 0.
Even if the arrow does not move from the 0 mark, do not be alarmed. This does not mean that the device is broken.
Attention! A couple of seconds are enough to measure. If the voltage is 12 volts and the current is at least 3-5 amperes, then the wires can heat up to the point where they become charred. This can damage all units connected to the circuit.
In the car
To determine the suitability of a vehicle's generator for use, you need to check its charge level. The rules for using the device are the same as with a battery. If the data is incorrect, you need to check each component of the device:
- brushes;
- rings;
- diode bridge;
- voltage regulator;
- stator device;
- rotor.
Efficiency factor (efficiency)
Efficiency is an indicator of the energy efficiency of a power supply, which displays the percentage of electricity lost in the process of converting alternating current of 220 V or 115 V into the direct current of 12, 5 and 3.3 V required by the computer.
The efficiency of almost all power supplies is above 70%. 80% and above is considered a good indicator.
From the point of view of energy savings, the value of efficiency should not be overestimated.
For example, a 600 W power supply with an efficiency of 80% at maximum load consumes 600 W + another 20% of electricity, that is, about 750 W/h. A power supply unit of similar power with an efficiency of 70% will consume more than 850 W/h.
At first glance, the difference is quite significant. But considering that the computer does not often “load” the power supply at full capacity, and 80% of the time it is almost idle, the real average power consumption will be less than 200 W/h. Taking this into account, the difference in energy efficiency of the first and second power supply in practice will be within an insignificant few W/h.
However, high-efficiency power supplies are made from high-quality components and have good circuit design. And from this point of view, it makes sense to take the level of efficiency into account.
You can quickly assess the efficiency by the presence of a sign on the cover of the power supply indicating its compliance with the “80 Plus” standard. How this sign might look can be seen in the image below (placed in ascending order from left to right).
Power supplies certified to the 80 Plus standard are tested only on a 115 V network. At the same time, their efficiency is at least 80%.
Assignment of the category “80 Plus Bronze” and higher indicates that the efficiency of the unit has been tested both in 115 V and 220 V networks, and is (for a 220 V network):
• “80 Plus Bronze” - not lower than 81% at full load and 85% at half load;
• “80 Plus Silver” - 85% and 89%, respectively;
• “80 Plus Gold” – 88% and 92%;
Safety precautions
It's easy to check the current strength. It is enough to connect the multimeter in accordance with the operating rules. It is necessary to follow the instructions in order not to violate safety precautions:
- The device is connected in a de-energized state.
- Pre-inspect the insulation on the wires. With a long service life, its integrity is compromised. There is a possibility of receiving an electric shock.
- You only need to measure amperes while wearing rubber gloves.
- Measurements are prohibited in rooms with high humidity. Moisture has high electrical conductivity. The risk of injury increases several times.
- Anyone who has suffered an electric shock, regardless of its power, must be urgently taken to the nearest medical center. It is forbidden to work with electricity alone. In an emergency, your partner can call an ambulance.
- It is strictly forbidden to work with devices that spark or are broken when connected to analog power sources, for example, to a battery, batteries or power supply. All this can lead to electric shock. Not too strong, but capable of harming the human nervous system and heart.
- It is forbidden to use a multimeter after an impact, just as it is forbidden to glue it with tape or insulating tape. It is better to use a new device or entrust it to a specialist for repair and testing for suitability.
After using the multimeter device, the cables that were cut are connected with the circuit de-energized.
A multimeter is a device that is simply impossible to do without in everyday life and other areas. Having even the most minimal knowledge of its operation, you can repair the devices. Knowing the indications, it is easy to determine their unsuitability.
How to measure current with a multimeter
Remember one rule when measuring: when measuring current, the probes are connected in series with the load, and when measuring other quantities - in parallel.
The figure below shows how to correctly connect the probes and the load in order to measure the current:
We do not touch the black probe, which is plugged into the COM socket, but transfer the red one to the socket where mA or xA is written, where instead of x is the maximum current value that the device can measure. In my case, this is 20 Amperes, since 20 A is written next to the socket. Depending on what current value you are going to measure, we stick the red probe there. If you don’t know approximately how much current will flow in the circuit, then put in the xA socket:
Let's check how it all works in action. In our case, the load is the computer fan. Our power supply has a built-in indication to show the current strength, and as you know from the physics course, the current strength is measured in Amperes. We set it to 12 Volts, turn the knob on the multimeter to measure DC current. We set the measurement limit on the cartoon to 20 Amps. We assemble as per the diagram above and look at the readings on the cartoon. It coincided exactly with the built-in ammeter on the power supply.
In order to measure the current strength of alternating voltage, we place the multimeter knob on the icon for measuring the strength of alternating voltage current - “A
” and we also take measurements using the same scheme.
How to measure DC voltage with a multimeter
Let's take a battery like this
As we can see, it says a current of 550 mAh, which it can supply to the load for an hour, that is, milliamps per hour, as well as the voltage that our battery has - 1.2 Volts. Voltage is understandable, but what is “current for an hour”? Let's say our load, a light bulb, consumes a current of 550 mA. This means the light bulb will shine for one hour. Or let's take a light bulb that shines weaker, and let it consume 55 mA, which means it can work for 10 hours.
We divide the 550 mA value that is written on the battery by the value that is written on the load and get the time during which all this will work until the battery runs out. In short, anyone who is good at mathematics will not have any difficulty understanding this miracle.