Design
An LED is a semiconductor element similar in design to a diode. When current passes through the LED, optical radiation visible to the eye is created. This part consists of:
- An anode through which a positive charge is applied.
- A cathode through which a negative charge is applied.
- Reflector of light fluxes.
- Emitting semiconductor chip or crystal.
- Glow diffuser.
This is the standard design for lamps of all shapes. To achieve brightness, manufacturers only increase the number of layers or the number of crystals. These values directly affect power.
Varieties
LEDs are used in various technologies. At the moment there are 2 main types of these parts:
- Indicator or DIP. Refers to low-power LEDs. They operate at an alternating voltage of up to 3.5 volts, with a power of up to 0.06 W. Used as light indicators for various electronic equipment. These elements are used for surface mounting for lighting strips.
- Lighting or powerful, operate at voltages up to 12 volts, with a power of 2.6–3 watts. Used for lamps and spotlights.
Technologies do not stand still. To the lamps of the usual design, various varieties have been added, differing only in the chemical composition of the crystal.
- Filomentous. Lamps that produce a white glow due to coating with a phosphor composition. The power of this type of LED is increased by using 28 parallel-connected crystals.
- COB. Designed by bonding crystals on an aluminum stand. The brightness of the glow increases due to focusing by the phosphor coating.
- OLED. Similar to earlier types of LEDs. The brightness and angle of luminescence are increased due to the use of polymer materials for the manufacture of the light emitter.
- Fiber. Fully synthetic construction with the addition of phosphor and polymers.
The principle of operation of these light elements remains the same. Only the consumed voltage has changed, power and reliability have increased.
How to determine current
Finding out what rated current an LED has without using special reference books is not so easy. By appearance, the current strength can be determined by the diode bulb: the larger it is, the greater the current. If during the test you cross the acceptable line, the color of the diode will change. For example, an initially yellow color may turn into a white or blue tint.
Most standard LEDs are rated at 20mA.
Modern technologies make it possible to supplement the device body with new components. The most commonly used are quenching resistors. In this way you can get an LED with a voltage of 5.12 or 220 V.
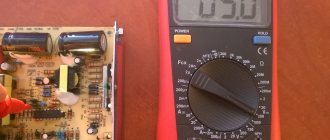
In addition, the rated current of the LED is determined by the same multimeter. When the light comes on, pay attention to the device screen; the voltage will be displayed on it; knowing it and Ohm’s law, you can easily calculate the LED current.
After watching the video, you can understand how to test different types of LEDs using a multimeter.
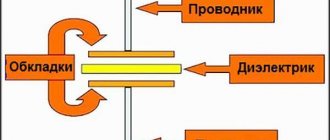
Principle of operation
The operating principle of any type of lamp is very simple. It can be described as the transition of positively charged particles from one semiconductor material to another. There are “holes” in the body of the second semiconductor, which, when filled with charged particles, release light photons. When current passes from one semiconductor to another, a difference in incoming and outgoing voltage is created. It is this difference that creates the luminous flux of the LED. Brightness is increased by a reflector that receives focused light and increases its brightness.
Power determination
The operating power of the LED is necessary for its correct connection to the operating circuit of any device. Many people are faced with the problem of how to find out the power of an LED without markings on the case or packaging. There are 2 ways to determine this parameter.
Visually
LEDs are produced in a variety of sizes and colors. By color and size you can find out the power of this part:
- Small infrared ones operate at a voltage of 20 mA, with a power of less than 2 Watts.
- Red ones have an operating voltage of up to 15 mA with a power of up to 1.7 W.
- Small yellow ones have a power of up to 2.2 W.
- Greens from 1.9 to 3.6 W.
- Blue from 2.5 to 3.6 W.
- Violet from 2.5 to 4 W.
- Large yellow ones operate from voltages up to 300 mA, have a power of 2.2 Watts, with radiator cooling.
- Large white or pink ones consume voltage up to 20 mA, with a power of up to 3.6 Watts.
You can determine the size of the LED using a regular caliper. Parts from 3 to 10 mm are considered small.
Multimeter
Determining the power of an LED with a multimeter is not difficult if you connect all the components according to the diagram. Next you will need:
- Find the cathode of the LED and connect one end of a 500 ohm resistor to it.
- Connect the “+” output from the power supply to the anode.
- Connect the negative from the power supply to the second end of the resistor.
This circuit will require a power supply with a voltage regulator. Further:
- Using the regulator, raise the voltage and measure it before and after the element being tested. It should be the same.
- Raise and measure the voltage again.
- Repeat adjusting and measuring voltage until a difference appears.
- At this point, you need to remember the last value in volts.
- Replace the 500 Ohm resistor with a similar element with a resistance of 10 Ohms.
- Raise the voltage to the calculated value.
- Switch the multimeter to ammeter mode.
- Measure the power.
This method does not require desoldering from the circuit if the LED is already connected to the circuit. The main thing is to correctly determine the polarity of the connection.
Checking the LED strip
Despite the fact that LED products (strips and light bulbs) are characterized by a long service life, they may stop functioning much earlier than the period specified by the manufacturer.
Working LED strip
In principle, you can understand whether the tape is working or not by simply connecting the power supply to it and supplying the amount of current required for operation. If the product glows evenly and brightly, then everything is in order. But if this does not happen, then you need to use a multimeter. Testing LED products of this type for performance with a multimeter is a fairly simple way to evaluate.
Note! In this situation, it is assumed that the power supply has previously been tested for functionality and found to be suitable for use.
To check the tape with a multimeter at home, you need to do the following:
- We “ring” the wires feeding the tape with a multimeter, since a local break is possible. For example, one wire may simply fall off due to the fact that it was poorly soldered during the circuit assembly stage;
- If there is no damage to the wires, then the whole problem is in the LED strip.
Such a conclusion may mean that the purchased products were of poor quality, there were violations in the assembly of the working circuit, or violations of the operating conditions of the house.
Voltage detection
The voltage at which the LED operates normally is also an important parameter. Determining how many volts a part is designed for is very simple. To do this, you must first determine the polarity of the pins of the part. The new elements have a longer “+” leg. If the leads are the same length, you need to connect a multimeter to both legs in dial mode. If the correct polarity is observed, the LED should glow dimly. Reversing the polarity will not result in glow. The following is a description of how to determine the operating voltage:
- Connect a resistor of up to 510 Ohms to the “+” leg of the part.
- Connect the “-” terminal of the 12 volt power supply to the resistor output.
- Connect the “-” power supply to the second leg of the LED.
- Raise the voltage of the power supply to a certain point of bright light. Adjust the current supply gradually, without sudden jumps.
- All this time, measure the voltage with a voltmeter.
The voltage will increase until the transition inside the element opens. The opened junction will stop passing excess current. This value must be recorded. This is the operating voltage of the LED. If you continue to increase the voltage, the PN junction may not withstand it and burn out. If the polarity is not observed, the cathode will not pass electric current, which will cause loss of performance.
Advantages and disadvantages of such LED products
LED strip is used today in a wide variety of fields due to its following advantages:
- the ability to give the product a variety of shapes;
Curved LED lighting
- the ability to install the product on any surface, as it is equipped with a self-adhesive base;
- the ability to increase the length of the product in an unlimited size;
- the ability to cut the tape to the desired size;
- high-quality luminous flux provided by LEDs;
- long service life;
- Possibility of use in rooms with high humidity;
Note! In rooms where there is high humidity, only waterproof products should be used.
- the ability to use such a tape to create a wide variety of lighting designs that can be used both inside and outside buildings.
But in addition to the above-described advantages of this LED product, it also has some disadvantages:
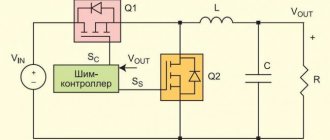
Power supply for LED strip
- quite high cost;
- the need to connect a power supply to the tape. In this case, the power supply can act as one of the weak links in the performance of a lighting system of this type. Very often, it is the power supply that should be checked for functionality in order to exclude incorrect functioning of the tape itself.
It is worth noting that the power supply in such a lighting system plays a leading role, since it ensures that the 220 V network voltage drops to the required level required to power the LED strip. And it may require a power supply of 12 or 24 V. Therefore, an incorrectly selected unit can lead to a decrease in the performance of the tape.
Cause of malfunction
LEDs operate at a specific voltage. At the output, the voltage of this part is significantly less. The reason for the malfunction of these elements is voltage surges. At a certain moment, a voltage exceeding the transition opening threshold is applied to the crystal, and the output voltage threshold increases. The LED burns out. You can visually identify a faulty element by the dark dot in the center. If it is impossible to visually determine the faulty element, in this case it is necessary to ring the part. Next, the process of testing an LED with a multimeter will be described.
Checking LEDs
Option 1
Checking the health of the LED with a multimeter is quite simple. This can be done directly on the board with a multimeter, without desoldering the LED itself. To check, you only need a multimeter turned on in diode testing mode. Before checking, you need to find the anode of the part. If the correct polarity is observed, the part should light up. The performance test can be considered passed. The brightness of the light also influences the determination of performance. Dim light is not an indicator of a damaged part. The cause may be a lack of voltage.
Option 2
Another simple way to test LEDs is possible if the multimeter is equipped with a socket for testing transistors. In this case, to check the serviceability of the LED with a multimeter, ring it in the following sequence:
- Set the multimeter to dial mode - hFE.
- Insert the LED into the socket, the anode into hole “C”, the cathode into hole “E” (NPN section).
- A bright glow of the part will indicate its serviceability.
Often after dialing, the LEDs do not work in the circuit. The reason for this is the difference in the current strength of the multimeter and the operating voltage. In order to accurately determine the suitability of the part, it is necessary to test the LED being tested with a multimeter without desoldering.
Option 3
This is a way to test LEDs connected in parallel in lighting lamps or strips. Before starting the test, you need to look at the connection diagram and determine the “+” input. The LED check itself in this case will look like this:
- Set the tester to DC current measurement mode.
- Turn on the device with the faulty part.
- The minus probe will connect to the minus on the board.
- Connect the “+” probe to the input contact of the element being tested.
- Measure the voltage.
- After the measurement, connect the “+” probe to the output of the part.
- If there is no voltage, this is an indication that the part is faulty.
This method is dangerous, since the test is carried out with a connection to the electrical network. Often the cause of a malfunction in lamps operating on constant voltage is a breakdown of the diode bridge.
Option 4
You can check several LEDs in a circuit at once without desoldering them from the circuit. The voltage of 9 volts, from which the multimeter operates, is quite enough to test all the LEDs at once.
- Set the tester to resistance measurement mode.
- Determine the polarity of the connection diagram for all parts.
- According to the polarity, connect one probe to the input of the first LED.
- Connect the second probe to the output of the last element.
- If there is no resistance, alternately connect the probe to the output of each next LED.
The appearance of resistance readings will indicate the last working LED in the circuit. After it, it is necessary to carry out one-by-one testing of all parts to identify the burnt-out element. If the lamp is assembled in a double circuit, the LEDs in the second circuit can be soldered in reverse. After checking one circuit, you need to change the polarity of the tester connection.
Options for assessing the performance of LED products
Due to the fact that LED backlighting has a complex organization, its functionality can be tested in several ways. The choice of method depends on what exactly is worth checking for performance at home. The following elements of the lighting system can be checked for functionality:
- the LED strip itself;
- specific LED;
- power supply connected to the tape. It is worth noting that when the product is powered using several converters (power supplies), each of them must be checked for functionality.
Let's look at each option in more detail.