Microwave ovens have long appeared in homes for convenient heating of food. They are quite easy to manage and affordable.
Despite its reliability, the product is not protected from inevitable technical failures. At some point it simply stops working. The main reason is the breakdown of the high-voltage diode.
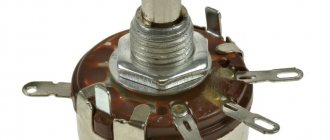
A high-voltage diode is several parts connected in series to each other in a common housing. The package includes a special rectifier diode. This product is equipped with a nonlinear current-voltage technical characteristic.
Such a microwave part cannot be measured with a conventional tester; you need to use a multimeter .
Where can I get high voltage?
Food in microwave ovens is heated by the operation of ultra-high-frequency waves. Microwaves are generated by a special emitter - a magnetron. To operate within the specified characteristics, it needs a high voltage - 2,000 V. This is almost an order of magnitude higher than what a household electrical network provides (220 V).
Where do kilovolts come from? They are created at the output of the secondary winding of the high-voltage converter.
Important! A microwave oven, even disconnected from the power supply, can cause an electric shock (U up to 5,000 V).
Expert opinion
It-Technology, Electrical power and electronics specialist
Ask questions to the “Specialist for modernization of energy generation systems”
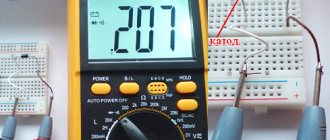
How to test a diode with a multimeter: complete instructions: set the multimeter mode, which allows you to measure DC voltage up to 20 V, and connect the device in parallel to the element being tested;. Ask, I'm in touch!
Possible faults
Like any other device or element in household appliances, the magnetron tends to fail. And a violation of the functionality of this part can be observed for the following reasons:
- burning of the protective cap, which can cause a spark during operation, in which case it is necessary to replace it with any whole one (usually they are all the same, so they are suitable for any magnetron);
- filament burnout;
- the process of depressurization of the magnetron, which can be observed as a result of overheating;
- the occurrence of a breakdown situation on a high-voltage diode;
- high voltage fuse blown;
- lack of contact in the thermal fuse;
- breakdown in a high-voltage capacitor.
In case of any malfunction, except for depressurization, it is possible to correct the situation at home without the help of specialists. If you do not have any experience in working with electrical appliances, it is better to contact a service center.
Types of high voltage converters
Elements of the converter installed in the microwave oven:
U = 220 V is supplied to the primary winding. The incandescent filament is powered from the secondary windings. The first of the two secondary windings is made of heavy gauge wire. U at the output is approximately 3 V. At the output of the second winding - variable high U = 4 kV.
Microwave ovens of different brands use converting devices from different manufacturers. The converters do not look the same and have different characteristics. They differ:
The secondary coil, like one of the emitter terminals, is connected to the housing.
What kind of lighting do you prefer?
Built-in Chandelier
Signs of a working and faulty capacitor
If the device does not work, then the values on the device either do not change or have a zero value. This device is no longer suitable for use. If the capacitor has leaked and there is an electrolyte leak, the value on the display will show a constant low resistance. This part must also be replaced and can no longer be used. A device broken due to a short circuit shows zero resistance on the device and must also be disposed of.
If, when checking the device, the device readings change from minimum to one, this means that the part is working normally. It can be left in the microwave for later use at work. For the next test, the capacitor must be discharged again.
It happens that a part loses only part of its capacity. It becomes different from the container on the body. In this case, diagnostics require a sensor, which is not available in every multimeter. Breakage due to mechanical impact does not happen very often. More often, breakdown or loss of capacity occurs.
Checking the capacitors in the microwave must be done in a timely manner, since they are a critical part in the microwave and directly affect its performance.
It is important to follow all the basic rules when checking the capacitor in a microwave oven in order to promptly find a problem in the operation of the oven and fix it without having special knowledge. Before you begin diagnosing and repairing electrical appliances, you must make sure that the power supply is turned off
Checking the rectifier diode and zener diode
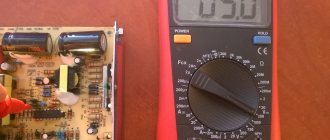
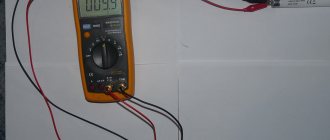
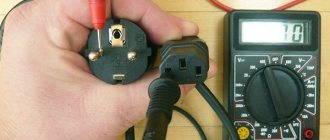
The protective diode, as well as the rectifier diode (including the power diode) or Schottky diode, can be checked using a multimeter (or use an ohmmeter); to do this, we switch the device to the continuity mode as shown in the photo.
We connect the probes of the measuring device to the terminals of the radio element. By connecting the red wire (“+”) to the anode and the black (“-”) wire to the cathode, the multimeter (or ohmmeter) display will display the threshold voltage value of the diode being tested. After we change the polarity, the device should show infinitely high resistance. In this case, we can state that the element is in good condition.
If, when connecting back, the multimeter registers a leak, it means that the radio element has “burnt out” and needs to be replaced.
Note that this testing technique can be used to test diodes on a car generator.
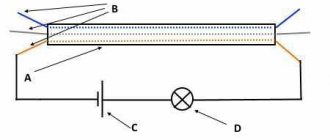
Zener diode testing is carried out according to a similar principle, however, such a test does not allow one to determine whether the voltage is stabilized at a given level. Therefore, we need to assemble a simple circuit.
- we assemble the circuit;
- set the multimeter mode, which allows you to measure DC voltage up to 200 V;
- turn on the power supply and begin to gradually increase the voltage until the ammeter on the power supply shows that current is flowing through the circuit;
- connect the multimeter as shown in the figure and measure the stabilization voltage.
How to test a microwave oven for functionality
In the case of the first failure, the magnetron must be replaced , in addition to this, the high-voltage diode should also be checked for functionality. When the magnetron fails, the diode usually fails along with it.
Expert opinion
It-Technology, Electrical power and electronics specialist
Ask questions to the “Specialist for modernization of energy generation systems”
How to check the magnetron for serviceability using a multimeter As we know, repairing any electronic equipment is not cheap, and sometimes can even exceed the cost of purchasing a new device. Ask, I'm in touch!
Important detail
High voltage diode
To understand how you can correct the situation if the cause of the breakdown is a high-voltage diode, you need to understand what it is.
A high-voltage diode has the form of a large number of connections that connect the diodes in series into one element. This includes conventional rectifier diodes. They are made using the same technology and are part of a single body. During the assembly process, capacitors and resistors are not used to equalize the voltage. As a result, this diode has a nonlinear current-voltage characteristic. Therefore, its resistance depends on the applied voltage. Due to this design feature, it is quite difficult to check the functionality of this component of the microwave oven.
Note! This element cannot be checked by a tester. Using a tester in this situation will not give an accurate result. The device will not show either reverse or forward resistance. Here you can use, for example, a multimeter. Its resistance should be measured in forward and reverse directions.
To do this, the multimeter should be switched to R x 1000 mode. Here, when the “+” output of the multimeter is connected to the anode on the diode, resistance is measured in the forward direction. As a result, the device should show the final value for resistance. If the connection goes to “-”, then the measurement is carried out in the opposite direction. In this case it should register infinity.
Varicap testing
Unlike conventional diodes, the pn junction of varicaps has a variable capacitance, the value of which is proportional to the reverse voltage. Checking for open or short circuits for these elements is carried out in the same way as for conventional diodes. To check the capacity, you will need a multimeter that has a similar function.
To test, you will need to set the multimeter to the appropriate mode, as shown in photo (A) and insert the part into the connector for capacitors.
- Resistors: R1, R2 -120 kOhm (yes, two resistors, yes in series, no, one cannot be replaced, parasitic capacitance, no further comment); R3 – 47 kOhm; R4 – 100 Ohm.
- Capacitors: C1 – 0.15 µF; C2 – 75 pF; C3 – 6…30 pF; C4 - 47 uF ha 50 volts.
This option is not ideal, the need for its practical use is questionable, but the circuit clearly demonstrates the dependence of the varicap capacity on the rated voltage.
Possible faults
We list the main breakdowns:
- During operation, sparks appear, indicating that the cap has burned out. Replacing this component will not be difficult, since all caps have the same configuration.
- The high-voltage diode has broken down.
- No voltage is supplied to the magnetron.
- There is no contact in the fuse that controls the temperature and heating level.
- The filaments have burned out.
- The magnetron for the microwave oven has depressurized due to complex overheating.
- The high voltage capacitor is not working or the fuse is blown.
Check the microwave magnetron to determine the type of problem. Absolutely all of the listed breakdowns can be repaired independently at home, except for depressurization. Now you know how to test a high voltage diode in a microwave. We remind you that repairs should only be carried out by those people who have at least a superficial understanding of radio electronics.
Methods for diagnosing a high-voltage diode
A faulty high-voltage diode can be tested for suitability in two ways:
- Using an ohmmeter whose resistance measurement limit is 200 MOhm. This device is designed to measure cable insulation resistance;
- Practical method using an alternating voltage circuit from 100 to 230 V.
Let's consider two ways to diagnose the problem:
- Let's check the appearance of the plug made of plastic or mica, which is located in the working chamber of the microwave oven. It is located opposite the magnetron waveguide. This plug protects the magnetron waveguide from getting heated food from the working chamber onto it. Since the plug is not protected by anything, very often it burns out; to provide additional protection, the top of the plug should be painted with food grade enamel;
- It is necessary to check the voltage in the socket and plug of the microwave oven. Even a small decrease in the supply voltage can globally affect the power of the microwave oven. At the same time, all the oven readings remain the same as they were before, and you might think that the faulty device is working normally. If the voltage used for power is reduced to 200 V, the power that the furnace produces will be reduced by almost 2 times. The feed-through capacitances of the magnetron are changed by removing the cover from its filter. Their common wire must be separated from the filter housing using a screwdriver. The serviceability of capacitors can be checked using an ohmmeter.
If the feed-through capacitors of the filament output are faulty, you can disconnect the old capacitor from the board using wire cutters, and then solder new work capacitors. New capacitors can be of any kind, but their capacity must be more than 200pF, depending on the operating voltages.
This is interesting! Electric oven: baking at home
The article discussed methods for repairing a microwave oven with your own hands, which make sense and allow you to save time and money spent on repairs.
If you follow all the rules for using a microwave oven, it will last quite a long time. If these rules are not followed, the microwave oven may fail. As we know, repairing any electronic equipment is not cheap, and sometimes can even exceed the cost of purchasing a new device.
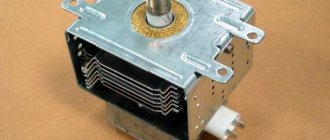
Microwave transformer: how to check
It is impossible to check the magnetron in a microwave without using special instruments, but it may fail due to a malfunction of one or more parts included in its design.
Expert opinion
It-Technology, Electrical power and electronics specialist
Ask questions to the “Specialist for modernization of energy generation systems”
How to check the magnetron in a microwave oven with a multimeter Therefore, after making sure that it is the magnetron that is not working, it is best to use the services of a service department that has trained employees, as well as the necessary tools and spare parts. Ask, I'm in touch!
What is a magnetron?
Appliances for heating food include one essential element. This is a powerful electron tube called a magnetron. With its help, microwaves are produced to influence water molecules in food. This process can be explained by the interaction of the magnetic field with the flow of electrons.
Without going into details of the power of microwave ovens, it should be noted that most of these devices have a power of 700-850 W, which makes it possible to boil a glass of water in just 2-3 minutes. It should also be taken into account when diagnosing that there are tunable and non-tunable devices, while in the former, a change in frequency characteristics can be observed up to 10%.
How to check the magnetron for malfunction with your own hands?
The magnetron serves as one of the voltage doubler diodes. This function will allow you to check the magnetron as a diode, provided that the standard diode exists and is working. We can obtain the data we are interested in about the performance, malfunctions and problems with the magnetron’s power supply mode by seeing the voltage shape at its cathode using an oscilloscope.
As the incandescence increases and its stable operation in the active mode, one can observe the initial entry of the magnetron into the operating mode. You can also identify which diodes, resistors and capacitors have failed. If the magnetron is faulty, then on the oscilloscope screen we can observe a sinusoid with an amplitude of 2 kV.
Determining the performance of a high-voltage diode
There is only one principle of operation of a high-voltage diode, but the variety of diode types is very large. On the device board, the diode is usually marked with the symbols DB 1; it can have a variety of markings by type. After reviewing the information and characteristics of the diode, you can replace it with a similar diode with a different marking, because each manufacturer has its own product marking.
The technical characteristics of the high-voltage diode are as follows:
This is interesting! Standard microwave oven sizes and rules for choosing a microwave oven
Useful tips Connection diagrams Principles of operation of devices Main concepts Meters from Energomer Precautions Incandescent lamps Video instructions for the master Testing with a multimeter
Signs and causes of transformer malfunction
The occurrence of problems in a transformer can be determined by the following signs:
- smoke is visible and the smell of burnt insulation is clearly felt;
- The microwave makes a lot of noise when operating;
- food is not heated.
In many cases, malfunctions are caused by power surges in the network: a wire may break or a short circuit may occur. You can do without checking in cases where traces of melting are clearly visible and there is a burnt smell. Then the transformer needs to be replaced.
Advice! Mainly due to changes in the network, the winding coils suffer. This is where you should look for the causes of problems.
The steel plates that make up the frame of the converter must be glued together. If delamination occurs, the transformer begins to make loud noise during operation. In this state of affairs, you need to buy a new device with similar power characteristics and replace the faulty one.
Installation and connection of a new magnetron
If the part cannot be repaired, the magnetron will have to be replaced. This applies to expensive models, in which case the costs are justified. The best option would be to visit a service center, but you can replace it yourself. Make sure that the used part and the new one match in power and hole location.
Connecting a new magnetron to a microwave oven is not difficult; it only has two contacts. All designations can be found in the diagram. Pay attention to these points:
Contacting the service center in case of problems should be a priority. If the equipment is no longer under warranty, self-inspection and repair will save on the work of specialists.
How to discharge a capacitor in a microwave
Having disconnected from the power supply, the capacitor is discharged by carefully closing its terminals with a screwdriver. A good discharge indicates its good condition. This method of discharge is the most common, although some consider it dangerous and can cause harm and destroy the device.
Tests with power applied are carried out when the question is how to test a transformer for an interturn short circuit. If we know the value of the supply voltage of the device for which the transformer is intended, then we measure the no-load value with a voltmeter. That is, the output wires are in the air.
If the voltage value differs from the nominal value, then conclusions are drawn about an interturn short circuit in the windings. If you hear a crackling or sparking sound when the device is operating, then it is better to turn off such a transformer immediately. It's faulty. There are permissible deviations in measurements:
Expert opinion
It-Technology, Electrical power and electronics specialist
Ask questions to the “Specialist for modernization of energy generation systems”
Typical malfunctions We measure the resistance of the primary winding by setting the measurement limit on the multimeter to 200 Ohms or within this value, depending on the type of measuring device. Ask, I'm in touch!
Microwave device
Real practice of electronics repair
A part in any microwave oven is a magnetron. A magnetron is a special vacuum tube that creates microwave radiation. Microwave radiation has a very interesting effect on ordinary water, which is found in any food.
When irradiated with electromagnetic waves with a frequency of 2.45 GHz, water molecules begin to vibrate. As a result of these vibrations, friction occurs. Yes, normal friction between molecules. Friction generates heat. It heats the food from the inside. This is how you can briefly explain the principle of operation of a microwave oven.
Microwave design
Structurally, a microwave oven consists of a metal chamber in which food is cooked. The chamber is equipped with a door that prevents radiation from escaping. To ensure uniform heating of food, a rotating table is installed inside the chamber, which is driven by a motor-reducer (motor), which is abbreviated as TTMotor ( Turtable motor ).
Microwave radiation is generated by a magnetron and fed into the chamber through a rectangular waveguide. To cool the magnetron during operation, an FM ( Fan motor ) fan is used, which drives cold air through the magnetron. Next, heated air from the magnetron is directed through the air duct into the chamber and is also used to heat food. Through special non-radiating holes, part of the heated air and water vapor is discharged outside.
Some models of microwave ovens use a dissector, which is installed in the upper part of the microwave chamber, to create uniform heating of food. Externally, the dissector resembles a fan, but it is designed to create a certain type of microwave wave in the chamber so that food is evenly heated.
Electrical diagram of a microwave oven
Let's take a look at a simplified electrical diagram of a typical microwave (click to enlarge).
As you can see, the circuit consists of a control part and an executive part. The control part, as a rule, consists of a microcontroller, display, push-button or touch panel, electromagnetic relays, and buzzer. These are the “brains” of the microwave. In the diagram, all this is shown as a separate board labeled Power and Control Curcuit Board. A small step-down transformer is used to power the control part of the microwave. In the diagram it is marked as LVTransformer (only the primary winding is shown).
The microcontroller controls electromagnetic relays through buffer elements (transistors): RELAY1 , RELAY2 , RELAY3 . They turn on/off the actuating elements of the microwave oven in accordance with a given operating algorithm.
The actuators and circuits are a magnetron (Magnetron), a table motor reducer TTMotor (Turntable motor), a cooling fan FM ( Fan Motor ), a grill heating element ( Grill Heater ), a backlight lamp OL ( Oven Lamp ).
We especially note the executive circuit, which is a microwave radiation generator.
This circuit begins with a high-voltage transformer ( HVTransformer ). It's the healthiest in the microwave. Actually, this is not surprising, because through it you need to pump the power of 1500 - 2000 W (1.5 - 2 kW) required for the magnetron. The output (useful) power of the magnetron is 500 - 850 W.
An alternating voltage of 220V is supplied to the primary winding of the transformer. An alternating filament voltage of 3.15V is removed from one of the secondary windings. It is connected to the filament winding of the magnetron. The filament winding is necessary for the generation (emission) of electrons. It is worth noting that the current consumed by this winding can reach 10A.
Another secondary winding of the high voltage transformer, as well as a voltage doubling circuit on the high voltage capacitor ( HVCapacitor ) and diode ( HV Diode ), creates a constant voltage of 4kV to power the magnetron anode. The anode current is small and amounts to about 300 mA (0.3A).
As a result, electrons emitted by the filament winding begin to move in a vacuum.
The special trajectory of electrons inside the magnetron creates microwave radiation, which is what we need to heat food. Microwave radiation is removed from the magnetron using an antenna and enters the chamber through a section of a rectangular waveguide.
This simple, but very sophisticated circuit is a kind of microwave heater. Do not forget that the microwave oven chamber itself is an element of this microwave heater, since it is, in fact, a resonator in which electromagnetic radiation occurs.
In addition to these elements, the microwave oven circuit has many protective elements (see KSD thermal switches and similar ones). For example, a thermal switch controls the temperature of the magnetron. Its standard operating temperature is somewhere around 800 – 1000C. This thermal switch is mounted on the magnetron. By default it is not shown in the simplified diagram.
Other protective thermal switches are labeled in the diagram as OVEN THERMAL CUT-OUT (installed on the air duct), GRILL THERMAL CUT-OUT (controls the grill temperature).
If there is an emergency and the magnetron overheats, the thermal switch opens the circuit and the magnetron stops working. In this case, the thermal switch is selected with a small margin - for a shutdown temperature of 120 - 1450C.