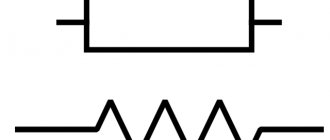
A capacitor is an electronic element classified as passive. Its main ability is to slowly (from an electrical point of view, within a few seconds) accumulate a charge, and, if necessary, instantly release it. During recoil, this discharge occurs. Unlike a battery, a capacitor releases all its energy in a pulse rather than gradually, after which the charging cycle begins again.
The main characteristic of this element is capacity. It is measured in pF and μF - pico- and microfarads. In addition, each capacitor has certain characteristics of operating voltage and breakdown voltage at which it fails. They are either indicated on the body by numbers, or they have to be determined from catalogs, guided by the standard size and color marking of the part.
Due to their design features, capacitors belong to the category of elements that most often fail on an electronic board. Therefore, any repair of a device containing electronics (from a microwave oven to a PC motherboard) begins with checking these elements for functionality - visually, using a multimeter or other devices.
What is the difference between sockets in Russia and China?
In Russia, two slightly different types of sockets are common.
Type C is a European socket with two round parallel pins without a third ground pin. One of the most common sockets in Europe.
What kind of lighting do you prefer?
Built-in Chandelier
Type F is the second most popular European standard. The round parallel pins are the same as Type C, but use two metal clamps on either side of the plug for grounding.
Useful adapter for connecting Chinese devices to European sockets
These are the sockets we install most often. In addition to the ability to ground the outlet (almost no one does this), this type of connection is distinguished by the depth of the plug.
A type F plug can easily be connected to a type C socket, but not vice versa.
Useless adapter for connecting Chinese devices to European sockets
The Chinese most often include adapters for type C with their gadgets sent to Europe, which simply do not reach the depth when connected to type F sockets.
There are two types of plugs/sockets used in China. And they are in no way compatible with ours.
Xiaomi smart gadgets: on the left is a 10A Type I plug, on the right is a 16A Type I plug
The most common is Type I , with a pair of flat contacts that are angled to each other and a separate contact for grounding. In simple chargers and low-power devices, there may not be a grounding contact.
The second type is also classified as type I, but it is designed for more powerful devices (16A and 250V).
The contacts of such sockets are located a little wider and at a greater distance from each other. The pins on the forks are more massive and several millimeters larger than usual.
So, a 16A plug cannot be used with a 10A socket, while a 10A plug fits into a 16A socket.
So it turns out that even in China there are two subtypes of plugs/sockets. And the complete adapters that sellers carefully put in the box are only suitable for Type C sockets and Type I 10A plugs.
In most cases, such an adapter does not fit into a socket , and a deep adapter purchased as a replacement for type F sockets greatly increases the dimensions of the device, making it impossible to install, for example, behind a cabinet or other furniture.
Expert opinion
Viktor Pavlovich Strebizh, lighting and electrical expert
Any questions ask me, I will help!
Before removing excess mortar and finally smearing the socket box into the wall, it is advisable to wait until the mortar begins to set. If there is something you don’t understand, write to me!
How to understand that a device needs diagnostics
Various signs indicate a faulty capacitor. Headlights that flash in time with the bass of the car speakers mean that the car's electronic components are not receiving enough voltage. In some cases, the signals begin to become distorted, and individual components of the machine do not work correctly.
The ignition capacitor is responsible for producing a spark that ignites the air-fuel mixture in the engine cylinder. If the spark has a weak red color and appears unevenly, if the car cannot be started normally, it is likely that there are problems with the capacitor.
It is important to avoid problems with the ignition capacitor. They arise for three reasons:
- if the product has lost part of its capacity,
- if an internal break occurs,
- if a short circuit occurs.
The first two options are especially insidious, since the ignition does not immediately fail. The components continue to function, although the spark may no longer have the required power level. The main signs of a breakdown in such a situation are instability of the engine at idle and problems with starting. Be sure to check the capacitor and replace it if necessary! If this is not done, sparks from the breaker will cause the contacts to burn, which will damage the power unit.
How to check functionality
A reliable way to identify a fault is to use an ohmmeter or multimeter in ohmmeter mode. For the most complete testing, prepare the following tools:
- the measuring device itself;
- portable lamp;
- crank handle.
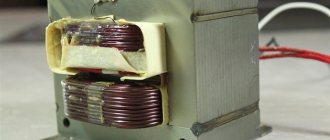
Location of the capacitor in the ignition system
The main check is performed in the following sequence.
- We switch the ohmmeter to the upper measurement limit mode.
- We connect one terminal of the capacitor to the housing for discharge. We connect one of the ohmmeter probes to the tip of the wire, the other to the body.
- If the indicator quickly deviates to “zero” and then smoothly returns to “infinity” - everything is in order. When changing polarity, the indicator quickly approaches zero. If the value “infinity” is immediately displayed, replacement is required.
Connect an ohmmeter to the capacitor
Instructions for checking a car capacitor on video
Design and purpose
Appearance of a single-key switch
A single-key light switch has a simple design and consists of the following main parts and assemblies:
- a plastic case designed in the form of a frame with a switching mechanism attached to it;
- two steel terminals designed to connect the incoming and outgoing conductors;
- a decorative cover and a wide key (in some models there is a control button instead).
The plastic frame has two mounting lugs with holes intended for fixing the device in the mounting box or directly on the wall surface.
The switch terminals have screw clamps that reliably fix the conductors incoming and outgoing to the junction box.
Single-key switch device
The purpose of the key switch is to switch lighting circuits - to turn a chandelier or lamp on and off. The scope of its application is not limited to one domestic sphere, since such a switch can be installed in premises of any category.
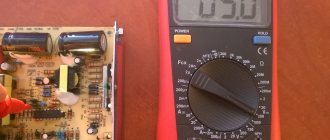
There is a connector for measuring capacitance
The further testing method depends on the functionality of the multimeter itself: whether it has special connectors and a capacitance measurement function (indicated by Cx) or not. If yes, then everything is extremely simple:
unsolder the part from the board;- clean the legs from oxides and solder residues;
- set the device to a capacitance measurement mode with a measurement limit close to or equal to the capacitor rating indicated on it;
- install the element into a special paired socket on the multimeter, or touch the legs of the metal plates that replace it.
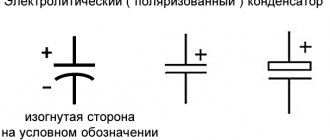
To check an electrolytic capacitor, it is necessary to observe the polarity - plus to plus, minus to minus. If the device sockets are marked with plus and minus, then this is the only way to install it. If they are not marked, it does not matter.
An electrolytic capacitor is a mini-battery that contains electrolyte and is connected only with correct polarity.
The plus is not marked on it, but the minus is marked with a tick on a golden background, in addition, the “minus” leg is sometimes longer. Incorrect connection of the polar element will lead to its unequivocal failure.
After installing the part into the sockets, the multimeter will begin to charge it with direct current. A number will appear on the display and gradually increase.
When the readings stop changing, the element is maximally charged. If the charge indicator is similar or at least close to the nominal value, the element is operational.
How to check a ceramic capacitor? Similar. Ceramic elements of this type are always non-polar, so there is no fear of incorrect connection.
Voltage check
The capacitor must produce a certain voltage - it is indicated on the case or in the performance characteristics according to the catalog. Before using it for work, you can check its actual ability to deliver the required discharge.
To do this, the capacitor is charged at a voltage below the rated voltage for several seconds. For high voltage, 600 V, a voltage of 400 V is suitable, for low voltage, 25 V - 9 V, and the like.
After this, the multimeter is switched to measuring constant (!) voltage and is connected to the part being tested. The initial value on the screen is the digit value.
Please note that the numbers on the screen will decrease very quickly - the capacitor is discharging.
If the initial value on the multimeter display is less than the nominal value, the element does not hold a charge. Please note that in any case it discharges quickly.
Safety regulations
But no matter how protective plugs guarantee the safety of a child in the house, the parent is independently obliged to provide for all possible options.
Therefore, there are safety rules for installing sockets in a house where there will be small children:
- Do not install electrical points, switches or sockets in a visible place. It is better to choose places behind the curtains, near the radiator, behind the sofa.
- Do not decorate sockets with bright plugs that would arouse the child’s interest.
- Ensure maximum safety for your child by purchasing a plug from a trusted manufacturer.
- Monitor the operating conditions of such a device, and if there is the slightest damage, replace it.
It is worth remembering that saving a few hundred rubles on the purchase of plugs can turn into a tragedy in a house with small children. It is essentially impossible to monitor a child for 24 hours; a child only needs a couple of seconds of inattention from a parent to find something dangerous to do. Blinds do not guarantee 100% safety for a child, but installing them increases the likelihood that a parent will notice the child in a dangerous activity in time.
The holes in the socket are covered with plastic inside, the plug fits in with great difficulty. | ImhoDom.Ru
Don phihek
Rybalovo Offline1 week 6 days
Should I disassemble and throw away the curtains or can this be repaired somehow?
outdoor sockets, I would like to have protection
THINKING OUT LOUD:How to unscrew a screw with a broken slot? choose a convenient solution: cut the slot with a hacksaw - drill the body and cut the left-hand thread into 2...6 turns - drill out the entire screw
Have your own thoughts? Write here
★ ★ ★ ★ ★
There are currently 10 users and 36 guests on the site.
Users on the site
- psm
- marazmiki
- ruslan8
- Universal
- Master-krovli.nsk
- joiner
- X
- lakore
- mach
- Neznaykin
(only extreme ones)
We welcome new users: LRomanV, frixer, Rustam, Svetlana42, Zhukovsv, HeMo, lumenn, Tatyana Zelenaya..., DmitryPo.
☆ ☆ ☆ ☆ ☆
Put #imhodom in your place!
Don phihek
Rybalovo Offline2 weeks 5 days
Should I disassemble and throw away the curtains or can this be repaired somehow?
outdoor sockets, I would like to have protection
THINKING OUT LOUD:Washing whitewash off walls is a dirty job. But there is a better way. If you smear the wall with paste, let it set a little and then remove the whitewash with a scraper or scraper - then there will be no dust or dirt.
Have your own thoughts? Write here
There are currently 2 users and 25 guests on the site.
(only extreme ones)
We welcome new users: domovoy, LRomanV, Yulia Shchipailo, frixer, Rustam, Svetlana42, Zhukovsv, HeMo, lumenn.
Put #imhodom in your place!
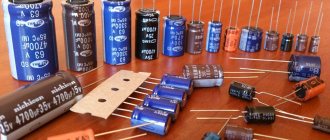
Features of testing different types of capacitors
There are many types of radio components that differ in the material of the dielectric, plates, and type of electrolyte, so they have different methods for diagnosing the operating condition.
To check the suitability of a ceramic capacitor, set the highest measurement limit of the ohmmeter. A sign of serviceability will be a measured resistance of at least 2 MOhm. For other values, the part is changed.
To test a tantalum capacitor, select the largest measurement limit in ohms. If the resistance is 0, change it. Before testing a high-capacity, high-voltage electrolytic capacitor, maximum discharge is necessary. Residual voltage will damage the device.
Home safety and protection
Adults, trying to protect small children, install sockets with protective devices. Today, stores have a wide range of products, including both silicone protective pads and special devices that operate automatically (touch sockets).
Such devices reduce the likelihood of death in the event, but it is worth remembering that even a high-quality child-resistant outlet does not provide a 100% guarantee that the baby will not harm himself. Therefore, the main rule, in addition to installing special devices, is control of the child himself.
How to measure capacitance
The performance of a capacitor for breakdown can be checked by measuring the capacitance characteristics and then comparing them with the rating indicated on the outer shell of the product.
Measuring capacitance is not particularly difficult and can be done independently. For this purpose, the switch is moved to the measuring range in accordance with the rating. The part itself is inserted into special mounting sockets.
If there are no sockets, the capacitance can be checked using probes, in the same way as when measuring resistance. After the probes are connected, the display shows capacity indicators close to the nominal value. If the device shows different numbers, then the part is considered broken and requires replacement.
Checking without instruments
The procedure for testing the performance of energy storage devices without devices:
- From the contact on the distributor breaker we disconnect the wires coming from the capacitor and the ignition coil.
- We attach a test lamp or car indicator contacts between the wires.
- We turn on the ignition, the light comes on - this means that the part being tested is faulty and needs to be replaced.
Instead of points 2 and 3, under certain circumstances, you can turn on the ignition and connect the wires to each other; sparking will be a signal of a malfunction.
If your car has the ability to manually rotate the crankshaft, then you can try another way to check the capacitor.
Algorithm of actions:
- By rotating the crankshaft we achieve closure of the contacts in the distributor.
- Disconnect the flexible end of the capacitor from the breaker.
- Pull out the central wire from the distributor cap.
- Turn on the ignition and bring it to the disconnected contact of the drive.
- We open the breaker with a screwdriver or turn the distributor housing to do this; the spark that slips between the wires charges the capacitor with a high voltage current.
- We bring its flexible contact closer to the body, a discharge spark jumps with a click and indicates serviceability. If there is no spark or click, the part being tested must be replaced.
In some cases, a visual inspection may be sufficient.
During a routine inspection, the following faults may be detected:
- swelling or rupture of the body;
- traces of electrolyte leakage;
- change in body color;
- signs of thermal effects in the area where the capacitor is attached.
Is it possible to connect phase to phase?
phases actually appear in an outlet?
?
Yes, this is possible, but various electrical appliances and light bulbs can burn out, since the
between different
phases
is 380 volts. The reason for this may be a short circuit of one of the phases that travel along the overhead line to the neutral wire.
Interesting materials:
What are the names for rabbits? What names do guys like best? What names were there in Ancient Rus'? What names are given to girls in April? What boy names are in fashion now? What names do men not like? What names suit each other Anna? What names suit each other Egor? What names are popular in 2022? What names are popular in Kyrgyzstan?
Switch device with one key
From the outside, a single-key device is seen as a moving part and a decorative frame. Both parts are easy to remove.
Single device with the key removed.
After removing the key, you can see the movable panel associated with the contact group, the terminal screws and the screws of the release petals. If you remove the frame, the screws securing the device to the wall become visible. You can also see the power indicator if installed.
Disassembled device with one key.
With further disassembly, you can get to the contact group, consisting of movable and fixed contacts. Sometimes the terminal screws are at the back. If they are located on the front part, then there is nothing interesting on the back side.
Further, single-key switches will also mean other switching devices with one contact group for closing and opening: a rotary design or with a button.
Types and location
Internal switch in the corridor
Single-key products for household use are available in the following versions:
- for outdoor installation and wiring;
- for indoor installation;
- in the form of modular structures.
Based on the degree of protection from moisture and dust, these products are divided into devices of increased tightness and conventional design.
Light switches for indoor installation are used with a hidden method of wiring conductors in the apartment. In the latter case, they are laid under plaster or in the cavities of frame walls.
For external installation, the switch housing is fixed directly to the wall or to a wood/plastic base.
Single-key switch connection diagram
Before connecting a single-key switch to a live network, you will need to familiarize yourself with the rules for its safe installation within a room. According to the standards adopted back in Soviet times, the device must be installed at a distance of at least 1.6 meters from the floor. This limitation was adopted for reasons of ease of control of the device, located approximately at eye level. Today, these strict requirements have been lifted; according to the new rules, it is allowed to place an electrical switch in the following areas:
- on the surface of the wall from the side of the door handle at a height of approximately one meter from the floor;
- at a distance of at least 0.6 meters from the door to the bathroom or shower room;
- at a distance of at least 0.5 meters from gas pipes and other dangerous lines.
Switches that control the light bulb from a cord can be installed in the area under the ceiling.
Modular devices or “wire switches” are used mainly in offices, as well as in industrial and commercial areas. These products are intended exclusively for installation in plastic cable ducts. Specially designed devices are installed in rooms with high humidity: bathrooms, basements, attics and other utility rooms.