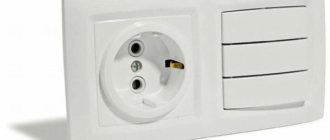
Sconces with a cord switch are often used in apartments. They are convenient for use in the bedroom near the beds, in children's rooms, in the relaxation area in the living room or kitchen, for illuminating pictures and mirrors. They easily attach to any flat surface. The light from such devices is soft and diffused, after which the eyes do not get tired. Such lighting devices are inexpensive and have two modes - on and off. You can connect a sconce with a cord yourself, you just need to understand the design features of the product.
Description of sconce with cord
Rope Switch Wall Sconce
Rope switch wall sconces are a popular type of lighting fixture. They are often used to illuminate a specific area - for example, a reading area, a bedside area.
Main advantages:
- Possibility of adjusting the level of general lighting. There are also models in which the luminous flux is adjustable.
- Compact, light weight.
- Low power consumption.
- Possibility of reliable installation even on walls made of fragile materials, ease of connection.
Classification is carried out according to various indicators. According to the form they are distinguished:
- Closed sconces. Products from this category have a solid shade, which is made of frosted or glossy glass. Also classified as closed are hemispherical lampshades.
- Decorative. There are various forms - from classic, strict ones to lamps in the form of toys or flowers. They are made from different materials, which are matched to the style of the lamp.
- Elite. These include lamps that are used as the main light source. They are distinguished by great power and functional features.
LED sconce with plug and dimmer switch Novotech Night Light 357324
By design we can distinguish:
- Stationary. They do not rotate, they are attached in one place.
- Rotary. The light can be directed in any direction depending on the capabilities of the sconce.
Based on the number of light bulbs, single-lamp and multi-lamp sconces are distinguished.
If possible, adjust the light level:
- Constant light.
- Models with dimmer.
By type of switch:
- With a button. It can be located on the lamp itself or on a separate box. Connects to electrical wiring.
- On a key or button on an electrical wire. Similar to the previous type, but the connection is made through an outlet.
- Sensory. It is turned on in different ways - with the help of claps, movement.
- With cord switch.
The cord can be a chain, rope or other device.
How to make a switch for sconces
Mlyn.
that's what it's called. Yesterday we hung a sconce in the kitchen, and the master said: but it does NOT have a switch, I didn’t see when I bought that there was no switch on the sconce itself (I ordered it through the Internet), otherwise it was possible to plan a switch for the wall in advance. Our internal wiring is connected to the “key” of the kitchen sockets in the panel. There is no furniture or appliances yet, I have turned off the sockets, but when I turn them on, the sconces will seem to be on constantly (well, if you just unscrew the bulbs a little). You cannot buy wiring with a switch, because... internal wiring. How to get out of this situation and what type of switch is easier and better to “attach” to the lamp itself (of course you will have to “break it up”), the electrician has already left, now you will have to climb around to look for the switch and call the electrician again.
A wall lamp (sconce) is a popular lighting fixture that complements a chandelier and sometimes replaces it. It gives a beautiful diffused light, which in some models can be directed in different directions. This lighting is ideal for reading in the evenings, working, creating a cozy atmosphere
Sconces have many advantages over floor lamps - they are cheaper and do not take up extra space. Before you begin installation, you need to decide how to connect the sconces, choose a diagram and location, and also purchase the necessary tools.
Selecting a location
When sconces are used to illuminate corridors, they must be installed at a distance of approximately 2 m from the floor.
For comfortable use of the lamp, you should choose the best installation location. The lamp must be accessible and at such a height that all family members can turn it on. This task is especially relevant when installing paired sconces, which should be located on the same line.
The sconce can be the main source of light in the corridor. In long hallways, several lamps are hung symmetrically on each wall.
The sconce can also be hung in the bathroom. Since this room has a special difficult microclimate, you should buy waterproof models.
To choose the right location, you need to make calculations in advance. The optimal installation height is 1.5 meters. For models with a plug, there must be a socket nearby so that the lamp can be connected to the mains.
Choosing a place to connect a wall lamp
Before you begin installing the sconce, you need to choose its location correctly, taking the time to take careful measurements. This is especially true for paired lamps, which should be located parallel to each other. Otherwise, there is a high risk of getting from the lighting a completely different effect than was expected.
When choosing a place for installation, it is advisable to take into account that it is recommended to mount the sconces at a height of one and a half meters from the floor. Take care in advance to covertly route the wiring to the device connection point.
Since this material is dedicated specifically to connecting sconces equipped with a built-in switch that is controlled by a rope or chain, we will talk in detail about the installation procedure for lamps of this type.
What tools are needed to connect?
The choice of drill for the job depends on the material of the walls.
Connecting a sconce with a chain for one lamp to the mains is not difficult. To do this, you will need a minimum set of tools that every home craftsman has. To connect you need:
- screwdrivers: Phillips, indicator, flat;
- wire cutters, pliers;
- ruler, pencil;
- insulating tape;
- electric drill with drills, the choice of drill depends on the material of the walls;
- a knife or device for stripping insulation from cores;
- stepladder if the lamp will hang high.
The sconce comes with an installation diagram. It shows in the pictures how to connect the lamp to the electrical wiring.
Before starting installation, you need to clarify a few nuances:
- Availability of a suitable degree of IP protection. When used in the kitchen or bathroom, protection should be increased.
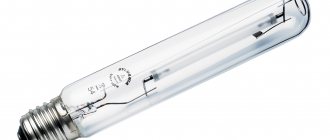
- Type of light bulbs and their power. The load of lamps must not be exceeded; it should not be higher than that stated in the lamp’s passport.
- Supply voltage. If the lamp requires a voltage of 12-24 V, you should select a step-down transformer and connect it to the circuit.
Then you can proceed to installation. It will differ depending on the type of sconce.
Simple wiring diagrams for light switches
These circuits provide on/off switching of household lighting devices with an operating voltage of 230÷250 V and currents of up to 10 Amperes. I note that these operating parameters of the switch must be indicated on its body in the regulatory markings, which I wrote about in the previous article: Types of lighting switches for household use. To put it a little more simply, these simple circuits work in any apartment or house to control the lighting of rooms. The academic name for these circuits is single-location lighting control circuits.
Two important points:
- At the switch you need to interrupt the phase power supply circuit;
- The circuits should only be assembled when the power supply is turned off (safety precautions).
Connecting the rope model to the electrical wiring
Before starting any electrical work, the room must be de-energized. To do this, you need to find the corresponding switch in the distribution panel. It is prohibited to turn on the electricity until the work is completed.
Using an indicator screwdriver, you need to make sure that there is no voltage on the wires. The tester is applied to each core in turn and checked to see if the indicator lights up.
You need to take the back cover of the sconce and attach it to the wall. You should mark the places with a pencil where the holes for installation will be made. Then holes are drilled with a drill, into which the locking mechanisms will then be installed.
The next step is connecting the wires. All electrical wiring in the house has at least two wires - zero and phase. They can be distinguished either by markings or using a tester. The corresponding wires must be connected to each other. The ends of the cables must be stripped using a sharp knife or a special insulation stripper. The contacts are stripped to approximately 5 mm. After this, the cores can be connected according to the diagram given in the instructions for the sconce. Most luminaires use the same connection algorithm.
If the house does not use grounding, the corresponding conductor must be reliably insulated. In this case, only two wires will be used for connection - brown and blue. If there is a ground, it must be connected to the corresponding conductor on the electrical wiring. The wire color should be yellow-green.
The blue one should be connected directly to the lamp to the corresponding core, usually it has the same color. You can connect the wires using electrical terminals, soldering, and then apply an insulating layer.
The brown wire goes to the black wire on the switch cord. The second end must be connected to the brown wire on the sconce.
In addition to direct connection through electrical wiring, the sconce can be powered through an outlet. This is convenient if the lamp is used infrequently.
You can install the lamp in place and screw it to the wall. Next, the lampshade is attached and the light bulb is inserted. At the end, you need to apply voltage and test the assembled system. Using a rope switch, you need to turn the lamp on and off. The lamp should not blink, and the contact points of the wires should not spark if the circuit is assembled correctly. Otherwise, you need to disassemble the assembled system and check the correctness of the connection.
How to connect a sconce with a switch with a cord or a chain - 3 simple diagrams.
The location of sockets, switches and lamps in the apartment is always planned at the renovation stage.
You map out the most optimal installation locations in advance of the project, trench the walls, and get a finished result that stays with you almost until the end of your life.
What to do if the repair is already completed, and you forgot to drill a socket box for a separate single-key switch for a wall sconce?
This is where lamps with an internal switch on a cord or hanging chain come to our aid.
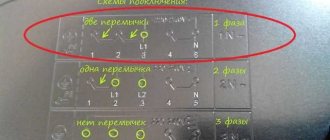
Also, such a switch chain can be purchased separately and independently installed on the finished product. In this case, you can assemble the circuit in three different ways:
If you didn’t forget anything during the repair, and you need to connect the sconce through a distribution box and a wall switch, then this circuit is no different from the power supply circuit for a lamp on the ceiling.
Read about this in a separate article.
We will take a closer look at the three above circuits with built-in microswitches.
So, what do we have at the initial stage of work? We have a wall sconce for one light bulb (first option), with two wires coming out of the body.
If you have a two-arm lamp, then there will already be 4 wires (its own zero and phase for each socket). Most often, the wires differ in color.
The chain itself is always installed from below, and the mini-switch-button is built into the body from the back side and is, as it were, hidden between the wall and the sconce. Visually it is not visible at all.
To secure the switch in the housing, you will have to drill a hole in the rim.
It is better to drill the hole in stages, starting with a small-diameter drill, gradually expanding its size. If you make a hole slightly larger than necessary, the tightening ring-nut may simply slip through it.
Next, the threaded part of the switch is inserted into the hole and tightened with a nut from the outside.
What should you do if the rim of the sconce is too narrow and you can’t attach the switch to it? In this case, it will have to be glued a little closer to the middle of the sconce, in a deeper place, so that it does not touch the wall.
For rigid fixation, use liquid nail glue (not the same as for ceiling skirting boards) or epoxy.
The fact is that the inside of the factory tightening nut is made in the form of a smooth cone, through which the lace runs.
This prevents it from clinging to the sharp edges of the drilled hole. Do it differently, and your chain will not last long and will quickly break.
Therefore, the rim will have to be drilled with the largest possible drill and this ring nut with a cone will have to be glued in from the inside.
After fixing the switch, we proceed to connecting all the wires. We have 6 of them in total:
How to connect them together? It is clear that one of the conductors is phase, the other is neutral.
The most important rule here is to let the phase through the switch. Remember, when you pull the chain, only one conductor breaks. And this should be exactly the phase.
Otherwise, if you want to change a light bulb, you will pull the cord, and there will still be potential on the socket, and you will get energized.
In this case, it also plays a role where this phase should arrive on the cartridge - on the central contact “patch” or on the threaded part.
In order not to confuse anything here, read the detailed educational program in a separate article.
Connecting a sconce with a cord and plug
Installation work must be carried out when the network is de-energized.
Such devices are convenient to use if it is not possible to cut walls and draw a new line to the electrical wiring. If desired, the sconce with the plug can be moved to any other place where there is an outlet nearby.
To connect a sconce to a switch from an outlet, you do not need to connect wires. All you need to do is select the installation location, drill holes for the mounting system and hang the lamp. The plug must be plugged into the outlet. You can use a lanyard to check the functionality.
The algorithm for connecting a wall sconce with several lamps is similar, only there will be a larger number of wires. All phases, neutrals and groundings from all lamps are connected to the same conductors.
Types of wall lighting devices
Before you figure it out and figure out how to connect the lamp, sconce,
having
a lanyard-style switch,
we recommend that you obtain general information about all existing models. Perhaps the user will choose another inclusion option, more suitable for a particular situation, taking into account the characteristics of the interior of the room and personal preferences. So, there are the following types of wall lamps:
- A sample that is turned on using a cord.
- A lamp that has a switch built into the connecting (supply) wire. This option is an alternative to the previous one. The only difference is that here the power is applied and stopped by changing the position of the switch key instead of pulling the rope. Some owners find this method more convenient.
- Sconces connected by connecting a plug and socket. The simplest, most primitive and, frankly speaking, not very convenient way. Ved will have to pull the plug every time, turning off the power from the network. And turning it on will not be convenient, especially if it happens in complete darkness.
Basic connection methods
How to connect a sconce depends on the specific type of lamp. There are several of them: a sconce on a rope, a model with and without a switch. To understand the features and do everything correctly, you need to become familiar with the installation process of each of them.
Connecting a rope sconce
Connecting a sconce lamp with a rope is not a complicated process. First of all, wires are connected to the future location of the device. The installation height of sconces, as a rule, does not have clear standards and usually varies from one to two meters. It is advisable to route the cable in a hidden way so that the already finished interior composition of the room is not disturbed.
The output will be three wires in total. One is marked N, which indicates the neutral conductor, the second is marked with the letter L - phase, the last PE indicates grounding. To figure out how to connect a sconce with a switch - a cord, you need to fix it according to the attached diagram, first connecting all the contacts to the blocks with the corresponding marks. As a result, it should turn out that the phase is connected to the phase, zero to zero, and grounding to ground.
Keyboard sconce model
An alternative to a sconce with a chain or rope is a model with a key switch. Quite often, instead of a rope, contacts are left in such lamps. Subsequently, which connect independently.
There is nothing complicated in the installation of such models; the only condition is that you need to connect the keyboard sconces at the time of laying the electrical wiring network. Otherwise, when cutting places for switches and cable routing, the integrity of the wall panel will have to be violated. The connection must be made strictly according to the diagram and all rules for working with electrical wiring. This is due to the fact that during manipulation the wires will not be visible, and therefore a short circuit can easily be caused.
The installation diagram of a sconce lamp on the wall looks like this: the mains input phase goes to the switch. From the switch it is fed back to the lamp so that it is possible to disconnect the circuit. But zero and grounding need to be connected directly.
Using a sconce via a switch is convenient in children's rooms.
Sconce with cord and plug
Models of wall sconce lamps can be connected to the network using a conventional electrical wire equipped with a plug. Here the wires from the device are connected to a cord, which will be connected to a power outlet using a plug. These specimens are good because when installing them, there is no need to rout walls to lay wires and place switches. Also, a cord is often added to the chain, which serves to disconnect the chain. This eliminates the need to pull the plug from the electrical outlet every time.
Instructions for connecting sconces
To ensure that the installation of the sconce is successful without incidents or errors, you should use simple instructions.
- First of all, you should turn off the power to the apartment. This is done using an RCD or DIF machine. Afterwards, be sure to make sure that the electricity is turned off. This can be done with an indicator screwdriver;
- Next, taking the back cover of the lamp, we apply it to the wall in the place where the sconce will be placed. The attachment points are marked with a pencil. If the power cable is connected to the lamp vertically, it is important not to get holes into it;
- Depending on the material of the wall panel that will be equipped with the installed sconce, fasteners and tools for carrying out installation manipulations are selected. If the base has a concrete platform with some kind of decorative finishing coating, then it is advisable to choose dowel nails. The same elements are suitable for other hard surfaces in the form of brick or stone. The holes are made with a hammer drill.
For softer wall bases made of foam block, wood, etc., in order to fix the platform for installing sconces, it is better to use the usual self-tapping screws.
- After all the necessary elements have been selected, the cover is attached to the wall;
- Next we move on to directly connecting the lamp. The power cable is cut to length with a margin of 10 centimeters. The braid is removed from it, and the ends of the wires are stripped to a distance of 5 to 8 mm;
- Then we connect all the contacts to each other accordingly. The lamp terminal block with a protective casing is placed on the power cable. The neutral conductor is connected to the block where there is a blue wire (generally the neutral conductor is indicated in blue) coming from the sconce. The phase is connected to the phase one accordingly;
- The bolts included in the kit secure the lamp body and install the lampshade;
- The sconce is supplied with a light source, that is, a light bulb, and the design is checked.
Very often sconces are placed on the wall above the bed. This is convenient, since in the evening such a lamp has a less bright directional light, which does not disturb the already resting household members.
Switch device
The working part of the switch is a thin metal frame with a drive installed on it. The frame is mounted in a socket box. A drive is an electrical contact, that is, a device on which electrically conductive wires are connected. The drive on the switch is movable, and its position determines whether the circuit is closed or open. When the circuit is closed, the electricity is on. An open circuit makes it impossible to transmit current.
The drive provides electricity or an obstacle to the path of the signal transmitted between two fixed contacts:
- the input contact goes to the phase from the electrical wiring;
- the outgoing contact is connected to the phase going to the lamp.
The normal contact position on the actuator implies that the commutator is off. The fixed contacts are open at this time and there is no lighting.
Pressing the control button on the switch completes the circuit. The moving contact changes its position, and the fixed parts become connected to each other. Along this path, the voltage network transmits electricity to the light bulb.
To ensure the safety of the system, the working part must be placed in a housing made of materials that are not capable of conducting electric current. In the switch such materials can be:
- porcelain;
- plastic.
Other design elements directly protect the user:
- The control key allows you to change the state of the circuit with one touch, closing and opening it at the request of the person. As a result of a light press, the light in the room turns on or off.
- The frame completely insulates the contact part, which eliminates accidental touches and electric shocks. It is attached with special screws, and then sits on hidden latches.
Plastic is effectively used as the main material for their manufacture.
Installation features
When carrying out repair work indoors to install additional lighting in order to save labor load (no need to groove the walls), you need to know that for laying wires there are diagrams for switching on the lighting device, which answer the question of how to connect a switch from an outlet, but also in In this case, all work has its own subtleties.
- All wires in the room must be laid only according to the diagram and in straight lines vertically or horizontally.
Connection diagram for a switch from a socket In wooden houses, it is necessary to exclude their interaction with wooden walls during the laying of wires; the electrical wiring is laid through special insulators.
Laying electrical wiring through special insulators Hidden wiring is carried out in houses made of stone or reinforced concrete slabs using grooves (channels) made in them. Hidden wiring in grooves
During the repair process, two-core or three-core electrical wires are used, in which one core has a phase, the other has a zero , if there are three cores, then the third one also has grounding.
What material and tools are needed to carry out the work?
To carry out work on installing additional lighting in the room, you must have the following tools and consumables:
- a device with which you can de-energize an electrical circuit;
- electrical wiring of the same cross-section and design (aluminum or copper conductor), which is installed throughout the entire room, house or apartment;
- distribution boxes in which we make connections;
- a screwdriver with an indicator that shows the presence or absence of a phase;
- pliers and side cutters with which the connection will be made;
- electrical tape to cover the surface of the twists;
- fasteners and material for performing work on a wooden surface (corrugation or metal strip);
- for installation of switches - socket boxes;
- If you need to make a groove, you will need a hammer drill.
Set of tools
In addition to preparing the tools and material needed for the work, you must first draw a diagram of the electrical connection of the switch and decide on the place where it will stand, as well as calculate the cross-section of the cores for the additional load.
Step-by-step instructions for connecting and installing an outlet
If you take the device in your hands and pay attention to its structure, you will notice that it has 2 parts, one of which is placed inside the wall, the other is located outside.
We take a screwdriver in our hands and unscrew the bolt between the two sockets, separating the cover from the core. We see that in the ceramic base, near each contact there are clamps for connecting wire strands to them.
When the socket is grounded, there is a U-shaped bracket on the sides, located with the “legs” up, connected to the core with a rivet. It also has a contact clamped with bolts.
We take a knife in our hands and strip the ends of the wire from 10-15 mm of insulation. We insert into the clamps, crimp the contacts
It is important to do this well so that the wires do not dangle. Otherwise, the socket will then spark, heat up, and its body will melt and burn.
After connecting the wires, place the core in the glass of the socket box, turn the screws on the sides with a screwdriver until its “paws” rest against the walls and sit firmly.
To prevent the socket from dangling later or falling out one day, you need to tighten everything well enough.
We put a frame covering the screws and all connections (it usually snaps into place)
Carefully screw the lid all the way. We do not apply much force, otherwise it may crack, as it is very fragile.
After you have installed a grounded socket with your own hands, you need to check the integrity of the insulation resistance, then turn on the voltage and measure it.
When everything is done correctly, the device should show 220 V. The socket is ready for use. There is nothing difficult about connecting it!
It is also important, before directly installing sockets, to familiarize yourself with the PUE (a kind of electrician’s handbook), which popularly explains in which room, at what height, and how much electrical equipment and devices can be installed without the risk of overload and injury.
Prudence and concern for personal safety are the key to a long life. You must always remember this!
Connection via terminal blocks
Wires connected through electrical blocks will form the tightest possible contact. Consequently, overheating of the connection becomes impossible in principle.
The brown wire from the wire is connected to the black wire from the switch-cord, the second end from the switch is connected to the brown wire from the sconce.
This completes the electrical part of the connection. Often, sconces are connected to the electrical network not through the general wiring, but through an outlet. It is very comfortable. Firstly, the sconce is used occasionally, and not constantly.
Secondly, such a lighting device can always be completely removed from the power circuit if, for example, you leave home for a long time.
In the video, the home master demonstrated the principle of connecting a sconce to the electrical network:
Did you like the post? Share with your friends and support the site:
Sconces are a common type of wall lamp that is used for local lighting and is most often installed above a sleeping area. It is convenient because it produces “soft” light, and its direction can usually be changed. With the help of such a lamp, you can, for example, read and not disturb the person relaxing next to you.
Those who have purchased such a wall lamp, but do not want to contact specialists for installation, are faced with the question of how to properly connect the sconce.
The installation method depends on the type of device. We offer you step-by-step instructions for any of these types, plus more detailed descriptions of individual varieties.
Installation steps:
- The power supply is turned off in the panel. They check on switches and electrical appliances, but the most reliable way is to test the wires themselves using an indicator screwdriver.
- The back cover or mounting strip of the sconce is applied to the wall surface. Mark the locations of future fasteners.
- The cover is attached using self-tapping screws or screws with dowels.
- If necessary, the power cable is cut (10–12 cm is left). The wires are stripped (5–8 mm) and connected in pairs, which will be described in more detail below. Next, securely insulate the connection!
- The housing is placed and usually secured with decorative nuts, which are included in the kit.
- The light bulb is installed.
- The lampshade (shade) is fixed.
- The electricity is turned on and the operation of the device is checked.
How to identify wires?
All connection diagrams presented below will only work when the wiring is correctly defined. This is usually easy to do due to the different colors that traditionally mark different conductors:
- Phase, L, is usually black, brown, white. There are, however, gray and even red, orange, purple and turquoise.
- Zero, N, is usually blue or light blue in color.
- Grounding, PE, is green, yellow or yellow-green.
Although this type of marking is a good aid for the electrician, there are a few complications. Firstly, manufacturers sometimes still differ greatly in assigning colors to conductors (and there is also an old standard that was in force in our country in the last century, and a new one). Secondly, the craftsmen who laid the wiring may not have cared about compliance.
Therefore, the most reliable methods of determination are to use an indicator screwdriver (especially if there are only two conductors: the probe will work on the phase) and, if there is a ground wire, to use a multimeter.
You also need to understand that if a lamp has more than one light bulb, there will also be more wires.
Connecting a sconce with a cord
Such models are also called “rope type”.
You can connect the device to the wiring so that turning the light on and off will be done only with the cord that comes with the lamp. This installation is simple.
It is necessary to bring the wires to the installation location on the wall, and then compare them with those available on the sconce. There should be three of them, as already indicated: phase (L), neutral (N) and ground (PE), the latter may be absent.
The corresponding wires are connected in pairs, L to L and so on. If there is no grounding in the house wiring, the corresponding sconce conductor is insulated.
As a rule, the sconce has a built-in terminal block, which simplifies the process.
Using the rocker switch
In this case, it will play the same role as the lace. The connection goes according to this scheme:
- The phase goes to the switch.
- Next - on the lamp.
- “Zero” and ground are connected directly.
Connecting the sconce to the electrical network
The lighting fixture “sconce” is in great demand among ordinary people. This is explained by its main feature, which is the ability to emit diffuse light fluxes. This light is suitable for comfortable reading books and working in the evening, for creating a cozy and warm atmosphere, or as an additional source of light in the room. That is why the question of how to connect sconces using your own powers is quite common.
Such lamps have a number of other advantages:
- possibility of adjusting the angle of incidence of the light flux. The design of the sconce has a mount that allows the product to rotate, thereby directing the light. Sconces are often placed above the bed in both children's and adult bedrooms;
- the widest range of species and variations in manufacturing materials. Since these lamps serve to complement the interior composition in a certain style, they are made from a wide variety of materials in the form of colored plastic, forged metal, precious crystal, etc.;
- You can install sconces on the wall yourself, the main thing is to read the instructions a little.
Is it possible to connect an outlet to the switch?
Full joint operation of the socket and switch, if the first is powered by the latter, is almost impossible. However, there are some variable methods to combine them. Let's look at them in detail.
Socket instead of switch
You can install an socket instead of an existing switch, for example, when you need to carry out a number of temporary repairs or decoration work using electrical equipment or connect a light bulb on a portable device. In this case, you need to perform the following series of actions:
- Turn off the machine - de-energize the network. Before work, you need to make sure that there is no voltage on the contacts using a test probe.
- Disassemble the switch and remove the wiring that goes to it.
- Dismantle the base of the switch, and in its place install a socket and connect its contacts to the freed wires.
- Next, you need to remove the cover of the junction box and disconnect the wires from the former switch from the wires going to the light bulb.
- Connect one of the conductors from the new outlet to the phase, the other to zero and cover them with a layer of insulation; the wires from the lamp are temporarily brought together and insulated.
- Close the distribution module cover and turn on the switch.
- Check the socket, for example, by connecting a plug with an adapter and a light bulb. If it lights up, the circuit is assembled correctly.
Connection from double switch
A two-key switch can also be connected to a power outlet to power electrical appliances, but in this case only one key will work. The algorithm of actions is as follows:
- It is necessary to de-energize the electrical network, be sure to check the contacts with a measuring probe before work.
- Install the socket and two wires connected to it.
- Next, you need to disassemble the switch and free the input and one of the two output wires.
- Connect one wire of the socket to the input contact (phase).
- Connect the second conductor of the socket (zero) to one of the output wires from the switch (the one that was previously disconnected) and insulate it.
- Having opened the cover of the junction box, it is necessary to disconnect the neutral conductor for one of the light bulbs and connect it with the same conductor that was disconnected at the output of the switch and twisted with the neutral conductor of the socket.
- All contact connections are insulated, and the covers on the switch, socket and distribution module are closed.
- The switch is turned on and the operation of the circuit is checked.
At what distance should bedside lamps be hung?
The installation height of bedside sconces should be 20-30 centimeters higher than the edge of the backrest. There are models whose back is higher than the maximum distance from the floor (1.6 m). In this case, the lamps are mounted above the edge (shades with a cord are selected for easy switching off) or directly into the furniture frame; height.
Interesting materials:
How to remove Slime from a wall? How to remove old tape? How to remove super glue from furniture? How to stop chickens from eating eggs? How to boil butter before frying? How to boil champignons before frying? How to respond to a collective appeal? How to unlink an Instagram advertising account from Facebook? How do bees make wax? How do bees build a hive?