Protected 18650 lithium-ion batteries have a special control board that protects them from overcharging, critical discharge and short circuit. Therefore, the algorithm for charging protected 18650 batteries is much simpler than the technology for recharging batteries that are not equipped with a protection board.
It is enough to install the battery in a standard charger (observing the polarity) and connect it to the network. Most modern chargers have an indicator indicating charging status. Typically, a red light is on during charging, and a green or blue light is on when charging is complete. On average, recharging time varies from 2 to 4 hours, with most of the capacity being replenished in the first hour. After this, the charge current decreases and the voltage is slowly brought to the limit value of 4.2 V.
How to charge a 18650 battery with protection: important rules
In order for protected Li-ion batteries of size 18650 to remain operational longer, you need to:
- Charge them with suitable chargers (ideally original ones) - constant voltage sources of 5 V, which deliver a charging current of 0.5 to 1.0 battery capacity, automatically start the charging process from 0.05 V and stop it at 4. 2 V.
- Carry out charging indoors at temperatures from +15 to +25 °C. After entering a room from frost, the battery must first be kept at room temperature and only charged after a few hours.
- Store with a charge level of about 40–50%, checking it periodically.
How to properly connect 18650 batteries:
- Use batteries of the same manufacturer, type, service life;
- Since a parallel connection can increase the current consumption, you must ensure that the cross-section of the cables is sufficient to withstand it;
- Before installation, you must clean all contacts and use only reliable clamps;
- Check connections regularly.
Useful tips Connection diagrams Principles of operation of devices Main concepts Meters from Energomer Precautions Incandescent lamps Video instructions for the master Testing with a multimeter
Introduction. Lithium batteries, characteristics, features.
Lithium batteries (Li-Io, Li-Po) are the most popular rechargeable sources of electrical energy at the moment. The lithium battery has a nominal voltage of 3.7 Volts, which is indicated on the case. However, a 100% charged battery has a voltage of 4.2 V, and a discharged one “to zero” has a voltage of 2.5 V. There is no point in discharging the battery below 3 V, firstly, it will deteriorate, and secondly, in the range from 3 to 2.5 It only supplies a couple of percent of energy to the battery. Thus, the operating voltage range is 3 – 4.2 Volts. You can watch my selection of tips for using and storing lithium batteries in this video
Alex2019-11-11T00:50:11+03:00
What are lithium batteries?
Depending on what material the positive electrode of a lithium battery is made of, there are several varieties:
- with lithium cobaltate cathode;
- with a cathode based on lithiated iron phosphate;
- based on nickel-cobalt-aluminium;
- based on nickel-cobalt-manganese.
All of these batteries have their own characteristics, but since these nuances are not of fundamental importance for the general consumer, they will not be considered in this article.
Also, all li-ion batteries are produced in various sizes and form factors. They can be either cased (for example, the popular 18650 today) or laminated or prismatic (gel-polymer batteries). The latter are hermetically sealed bags made of a special film, which contain electrodes and electrode mass.
The most common sizes of li-ion batteries are shown in the table below (all of them have a nominal voltage of 3.7 volts):
| Designation | Standard size | Similar size |
| XXYY0 , where XX is the diameter in mm, YY is the length in mm, 0 reflects the design in the form of a cylinder | 10180 | 2/5 AAA |
| 10220 | 1/2 AAA (Ø corresponds to AAA, but half the length) | |
| 10280 | ||
| 10430 | AAA | |
| 10440 | AAA | |
| 14250 | 1/2 AA | |
| 14270 | Ø AA, length CR2 | |
| 14430 | Ø 14 mm (same as AA), but shorter length | |
| 14500 | AA | |
| 14670 | ||
| 15266, 15270 | CR2 | |
| 16340 | CR123 | |
| 17500 | 150S/300S | |
| 17670 | 2xCR123 (or 168S/600S) | |
| 18350 | ||
| 18490 | ||
| 18500 | 2xCR123 (or 150A/300P) | |
| 18650 | 2xCR123 (or 168A/600P) | |
| 18700 | ||
| 22650 | ||
| 25500 | ||
| 26500 | WITH | |
| 26650 | ||
| 32650 | ||
| 33600 | D | |
| 42120 |
Internal electrochemical processes proceed in the same way and do not depend on the form factor and design of the battery, so everything said below applies equally to all lithium batteries.
Which device should you use?
Popular electronics stores offer a wide selection of suitable chargers. The cheapest one, with a current level of 1 ampere, can accommodate one 18650 model battery.
more advanced version, with two “sockets” for elements, with a maximum voltage of 4.2 V. This 18650 charger is a little more expensive, but it does have a charge level indicator that monitors how long the battery needs to charge.
There is also a similar option, with the same characteristics - you can insert not only 18650 cells into it, but also charge a 26650 lithium-ion battery.
You can also purchase a universal charger that is suitable for all types of batteries, from nickel-cadmium to lithium-ion.
There are quite a lot of chargers, and most of them are equipped with both indicators and a safety system that eliminates the need to constantly check the voltage or current level. Of course, the quality of the charger directly depends on how much money will be spent on it.
If you have the skill, time and desire not to waste money on buying a charger, you can make it yourself - of course, this will require a certain circuit.
How long does it take to charge a 18650 battery? Information about gadgets and programs
The permitted voltage tolerance is only 0.05 volts. The average lithium-ion battery takes about 3 hours to charge. However, the exact charging time still depends on the battery capacity. So, here are a few basic rules, using which you can extend the life of a li-ion battery significantly.
Expert opinion
It-Technology, Electrical power and electronics specialist
Ask questions to the “Specialist for modernization of energy generation systems”
How to charge 18650 battery correctly? When considering how to charge an 18650 battery for a flashlight, electronic cigarette and other devices, it is necessary to describe the principle of its operation. Ask, I'm in touch!
Is it possible to solder 18650 batteries?
It is forbidden ! This is the wrong approach. “ But if you’re very careful, it’s possible ,” is the approach in DIY communities. What is the catch, what should you be wary of?
When connecting 18650 batteries into a large battery (from laptops to vehicles), the task is to ensure reliable contact without losses, resistant to external influences (shock, temperature, and so on - depending on the purpose of application). Many lovers of DIY crafts consider soldering as one of the options.
Lithium-ion batteries (18650 and any other Li-Ion) when heated from a soldering station (or even a low-power soldering iron) are destroyed in their structure and irreversibly lose capacity!
That is, solder 18650 batteries unless absolutely necessary. Or you will have to put up with a change in chemical composition and deterioration in performance.
In addition, the solder connection is unreliable if the battery overheats. The method is also impractical for compact assembly due to random solder shapes and vulnerability to external influences.
How to properly charge a lithium-ion battery: how to assemble a lithium battery with your own hands
Initially, lithium-ion batteries were intended for mobile devices, be it phones, cameras, video cameras, laptops, but in the last decade, the production of lithium batteries has also been launched by most automakers.
Then why assemble it yourself if you can buy a ready-made battery? There are enough reasons:
- factory-assembled lithium batteries are unreasonably expensive;
- it is very difficult to find a battery of suitable dimensions for a motorcycle or car;
- If the assembled battery fits into the installation space with a margin, then it will have a lower capacity.
With your own hands, you can assemble a battery from individual elements, which will be limited only by energy density and price per watt-hour, depending on the type of elements selected:
- NiMH - nickel metal hydride;
- Li-ion - lithium ion;
- Li-pol - lithium polymer;
- LiFePO4 - lithium iron phosphate;
- Lead-Acid - lead-acid.
Danger of overcharging lithium cells
Lithium cells must be handled with care because they concentrate a lot of energy into a small area when fully charged. Therefore, protected Li-ion and Li-pol batteries have been on sale for a long time.
Back in 1991, Sony drew attention to the explosion hazard of Li-ion cells. Nowadays, all batteries without exception are wound with a two-layer separator between the plates to eliminate the risk of internal short circuit.
A little about lithium-ion batteries
These include the following aspects:
- high density of output current and accumulated energy, long-term charge retention;
- no effect of capacity reduction due to regular incomplete charging;
- self-discharge no more than 4-8% per month when stored without recharging, aging no more than 15-20% per year;
- no need for a full discharge to train the energy capacity of the drive;
- light weight, variability of shape and dimensions of the device;
- operating temperature range – from -20°С to +50°С (low temperatures prevent recharging);
- long service life (up to 10 years of operation and more than 1000 discharge cycles).
The disadvantages of lithium batteries are:
- dependence of the service life on the duration of use and storage, and not on the number of discharge cycles;
- risk of failure during overcharging (current flow upon completion of charging);
- low resistance to deep discharge;
- high price;
- explosion hazard due to mechanical damage and excess current, if they lead to heating of the electrolyte and breaking the seal of the housing.
The name of the 18650 battery is due to its shape and dimensions. The battery width is 18 mm and the length is 65 mm. The last number in the marking indicates the cylindrical shape of the battery. The drive circuit is equipped with a controller that prevents overheating during charging.
The battery case can be marked in more detail: for example, INR18650-20R. The first letter distinguishes all lithium-type batteries, the second specifies the type of cathode material (C – cobalt, N – manganese, F – ferrophosphate).
The letter "R" stands for rechargeable. The next 5 digits reflect the dimensions and shape factor of the battery, and the last one is the battery capacity in Ah.
18650 batteries with a protection board can be labeled as 18700 or 18670. The protection board controller helps prevent the battery voltage from exceeding the rated voltage (4.2 V) and falling below 2.5 V.
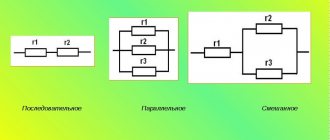
What types of connections exist
The most commonly used series and parallel connections of batteries. There is also a third type, combined, or series-parallel.
Is it possible to connect batteries of different capacities?
Consistently - no. The fact is that internal resistance depends on capacitance. The larger the capacitance, the lower the resistance. A large voltage difference is formed in the assembly, and somewhere it can be much higher than the limit, and somewhere much lower. When you connect a charger, a battery with a smaller capacity will charge faster and there will be excess voltage on it, which will lead to damage and loss of capacity, while batteries with a larger capacity will not be fully charged.
When a load is connected, the opposite situation will occur: a small battery will discharge below the permissible limit (the so-called deep discharge), as a result losing part of its capacity.
IMPORTANT! You cannot connect batteries of different capacities, different types, or different degrees of charge in series. They should be as similar as possible, preferably from the same batch.
To the question of whether it is possible to connect batteries of different capacities in parallel, the answer is yes. But be careful. Make sure that the voltage at their terminals is equal. If it is very different, it may cause a short circuit or damage to the smaller battery. It is also worth considering that the terminals of a particular battery may not withstand too much current for a long time. See specifications before assembly.
Features of serial connection of lithium batteries
For sequential assembly, you need to take elements of the same type and equal sizes, with identical capacitance and voltage values, preferably with the same release dates and model numbers. If there is a “weak link” in the assembly, it will lead to an imbalance in the battery. But the problematic battery may not manifest itself immediately.
Therefore, it is necessary to measure the voltage on each element of the system once every six months and, if an imbalance is detected, perform balancing:
- if the voltage spread does not exceed 0.1 V, this is excellent, but for preventive purposes it is recommended to do an equalizing charge once every six months;
- if the spread exceeds 0.1 V, it is recommended to perform balancing;
- if the spread exceeds 0.2 V, balancing is required.
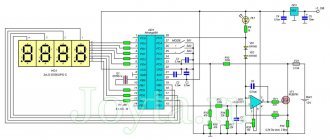
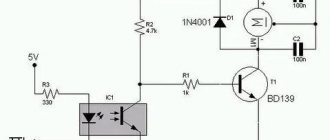
Simplified diagram of a balancer for a battery
Here is a simplified circuit diagram of a current balancer based on the TL431. Resistors R1 and R2 set the voltage to 4.20 Volts, or you can choose others depending on the type of battery. The reference voltage for the regulator is removed from the transistor, and already at the border of 4.20 V, the system will begin to open the transistor slightly to prevent exceeding the specified voltage. A minimal increase in voltage will cause the transistor current to increase very quickly. During tests, already at 4.22 V (an increase of 20 mV), the current was more than 1 A.
In principle, any PNP transistor operating in the range of voltages and currents that interests us is suitable here. If the batteries are to be charged with a current of 500 mA. The calculation of its power is simple: 4.20 V x 0.5 A = 2.1 V, and this is how much the transistor must lose, which will probably require some cooling. For a charging current of 1 A or more, the power loss increases accordingly, and it will become increasingly difficult to get rid of the heat. During the test, several different transistors were tested, in particular BD244C, 2N6491 and A1535A - they all behave the same.
The voltage divider R1 and R2 should be selected so as to obtain the desired clamping voltage. For convenience, here are a few values, after applying which we will get the following results:
- R1 + R2 = Vo
- 22K + 33K = 4.166 V
- 15K + 22K = 4.204 V
- 47K + 68K = 4.227 V
- 27K + 39K = 4.230 V
- 39K + 56K = 4.241 V
- 33K + 47K = 4.255 V
Why connect batteries into batteries?
To power some devices, voltages and currents are required that cannot be provided by existing batteries. To provide the necessary conditions, several drives are combined.
When several batteries are connected in parallel, the total capacity increases. And this design can be used to power powerful devices that require large current values. This can be used when there are two small-capacity drives, but you need to power a powerful device or extend its battery life. Then, in order not to buy large-capacity drives, you can use an assembly of two existing drives.
To increase the voltage, the batteries are connected in series. For example, two 12V batteries will produce 24V.
To simultaneously increase the potential difference and capacity, you need to use a combined connection.
Serial connection of Li-ion batteries
When connecting batteries in series, the “+” terminal of the 1st battery is connected to the “+” of the electrical circuit. The “+” terminal of the 2nd battery is connected to the “-” terminal of the 1st battery, etc. At the end, the “-” terminal of the last battery is connected to the “-” block. A battery assembled according to this scheme has a capacity value, like that of an individual battery, and the voltage corresponds to the total value of the voltages of all elements included in the battery.
If, when compiling the battery, cells with equal voltage values were used, then the total voltage of the battery is calculated as the voltage of one of the elements multiplied by the total number of cells in the assembly. The energy of the battery, regardless of the format of the connection of the elements, corresponds to the total energy value of the cans included in the battery.
Theory
To connect batteries in series, usually the positive terminal of the first battery in series is connected to the positive terminal of the electrical circuit. The positive terminal of the second battery is connected to its negative terminal, etc. The negative terminal of the last battery is connected to the negative terminal of the unit. The resulting battery in series connection has the same capacity as a single battery, and the voltage of such a battery is equal to the sum of the voltages of the batteries included in it. This means that if the batteries have the same voltage, then the battery voltage is equal to the voltage of one battery multiplied by the number of batteries in the battery.
The energy accumulated in the battery is equal to the sum of the energies of the individual batteries (the product of the energies of the individual batteries, if the batteries are the same), regardless of whether the batteries are connected in parallel or in series.
Lithium-ion batteries cannot simply be connected to a power supply unit - the charging currents on each element (bank) must be equalized. Balancing is carried out when charging the battery, when there is a lot of energy and it can not be saved much, and therefore, without any significant losses, you can use the passive dissipation of “excess” electricity.
Nickel-cadmium batteries do not require additional systems, since each link, when its maximum charge voltage is reached, stops receiving energy. Signs of a Ni-Cd being fully charged are an increase in voltage to a certain value, and then a drop of several tens of millivolts, and an increase in temperature - so that the excess energy immediately turns into heat.
The opposite is true for lithium batteries. Discharge to low voltages causes degradation of the chemistry and irreversible damage to the element, with an increase in internal resistance. In general, they are not protected from overcharging, and you can waste a lot of extra energy, thereby dramatically reducing their service life.
If we connect several lithium cells in a row and feed them through clamps at both ends of the block, then we cannot control the charge of individual cells. It is enough that one of them will have a slightly higher resistance or a slightly lower capacitance, and this link will reach a charge voltage of 4.2 V much faster, while the rest will still have 4.1 V. And when the voltage of the entire package reaches charge voltage, it may be that these weak links are charged to 4.3 Volts or even more. With each such cycle, the parameters will deteriorate. In addition, Li-Ion is unstable and, if overloaded, can reach high temperatures and, consequently, explode.
Most often, a device called a “balancer” is installed at the output of the charging voltage source. The simplest type of balancer is a voltage limiter. It is a comparator that compares the voltage on a Li-Ion bank with a threshold value of 4.20 V. Upon reaching this value, a powerful transistor switch is opened, connected in parallel to the element, passing most of the charge current through itself and converting the energy into heat. In this case, the can itself receives an extremely small part of the current, which practically stops its charge, allowing its neighbors to recharge. The voltage equalization on the battery cells with such a balancer occurs only at the end of the charge when the elements reach a threshold value.
Ideas and diagrams for DIY assembly
In order to make your own Power Bank, you will in any case need a charge controller and a converter that increases the voltage from 3.7 to 5 volts; there is very little room for creativity. However, there are several options for what to make the body out of. You can not only find it in an online store, but also convert it from a ready-made case from an unnecessary gadget. Or you can make a very beautiful, stylish case from wood yourself.
You can also use your imagination when choosing batteries. They can be obtained from faulty laptop batteries or old mobile phones. You can also use flashlight batteries.
What modules from China will we need?
To make a profitable Power Bank with your own hands, you can pick up cheap components, for example, on the Aliexpress website. Here's the basic information you need to choose a cheap, high-quality module.
The charging board must have protection against overcharging, short circuit, and overload. The device is assembled on the basis of a microcircuit and is needed in order to stop charging in time. The main characteristic of the charge board is the output current (it can be equal to 1 ampere), or there are devices with two outputs for 1 and 2 A. In addition, when choosing, you also need to pay attention to the type of batteries - usually most boards are designed for lithium-ion batteries 18650. Some models have digital displays that show the percentage of battery charge.
The batteries produce 3.5-3.7 volts, and a voltage of 5 V is required to charge a mobile gadget. Therefore, a boost converter is required for the charger. It can be in the form of a board to which you need to solder wires, or in the form of a board with a USB connector already installed (one or a pair). In the latter case, you will only need to solder the “+” and “-” wires from the battery to the “B+” and “B-” connectors (they can also be designated “Vin” or “input”). You can find this device in stores by searching for “boost converter for 3.7-5 volt power bank”, or simply “boost DC-DC converter”.
But there are boost converters with adjustable output voltage, in this case, before soldering it to the USB connector and connecting it to the phone, you need to measure the output voltage with a multimeter and set the required 5 volts.
Power bank for 18650 from a laptop battery
To assemble a power bank with your own hands from old laptop batteries you will need:
- charge module with overcharge protection;
- a converter that increases the voltage from 3.7 to 5 volts;
- frame;
- 18650 lithium-ion batteries;
- 100 µF capacitor, 16 V;
- USB connector;
- button to turn the device on and off;
- connecting wires.
Step-by-step assembly instructions:
- First you need to mark the case according to the dimensions of the components.
- Make holes according to the markings.
- Using soldering, connect the batteries used for the power bank in parallel (the soldering iron tip must be massive, and soldering must be done quickly so as not to damage the battery).
- Strengthen the battery structure with tape and install it in the case.
- Install the charge module into the housing.
- Solder the 18650 battery pack to the charge module.
- Install the boost converter by connecting it to the charge module via the power button.
If the boost converter board has USB connectors, the manufacture of the charger can be considered complete. If there is no such socket, it needs to be soldered. To do this, the positive and negative outputs of the converter board are soldered to the connector. To stabilize the charging current, you can solder a capacitor with a capacity of 100 microfarads, designed for a voltage of 16 volts, between the positive and negative outputs of the connector.
Attention! Lithium-ion batteries do not tolerate high temperatures well, so when soldering you need to work with a powerful soldering iron for a short period of time.
Power bank made from phone batteries
Many people have some unnecessary mobile phones from which they can get batteries. When using several devices from phones, keep in mind that the batteries must be of the same capacity, and in other respects they must be similar to each other.
Expert opinion
Alexey Bartosh
Specialist in repair and maintenance of electrical equipment and industrial electronics.
Ask a Question
Important! The capacity of a power bank is affected by the number of batteries used: the more batteries there are, the more energy can be stored. The recommended capacity of a homemade Power Bank is from 6,000 to 20,000 mAh.
The procedure for assembling a homemade Power Bank is the same as when using a laptop battery.
Power bank made from batteries
For the simplest homemade power bank of four AA batteries you will need:
- nickel cadmium batteries;
- USB connector (can be taken from a broken gadget);
- a can of used air freshener;
- two matchboxes;
- film packaging;
- connecting wires;
- staples;
- a jar of vitamins.
Manufacturing procedure:
- We bend one of the walls of each of the two matchboxes (shown in the photo). Then we glue the boxes together and install the batteries in them.
Batteries in matchboxes
- On the back of the matchbox we make electrical contacts from staples. After this, we connect the staples with wire.
- We install the resulting product in a film box. We check the voltage at the battery output: it should be slightly more than 5 volts.
- We cut off the bottom of the vitamin packaging and make a hole in it for the USB connector. We insert the USB connector and solder the wire to it to which the batteries are connected.
- We insert our design into the air freshener can, then close it.
Now you can test the resulting design in action.
Functionality check
When connecting batteries, make sure that they are intact, without external damage, signs of rust or oxidation. Terminals and wires must be securely fastened. If the batteries appear intact, check the voltage and amperage. You can do this in one of the following ways:
- Connect a load of a certain power to the system and measure the voltage drop using a voltmeter or multimeter. Compare the finished data with the characteristics of the batteries used, taking into account the load size.
- You can measure the voltage without a load. Different types of batteries have their own open circuit values. For example, lead-acid batteries operate at 12.6 V.
- A load fork can be used to measure voltage. If within 10-15 seconds the value increases slightly or does not change at all, then the system is working properly.
- Check battery stability using special analyzers and testers. For example, using Pendant, PITE, Fluke, Vencon devices.
- The simplest and most reliable method of checking the health of the battery is to completely discharge and charge it. First, a deep discharge is performed, and then the capacity is replenished. However, this method takes a long time - from 14 to 24 hours or more.
Safety precautions
Regardless of the chosen method of connecting batteries, it is important to follow safety precautions:
You cannot combine batteries with different capacities and parameters into a single circuit.
- Wear dielectric gloves before work;
- do not touch the battery connections and terminals in series with bare hands;
- disconnect batteries from the network and other loads;
- use tools with insulated handles;
- before connecting elements, check the contacts;
- do not connect batteries with different capacities and parameters into a single circuit;
- observe polarity;
- insulate the finished assembly from moisture.
Serial and parallel connection of batteries in compliance with safety regulations will reduce power losses and increase efficiency. Batteries are also connected to combine capacities when one battery is not enough. Having created a single circuit, you need to check it, both using special devices and by connecting a load.
Soldering batteries
When assembling a battery of six elements, I first combined all the elements in pairs: the minuses of the two elements together and the pluses also together. Then I connected three pairs in series.
Now that the assembly of elements is ready, you need to connect the controller to it. Important!!! The controller is connected in the reverse order, that is, we start with the wires with the lowest potential and move upward: 0 V and 3.6 V, only then 7.2 V and finally 10.8 V.
Now all that remains is to carefully assemble the battery for testing. Without sealing the battery case, I connected it to the laptop and pressed the power button, but the laptop did not turn on and realized that when I disconnected the old battery assembly, the controller went into transport mode and disconnected the battery. I connected the mains power to the laptop, the laptop started up and saw a restored battery!
How to charge lithium batteries?
And if we are talking about a disposable battery that is not intended for recharging, then the correct (and only correct) answer to this question is NO.
The fact is that any lithium battery (for example, the common CR2032 in the form of a flat tablet) is characterized by the presence of an internal passivating layer that covers the lithium anode. This layer prevents a chemical reaction between the anode and the electrolyte. And the supply of external current destroys the above protective layer, leading to damage to the battery.
By the way, if we talk about the non-rechargeable CR2032 battery, then the LIR2032, which is very similar to it, is already a full-fledged battery. It can and should be charged. Only its voltage is not 3, but 3.6V.
How to charge lithium batteries (be it a phone battery, 18650 or any other li-ion battery) was discussed at the beginning of the article.
Battery protection
Today, the types of batteries presented are available complete with a special controller or contain manganese. Previously, batteries were produced without protection. In this case, you needed to know how to charge an 18650 battery correctly for your own safety.
The fact is that a device that did not have special protection could overheat greatly if it was charged incorrectly or for too long. In this case, a short circuit and even a fire or explosion of the battery could occur. Today, the use of such structures has sunk into oblivion.
What kind of lighting do you prefer?
Built-in Chandelier