Lifetime
Wiring does not last forever, so you should understand that it will need to be replaced again after a certain amount of time.
Aluminum wiring lasts no more than 20 years, and the service life of copper wiring is twice as long - 40 years. It is important to know! It is for this reason that when renovating a house, it is recommended to replace all aluminum wiring with copper, as it will last much longer
When constructing new buildings, aluminum wiring is no longer used, but is replaced in old ones. Replacing wiring in Khrushchev is mandatory, since these buildings were built more than half a century ago.
Electrics in a two-room apartment in Khrushchev 41 m2
Conducted robots.
The issue of changing electrical systems in houses built during socialism is very relevant. If you decide to carry out a major overhaul, you must clearly understand that the existing electrics are not able to cope with the load of modern household electrical appliances. You should take the opportunity to resolve the issue with old communications. Hiring craftsmen must be taken seriously, since the quality of the work performed determines the comfortable living of the family, the safety and security of electrical appliances. The service life of the aluminum wiring has long expired, and major repairs have never been carried out. Unfortunately, it is quite difficult to carry out a complete change of electrical systems in such houses and cannot be done without special equipment.
What to consider when replacing electrics in a 2-room Khrushchev house
The work involves a specific, rather complex algorithm, so it is advisable for you to turn to real specialists. Our electricians have the skills and considerable experience in electrical installation work in two-room Khrushchev-era apartment buildings. The sequence of work is as follows; checking the entire line, searching for weak points, identifying them and discussing them. Next, a plan is drawn up; after the network is disconnected, the old electrical equipment is dismantled and new sockets and switches are installed. Based on the area of apartments and specific layouts, as well as the current state of houses and apartments, our specialists always give relevant advice and help you make the right decision on the purchase of components. For example, installing electrics in a two-room Khrushchev house has its own characteristics due to the fact that the building most often uses an old electrical network. For this reason, a serious plan for preparing projects is required; it often happens that many electrical appliances have to be placed in one room.
Number of points in a two-room apartment in Khrushchev 41 m2
| № | premises | module | Qty |
| 1 | Room 1 | switch | 1 |
| socket | 3 | ||
| output for lamp | 1 | ||
| 2 | Room 2 | switch | 1 |
| socket | 2 | ||
| output for lamp | 1 | ||
| 3 | Corridor | switch | 1 |
| block | |||
| switch | 2 | ||
| socket | 1 | ||
| output for lamp | 1 | ||
| 4 | Kitchen | sockets | 2 |
| output for lamp | 1 | ||
| 5 | Bath | output for lamp | 1 |
| 6 | Toilet | output for lamp | 1 |
| 7 | Connection to machines | 2 |
The table provides a list of electrical work for the apartment as standard (the cost of materials is not included in the price). The price of electrical installation work in a 2-room apartment in Khrushchev 41 m2 is 23,000 rubles. A more detailed price list for electrical installation work, unit prices, can be found here.
The optimal price-quality ratio is the choice of smart people.
All you have to do is call and place an order.
T.
Finding the location and dismantling old wiring
To carry out new electrical wiring, you will first need to find and dismantle the old conductive lines. In Khrushchev buildings, the electrical wiring diagram is arranged through technological holes in the panels. In this case, the laying of conductors can be done not only in horizontal and vertical directions, but also at an angle. In most cases, the main part of the ducts runs under the ceiling.
Initially, you will need to find all the junction boxes. They can be plastered, covered with wallpaper or covered with a special plastic casing. In one-room apartments, only one distribution box can be used. If the connection box is plastered, then you will need to tap the walls to find it. A characteristic empty sound will indicate the location of the box.
By assessing the locations of junction boxes, switches and sockets, you can understand how the old wiring is laid, and then begin the dismantling process. To do this, it is enough to pull out the conductive wires from the technological holes. In some cases, cables may become stuck in the plaster mortar. Therefore, you will need to find the place where the plaster is applied and gouge it out with a hammer drill.
Note! All work on searching and dismantling old electrical wiring must begin with relieving the voltage
Khrushchev and some nuances of replacing old wiring
In principle, it is better to lay new wiring in the same channels where the old one was located. To make a replacement, it is enough to screw new ones to the old wires and just stretch them. This operation can be seen in detail in the following video:
If the cable cannot be pulled through, it is possible that there is a bricked-up junction box somewhere. That is, the cable is held in place by the plaster. If this happens, you will have to start searching for this box. When you manage to find it and break it, the line can be drawn without the slightest difficulty.
Installation of distribution panel
In order to correctly replace the wiring in a panel Khrushchev building, you need to start by installing a new electrical panel. If in new buildings there is a special niche for them, equipped with a power cable, then in Khrushchev houses there is nothing like that. The panel in old houses is installed using a hinged method anywhere. In Soviet-era apartments, the wire can only be installed by drilling a hole and pulling the cable through it into the room.
The phase arrangement in the apartment panel is as follows: the upper part is the neutral terminals, in the center are the circuit breakers, and the ground is at the bottom. The access cable is connected according to the diagram - blue wire to the neutral terminal, yellow to ground, and white to the upper contact of the machine.
Options for connecting elements in electrical circuits
In order for the electrical wiring in the apartment to be done correctly, you need to have knowledge in the field of electrical engineering, and ideally also experience in such work. If you do not have sufficient qualifications and experience, then you should not take on the job, but entrust it to specialists.
You can, of course, try to do the electrical wiring in your home yourself, but the consequences can be very sad. It would be best to entrust all the work to a qualified specialist who will draw up the correct diagram and also take the necessary measures to install new wiring or replace the old one.
If you know that you can cope with drawing up a diagram, as well as arranging the electrical network in your home, then first you need to remember the methods of connecting electrical circuits.
Sequential method. In this case, each element of a closed circuit must be connected to the previous one, and the circuit does not provide for the presence of node contacts.
The most common example of this type of connection is a Christmas tree garland - in it, each light bulb is connected to the next one, and they are all located on one common wire. The main disadvantage of this scheme is the fact that the failure of one of the network elements leads to a breakdown of the entire system.
Different connection schemes
Parallel method. This scheme is completely opposite to the previous one. Here the elements of the chain are not connected to each other, but are grouped into separate nodes. If one of the elements breaks down, then all the others will be able to function normally.
Mixed method. As the name implies, in this case, the two methods described above are used simultaneously for one electrical circuit.
Installation tips from an electrician
When performing work, you need to take into account the features of old-style houses, as well as installation technology, in order to avoid mistakes. Follow these guidelines:
- Be careful when gating walls and wiring areas adjacent to neighbors, as they may be adjacent to neighbors’ wiring and there is a risk of damaging it;
- Dismantling of old cables is carried out after de-energizing the facility from the switchboard in the entrance;
- Be careful when making twists and terminal connections; an insufficiently tightened bolt or poor twist will heat up when you turn on electrical appliances and can cause a short circuit;
- For equipment with high consumption (electric stove, heating boiler, boiler), you need to lay a separate line from the panel;
- If the cable was measured incorrectly and there was not enough length during installation, it is better to cut a new piece and not extend the old one. Additional twists will oxidize and heat up;
- For lighting and household sockets, it is better to use two separate lines;
- Use a three-core cable with grounding, even if there is no grounding in the house, it is possible to install one after a major renovation of the electrical network, and you can easily connect to it.
The main recommendation is that if you do not know how to work with electricity correctly, it is better to contact a specialist who will do the work quickly, efficiently and inexpensively. Phone: +7(920) 033-22-88
Wiring options for a panel house
Before changing electrical wiring, clearly decide which method is most suitable for you.
The most affordable option is to lay the wires along the surfaces of the walls and ceilings under the plaster. In this case, the cable is attached directly to the surfaces. You can pre-stretch it into a pipe: steel, electrical, plastic, corrugated plastic, or flexible metallized. Fastening to surfaces is carried out with special clips, clamps or brackets, for which you will need to drill small holes. After the conductors are secured, a layer of plaster is applied. Using this method, you can extend separate lines not only to lighting fixtures, but also to powerful household appliances (air conditioners, water heating boilers).
The disadvantage of this option is that additional monetary and physical costs will be required for plastering the surfaces.
Wiring in a panel house can also be placed on the floor if you later make a concrete screed on top. The conductors are pulled into corrugated pipes, laid on the floor and filled with concrete. The wires are also located in the suspended ceiling. The only drawback is that sockets cannot be mounted on floors and ceilings; you will still have to install them on the walls, and up to this point, trench the surface or lay wires under the plaster.
In this case, the conductors are mounted in pipes or special plastic cable ducts. It is advisable to choose places for installation where the possibility of mechanical damage to the cable box will be minimal. This, of course, is not the best option from an aesthetic point of view, but the installation of such wiring can be carried out when the renovation in the apartment has already been completely completed.
The gating method also remains relevant, only in concrete slabs it will require significant physical and time costs.
Electric meter in a 2-room Khrushchev house (house from the 1960s)
Masters online: 649 Orders per week: 1,546 Offers per day: 1,112
It’s because of advisors like this that fires happen (25 A), if you don’t understand electricity, then it’s better to remain silent. People can take this seriously.
It’s usually because of those who try to shoot against the background of the experience of others, without understanding anything themselves, that a showdown results.
Dear Alexander, I have 40 years of experience in electrical installation work and the current 4th group is over 1000V, and you, most likely, haven’t even seen the PUE, that’s why you write things like a 25 A automatic machine in a Khrushchev building with an old one wiring.
Yes, no matter what the wiring is, household sockets are rated for a current of no more than 16 A.
Oleg, apparently you haven’t seen the projects. PS That's it, I have no more strength. Goodbye!
The comrade is obviously guided by the cross-section of the wire.
If the wiring is aluminum, more than 10 years, then do not risk 10-16A
The wiring is definitely more than 10 years old, but it breaks when connecting the load, because the rating should be 25 according to the diagram or because they “messed up” when replacing sockets and switches. Therefore, I would like to know whether all 4 should be of the same denomination or not. Is it really true that no one lives in Khrushchev apartments anymore and there are no power supply circuits for such apartments? The scheme should be typical for those years.
In Khrushchev buildings they installed 2 plugs per phase and 2 at zero, so you only have 2 lines. The plugs should be no more than 16 A, otherwise there is a chance of burning out. If 16 A of the plugs are knocked out, you need to reduce the load, and not increase the rating, but for good reason you need to change aluminum to copper and install automatic machines instead of plugs. The machines can be installed even without replacing the wiring.
You need to start not from what you want, but from the condition of the wires. If you have decrepit aluminum, then 10A is the maximum that can be installed. And preferably with characteristic B.
Thanks for the advice, Dmitry Evgenievich! The essence of the question was that there were already traffic jam machines there, and I was trying to find out their probable denominations + hoped that someone would have a diagram. And you are talking about automatic switches, which are not there.
There were traffic jams. There are no automatic machines now. What is? And it’s no good to forget about differential protection. The scheme has nothing to do with it, you need to set it with the denominations from what you have.
Thank you I don’t plan a global repair with replacement of wiring, I just want to restore the traffic jams. The smartest thing to do would be to call a specialist who will sort everything out.
How much will it cost to replace old wiring?
If you decide to replace the old wiring in your apartment by inviting professionals to do the work, then you will have to pay quite a lot. One point, according to the prices of specialized companies, will cost you about 500 rubles. That is, for a couple of sockets and a switch you will pay about one and a half thousand. And this is minus the cost of materials. You will need to pay separately for laying the cable from the panel to the junction box. Plus, again, for consumables for this. If you make an approximate calculation, then replacing the old wiring with a new one in one room will cost you about 7 thousand rubles or more.
Of course, replacing the old wiring with your own hands will be much cheaper. To do this, you just need to have the necessary tools and materials at hand.
Electrical wiring in the kitchen: design and installation rules
The kitchen is the main consumer of electricity in the apartment. Kitchen wiring provides power to household appliances: hoods, refrigerators, microwaves, bread makers, juicers. Ten years ago, kitchen life was managed with a minimum number of mechanized assistants. But modern kitchens are hard to imagine without electrical appliances. High-quality electrical wiring in the kitchen not only ensures their operation, but also prevents short circuits, wire fires, and damage to electrical appliances. How is reliable electrical wiring designed? And what needs to be taken into account when installing electrical elements - wires, sockets, switches?
Varieties of electrical wiring diagrams
The electrical wiring project in the apartment is very important, so its creation must be approached with the utmost seriousness. A very important step is choosing the type of wiring. At the moment there are three types of wiring.
Using distribution boxes. In this case, a meter and a number of machines are installed in the electrical panel. The electrical panel itself is located in the entrance, but a wire powered from the network extends from it into the apartment. The wire reaches distribution boxes, which are located in each room and are connected in series. And from these boxes cables go to sockets, switches, etc. This type of wiring is very common.
The second type is called a star. In this case, each socket is connected directly to the electrical panel. Each client has his own machine. The main advantage of this type of wiring is the ability to carry out repair work on one of the circuit elements without disconnecting the entire apartment. But you should understand that to install this type of wiring you will have to purchase a large number of wires, as well as pay for the services of specialists, since installation is extremely difficult.
The third type is called a loop. In this case, clients are also directly connected to the electrical panel, but they are formed into groups from which the wire extends.
Star wiring
To achieve greater efficiency, you should not use one type of wiring for the entire apartment, it is better to combine them.
Electrical circuit in a panel house. Home electrical planning
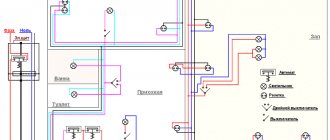
So that during the operation of electronic equipment and connecting it from various electrical points does not lead to constant reinstallation of network elements, so that you do not have to constantly ditch the walls of the apartment, experts recommend starting work on arranging the electrical network with drawing up a power supply diagram. An example of a wiring diagram and connection of electrical equipment can be seen in Figure 1.
Rice. 1. Example of an apartment power supply diagram
Such a drawing or diagram is formed in the “reverse order”: initially, all the lighting equipment and power equipment used are applied to the apartment plan; then, based on power calculations, the wiring diagram, wire cross-section, and protective devices are selected.
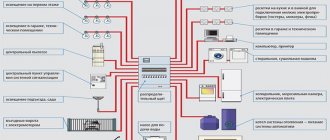
Power section
The power part of the electrical network includes powerful equipment used in the apartment: ovens, stoves, heating tanks, air conditioners. To connect them, separate powerful lines are allocated, protected by separate circuit breakers (RCDs). This design method will allow for safer operation of equipment in an apartment and more efficient repair work on electrical wiring networks.
Lighting part
The next block of the apartment's electrical circuit is the lighting part. There are two design options here:
- one group;
- several groups of lighting equipment.
The first type of scheme is used in small rooms equipped with a relatively small number of lighting devices. The second lighting chain method is more common. An example of such a connection is shown in Figure 2.
Rice. 2. Design diagram for several lighting groups in an apartment
If in a room, in addition to lighting elements, there is a need to use power supplies and transformers, it is also recommended to turn them on in a separate electrical circuit with a separate RCD.
Large home appliances
In any apartment, the place where a large number of household appliances are concentrated is the kitchen. Most of them continue to work when a person is not directly using them. This is a refrigerator, electric stove, bread maker, etc. To ensure correct operation of equipment and constant protection of the network from overloads and short circuits, when developing an apartment’s electrical network, experts recommend separating a separate line. Such connections are made by laying electrical wiring with a larger cross-section and installing a high-load RCD.
Electrical wiring in old houses. Typical wiring diagrams in an apartment
Hello, dear readers and guests of the Electrician's Notes website.
In the previous article, I told you about preparing to replace the electrical wiring in the apartment. Here is a link to this article. So, let's proceed to further study the material.
But before you start studying new schemes, you need to become well acquainted with existing standard schemes and projects.
I will repeat to you once again that in order to replace the electrical wiring in the apartment, it is necessary to develop a project, and it cannot be otherwise. Because there are many important questions that need to be given sufficient attention:
- calculation of the power of installed equipment
- selection of wire and cable cross-sections
- selection of protection devices (automatic machines, RCDs, difavtomats)
- choosing an electricity meter
- installation location of the apartment panel
- installation location of sockets and switches
- etc.
Here are a few examples for clarity: an office power supply project and a project for the electrical wiring diagram of the Manufactured Goods store.
In old houses and apartments there are several standard schemes.
1. Diagram of old electrical wiring in an apartment with electric stoves
In this scheme, the PE protective conductor is used only for the electric stove. It is not used for group lines.
Most often, the electric stove is powered by a three-core aluminum wire with a cross-section of 4 square meters. mm, for example, APPV (2x4), and the power supply for group lines is with a two-core aluminum wire with a cross-section of 2.5 sq. mm, for example, APPV (2x2.5).
Read the article about how to connect an electric stove according to modern standards and requirements.
2. Diagram of old electrical wiring in an apartment with gas stoves
In apartments with gas stoves, there was no PE protective conductor at all, and the input cable and group lines were made with a two-core aluminum wire with a cross-section of 2.5 square meters. mm, for example, with the same APPV (2x2.5).
I recommend you read the following articles:
- floor board diagram
- emergency condition of the access panel (we analyze the reasons)
Disadvantages of old electrical wiring
In our apartments, built 20-40 years ago, the standards and requirements for electrical wiring were different, so the electrical wiring was carried out according to the old requirements:
- aluminum wires, designed for small electrical powers and loads
- with TN-C grounding system, i.e. absence of protective conductor PE
- lack of protection against electric shock to humans (differential circuit breakers, RCDs)
Operation of old electrical wiring is VERY dangerous to human life. Fires due to short circuits are not uncommon.
If you care about your safety, then you need to periodically check the quality of your electrical wiring. Any electrical engineering laboratory (ETL) at your place of residence will help you with this. She has a number of special devices for this. It is also necessary to switch to the TN-CS grounding system. Read about it here.
Let me give you a clear example: You bought a jacuzzi bathtub, a washing machine or a dishwasher for your apartment. We read the passport and instruction manual, which states that the bath must be powered from a 380/220 (V) network with a TN-CS grounding system (3-wire network - phase, neutral and ground) and must be installed in the line residual current device (RCD) or difavtomat.
In the next article “Wiring diagram in an apartment” we will look at the electrical supply diagrams for apartments and houses, according to modern standards.
Open way
In this case, the wires go over the walls. But, of course, simply attaching them is not enough - it looks ugly and is extremely unsafe: the wires can overheat, there is a high risk of mechanical damage, and this is fraught with short circuits and fire. You can use a special plinth or boxes.
And if in the case of laying wiring in plaster, the plaster itself serves as an insulating material, then with the open method, “camouflage means” are used - cable channels, corrugated hoses, pipes, special skirting boards or baguettes.
Advantages:
- quick access to all wires, which means easy local repairs;
- the ability to change the layout of points;
- sometimes this option becomes part of the design solution.
Flaws:
Not everyone likes boxes on the walls, and you can’t do without them completely.
Options for laying new lines in Khrushchev
During the renovation of a Khrushchev building, apartment owners, as a rule, use the following options for laying new electrical wiring:
- By gender. If this method is chosen, then the electrical cables are laid under the screed. Moreover, they do this by first placing them in a corrugation. But this method has a rather significant drawback: if the cable fails, you have to break the tie.
- In the baseboards. Retail companies offer a fairly large selection of skirting boards that have a built-in cable channel. In principle, this installation option is good in that users can limit themselves to only a small vertical groove to the location of the new outlet.
- Under a suspended (stretch) ceiling or behind elements of plasterboard finishing . Moreover, as in the previous version, we can only talk about a limited number of vertical grooves. Necessary to power new sockets. However, in fact, this option is more like external wiring. Because the wire, laid in a corrugation, is simply attached to the surface of the corresponding structural element - the ceiling or wall.
Selecting the cross-section of conductors according to the calculated load
First you need to count the total number of consumers and determine their power. By consumer we mean a separate electrical device: light bulb, fan, refrigerator, etc. In order not to miss anything, it is better to draw a floor plan of the apartment and mark on it the locations of household appliances, lighting fixtures and sockets.
Procedure:
- It is necessary to divide all devices according to power consumption in the apartment into 3 categories: lighting, devices up to 2 kW and devices over 2 kW.
- We distribute all consumers along the lines and plot them on the diagram. A separate line means a group of consumers powered through a separate machine. According to the requirements of the PUE, there can be no more than 20 points (light bulbs, sockets, etc.) on one line. It is better to connect devices with high power consumption (electric furnaces, air conditioners, electric boilers, etc.) through separate circuit breakers in the distribution panel.
- We calculate the total power consumption of each category and calculate the current load.
- Select the wire cross-section according to the table.
The current strength is determined by the formula:
I=(P/U) x cosφ, where
I – current, AU – voltage, BP – power consumption, Wcosφ – power factor.
In this case, cosφ can be neglected, since its value in household electrical networks tends to unity. Thus, the formula for determining the current load takes the following form:
I=P/U
Example: let's say we need to determine the current load of an electric stove with a maximum power consumption of 4 kW, which is connected through a separate machine. Household power supply voltage is 220 V. Substituting both values into the formula, we get:
I=4000/220 = 18 (A)
Using the table, we determine: the cross-section of the wire for connecting the electric stove must be at least 1.5 mm².
According to the PUE, the ratio of the wire cross-section to the magnitude of the current loads must correspond to the values given in the table:
Open wiring Cable cross-section Hidden wiring
| Copper | Aluminum | Copper | Aluminum | |||||||||
| Current, A | power, kWt | Current, A | power, kWt | Current, A | power, kWt | Current, A | power, kWt | |||||
| 220 V | 380 V | 220 V | 220 V | 220V | ||||||||
| 11 | 2,4 | — | — | — | — | 0,5 | — | — | — | — | — | — |
| 15 | 3,3 | — | — | — | — | 0,75 | — | — | — | — | — | — |
| 17 | 3,7 | 6,4 | — | — | — | 1,0 | 14 | 3,0 | 5,3 | — | — | — |
| 23 | 5,0 | 8,7 | — | — | — | 1,5 | 15 | 3,3 | 5,7 | — | — | — |
| 26 | 5,7 | 9,8 | 21 | 4,6 | 7,9 | 2,0 | 19 | 4,1 | 7,2 | 14 | 3,0 | 5,3 |
| 30 | 6,6 | 11 | 24 | 5,2 | 9,1 | 2,5 | 21 | 4,6 | 7,9 | 16 | 3,5 | 6,0 |
| 41 | 9,0 | 15 | 32 | 7,0 | 12 | 4,0 | 27 | 5,9 | 10 | 21 | 4,6 | 7,9 |
| 50 | 11 | 19 | 39 | 8,5 | 14 | 6,0 | 34 | 7,4 | 12 | 26 | 5,7 | 9,8 |
| 80 | 17 | 30 | 60 | 13 | 22 | 10 | 50 | 11 | 19 | 38 | 8,3 | 14 |
| 100 | 22 | 38 | 75 | 16 | 28 | 16 | 80 | 17 | 30 | 55 | 12 | 20 |
| 140 | 30 | 53 | 105 | 23 | 39 | 25 | 100 | 22 | 38 | 65 | 14 | 24 |
| 170 | 37 | 64 | 130 | 28 | 49 | 35 | 135 | 29 | 51 | 75 | 16 | 28 |
According to the requirements of the PUE, the rating of each circuit breaker should not exceed 25A. Taking this into account, it is better to power powerful electrical appliances through a separate machine. Below is the electrical diagram of a one-room apartment:
In the example given there are only 4 lines. Its advantage is simplicity. The simpler the circuit, the easier it is to maintain during operation.
Development of a power supply scheme
To draw up a diagram of the planned electrical wiring, it is recommended to use the general plan of the apartment. This will allow you to mark the required locations of sockets, switches and electrical equipment. The following factors need to be considered:
- total load of electrical appliances;
- the presence of a security or fire alarm;
- the need to lay network cable lines.
It is recommended to connect large electricity consumers through a separate outlet. This could be an electric stove, a split system, and so on. It is also better to separate the lighting and socket lines. You can use standard schemes for two-room and three-room apartments.
Operational resource
The electrical wiring of current-carrying conductors in the Khrushchev building definitely needs to change, since these objects were put into operation more than fifty years ago. In those days, aluminum cables with rubber insulation were used for electrical wiring. The operational life of such cable lines is about twenty years.
Old aluminum wiring
When independently replacing the electrical wiring in a Khrushchev-era building, it should be taken into account that currently only copper is used for wiring. Copper cable lines have a service life of more than forty years.
Redevelopment of Khrushchev: 79 photos of 1, 2 and 3-room apartments |
- On the brackets - for sockets you need copper wires with a cross-section of 2.5 mm2, for lighting - 1.5 mm2. Metal strips are used as staples, fixing them so that the non-flammable part extends 1 cm beyond the line.
- In pipes, corrugated flexible products prevent surface leveling. The diameter of the pipe is equal to the total thickness of the conductors, multiplied by 2. Fastening is done with screws, clips, dowels and nails. Each element is removed from each other by 20-40 cm.
- The boxes contain a metal or plastic cable channel and the baseboard is equipped with a removable lid with a latch. The main difficulty of the work is the correct fastening with screws, dowels or staples. Sockets can be mounted directly onto the box.
Hidden kitchen wiring
Before you do hidden wiring, you will need to do a lot of dirty, dusty and noisy work. In places where switching devices will be installed, holes must be drilled. This is done using a chisel and hammer, or a hammer drill with special attachments for concrete or brick. The socket boxes are fixed into the holes made using plaster or alabaster.
To lay wires, special grooves are cut in the walls, called grooves. There is a special tool for this purpose - a wall chaser. It will be very convenient if you manage to rent such a device, because buying it is expensive. But it is very effective in use.
Firstly, you can adjust the width of the groove being cut, depending on how many wires will be in it and what cross-section. Secondly, many models are equipped with a vacuum cleaner, which allows you to work quietly without polluting the air in the workplace.
In order to quickly and reliably fix the wires in the grooves, use gypsum or alabaster mortar.
Remember that such walled up wires and switching devices cannot be moved from place to place. Therefore, first think about all the pros and cons, and only then make a decision for yourself - what type of wiring to choose for the kitchen.
The video shows a few more nuances regarding kitchen electrical wiring:
At first glance, it may seem to some that doing electrical wiring in the kitchen with your own hands is quite possible. But this is not so, the experience and knowledge of a professional is needed here in order to subsequently avoid fires, fires or electric shock to a person. Contact professional electricians or at least consult with them, and then all electrical appliances in your kitchen will work reliably.
Typical schemes
Now you would probably like to see an example of electrical wiring in an apartment, so let’s dwell on this point. For a number of reasons, there are two types of basic wiring - for a one-room apartment and for a multi-room apartment.
Wiring in a two-room apartment
It is better to divide the wiring in a one-room apartment into two groups. One of which includes the kitchen and bathroom, and the second the living room and hallway. This separation allows the load to be divided into two circuits, which means high power for each of them. Also, if one of the circuits fails, the second one will be able to continue to function.
In apartments with two rooms, the electrical panel is located near the door, and the wiring is divided into several circuits according to consumer groups; each group requires its own circuit breaker. A similar scheme is used for housing with a large dwelling.
Preparation for repair
Before you begin directly replacing the wires, you should draw up a detailed drawing of the new route, marking all the elements of the electrical system. It must be developed taking into account the convenient connection of all electrical appliances available on the household.
Tip 1. Remember that equipment manufacturers do not recommend connecting powerful electrical appliances to the network through power strips. Separate sockets must be provided for an electric stove, boiler, air conditioner, etc.
Tip 2. Each room must have at least two cable branches: for lighting fixtures and for sockets.
After drawing up a drawing plan, you can begin purchasing the necessary materials. In addition to the cable, you will need:
- boxes
- switches
- sockets
- rag tape
You should not use system elements that have already been used, since there is no guarantee that they have retained their original performance properties. Saving on small things can lead to problems in the future. A worn-out socket will certainly need replacement sooner or later, but if a short circuit accidentally occurs in it, the new wiring may also burn out.
To change internal electrical networks with your own hands, you will also need a set of tools, namely:
- phase indicator
- hammer drill
- pliers
- screwdrivers
- angle grinder (grinder)
- soldering iron
- terminal blocks
- knife
Having everything you need in hand, you can get to work.
Disadvantages of partial electrical wiring replacement
If you choose to partially replace the electrical wiring by laying wires in one of the rooms, you will need to power the new lights and sockets from the old existing distribution box. It should be recalled that old electrical wiring was usually made of aluminum wires. If they are directly connected to new copper wires, electrochemical incompatibility will occur, which is unacceptable.
Of course, for this purpose you can purchase special connecting terminals, which are presented in a wide range on the modern electrical market. But you should take into account all possible difficulties associated with their use.
In addition, in the distribution box there may simply not be free space for new connections, or there may be so many old connections that fragile aluminum wires will need to be reconnected.
Certain difficulties will also arise with the uniform distribution of the load and the correspondence of the cross-section of the electrical wires in the wiring to it. If, for example, you replace the old wiring in one of the rooms, increasing the total number of “points” in it and connecting the new wiring to an existing distribution box, there will be a current overload of those wires that power this box.
The thing is that the old wiring in almost all houses is made of only one power supply group made of aluminum wires, the cross-section of which does not correspond to the significant power consumption, as well as the number of modern household appliances.
In this case, it is advisable to power the room by bypassing the distribution box. To do this, it must be connected directly to the circuit breaker in the distribution panel.
But even such a solution cannot be called universal, since wires laid to the electrical panel through the entire house (even hidden in a cable channel) are unlikely to decorate the home. And if there are no plans to renovate the house, it will not be possible to hide the wiring in grooves.
Thus, the disadvantages of partial replacement of electrical wiring include:
- an increase in electrical wiring switching points, which may become a potential source of problems in the future;
- an increase in the number of consumables, since all cables will need to be routed into distribution boxes, and with a complete replacement they go directly to the electrical panel;
- increasing labor costs and, consequently, the cost of replacing electrical wiring in general.
Before you begin a partial replacement of electrical wiring, you should stock up on tools. To perform such work, you will need screwdrivers, a hammer drill, a grinder, a soldering iron, terminal blocks, pliers, a knife, a building level, a spatula, and a phase indicator.
Replacement of wiring must be carried out in such a way that there is no overvoltage in the network and no failures occur. Therefore, each device connected to the network must have enough power.
Power directly depends on the cable cross-section. In order not to make a mistake with your choice, you should do a little calculation. First, add up the power of all household appliances that are planned to be connected to the network. After this, an additional 100 W must be added to each electrical appliance, the number obtained as a result of the calculations divided by 220.
If the final number is in the range of 12-15, then wiring with a cross-section of 1.5 mm2 will be enough to provide all devices with sufficient power. This indicator is the most common. But in some cases the result is higher. There are two options for solving the problem: lay wiring of a larger cross-section or run 2-3 cable lines from the electrical panel. The second option is preferable, since thicker wiring will make the entire system not very reliable and, as a result, the likelihood of failures will be high.
Partial replacement of electrical wiring is carried out in several stages. First, they de-energize the home, then check again that the current is really no longer flowing.
After this, they replace the wiring in the selected room and connect it to the distribution box using terminal blocks. Or, as mentioned above, they power the new wiring bypassing the distribution box, laying the wires directly to the electrical panel.
When all the wires are already connected, they are hidden in decorative boxes. Lastly, sockets and switches are installed.
Wiring replacement steps
The following signs indicate the need for new wiring:
- The walls are pierced by electric current;
- When you turn on several household appliances, the plugs constantly pop out;
- Sockets spark and melt;
- Presence of a specific burning smell.
In addition, the installation of powerful household appliances (boiler, washing machine, dishwasher and others) may also require the installation of separate lines.
Replacement of electrics in “Khrushchev” buildings is carried out in stages.
- Calculation of the cross-section of the electrical cable. To do this, you need to determine the total power consumption of all electrical appliances and equipment, plus a 20-30% reserve.
- Selection and purchase of all electrical wiring elements. Customers can do this themselves or order from specialists. The second option is more preferable, since many craftsmen have personal discounts in construction hypermarkets and specialized stores, and also have a better knowledge of manufacturers.
- Drawing up an up-to-date diagram.
- Complete blackout of the apartment.
- Removing old wiring.
- Additional gating of walls (if necessary), installation of switches, European sockets, distribution boxes, automatic machines.
- Cable laying and alternate connections, according to the drawn up diagram.
- Connection of electric machines.
Stages of work
Replacing the electrical wiring in your apartment yourself requires a lot of work with a hammer drill and construction dirt. Usually, indoor wires are laid in a hidden way in grooves in the walls, which you have to do yourself. It will be necessary to tap even in a panel house; it is not always possible to insert new cables into existing cavities in the panels. Often these channels are filled with concrete in some places.
How to hide cables without gating walls
Removing old wiring
Before dismantling the old wiring in the apartment, it must be completely de-energized by turning off the general apartment switch in the panel on the floor. After this, you should check the presence of voltage in the sockets using an indicator screwdriver or a voltmeter. Only after checking can you begin further work on replacing cables.
Marking and preparing walls in the apartment
To simplify the installation of wiring throughout the apartment, you should first mark on the walls all wiring lines and installation locations for sockets, distribution boxes and switches. Then you can begin to groove and cut out holes for the socket boxes.
Marking walls for electrical wiring
Electrical wiring
It is recommended to do internal electrical wiring in a wooden house in an open way with wires laid in cable channels. And in apartments it is customary to install it hidden. It is then easier to cover such wiring with decor, and the risk of damage to it subsequently is minimal. Fixation of electrical wires in the grooves is done with dowel clamps or gypsum mortar.
Placement of electrical appliances in the corridor
Installation of protective systems
In many old high-rise buildings, it is basically impossible to lay a three-core wire with a grounding conductor from the panel to the apartment. This is not provided for in the project. But in some apartment wiring there is a two-wire one, but it can be easily changed to a modern three-wire one. You just need to connect everything correctly in the panel on the floor.
The possibility of converting the Soviet TN-C electrical wiring to a more reliable version TN-S or TN-CS should be checked with the housing office electricians. Changing anything on the floor panel yourself is strictly prohibited. You can do this grounding in a private house yourself; in an apartment building everything is much more complicated.
The calculation of the parameters of RCDs and automatic devices should definitely be entrusted to a specialist in this field. Mistakes here can lead to serious problems.
Connection diagram for the security system in the apartment
Connection to the panel
If you have an electrical design completed by professionals, then it is not difficult to assemble protective devices based on it in a panel on the floor. However, it is best to entrust this task to an invited electrician, who will also then ring the system to check its functionality and the absence of short circuits.
Redevelopment of an apartment in Khrushchev. Nuances and features.
1.1. There are no load-bearing walls inside the apartment.
Location of load-bearing walls in Khrushchev.
Even when affecting only non-load-bearing partitions, you can break some laws, which we will discuss below. Typically, the load-bearing walls in a Khrushchev building are the enclosing walls of the apartment, all or only some. The only load-bearing structures that can be located inside an apartment in brick houses are beams resting on the external and internal inter-apartment load-bearing walls. On the right in the figure is a typical example of the location of load-bearing walls in a real Khrushchev apartment (load-bearing walls and rigidity diaphragms are marked in green). Many, as we have already mentioned, mistakenly believe that if they do not affect the load-bearing walls, then there is no need to coordinate such a redevelopment. In fact, redevelopment of a Khrushchev-era apartment with any change in the configuration of the partitions entails the obligation to make these changes to the BTI documents for the apartment, and, therefore, requires appropriate approval. Moreover, most of these changes are coordinated by projects carried out by the relevant organizations with permission. You can view the project requirements here. You can read more about the definition of load-bearing walls in Khrushchev-era buildings here. Commentary on the video: The points have changed: It is not possible to combine a gasified kitchen with a living space according to clause 10.16 of Appendix 1 to Moscow Government Decree No. 508 (after the introduction of PPM No. 1335 of 08/19/2020).
1.2. Touching the bathroom.
Redevelopment of Khrushchev. Problem area.
The area highlighted in red in the figure on the left is functionally a corridor, and formally, according to the BTI, it is classified as the area of residential premises. Therefore, if we approach the issue formally, then expanding the bathroom due to this zone is impossible. In this case, it is better to coordinate the redevelopment of the Khrushchev building in two stages. First, install a partition separating room No. 1 and the area marked in red and coordinate the changes according to the “sketch”. After this, the selected zone according to the documents will be unambiguously called a corridor in the explanation. Now it is already possible to carry out and coordinate the expansion of the wet zone due to its area. In this rather cunning way, you can coordinate some other methods of redevelopment. True, now Housing Inspections have begun to request BTI plans for the apartments above and below, so this option is now very difficult to go through.
You can read more about the consolidation and expansion of wet zones here.
1.3. Dismantling the partition between the kitchen and the room.
a) it is prohibited to move or expand the kitchen at the expense of the territory of living rooms in accordance with paragraph 22 of the Decree of the Government of the Russian Federation No. 47 of January 28, 2006
Coordinated redevelopment of a two-room Khrushchev house.
b) it is not allowed to dismantle the partition between the kitchen equipped with a gas stove and the living room in accordance with clause 10.16 and clause 10.17 of Appendix 1 of Decree No. 508 of the Moscow Government. And even create an opening without a door in such a partition.
two-room apartment in Khrushchev
| № | premises | module | Qty |
| 1 | Room 1 | switch | 1 |
| socket | 3 | ||
| output for lamp | 1 | ||
| 2 | Room 2 | switch | 1 |
| socket | 2 | ||
| output for lamp | 1 | ||
| 3 | Corridor | switch | 1 |
| block | |||
| switch | 2 | ||
| socket | 1 | ||
| output for lamp | 1 | ||
| 4 | Kitchen | sockets | 2 |
| output for lamp | 1 | ||
| 5 | Bath | output for lamp | 1 |
| 6 | Toilet | output for lamp | 1 |
| 7 | Connection to machines | 2 |
The table provides a list of electrical work for the apartment as standard (the cost of materials is not included in the price). The price for replacing electrical wiring in a 2-room Khrushchev apartment of 46 m2 is 23,000 rubles. A more detailed price list for electrical installation work, unit prices, can be found here.
The optimal price-quality ratio is the choice of smart people.
All you have to do is call and place an order.
T.
Danger of using old wiring
Currently, a wide variety of electrical appliances are used in everyday life. Depending on the functionality, it has a specific power level. Old wiring is not designed to withstand heavy loads. When several electrical appliances are turned on at the same time, there is a high probability of electrical wiring ignition.
Electrical panel in an old five-story building
The initial signs of the required replacement of old conductors in Khrushchev include:
- sparking and melting of sockets as a result of connecting devices;
- the appearance of a characteristic smell of burnt insulation in the room;
- when connecting sockets or switches, the ends of the wire break off;
- current leakage through the walls.
When and why do you need to change old wiring?
Not all of us live in new buildings; most houses in the country were built more than a quarter of a century ago. Of course, the internal equipment of these buildings has long been outdated. Thus, wires for electrical networks in the last century were made of aluminum, a metal highly susceptible to corrosion. In addition, over time, its structure changes, and old wires become very fragile. And this greatly increases the risk of a short circuit and subsequent fire.
Old wiring has a lot of other problems:
- There is no protective grounding, which is now universally accepted. Instead, there is a solidly grounded neutral. The old wires were routed using the branching method.
- There are no RCDs.
- The number of sockets in old apartments does not meet the needs of residents.
It should also be taken into account that over the past couple of decades the number of household electrical devices in apartments has increased several times. Almost every family has various types of coffee makers, mixers, stereos, laptops, etc.
n. The load on the old electrical networks has increased noticeably and has long ceased to correspond to what was initially included in the project. And this is a direct risk of an emergency and fire.
In many homes, due to old wiring, sockets often spark and fail. When repairing them, the wires break. Due to current leakage, any wall can unexpectedly shock you with an electrical discharge. Sometimes, as soon as you plug in some powerful electrical appliance, the old wires begin to smell like melting insulation. If you notice at least one of these signs, then the old wiring clearly needs urgent replacement. If there are more signs, then you have almost no time left to think.
According to the scale of work, replacing old wiring can be:
- partial;
- complete.
Partial replacement of old wiring is justified if:
- There is damage (mechanical or from fire) to only one line of non-old wiring.
- The load on one or more lines has increased, which the wire is not able to withstand. But the rest of the wiring, like the distribution panel, can still be used.
- A major renovation is planned very soon, you just need to wait a little. In this case, you can make a partial repair of the old wiring.
A complete replacement of the old wiring must be carried out in cases where:
- Its insulation has dried out and cracked.
- If its service life has expired. For aluminum it is 20 years, for copper – 30.
- There are old sockets in the apartment or house.
- The old wiring can't handle the new power. For example, thin wires cannot cope with the load from electrical appliances that are simultaneously turned on in the apartment.
If houses built two decades ago need replacing old wiring, what can we say about Khrushchev-era buildings, many of which are “over fifty”? The old wiring was made of aluminum wire, which was not even protected by corrugation. However, it makes no sense to blame the designers: in the last century, apart from a TV and a refrigerator, a chandelier and an iron, apartments often had no other electrical appliances. And they didn’t need a powerful network.
Over time, electric stoves, microwave ovens and kettles, washing machines and dishwashers, vacuum cleaners and food processors were added to the standard set - and the situation changed dramatically. Turn on a couple of such devices at the same time in an old apartment - and the traffic jams instantly pop out. In addition, every time the network is overloaded, there is a risk of fire.
Calculation of wiring and selection of apartment power supply
Before changing the electrical wiring in a Khrushchev building, we should perform at least an approximate calculation. This will allow you to correctly select the wire cross-section, the required number and rated parameters of circuit breakers and, of course, the power supply circuit for our apartment.
Electrical wiring calculation
In order to more correctly calculate the rated power of our apartment’s electrical network, it is necessary to draw up a detailed plan of all possible electrical appliances. In this case, you should take into account not only their rated power, but also their location, as well as the connection method.
So:
- First of all, you should divide all the devices in your apartment into powerful ones, whose rated power is equal to or greater than 2 kW, and low-power ones, respectively, less than 2 kW. To power powerful devices, it is better to provide a separate power supply group with its own circuit breaker in the distribution panel.
- Now we should calculate the total power of low-power devices. In this case, the calculation should be performed based on the most unfavorable conditions. That is, in our case it is necessary to take into account the largest number of operating devices at the same time.
- Now, having calculated the rated power of our electrical network, we have to convert it into rated current. To do this, we use the formula: I=P/(U×cosα), where I is our rated current, P is our rated power, U is the rated voltage, and cosα is the power factor. But in our case, cosα is practically equal to unity, so we neglect it, thereby adding additional margin to our wire.
- As a result, we get the following formula: I=P/U
Based on this, knowing that the voltage in our electrical network is 220V, we can calculate the rated current. Having carried out a simple calculation, we find that an electrical appliance with a power of 1000 W consumes a current of 4.55 A.
To further simplify the calculation and give additional margin to our wiring, we accept this value as 5A.
The photo shows the rated currents of wiring of different sections and materials of manufacture
Any electrical wiring in a Khrushchev-era building and its laying pattern largely depend on the type of wire used. After all, it’s no secret that copper wires have a higher throughput, and aluminum wires have less. Therefore, the choice of wire cross-section should be made according to the table below.
Choosing an apartment power plan
Now the electrical wiring diagram in the Khrushchev is selected. This is done based on clause 7.1.18 of the PUE (Electrical Installation Rules), which states that all protection devices in residential premises should not exceed 25A. This point will become the starting point for all further choices.
- So, if the power of all your electrical appliances in the apartment does not exceed 25A, then you can power the entire apartment from one machine using a copper wire with a cross-section of 2.5 mm2 or an aluminum wire with a cross-section of 4 mm2. But in modern even one-room apartments this is unlikely.
- Usually the rated current of the electrical network is more than 25A. Therefore, in this case, we need to divide the meals into groups. The power of each of them should not exceed the specified current. To do this, power groups for sockets and lighting are usually separated. But you can divide groups into rooms or in any other way convenient for you. The main thing is not to “scatter” one group across different parts of the apartment, otherwise problems may arise during operation.
Possible power supply plan for your apartment
- It is also worth remembering powerful electrical appliances, which we excluded at the calculation stage. For them, it is better to organize power from a separate circuit breaker. Moreover, if possible, it is better to do this without additional sockets. The wire cross-section and rated parameters of the switch in this case are selected based on the rated parameters of the electrical appliance according to the same principles as for individual groups.
- If you are planning to install an outlet in the bathroom, then this group should be considered separately. Indeed, according to clause 7.1.37 of the PUE, sockets in the bathroom can only be installed through an RCD (residual current device). In this case, our instructions advise that in the group with the socket in the bathroom, include sockets in the kitchen, where RCD protection will be most relevant. Although PUE does not impose such requirements on kitchens.
- Depending on the square footage and the number of electrical appliances, the electrical wiring diagram in a brick Khrushchev house can contain from two to six groups. It is better to label each of these groups immediately, and visually separate the outlet and lighting groups.
Why does a Khrushchev apartment need to replace the electrical wiring: three main reasons
As a rule, people think about the condition of electrical wiring only when problems arise. But if you live in a Khrushchev-era building, you shouldn’t expect any problems. We need to get down to business as quickly as possible. Because these houses are, in principle, very old. Most of them are more than half a century old. And the main reasons to urgently get down to business, in particular, are the following:
- Insulation that has become unusable . If we talk about cables in PVC insulation, their service life is no more than 25 years. But in Soviet times, such “long-lasting” isolation was not yet known. Rubber insulation was widely used back then. Moreover, its durability was half that of PVC insulation.
- Availability of aluminum conductors . Due to the specific properties of aluminum, it was prohibited from being used in household electrical wiring. Moreover, this ban has been in effect for almost two decades.
- Significantly increased power of household electrical equipment . When designing Khrushchev apartments, the developers proceeded from the fact that the only appliances residents would have at their disposal were radios, televisions, refrigerators and irons. As a result, the appropriate cable cross-section was selected. That is, one that is completely insufficient at the present time.
If your apartment still uses aluminum wires, remember that their contact connections require regular tightening. And it’s better to do this at least annually!
The reasons listed above are quite sufficient motivation to change the electrical wiring in your Khrushchev without delay. Moreover, it is better to use the VVGng-LS cable and the like.
Dismantling the old line
Before completely replacing the electrical wiring in the apartment, you will need to dismantle the old networks. First, furniture and equipment are removed from the premises and completely emptied of all items. Then the power supply is turned off at the input. Having prepared, they begin to dismantle the finishing and network elements. It is most convenient to conduct it from distribution boxes. They are easy to “calculate” by the characteristic contours under the wallpaper or plastic covers.
After removing the lid from the box, disconnect the connections and pull the core out of the groove. Sometimes removing a cable in an apartment building is accompanied by severe damage to the wall structure. To avoid any major damage, the problem area is cut off, carefully isolated, and left in its original place. Having completed dismantling, they begin laying new lines.
Having assessed the scale of the event, many craftsmen ask: how to change the electrical wiring in an apartment at minimal cost? This option exists. With a small budget, they get by by adding missing lines, installing additional boxes, and connecting backup points.
The source of problems with the electrical network most often are connections (twisting, soldering). Therefore, partial repairs are considered a temporary solution.
It is strictly forbidden to directly connect aluminum and copper wires. The difference in their physical and chemical properties leads to a gradual breakdown of contact and destruction of the connection. Therefore, high-quality repairs require a complete reconstruction of the electrical network.
Old aluminum wire
Replacement of electrical wiring in Khrushchev: 5 main stages
Although the Khrushchev building differs greatly in its performance characteristics from other types of residential real estate, updating the electrical wiring in it has practically no special features. So that you can plan the upcoming work, we suggest following the following sequence of actions:
- Scheme development . To make it more convenient, it is better to carry out the diagram directly on the apartment plan. Directly on it you can mark the location of all elements of electrical equipment. Moreover, this approach will simplify the calculation of the number of sockets, lamps, switches, taking into account the required power.
- Calculation of the cross section of the cores . We have already written about how this is done earlier. Moreover, the wire connecting the electric meter to the junction box must be designed for the maximum load. Because through it power will be supplied to the entire set of residential premises and electrical appliances of the apartment. This point is especially important for multi-room apartments.
- Performing markup . It is perhaps quite clear that the markings allow you to determine the specific locations of lamps, sockets, and switches. Moreover, if there are markings, you can quite accurately calculate the length of the required cable. An estimate for electrical wiring and a purchase list can only be drawn up after the marking stage has been completed.
- Searching for old channels, laying new lines . We wrote above about how to find old channels, perhaps in sufficient detail. If there is a need to lay new lines, then gating may be required. Although, the volume of this operation can be significantly reduced if you resort to installing wiring in baseboards and behind finishing elements (behind plasterboard or behind a suspended ceiling).
- Wiring installation . Electrical installation work is usually completed by checking the circuits for short circuits. Moreover, it is necessary to check each section separately (from each distribution box to each switch, to each socket). At the final stage, the connection diagram for the apartment electrical distribution board is assembled.
Programs for designing electrical wiring in an apartment
Visio . This graphic editor is one of the most common for creating wiring drawings. This program is very simple, even a novice electrician can easily figure it out. Advantage - ease of use, free access, Russian language disadvantage - rather narrow functionality.
Compass . This software is a professional tool for creating wiring diagrams. The program database contains the designations of all elements of the electrical circuit, as well as their names. The main advantage is free access, since programs of this class are usually paid; there is also a Russian-language interface, which makes the program quite convenient. Cons - a novice electrician is unlikely to be able to work normally in the editor.
Eagle . This graphic editor allows you not only to create single-line wiring drawings, but also to create a printed circuit board drawing yourself. The drawing process takes place manually or automatically. At the moment, there are two versions of the editor - paid and free. In principle, the functionality of the free version is quite enough to create a wiring diagram, but if you want a full set of capabilities, it is better to purchase the full version.
By following the link https://vse-postroim-sami.ru/engineering-systems/electrician/433_kak-sdelat-zazemlenie-v-dome/, you will learn how to make grounding in a house. This article contains information about color coding of wires. You may also be interested in installing hidden wiring in a wooden house.
1-2-3. This program is a free graphic editor with which you can easily create an apartment wiring drawing. Thanks to the Russian-language interface, the editor is quite convenient to use, and the developers also pleased us with a small bonus in the form of a list of symbols that you can print out and stick on the corresponding elements in your electrical panel.
Autocad . This famous graphic editor requires no introduction. This program is the most common engineering software. There are a huge number of different versions of the editor, and to draw wiring diagrams, just use the free version. The editor has a Russian-language and intuitive interface, which makes the program very convenient to use.
Elf . This program was designed specifically for those involved in wiring projects. The software allows you to create drawings of any complexity, and also has a database that will help you select the necessary element. The editor is also able to automatically calculate the current strength in the circuit and suggest a machine with the appropriate rating.
How to determine the layout of an existing electrical wiring.
Determining how the wiring is done in an apartment is not difficult if you know some of the rules by which it is laid. Installation diagrams may vary depending on the type of house and the year it was built, but it is still possible to determine the wiring diagram for the apartment.
In brick houses, wiring can be done in two ways. The first method is an overhead distribution no lower than 15 cm from the ceiling level. At the same level, distribution boxes are placed, from which descents to sockets and switches are made. All wires are laid strictly vertically and horizontally in the groove. Cables for lighting are laid in ceilings in which there are voids (channels).
The second method is bottom wiring, when the cables are laid in pipes along the floor and filled with screed; from the floor, the cables rise vertically to the distribution boxes and wiring is already done from them. Lighting is also provided in the ceiling ducts.
In panel houses and Khrushchev-era buildings, electrical wiring is carried out in the channels of the slabs. Channels for wiring, places for installing sockets, switches, are made at the factory during the manufacture of slabs. All channels converge into distribution boxes, from which channels go to the electrical panel. In panel houses, channels are often made not vertically and horizontally, but along the shortest path, that is, along an oblique line.
In some Khrushchev buildings, the wiring for powering the outlets is routed under your floor, and the wiring for lighting is under the floor of your neighbors above.