Stretch ceiling is a solution to problems in organizing the interior. It is easy to install, quickly hides existing unevenness, decorates the interior and has an affordable price.
But the main difficulties are not related to the installation of the ceiling, but to the organization of lighting and electrical wiring.
What points should be taken into account when organizing work? What are the features of installation, and how does it depend on the type of surface?
Wiring subtleties: where to start?
The main rule of installation work is planning and no rush. You should not start until the material part has been studied, a diagram has been drawn, and the points of lighting and fastening of the boxes have been determined.
Electrical wiring of a suspended ceiling must be organized in compliance with the following rules:
- Before starting work, draw a diagram according to which the wires are laid along the surface. Please note that wiring under a suspended ceiling should only run perpendicularly or parallel. Installing wires diagonally is prohibited;
- When placing distribution boxes, make sure that they remain accessible after completion of repair work. This is easy to do - just follow the diagram drawn up earlier, study the features of the ceiling, analyze the pros and cons of each option. If you do not think through the installation location of the box, then its further maintenance will be complicated;
- Once the design of the diagram is completed, transfer the drawing to the ceiling. For these purposes, use a hammer drill. Don't be lazy and make enough fastenings for the clamps. Wire sagging is unacceptable;
- install junction boxes taking into account the drawing. All wires that are located under the tension structure must be placed in a corrugated pipe (options are possible). The conductor should extend out of the pipe at a distance of 12-15 centimeters;
- After completing the work, check the correctness of the assembled circuit and the reliability of the fastening of the elements.
Carrying out marking work
When repairing, expanding or initial installation of electrical wiring, markings begin with marking on the walls and ceiling the future locations of lamps, switches, sockets, junction boxes and the apartment panel. That is, first, from the project drawings to the building structures of the premises elements, the overall dimensions of all terminal devices of the apartment’s electrical equipment, which must be connected by cables and wires, are transferred on a real scale.
To place these elements in hidden wiring, it is necessary to draw the boundaries of the recessed areas of the installation boxes.
It is necessary to take into account that:
- apartment walls can be leveled, covered with a layer of plaster or construction finishing sheets;
- Suspended or tension structures can be attached to the base ceiling;
- the height of the floor can be raised by additional flooring made of parquet, laminate or other floor coverings.
All these elements reduce the internal space of the room and thereby affect the accuracy of determining the location of electrical wiring.
It should be taken into account that the strict rectangular geometry of apartments during the construction of a building, as a sad rule of our reality, is often not maintained. Therefore, as a starting point for measuring dimensions, it is necessary to use the distances set aside from the upper and lower corners of the walls, to which adjustments have been made for alignment.
Watch the video: Electrical wiring under a suspended ceiling
Wiring under a suspended ceiling is carried out taking into account current fire safety rules and PTE standards. To avoid damage to the film of the suspended structure, the distances to the pendant lamps must be strictly observed.
If, according to the instructions, the distance between the wire and the film should be 15-20 centimeters, then you should not underestimate this parameter for the sake of “aesthetics”. If necessary, it is better to replace the lamp.
In the process of wiring, provide technological reserve. This is explained by the following points - it simplifies the connection of electrical receivers and the wiring maintenance process.
It was mentioned above that the corrugation with the wire should not sag - this is a must! If this happens, then install additional fasteners for the conductor in the problem area.
To simplify the work, use plastic clips that will simplify the work. Another option is to use a dowel with a clamp.
The main electrical receivers for which electrical wiring is laid under the suspended ceiling are lamps.
When choosing devices, consider the type of tension structure (the material from which it is made). So, for PVC products, choose lighting devices of lower power. Mistakes in this matter lead to melting of the film.
The best option is to use LED light sources. Advantages: low temperature, high light output, ease of installation.
Even a beginner without electrical engineering education can install such structures. As for laying wires, without any knowledge, trust the work to experienced craftsmen.
Make sure that the conductors do not intersect.
If this is unavoidable, then provide protection against short circuits in places where the intersection occurs. In any case, at the stage of drawing up the circuit, try to ensure that the wires cross as few times as possible.
What to pay attention to before starting work
It should be noted that most suspended ceilings are made from materials that burn.
The following types of surfaces that have this disadvantage can be listed:
- plastic panels;
- canvases that are needed to create suspended ceilings;
- panels for the production of which MDF was used.
That is why you should not forget about fire safety. When installing wires, make sure that they are securely connected.
How to choose a wire
Industrial companies supply different brands of wires to the market, but you must find those products that strictly comply with safety requirements.
Buy a wire with the following characteristics:
- resistance to high temperatures;
- non-flammability.
RKGM wire has proven itself well; this brand is in demand among specialists. Copper wire, heat-resistant. The product has two layers of insulation. The wire does not burn, it is heat resistant. The outer layer of insulation is represented by varnished fiberglass winding, and silicone rubber was used to make the inner one. This made it possible to give the inner insulation layer special strength.
Wire RKGM
This wire can be used when installing lamps in a sauna or bathhouse, since the product performed well at temperatures from -60 to +180 degrees Celsius.
Tree
If the ceiling is made of wood, then the main “masking” material is steel pipes.
When choosing the diameter of the product, be guided by the thickness of the wire harness (cable products) used. If you plan to use several cables, then pull them through one pipe (provide for a larger diameter of the product in advance).
Requirements for junction boxes:
- IP 65 version;
- made of metal;
- The internal elements of the box are protected from the cable cores touching them.
For these purposes, use insulating materials.
Distance from the ceiling of junction boxes in the apartment
uspapil (13.00)
It had to be presented at the installation and planning stage, and not later when you wanted
Smart guy, read above carefully, at what stage of installation and planning, if you bought it already with all the communications, but the electricians did a terrible job. maybe someone can give me some practical advice, but not like the answer above?
It's probably too late to drink Borjomi. Already bought. Consider the option of remaking it for yourself. And many remake them to suit themselves. Starting from the shield and beyond.
Well, this is all clear, you need to prove to those installers that they don’t do the wiring close to the ceiling
uspapil Smart guy, read above carefully, at what stage of installation and planning, if you bought it already with all communications, but the electricians did a terrible thing. maybe someone can give me some practical advice, but not like the answer above?
I read that they bought one .. that’s why and what do you want to show?
I remember this topic has already been discussed here. Series from series (and even one series from different DSK) varied greatly.
There is no point in presenting something to the installers if it has already been laid by the organization... You will waste your nerves and also financial expenses. As my colleague stated above, make a new installation for yourself.
Of course, it would be good if they did it like in the picture, not only is it good to maintain and the suspended ceiling can be mounted, but also the electricians have less problems when installing the wire. And it is necessary to refer to PUE 7, less than 15 cm means it is incorrect, and it is prohibited to groove beams used in construction if it intersects with the wiring route.
What is the height of the ceilings in general? Can't you lower the suspended ceiling below the boxes?
Well then, if we’re talking about the rules, then if not according to Feng Shui (PUE), there will be no access for inspection.
I don't argue about the rules. Just wondering, have you personally seen a lot of suspended ceilings with hatches for inspecting junction boxes? I redid the wiring in my apartment (a 9-story panel building built in 1985), instead of boxes there were just niches in concrete, the connections were twisted and covered with a cap (no one apparently bothered to solder the twist) and all this worked for almost 25 years . I just mean that if the connections in the wiring are reliable (welding, soldering, crimping), then the ceiling is more likely to fall faster than anything happens in the wiring. Sorry for the pun.
uspapil Smart guy, read above carefully, at what stage of installation and planning, if you bought it already with all communications, but the electricians did a terrible thing. maybe someone can give me some practical advice, but not like the answer above?
Source
Watch the video: wiring and light for suspended ceilings
Installation is performed according to the following algorithm:
- mark the path along which the wires (cable products) will go;
- mark locations and install passage and distribution boxes;
measure the pipes and cut them, then fix the products on the ceiling, combine
- construction by welding;
- make any changes in the cable path (raising, lowering, turning) at an angle of 90 degrees;
- tighten the cable at small intervals (so that there is no sagging), then leave 22-25 centimeters at the outlet (this length is enough to strip and connect the wires);
- combine the wires that converge into distribution boxes under the suspended ceiling;
- Ground the wiring, then check the quality of the work performed.
Photos of wiring to help the master
As you can see from the article, the installation process is not as simple as it might seem.
During the work process it is worth considering:
- requirements of current safety standards;
- norms of the Technical Operation Rules;
- features of the tension structure;
- availability of the necessary tools for the job.
Photo gallery of an example of installing electrical wiring under tension
Example of installation of a distribution box Example of installation for a low current
Electrical wiring without corrugation
Example of relocating a smoke alarm
Electrical wiring on the ceiling in the hallway
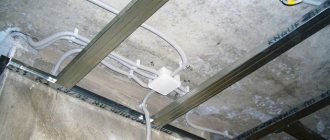
If you encounter any difficulties with installation, use photographs or videos that help you complete the work step by step and eliminate gross mistakes.
The photographs clearly show the methods of fixing pipes and cable products, as well as the features of connecting wires. With the help of photos, even a beginner in this field can do the job perfectly.
656
Metal
If the ceiling surface is made of metal, then the pipes for laying must be made of electrical plastic. The advantages of the material are ease of installation, fire resistance, and reliability.
Boxes for combining wires should also be made of the same material. If the installation of such structures is unacceptable indoors (as required by regulatory documents), then use steel pipes.
Install as follows:
- mark the path along which the wires will pass. Proceed according to the diagram drawn (this will make it easier to repair wiring under a suspended ceiling in the future);
- mark and install distribution boxes;
- measure the pipes and cut them to the required length, then fix them on the ceiling. Upon completion of work, glue the structure;
- Make sure that all directions of cable movement are made at an angle of 90 degrees. Use corrugation for these purposes;
- pull cable products in fixed tubes using a steel broach and
- route the cable to a distance of 22-25 centimeters on each side;
- solder or weld conductors in junction boxes;
- check the correct installation.
Factors affecting the wiring order
The process of laying wiring along the main ceiling is influenced by the type of surface and the material from which it consists. If the surface of the ceiling is wooden, then for laying electrical wiring you should use steel pipes designed for this purpose, through which you can pull one or more cables carefully insulated from each other. Wood, as you know, is a flammable material, so it is necessary to insulate all heating devices and wiring from it, without neglecting fire safety rules. Junction boxes must also be as safe as possible.
We carry out installation in the following order. On the ceiling we determine the configuration of the cable routes, make markings, and install distribution and feedthrough boxes. We cut the pipes to length, fix them at the given marks on the ceiling using special fastening clips, then use welding to connect the entire structure. When working with welding, remember safety precautions, especially near flammable surfaces. Now you can stretch the cable through the tubes from the boxes, not forgetting to leave leads (200-250 mm) at the ends, so that you can then solder them in the boxes, then you need to solder the cable cores in the boxes and insulate them well.
Wiring under a suspended ceiling covering on a metal structure is also carried out in compliance with a number of rules. Metal conducts electricity well, so electrical wiring should be placed in special plastic cable ducts or pipes; distribution boxes should also be selected from electrical plastic. Installation of cable channels and wiring is carried out in the same order as in the case of wooden surfaces, with the exception of welding, which is not used in this case. The entire structure is connected using corrugation and attached to the ceiling.
If the ceiling of the room is a reinforced concrete slab in which technological channels for laying electrical wiring are built in, you need to remember that in such channels there are piles of concrete that can interfere with the laying of the cable. In this case, it is better to use the external pulling method, directly along the surface of the concrete ceiling. This applies mainly to old “Soviet” built houses. In new buildings, floors are arranged differently; as a rule, they have pre-installed electrical communications that can be used without wasting extra time and materials.
In conclusion, it should be noted that the process of installing wiring with a suspended ceiling can be done independently without outside help. At the same time, you should remember a few simple things. Choose a cable with a cross-section that is larger than the calculated one, so to speak with a reserve, do not skimp on insulating materials, remember the safety rules during installation and everything will work out in the best possible way.
Interesting:
Why do you need camouflage decorative tape for suspended ceilings?
Installation of suspended ceilings without gas
How to glue a ceiling plinth to a stretch ceiling?
What is adhesive for suspended ceilings used for?
Why do you need a heat gun to install suspended ceilings?
Components for suspended ceilings – what is needed for installation?
Reinforced concrete structures
In old houses (USSR times), reinforced concrete slabs were used, which require a special approach. At the present stage, floors are prepared during the construction process.
They contain everything necessary for wiring in advance - boxes, pipes, etc. But this design is typical for new buildings. As for old houses, they use standard floor slabs.
If these are reinforced concrete slabs - your case, then the wiring should be done in special channels.
The difficulty is that dirt and sand accumulate inside the holes, which complicate the process of pulling cable products. Therefore, before carrying out the work, ensure that it can be completed.
What is a spotlight
A standard lamp is used everywhere and is a structure consisting of the following elements:
- frame;
- wires;
- cartridge (can be electric);
- clamps (2 pcs.).
It is possible to complicate the design, in which case it is supplemented with hinges. With their help, adjustments are made and the direction of lighting changes. The lamps themselves are sources, the light from which emanates directionally.
The industry offers consumers a variety of incandescent lamps, many of which are designed specifically for individual spots. Each lamp consists of a flattened bulb containing a special reflector. There are also halogen products on sale; these lamps have an additional glass housing.
Prices for spotlights
Spotlights
Design and selection of spotlights
Lamps into which halogen lamps are screwed are smaller in size. If compared with conventional products, such lighting devices are half the size. Halogen lamps last two to three times longer than regular lamps.
Enterprises also produce LED lamps; they perfectly replace all of the ones mentioned above. Such lamps have powerful LEDs that replace conventional tungsten filament. The products are energy efficient and have no equal in terms of service life. Experts say that the future lies with such light sources.
Table. Correspondence between LED lamps and incandescent lamps.
LED lamps, W Correspondence to incandescent lamp, W
| 1,8 | 10 |
| 3 | 30-40 |
| 4 | 35-40 |
| 4,2 | 45 |
| 5 | 50-55 |
| 5,4 | 55 |
| 6 | 55-65 |
| 7 | 65-75 |
| 8 | 70-80 |
| 9,5 | 80-90 |
| 10 | 70-80 |
| 12 | 90-100 |
| 14 | 140-150 |
Even the most beautiful chandelier will not protect the ceiling from the appearance of shadows. The thing is that light, coming from one source, illuminates the center and corners of the room unequally. By installing spotlights, also called spots, you will create uniform lighting and emphasize the dignity of the interior.
When using one light source, shadows appear on the ceiling, and the room itself is illuminated unevenly
Watch the video: Errors when connecting electrical equipment under a suspended ceiling
If the holes in the reinforced concrete slab are clogged, use one of the following methods:
- fix the cable products to the plate using fastening brackets;
- pull the wires through the corrugated plastic, then secure it with clips; use a corrugated metal pipe, which is also secured with clips or staples;
- in pipes made of steel or plastic. The latter are fixed using clamps, clips or staples.
During the installation process, consider the type of cable installation.
There are two options here:
Layout
To begin, make a flowchart that makes it clear which consumer groups need to be created. Then the power on each branch is calculated.
There are two methods of load distribution:
- Interior. An introductory (basic) box is organized in each room. Power lines are laid from the base points to the input distribution board. Each line is started on a separate machine. In the case where powerful electrical equipment (boiler, air conditioner, electric stove) is installed in some rooms, a separate line of power sockets is laid. Then the basic distribution box is disconnected for each consumer in the room. For this purpose, additional junction boxes can be installed. An approximate diagram of the basic boxes looks like this:
- By consumer groups. Separate lines are laid for the lighting of all rooms, for the low-load socket network (TV, computer, table lamps), and for the power socket network. These wires are also connected to the circuit breakers of the input panel. Again, distribution boxes are installed along each line at the tapping points to individual consumers.
Next comes the dirty work: actually installing the boxes and laying the cable lines.
Hidden installation
Wiring is laid between the nodal points (where the boxes are installed). Since the installation is hidden, the walls are grooved for the cable, and the boxes are installed on alabaster. The prepared wires are removed from the installed boxes for connection. The length of the free ends should provide the possibility of connection without interference, and allow for 2-3 alterations (with cutting off the used conductors).
The method of connection does not matter (soldered twist in the illustration), the main thing is to understand the principle itself. For cables, the flush-mounted boxes have marked holes. In this case, tightness is not required; there will be a wall and plaster around it. The secret is that alabaster, diluted to a creamy consistency, when installing the box, fills all the cracks, grooves and extra holes.
The result is a monolith with dielectric walls. The planting depth is calculated taking into account the thickness of the wallpaper and the shape of the lid.
Outdoor installation
The principle of connecting the wiring is the same, but the installation is done differently. First, the junction boxes are installed, then the external cable is connected to them. Since the housing provides protection from dust and moisture, the cables are routed inside using sealing clamps.
For outdoor installation, collet clamps are used.
The wires must be color-coded: in single-phase versions, zero, phase, and protective grounding. It is not possible (especially before connecting the ends of the cable) to hang tags indicating the purpose of the wires. After final installation, it is enough to record the purpose of the wires on the diagram. You can stick short symbols on the inside of the cover for ease of further maintenance.
If the methods of how to disconnect a distribution box on a power line are clear: we simply connect the input and output wires by color, then connecting a switch is a completely different scheme.
Various ways to connect switches and lighting fixtures
- Classic connection using a junction box.
The neutral and phase wires are inserted into the box. For simplicity, we will leave protective grounding out of brackets. The neutral wire is directly connected to the lamp. The phase is supplied to the switch, then transits through the box and connects to the second input of the lamp. From an installation point of view, 3 two-core wires enter the junction box. Using the same principle, two or three-key switches are connected. Only more transit phase wires (from keys to lamps) will pass through the box. If you connect several lamps to one switch, there is no point in installing several distribution boxes. You can connect lamps in parallel, starting from the first lamp. In this case, the switch will be a group switch. - Wiring for a lamp without junction boxes.
In this case, a power cable is inserted from the nearest distribution box into the switch housing. The neutral wire is connected to the lamp directly, and the phase wire is opened by a switch. On the one hand, this saves one box. On the other hand, the cable is laid irrationally and must be inserted into the switch housing from below or from the side. While according to the standard generally accepted scheme, the main line runs along the ceiling. And from the ceiling junction boxes, the wiring goes down to the sockets or switches.
Open gasket
Start by marking the route, and then install installation boxes (pass-through and distribution boxes).
Next, cut the pipes (plastic, metal, corrugated) taking into account the required size and combine the network.
If the wires are pulled into flexible pipes, then do this work before fixing the latter to the ceiling.
Stretch the cables and leave a margin of 22-25 centimeters on each side.
As mentioned, make changes in cable direction at right angles. At the last stage, connect the wires, ground the metal elements and make sure that the work was done correctly.
Advantages and disadvantages of LED lamps
The continuous increase in the cost of electricity forces us to think about saving. Replacing incandescent light bulbs with LED ones reduces costs by 10 times.
There are other advantages:
- compactness;
- no soot;
- fast ignition (without warming up);
- long service life;
- low sensitivity to voltage changes;
- ease of installation;
- high quality (if you buy products from a popular manufacturer);
- environmentally friendly.
LED lamps have an attractive appearance, but they are more expensive than all others. If you purchase cheap Chinese-made products, the quality of the glow and service life will decrease.
Disadvantages include exaggeration of some advantages:
- the real service life is not 10-11 years, but 3-5 (taking into account the degradation of LEDs);
- narrow directionality of the light beam, requiring the installation of a large number of lamps;
- the need for expensive drivers and cooling systems.
The costs of reconstructing lighting systems are not reimbursed in any way. Those who have begun to use LEDs in residential premises claim that it takes some time to get used to their glow.
Hidden gasket
If the wiring under the suspended ceiling is hidden, then pull the cables near the channels and cut the groove along the slab. Otherwise, there is a risk of compromising the reliability of the design.
When installing, step back from the wall 5-7 centimeters and put a mark. Then punch a hole up to two centimeters long and up to ten centimeters near the panel.
Do the same work in the place where you plan to install the lamp.
Now thread the broach and fix the cable to it, then measure the required length at the outlet and cut the cable. Now connect the wires in the junction box using soldering or insulation. Make sure the work is done correctly.
Serial connection
It is quite easy to implement such a scheme for installing ceiling lamps with your own hands, since it does not require a large number of wires. However, no more than six lamps can be connected in series, and the lighting will not be as effective. In addition, with a serial connection, a malfunction of one light source breaks the circuit, therefore, the operation of all lamps stops. To restore the functionality of the circuit, it is necessary to check each light bulb.
The connection diagram is as follows: the phase sequentially bypasses all lighting devices, and zero is applied to the output of the last lamp.
When deciding how to connect LED ceiling lights, special care and attention should be exercised. It is very important that the phase goes exactly to the switch and then to the lamps. Zero should go to the last element of the electrical circuit. This scheme will make the operation of the lamps safe and reliable.
When connecting to three-wire wiring that has an additional ground wire, the third wire must be connected to the appropriate terminal of each lamp. In this case, the grounding wire can come from the “ground” block, from the nearest outlet or switch.
A similar circuit for connecting spotlights is used very rarely, since the phase constantly breaks on the lamps. At the same time, the neutral wire remains intact all the way from the junction box to the output of the last lighting device in the chain.
Electrical wiring on the ceiling in the hallway
If you encounter any difficulties with installation, use photographs or videos that help you complete the work step by step and eliminate gross mistakes.
The photographs clearly show the methods of fixing pipes and cable products, as well as the features of connecting wires. With the help of photos, even a beginner in this field can do the job perfectly.
Stretch ceilings are one of the most popular options for finishing the ceiling in a house. One of the main advantages of suspended ceilings is the hiding of all irregularities and foreign elements, including elements of home electrical wiring.
It is very important to understand that the question of how to make wiring under a suspended ceiling must be resolved even before the suspended ceiling is installed, since situations often arise when, during the repair process, the issue of replacing or revising the existing wiring is neglected.
Subsequently, incorrectly installed electrical wiring or electrical wiring that is in unsatisfactory technical condition makes itself felt and there is a need for its repair, which entails additional costs for dismantling and installing a suspended ceiling in a particular room or throughout the house.
In this article, we will consider in detail the question of how to properly install wiring under a suspended ceiling in order to avoid negative consequences in the future.
First of all, it should be noted that choosing a stretch ceiling as a finishing material provides a great advantage - the ability to install electrical wiring in an open way on the ceiling. That is, in this case, the process of installing electrical wiring is greatly simplified, since all the lines that were planned to be laid along the wall in grooves can be laid along the ceiling, saving not only time, but also the cost of installation work and finishing the walls after grooves and cable installation. This advantage must be taken into account when designing new electrical wiring in order to simplify and, accordingly, reduce the cost of the process of replacing electrical wiring as a whole.
Cable installation in electrically conductive panel conditions
These ceilings are modules filled with polyurethane foam. Conductive plates are built into these plates. Modules can be connected up to 5 pieces to one connector. The wiring is laid based on the characteristics of the room, whether the ceiling is made of reinforced concrete, wood or metal. In addition, wire distribution boxes should be moved beyond the ceiling.
Conductive panels look great at night when all the lights are off except the ceiling lights. By taking a photo of this ceiling at night, you can enjoy the unusual contrast of light and darkness.
The proposed options for placing wiring on the ceiling and under it are basic and relatively easy to reproduce on your own. If you carefully follow the installation instructions and comply with all safety standards, then there should be no problems with electrical wires, and installing lighting fixtures will turn into a real pleasure.
Requirements for electrical wiring under a suspended ceiling
The main requirements for electrical wiring under suspended ceilings, as well as for electrical wiring throughout the house as a whole, are reliability and safety of operation, both in terms of electrical safety and fire safety.
First of all, it is necessary to correctly select all the structural elements of the electrical wiring so that during the operation of household electrical appliances and elements of lighting devices they operate in nominal mode, that is, they are not overloaded and, accordingly, do not overheat.
Each electrical wiring line must be protected by a circuit breaker rated at a current rating that will protect all wiring components from overheating or damage due to possible overloads or short circuits.
To protect the electrical wiring lines that supply the most dangerous electrical appliances in terms of electric shock, it is necessary to install residual current devices or combined protective devices - differential circuit breakers. RCDs and difavtomats protect people from electric shock, as well as from electrical wiring fires in the event of a current leak as a result of damage to a cable line or household electrical appliances.
A residual current device with a rated differential current of 100 mA must be installed on the electrical wiring as a whole, which, firstly, reserves the RCD of outgoing lines, and secondly, performs a fire-fighting function, providing protection against fire due to current leakage through the home electrical wiring as a whole. .
Also, at the input in the distribution panel, it is necessary to install an automatic switch, which will back up the automatic switches of the outgoing electrical wiring lines and, in the event of a failure of one of the protective devices, will de-energize the electrical wiring, preventing damage to one or another wiring line and, accordingly, the suspended ceiling under which this cable is laid.
To ensure fire safety under a suspended ceiling, it is necessary to lay a cable that has a non-flammable sheath. The best option is to choose a VVGng cable. The cable should be laid in a corrugated pipe, which will protect the stretch ceiling from damage if the cable overheats during overload.
The corrugation will also act as additional protection for the cable from the negative effects of moisture, which is important for rooms with high levels of humidity or for the apartment as a whole if there is a possibility of flooding by neighbors in the apartment above.
If the cable will be laid on a flammable base, for example, on a wooden ceiling, the mounted cable must be additionally protected by laying it in a metal pipe or metal hose. The joints of pipes or metal hoses must be sealed and insulated from flammable surfaces with linings made of non-combustible material.
Laying wiring in pipes provides the advantage not only of higher reliability, but also of easy access to the electrical wiring cable, which, if necessary, can be easily replaced. But still, the installation of electrical wiring under a suspended ceiling, as well as throughout the house as a whole, should be carried out with the expectation of long-term operation, that is, it is necessary to install electrical wiring that is reliable in all aspects, which will last for decades or, at least, until the next major renovation of the apartment or private house.
With regard specifically to electrical wiring under a suspended ceiling, the issue of ease of maintenance is no less important, in particular the easy accessibility of junction boxes and other electrical wiring elements that require periodic inspection and maintenance. That is, distribution boxes, power supplies for low-voltage lighting, LED controllers and other devices must be mounted outside the suspended ceiling so that, if necessary, they can be easily accessed for repair or replacement.
Separately, mention should be made of the electrical wiring for powering the lamps.
Often, in order to save money, preference is given to installing a distribution box on the ceiling, from which wiring lines are branched to power the lamps in the room. In this case, after installing the suspended ceiling, a distribution box remains underneath it, and if it is damaged, there will be no access to it. Therefore, in this case, it is necessary to choose the most reliable method of connecting conductors to ensure a reliable contact connection.
In this case it is soldering, welding or crimping. It is better not to use terminal blocks under a suspended ceiling, since after installing the suspended ceiling there will be no access to them and, accordingly, if necessary, it will not be possible to assess their condition and replace them if the contact reliability deteriorates.
In general, the most reliable option is to connect lamps without a distribution box under a suspended ceiling. It is better to lay more cable, but connect the lamps either from each other or using a distribution box, but installed outside the stretch ceiling. In this case, it is better to spend more money, but make reliable wiring, than to save a little, but in the future, if the electrical wiring is damaged, be forced to dismantle the suspended ceiling, which will cost several times more and cause a number of inconveniences.
Making wiring
- making a connection diagram and calculating the required amount of materials - we described how to do this above;
- We mark on the walls the future locations of sockets and switches. Sockets are mounted at a distance of 40 cm from the floor, and switches - at 90 cm. Again, this is the standard;
- draw perpendicular lines from them to the ceiling with a pencil;
- take a fence cutter or grinder with a stone disc and make two parallel cuts at a distance of 2-3 cm from each other along our marked line to the ceiling;
- hollow out a groove;
- now it's time to spread the remaining wires on the ceiling;
- To do this, we take and measure the required length of wire, cut them off from the common coil. We thread it through the armored hose. It is necessary for fire safety reasons, since in the event of a possible fire in the wires, it will prevent the fire from spreading and setting fire to our PVC ceiling, which, by the way, catches fire like a dry stack of straw. Even a plastic corrugated pipe is suitable for us, since this plastic does not support combustion, but, on the contrary, helps to stop it;
- we mark the places for future communication installation on the ceiling and install fasteners along the entire line;
Remember! Do not use putty or any other mixture to attach wires to the ceiling. Also, do not use plastic zip ties. Over time, they dry out and burst, and the wires fall. When attaching an armored hose, do not do the following: do not attach one armored hose to the mount, and do not tie the rest to it with a rope. Thus, over time, they will sag and can fall on the ceiling, then appear in the form of “humps” on your PVC ceiling. Choose responsibly when choosing fasteners and choose only reliable ones.
- It's time to answer the question of whether it is possible to hide junction boxes. Certainly! You can resort to indoor installation - and mount them into the wall, below the ceiling level, or purchase external installation mounts and hide them in the suspended ceiling space;
- We insert the wires into our boxes and lay them to the installation sites of sockets and switches. At the same moment, we putty our grooves with wires and installation boxes, doses, or as they are also called, socket boxes;
- Now we connect the wires to the future installation locations of spotlights or chandeliers. There, right above the place where our spotlight or chandelier will later be, we nail to the ceiling a store-bought fixture for a suspended ceiling lamp, or just a wooden block, which should be 0.5–1 cm thinner than the future ceiling level. It is to this place that the future lamp or chandelier fastener will be screwed;
- We carry out switching according to pre-prepared diagrams;
- we check the system for operability;
- we begin installing the stretch ceiling or entrust this task to specialists;
- after the ceiling is stretched, we find our bars or installation boxes for the chandelier or lamps - and directly above them we glue the mounting rings using Moment glue (this is not an advertisement) (this will prevent the ceiling from tearing when we cut a hole);
- cut a hole;
- we take out our wire, which is already “waiting” for us, and screw it to a lamp or chandelier;
- we attach the lamp, or its fastening to a block or to our installation box;
- install the lamp.
That's all, dear friends. This concludes my story, but I would like to warn you. If you have never dealt with electricity, do not take risks - entrust it to professionals, because our article is only a recommendation.
You should not take it as a direct instruction to action, since in it we omit some points that are known to those who have carried out similar work before. In general, take care of your life and do not skimp on safety. Good luck and see you again on the pages of our portal!
Features of installing electrical wiring under a suspended ceiling
When the apartment's electrical wiring diagram has been carefully thought out, the personal preferences of the residents, the ease of use of electrical appliances and, most importantly, their loads have been taken into account, we proceed to drawing up the wiring diagram. An installation diagram is a diagram that clearly shows the location of all structural components of electrical wiring in relation to building structures, communications and other elements around the house.
You should not neglect drawing up this diagram, since without a well-thought-out wiring diagram, the installation of electrical wiring will occur chaotically, you can get confused and make a mistake, which will ultimately reduce the reliability of the electrical wiring and the safety of its operation. On the other hand, electrical wiring installed without a wiring diagram will be disordered, confusing and therefore inconvenient to maintain.
When installing the cable, it is necessary to securely fasten it and not allow it to sag along its entire length.
It is also worth mentioning 12V low voltage lighting. Many people say that low voltage lighting is safer than 220V lighting in all aspects, but this is not true.
As for voltage, in this case low-voltage lighting can be considered conditionally safe. But in terms of fire safety, 12 V lighting is more dangerous than 220 V due to the fact that in a 12 V network with equal power, significantly greater currents flow than with a voltage of 220 V and, accordingly, there is a greater likelihood of cable overheating due to overload or contact failure connections, which may result in a wire (cable) fire.
Andrey Povny (Google+, VKontakte)
Home / Installation, repair, maintenance / Wiring and suspended ceilings - what should you pay attention to?
A stretch ceiling instantly solves many problems - leveling the ceiling is not required, the appearance becomes beyond praise and the wiring is easier to install using an open method. The benefits are obvious. However, in some cases serious problems arise and all of them, as a rule, are associated with the fact that the wiring under the suspended ceiling needs maintenance or is done incorrectly.
Parallel connection
In most cases, a parallel circuit for connecting spotlights (lamps) is used. Even though a large number of wires are required. But the voltage is supplied to all lighting devices at the same level; if one burns out, one does not work, all the others work. Accordingly, no problems with finding the location of the breakdown.
Parallel connection diagram for spotlights
How to connect spotlights in parallel
There are two ways to connect in parallel:
- Ray. Each lighting fixture has a separate cable (two or three wires, depending on whether you have a ground connection or not).
- Trailed. The phase coming from the switch and the neutral from the panel go to the first lamp. A piece of cable goes from this lamp to the second one, and so on. As a result, four pieces of cable are connected to each lamp, except the last one.
Methods for implementing parallel connection
Radial
The beam connection scheme is more reliable - if problems occur, then only this light bulb does not light up. There are two disadvantages. The first is high cable consumption. You can put up with it, since the wiring is done once and for a long time, and the reliability of such an implementation is high. The second disadvantage is that a large number of wires converge at one point. High-quality connection of them is not an easy task, but it can be solved.
You can connect a large number of wires using a conventional terminal block. In this case, a phase is supplied from one side and, using jumpers, it is distributed to the required number of contacts. On the opposite side, the wires going to the light bulbs are connected.
Methods for connecting wires in radial design
In almost the same way, you can use Vago terminal blocks for the corresponding number of contacts. You need to select a model for parallel connection. It is better if they are filled with a paste that prevents oxidation. This method is good - it’s easy to implement (strip the wires, insert them into the sockets and that’s it), but there are a lot of low-quality fakes, and the originals are expensive (and it’s not a fact that they will sell you the original). That's why many people prefer to use a regular terminal block. By the way, there are several types, but carbolite ones with a protective screen are considered more reliable (they are black in the picture above).
And the last acceptable method is to twist all the conductors with subsequent welding (soldering will not work here, since there are too many wires, it is very difficult to ensure reliable contact). The downside is that the connection is permanent. If something happens, you will have to remove the welded part, so you need a “strategic” supply of wires.
An example of a beam connection for spotlights
To reduce cable consumption with the radial connection method, a line is drawn from the switch to the middle of the ceiling, fixed there, and wires are routed from it to each lamp. If you need to make two groups, install a two-key (two-position) switch, draw a separate line from each key, then turn off the lamps according to the chosen circuit.
Daisy chain connection
Daisy chain connections are used when there are a lot of lamps and it is very expensive to run a separate line to each one. The problem with this method of implementation is that if there is a connection problem in one place, all others also become inoperative. But localization of the damage is simple: after a normally working lamp.
Actual implementation of parallel connection in a daisy chain method
In this case, you can also divide the lamps into two or more groups. In this case, you will need a switch with the appropriate number of keys. The connection diagram in this case does not look very complicated - just add one more branch.
How to connect spotlights to a double switch
Actually, the diagram is valid for both methods of implementing parallel connection. If necessary, you can make three groups. There are also such three-position switches. If you need four groups, you will have to install two two-position ones.
Most common problems
Often, when installing new suspended ceilings, the wiring is not given due attention - they can simply forget about it. And then the problems begin.
The simplest one is an incorrectly positioned mounting baguette. Often, installers of such structures do not attach importance to the fact that the mounted mounting profile intersects the distribution box on the wall. This is a grave mistake.
No less often, installers of such coatings simply do not have the necessary equipment for their work. This applies to the hidden wiring detector. By drilling into a wall or ceiling without first checking for hidden wires, an installer could damage existing wiring.
No less often you can see how cables are routed along the ceiling without laying them in special corrugated plastic pipes.
Such installation is only permissible in the case of installation of a low-voltage circuit with the connection of a step-down transformer. The voltage in this option does not exceed 24 volts and will not lead to fire or fire. In other cases, installation using corrugation is required.
The most common mistake, which, nevertheless, is found everywhere, is the need to service the existing electrical wiring after installing the ceiling panel.
In this case, the canvas will have to be dismantled. It’s good if everything can be done by partially removing the canvas, which is not too expensive. But if a more serious intervention is needed in the existing circuit - for example, replacing all cables, then the problem becomes quite significant.
Organization of distribution boxes when laying wiring above a suspended ceiling
As mentioned earlier, when installing a solid suspended ceiling, access to the boxes is impossible. One solution is to install boxes below the ceiling. But then the entire effect of hidden wiring is lost.
If you foresee the need for periodic intervention in the box, you can install an inspection hatch in an inconspicuous place (for example, above a tall cabinet).
There are so-called “invisible hatches” that do not spoil the appearance too much.
Then it makes sense to bring the key lines into one junction box and place it above the hatch. This will complicate installation somewhat, but will provide easy access if necessary.
And yet, the most optimal way to organize distribution nodes (at least on main lines) is to move the boxes beyond the plane of the suspended ceiling. Therefore, nodal points are made in the corridor (hallway), where mezzanines can always be arranged. All boxes will be accessible, and at the same time, hidden from view.
Correct installation
To avoid all these troubles, you just need to follow some rules and everything will become much easier.
Before installing a stretch ceiling, you need to draw up a plan for the location of all instruments and devices that will be connected to the electrical network. Such a plan will help you avoid mistakes when laying wires and will not let you forget about all the necessary connection points.
All elements of the future electrical circuit must be installed strictly in accordance with fire safety requirements. Do not neglect the requirements for installing tension fabrics regarding the distances required for recessed luminaires.
If the instructions say that 15 centimeters are needed from the plane of the stretch ceiling to the base ceiling, you should not reduce this distance for the sake of aesthetics. It is better to choose another lamp that will require less free space.
All wires must be routed with a small technological margin. This will simplify the connection of consumers and make further maintenance easier. There should be a supply of wire.
The corrugation with the wire should not sag.
To eliminate sagging, it is necessary to install wiring fasteners in advance. In most cases, craftsmen use special plastic clips. You can also use a dowel with a clamp designed for fixing cables.
The main consumers for whom cables are installed on the ceiling are lamps.
They must be selected for a specific type of tension fabric. PVC coatings require less powerful lighting fixtures. Incorrect choice of lamp power can lead to melting of the film.
The best option for suspended ceilings will always be LED lamps.
They will not melt the canvas and do not require special electrician skills during installation. True, it is still better to entrust the wiring to a professional. Before the transformer block, it will have the same voltage of 220 volts as the rest of the wiring in the apartment.
The wires must not cross. If this cannot be avoided for some reason, it is necessary to provide additional protection against short circuits at the intersections. And we need to try to reduce their number as much as possible.
To make it easier to understand all the subtleties and nuances of how wiring is done under a suspended ceiling, you can watch the video below.
"load...
When connecting any lighting fixtures, be it spotlights, spotlights or a crystal chandelier, electrical wiring is required along the ceiling. In order to position it correctly and to ensure that it complies with all standards and requirements, it is necessary to take into account the characteristics of each specific case.
When installing a pendant system, damage to the wiring leading to the lighting fixtures is typical. Since the wire leading to the chandelier runs inside the hollow panel, replacing it seems to be a more complicated process than laying a new one along the floor slab from the junction box, due to the fact that such electrical wiring will still not be visible under the suspended ceiling.
Cases of damage during installation of a baguette are not uncommon. Damaged wires running along the top that serve to route sockets can be replaced. This will require the installation of external electrical wiring and the laying of new grooves along the walls.
However, most often new wiring is required for the installation of recessed lamps, which have low power consumption, which minimizes the possibility of overheating. However, in any case, it must be properly insulated, since if it is flooded from above, water falling on it will cause a power surge and a short circuit.
Preparatory stage
When marking, the master must have the following documents on hand:
- detailed electrical circuits for each room and the entire building as a whole, developed on the basis of already working standard solutions;
- installation drawings indicating the location of each electrical wiring element, supplemented by information on the laying of low-current circuits (telephone, computer networks, intercom, antennas, alarms and other circuits), gas pipelines, water supply systems, heating systems, sewerage systems to take into account their mutual influence.
If you neglect this rule, relying on the rich life experience of the owner or the extensive experience of performing electrical work by an invited electrician, then there is a high probability of making mistakes that will have to be corrected in the future.
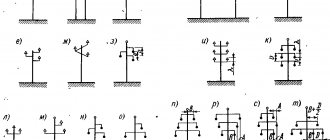
As a last resort, when there is no longer time for design, for reference and guidance, you can use the simple recommendations for the placement of electrical wiring relative to the elements of building structures, shown in the picture, although it is still better to refer to building codes and regulations.
All wires and cable channels here are placed only in their horizontal and vertical directions at right angles. It is impossible to arbitrarily mark routes at an angle to save distance. During operation, after a few years, there is a possibility that when attaching furniture to walls, hanging pictures... the drill bit will get into an electrical wire and create an emergency situation.
The height of placement of sockets and switches is not strictly regulated, but is chosen according to the habits and preferences of the apartment owners. When placing electrical wiring in relation to a door, window, radiator, gas stove, adjacent walls and ceiling, one must be guided by the requirements of regulatory documentation.
Wiring marking is the process of drawing lines on walls and ceilings. To carry it out, you need to use at least simple drawing devices:
- ruler or tape measure for measuring distances;
- marker, pencil or ballpoint pen to mark lines;
- plumb line and level to determine the horizon and verticals.
Laying in pipes
Laying wiring in steel or copper pipes, observing the requirements specified above, is possible only at the stage of building a house from scratch.
For example, when installing electrical wiring in a house made of laminated veneer lumber, the installation of a system of such pipes, junction boxes and sockets (also metal) is carried out at the stage of installing the frame.
The rules for hidden wiring of power cables in a wooden house do not allow laying the cable in metal or plastic corrugation in sawn grooves. Laying wiring in grooves inside the walls of a wooden house in thick-walled pipes is acceptable, but difficult due to the need to bend the pipes and make complex connections using couplings, fittings or welding.
There are a number of requirements that must be met when installing hidden wiring in a wooden house.
The inner surface of steel pipes must be painted or galvanized to prevent corrosion, copper pipes must be painted to protect against oxides.
The use of a metal hose/steel corrugation on bends and transitions makes the entire structure meaningless - transitions are provided with threaded connections or butt-to-butt welding.
Horizontally, electrical wiring pipes in a wooden house are laid at a slight angle to allow condensation to escape; at the lowest point, a hole is made for liquid drainage (not inside the wall). The entire system is provided with a grounding connection that is separate from the grounding provided by the wiring.
In wooden houses, only metal sockets are used for sockets and switches. The connections between the junction box and the pipes entering it must be sealed.
To avoid damage to the cable sheath by a sharp edge when exiting the pipe, the edge must be rolled or provided with a protective plastic plug.
Box for hiding electrical wires
Delivery to CIS countries 450 ₽ (according to the exchange rate of the selected currency)
- DESCRIPTION
- REVIEWS ( )
- Shipping and payment
In recent years, our homes have seen a noticeable increase in all kinds of electrical appliances. Sometimes there are so many wires that it is difficult to figure out which is which and from which device. If there are children or animals in the house, then exposed wires become unsafe for them. Now there is a great solution - a plastic container for hiding electrical wires. You can easily store cables, wires and sockets from extension cords in it. You will not only hide the wires in a safe container, but also decorate your interior. Sticking wires do not decorate at all, but create a look of negligence in the interior. Now everything will change, by placing all the sockets and wires in the cable box, order will reign in the interior. Children and animals will not break or spoil anything, they will not trip over wires and equipment will not fall. Everything will be safely stored, and your nerves will be calm.
Box for hiding wires, advantages:
- Beautiful color and design;
- Convenient and practical to use;
- Safe for children and animals;
- Excellent protection of sockets from dust and moisture.
Specifications:
- Model: LRS 160;
- Type: box for hiding wires;
- Material: high quality ABS plastic;
- Color: black, blue, green, red, white;
- Size S: 23.5 cm x 13.5 cm x 12.1 cm;
- Size M: 32.5 cm x 13.5 cm. x 12.7cm;
- Size L: 40.6 cm x 15.6 cm x 13.4 cm;
- Weight S: 335 grams;
- Weight M: 510 grams;
- Weight L: 700 grams.
Equipment:
Box for wires – 1 pc.
Detailed information about methods of payment and delivery of this product
Delivery method: Federal State Unitary Enterprise “Russian Post”. Delivery to other countries by the postal service of the country specified in the order.
Cost of delivery:
180 rubles – across Russia to any region;
450 rubles – to the CIS countries and neighboring countries. If another currency is selected, the amount will be automatically recalculated at the ruble exchange rate.
Free delivery is valid for orders over 2,700 rubles or also at the exchange rate to the ruble in the selected currency.
Order dispatch time: for all products, with the exception of tourmaline products from the SugarBae company, is 3 business days from the date of payment for the order.
Tourmaline, jade rugs, pillows and mats “SugarBae” require more careful inspection, therefore, the dispatch time is 5-7 business days from the date of payment of the order.
Delivery time: from 10 to 30 working days (depending on the postal service).
Payment must be made immediately upon checkout or within 3 working days from the date of placing the order.
If it is not possible to pay for the order within the specified time frame, then you need to contact the operator on the site (online consultant) and indicate the date when you can make the payment.
Note ! We no longer work with cash on delivery since February 2016!
- “Bank card” (Visa, MasterCard, Maestro and MIR) – commission 0%
- “YANDEX money” (electronic wallet) – commission 0%
- “Sberbank-online” (payment through the personal account of Sberbank of Russia) – commission 0%
- “QIWI wallet” (direct transfer to another Qiwi wallet) – commission 0%
- “Sberbank of the Russian Federation” (in cash through an ATM or a branch of a Sberbank branch) – commission 1%
- “Bank card” (for residents of the CIS countries and neighboring countries) – commission 10%
- “QIWI wallet” (via the “Robokassa” payment system) – commission 10%
- “Svyaznoy” (payment in cash) – commission 10%
- “Euroset” (payment in cash) – commission 10%
- “From a mobile phone account” (Beeline, MTS, Tele2) – the commission depends on the operator.
- “Payment terminal” (cash payment at any terminal) – commission from 0% to 5% (depending on the terminal)
Payment via Qiwi wallet is a convenient way for buyers living in the CIS and neighboring countries (it is possible to choose a different currency).
ORDER VALIDITY DURATION
The order is valid for 3 days. The order will then be cancelled.
If you want to extend the validity period of your order, you need to contact the operator on the “Online Consultant” website and indicate the date when you can make payment.
HAPPY SHOPPING!
If, after clicking on “Buy”, the transition to placing an order does not occur, then the option at the top of the page immediately below the cost of the product is not selected
Read further:
Junction boxes for hidden wiring
Electrical distribution boxes for hidden wiring
Junction boxes for hidden wiring under drywall
How to connect wires in a wall without a box?
Connecting wires in the junction box to the switch