Detailed instructions for repairing an electrical plug will certainly be useful to an inexperienced person who cannot independently figure out which pins the conductors should be connected to. In the modern world, almost all household appliances operate from the electrical network using a Euro plug, which can be made with or without grounding. Instead of the usual two wires, you need to connect three; this sometimes causes problems when connecting yourself. There are very simple ways to change the plug on the wire so that the equipment works normally again.
What types of forks are there?
Before replacing the plug, you need to find out its type. There are devices in which it is permissible to use only grounding plugs. For example, washing machines, microwave ovens, irons. In other devices, a simple plug without a third contact will do.
Depending on the structure, maximum current and the presence of grounding, plugs are conventionally divided into the following types:
- collapsible models;
- non-separable;
- with grounding;
- without grounding;
- ordinary;
- corresponding to the European standard.
Types of electrical plugs
Installation procedure
The angled plug with grounding is installed according to the following diagram:
- A phase is connected to one contact of the plug, which supplies voltage to the consumer.
- The wire with zero is connected to the other contact. Ideally, the zero, neutral contacts should carry a current of the same value. In the event of a short circuit, it increases and the protection is triggered. Connecting the neutral to the housing or ground loop is prohibited.
- The third ground pin is connected to the ground wire. It does not have a direct connection with the phase wires. It is inextricably linked with those parts of the structure that are grounded.
Since there is no uniform standard for the production of electrical plugs with grounding in different countries, there are many types of plugs. Here are some food types in other countries:
- 110-127 V and 60 hertz - USA;
- 220-240 V, 50 hertz - Euro plug with grounding.
In Russia, the euro version is accepted as a single standard, not the American one.
Device
Most plugs have a standard design. They consist of a dielectric body and metal pins. Modern models that comply with the European standard provide an additional grounding contact. Such models usually have a non-separable body. Soviet-style forks are usually collapsible. However, they do not have grounding. This sharply narrows the list of devices on which they can be used.
Non-separable forks
Non-separable models are made using injection molding technology. They can often be found on extension cords. During manufacture, an electrical cable is connected to the conductive pins. Then the resulting structure is filled with liquid plastic mass. Sometimes rubber-like flexible compounds are used.
The result is a monolithic structure. It is completely sealed, so it is not afraid of a humid environment. Such a plug cannot be disassembled so that it can be used later.
Removable grounding plugs
Removable plugs with a third grounding prong are available at almost any electrical supply store. They comply with European safety requirements and allow the connection of a ground wire.
These plugs are sold assembled. The approximate price is 100-200 rubles. They are universal. They can be installed on any household appliance. Often these models have a finger ring that allows you to conveniently remove them from sockets.
Collapsible C1-B
With the advent of European standards, C1-B plugs lost their relevance. Their design is familiar to every electrician. Plug C1-B is suitable for low power devices. For example, for a fan or a table lamp.
The C1-B plug consists of a dismountable plastic housing, brass conductive pins and a pair of screws. Sometimes it is supplemented with fasteners for fixing the cable. The body consists of 2 almost identical halves. They are distinguished by the presence of holes for attaching conductive pins. There is a hole in one half, but not in the other. This point is important for ease of plug assembly. The plastic halves of the housing are secured together with a screw.
Collapsible C6
These plugs are analogous to European models CEE 7/17. They are available in both versions with and without a grounding contact. The permissible power for the C6 plug is 2.2 kW, which allows them to be used on washing machines and instantaneous water heaters. The C6 pins have an increased diameter of 4.8mm. This ensures a tighter fit in the socket slats and reliable electrical contact.
If the power cord is broken
Most often, a burnt out or melted plug is only the result of a short circuit that has occurred, and the source of the problem lies in something completely different. For example, in a broken power cord. The power cable suffers after being crushed by a heavy object or externally damaged by a snag on a sharp nail or corner. Therefore, we are not in a hurry to disassemble the adapter, but carefully inspect the surface of the wire for cracks, bends or burn marks.
Sometimes a quick external examination is not enough to identify internal damage, since the insulation layer hides the break of one of the conductors into two parts.
The easiest way to check the integrity of the cord is to use a multimeter. You just need to find the tester, switch it to “Buzzer” mode and ring the cable. If the device detects a current leak, a high-pitched squeak will be heard.
If it is necessary to test a chain longer than two meters, then an additional wire should be prepared and included in the overall circuit. When there is no spare conductor, there is another option - to twist the phase and zero at one end of the wiring. Next, connect the multimeter probes to the nearest contacts. This option has several advantages over the first one:
- you can check for leakage two wires connected in series into a single circuit at a time;
- there is no need to look for a compatible conductor and expand the circuit.
If you don’t have a multimeter at hand, you can verify the integrity of the conductor using a special homemade universal device. To make it you will need a 3.5 Volt Ilyich light bulb, a power battery (preferably a square one with a power of 4.5 Volts), two connecting wires and a gripping connector. We connect all the elements in the following sequence:
- connect a light bulb to the “plus” of the battery;
- We connect a flexible conductor with an alligator clip to the negative of the battery.
When working with high voltage, remember safety precautions, especially if there is a risk of current leakage.
It is better to first test the resulting device on an already familiar and working section of the network. It is enough to hook the clamp anywhere, and if the circuit is assembled correctly and current flows into the wire, the light bulb will light up. If there is no glow, we make a logical conclusion that there is a leak or a wire break.
If there are doubts about the integrity of the cord and plug or there are obvious traces of melting and burning, immediate action must be taken. Knowing what to do first and how to make repairs, you can protect your life, health and property.
Interesting:
- The plug on the washing machine melted
- Ardo washing machine does not turn on
- There is a smell of burnt wiring when the washing machine is running.
- How to change the power cord of a washing machine?
- Washing machine socket installation height
- The washing machine does not start and the indicators do not light up
1 reader comment
- 08/11/2021 at 22:07
Lena:
Changed the plug. The machine stopped working. But it turns on. What does it mean?
Answer
Typical malfunctions of electrical plugs and methods for eliminating them
Plug malfunctions can result from their incorrect use. Any problem is easy to detect in the early stages.
| Malfunction | Signs of a problem | Repair methods |
| Carbon deposits on conductive pins | The pins get hot. Covered with black coating, soot and oxide. Sometimes craters and traces of pin melting are formed. | If there are no craters and there is just soot on the pins, it is enough to clean them with sandpaper. If the pins have melted and have craters with a diameter of more than 2 mm, it is advisable to replace the plug with a new one. |
| Poor contact between conductive pin and wire | The fork, when working under load, cracks and emits a characteristic burning smell. | It is necessary to open the plug and clean the burnt parts with sandpaper. Then securely screw the wires to the cleaned contacts and reassemble them to their original state. It is better to bite off the burnt ends of the wires. |
| Broken wire | If you move the wire at the bend, the contact disappears. This often happens with a vacuum cleaner, drill and other portable equipment. | It is necessary to cut out the section of the cable with a break. |
| Hull destruction | The plug body falls apart when pressed with fingers. | The plug should be replaced with a new one. The probable cause is overheating. It is necessary to additionally check the condition of the outlet. |
Important! If the pins burn, you need to check the lamellas in the socket. With a high probability they overheat and are in disrepair. Do not use overheated plugs or sockets. Heating can cause a fire in the wiring.
Correct plug replacement
The method for correctly replacing a fork is determined by its type. Cast, non-separable modifications cannot be repaired. They will have to be thrown away. And reusable, collapsible ones are completely replaceable.
Plug C1-B
Replacement of C1-B is required in case of destruction of the housing or significant burning of the conductive pins. In other situations, you can try to restore the existing plug.
But if it comes to replacement, then the procedure is as follows:
- Using wire cutters, cut the cable 5-10 cm long from the burnt plug. Don't forget to unplug the plug from the socket first.
- Cut the free end of the cable. At the ends of the individual cores, slip rings with a diameter of 3-4 mm should be formed. They will be needed to screw the wires to the conductive pins of the new plug.
- Screw the wires to the pins. It should be tightened tighter. Be careful. The screwdriver often slips off the screw head and painfully sticks into your hand.
- Install the conductive pins into the corresponding holes. Both pins should protrude an equal distance and be parallel to each other.
- Align the plastic plug halves until there is no gap. Secure them with a screw.
C6 plug
For C6 the operating procedure is similar. However, the presence or absence of a grounding contact should be taken into account. It is located in the middle. After connection, the grounding contact should make a short contact with the metal body of the electrical appliance. You can check this with a multimeter. You should also make sure that none of the power wires are shorted to the green/yellow ground wire during assembly. Otherwise, phase potential may enter the housing of the household appliance.
Grounding Plug Assembly
C5 or C6 using wire extension
This replacement is the easiest option. You have an electrical appliance with a faulty plug that needs to be replaced. At the same time, you have a working plug and cable. In this situation there is no need to disassemble anything. All you have to do is bite off an old faulty fork. Then instead of it, connect a working plug with a cable by twisting it.
The operation of replacing the plug turns into an operation of extending the cable. It's much easier. But you need to have spare plugs on hand.
Extension of connecting wire
The main thing to consider when replacing is the cross-section of the wires. The new cable for extension should be no thinner than the old one being replaced. This is especially critical if you are trying to make a replacement on a powerful electrical appliance.
Note! The power plugs indicate the maximum current that can be passed through them. Typically it is 16 A. After replacement, turn on the electrical appliance and make sure that the cable does not overheat. Light heating is acceptable.
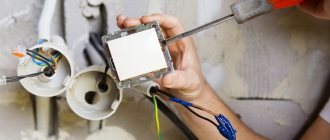
Euro fork repair on a typewriter
Before opening and replacing the plug, you must ensure that it is damaged. To do this, remove the plug from the socket and carefully inspect the housing and wires. If there are traces of soot, melting, or a burning smell, then repairs are inevitable. We prepare a knife, screwdrivers, pliers and get down to business:
It is recommended to first identify the reason why the plug burned out so that the situation does not happen again.
- Cut off the old Euro plug.
- Remove the top insulating layer from the cord by about 4-5 cm.
- We strip each wire by 1.5-2 cm.
- We twist the wires and cut them, leaving at least 1 cm of exposed wire.
- Using pliers, bend the ends of the wire.
- We inspect the wires. A standard power cord consists of 3 contacts: blue or light blue is zero, yellow-green is ground, and black, pink or brown is phase.
- We connect the wires to the new case, connecting the ground to the central contact, and the phase and zero to the other two (their location does not play a special role).
Next, we clamp the cord with a plastic jumper, which will securely fix it in the specified seat. Then we check all the clamps again and assemble the plug body. The final step will be tightening the main screw.
Comparison of molded and collapsible plugs
The main difference between non-separable and collapsible models is the structure of the body. There are also differences in manufacturing technology. It is cheaper to make a cast, non-separable plug than a collapsible one, which consists of many complex parts. This factor affects the final price of household electrical appliances.
Collapsible models can be removed from one wire and moved to another. If necessary, the forks can be repaired by replacing faulty parts. A collapsible plug is also good because it can be bought and installed on any wire used in everyday life.
Replacement features
All plugs are similar in design. But each type has small nuances that should be taken into account.
European style plugs
European models must have a grounding contact. This is required according to safety regulations. When connecting the plug, use a three-core cable. One conductor is the grounding conductor. It is painted yellow-green and is connected to the central, grounding contact of the plug.
Soviet style forks
Most Soviet plugs do not have a ground connection. A two-wire wire is sufficient for them.
When connecting the cable, do not neglect its fastening. It consists of a small plastic plate and 2 screws. They fix the wire in the plug. If you do not clamp the cable into the fastener, it will soon come off.
Old electrical plug and its replacement
The old electrical plug has a simpler design. Here the replacement technique will be slightly different. Here are the main steps you will need to complete:
First, you need to cut off the old electrical plug housing and disassemble it.
As with the Euro plug, you need to expose the wires. The ends should be stripped to 15 cm of the wire. The design of a regular plug may differ, which is why it is necessary to strip the wires, as indicated in the photo below.
There is no grounding here, so you only need to connect two wires
When connecting, be sure to pay attention to the polarity
Now you can begin assembling the electrical plug housing.
As you can see, the old electrical plug has a simple assembly design. You can see how to do this in the video below. If your washing machine is noisy, then you should read about this problem.
Lawn mower fork repair
Lawn mower plugs are used in open air conditions. Moisture that gets inside can worsen electrical contact and lead to overheating. As a result, the conductive pins melt the plastic body of the plug and are displaced from their original position.
To repair, the fork will need to be disassembled. This is where the first problems are possible. Lawn mower manufacturers use non-standard screws. It is almost impossible to unscrew them with a regular Phillips screwdriver. You can get out of this situation by drilling out the screw head. Before doing this, you should still look for a suitable screwdriver in stores.
Lawn mower switch with plug
Another problem is conductive pins that have shifted due to heat. Before repairs, they must be descaled. Afterwards you can fix it with epoxy glue. It is advisable to choose an adhesive that can withstand high temperatures.
How to plug the wrong plug into a regular outlet
Many people are familiar with the situation with unsuitable forks. You buy equipment in an online store, but it is not possible to connect it. The problem lies in the different shaped pins of the plug.
This situation can be dealt with using an adapter. It is an adapter. On one side, a device with a non-standard plug is inserted into the adapter. On the other side there is a standard fork that fits the shape.
Adapter from Chinese plug to Euro
IEC 60906-1
IEC 60906-1 standard plugs are used in Brazil and South Africa. Outwardly, they resemble common Samsung chargers. The distance between the conductive pins is 19 mm.
The main difference between IEC 60906-1 and the plugs familiar to residents of the CIS is the additional grounding pin. It is located in the middle. For sockets used in Russia, this grounding pin will have to be removed.
BS 1363
BS 1363 plugs are used in the UK. They are distinguished by conductive pins of rectangular cross-section. These models also have a grounding contact.
Finding an adapter for a BS 1363 plug is easier than finding one for an IEC 60906-1 plug. But if this was not possible, then the plug will have to be replaced with any other suitable one.
Note! BS 1363 plugs may be fitted with fuses. If the measuring instruments show that the plug is broken, you need to check whether the fuse has blown. This is possible when the machine did not have time to operate.
Grounding Plug Assembly
If this is your first time assembling a plug, try doing everything wirelessly first. This will make it clearer how individual details should match. In general, the following principles should be followed:
- The wire must be secured with a clamp. Without this, he will come off.
- The grounding yellow-green conductor must be connected even if there is no grounding in the apartment. This operation is useless, but its implementation is required by safety rules.
- It is advisable to solder the rings before tightening them to the screws. The resulting contact will become more reliable.
- Make sure that the screw holding the plug halves together does not touch the live wire under any circumstances. You can check with a multimeter.
Connecting 380V sockets
Having understood the main types and features, you can consider connecting a 380 V outlet. We will do this separately for each type.
Connecting 2P+PE and 3P+PE sockets
Let's start with the simplest connection of a 2P+PE socket. As the name suggests, for this we need two phase wires and one ground wire.
- Based on this, before making the connection, we need to determine the wire data. To do this, we need to decide on the distribution board in which the connection will be made, as well as on the circuit breaker of the appropriate power.
Note! To connect a 2P+PE socket we need a two-pole circuit breaker. In some cases, it is possible to use a three-pole machine, in which we will only use two poles. The rated voltage and rated current of this machine must correspond to the rated values of the socket.
- If you will make all the connections yourself, then first of all we run a cable or wire from the distribution board to the outlet. In this case, a three-core cable of the appropriate cross-section will suit us.
- Now we make the connection in the distribution board. First we connect the protective ground wire. To comply with PUE standards and facilitate the connection of the socket, it is advisable to use a yellow-green conductor. We connect it to the PE bus, which should go in the distribution board in addition to any automatic machines.
- After this, we connect the phase conductors. They are connected to the terminals of the machine. Before connecting, make sure the machine is turned off.
- Now we connect directly to the outlet. First of all, we again connect the protective ground wire. Above, we have already decided on its labeling.
Note! If you do not know which contact to connect the protective grounding wire to, you can always determine this visually. According to the PUE standards, the design of any socket must ensure that the grounding contact is closed first. Because of this, the plugs have a longer blade to create a grounding circuit.
- After this, we connect the phase wires to the two remaining contacts. There may be two connection options: screw or clamp. Both options are quite reliable, but I personally prefer screw contacts.
- The circuit diagram of a 380V socket of the 3P+PE type is almost identical to the connection of a 2P+PE socket. The only difference is the number of phase conductors, of which in this case we have three. In addition, for such a connection we only need a three-pole circuit breaker and a four-wire cable. Otherwise the connection is completely identical.
Common assembly errors
Replacing the plug correctly is not difficult. A novice electrician can handle this. Errors most likely arise from a reluctance to make the replacement carefully:
- The plug must match the current. You cannot put a low-power plug from a 25 W soldering iron on a 1.5 kW iron.
- It is necessary to ensure that the plug halves do not damage the insulation of the wire. Possibly snacking.
- Same for screws. When the plug is in the final stages of assembly, it is necessary to ensure that the mounting screws do not touch the live wires.
Tips from experienced craftsmen
The main thing to worry about is safety. The plug is replaced with the voltage turned off. Do not try to twist the plug or tighten the wires while it is inserted into the outlet.
Reliability should be kept in mind. If the wire is fixed with a screw, it is advisable to make a ring. This will reduce the risk of tearing the cable out of the plug. Do not forget about the fasteners that secure the wire to the plug body.
If you do not fully understand what you are doing, it is better to contact a specialist. By connecting the grounding wire to the power contact, you can obtain phase potential on the body of the electrical appliance. This is extremely dangerous on devices with metal casings such as refrigerators or microwave ovens.
All plugs are divided into collapsible and non-removable. It is better to deal with collapsible models. If necessary, they can be installed on another electrical device.
When connecting the plug to a new cable, you should be careful. Avoid damaging the wire insulation. Gaps in the fork body are undesirable. The conductive pins must be level. If the plug contacts are burnt, they should be cleaned.
How to connect the oven
Quite often, devices - both Electrolux and Samsung - do not come with a plug, but only a power cable. What kind of socket and plug it needs determines the power of the device, and how to connect it depends on the wiring in the kitchen. The photo shows the cable connection.
How to connect a model without a cable
Some high-power devices are sold without a plug or power cable. It is believed that direct connection to the wiring is more economical and reliable, since it eliminates unnecessary contacts. If this method seems unsafe or too unusual, you can connect the plug to the oven. Which one is needed for the device needs to be clarified in the instructions.
The model with a hob is connected in the same way. The photo shows an oven without a plug.