Intercom visit - operating instructions. Intercoms are an effective access system, which is found both in multi-storey buildings and in enterprises, offices, private cottages and other premises where access control is needed. The equipment protects property and territory from penetration by third parties, and also allows you to determine who plans to enter the building while inside.
Against the backdrop of the rapid growth in popularity of Visit intercoms, instructions for setting up and connecting devices in an apartment building have become extremely popular.
general information
Currently, the VIZIT Group holding consists of several enterprises that specialize in the development, implementation and maintenance of access control and management systems under the more well-known Visit brand. The NPF MODUS-N trademark is responsible for the marketing and promotion of equipment, and given the sales volumes, the products are in demand not only in Russia, but also in other CIS countries.
The main advantages of the manufacturer include:
- A wide range of models with different technical characteristics.
- Operating temperature range from -40 to +45 degrees Celsius.
- Integration of advanced technologies and protective equipment.
- Development of advanced software solutions.
The listed items are present in each Visit intercom model. In addition, they are confirmed by hundreds of positive reviews and official certification by government quality control authorities.
Video intercoms
Vizit brand devices are presented in a wide range. The quality of Visit video intercoms has been time-tested. With the help of such technology, it is possible to establish not only an audio connection with the guest, but also establish communication via video communication. Among other things, the video intercom can be additionally equipped with a surveillance camera. The technology allows you to clearly distinguish the guest not only during the day, but also at night.
BVD 431 DXKCB
This model is considered the most common version of video intercoms. The device is simple to configure, but provides a high level of room protection. We list the main characteristics of the model:
- Day and night shooting mode, color picture; when the lighting level is low, the backlight turns on;
- The video intercom is equipped with a Board lens, the viewing angle is 31 degrees vertically and 76 degrees horizontally.
Video intercom BVD 431 DXKCB transmits a high-quality image, which allows you to clearly identify a person in front of the door (even if he is 1 meter away from the camera).
To operate this model, contactless RFID keys are used, the operating frequency of which is 125 kHz. The video intercom has a button to call the concierge, an LCD indicator, and a keyboard for entering a code. The system is installed not only in apartment buildings, but also in private houses.
Basic models: their purpose and features
Before connecting the Visit intercom handset, you should clarify its model and the specifics of connection with the other components of the complex.
The company's model range includes several generations and series of access devices. They differ in modifications, permissible number of connections, protection standard and purpose. The standard classification is as follows:
- The SM and N line is intended for use by a group of up to 100 people. It is found in multi-storey buildings and is represented by the following models: SM101T, SM101R, N101RTC (intercoms are supplied without cameras). The editions are equipped with backlit keys and can handle 600 keys. The series also includes an improved model N201FCP with a camera and connection for up to 200 subscribers.
- BVD300 includes several models (BVD306b, BVD310, BVD 313, 314, 316). The devices are capable of working with different numbers of users and have extensive functionality. The latest models 313, 314, 316 and 323 are designed for private homes and offices. At the same time, they can be installed in multi-apartment premises, taking into account the individual needs of consumers.
- 400 Comfort. An advanced line of intercom systems, which is used primarily in offices, apartment buildings and enterprises. The equipment works with 200 subscribers (depending on the configuration).
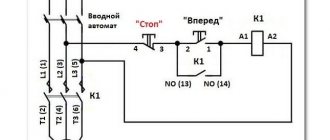
The “call” goes through (the bell rings), but when the handset is picked up, the “call” is dropped.
This reason is the switch “ SA3
”, which the “tongue” presses on when you put the handset back in place. This is exactly the switch that needs to be pressed to start a conversation when the “tongue” of the handset sinks. It can also be the reason when the “call” is dropped.
It can be cured by pouring alcohol inside and clicking the key several dozen times. But this doesn't last long. At one time I disassembled and cleaned these switches, and let me tell you, it didn’t last long. Out of ten cases, seven started to work, but after some time they failed again. Therefore, I advise you to replace this switch.
It has six legs, and therefore for an untrained user it will not be easy to desolder this switch, but there is no need to despair, everything is done for the first time, and you are no exception.
Take a screwdriver and insert it between the board and the bottom of the switch housing, for example, on the right side. Now, lifting the right side with a screwdriver, use a soldering iron to heat up all three of its side legs.
To do this, we lean the tip between any side and central legs. As soon as the solder has melted, we immediately transfer the tip to the other outer leg, while the central leg constantly warms up along with the outer ones. That is, it turns out that the switch legs heat up in pairs, preventing the solder from hardening. This should be done until you feel that the soldered side has moved slightly upward.
Now we go to the right side of the switch, and thus, melting the solder, we try to lift it up. Don't try to lift too much at once. Do it gradually.
When the switch is raised above the board, but not yet completely soldered, you can already lift it with your fingers. Also melt the solder on the right side, lifting it, then move to the left, and so on until the switch is in your hands. All this takes me about a minute. If there is any solder left in the holes, remove it. You insert the switch, solder it, assemble the tube, and connect it.
Intercom design
To understand the operating principle of the intercom and the features of independent connection and configuration, it is necessary to clarify the internal structure of the system. In essence, such an invention is a special means that limits or provides access to an object. The device has become extremely popular relatively recently, since previously code technology was used to protect entrance doors.
Vizit intercoms for an apartment or private house include several components:
- Subscriber device (handset). The device is located in the apartment and allows the owner to answer a guest’s call and decide whether to open the door or ignore the request. By default, the tube is combined with a locking mechanism.
- Call block. Used to enter the required code combination. The outer panel has different designs: with dialing buttons, with a reading platform that processes codes from keys or cards, with backlighting and even visual support. The last modification is not too common and is found in particularly protected facilities.
- Video camera (if we are talking about a video intercom).
- Locking mechanism. Allows you to control access to the building, because locks the door leaf. Modern intercoms are produced with electromagnetic, less often electromechanical locks. The first type can be opened from the outside, but it is much more reliable than designs with a metal latch.
- Switch. Responsible for transmitting data from the calling unit to the subscriber. A similar device is found in multi-subscriber intercoms, since single-user models do not require signal distribution.
Among the auxiliary means and accessories in the Visit intercom circuit, a video camera and a special monitor can be used to display the picture. Such systems are more reliable and functional, since in addition to audio contact, visual monitoring of what is happening at the door is provided.
Types of pipes
There are a couple of options on the market: digital and coordinate analog.
Analog
To connect such a handset, you will need a matrix-coordinate switch (similar functions to an automatic telephone exchange).
The presence of such a device solves the problem with processing the signal from the external intercom unit and redirects it to the intercom tube installed in the house or apartment which was called.
An analog handset for an intercom is much more difficult to install, because you will need to install another line of wires from the switch to all apartments in the entrance.
But then it becomes possible to maintain duplex audio communication, adjust the volume of the conversation and call signal, and perform some actions with the front door lock from a distance.
Digital
It is necessary for the use of improved intercom systems in a warehouse.
They are mainly used in high-rise buildings, where there is a need to connect a pair of subscriber handsets to a single intercom input unit without using a huge number of cables.
The main advantage of this type of handset is the ease of installation and connection of another subscriber point to the intercom system.
In addition to the fact that a digital intercom handset is easy to install, it is important to fundamentally observe all connected jumpers during installation work and changing a new handset. If a mistake is made during connection, the device will not only perform its functions incorrectly, but will also affect the functionality of the overall intercom system, making it difficult to function correctly.
Using a digital device, like an analog handset, you can control a remote electromechanical lock, adjust the volume of the call signal, change the call melody, and increase/decrease the duplex volume level.
Connecting Vizit intercoms
For the intercom system to work correctly, you need to connect it correctly. This is done strictly according to the manufacturer’s instructions and diagram.
In order for the intercom to work as long as possible, you need to follow the basic operating rules and maintain it on time. The timing of scheduled inspections is specified in the regulations and the contract with the service company.
How to connect Vizit to an entrance intercom
The Vizit UCP components are interfaced using an appropriate set of wires and switches. To carry out the work you need:
- Stretch the cable from the calling unit into the apartment to the handset.
- Register your apartment number in the device memory.
- Buy an adapter and configure it.
- Adjust equipment parameters.
Connecting a video intercom to a digital entrance intercom
For the proper functioning of such equipment, you need to buy a special component - an MSC interface module. It allows you to coordinate the video device with a digital intercom. The adapter is compatible with various types of equipment, including Visit models. According to the manufacturer, it works reliably and efficiently.
Installing the MSC adapter is quite simple. To do this, you need to connect the wires from the handset to it, and then connect it to the video intercom. The call block is connected like a camera.
Connecting to a coordinated entrance intercom
The MSC adapter is used for analog intercom systems. In this case, it is connected according to the instructions described above, and the detailed pairing diagram is as follows:
Changing your individual code
Setting up the equipment The visit is quite quick and simple. To change the lock opening code, you need to do the following:
- Press the combination #-999.
- After the double signal sounds, indicate the master code (1234 or any other).
- A successful change of parameters will be indicated by a single beep.
If you hear 2 beeps, you will have to repeat the action from scratch.
You dial a number, press “call”, and it hangs up.
Here you will have to sweat a little, as there are enough reasons
.
First of all, pick up the phone and look at the “ plus”
" and "
minus
" coming from the intercom panel so that they are not torn off. If the ends are in place, then we disconnect them and move on.
Remember! The intercom handset has connection polarity. Therefore, when you remove it, be sure to mark the incoming wires: “plus” and “minus”
.
Open the phone. To do this, unscrew the screw that secures the top cover, insert the end of a thin screwdriver into the place where the cord enters, and unclip the latches at the bottom of the tube. Now it won’t be difficult to completely remove the top cover by hand.
Please immediately pay attention that both wires are soldered to the speaker terminals. Over time, it happens that due to poor-quality soldering, wires fall off from the terminals. This is the second reason
, why the call is dropped.
If the wire falls off, solder it. At the same time, we check the integrity of the speaker coil - this is the third reason
for the call being dropped.
We put the multimeter, or any other measuring device, in resistance measurement mode. If everything is in order with the speaker coil, then when you touch the speaker terminals with the probes, you can hear a click, while the coil resistance should be in the range of 40 - 60 Ohms. In my case, the resistance was 42 Ohms.
We assemble the handset and try its operation. If the tube works, then you have won, if not, move on.
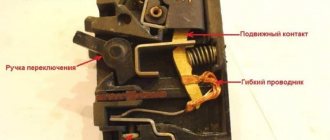
The next element that causes a call to be dropped is the toggle switch
(switch) is responsible for turning the handset on and off, and in the circuit diagram it is designated as “
SA2
”.
As a rule, it is located next to the door open button. You can buy it, but this particular one is not always on sale, so it is easier to repair.
There are latches on the sides of the toggle switch that hold it onto the panel. Use a thin screwdriver to press on the latch, simultaneously pushing out this side of the toggle switch, but so that it only presses the latch. Perform the same actions on the opposite side, and now you can immediately remove the switch.
For ease of repair, the toggle switch can be unsoldered, but then do not forget to mark the ends
, which one goes where.
We take a thin screwdriver, maybe a knife, and insert it between the key and the switch body to a depth of 3 - 4 mm (left side of the photo).
Using the end of a screwdriver, carefully press the side of the key outward until the latch appears (circled). Now we do the same on the opposite side of the switch and remove the entire key. You should get something like the photo on the right. Remember right away how everything costs
.
We turn the switch body over to pull out the moving contact. When you look at the image below, you will see how much dirt has accumulated on the contacts and inside the toggle switch. And since the voltage and current here are small, this dirt is quite enough to prevent the signal from passing through the intercom panel. We take a stick with cotton wool, alcohol and clean the whole thing. If you don't have alcohol at home, use vodka.
It is as easy to assemble as it is to disassemble. For example, press the left side of the key so that the latch just enters the body. Now, with your thumb, press the entire key down until it is in its normal place.
If you have problems pressing with just your finger, help with a screwdriver by moving the side of the housing away. After assembly, be sure to click the toggle switch to make sure it works clearly. We insert it into place, assemble the tube and check it. The handset started working - Hurray!
Another point you need to know is when you assemble the tube body - and this applies to all tubes. Lay the wires inside so that they do not interfere with the operation of moving parts.
Major breakdowns and repairs
An intercom system is a complex and high-tech invention, so various malfunctions and malfunctions are not excluded. To minimize the likelihood of their occurrence, you should purchase equipment from official suppliers or trusted companies. You also need to know how to fix common breakdowns yourself:
- If the keys work correctly, but a reset occurs when dialing the subscriber's number, the connection may be lost. To do this, the serviceability of the BV-KM line should be assessed.
- If the call block does not respond to pressing. This happens when there is no power supply. To eliminate the failure, you need to evaluate the connection of terminals Y1 and Y2. Normal voltage is 13-18V.
- The lock cannot be opened with a key or button. This is usually due to problems with the power supply or the call block.
Brief description of the equipment
A traditional intercom handset is presented as a component of a security system. Thanks to this, communication is ensured between the owner of the home and his visitor.
If a multifunctional calling panel is installed on the outside, then the handset is a home unit that is installed exclusively inside the protected premises. The huge advantage is that you can install the device not only with the help of a qualified team, but also yourself.
Most often, the system provides high-quality communication immediately after picking up the handset; the user does not need to press any combinations or special keys. Despite the simplicity of the scheme, installation most often falls on the shoulders of professionals.
Each type of protective equipment requires the use of a specific tube. The peculiarity is that for different models you need to lay a certain number of wires.
If the user decides to use a digital intercom, then only one cable is needed, which originates from the calling panel. Craftsmen create additional branches that provide connection to each apartment separately. When a coordinate-metric type intercom is installed at the entrance, high-quality wires are used for installation, in strict accordance with the number of apartments in a multi-story building.
Installation of intercom handsets Visit
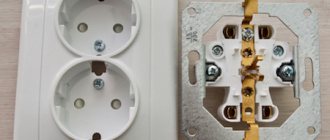
The subscriber device in the Visit intercom consists of the following components:
- Shockproof housing.
- Key to adjust call volume.
- Button for opening the locking mechanism.
- Microphone and loudspeaker.
- Control board.
- Tube clamp.
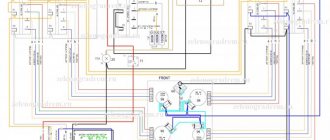
Tube connection diagram Visit
And although intercoms are quite reliable and durable, they are subject to failures and breakdowns, and therefore require a special connection diagram. If you adhere to the following drawings, errors will be eliminated.
Possible breakdowns of the intercom handset Visit
When operating intercom systems, the following problems are observed:
- No change when pressing the lock release key on the handset.
- No sound on one side.
- Recession of the tongue.
- Broken cable connecting equipment.
Principle of operation
Modern Visit pipes are represented as an element of the overall house design in the area of safety and order. High-quality installation of such a device in the house involves connection to a common block through wires laid inside the housing. The unit works on the principle of a regular telephone, as it is equipped with a microphone and speaker.
Experts note that the subscriber pipe is equipped with a door lock control and a bell button. When a visitor presses the corresponding button on the display, a signal is heard in the apartment. If the owner presses a special button, the front door will open. In addition, experts note several key features of intercoms :
- In more expensive models, manufacturers have provided a built-in indicator. If you turn off the sound at night, the bell will not be heard, but the bright light will be visible at a great distance. The control system is located on the body.
- Budget models have a standard set of buttons: “Loud”, “Open-close”, “Turn off”, “Quiet”.
- In addition to the basic call, specialists often install handsets on their clients’ front doors. The entrance to the entrance can be opened with just one click of a button, while being in any room.
- In addition to the well-advertised audio intercoms, the models sold today are equipped with a calling panel. They perform the functions of a standard telephone and wireless intercom.
Expert opinion
It-Technology, Electrical power and electronics specialist
Ask questions to the “Specialist for modernization of energy generation systems”
Installing an intercom in an apartment building: necessary equipment, connection diagrams, installation procedure If there is a need to change or reinstall the individual code for your apartment, you can do this yourself. Ask, I'm in touch!
Self-installation rules
The intercom handset is presented as a multifunctional intercom device, thanks to which the property owner and his visitor can communicate. The main signal comes from the speaker and reaches the owner himself. In digital units, manufacturers have provided a two-core wire to which the intercom is connected. But in order to avoid the most common mistakes, you need to maintain a certain polarity.
In the internal compartment of the unit there are microcircuits that must be programmed accordingly. For these purposes, you can use a jumper or jumper. If you need to find out the code, when the technician will have to disassemble the device and examine the board.
The panel with numbers is most often located near the jumper. The code consists of numbers that correspond to closed jumpers. If the master has already taken on this work, then he needs to have an old collapsible structure in order to later assemble a new part using it.
Minor difficulties may arise with a coordinate matrix device, since such a tube has keys that consist of a “zero” and seven cores. To avoid the most common mistakes, you need to find tires of ones and tens. Practice shows that the initial cores are much easier to find in the panel (the same numbers in the apartment numbers). But to find the tires of the units, you need to go up one floor. The necessary element is located in the top panel. A novice master needs to remember that + is connected to tens, and - to units.
If a person understands that he cannot install the tube on his own, then it is better to seek help from specialists . In this case, you can count on fast and high-quality completion of all assigned tasks. In addition, a specialist can recommend the most suitable device model.