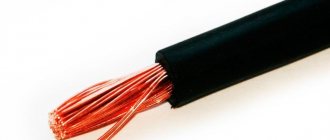
Criteria for choosing wisely
The key to uninterrupted operation of the home electrical system is the quality of components.
Therefore, at the stage of purchasing them, one of the key tasks is to choose a cable of appropriate quality. Manufacturers always indicate what metals the cores are made of and what materials are included in the insulation braid; these parameters are indicated in the cable marking
To help you choose the right cable, you need to carefully study the product labeling. The cable must indicate: brand, manufacturer's name and compliance with GOST or technical specifications. The cross-sectional size and grade of the cable must be repeated at equal intervals along the entire length of the outer braid of the product.
The marking of any electrical cable is represented by numbers and three letters.
The first digit of the numerical designation determines the number of cores, the second digit – the cross-sectional area of each of them, the third – the calculated network voltage. The remaining numbers indicate the flexibility class of the cord. The first letter determines the type of material used to create the top braid of the insulation.
If you have a product in front of you that has the letter “A” in the first place in its marking, this means that the cores are made of silver metal – aluminum; if such a letter is missing, the threads are made of copper
The second letter indicates the wire type:
- “K” – control;
- “P” – flat;
- “M” – installation;
- “Ш” or “У” – installation;
- “Mg” – mounting with flexible core.
The third letter of the marking determines the material used for internal insulation of the cores.
Options for its designation and decoding:
- “P” – insulation is made of polyethylene;
- “B” or “BP” – the braid is made of rubber;
- “Pv” – vulcanizing polyethylene is used;
- “Ps” – self-extinguishing polyethylene was used;
- “C” – the outer braid is made of lead;
Rubber insulation can be protected by a Nairite “N” sheath or a polyvinyl chloride “B” sheath.
An example of decoding the designation: VVG 4x2.5-380 - a cable with four copper cores with a cross-sectional area of 2.5 mm, designed for a voltage of 380 V, insulated with PVC braiding and enclosed in an outer PVC sheath
The following letter indicates the type of cable: “NG” - non-flammable and fire-resistant, “B” - armored, “LS” - does not emit smoke when melted. Products with an armored shell are used where there is a possibility of mechanical damage.
The presence of the letter “E” in the marking indicates that there is filler between the cores. The letter combination “OZH” indicates that this is a single-wire conductor.
By air
To connect your home to the electrical network by air, it is recommended to use the following cable brands:
This is a cable with aluminum conductors, vinyl insulation and coaxial braid. Designed for power transmission in networks up to 380 volts. Due to the design features, it is impossible to make an unauthorized connection to the electrical network. You can use AVK to install the input from the overhead line section to the metering panel. Operating temperature from -45 to +45 degrees. Suitable for connecting voltage 220 volts, one phase and zero. One of the disadvantages of using this cable to connect to the house is the need to use a special coupling for electrical connection.
SIP stands for self-supporting insulated wire. This conductor is used for overhead power lines up to 1000 Volts. The insulation is made of light-stabilized cross-linked polyethylene. Operating temperature range from -60 to + 50 degrees. A wide range of sections and price range makes it an ideal candidate for connecting a home to the power grid. The wire is suitable for connecting both single-phase consumers (220 volts) and three-phase (380 volts). The disadvantages include: the use of specialized couplings and the ambiguous attitude of inspectors of energy supply organizations to connecting this type of supply to a metering device. The fact is that the rules indicate that connections on the cable to the metering station are not permissible. The line should run in one piece, as shown in the picture below:
Due to the specifics of the SIP, it is not possible to insert it into the metering panel without making the transition to another, more flexible wire. Therefore, it is better to first agree on this point with the energy supply organization before you decide to choose a cable to connect a private home to the network. We talked about how to connect SIP with copper cable in a separate article. Please note that according to chapter 1.7. PUE clause 1.7.131, the cross-section of SIP cores should not be less than 16 mm².
The decoding is as follows - aluminum, polyvinyl chloride insulation of cores, polyvinyl chloride sheath, bare (no protective coverings). AVVG is used for voltages up to 1 kV. Designed for use in temperate, cold and tropical climates. It is used for laying in air, damp and dry rooms, channels, trenches, partially flooded rooms with moderate and severe corrosive activity. For air installation it is necessary to use cable wiring. The conductor is suitable for connecting consumers to both 220 and 380 V electrical networks.
Copper cable VVG, PVC core insulation, PVC sheath, without additional protection. Analogous to AVVG in design and characteristics, but with copper current-carrying conductors. Used in networks up to 1000 volts. Climatic version: temperate and cold climate. It is also used for laying in the open air, dry and damp rooms, in tunnels and wells, etc. For overhead wiring, it is necessary to make cable wiring, the cable is used as a load-bearing element, and it is tied to it at regular intervals. You can find out how it is made from the article we linked to. Please note that, according to the same paragraph 1.7.131, the cross-section of copper cables in branches must be at least 10 mm², and also that the insulation of cables such as VVG and AVVG is destroyed under the influence of ultraviolet radiation. In addition to laying them on a cable, it is better to additionally protect such cables with polypropylene corrugation, which is resistant to ultraviolet radiation.
Below are tables for selecting a cable for connecting a house to the electrical network by air:
The video shows how to run a wire from a pole to a house through the air:
Useful tips
Since only experienced and knowledgeable specialists can correctly lay a cable in the ground, let’s consider their advice:
- After filling the wire with sand, the warning tape should be laid exactly above the wire. Subsequently, during excavations, it will help locate the cable and prevent its damage.
- Only a whole section of cable is laid in the trench. There should be no underground connections.
- The trench should not be located under loaded areas (where people, cars or garden equipment move).
- If metal sleeves are used, their diameter should be at least three times the thickness of the wire.
Using these simple tips, you can avoid some styling mistakes.
Several cables can be laid in a trenchSource dom-i-remont.info
Correct cable routing
The cable itself is laid in a “snake” trench.
SNiP 3.05.06-85 stipulates that cables in trenches should be laid with a margin of 1-2%. This reserve is precisely provided by the snake.
Just don't go overboard with the bends.
Error No. 7: It is not allowed to make a reserve in the form of rings.
Why are these extra bends needed at all? As it turns out, not for emergency repairs at all. If the CL is laid in a perfectly straight straight line, then the temperature deformations that will accompany the operation of the CL will sooner or later damage the input. Error No. 8 Before and after laying, do not forget to test the insulation of the cable cores with a megometer.
A small layer of sand is again poured on top of the laid cable.
Briefly about the main thing
Underground cable laying eliminates accidental breakage and electric shock to people. Despite the need to perform excavation work, this method is considered more preferable, since there is usually no need to maintain or repair the wires.
Before laying a wire underground at the dacha, you should draw up a working drawing where the route will be marked in compliance with all permissible distances and gaps
In addition, it is important to maintain the specified trench depth and avoid sharp turns
Only suitable grades of conductor should be used and the correct cross-section should be ensured. Power should be calculated with a margin, since the load may increase.
How to serve input
The very first thing that needs to be done after installation is to test the resistance of the insulating layer, as well as the zero-phase loop. If the tests give a satisfactory result, then the main switchboard and input can be allowed to operate. Six months after installation, it is imperative to tighten absolutely all screw connections - start from the circuit breaker, which is installed before the meter, and end with the clamps on the ASU.
Once every five years it is necessary to reupholster, and if oxidation is detected, cleaning must be carried out. At approximately the same frequency, you need to inspect the wires to identify damage. The input can last about 30 years. After this period, it is necessary to conduct a thorough examination of the cable. If there is melting on the insulating layer, drying out, or crunching in the cable, this indicates that the conductors are not coping well with the load that is placed on them. Therefore, it is recommended to replace the input with a more powerful one.
These are approximate inspection times. If you notice damage early, it is recommended to check the condition of the entire cable and, if necessary, replace it. The best way out of the situation would be to calculate and install a new input. Moreover, you need to make a power reserve of about 25-30% so that the wires can cope with any peak loads.
Obtaining permission for underground input
First, you need to complete the project. It should be developed by a specialist. Technical documentation, plans and drawings must comply with all rules and regulations. The designer determines the brand of cable and calculates the cross-section of the conductors.
To receive a project, a number of technical conditions must be met. To connect a house to a common power line, you will need appropriate permission. For example, an agreement for excavation work is drawn up by the service responsible for facilities and communications.
Then the land plot is traced. If there are any communications in the immediate vicinity of the cable being laid, it is necessary to invite their representative to coordinate the position of the trench and control the work being carried out.
Options for supplying power cables from power lines
In the process of installing electrical wiring at the dacha, the owner will certainly be faced with the question of how to connect the power supply to the household. The cable line will need to be pulled from the nearest overhead power line support, naturally after obtaining the necessary permits, together with representatives of electrical network services. You can use one of the following options for connecting to a power line support:
- by air;
- underground.
Cable supply to a country house by air
Next, we will consider in detail the advantages, disadvantages, as well as important nuances during installation for each of the options.
Air supply
Supplying power to a country house by air can be done using two methods. The first involves the use of SIP cable, which means self-supporting insulated wire. It stretches directly from the power line to the facade of the house. The second option is accompanied by pre-tensioning of the metal cable from the support of the centralized electrical network to the walls of the house using special hooks or talpers. This allows you to use any cable cables that are subsequently fixed to the cable.
Regardless of the chosen method, you will need to use additional insulating fasteners to secure the conductive wires. The following factors will need to be taken into account:
- If the distance from the power line support to the construction site is more than 25 meters, intermediate support pillars should be installed.
- In winter, the load on the wires will increase due to the accumulation of ice. In this regard, it is necessary to correctly calculate the load-bearing capacity of the cable.
- Ultraviolet radiation contributes to the mechanical destruction of the insulating layer of conductor cores. Therefore, it is necessary to use additional protection in the form of corrugation.
Standards for connecting a house to a power line
Connecting electricity to a country house from a pole via air is carried out in the shortest possible time. You will need to purchase special fasteners and also use a tower. This comes with additional costs.
Power supply underground
When powering a country home with a cable laid underground, it is recommended to adhere to the following rules:
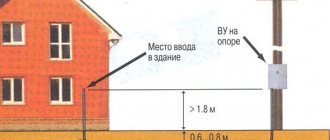
- The wires are laid in a trench at least seventy centimeters deep. Except for the case when the cable line is laid in a protective pipe, and the length from the power line support to the input panel is less than five meters. Under such conditions, it is possible to prepare a trench 50 cm deep.
- The trench must be dug at a distance of at least 60 cm from the foundation. If there is a need to lay a cable through the foundation, then you will need to use an additional pipe in it. It is prohibited to pull conductive conductors directly under the foundation.
- When excavating a trench, the following distances should be maintained from various objects:
- 75 cm - bush plantings;
- 100 cm - sewerage, water supply;
- 200 cm - trees, gas pipeline.
- The cable must be armored and have appropriate insulation protection.
Electricity supply to the house underground
The listed instructions are determined by the requirements of PUE, PTE and SNiP, regardless of the selected cross-section of current-carrying conductors.
The main advantage of this option for connecting a country house to a centralized power supply is the minimal cost of the required material. You can also do without using special equipment. Laying the power cable underground will be difficult if the area is tiled or concrete is poured.
Advantages and vulnerabilities of underground electrification
Inserting an electrical cable into a house underground instead of overhead lines has a number of advantages:
- does not spoil the architecture and design of the site;
- does not experience atmospheric influences;
- high fire safety.
In addition, eyeliner made in this way is protected from theft and vandalism. This is especially important if the building remains unattended for a long time. Underground installation of electrical cables has some disadvantages:
- may be subject to mechanical stress during the process of swelling and subsidence of the soil;
- the influence of groundwater, soil freezing, pressure from the roots of large trees;
- Insects and rodents can damage the wiring;
- it is susceptible to aging and corrosion.
The durability of electrical wiring depends on the composition of the soil and its saturation with water, thermal fluctuations and vibration processes.
Selecting a cable for entry into the house
Comparison of SIP-1 and SIP-2
The optimal material for a home electrical network is SIP cable, which can be used to organize lines with voltages up to 35 kW. The wire consists of 3-phase cores, entwined with a neutral conductor, and has a high-quality insulating coating made of polyethylene. The neutral conductor made of aluminum is located in the center of the twist.
If a SIP cable is needed for wiring from a pole to a house over the air, you should pay attention to the insulating layer:
- thermoplastic polyethylene insulation SIP-1, SIP-1A, SIP-4 and SIPn-4 can withstand temperatures up to +70 degrees;
- Cross-linked polyethylene materials SIP-2, SIP-2A, SIPs-4, SIP-3, PEV and PEVG can withstand temperature loads of up to 90 degrees and provide protection against overloads and short circuits.
A good cable for laying in the ground has an insulating surface made of compressed impregnated paper, polyethylene, or PVC. VBBShV or PvBSHV cores are reinforced with tape insulation. For areas with risks of damage, PaKShp with wire mesh is used.
Entry using unarmored cable and HDPE pipe
Electrical network in a corrugated underground
If you need to supply electricity underground at your dacha, you can use a regular wire in a PVC sheath. For installation in the ground, it is better to choose sealed and fairly durable brands of cable products - NYM, VVG or SIP. They can be used, for example, to provide lighting in a country cellar. However, products under active external influence quickly fail.
To extend the service life, pipes made of low-density polyethylene (HDPE) are used as protection. They reliably protect against stray currents, mechanical damage and the influence of aggressive soil. Corrugated products can be used for this purpose. They have increased elasticity and strength, easily restore their linear dimensions, and are easy to install. Can be reused for frequent repairs. Some models are equipped with a probe, which makes it easier to pull the cable inside the corrugation.
How to choose the right section and brand of SIP
So what kind of cable should be used to bring electricity into the house? Many people resort to using SIP cable; it is allowed in many electrical industries and even in high voltage lines up to 35 kW.
This cable has its own design feature - phase wires, most often in the amount of three, wrap around the fourth - zero. Therefore, the appearance of SIP resembles a rope twisted into a spiral. High-quality LDPE or XLPE polyethylene is used to insulate conductors. These types of materials have high resistance and a long service life, which allows them to be used even with sudden temperature changes.
The core, which is located in the middle and has zero potential, is made of aluminum alloy. Sometimes the zero does not have its own insulation, which is required for phase conductors.
The SIP cable has one serious drawback - due to the presence of insulation, the cable is insufficiently cooled, so the current loads allowed are lower than those of uninsulated conductors
When choosing SIP, you should pay attention to insulation:
- With insulation made of thermoplastic polyethylene, temperature loads of up to 70 degrees are allowed. Suitable for this parameter: SIP-1, SIP-1A, SIP-4, SIPn-4.
- When choosing cross-linked polyethylene as an insulating material, temperature loads of up to 90 degrees are allowed. Overload mode indicators and short circuit current parameters also increase. Such performance characteristics have: SIP-2, SIP-2A, SIPs-4, SIP-3, PEV and PEVG.
The SIP cross-section is also determined by power consumption, the formula is presented above.
Conclusions: should you choose an overhead or cable line?
An air line is suitable for you if:
- You want to significantly save time and money on input installation.
- You don't want the wire to be stolen by intruders.
- A hanging wire will not spoil the appearance of your site.
- You don't want to dig a trench or hire people to do it.
An underground cable line is suitable for you if:
- The appearance of your site is important to you.
- In your area, there are strong winds and wires often break due to falling trees.
- You have large-sized agricultural equipment, and you need to power several buildings in your yard.
- The power line support is located more than 25 m from your home, and you do not want to spend money on installing an additional support.
Sources:
- https://ProFazu.ru/provodka/cable-wire/kabel-dlya-vvoda-elektrichestva-v-dom.html
- https://StrojDvor.ru/elektrosnabzhenie/kak-pravilno-provesti-podzemnyj-kabel-dlya-elektrichestva/
- https://electrikmaster.ru/vvod-elektrichestva-v-dom/
- https://domikelectrica.ru/montazh-kabelya-v-zemle-20-chastyx-oshibok/
- https://ichip.ru/sovety/remont/po-vozduhu-ili-pod-zemley-kak-podvesti-elektrichestvo-k-zagorodnomu-domu-653352
Electrical distribution principle
First you need to decide what an electrical input is. This is the border between two spheres of power supply - external and internal. This is the same line that connects the home and municipal parts of the power supply
Therefore, knowing how to introduce electricity into a house from a pole with your own hands is extremely important. After all, this is the area where the load is highest.
Consequently, the requirements for input arrangement are the highest. The input resource is three times lower than the electrical wiring in the house itself.
Judging by the experience of electricians, there are several connection points:
- In 95% of cases, private houses are connected to power supply from overhead power transmission poles.
- No more than 1-2% of cases - to collector nodes of underground cable routes.
- In approximately 3-4% of cases, the connection is made to low busbars of transformer substations.
Features of electrical wiring
After arranging the distribution panel in a wooden house, you can carry out wiring to connect switches, sockets and lighting fixtures. To do this, you first need to draw up a wiring diagram.
At this stage, it is necessary to carefully consider the location of all electrical appliances in the house, which will allow you to plan the optimal location of sockets. This approach will allow you to avoid future alterations and the use of extension cords.
Open Wiring Example
As for the laying of the wires themselves, in wooden houses they are usually installed in the following ways:
- Open - the simplest, but at the same time unaesthetic, wiring option, in which the wires are simply fixed to the walls and ceiling using special fasteners. In addition, this method is far from the safest, because according to the PUE, the wires should not touch the surface of the walls.
- In cable channels, this option of doing the wiring yourself is somewhat more complicated, however, it has a number of advantages. It takes on a neater appearance, in addition, all wires are protected by flexible casings, which makes wiring safer.
Wiring in cable channels
Note! The instructions for wiring in a wooden house strictly prohibit the implementation of “twists”. All wires must be connected using special clamp terminals.
After wiring is completed, it should be connected to the distribution panel. Before doing this, it is advisable to invite a professional electrician to check that all the work has been completed correctly. (See also the article Leveling wooden floors: features.)
Important characteristics when choosing a wire
It is necessary to take into account the number of cores. In houses where a grounding loop is installed, a 3-wire is used, and where not, a 2-wire is used. Most often, wiring is reconstructed when replacing it in old houses. There is no point in using expensive material there
Pay attention to the type of cable cores, which can consist of 1 conductor or several twisted wires
A solid core has less resistance than a multi-wire one, but it is difficult to install wiring for lighting in an apartment with such a cable. The other type is flexible and can be easily installed in the voids of concrete floors or other hard-to-reach places.
Having greater resistance, the wire heats up, and as the load increases, the insulation melts or ignites. Therefore, a flexible cable with a non-flammable coating is used.
Device and material
According to the requirements of SP 31-110-2003 “Electrical installations of residential and public buildings”, internal electrical wiring must be installed with wires and cables with copper conductors and not support combustion. Despite the fact that aluminum is a metal with low resistance, it is a chemically active element that quickly oxidizes in air. The resulting film has poor conductivity, and the wires at the contact point will heat up as the load increases.
Connecting conductors made of different materials (copper and aluminum) leads to loss of contact and broken circuit. During operation, structural changes occur in the metal, as a result of which strength is lost. With aluminum this happens faster and more strongly than with copper.
By design, cable products are:
- single-core (single-wire);
- stranded (multi-wire).
Cable laying for lighting has its own specifics due to increased fire safety requirements.
Single-core wires are stiffer and difficult to bend if they have a large cross-section. Multiwire cables are flexible, they can be used both in external wiring and laid under plaster. But single-core conductors are rarely used for arranging lighting networks in residential premises. For internal installation in apartment buildings and private buildings, 3-core single-wire cables are used. Multi-wire products are prohibited for these purposes due to their high fire hazard.
Cable cross-section
The value is measured in mm² and serves as an indicator of the conductor’s ability to pass electric current. A copper conductor with a cross-section of 1 mm² can withstand a load of 10 A without heating above the permissible limit. For wiring installation, the cable should be selected with a power reserve, because a layer of plaster reduces heat transfer, which can result in damage to the insulation. The cross-section of the wire is determined by the formula for calculating the area of a circle. In a stranded conductor, this value must be multiplied by the number of wires.
Insulation and sheath thickness
Each conductor in a multi-core wiring cable has an insulating coating. It is made of PVC-based materials and serves to protect the core from damage. At the same time it creates a dielectric layer in a bundle of conductors. The thickness of the coating is standardized and should not be less than 0.44 mm. For cables with a cross section of 1.5-2.5 mm², this value is 0.6 mm.
The selection and installation of cables must be trusted to professionals.
The sheath serves to accommodate the cores, fix them and protect them from mechanical damage. It is made of the same material as the conductor insulation, but has a greater thickness: for single-core cables - 1.4 mm, and for multi-core cables - 1.6 mm. For indoor wiring, double insulation is a mandatory requirement. This protects the wire from damage and ensures the safety of residents.
Cable marking
It is applied to the cable sheath along the entire length at short intervals. It should be easy to read and contain the following information:
- wire brand;
- name of the manufacturer;
- release date;
- number of cores and their cross-section;
- voltage value.
Knowing the product designation, you can choose the right product for the job. Knowing the product designation, you can select the right equipment.
Vein colors
The coloring of the conductor insulation is necessary for ease of installation. Wires in the same sheath have different colors, which are the same along the entire length. Depending on the manufacturer, they may vary, but the ground wire does not change color. In a 3-core cable, most often the phase wire is red or brown, the neutral wire is blue or black, and the ground wire is yellow-green.
The colors of wires in electrical wiring are regulated by regulatory documents.
Step-by-step instructions for underground cable installation
So, having considered the basic requirements, you can proceed to the direct installation of the cable. You can do this yourself, without resorting to the help of specialists, but for this you will need a pre-drawn plan. I propose dividing the process of creating an underground network into several main stages:
- Marking the territory and digging trenches (according to a pre-created scheme). The recommended trench width is approximately 25-35 cm, and the depth is at least 80 cm. But keep in mind that if you are laying an external lighting cable, you can make the trenches a third less deep.
- Cleaning the trenches and pouring out the sand cushion. All debris, stones and any sharp objects should be removed from the trench, as all this can damage the cable insulation. Next, you need to pour a sand cushion about 10 cm thick. Distribute it evenly along the entire perimeter of the trench.
- Pipe preparation. Even if you use very durable and moisture-resistant wire, you will need to hide it in the pipe. The most suitable option would be HDPE pipes, which are manufactured specifically for such tasks. I note that it is absolutely not necessary to purchase an expensive pipe that meets GOST, since such products are intended for transporting pollen water. The optimal choice is much more affordable recyclable materials. But keep in mind that the smoothness, roundness and evenness of the pipe inside and outside are the main selection criteria. Also, use whole pieces of pipe to avoid sealing problems.
- Cabling. The wire is inserted into the pipe so that there is no tension in it, it should lie freely. When laying the pipe, make sure that it does not protrude above the ground level. Next, the pipe with the wire can also be covered with a layer of sand of 7-10 cm for additional reliability.
- Ensuring security. Place a special warning tape on the layer of sand clearly above the cable laying area. It is used to protect the cable from damage when digging: the digger will not be able to cut through the material, but will find a tape on which there is a mark that an electric cable is laid in this area.
- Digging a trench. This can be done using the most ordinary soil. Create at least a small mound, as the earth will sag after a while.
As you can see, when laying an underground cable you do not need a large number of special tools and materials.
Obtaining permission for underground input
An example of a cable entry project into a house
First you need to complete the project. It should be developed by a specialist. Technical documentation, plans and drawings must comply with all rules and regulations. The designer determines the brand of cable and calculates the cross-section of the conductors.
To receive a project, a number of technical conditions must be met. To connect a house to a common power line, you will need appropriate permission. For example, an agreement for excavation work is drawn up by the service responsible for facilities and communications.
Then the land plot is traced. If there are any communications in the immediate vicinity of the cable being laid, it is necessary to invite their representative to coordinate the position of the trench and control the work being carried out.
Section of Responsibility
It is through the meter that responsibility can be divided between the electricity supplier and consumer. The metering device and all lines that connect to it belong to internal supply projects. But supplying electricity to a house from a pole using a SIP wire or any other wire is the scope of servicing city electrical networks.
Disputes may arise at this point, since the electricity supplier does not allow supply until the meter is sealed. And since meters are installed exclusively by distribution network employees, the consumer has difficulties installing the outgoing line. The ideal option is to install all the internal wiring and lead the cable to the façade of the house to connect to the central power supply line.
Required safety standards
To ensure the electrical safety of installed wiring in a country house, the use of elements such as protective grounding, RCDs and automatic circuit breakers should be provided in advance.
Protective grounding
As mentioned earlier, in most cases, old four-wire power lines are used to power country houses. This means that a combined neutral and ground wire is used. If it breaks, life-threatening voltage may appear on the equipment housing. The machine will not turn off due to the rated current flowing through it. To eliminate such situations, it is necessary to install an additional grounding circuit on the site.
Design of a protective grounding loop
Note! To install a grounding system in a dacha, it is recommended to use factory-made modular-pin circuits. They can be installed in any type of soil without loss of performance characteristics
RCD
Installing a residual current device allows you to ensure the safety of a person from electric shock, as well as prevent the development of a fire. The RCD reacts to leakage currents that are formed when the insulating coating of the cores is damaged or when the neutral wire breaks. It is recommended to mount the RCD directly at the power input.
The shutdown setting is selected taking into account the calculated leakage currents of all electrical equipment used in the country. The resulting value must be increased three times. RCDs with the following rated differential currents are available for sale: 10, 30, 100, 300 mA.
Connection diagram for RCDs and circuit breakers
Automatic circuit breakers
To protect cable lines from overload currents and short circuits, circuit breakers should be used. They are established for each individual consumer group. Selection is carried out in accordance with the calculated current consumption. As a rule, individual machines are mounted on lighting and socket networks.
Choosing a method for laying cables in the ground
The method of laying the cable in the ground is selected depending on the voltage of the cable line, the purpose of the cable line, the nature of the soil and the surrounding infrastructure.
Power lines up to 35 kilovolts can be laid in the ground in any cable structure, as well as in a trench. The use of trenches is limited on the territory of power plants.
In all other territories, including cities and towns, a trench, due to its inexpensive design, is a permitted and often recommended method of laying cable power lines.
When choosing a trench as a method of laying, soil is important. The trench cannot be used in heaving soils and soils that can settle
Preference is given to soils with pebbles, sand, crushed stone, and rocks. The number of cables for laying in a trench is limited to four.
Which cable to lay
Cable installation in the ground can be done in two ways:
- without any protection (using armored KL grades)
- in pipes or special corrugation
Let's look at the first method first. Here, as a rule, a cable with tape armor is used - VBBbShv or AVBbShv.
It is not at all necessary to use armor of the type AABL, AAShV, where there is a one-piece cast protective shell made of aluminum. It could just be ribbons overlapping each other.
In this case, the armor protects not so much from external influences (someone started digging where it is forbidden to do so), but from deformation and traction forces during soil heaving. Error No. 1 Under no circumstances bury ordinary cable grades in the ground without protection home wiring.
The same applies to the SIP wire. It cannot be laid in the ground, even in pipes. Select the cable cross-section according to the connected load, but not less than 10mm2 for copper or 16mm2 for aluminum.
You can often find videos on YouTube where copper CLs with 6mm2 conductors or 10mm2 aluminum are used. This is explained by the supposedly small number of electrical appliances in the house or country house.
In terms of load, this may be enough for you, but in terms of compliance with the requirements for the minimum cross-section of the PEN conductor, you will have a violation. For single-phase power supply, the cable must be three-wire, for three-phase power supply, it must be five-wire.
Independently connecting your home with SIP wires to the line
You can connect the SIP to the house yourself, but you will have to entrust its connection to the line to electricians. However, in order to correctly install the cable, you need to familiarize yourself with the technical standards, which can be obtained from the relevant organization. Making such demands is justified by the safety of the entire line, and not just your home.
Basic Installation Requirements
To install a SIP cable from the line to your home, you need to know the basic requirements:
- the minimum height of the supply cable above the ground is 2.75 m;
- a similar distance must be maintained from windows, doors and loggias.
Typically, the consumer connection is made using a SIP 4 cable without a supporting core. The cross-section of such a wire is 16 mm2, which meets the requirements of the PUE. Conductors of a smaller cross-section may not withstand the load, so such cables are prohibited from being used for entry into the house.
Before you start pulling the cable into the house with your own hands, you need to draw an exact diagram of its passage from the pole to the building. This will help you take measurements to purchase the wire. Moreover, you need to buy SIP with a small margin, taking into account measurement errors
It is important to pay attention to the number of cable cores. If the connection is single-phase, it is enough to connect 2 wires to the house, that is, a phase and a zero. For a three-phase connection you will need 4 wires
For a three-phase connection you will need 4 wires.
The house input will have to be connected to the main line. To do this, you will need to install a special connector on each core. It is best to connect SIPs with piercing clamps. They will eliminate the need for stripping cable ends and ensure a tight connection.
When laying an overhead connection line from the pole to the house with your own hands, you must take into account the PUE standards. The rules clearly state that the maximum distance from the consumer input to the support is 25 m, otherwise an intermediate pole will have to be installed.
Input connection options
You can extend SIP from the pole to the house by air or underground. The first method is easier. In addition, the cable is always under supervision and has free access for repairs. Underground installation is more difficult, however, it protects the wire from accidental breakage.
Which method is preferable is chosen by the owner of the house himself, and installation work is carried out as follows:
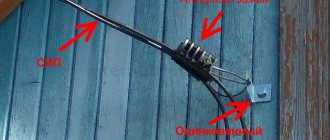
- For an aerial connection, the cable is secured with anchors to the facade of the building. For aesthetics, it can be laid inside a corrugation or plastic case. For your information, if the walls of the house are wooden, then the use of a box is mandatory.
- An underground connection involves digging a trench from the house to the pole at a depth of 800 mm. The wire is laid in a PVC pipe or corrugation. Only the ends of the pillar and the façade of the building come to the surface. The cable is fixed to the wall with anchors in the same way as for the air connection.
Further work involves introducing the wire into the building.
Which wire is better to introduce into the house?
A dispute often arises that SIP is not suitable for entry into a building. Why? After all, it is isolated and also resistant to many negative factors. In fact, this is true, and it can be introduced inside the house. However, SIP is very rigid and does not bend well, which increases the complexity of installation. It is recommended to lay a cable with copper conductors inside the building, since this metal is the best conductor of electricity. Many electricians recommend making internal input using a VVGng cable.
To make an entrance to the house, a distribution panel is installed on the facade. A self-supporting insulated wire is connected to it, inside it is connected to automatic circuit breakers and an electric meter, and from them a copper cable is brought out into the house.
Connecting SIP on a support
The final work is to connect the entire input to the main line. When laying underground, the SIP coming out of the sleeve is lifted along the pole, securing it with clamps
It is important that the plastic sleeve extends out of the ground to a height of 2 m
For an air connection on the facade, the SIP is fixed with a clamp to the anchor bracket. A roller block is installed on the pole and the wire is pulled along it. The end of the SIP on the pole is secured with a clamp with a loop, placing it on the anchor bracket.
Connecting the SIP to the insulated main line is done with the same piercing clamps. If it is necessary to connect SIP with bare line wires, connecting aluminum sleeves are used. The ends of the main and SIP cores with the insulation removed are inserted inside, after which the sleeve is pressed. Bolted connectors for subscriber branches can also be used.
The first supply of electricity to the consumer is carried out in the presence of a representative of the energy company.
Digging a trench for cables - distances and dimensions
The selected cable should be carefully laid in the trench. What size should it be, what distances should be maintained when excavating it? Error No. 2 Firstly, this trench cannot be dug close to the foundation of the house.
Don't miss: How to connect aluminum and copper wires. How to correctly connect aluminum wires with copper wires in electrical wiring
It is necessary to maintain a certain distance of 60cm.
After laying in the ground, the cable should not fall on the line of action of the foundation force, directed at 45 degrees from the base.
Standardized clearances from plants and trees on your site are also required. Here are the minimum dimensions for underground cable laying from nearby utilities, structures and obstacles.
What dimensions should this trench have? You can navigate here by the standard project A5-92 “Laying cables with voltage up to 35 kV in trenches” - download.
The cable depth is 0.7 m. Please note that this is the distance from the surface to the top of the cable itself. Error No. 3 Taking into account the fact that there will be a sand cushion of 10-15 cm under it, the total depth of the trench should be at least 900 mm. Not 0.8m, as many recommend, but 90cm, and certainly not 0.7m.
Where did all these numbers even come from? Why can’t you just bury the cable in your yard to the depth of a spade bayonet? Why such torment?
You are not doing the installation in a public place on a city street or at a construction site where heavy vehicles will drive. The most important reason for such a depth is to ensure optimal temperature conditions for the cable.
By laying it as close to the surface of the earth as possible, you will lose the main advantage of underground installation - the lack of influence of ambient temperature and weather conditions.
The upper layers of the soil warm up much more, and moisture after good rains simply will not reach the cable sheath if it lies at 70 cm. The same cannot be said about 30-40 cm. The second factor of such a laying depth is pressure. The deeper the cable lies, the more evenly the pressure from above is distributed on it. Especially under external influences - a car driving along the KL highway, something heavy was placed on top, etc. Error No. 4 If your entrance to the house runs from a support across the road, then here you need to bury the cable to an even greater depth - 1000 mm.
The minimum trench width is calculated by the formula = cable diameter + 100mm on each side for a sand bed.
By the way, so that such labor-intensive work on digging a trench does not go to waste, some additionally lay a grounding loop in it. Just don’t forget about the minimum margins of 300-350mm.
Well, in the case of protecting the cable with a pipe, the circuit is not a hindrance at all. After all, it is not necessary that it be in the shape of a triangle or square.
And if the geometry of the site and the location of the input allow, the same trench is adapted for simultaneous installation:
- input cable
- cable to video intercom
- street lighting
- power supply for sliding gate automation
