Here you will learn:
- Features of various designs
- Types of boiler breakdowns and their possible causes
- Finding the cause of the breakdown
- Disassembling the water heater
- Removing scale
- We change the anode and temperature sensor
- Checking the circuit with a tester
- Changing the heating element in the boiler
- Fixing tank leaks
- When to call a specialist
- How to care for your water heater
To minimize problems with the device, you should study its structure and operating principles. Typically, private households use storage models rather than flow-through ones, which allow them to use electricity more efficiently. Such a device consists of a heat exchanger tank, inside of which a heating element is installed - a heating element, connected to the power supply.
An important part of the device is the thermostat. This element allows you to maintain a constant temperature of the water inside the storage tank. Water flows through pipes into the heat exchanger. If its temperature is too low (and this is usually the case), then the thermostat sends a signal and turns on the heating element.
The water is heated until it reaches the required temperature. After this, the thermostat operates again and turns off the heating element. Hot water is taken from the tank and replaced with cold water, the heating process is repeated again and again. This is a general diagram of the design and operation of a conventional storage water heater.
The design of a storage water heater is not too complicated. The most vulnerable elements of such a device are the tank, heating element, thermal relay and gasket
Also popular among consumers are instantaneous water heaters, which are available on the market in a wide range. Such models are arranged somewhat differently. They heat not a static volume of water, but a flow. They use more powerful heating elements that start when the water is turned on and stop when it is turned off.
To study the operation and design of a particular model in more detail, you need to carefully read the technical documentation accompanying it.
The heater tank is a durable stainless steel container, one or two millimeters thick. No matter how resistant this material is to corrosion, these processes still periodically arise and develop, which leads to water leaking from the device. One of the common causes of such breakdowns is electrocorrosion.
Flow-through heaters usually break down for the same reasons as storage models. Diagnostics and repair of such devices are carried out using similar methods.
To prevent it, you need to regularly, i.e. annually, replace the magnesium anode installed inside. This element is designed specifically to prevent electrocorrosion. Over time, it wears out, and storage tank owners neglect to replace this important part.
As a result, the tank, which has been serving well for some time, suddenly begins to leak. The incorrect condition of the magnesium anode can also affect the condition of the heating element. On the outside, the storage tank is usually enclosed in a metal or plastic housing, and it also has an insulating shell that prevents heat loss.
Regular cleaning of the insides and heating elements of the water heater from dirt and scale, as well as replacing the magnesium anode will reduce the likelihood of breakdowns
Damage to the outer shell and insulation occurs rarely, usually due to careless handling of the device. Cracks and chips on the body of the water heater may not disrupt its operation, but this will lead to a deterioration in the properties of the heat insulator and will negatively affect the functioning of the device as a whole.
Inlet and outlet pipes for cold water and outlet pipes for hot water usually do not cause any problems if the installation of a storage or flow-through heater is done correctly.
An electrical diagram of a household water heater will help you correctly repair it, which usually consists of replacing damaged elements
Typically, a water heater is equipped with two thermostats, one of which is designed to control the water temperature, and the second monitors the condition of the first device.
Sometimes a third thermostat is used, which determines the working condition of the heating element. In any case, a broken thermostat will have to be completely replaced. There are capillary, rod and electronic types of thermostats. Their design is different, but the principle of their operation is similar.
The insulating gasket not only serves to seal the connection between the elements of the water heater, it is also necessary as an electrical insulator. It is recommended to replace this element regularly during each maintenance of the water heater.
The thermostat shows to what temperature the water inside the device is heated. If this element breaks, the water heater will still perform its functions, although data on the degree of heating will not be received.
Features of various designs
Before you start repairing a water heater with your own hands, you need to figure out what type of device it is. There are several varieties:
- electric boilers;
- flow-through;
- indirect heating systems;
- geysers.
The word "boiler" means "boiler". It follows from this that such products include not only storage devices, but also flow-through devices.
Electric heaters
This type of boiler is considered the most popular. The design consists of a tank, a thermal insulation layer (polyurethane foam is often used), and an upper casing.
The heating element is located at the bottom of the device. The water is heated to a certain temperature, which is pre-set on the thermostat, the maximum value is +75°C.
If no water is drawn, the device maintains temperature readings by turning the heating element on and off. It is equipped with overheating protection, so when the maximum performance is reached, the device turns off.
The optimal temperature value is +55°C; it is in this operating mode that the structure will last longer and save electricity.
This device is the most common
Hot water is drawn through a tube located at the top of the device. The cold liquid inlet is located at the bottom of the device. The metal tank is protected from corrosion by a special magnesium anode, which has a certain working life. The element must be replaced once or twice a year, depending on the hardness of the water.
Indirect heating systems
Such products do not independently generate thermal energy; water is heated using a coil in which the coolant is located.
Cold water comes from the bottom of the device, hot water comes out from the top. Indirect heating devices can provide large quantities of hot water, which is why they are often installed in large houses. The operating principle is to exchange heat between liquids at different temperatures. In order for the output to be +55°C, heating is carried out to +80°C.
The process takes a lot of time, this feature must be taken into account when choosing a suitable device. Like their electrical counterparts, indirect ones are equipped with a magnesium anode. The structures can be wall-mounted or floor-mounted; in addition, they can be connected to a double-circuit gas boiler. More expensive models are equipped with additional electric heating elements, which reduce heating time as needed.
Gas and flow structures
Gas-powered appliances are only wall-mounted. There is a thermal insulation layer inside the structure. There is a chimney pipe at the top, and a gas burner at the bottom. The latter is a source of heating, in addition, it is helped by the heat circulation of combustion products. An automatic electronic system monitors and extinguishes the gas as needed. The column is equipped with a protective anode.
Gas water heaters produce large amounts of hot water in a short period of time.
Flow systems do not accumulate liquid inside. The heating process occurs at the moment the tap is opened, when the devices allow water to flow through them. The structures operate on both gas and electricity. Gas products are modern modifications of popular geysers.
Electrical systems carry out heating using heating elements of increased productivity. Despite their small dimensions, the products are high-power, so their scope of use is limited. Hot water flows regularly without interruption for heating.
Gas water heaters have greater efficiency
Gas Water Heater Troubleshooting
(click to enlarge)
Water leaks from above
Just like with an electric water heater, you should first check the cold water inlet and hot water outlet, pipes and connections to make sure they are not loose. A faulty or loose temperature and pressure relief valve or inlet valve can also be the cause of a leak. See water heater leaking from above for more information.
Water leaks from below
When you see water that appears to be leaking from the bottom of your gas water heater, it could be due to condensation (try turning up the thermostat), a leaking or loose drain valve, or a T&P valve draining water through the tank overflow pipe due to excess pressure . If the water heater tank is leaking due to corrosion, replacing the water heater is necessary. See water heater leaking from below for more information.
No hot water
The very first thing to check is if you have gas mileage and that your pilot light is on. If so, the problem may be with the thermocouple, which is not correctly sensing that the pilot is burning and, in turn, the gas is not ignited. If you have a newer style water heater with electronic ignition, check the fuses to see if the breaker trips. See here for more information.
Not enough hot water
Some reasons for not having enough hot water or hot water too early include not having the thermostat set at a high enough temperature (especially during the winter months), a faulty thermostat, a faulty or damaged immersion plug that allows cold water in to mix with the hot water in top, or simply not having a water tank that is large enough for your needs. Although you may have a 40 liter aquarium, only about 28-30 liters will use hot water at a time.
The water is too hot
Chances are you have your thermostat set too high. This most often occurs when moving into the warm spring and summer months and forgetting to set the temperature after raising it to account for the cold winter temperatures. Less likely is a faulty thermostat that needs replacing.
Water takes too long to heat up
If it feels like your gas water heater is recovering too slowly, then the thermostat may be set too low, the burner hole may be too dirty or clogged and needs cleaning, the gas pressure may be too low, or the chimney baffle may be too dirty and needs cleaning . For many, it is simply a matter of having too small a water tank heater for their family's needs and never giving it a chance to fully recover.
Low Hot Water Pressure
If you have an older home, there's a good chance you have less than 1/2-inch diameter galvanized pipes throughout your home. This significantly reduces the amount of hot water that can flow through your home's plumbing. Unfortunately, the only way to get noticeably higher hot water pressure is to upgrade to the new 3/4-inch pipes that are used in modern homes. Definitely no small task. You may be able to increase your water pressure a little by cleaning out sink or shower head aerators that tend to clog over time. Also, make sure your water inlet valve is fully open and not partially closed.
Pilot There Will Be No Light
When you know exactly how to light the pilot light on a water heater it's not yet light, there are several possibilities why. Either the pilot light hole or tube is clogged or requires replacement, the thermocouple is loose or faulty, there is air in the gas line or the gas valve is faulty.
Pilot Won't Burn
It's just not as annoying as a modeling light, what isn't a light is a modeling light that comes out frequently. Most often, thermocouples need to be replaced. Other possibilities include a bad gas valve or a partially plugged orifice, which can cause downdrafts that blow out the igniter.
Burner Won't Burn
A tube that sometimes leaks or creates an unusual, higher or lower than normal flame or even a whistling sound is most often due to dirty or clogged burner holes. As with the modeling light, a faulty thermocouple or dirty reset can also be causing the problem.
The water heater hisses
Just like an electric water heater, a hissing, clicking, knocking, knocking or noise can sometimes come up. On gas models, it is usually due to sediment accumulating at the bottom of the tank, expanding/contracting pipes that rub against the wood frame in the walls, or dirty/clogged parts that gas flows through.
Rusty color of water
Once again, corrosion of the anode rod or inside the water tank itself is usually to blame. While replacing the magnesium anode is not difficult or expensive, the more serious problem lies if the tank shows signs of corrosion. It's only a matter of time before a leak develops and a new water heater is needed.
Types of boiler breakdowns and their possible causes
There are many reasons why boilers break down, most of which can be fixed with your own hands.
- The boiler does not heat the water. The cause may be a breakdown of the heating element or the electrical system of the device. If the water takes a very long time to heat up, then a large layer of salt scale has accumulated on the heating element, which must be removed. Limescale can also cause the device to be turned on or off too often.
- The water is overheating. The cause may be a thermostat failure.
The thermostat has a special temperature sensor and automatically turns off the heating element when the water is heated to a predetermined limit.
- Tank leaking or leaking from under the flange. The problem may be damage to the tank due to corrosion or mechanical stress. The reason is usually a lack of grounding or natural wear of parts.
Often the cause of a leak from the tank is wear of the rubber gasket through which the heating element flange is pressed against the body
- The plug or socket gets very hot. Typically, overheating occurs due to a mismatch between the power consumed by the heater and the electrical wiring capabilities or due to loose contacts.
- Extraneous noises in the boiler. Possible reasons include: scale on the heating element, water pipes that are too narrow, or a failure of the check valve that needs to be replaced.
- Error indication on display. Devices with built-in electronic systems may malfunction due to power surges. In this case, the electronic module breaks down and needs to be repaired or replaced.
An error indication is often the result of a failed electronic module, which is usually easier to replace
- No hot water supplied. This means that the thermostat or heating element has failed (poorly secured).
- The water is too hot or steam formation is occurring. The reason may lie in an incorrect connection of the boiler or a broken thermostat.
- Low water temperature. The thermostat temperature mode is set incorrectly, the heating element is installed or is faulty.
- Hot water is black. The reason is corrosion, which is caused by too hard water. The boiler may need to be replaced.
- The boiler is deformed (inflated). The reason is high pressure, which is not provided by the device manufacturer. A pressure regulator needs to be installed.
The pressure regulator maintains the water pressure within the limits for which the boiler is designed
- The boiler is electrocuted. This may happen because the cable is damaged, the heating element has burst, or the electronic panel or control board has failed.
- The boiler does not turn on. The cause may be low water pressure. The instructions for each device indicate the nominal pressure value, which will ensure high-quality operation of the device. The same problem can occur when contacts burn out, which are destroyed over time due to weakened fastening. Therefore, they need to be tightened regularly.
- The boiler does not turn off. The shutdown button is melted, the temperature sensor is faulty, as a result of which the relay contacts stick and cannot turn off the heating element after the water supply stops.
- Heating elements often burn out. The cause may be a large layer of scale on the element or an incorrectly installed unit.
If a large layer of scale forms on the heating element, it begins to work with increased intensity and quickly burns out
- Air appears in the boiler. Air may enter the system due to a malfunction of the check valve or a leak in the gaskets.
- The boiler does not let water through or the indirect heating boiler does not see the boiler. This may indicate that the device is not connected correctly.
- The gas water heater whistles, makes noise or blows. This behavior may be a sign of low gas pressure, insufficient draft in the chimney, or contamination of the pilot burner wick. The whistle appears when scale is deposited in the heat exchanger or a foreign object gets into it. The malfunction may also occur due to a defective valve, which modulates the combustion power of the flame.
- A pipe broke off the water heater. The cause may be improper connection of the device, wear of fasteners and gaskets, or too much water pressure.
Vulnerable elements of a water heater
Even before installing the device, you should carefully study its technical data sheet and operating instructions. These documents usually quite accurately reflect the structure of the device, describe the position of the main elements, give recommendations for proper use, etc.
The boiler storage tank is usually made of stainless steel about two millimeters thick. On the outside, a layer of heat insulator is applied to the container, which is covered with a body made of metal or polymer materials.
Many breakdowns of water heaters are in one way or another related to the tank, and they manifest themselves in the form of a leak. In order to respond correctly and choose the right strategy for eliminating problems, you must determine the location of the leak and identify its cause.
The cause of a leak is not always damage to the tank; more often its presence indicates that:
- the protective gasket is leaking;
- there were problems in the operation of the heating element;
- The thermostat and/or temperature sensor has deteriorated.
To protect the storage water heater, a safety valve is included in the piping circuit or built into the housing, the presence of which significantly reduces the number of breakdowns and the occurrence of emergency situations.
Sometimes a leak occurs in the area where the hot and cold water pipes enter the boiler body. Most often this is a consequence of improper installation, which appears immediately after putting the device into operation or shortly thereafter. You need to take care in advance to ensure that all connections are properly sealed.
In high-quality boilers, not one, but two or three thermostats are usually installed. The first regulates the water temperature level in the device, the second is needed to monitor the condition of the first, and the third device allows you to check the working condition of the heating element.
The design of these elements may vary. Rod and capillary devices are popular; the electronic version of the thermostat is considered very convenient to use. But the operating principle of such devices is almost the same; in the event of a breakdown, the device simply needs to be replaced with a similar model.
However, such a malfunction will not be critical to the operation of the boiler. If the heating element is in order, the device will continue to heat water. But lack of control over the heating temperature can lead to incorrect operation of the device. The result may be a broken heating element or other problems.
Finding the cause of the breakdown
Before you begin repairs, you need to find out what is causing the problem.
This can be understood in advance without disassembling the device itself.
The main malfunctions of electric water heaters are:
- the device does not turn on;
- short circuit protection (RCD) is triggered;
- the water heater does not heat water or does not comply with heating standards;
- boiler leaked.
If a leak appears, you need to find out where the leak is. If it is the heating element gasket that has leaked, then such a defect can be easily eliminated. You just need to replace it with a new one, especially since they cost pennies.
It is worth noting: if water drips from the body of the water heater itself, then it will probably be easier to buy a new device, because such a defect is practically irreparable. In water heaters, the first thing that fails is the water heating elements - heating elements, since they are the main working element of the design .
You can first understand that it is the heating element that has failed by the following indirect signs:
- automatic protection is triggered;
- knocks out the machine on the meter;
- the water does not heat up, or the device does not heat well;
- the hissing of the water heater and the release of water with a cloudy consistency and an unpleasant odor.
With such symptoms, the heating element is most likely to fail. This can also be determined by the appearance of the heating element itself - the shell is damaged.
Sometimes heating elements burn out without visible damage to the shell, then this can be determined using a tester.
If the ohmmeter shows infinity at the terminals, then the nichrome spiral is broken.
If it is zero, then there is a short circuit somewhere. In any case, such an element needs replacement.
In some cases, the heating element fails for the following reasons:
- The heating element has served its term;
- the unit was turned on without water;
- the water heater was turned off for a long time, but the water was not drained;
- sudden changes in voltage in the network.
In any case, the heating element needs to be changed. Of course, the easiest way is to use the services of a specialist, but it is quite possible to change the heating element yourself. It is necessary to warn that repairs must be done in a certain sequence to avoid confusion. This is an important key to successful repairs.
Boiler maintenance: technical inspection and cleaning
The manufacturer's instructions should be followed for cleaning and maintenance. This will help you avoid many troubles later.
General recommendations for cleaning heating elements (heating elements) are as follows: - Dry-type heating elements should be cleaned at least once every 2 years - Wet-type heating elements should be cleaned once a year - If the water heater operates in conditions of increased productivity (eg: public place) heating elements must be cleaned at least once every six months.
In the event that the product passport says that technical. Maintenance should be carried out by a service center employee, it is better to follow this. Otherwise, independent intervention will affect the warranty service of the device. Self-inspection and maintenance of the drive consists of the following steps:
- The device is disconnected from the water supply and electricity supply systems
- The water from the tank is completely drained
- By unscrewing the fastening bolts, the housing opens and the heating element is removed
- The inner surface of the tank and the heating element are cleaned of accumulated scale and dirt
- The protective gasket is being replaced. If there is a magnesium anode, it is replaced with a new one. The magnesium anode serves to prevent electrical corrosion of the tank and, therefore, increases its service life. Electrical corrosion can also be caused by a lack of grounding of the device.
- The final step will be to reassemble the water heater
Disassembling the water heater
It is recommended to follow one simple rule: if the boiler shows the slightest signs of malfunction, it is better to perform a complete disassembly and a comprehensive inspection. To do this, you need to drain the water through the cold water supply pipe, opening the “hot” tap to suck in air. With proper hydraulic piping of the boiler, this possibility is always provided. Unpack the connection fittings and loosen the anchor nuts to lift the tank up and away from the wall.
Classically shaped water heaters are serviced from the bottom. First you need to remove the protective cover of the control unit by unscrewing several screws and unfastening the latches. The task is quite delicate: not only can some fastening screws be hidden under stickers, a regulator knob or a nameplate, but also the fragile clips are located far from obvious places.
Inside the block there is electrical wiring: the red and blue wires, terminated with terminals, are removed from the contacts of the heating element, the yellow-green one is disconnected by twisting the grounding nut onto the housing. Next, we disconnect the wires of the thermostat and temperature controller, remove the thermal conductor, which is sometimes made in the form of an ordinary single-wire copper wire.
Having separated the tank and the electrical part, we tighten the nuts securing the technical flange. After removing them, you need to put some effort and tear the flange off the neck; it can become completely stuck. The tank must be in an inverted position to prevent any remaining water from leaking onto the floor.
When the flange, along with the devices attached to it, is removed, you will be able to clearly assess the quality of tap water. Scrape off the bulk of the dirt from the functional elements directly into the tank and set it aside for the time being; we’ll return to the heating element and anode a little later.
For stylish and modern tanks, the lower part of the body plays the role of a protective casing. Indication and control panels and a built-in thermometer are auxiliary equipment that is not directly related to operation; if they fail, they are replaced modularly.
Why is the water heater not working?
First of all, you need to figure out the cause of the problem. Most often, owners of water heating equipment encounter the following malfunctions:
- The water pressure at the outlet of water heating equipment decreases.
- The boiler takes in water and heats it, but there is no water coming out.
- Water does not flow into the tank of the water heating unit.
A boiler is a complex system consisting of many pipes of various diameters, filters, valves and faucets. Failure of any node can lead to malfunction of the entire system.
Boiler design
Here are the main causes of malfunctions:
- Deposition of insoluble carbonate salts (scale) on pipe walls, valve parts or valves.
- Ingress of rust particles.
- Blocking the flow of water with an air bubble.
- Failure of the valve or valve (jamming of parts).
First of all, you need to find the problem node. To do this, sequentially disconnect the parts from the inlet and see after which unit water stops flowing into the system. Once the problem area is found, repairs can begin.
Removing scale
After you empty the tank, you will need to disassemble the boiler yourself. To do this, carefully disconnect all the fastons connected to the thermostat and unscrew the bolts, of which there are usually 6 pieces.
When removing the heating element, some more water that remains in the tank will pour out. It is recommended to clean the heating element itself immediately, while it is wet and scale deposits have not hardened. For cleaning, we recommend using special products that can be sprayed onto the heater. After some time, the deposits can be easily removed with a wooden spatula or even a dull knife. Also, for repairs, you can boil the heating element in a bucket with the addition of a special acid to the water, which will effectively solve the problem. To be sure to get rid of scale, we recommend using fine-grained sandpaper (“sandpaper”) to clean the tubes to a metallic color.
Simultaneously with the repair of a boiler that heats water for a long time or poorly, it is recommended to replace the magnesium anode, which protects the tank from corrosion. To do this, dismantle the worn rod and purchase exactly the same one so you can replace it yourself!
After this, you need to reassemble the boiler in the reverse order and check whether the weak water heating was repaired. Do not forget that first of all you must fill the tank completely with water, after which you will connect the plug to the power supply and start.
We draw your attention to the fact that there is a situation when the boiler does not heat the water because the heater is broken. In this case, self-repair consists of testing it with a multimeter, setting the resistance measurement mode. We will tell you about this below!
Malfunctions of electric water heaters
(Click to go to gas water heater problems)
(click to enlarge)
Water leaks from above
If you think there is a leak at the top of your electric water heater, it could be one of several things. A cold intake or hot exhaust pipe may be loose, the T&P valve may be damaged, or the intake valve may be leaking. Everything is easy to fix. For more information, see The water heater is leaking from the top.
Water leaks from below
An electric water heater that leaks from the bottom is usually due to normal condensation, a leaking electric heating element gasket, or a small amount of water is released through the overflow pipe because the T&P valve opens to release excess pressure in the tank. In some cases, the actual tank is leaking and the only problem is replacing the water heater. For more information, see The water heater is leaking from below.
No hot water
The water in an electric water heater is heated by two heating elements (in most cases). The most common reason for absolutely no hot water is that the breaker has failed and you should check the fuse first. If this is not the cause, then the heating elements may be faulty and need to be replaced. Lastly, it could be a problem with the limit/reset switch on the thermostat. Maybe it was tripped because the water was too hot or it was simply faulty and needed replacing.
Not Enough Hot Water
This is most likely due to a problem with the thermostat. This can be as simple as adjusting the desired water temperature on the thermostat for a specific heating element. On electric models, the thermostat is usually hidden behind a removable panel on the side wall of the tank and a layer of insulation. Unlike gas models, the electric thermostat is factory installed and is not intended to be changed, but sometimes you have to. During the cold winter months, you may need to raise the thermostat temperature slightly so that hot water cools faster through the cold pipes running through your home's water supply.
Other possible reasons for not having enough hot water are a faulty thermostat, a faulty element, protruding wires, or simply a water tank that is too small for your needs. See “what size water heater do you need” for more information.
The water is too hot
Again, this is likely due to the thermostat(s) where the temperature is too high. Simply access the thermostat and adjust as needed. This may also be required during the transition from cold to warm seasons. For our recommended temperature values, see here.
If you cannot lower the water temperature low enough, you need to replace the thermostat or there may be some type of wiring issue (it is recommended to call the pro if later).
Water takes too long to warm up
This is one of the disadvantages with electric water heaters. On average, the recovery time (the time required to heat the entire volume of water) on an electric model is twice that of a comparable model. That said, if it takes longer than usual for the hot water to restore, there may be a problem with the heating elements (including sediment buildup on them) or the thermostat and those parts may need to be replaced. If your household is looking to use more hot water than it did a few years ago, you may want to consider investing in a new model with a larger tank capacity or installing a point-to-use water heater that's close to the water source you use most often (read: soul). You may need to do some research on tankless vs tank water heater comparisons.
Low hot water pressure
Most often, these reports have low hot water pressure, there is an old house with 1/2-inch diameter galvanized pipes that enters and exits the water heater. Since the water pressure will be automatically limited, the only solution is to install modern 3/4-inch pipes, which allows more water to flow through. Calcium deposits and rust inside pipes or sink aerators can also contribute to low hot water pressure as a leaking water heater.
The water heater is noisy
If you hear clicking, hissing, cracking, knocking, or other strange noises from your water heater, it is most often due to scale buildup on the heating elements or too much sediment in the bottom of the tank. Other reasons include noises, a leak somewhere, too much pressure inside the tank, or noisy pipes due to normal expansion/contraction. When your water heater makes noise, it is often harmless, but boiler cleaning is necessary.
Dirty or rusty colored waters
Rusty hot water is often a sign of corrosion of the anode itself or even the tank. If left untreated, the water heater will most likely need to be replaced once the corrosion becomes severe enough for the tank to develop leaks. If the water is not rusty but dirty or discolored, it may be due to scale on the heating elements or sediment making its way into the hot water outlet.
Smelly Hot Water
Most likely, the stinky and stinky hot water is due to bacteria in the tank. Homes that use well water as a water source are more susceptible to their water emitting an unpleasant odor. Flushing your water heater periodically helps, but you may have to do a full tank cleaning. A quick fix may be to raise the temperature of the thermometer to 140 degrees to kill any remaining bacteria.
For more information on troubleshooting an electric water heater, watch the video below:
We change the anode and temperature sensor
Anode replacement tools:
- Hose.
- Big basin.
- Cleaning agent.
- Knife.
- Screwdriver.
- New anode.
- Spanners.
Before carrying out work, you must disconnect the boiler from the network. The sequence of procedures is as follows:
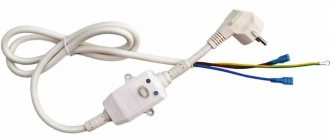
- Remove the cover and disconnect the wiring or simply unplug it from the outlet. If the boiler has an automatic device, then it must be turned off.
In order to disconnect an electric boiler from the network, it is usually enough to remove its plug from the socket
- Shut off the water supply to the boiler inlet and pipeline. Disconnect the pipes from the tank.
- Open the cold water valve. Since cold water will come from below, and hot water is usually supplied from above under pressure, a vacuum will be created when the tap is opened. Therefore, it is necessary to supply air through the hot water supply fitting.
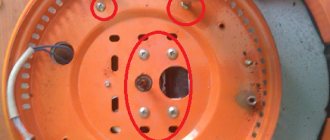
- Place a basin under the boiler and use a screwdriver to unscrew all the fastening screws. Remove the protective cover. We will have access to heating elements and temperature sensors.
When removing the heating element from the tank, dirt may fall out, so you must first place a wide basin under it
- Remove the flange and temperature sensors.
- Remove the heating element without damaging the rubber gasket.
- Remove the boiler from the wall, put it in the bathroom and direct the hose with water inside so that all remaining scale is washed out of the tank.
- To clean the heating element, take 50 g of citric acid and one and a half liters of water. Place a heating element in the solution and leave for 2 days.
The heating element should be left in a solution of citric acid for two days
- Remove the anode and look at its condition. If there is only one pin left, you will have to buy and install a new anode.
If the magnesium anode has exhausted its service life, you need to buy and install a new one
- After cleaning, install the heating element with the magnesium anode back.
- If necessary, you can also replace the temperature sensor if it fails. It will not affect the boiler itself, so the device will switch to normal operation. The boiler may have a scale with an arrow or a digital indicator.
When performing routine cleaning of the boiler, you can also replace the temperature sensor by installing a more modern model with a dial or digital indicator
- Reassemble the boiler in reverse order. Here you need to pay attention to the condition of the gaskets. If they are damaged, it is best to replace them with new ones to avoid water heater leaks after assembly.
Rubber gaskets are consumables, so it is best to replace them with new ones
- Connect the boiler to the network after it is completely filled with water. Pay attention to the presence of leaks and how quickly the device heats up. If water does not drip anywhere and the boiler works well, it means that the work of cleaning the heating element, replacing the anode and temperature sensor was carried out correctly.
DIY water heater repair Ariston 80 liters
Not every user knows how to drain water from a water heater. Almost everyone who owns an electric heating tank sooner or later faces the question of how to clean it from scale. Due to rising utility bills, including hot water supply, more and more residents are buying water heaters to constantly supply hot water to their apartment or house. The boiler is easy to use, does not take up much space and allows you to use it at any time.
A household appliance such as a water heater is very popular. Convenient and low maintenance, it has found its application both in private houses and apartments. However, not everything is as smooth as it may seem, and sometimes owners are faced with incorrect operation of the equipment. The reasons that, for example, hot water does not come from the boiler when you open the tap, may be different. If problems occur, do not panic and replace the device with a new one; in most cases, breakdowns can be repaired.
The inlet part of the water heater passes large volumes of water through itself. To protect the internal parts of the device from foreign elements and water debris, the design provides for the installation of a coarse filter
.
Due to the specific nature of its operation, the filter is subject to periodic contamination. Rusty pipes and dirty water form dense formations on the mesh gasket, interfering with the flow of liquid.
The malfunction is eliminated after thorough cleaning under running water. To do this you need:
- unscrew the cap of the flask using a special key;
- remove the mesh gasket and remove contamination;
If the clog is too dense, you can use dishwashing detergents.
Do not leave the mesh soaked in the solution with the product, just apply it to the sponge and wipe the part. After this, you need to install the filter in place, repeating all the steps in reverse order.
Coarse filter
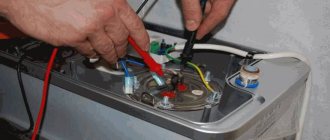
Checking the circuit with a tester
If the light on the boiler is on, but the water does not heat up, then it is likely that the heater, which we discussed above, is not working. Checking it at home is quite simple; you need to install the tester probes on the contacts of the heating element and look at the resistance on the display. For a working heater, the resistance can vary between 0.4-0.7, as shown in the photo below. If you see “1” on the display, it means a break has occurred and you need to replace the part with a new one, because it is almost impossible to repair it.
By the way, if the boiler is electrocuted or when it is turned on the RCD turns off by itself, then the cause of the breakdown is, again, in the heater from which the leak occurs. You can check the malfunction by connecting one probe to the contact of the heating element, and the second to the tube itself. You will see “1” on the display, the part is in good working order and there is no need for repair, a negative value or too high means replacement is required. We described in more detail how to check the heating element with a multimeter in a separate article.
Another reason why the boiler does not heat the water or, on the contrary, heats up too much, is the failure of the thermostat. You can check it in two ways - with a tester or a lighter.
Everything is clear with the tester, you need to follow a similar method, but as for the lighter, everything is more interesting. To begin, remove the thermostat and press the button on it (circled in the photo below). After this, the copper contact of the thermostat must be heated. If after some time the button returns to its original position (it is knocked out), the thermostat is working. If the thermostat does not work, you can repair a boiler that does not turn off or turn on by replacing this part with a new one. I would also like to note that to replace the thermostat on a water heater there is no need to drain the water. It is enough just to disconnect the equipment from the network and disconnect all the connected wires.
Also, sometimes there is a breakdown - the water heater display does not show the temperature or the display does not work at all. In this case, check all the elements of the circuit and if you do not find a break, most likely the control unit is broken. You will not be able to repair electronics with your own hands if you lack experience and knowledge, so you will have to take the electric water heater for repair to a service center.
Troubleshooting common problems
The surface of the tank consists of several layers: the tank itself, insulation, outer casing, etc. This allows you to retain heat and save energy, but makes it difficult to repair the device.
The fact is that if the integrity of the internal tank or outer shell is damaged, then this has a devastating effect on the condition of the heat-insulating material.
To remove the protective cover from the boiler, you need to find and unscrew the mounting bolts. If they are hidden under decorative stickers, you need to carefully peel off the protection and save it
The cause of tank failure may be careless handling of the device during installation and/or operation. If you drop a heavy object on the case or accidentally hit it, a chip, crack, or other similar damage may form on the surface.
It is almost impossible to fix such a breakdown on your own; you will have to either contact a service center or simply buy and install a new boiler. Of course, you can solder the hole inside or outside, but this method will only solve the problem for a while.
It is unlikely that it will be possible to provide sufficient protection for thermal insulation material at home. It will gradually deteriorate, as a result the boiler will retain heat much worse, and corrosion processes will develop. If the boiler begins to leak, this does not necessarily mean that the tank itself has deteriorated.
When replacing the protective gasket, you need to carefully remove the worn element and install exactly the same new one. The fasteners should be tightened gradually to avoid distortion of the gasket.
First you need to accurately determine the location of the leak. If water is leaking where the gasket is installed, you may just need to replace the element. The procedure for maintaining the device during which such an operation is performed has already been described above.
One of the most obvious and common boiler breakdowns is a malfunction of the heating element. If the water inside stops heating, this is most likely the problem.
If you need to replace the heating element, you should choose an element exactly the same in size and characteristics so that the boiler works correctly
Of course, before you begin dismantling and disassembling the device to replace the heating element, you should make sure that there is power in the house and that electricity flows freely to the boiler. For such a check, you should use a tester, applying it to the contact points.
To check, it is recommended to perform the following operations:
- The tester's measurement scale should be set to between 220 and 250 V.
- Record the voltage value at the terminals of the device connected to the electrical network.
- If there is no voltage, you can confidently state that the heater is faulty.
- If voltage is present, the test must be continued.
- The water heater should be disconnected from the power supply.
- After this, unfasten the thermostat from the heating element and remove the insulation from the contacts of the heating element.
- Now you need to use a tester to measure the voltage on the non-insulated contacts.
- The absence of a reaction allows us to conclude that the heating element is malfunctioning; its presence indicates that the device is working properly.
The heating element works properly, but the water does not heat up? The thermostat is probably faulty. To check this version, you should set the tester to maximum, and then check the voltage sizes at the input and output of the device.
Lack of response will indicate that a replacement needs to be made. The presence of voltage does not give a clear signal that the thermostat is working properly; the test should be continued.
A broken thermostat with a temperature sensor simply needs to be replaced with a new similar device. During diagnostics, you need to handle the temperature sensor bulb carefully.
Now you need to set the tester to the minimum value and take measurements on the thermostat contacts for some time. If you cannot fix the sensors, you need to ask someone for help.
You should heat the edge of the temperature sensor (for example, using a lighter), and monitor the operation of the temperature relay. If heating caused it to open, the device can be considered serviceable. Lack of response indicates that a replacement needs to be made.
The working condition of the thermostat is diagnosed using an electrical tester, measuring the voltage at the contacts of the device, as well as checking the operation of the sensor and relay
If both the heating element and the thermostat are working normally, there may be no heating due to incorrect settings of the device. A simple adjustment will solve the problem. Another possible scenario in this situation is a breakdown of the control board. In this case, you will have to seek help from a specialized center.
A breakdown of the electronic control board is difficult to fix with your own hands; you will need the help of qualified specialists who will help you choose a suitable replacement and configure the device correctly
Replacing the heating element, gasket or any other element of the boiler must be carried out with a new part, which in all respects corresponds to the faulty one. Therefore, it is better to dismantle the old element and take it with you to the store.
It doesn’t hurt to study the product labeling or its characteristics set out in the boiler’s technical data sheet, so that a working element matches the broken one not only in appearance.
Disassembling the boiler for repairs is carried out in the following order:
- Power and water supply are turned off.
- Drain the water inside.
- Unscrew the fasteners from the protective cover.
- Remove the cover.
- Dismantle the heating element.
- Remove the thermostat and temperature sensor.
Wall-mounted models are usually easier to work with if you first remove them from the wall. The cover can be located on the bottom, side, or even on the front panel - it all depends on the model. Particular care must be taken when handling the temperature sensor.
If the device's bulbs accidentally break, they cannot be repaired. Most likely, you will have to completely replace the entire thermostat.
Scale deposits on the surface of the heating element can be very significant, so care must be taken when removing it from the housing
It also helps to be careful when removing the heating element. If too much scale has accumulated on the surface of the heating element or the bulb that protects it, it may be difficult to remove it from the tank. Sudden movements and excessive force can cause permanent damage.
If you encounter a problem that you cannot solve on your own, be sure to contact the service center. Only a specialist can make an accurate diagnosis, correctly perform repairs or install a new part.
Changing the heating element in the boiler
You can do the same with the heating element: immerse it in a solution of citric acid for a day. If the situation is critical, then it is better to replace the part. After the heater and the walls of the tank have been cleaned, you need to install all the parts in place, pour water, and connect electricity. Be extremely careful when connecting the water heater to the power supply. Before starting, do not forget to check the water heater for leaks. Fill it with water and wait half an hour - if no water leaks out, you can turn it on.
Important! If you have forgotten how the device was connected, the diagram shown on the thermostat can serve as a hint. You can also use your smartphone camera before disconnecting
How does a water heater (boiler) work?
A typical boiler consists of:
- Cases.
- Special insulating layer.
- Water heating tank.
- heating element.
- Magnesium anode (an element that takes on all the scale).
- An inlet pipe that connects to the hot water tap.
- Safety and temperature control sensors.
- Control panels with adjustment knobs and display (depending on model).
Since the inner surface of the tank is a place where there is a high risk of pathogens, manufacturers make the walls of the tank from stainless steel or titanium coated. Glass porcelain is the most inexpensive coating, but it quickly develops microscopic cracks.
The boiler is a sealed tank, inside of which there are elements necessary to heat water and ensure durable and safe operation of the device.
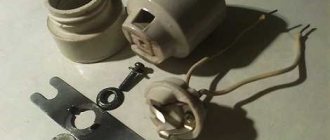
Heating elements (heating elements) are divided into:
- wet (located directly in the water). Wet heating elements are hollow structures, inside of which there is a heating coil. The space of the heating element around the spiral is filled with sand or magnesium oxide, that is, a substance with a high degree of thermal conductivity;
Wet heating elements are in water and heat it by transferring heat from their surface through direct contact
- dry (located outside the water tank). Dry heating elements are electrically conductive elements that are separated from the water by a ceramic casing. Such heaters are safer, since scale does not appear on them, the risk of short circuit is minimized and their service life is increased.
The dry heating element is located in a special dielectric flask and transfers its heat to water through its body
According to the method of fastening, heating elements are divided into:
- flanged (pressed with a bolted connection);
The flanged heating element is inserted into a special niche on the boiler body and pressed against it using a nut screwed onto a threaded rod
nut (equipped with a thread and screwed in like regular light bulbs).
The nut heating element is screwed into a special cartridge on the body of the water heater
Typically heating elements are made of steel or copper.
Features of operation of water heating devices of various types
All water heating devices are divided into:
- Electric storage.
- Flow-through.
- Indirect heating boilers.
- Gas water heaters (water heaters).
The word "Boiler" is translated as "Boiler". This means that this type of device includes not only storage heaters, but also various flow-through structures.
Electric boilers
Electric boilers are the most popular types of water heating devices, which consist of a tank protected by a layer of thermal insulation (for example, polyurethane foam) and closed with a top casing.
An electric heating element, which is located at the bottom of the tank, heats the water to a certain temperature set on the thermostat. Water is heated in all electric water heaters up to 75 °C. If water is not drawn, the boiler device maintains the required temperature in the mode of turning the heating element on and off. The heating element is equipped with special protection against accidental overheating, so it will turn itself off when the water reaches its maximum temperature.
The optimal heating temperature for the boiler is 55 °C, since it is in this mode that the device can provide the required volume of water for hot water and save energy.
The intake occurs through a pipe that comes from the top of the tank, where the hottest water is located. Cold water is supplied through the bottom of the device, where the heating element is located. The metal tank is protected from corrosion by a magnesium anode. It degrades over time, so it needs to be replaced every 2 or 3 years.
Despite the fact that the hot water outlet in most boiler models is located at the bottom, heated water is drawn from the top through a tube that runs inside the tank
Indirect heating boilers
Indirect heating boilers do not generate thermal energy themselves, but heat water for hot water supply from a coil through which the coolant flows.
Inside the indirect heating boiler there is a spiral-shaped heat exchanger through which the coolant from the heating system passes, the water in the tank is heated due to the heat it gives off through the walls of the coil
Cold water enters through the lower part of the heating device tank, and its exit occurs through the upper part. Such a boiler can easily provide an increased volume of hot water, so it is installed in large houses.
The operating principle of an indirect type water heater is the exchange of thermal energy between liquid media with different temperatures. In order for water to flow from the tap at a temperature of 55 °C, it is necessary to heat the boiler to 80 °C. Such devices heat water for quite a long time, so this fact must be taken into account when choosing. Just like electric models, they are equipped with a protective anode, and more expensive options have two coils, through one of which water flows from the boiler, and the second is connected to another heat source.
Indirect heating boilers can be floor- or wall-mounted, and are also offered in conjunction with double-circuit gas boilers. Some models of water heaters have additional electric heating elements that speed up the process of heating water if necessary.
In some models of indirect heating boilers, you can install an electric heating element and turn it on if you need to quickly heat water
Gas storage water heaters
Gas boilers, like electric ones, are hung on the wall and have a tank covered with a layer of thermal insulation. There is a gas burner at the bottom, and a chimney pipe is located at the top. Here, the source of heat generation is a burner that heats a tank of water. Water heating occurs not only due to gas, but also through heat removal from combustion products. This effect is achieved thanks to a gas duct with dividers, which passes through the tank and exchanges its heat with water. The electronic system automatically controls the operation of the gas burner and, if necessary, extinguishes or ignites it when the required temperature is reached or decreased. A protective magnesium anode is installed in the column.
Gas storage water heaters can immediately produce a large volume of hot water, but over a short period of time.
Gas boilers heat water by burning main fuel and require the installation of a full chimney
Instantaneous water heaters
Flow-through boilers do not accumulate water, but heat it when the tap is turned on immediately at the moment it passes through itself. They come in electric and gas. Gas instantaneous water heaters are modern modifications of well-known gas water heaters, which still supply many city apartments with hot water.
In an electric flow-through device, water is heated by a heating element with increased productivity. Despite its small dimensions, the device has high power consumption and therefore its scope of application is noticeably limited. Hot water is supplied regularly without interruptions for heating.
A instantaneous gas water heater is a modern analogue of the popular gas water heater
Fixing tank leaks
A water collection tank leaking can occur for a number of reasons. Errors made during installation can lead to poor sealing at the base of the pipes. In this case, it will be necessary to replace the gaskets.
If everything is in order with the tubes, you need to carefully inspect the body itself for cracks. A cracked or rusted tank cannot always be repaired. However, if the defects are not too large, then the holes in the container can be repaired using welding. As an alternative, you can use so-called cold welding, but this will only be a temporary solution to the problems.
If water does not enter the boiler
If the described reasons have been eliminated, there is water pressure, but the boiler still cannot be filled, the cause may be an incorrect connection (the inlet and outlet pipes are mixed up) or a clogged mesh filter pad. It's easy to fix these problems: unscrew the hoses, rinse the filter and put everything back in the correct order.
Water heater operation diagram
Another cause of the malfunction is a broken check valve. It is installed at the entrance to the storage tank and does not allow water to return to the water supply. It can also release excess pressure when overheated. Over time, the valve spring becomes clogged with particles of scale and rust, causing the valve to jam. Disassembly and thorough cleaning will help resolve the problem. If it was not possible to clean the part and restore its functionality, you will have to look for a replacement.
Having figured out why the boiler may stop working normally and how to eliminate the most common malfunctions, it is worth focusing on preventive measures.
Most breakdowns can be avoided by following simple care recommendations:
- Do not overheat the water. Lower temperatures mean scale forms more slowly, leading to breakdowns.
- The design of many boilers includes the use of softening cartridges. Don't skimp on water softening, as this will help you avoid spending on repairs.
- When leaving for several days, turn off the device without draining the water. But turning it off at night to save energy is impractical due to the high wear and tear on the electrical part.
You can solve the problem yourself. Let's look at the most common malfunctions of water heaters.
When to call a specialist
When the water heater stops heating water, it immediately becomes clear that it is faulty. However, sometimes this is noticeable indirectly, the automation simply regularly knocks out, the RCD is triggered, and upon contact with water it gives an electric shock. All this also indicates a faulty boiler. Of course, in most cases you can repair a water heater yourself, but there are times when you need to call a specialist.
There are breakdowns that only a professional can fix.
Such breakdowns include the following:
- an almost new boiler shuts down unexpectedly;
- The settings on the thermostat are constantly reset;
- The RCD is constantly tripping;
- The water heater bulb is leaking.
It is worth noting that in the latter case, repairs are rarely effective; it is better to purchase a new boiler. Of course, you can replace the magnesium anode yourself, but it is better to entrust it to specialists by contacting a service center.
Installation of instantaneous water heater
Below I will describe the installation process of the Thermex System instantaneous water heater (Termex System) , a photo of which is given at the very beginning of the article. Here is the box from under it:
Instantaneous water heater Termex system_box
The erotic fantasies of designers of other heaters will play out more strongly, read the article to the end
It is mounted on the wall using ordinary dowels, its weight is light, so there are no problems. The main thing is to take into account that in addition to the electrical wire a WATER wire is also connected; you need to buy water hoses of the required length in advance.
How to care for your water heater
The quality of main water allows for an increased content of hardness salts. A concentration of magnesium and calcium salts that is harmless to humans precipitates on the surface of the heating element. The same layer of salts on the inner surface of the tank is not dangerous. It increases the protective layer and becomes additional insulation. And the heating element must be cleaned annually, since the sediment does not conduct heat, the element overheats and fails. In an acidic solution of acetic or citric acid, the precipitate is destroyed and the element becomes pure.
As a preventive against scale, you can use preliminary softening of water before supplying it to the water heater. There are special water purification filters for this. Be sure to install a filter on the water supply line to remove suspended substances from the water and direct them into the sump.
Device and principle of operation
In general, we can talk about three types of devices capable of storing and heating water:
- electric water heaters;
- indirect heating boilers;
- gas water storage tanks.
All of these devices have a similar design and operate on the same principle. They differ only in the heat sources used to heat the water. In this case, the role of a heater can be performed by: a heating element, a coil with a coolant supplied to it (for example, a boiler), or a gas burner. Structurally, all boilers have the form of a wall-mounted tank, the internal surfaces of which are covered with heat-insulating material. Cold water enters it through a pipe located in the lower part, and the heated liquid is taken from the upper part.
The heaters in all boilers are located in the lower part. The water in the tank is heated to the required temperature and then used by the owner for its intended purpose. To maintain and, if necessary, adjust the required temperature regime, a special thermostat is built
. In addition, the boiler is equipped with a temperature meter, with which the user can control the degree of water heating, and a safety valve that prevents the unnecessary leakage of liquid.
Main types of faults
During operation of water heaters, several types of malfunctions can occur:
- The heating element has burned out, the water does not heat up;
- The thermostat has deteriorated;
- the magnesium anode has used up its resource;
- a large layer of scale on the heating element and the inner surface of the boiler.
All of these faults, except for replacing the thermostat, require disassembling the water heater. Considering that there is no fundamental difference in connecting Ariston storage water heaters with different capacities and modifications, the disassembly process will be the same.
It can be divided into several stages:
- disconnecting the electrical power cable;
- draining water from the boiler tank;
- dismantling the flange and directly opening the boiler.
How to remove a water heater from the wall
At the back of the boiler there is a plate with holes for mounting to the wall. At the same time, anchors with hooks are fixed in the wall, on which the unit is suspended through these holes. The heater, freed from water, is disconnected from the pipes (using an adjustable wrench) and raised so that it can be easily removed from the hooks.
Fastening the boiler to the wall with hooks
Sometimes a device suspended from a wall is additionally secured with bolts. In this case, you will first have to unscrew the bolts with a wrench and then remove the installation from the wall. The removed boiler is turned over and placed on the floor with the pipes facing up - this will make it easier to dismantle it.
How to disassemble a water heater with a heating element
Diagram of an electric flow heater.
This is a relatively inexpensive type of boiler that has a heating element attached to nuts. This device, as a rule, does not have external adjustment. Its distinctive feature is the presence of a hexagonal flange, which can be unscrewed with a 55 wrench or a regular gas wrench.
Algorithm for disassembling a water heater with a heating element:
the device is disconnected from the network, the water is drained and the check valve is dismantled, which will only complicate the work; the boiler cover is removed, which is screwed closer to the pipes; The thermostat is being dismantled; place a container under the water heater into which the remaining dirt, water and scale will be drained; unscrew the flange counterclockwise (existing dirt and scale can complicate the work, so they are carefully cleaned off with a wooden or plastic knife; as soon as the thread ends, the flange is carefully removed); in order to remove the heating element, remove the scale from the bends of the heating element and, carefully swinging it left and right, pull out the lower part of the element.
How to disassemble an economy class water heater (boiler) Economy class water heaters are distinguished by an oval flange shape, therefore the principle of their disassembly has some peculiarities.
Stages of disassembling an economy class boiler:
- the device is disconnected from the power supply, the water is drained and, if necessary, the check valve is unscrewed;
- There are two screws near the drain and fill pipes that should be unscrewed and the water heater cover removed;
- with a sharp downward movement, the thermostat is removed and access to the flange is opened, which is attached with a nut to the body using a strip; After the nut is unscrewed, you can remove the flange.
How to disassemble a medium-class water heater Medium-class water heaters have an average price category. The device comes with flanges that are attached directly to the neck using 6 bolts.
The disassembly process for this water heater is as follows:
- the power supply to the device is turned off, the water is drained and the check valve is removed;
- to remove the cover, find the screws and unscrew them (the location of the screws may vary);
- after this, it is necessary to remove or remove the thermostat (depending on whether it is connected to the heating element with a wire or inserted into it);
- all necessary screws or nuts are unscrewed.
In what cases is it necessary to disassemble the boiler?
Gas boiler wiring diagram.
The magnesium anode in the boiler, used as a catalyst to protect against corrosion of the tank walls and aggressive effects on the heating device, must be changed periodically.
The service life of the anode depends on the quality of the water used in the boiler (it is recommended to install a special filter on the cold water supply pipe), the operating temperature of the water, and the intensity of operation of the water heater.
The standard period of use of a magnesium anode, indicated in the boiler operating instructions, does not exceed 6 months. When using the boiler in a gentle mode, the magnesium anode can last 1-1.5 years without replacement.
Along with replacing the anode, as a preventative measure for the water heater, it is necessary to thoroughly clean the inside of the tank from scale and wash the walls.
The heating element must also be cleaned using special chemicals or a regular metal dish sponge.
As a rule, the heating element fails.
Diagram of connecting the boiler to the network.
If the water from the boiler has an unpleasant odor, yellow or brownish tint, this indicates corrosion and clogging of the tank. The same is evidenced by the fact that the water takes too long to heat up and the appearance of loud extraneous sounds during operation of the heating element.
It is necessary to immediately disassemble the boiler, determine the malfunction and eliminate it. In any case, you should thoroughly rinse the boiler and make sure that both the walls of the storage tank and the heating element are clean.
If there is a leak in the boiler, you need to make sure that the rubber waterproofing gasket is reliable. If necessary, the gasket should be changed.
If the leak occurred as a result of depressurization of the storage tank itself, it is not possible to repair such a breakdown with your own hands. This may be a manufacturing defect - then the boiler must be replaced in accordance with the warranty agreements.
Sometimes, as a result of improper operation of the boiler, the walls of the storage tank may rust. In this case, the procedure for replacing the storage tank may cost more than a new water heater.
Ariston boiler analysis
Disassembly of Ariston boilers must be carried out according to a special algorithm, taking into account some features of the device, primarily the oval flange. Thus, the preparatory stage includes the well-known power outage, as well as the draining of water necessary for further analysis. It is also possible to remove the check valve if dismantling requires it. (See also: How to make a boiler with your own hands)
The subsequent actions are similar to the established algorithm for disassembling water heaters. That is, you need to unscrew the bolts located below and remove the cover. The thermostatic device is released with a slight downward movement. Removing this equipment allows access to the flange. Ariston boilers secure the flange with a nut and a strip, so its removal will only be possible after removing these fasteners
It is important to remember that the removal of the heating element and flange is carried out by first turning the heating element down. The same algorithm of actions must be performed to assemble a disassembled boiler
The device is cleaned using all known methods, including chemical action of special agents, or mechanical action with a stiff brush.
It is very important to take into account the asymmetrical flange shape when reassembling the unit. In order to avoid problems with reassembly, it is best to remember the location of the flange in the neck
You can choose the terminal as a reference, since its position is much easier to remember. It often happens that after disassembling the unit begins to leak, in this case it is recommended to change the rubber gasket in advance.