For a three-phase motor, the presence of a starting winding is an unnecessary element. Consuming 380 volts, it is connected directly to the network, the stator coils are phased in a certain way. Requires starting from a 230 volt network - the craftsmen begin to use chemicals. Star and delta circuits appear, using a capacitor that provides a voltage shift of 90 degrees in an arbitrary winding relative to the remaining two. The first one acts as a starting one; the capacitor should turn off when the engine picks up speed. In fact, a three-phase motor turns into a two-phase one. Of course, you can make a power supply that produces three sinusoids, artificially shifted 120 degrees relative to each other. The start-up protection relay of the refrigerator echoes the operating principles of asynchronous motors and serves to implement the functions implied by the name.
Starting an asynchronous motor with a single-phase 230 volt network
Voltage 380 volts - three phases of 230 volts each, both cases consider the effective value. Causing a similar thermal effect on passive resistance. The alternating voltage changes continuously, the figure is averaged over time. The result is called the effective (effective) value of the quantity.
For an induction motor to operate correctly, the stator field must rotate. It is easy to ensure (proven by Nikola Tesla): apply the corresponding phases to three windings. Vector addition of fields occurs. The resulting vector rotates smoothly, dragging the rotor. The efficiency of three-phase motors on a 380 V network is the maximum among other varieties and types of inclusions. In industry, voltages that are unusual for residential buildings are used. Can a tenant get 380V? Hypothetically, yes. A professional electrician will find three phases shifted relative to each other at the desired angle (120 degrees).
High-rise buildings are powered by a 380 volt network. The apartment receives 1 phase. Rare exceptions are limited to modern high-rise buildings. Some household appliances (cookers) are powered by two phases. The measure reduces the requirements for the electrical wiring of the apartment.
Phase one. Rotation of the field is fundamentally impossible. Motion is obtained by adding at least two vectors. You have to use the services of a capacitor that shifts the voltage by 90 degrees. In fact, with a star or triangle circuit, one winding acts as a starting winding and causes the field to rotate. Subsequently, the value changes linearly, since the engine has gained speed, the inertia is enough to maintain rotational motion. The alternating field will rhythmically push the rotor in the desired direction. The smoothness is inferior to the resulting addition of three vectors; the functioning of home appliances is sufficient.
Why are apartments deprived of three-phase voltage? Working with it requires deep knowledge and excellent practical skills. 230 volts will help any housewife to provide an outlet. One phase and ground (neutral). No need to think. The wording is exaggerated, but close to the meaning of the real state of affairs. We lose efficiency, we get simplicity in return.
What does the starting winding do? The engine will not enter operating mode, creates a second vector, which, to a first approximation, allows us to consider the field inside the engine to be rotating. It’s enough to move the uneven circle and spin the rotor. The speed is up, the starting coil must be turned off, there is minimal use, a lot of energy is wasted, reducing the efficiency of the device.
Operating principle of the starting protection relay
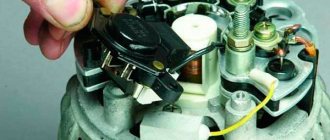
The starting coil must be turned off when the speed is up. At the moment of start, the windings consume a large current, the effect allows you to track the moment of recommutation. The refrigerator start relay performs protective functions (not always). The option is implemented by heating the sensitive element with electric current. The threshold is exceeded - the circuit breaks, regardless of whether the desired refrigerator mode has been reached according to the thermostat readings or not. Two schemes for the operation of the starting relay have been invented (at the same time it can be protective):
- "Tablets" work on the basis of a material that expands by heat. Initially, the working element is cold, the starting winding consumes current, ensuring a smooth start of the asynchronous motor. Gradually, the temperature of the tablet rises, causing the contact to open, and the working coil remains switched on. We believe that to maintain the mode, a mechanism is installed inside the relay to prevent the tablet from cooling. Operating winding choke, heating element. If a button relay breaks, you can often hear the rustle of scattered powder inside, changing the position of the device body.
- Induction relays are based on the action of electromagnets. When starting, the current is high and due to this the core presses the contacts of the starting coil. Over time, engine consumption drops. As a result, the current will no longer balance the spring, and the contacts of the starting coil open. Please note: it is important to orient the relay in space correctly. Often the core falls, carried away by the force of gravity. But testing such elements is much simpler: turn from side to side so that the contacts of the starting relay change the resistance from zero to infinity.
The tablets often come with thermal relays on a bimetallic plate in the same housing. The current of the working coil passes through it. As soon as the value exceeds the response threshold, the contacts open, stopping the compressor. The bimetallic type refrigerator relay circuit is based on heating the sensitive element. There is nothing complicated about it! The two plates are welded tightly to each other. The coefficient of expansion of metals in them is different. When heating occurs, the double plate bends towards the material that elongates less. It becomes possible for the relay to operate. This scheme is often used in household appliances.
Start protection relay design
The start-up relay resembles a tablet or an indeterminate shape in appearance. This is such a small element located directly next to the black barrel-shaped compressor housing. Have you ever wondered why this soot color was chosen to paint the heart of the refrigerator?
The answer is simple: black absorbs heat, but also radiates well. In which direction the process moves determines the direction of the temperature difference between the compressor and the environment. When the motor is hot, the black housing gives off heat to the air. In addition, there is a fan nearby that creates forced cooling of the compressor.
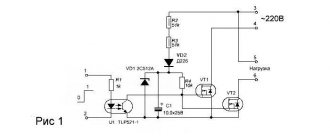
Switching diagram of the refrigerator start-up relay:
- Two entrances:
- Phase 220 V.
- Earth.
- Three outputs:
- Starting winding of an asynchronous compressor motor.
- Working winding of an asynchronous compressor motor.
- Earth.
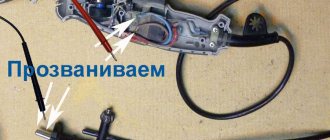
You can usually find out what is connected where and by the color of the wires. In any case, repairs should be carried out carefully. It’s easier to find out the compressor ground if you scrape a little paint off the housing and ring the three contacts. But this method is left for last when the others have not helped.
DXR induction start-up protection relays are mounted on a fixed frame and work in tandem with DXM compressors. The designation may be followed by a number that is the same for both devices. The difference in designs is in the operating voltage and operating and releasing currents. To speed up the breaking of the circuit when overheated, a magnet is located behind the bimetallic plate. If metal enters the field of action, the system’s response speeds up. The magnet also serves to hold the bimetallic plate with the contact open a little longer than necessary to normalize the temperature. This is an additional protective measure.
The induction relay for the RTP refrigerator compressor differs in that it can also be located on a wire. Doesn't have to be attached to the frame. The work is carried out with compressors DXM 3 and 5. The difference from DXR is a slightly lower operating current. This will better protect the compressor. The release current is the same. Craftsmen use refrigeration compressors to manufacture high-pressure apparatuses and receivers. Tires are inflated and pneumatic equipment is used.
Before you buy a relay for your refrigerator, make sure that the product matches the type of compressor. The element must then be installed correctly. It is better to take exactly the brand that was available before the repair. If the relay of the Biryusa refrigerator is equipped with the RTK type, it is better to take this, despite the fact that both RTP and DXR are also suitable for the DXM engine. Lookup tables can help determine device compatibility. Indicate the necessary technical information.
The refrigerator is considered the most common household appliance that is installed at home for storing food. It is represented by a combination of a large number of different nodes. The refrigerator relay controls the operation of the compressor and electric motor. Like many other elements, the one in question may fail. Therefore, it is important to pay attention to its performance characteristics.
Device and how it works
The relay in the refrigerator is considered an important element that is responsible for proper power supply of the installed asynchronous motor. The features of the device are as follows:
- The field located inside the motor device must necessarily rotate. This can only be checked by applying the correct phase value to the three phase windings. To ensure such conditions, a three-phase 380V network is required, but it is not found in domestic conditions. A refrigerator start-up protection relay is installed when the device is powered from a two-phase network.
- Field rotation is possible only if there are two vectors. Field shifting requires a compressor that provides a 90-degree voltage shift. In this case, a smooth start is practically impossible, but the conditions created are sufficient for the uninterrupted operation of the device.
- A second vector is created, thanks to which the field begins to rotate. The force generated is sufficient to spin the rotor. To improve installation efficiency and save energy, the coil is switched off.
The device operates according to a simple circuit; the refrigerator starting relay can last a long time. The operating principle is characterized by the following features:
- The start relay for the refrigerator compressor determines the maximum energy consumption at the beginning of operation. In this case, such a device is used as additional protection; a thermal relay is installed; when the main element heats up, the circuit breaks.
- The device is characterized by different operating principles. After a period of time has passed, the main part heats up and the relay turns off, thereby reducing energy consumption.
Motor relays can be classified according to design characteristics. The most common versions are the following:
- Pills. A similar design of the starting relay is made using a substance that can expand when heated. When the engine starts, the device is cold, but as it operates it heats up. A constant increase in temperature leads to the circuit opening, leaving only the coil working.
- Inductive relay. This device works on the principle of interaction of two electromagnets. The maximum amount of current that is supplied causes the core and the starting coil contact to interact. If the current drops, the connection weakens.
- Compressor relay with bimetallic plates. This version opens the contact almost immediately after the temperature rises.
Refrigerator start relay: what it is, how it works and how to fix it yourself
A household refrigerator is one of those devices without which we cannot imagine our usual comfortable life. Any breakdown entails confusion and financial costs.
Therefore, it makes sense to study the operation of the device and, in case of surprise, apply the acquired skills.
The compressor drive of a refrigeration device is an ordinary electric motor operating on the desynchronization principle; current is supplied to it from a single-phase network with a voltage of 220 V.
The highlight of this element is that when turned on, a refrigerator starting relay is required, which in some devices also serves as a fuse for the motor windings.
Where is it located and how to check
The refrigerator can have a variety of relays installed. A similar device is located in various parts of the system, it all depends on the design features. The check takes into account the following:
- Replacing a relay in a refrigerator is carried out taking into account the fact that the device is located on a wire without a rigid attachment to the frame. In this case, the protective device is located in close proximity to the compressor. Performance is not affected by the placement of this element.
- The test is carried out using a multimeter. Indicators indicate device malfunctions.
If you carry out an independent check, you can carry out repairs for minor faults. You need to check the relay if there is strong noise or other signs.
Asynchronous or collector: how to distinguish
In general, you can distinguish the type of engine by a plate - a nameplate - on which its data and type are written. But this is only if it has not been repaired. After all, anything can be under the casing. So if you are not sure, it is better to determine the type yourself.
This is what a new single-phase capacitor motor looks like
How do collector motors work?
You can distinguish between asynchronous and commutator motors by their structure. The collectors must have brushes. They are located near the collector. Another mandatory attribute of this type of engine is the presence of a copper drum, divided into sections.
Such motors are produced only as single-phase ones; they are often installed in household appliances, as they allow one to obtain a large number of revolutions at the start and after acceleration. They are also convenient because they easily allow you to change the direction of rotation - you just need to change the polarity. It is also easy to organize a change in the rotation speed by changing the amplitude of the supply voltage or its cutoff angle. That is why such engines are used in most household and construction equipment.
Commutator motor structure
The disadvantages of commutator motors are high operating noise at high speeds. Remember a drill, an angle grinder, a vacuum cleaner, a washing machine, etc. The noise during their operation is decent. At low speeds, commutator motors are not so noisy (washing machine), but not all tools operate in this mode.
The second unpleasant point is that the presence of brushes and constant friction leads to the need for regular maintenance. If the current collector is not cleaned, contamination with graphite (from brushes being worn out) can cause adjacent sections in the drum to become connected and the motor simply stops working.
Asynchronous
An asynchronous motor has a stator and a rotor, and can be single or three-phase. In this article we consider connecting single-phase motors, so we will only talk about them.
Asynchronous motors are characterized by a low noise level during operation, therefore they are installed in equipment whose operating noise is critical. These are air conditioners, split systems, refrigerators.
Structure of an asynchronous motor
There are two types of single-phase asynchronous motors - bifilar (with a starting winding) and capacitor. The whole difference is that in bifilar single-phase motors the starting winding works only until the motor accelerates. Afterwards it is turned off by a special device - a centrifugal switch or a start-up relay (in refrigerators). This is necessary, since after overclocking it only reduces efficiency.
In capacitor single-phase motors, the capacitor winding runs all the time. Two windings - main and auxiliary - are shifted relative to each other by 90°. Thanks to this, you can change the direction of rotation. The capacitor on such engines is usually attached to the housing and is easy to identify by this feature.
You can more accurately determine the bifilar or capacitor motor in front of you by measuring the winding resistance. If the resistance of the auxiliary winding is twice as large (the difference can be even greater), most likely this is a bifilar motor and this auxiliary winding is a starting winding, which means that a switch or starting relay must be present in the circuit. In capacitor motors, both windings are constantly in operation and connecting a single-phase motor is possible through a regular button, toggle switch, or automatic machine.
Malfunctions and their elimination
Do-it-yourself refrigerator repair is not always done, as this requires a small set of tools and consumables. If the relay burns out, then there is a possibility of failure of the installed motor or compressor.
If the compressor is working properly and does not turn on when commanded, there is a possibility that there is no voltage on the starting winding. Repairing a refrigerator can only be done after a detailed study of what caused the problem. The factor may be:
- Electrical circuit break.
- The problem is the contact strip.
- The protection is triggered, after which the active element does not return to its original position.
If the refrigerator turns on for 20 seconds and then turns off quickly, this indicates a rapid response of the protective mechanism. The reason may be a malfunction of the thermostat or safety mechanism. The most common problems are:
- To turn on the device, energy is supplied; operation occurs due to problems in the operating winding of the installed motor.
- The relay does not open the contacts in the starting winding circuit.
- The defense mechanism is defective. False alarms occur even with a minor defect.
Problems with the contact strip are common and occur on many refrigerator models. In this case, two cases are distinguished:
- No current flow occurs in the event of contact closure.
- Sticking of the bar when the moving element does not lower.
The curvature of the position of the bar leads to the fact that the refrigerator stops working. In most cases, the entire device is replaced; repairs involve replacing basic elements that are quite difficult to find on sale.
Troubleshooting often involves replacing the entire element. A relay is a simple device; there are many reasons for failure:
- Jamming of the movable contact group. This leads to the fact that two moving elements do not complete or open the circuit.
- Failure of the heating element of the winding. Environmental influences may cause changes in the properties of the material used during manufacturing.
When checking the device, you need to conduct a visual inspection. Signs of burning or melting of the wire may indicate that the relay needs to be replaced. Looseness of the device indicates a lack of contact. Corrosion or oxide causes a significant decrease in conductivity; mechanical removal is sufficient to eliminate the problem.
How to test a refrigerator relay for functionality with a multimeter
In modern refrigerators, a posistor relay is installed. To check its performance, you need to use a multimeter. Its probes are respectively connected to the terminals of the working and starting windings, between which there is a posistor. If the resistance value is approximately 30 ohms, the device is working properly.
You can check it in another way. The relay case is opened, the tester probes are brought to the sides of the posistor disk and the resistance is measured. At the same time, they make sure that there are no cracks or chips on it. If the compressor is in working condition, but does not turn on at the command of the control unit, it means that there is no voltage on the stator starting winding. This can happen if the posistor overheats, problems arise with the contact strip, or the circuit breaks, and the protection system is triggered, which then does not return to its previous position.
There are situations when the device turns on for a few seconds, then turns off. This mainly happens because the relay's protection mechanism is triggered. The problem may be hidden in a malfunction of the working winding of the motor. Also, if the mechanism is faulty and there is slight heating, a false alarm occurs. It is necessary to carry out a complete diagnosis of the start-up relay, because there are many causes of failure.
In the induction device, take out the solenoid and check the contacts. If they are oxidized, then they are cleaned with sandpaper. The broken core is replaced, and the surfaces in contact are wiped with alcohol.
The induction relay is placed strictly in the direction indicated by the arrow.
After all these steps, the relay is connected to the compressor and the refrigerator is turned on. The motor should work. If this does not happen, you need to check the compressor.
How to replace
Replacing the relay in the refrigerator is carried out at a service center or independently at home. To carry out the work, a tester and a screwdriver are required to dismantle the element.
How to remove
You can remove the device yourself, taking into account the following points:
- Before carrying out any work, the device must be disconnected from the network, after which you need to wait some time to de-energize the entire system.
- The RTP type can be removed by simply disconnecting the contacts. A relay on a refrigerator for starting an engine is often installed without insulating the contacts, which causes the appearance of oxide on the contacts. Therefore, problems with dismantling may arise.
- You can replace the device depending on how it is attached. Rivets, screws and latches are used. You can unscrew the screws with a screwdriver; the latches are pressed out.
The type of mounting method used largely depends on the refrigerator model. You can replace the mechanism yourself only by selecting a relay taking into account the characteristics of the equipment.
Which relay to choose and how much does the part cost?
After checking the mechanism, you can often find that it needs to be completely replaced. The refrigerator starting relay is selected taking into account the following points:
- Technical characteristics specified in the operating instructions.
- According to the parameters of the installed engine.
- The mechanism is sold at different prices: from 500 to 3000 rubles.
Manufacturers indicate what mechanisms should be installed.
How to connect
You can connect to the compressor yourself. The work is carried out according to the following scheme:
- The plug is removed from the socket.
- The screws that secure the motor are unscrewed.
- The panel is removed and moved aside.
- The mechanism latches are released.
- The faulty part is removed.
- The contacts are disconnected. The relay circuit may differ significantly, so it is recommended to mark the wires.
After this, a working device is installed. A complex connection diagram involves connecting additional wires, through which the device is controlled.
If the refrigerator does not operate stably and the relay has been checked, there is a possibility of failure of one of the important components. The low cost of the mechanism allows you to replace it quickly and without significant costs. When installing a new device, you need to be careful, as incorrect connection can lead to malfunction.
Replacing relays in different brands of refrigerators
Symbolic identifiers of the feed-through contacts will help you correctly connect the new starting device. If there are none, then when unscrewing the wires, it is recommended to mark them, otherwise it is easy to mix up the contacts, which will lead to breakdown of a working mechanism.
Refrigerators Nord, Stinol, Ariston, Indesit
Refrigerators Nord, Stinol, Ariston, Indesit have similar designs, so replacement is carried out according to the same scheme:
- disconnect the device from the power supply, after which it is recommended to wait until the device is completely de-energized;
- unscrew the fasteners securing the water supply hose and move it to the side to avoid damage;
- Unscrew the fasteners of the rear panel, remove the protective plate of the rear panel of the refrigerator;
- press out the latches, rivets or unscrew the screws holding the trigger mechanism to the compressor;
- carefully pull out the part, maintaining spatial orientation;
- disconnect the wiring from the start relay, mark each contact to avoid confusion when installing a new device;
- loosen the clamp by lightly pressing, disconnect the connector;
- clean the contacts of the wires and connector with a soft cloth moistened with alcohol;
- move the starting capacitor from the old to the new relay;
- connect the cleaned connector to the space provided for it;
- fix the relay on the capacitor in a strictly vertical position;
- Tighten the wiring using pliers and check the reliability of the connection;
- secure the relay with screws, latches, rivets;
- put the back panel in place, screw it on;
- put the water supply hose in place and secure it;
- Connect the refrigerator to the electrical network and check operation.
Refrigerators Atlant, Minsk
Replacing the starting relay of Atlant, Minsk refrigerators is carried out according to a different scheme, since they have similar designs:
- disconnect the refrigeration device from the electrical network, wait a while for complete de-energization;
- remove the back panel of the refrigerator;
- remove the wire clamp that secures the trigger mechanism;
- disconnect the contacts, inspect them and, if necessary, sand them with sandpaper;
- mark the wires to avoid mixing them up when connecting a new device;
- Unscrew the fasteners, if they are rusty, pry them off with a screwdriver or lubricate them with oil;
- slightly press the wire clamp to remove the device;
- move the starting capacitor from the old to the new relay by simple rearrangement;
- install the mechanism in place, monitor strict horizontality and verticality;
- connect the wires according to the markings, securely screwing each patch;
- Throw on a wire clamp and secure;
- put the back panel in place, tighten the screws;
- Connect the refrigerator to the electrical network and check operation.
Varieties
The relay can be starting or starting protection. The first protects only from exceeding the operating speed, while the second can prevent problems that can arise from excessive temperature increases.
A start-up protection relay is considered a more acceptable option, therefore it is introduced into the design of the Biryusa refrigerator (Indesit, Atlant, Stinol) much more often than a start-up relay. Many people replace the first option with the second immediately after purchasing a new unit.
It is possible to carry out this procedure if you have the appropriate experience and special knowledge, in particular, it is necessary to understand electronics. As a last resort, you can contact a professional.
Problems with the start relay
Suspicions of malfunction of this element arise when:
- failure of the Indesit (Biryusa, Stinol) refrigerator motor to start;
- spontaneous shutdown of the motor in the unit after a short period of operation.
These problems may be caused by stuck contacts or loose springs. Both directly depend on the compressor start relay.
It is quite possible to find out how this important part functions. If a posistor relay is installed in the refrigerator, then just listen to how it “sounds”. The sound of powder pouring out indicates the complete uselessness of using this relay, since the “tablet” that was responsible for conductivity simply crumbled. In this case, only a final replacement will help.
The thermal compressor start relay cannot be tested using the method described above. Here you need a special device called a tester. Between the contacts of a working element, a resistance equal to zero is established.
Purpose of the starting relay
The relay is designed to prevent overheating of the motor. The refrigerator engine is not able to start without an additional compressor starting winding, which is shifted by 90 degrees compared to the working winding.
There are two types of relays installed in modern refrigerators. In the starting functions, the engine is started, and the start-protective relay prevents the unit from failing due to the reasons mentioned above. Also, after turning on the motor, it sends a signal to return the starting winding to its original position. Thus, the likelihood of a refrigerator breakdown is significantly reduced. Today, in stores specializing in spare parts for such units, it is possible to find universal relays.
Single-phase electric motor with starting winding
Single-phase motors equipped with a starting winding are, among other things, equipped with a pair of contacts leading to a centrifugal limit switch. The miniature device breaks the chain when the shaft is untwisted. The starting winding catalyzes the initial stage. Further action will interfere, reducing the efficiency of the engine. The design is usually called bifilar. The starting winding is wound with double wire, reducing reactance. Helps reduce the capacitance of the capacitor - critical. A striking example of single-phase asynchronous motors with a starting winding are the compressors of household refrigerators.
But not always, you can find electric motors with a starting winding on machines, for example: a knife machine, popularly known as a knife. We have a motor with a starting winding and a working winding. Two windings are needed to cause the rotor of a single-phase motor to rotate. The most common motors of this type can be divided into two groups: single-phase motors with a starting winding and motors with a running capacitor.
Working and starting windings of a single-phase motor
For engines of the first type, the starting winding is turned on through a special push-button post PNVS or a capacitor, a start-protection relay only at the time of start-up and after the engine has developed a normal rotation speed, it is disconnected from the network. The motor continues to operate with one working winding. If the start is carried out by a capacitor, the value of the capacitor is usually indicated on the nameplate of the motor and depends on its design.
That is, if the auxiliary winding of a single-phase motor is starting, its connection will occur only during the start-up, and if the auxiliary winding is a capacitor, then its connection will occur through a capacitor, which remains turned on during engine operation. But that is another story.
In some designs, a centrifugal switch is installed, which opens the contacts when a certain rotation speed is reached.
Now here are a few examples you may encounter:
If the motor has 4 terminals, then having found the ends of the windings and after measuring, you can now easily figure out these four wires, less resistance is the working one, more resistance is the starting one.
Everything is connected simply, 220V is supplied to the thick wires. And one end of the starting winding, for one of the workers. On which of them there is no difference, the direction of rotation does not depend on it. It also depends on how you insert the plug into the socket. The rotation will change depending on the connection of the starting winding, namely, by changing the ends of the starting winding.
Next example. This is when the motor has 3 terminals. Here the measurements will look like this, for example - 10 ohms, 25 ohms, 15 ohms. After several measurements, find the tip from which the readings, with two others, will be 15 ohms and 10 ohms.
This will be one of the network wires. The tip that shows 10 ohms is also the network one and the third 15 ohm will be the starting one, which is connected to the second network one through a capacitor.
In this example, the direction of rotation, you will not change what it is and will be. Here, in order to change the rotation, you will need to get to the winding diagram.
Another example when measurements can show 10 ohms, 10 ohms, 20 ohms. This is also one of the types of windings. These came on some models of washing machines, and not only that.
In these motors, the working and starting windings are the same (according to the design of three-phase windings). It makes no difference what kind of working winding you have and what kind of starting winding. The starting winding of a single-phase motor is also connected via a capacitor.
Electric motors of this type are used mainly in low-power devices:
- Household appliances. (refrigerators)
- Low power fans
- Pumps.
- Compressors.
- Machines for processing raw materials, etc.
Models are available with power from 5 W to 10 kW.
The values of efficiency, power and starting torque for single-phase motors are significantly lower than for three-phase devices of the same size. The overload capacity is also higher for 3-phase motors. Thus, the power of a single-phase mechanism does not exceed 70% of the power of a three-phase mechanism of the same size.
Characteristics of the starting winding . Compared to the working , the starting winding has a smaller cross-section of the current-carrying conductor, due to the lower load and number of turns. Consequently, in the auxiliary winding there is a greater active resistance (current density), usually about 30 Ohms, with a resistance of the working winding of 10-13 Ohms.
Usually, 4 ends come out of a motor with a starting winding, two thinner wires and two thicker ones, the thinner ones are the starting winding!
To change the direction of rotation of the electric motor, you need to swap the ends of the starting winding!
Device:
- In fact, it has 2 phases , but only one of them does the work, which is why the motor is called single-phase.
- Like all electric machines , a single-phase motor consists of 2 parts: stationary (stator) and moving (rotor).
- It is an asynchronous electric motor , the stationary component of which has one working winding, connected to a single-phase alternating current source.
The strengths of this type of engine include the simplicity of the design, which is a rotor with a squirrel-cage winding. The disadvantages are low starting torque and efficiency.
The main disadvantage of single-phase current is its inability to generate a magnetic field that performs rotation. Therefore, a single-phase electric motor will not start on its own when connected to the network.
In the theory of electrical machines, the rule applies: in order for a magnetic field to arise that rotates the rotor, there must be at least 2 windings (phases) on the stator. It is also required to shift one winding by a certain angle relative to the other.
During operation, alternating electric fields flow around the windings:
- In accordance with this , the so-called starting winding is located on the stationary section of the single-phase motor. It is shifted 90 degrees relative to the working winding.
- A current shift can be obtained by including a phase-shifting link in the circuit. Active resistors, inductors and capacitors can be used for this.
- 2212 electrical steel is used as the basis
Operating principle of starting relays
There are four types of relays, among them:
Current
How and where can it be connected? It is used for engines whose power does not exceed 370 W. Interaction is ensured through serial connection of the relay coil and the operating winding of the motor. Because of this, the wire in the coil is characterized by a certain cross-sectional size.
During installation, it should be taken into account that the contacts of this compressor starting relay must be open, and their operation with the armature occurs under the influence of gravity. Closing the electrical circuit from the regulator to the motor causes the maximum possible current to flow into the relay coil. Because of this, a phase shift occurs and the engine starts. In this situation, motor overvoltage protection is required.
Start-protective relay RKT diagram - operating principle
Semiconductor
It differs from all others by the presence of a ceramic element that has methods of self-regulation and conductivity. To connect the refrigerator you need to start the compressor. This causes an increase in the resistance of the ceramic part, as a result of which the current in the starting winding decreases to a minimum (milliamp level). The relay start time is 0.35 s. This type of starting element is used in units whose power does not exceed 300 W.
Thermal
A variant of the compressor current starting relay that does not require an electromagnetic coil. The source is heat, which is generated by electricity. To preserve it, the relay design contains a biometallic plate, which then interacts with the contacts (two closed pairs).
Voltage relay
It functions like an electromagnet and consists of a coil of small diameter wire wound around a core. The start relay contacts are closed and open only when the refrigerator is put into operation. For internal connections, terminals numbered 125 are used; those marked with numbers 4 and 6 are used as auxiliary ones.
Electrical connection diagrams
If you understand Stinol refrigeration units, that is, you are able to distinguish a compressor from an evaporator or disassemble the engine with your own hands, then there will be no problems with changing the start relay. Otherwise, it’s not even worth the risk, because one wrong move can cause the refrigerator to break down, and it will be almost impossible to connect and repair it later.
Connection diagrams for single-phase asynchronous motors
With starting winding
To connect a motor with a starting winding, you will need a button in which one of the contacts opens after switching on. These opening contacts will need to be connected to the starting winding. In stores there is such a button - this is PNDS. Its middle contact closes for the holding time, and the two outer ones remain in a closed state.
Appearance of the PNVS button and the state of the contacts after the “start” button is released"
First, using measurements, we determine which winding is working and which is starting. Typically the output from the motor has three or four wires.
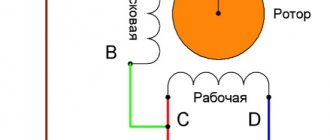
Consider the option with three wires. In this case, the two windings are already combined, that is, one of the wires is common. We take a tester and measure the resistance between all three pairs. The working one has the lowest resistance, the average value is the starting winding, and the highest is the common output (the resistance of two windings connected in series is measured).
If there are four pins, they ring in pairs. Find two pairs. The one with less resistance is the working one, the one with more resistance is the starting one. After this, we connect one wire from the starting and working windings, and bring out the common wire. A total of three wires remain (as in the first option):
- one from the working winding is working;
- from the starting winding;
- general.
We work further with these three wires - we use them to connect a single-phase motor.
With all these
- Connecting a single-phase motor with a starting winding via the PNVS button
connecting a single-phase motor
We connect all three wires to the button. It also has three contacts. Be sure to place the starting wire on the middle contact (which closes only during the start), the other two - on the outermost (arbitrary). We connect a power cable (from 220 V) to the extreme input contacts of the PVNS, connect the middle contact with a jumper to the working one (note! not to the common one). That's the whole circuit for switching on a single-phase motor with a starting winding (bifilar) through a button.
Condenser
When connecting a single-phase capacitor motor, there are options: there are three connection diagrams and all with capacitors. Without them, the engine hums, but does not start (if you connect it according to the diagram described above).
Connection diagrams for a single-phase capacitor motor
The first circuit - with a capacitor in the power supply circuit of the starting winding - starts well, but during operation the power it produces is far from rated, but much lower. The connection circuit with a capacitor in the connection circuit of the working winding gives the opposite effect: not very good performance at start-up, but good performance. Accordingly, the first circuit is used in devices with heavy starting (concrete mixers, for example), and with a working condenser - if good performance characteristics are needed.