What is needed for this, and is it possible to light a low-power flashlight, an LED clock powered by 1-2V round batteries, or make a radio work in this way? Yes and no, let's take a closer look.
Where does electricity come from in potatoes?
To understand that voltage from potatoes is not a fiction, but a very real thing, just stick sharp probes from a multimeter into one single potato and you will immediately see several millivolts on the screen.
If you complicate the design a little, for example, insert a copper electrode or a bronze coin into the tuber on one side, and something aluminum or galvanized on the other side, then the voltage level will increase significantly.
Potato juice contains dissolved salts and acids, which are essentially a natural electrolyte.
By the way, you can use lemons, oranges, and apples for this with equal success. Thus, all these products can power not only people, but also electrical appliances.
Inside such fruits and vegetables, due to oxidation, electrons will leak from the immersed anode (galvanized contact). And they will be attracted to another contact - copper.
However, do not be confused, electricity here is not generated directly from potatoes. It is well produced precisely thanks to chemical processes between three elements:
- zinc
- copper
- acid
And it is the zinc contact that serves as a consumable. All electrons flow away from it. Under certain conditions, even earthen soil can produce electricity. The main condition is its acidity.
You stick two sticks (of course, made of zinc and copper) into the ground and measure the voltage. Sometimes the potential difference reaches 0.2V. With moist soil the result improves.
This is the so-called earth battery.
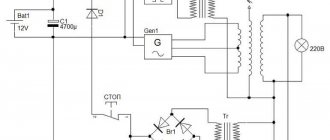
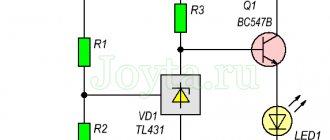
Design and principle of operation of solar panels
The principle of operation and design of the battery consists of several parameters, among which are the following:
- several electronic devices that convert photon energy into electrical energy. Photovoltaic elements are connected in solar batteries in strict sequence, located parallel to each other;
- a battery that stores electromotive force;
- periodic voltage generator-converter;
- an electrical multi-position switching device that controls the operation of all devices in the battery.
Photovoltaic cells used to create batteries are made from silicon. However, purification of the material is a very expensive procedure. Therefore, recently manufacturers have been using copper and indium. Each element is an autonomous box that generates electricity. The boxes are connected to each other, forming a single platform. The intensity of the solar battery depends on its size. Therefore, the more solar station contains photovoltaic cells, the more energy it produces.
When the sun's rays hit an element, a photovoltage is formed in it, creating thermal generation of electron-hole pairs. Some of the extra electrons pass through the area of contact of two semiconductors with different types of conductivity from one layer to another. After this, voltage appears on the external section of the electrical circuit. In this case, a positive current pole appears at the p-contact, and a negative current pole appears at the n-contact. Once connected to the battery, the photovoltaic cells form a closed ring. As a result, the solar station operates on the “squirrel in a wheel” principle. Stably negatively charged particles “run” in a circle, and the battery gains charge.
Assembling a battery from potatoes
So, here's what you need to assemble a more or less capacitive battery:
- potato
Several pieces, since one will not be of much use.
- copper, preferably single-core wires
The larger the cross-section, the better.
- galvanized and copper nails or screws (you can just use wire)
The nails will play the main role in generating electricity for the flashlight.
- galvanized - this is the negative contact (anode)
- copper-plated is a plus (cathode)
If you use simple nails instead of galvanized ones, you will lose up to 40-50% in voltage. But as an option, it will still work.
The same applies to using aluminum wire instead of nails. At the same time, increasing the distance between the electrodes in one potato does not play a special role.
Take copper wires (mono core) with a cross section of 1.5-2.5 mm2, 10-15 cm long. You strip them of insulation and tie them to a nail.
It is best, of course, to solder, then the voltage loss will be much less.
One copper nail on one side of the wire, and a galvanized nail on the other.
Next, lay out the potatoes and stick nails into them one by one.
In this case, different nails are stuck into each tuber, from different pairs of wires. That is, you must have one zinc contact and one copper contact plugged into each potato.
Different tubers are connected to each other only through nails made of different materials - copper + zinc - copper + zinc, etc.
Voltage measurements
Let's say you have three potatoes, and you connected them together in the manner described above. To find out what voltage you get, use a multimeter.
Switch it to the DC voltage measurement mode and connect the measuring probes to the conductors of the outermost potatoes, i.e. to the initial positive contact (copper) and the final negative contact (zinc).
Even with three medium-sized potatoes you can get almost 1.5 Volts.
If you reduce all transition resistances to the maximum, and for this:
- use not a nail as a copper electrode, but the very wire with which the circuit is assembled
- apply soldering to the contacts
then only 4 potatoes can produce up to 12 volts!
If your cheap flashlight is powered by three AA batteries, then you will need about 5 volts to light it successfully. That is, when using conventional wires, you need at least three times more potatoes.
To do this, by the way, it is not necessary to look for additional tubers; it is enough to cut the existing ones into several parts with a knife. Then do the same procedure with the wires and studs.
Insert one galvanized and one copper nail in succession into each cut tuber. As a result, it is quite possible to obtain a constant voltage of more than 5.5V.
Is it theoretically possible to get 5 volts from one single potato and at the same time ensure that the entire assembly is no larger in size than a AA battery? It is possible and very easy.
Cut small pieces of the core from the potato and place them between flat electrodes, such as coins made of different metals (bronze, zinc, aluminum).
As a result, you should end up with something like a sandwich. Even one piece of such an assembly can produce up to 0.5V!
And if you put several of them together, then the required value of up to 5V can easily be obtained at the output.
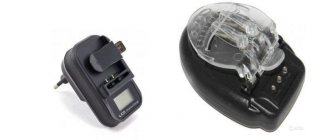
How to make a Krona battery simply and inexpensively at home
Video on the topic Batteries
and batteries.
Main postulate:
- The charge is not feasible if you arrange and - in a different way. On the contrary, the battery
will drain even faster. - You can charge an object with your own hands several times.
- Using the method described above, you can only charge ordinary AA alkaline batteries.
- The charge can be carried out in all environmental temperature conditions.
The next charging method is the conventional heating method. But it is fraught with consequences (explosion). Thus, there is an option to restore, of course, small alkaline batteries yourself. You can also charge them using a more conventional method - placing the discharged objects in boiling water, but for less than 20 seconds, otherwise sad results are likely. Another simple method is to flatten or otherwise reduce the volume of the element in artisanal conditions. This way you can charge different AA batteries.
. There is an example when a person, after the charge of a lithium-ion battery had expired, simply took it out and stomped on it, then the charge characteristics showed 100 percent.
There is another option to return the charge without a charger: we make 3.2 holes with an awl near each carbon rod with a depth of three-quarters of the height of the element itself. There we fill in the liquid and seal them, covering them with resin or plasticine. There is an option to pour not only liquid, but an eight to ten percent solution of hydrochloric acid or double vinegar. Fill the solution a couple of times to ensure sufficient saturation. This method allows you to charge up to seventy to eighty percent of the original capacity.
Another method to charge
product: open the element cover with a knife. If the zinc cylinder, the object's rod and the carbon powder are intact, then immerse the object in the salt solution. Its ratio is as follows: 2.4 tablespoons of table salt per several glasses of water. Next, we boil the solution together with the element for about ten to fifteen minutes. Later we return the gaskets responsible for sealing to the area and cover it with wax or with plasticine.
In this publication, we have given a hint for you on how to charge batteries on your own without a charger. The suggested tips apply only to AA batteries.
, since they, unlike the little finger, flat (pills) used for lasers, are usually applicable in everyday life. Now it is possible to properly charge the necessary elements if there is no electricity!
Current strength
It would seem that everything is achieved, the goal is achieved, and all that remains is to find a way to connect the wiring to the power contacts of the flashlight or LEDs.
However, having gone through this procedure and assembled a rather weak structure from several potatoes, you will be very disappointed with the final result.
Low-power LEDs will of course glow, after all, you still received voltage. However, the brightness level of their glow will be catastrophically dim. Why is this happening?
Because, unfortunately, such a galvanic element produces a negligibly low current. It will be so small that not even all multimeters can measure it.
Someone will think that since there is not enough current, they need to add more potatoes and everything will work out. Here's a video experiment using 400s! potatoes and connecting them to a 110-volt LED light bulb.
Of course, a significant increase in tubers will increase the operating voltage.
When tens or hundreds of potatoes are connected in series, the voltage will increase, but the most important thing will not be there - sufficient capacity to increase the current.
And this whole structure will not be rationally suitable.
Potato battery light
Perhaps you "conjured" the light in physics lessons at school using a potato battery. Israeli scientists have discovered that the energy output is even greater if you use boiled potatoes. The vegetable is available almost all over the world, and studies have shown that you can get enough energy from one potato for about a month.
This hack can be especially useful in developing countries, and it can also prevent fires and burns because you no longer need to generate light from an open flame.