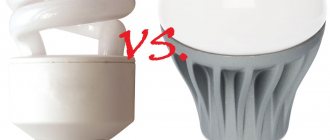
Technical aspects of installing LEDs instead of halogens
The process of installing LED lamps in a chandelier instead of halogen lamps comes down to changing the power circuit. Here are a few solutions.
Option 1
Complete replacement of power supplies. This is the most expensive upgrade option, but also the most reliable.
Transformers are removed from the lamp body and a DC converter for LED is inserted. Its power should exceed the total power of all lamps by 1.5 times. Large chandeliers may have several circuits, each of which has a separate operating mode (chandeliers with remote control). In this case, you will need a separate driver for each circuit.
Installing LED drivers instead of transformers
Also, if you can’t get by with just one device, you can divide 1 circuit into groups and power each with a separate driver. In this case, the input of all blocks is connected in parallel: the phase wires are collected in one node, the neutral wires in another.
If this is your option, at the end of the article there will be a video that shows in detail how to change halogens to LEDs in chandeliers with multiple circuits.
Option 2
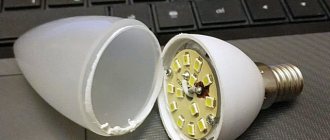
Simplest. Replacing halogen lamps in a chandelier with LED lamps with built-in rectifiers operating on the same voltage as in the original version.
Here, in general, there will be no need to carry out any work - it will be enough to install diodes with the same base in place of the halogens. You can find out what type of LED lamps you need by looking at the markings. Letter designation AC/DC.
The disadvantage of the method is insufficient illumination due to the voltage drop on the internal bridge. We can increase brightness by increasing power.
Designation of LED bulbs with built-in rectifier
Option 3
Models of LED lamps operating on 220 volts are selected. They are connected in parallel, from the household network. It is necessary to remove the step-down transformers and directly power the lamps. No other auxiliary devices are needed.
Important! If the chandelier worked on 12-volt halogens, and we install ice with a rated voltage of 220V (with a built-in driver), then you should be prepared to replace the connecting cables in the chandelier. If they are not designed for such a current, at best we will simply burn them, at worst we will triple the fire
Converting a chandelier with halogen lamps to LED lamps with a built-in driver
Making your own lamp
Making an LED-based illuminator with your own hands, as they say, “from scratch” is a troublesome task and not suitable for everyone. It’s easier to do this by using an old lamp of a similar type that has already spent its life.
In this case, a homemade LED lamp will be assembled from new elements, soldered onto a board removed from the old device or repaired. If there are working diodes left on it, you will need to replace the burnt elements with new ones (preferably of the same type and design).
Note! When manufacturing branded lamps, for reasons of profitability of sales, the operating current of individual LEDs is selected with an extremely high value. When remaking such a device, it is advisable to solder a limiting resistance of about 1 Kom in series with each element.
If necessary, to make a lamp with your own hands, you can use an old board with a driver circuit, replacing all the faulty parts in it.
In the absence of the necessary boards and parts, the driver can be manufactured based on the above-mentioned circuit of the power supply combined with the converter (see the figure above). When modifying, another resistor should be added to it (let’s denote it as R3), used to discharge capacitor C2. The result will be the diagram below.
Homemade driver circuit
In addition to the resistor, two standard zener diodes (VD2, VD3) are added to it, providing its bypass when the load circuit is broken.
This driver device circuit is designed to connect 20 colorless LEDs of a certain type. If their class or total number is different, the value of capacitor C1 should be changed so that the load current in the diode circuit is at least 20 mA. Its specified value guarantees sufficient brightness of the glow of these devices.
As a rule, a unit that does not include a bulky transformer element is used as a circuit supplying the driver (this connection is called “direct”). The absence of a transformer significantly simplifies the assembly of the module and reduces its size.
Important! But in this case, there is a real threat of high voltage reaching the output of the circuit (in the event of a breakdown of a number of series-connected elements, for example). The only consolation is that this happens extremely rarely
In the final part of the review, we note that the circuit diagrams of most of the LED products on sale are almost no different from one another. Certain differences are observed only in the type of components used in them, as well as in the method of generating the output voltage carried out by the driver.
Let's add to this that LED lamps equipped with special drivers are reliably protected from voltage fluctuations in the network, and the radiator included in their composition protects the product from overheating. The use of independently manufactured modules due to their additional modification can significantly extend the service life of lighting devices assembled on their basis.
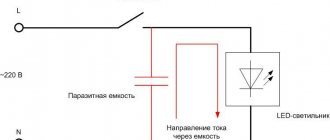
Using capacitors
The second scheme that will help increase the lifespan of incandescent lamps is a scheme using capacitors. For these purposes, an incandescent lamp is connected not directly to a 220 Volt network, but through a high-capacity capacitor.
It is also noteworthy that the intensity of the lamp’s combustion will depend on the exact capacitance of the capacitor connected to it. Here, capacitors are also used to make backlighting, so that incandescent lamps do not go out immediately, but gradually. In this way, an interesting light phenomenon can be obtained.
Also, the capacitor can reduce electrical interference in the network, so the incandescent lamp will not “pulse” and shine unevenly. Capacitors are used in many DIY projects, radios and electronics. For example, you can use them to make a powerful stun gun, as well as many other homemade products.
With all this, do not forget about your own safety measures, since inept work with electricity can lead to serious consequences. If you are not sure or doubt something, then it is better to abandon the idea of making homemade products from capacitors.
Features of burnout
Conventional incandescent lamps burn out immediately. They simply and irreversibly stop glowing due to the destruction of the tungsten filament. LEDs in this regard differ markedly from alternative types of lamps. At the beginning of operation, they demonstrate maximum parameters, but gradually burn out during operation. Experts call this process degradation. The longer the service life, the more the LED degrades, loses brightness and other capabilities.
First of all, you need to know that their service life is assessed in two ways:
- effective. This is the period of time when the luminous flux from the lamp has maximum parameters. This period ends when all values decrease by 30%;
- full. This is the entire period of operation of the lamp.
Toys and decorations for the New Year tree
The shape of incandescent lamps serves as an incentive to create Christmas tree decorations: heroes from fairy tales, penguins, various animals, snowmen and others. Lamps are painted with paints, covered with fabric or paper using decoupage technique.
Hats, mittens and scarves can be knitted or cut from a variety of fabrics or felt. Having awakened your imagination, you can surprise not only children with such crafts, but also all adults present at the New Year's party.
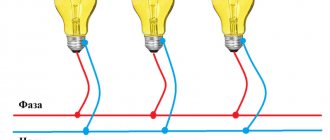
Fluorescent lamps with two, four or more lamps
If you have a two-lamp lamp, it is best to supply voltage to each connector with separate conductors.
When installing a simple jumper between two or more cartridges, the design will have a significant drawback.
The second lamp will light only if the first one is installed in its place. Remove it, and the other one will go out immediately.
The supply conductors should converge on the terminal block, where you will have the following connected in turn:
phase
zero
Earth
Before installing the lamp on the ceiling, it is necessary to apply voltage to it and check the operation of the lamps. If some contact comes loose, you can adjust everything here without climbing on top or jumping on stepladders.
LED lamps, unlike fluorescent lamps with a 360-degree view of the glow, have a directional flow of light.
But due to the ability to rotate around an axis by 35 degrees in the G13 base + by rotating the base itself, you can adjust them in the direction you need.
However, not all lamps have this base design. And sometimes you have to re-drill the cartridge mounts by 90 degrees.
If everything is in order, install the lamp in its place and enjoy economical and brighter lighting.
Candle from a lamp
It's easy to make a candle from a burnt out lamp. All you need to do is drill the base, then remove all the insides, place a cotton wick inside, and then fill everything with oil. Just 10 minutes of painstaking work and you have a wonderful candle.
There are a lot of ideas for creating crafts from light bulbs, just use your imagination and you can create a lot of exciting things with your child. The main thing is not to forget the simple rule - you can’t let kids play with crafts.
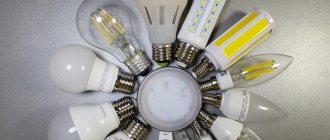
What do we change for what?
Halogen (halogen?) lamp. Halogen lamps operate on the principle of incandescent lamps. In them, light is emitted by a hot tungsten filament. The internal cavity of the flask is filled with a special chemical composition that prevents rapid wear of the spiral and failure of the product.
In everyday life, they are powered by 12-24 volt current sources. They are used in conjunction with electronic converters (transformers) that reduce the voltage to the required value.
Low voltage halogen lamp 12V and spotlight for it
LED bulbs. These are assemblies made from an array of semiconductor elements that can glow under the influence of electric current. All emitters are connected in series-parallel with each other and are designed for certain power parameters.
LEDs operate only on direct current. In order to adjust a standard household network to the specified values, special electronic devices are used - drivers.
LED lamp with g4 socket
LED lamps are gradually fading
Unlike incandescent lamps, LEDs do not simply burn out and stop working, but their glow intensity decreases gradually. The brightness of such lamps changes noticeably towards the end of their service life. Manufacturers of LED lamps include in the total service life the time during which the brightness decreases to 70% of the maximum possible.
For example, if a lamp emits a luminous flux of 800 lumens, then its degradation to 570 lumens would be considered normal within 10,000 hours of service. Brightness below 70% of the maximum lamp rating is considered unacceptable for proper operation.
Benefits from inoperative LED lamps
DIY crafts from LED light bulbs:
- The LED lamp is wrapped in threads, possibly multi-colored, symbolizing eco-style;
- Non-working lamps painted in different colors can serve as decor together with working lamps;
- Floating decorations made from painted lamps in the nursery.
Joy is brought not only by the results, but also by the creative process itself. Get satisfaction and inspiration, create yourself and give the joy of creation to your children.
What the manufacturer promises and actual service life
The packaging of LED lamps indicates very attractive service life. They amount to up to 50 thousand hours. A simple calculation gives an interesting result - if the device works 8 hours a day, the total service life will be about 17 years. However, there are strange discrepancies here too.
LED production technology is almost the same throughout the world. The design and operating principle of the device do not allow deviations from the basic methodology. This means that the finished product should have approximately equal parameters. However, in practice this is not the case. One package says 25 thousand hours, the other says 50 thousand. This discrepancy cannot be explained by design features or differences in operating conditions, since the light sources are almost the same.
Unscrupulous lighting manufacturers often overestimate the characteristics of lamps. There are two reasons for this:
- a banal marketing ploy. The user is more likely to buy an LED lamp with high performance, so there is a temptation to somewhat embellish the actual situation;
- difference in operating conditions and testing conditions.
If everything is clear with the first reason, then the second one needs to be dealt with. Factory tests are carried out in laboratory conditions that are optimal for the operation of lighting devices. The user purchases a lamp for home or other premises where working conditions are far from ideal. Therefore, it is always possible to explain the discrepancies between the declared and actual values of the lamp's lifespan by non-compliance with operating rules.
LED lamps require low voltage power - each emitting crystal consumes approximately 3-4 V of electricity. A driver is installed inside (sometimes outside) each lamp. This is a power source that converts the incoming 220 V AC into the amount of DC required for the operation of the crystal. Therefore, voltage drops in the network are not too dangerous for LEDs; the converted value will still correspond to the specified values.
Making an eternal light bulb
LED lamp packages indicate a service life of 30, 40 or 50 thousand hours, but many light bulbs do not last even a year. Today I will tell you how to modify a light bulb in five minutes without any tools so that its service life is significantly increased.
First of all, let me remind you that all LED light bulbs have a warranty of one to seven years. If the light bulb fails during the warranty period, it can be exchanged at the store where it was purchased. To exchange in large stores like Leroy Merlin, you don’t even need a receipt and packaging.
In the Lamptest.ru project I test lamp light parameters, but I cannot test reliability. I understand perfectly well that for most buyers it is more important that the light bulb works for a long time, and not what its parameters are.
There are basically two reasons for failure of lamps - burnout of LEDs and failure of capacitors.
If you reduce the lamp power by a third, the life of the LEDs will increase significantly (of course, the brightness of the lamp will decrease). This is what we will do.
The cheapest lamps use very bad capacitors that do not last even a year. There is no point in modifying such lamps - they will not last long anyway.
For modification, lamps from the mid-price segment are best suited (there is a chance that they have better capacitors). The higher the power, the better (after all, after reducing it, the lamp should shine brightly enough). 15 W lamps are optimal. Of course, it is better to take lamps with a pulse driver, which have a built-in stabilizer and they shine equally brightly at any network voltage.
There are two types of lamp designs - traditional double-board (there is a driver board inside the case, with a round board with LEDs above it) and single-board (the driver is located directly on the board with LEDs, and the capacitors are soldered to this board at the back). For a simple and quick modification, you need a lamp with a single board design.
From my supplies, I found lamps that are ideal for conversion - Navigator NLL-A60-15-230-4K-E27 with production date 0419 (I hope modern lamps of this type have the same design). This lamp has a real power of 13.66 W, produces 1210 lm of light, has a color rendering index of CRI(Ra) 83, and has no pulsation at all. The lamp is equipped with a pulse driver. Such lamps can be found on sale at prices starting from 120 rubles.
Of course, you can also take the model with warm light NLL-A60-15-230-2.7K-E27. First of all, remove the cap. With this lamp you can simply tear it off by hand (it will take a lot of force). Under the hood is a single board. On it we are interested in resistors R1 and R2, they set the current of the LEDs. Resistors are connected in parallel, their values are 2.7 Ohm and 5.6 Ohm. We carefully break resistor R2, trying with all our might not to break everything around the resistor.
That's all. You can put the cap back on.
The lamp power decreased from 13.66 to 8.83 W. The luminous flux decreased from 1210 to 925 lm. Now the lamp can replace an 85 W incandescent lamp, which is also not bad. The lamp's efficiency has increased significantly: from 89 lm/W to 105 lm/W.
The main thing is that the lamp has become much “colder”.
The body temperature of an unconverted lamp reaches 67 degrees, while that of a modified lamp is only 52 degrees. The thermal imager displays the temperature on the turned on LEDs incorrectly, but it is quite possible to compare.
The temperature difference between the LEDs is very large - 21 degrees.
The LEDs in the modified lamp will now work for a very long time, it’s up to the capacitors (by the way, it will also be easier for them due to the lower temperature inside the lamp). If they don't fail, this light bulb will last for decades.
A few important notes:
- Only new light bulbs are suitable for modification (if the lamp has been working for a long time, the degradation of the LEDs has already begun and it will not stop);
- when remaking, you lose the warranty on the lamp (however, if the lamp still fails and you glue the lampshade back on, no one will figure out that you broke off the resistor inside);
- do not forget that when the lamp is plugged in, there is dangerous voltage on the board.
I will continue to search for successful and mass-produced models for such a modification, and as soon as I find interesting options, I will tell you how to modify them, of course, measuring the parameters after the modification.
© 2022, Alexey Nadezhin
Transformer replacement
The problems listed above can be easily eliminated: remove the transformer for halogen products and instead install a power supply with parameters suitable for the mounted group of LED lamps. It is necessary to consider not only the supply voltage (12 V), but also other characteristics. When choosing an element, focus on the total power of the connected lighting fixtures. If necessary, two or three transformers can be used.
These calculations are relatively simple: count the number of installed light sources in a group and multiply their number by the power of one (provided that you have chosen the same lamps). For example, if the power of an LED product is 2 W, there are 10 of them in a group, then the transformer must withstand a total load of 20 W (it is advisable to increase the parameter by 10%; the result will be 22 W).
When comparing halogen lamps and LED lamps, it becomes obvious that the power of the former is 2-3 times higher than the total load of the entire group of the latter. When buying a transformer for diodes, make sure that the dimensions of the electrical element approximately match the power supply for halogen lamps.
How to distinguish high-quality products from low-quality ones?
The luminous flux of quality products meets established standards. In this case, the operational life should be divided into effective and complete. The first definition is related to the period during which the lamp intensity decreases by less than 30%. Distinctive features of quality products from fakes include the following:
- Large companies guarantee a service life that meets the industry standard L70 or LM70. For the first, the operational life is 30 thousand hours.
- Manufacturers of lower quality products do not use markings when indicating the service life. Most often the time period is specified in hours.
- The effective service life also depends on the color. For white it is 10 thousand hours. For green, red and other colors the figure reaches 25 thousand hours.
When choosing, it is recommended to pay attention to the warranty period. When operating a light source around the clock, 9 thousand are consumed.
hours. If the manufacturer indicates that repairs under warranty are carried out only for a year, then he is not confident in the quality of the product. Original lamps have a warranty period of 3-5 years.
Features of burnout
Conventional incandescent lamps burn out immediately. They simply and irreversibly stop glowing due to the destruction of the tungsten filament. LEDs in this regard differ markedly from alternative types of lamps. At the beginning of operation, they demonstrate maximum parameters, but gradually burn out during operation. Experts call this process degradation. The longer the service life, the more the LED degrades, loses brightness and other capabilities.
First of all, you need to know that their service life is assessed in two ways:
- effective. This is the period of time when the luminous flux from the lamp has maximum parameters. This period ends when all values decrease by 30%;
- full. This is the entire period of operation of the lamp.
Lamp pendant
You can use a lamp to make a cute necklace – a pendant. But despite the beauty of the product, you should not use it for its intended purpose, because there is a high probability of breaking the pendant while wearing it and getting injured.
We recommend reading:
- Can compulsory motor liability insurance be issued by someone other than the owner?
Stencils for crafts - beautiful stencils and a master class on making beautiful crafts (125 photos + video)
- Crafts with a jigsaw - 85 photos and videos on how to cut beautiful jewelry and crafts with a jigsaw
What is an everlasting LED light bulb
None of the manufacturers produces LED lamps with the loud name “eternal”. Quality products can last up to 50,000 hours, but only if there are no wiring problems and reliable assembly elements that will help overcome overheating if this occurs. To extend the service life, the technician can replace the components with more expensive ones, which will prevent the diodes from burning out even after 5-6 years.
To make an eternal LED lamp, you should first take care of the cooling system. This is where many manufacturers save, which is why the temperature regime is disrupted and the LEDs burn out. Also, the electronic components of the device often suffer. The design may look like the picture below.
Design of a homemade lamp.
To assemble this lamp you will need experience. Therefore, it is better for a novice master to remake a purchased LED lamp. An eternal lamp can be considered a product with elements replaced with more powerful and efficient ones.
What you need to convert an LED light bulb into an eternal one
To work you must have:
- holder;
- glue;
- knife;
- soldering iron with a thin tip;
- new diodes (if replacement is made);
- higher resistance resistor;
- posistor for smooth switching;
- tweezers;
- capacitor.
Capacitor.
The last element of the assembly is necessary to remove heat, the excess of which shortens the service life of all lamp components. The capacitor is installed between the plate with LEDs and the base, and is selected depending on the power of the light bulb.
Related article: How to disassemble and repair an LED light bulb
What is an everlasting LED light bulb
None of the manufacturers produces LED lamps with the loud name “eternal”. Quality products can last up to 50,000 hours, but only if there are no wiring problems and reliable assembly elements that will help overcome overheating if this occurs. To extend the service life, the technician can replace the components with more expensive ones, which will prevent the diodes from burning out even after 5-6 years.
To make an eternal LED lamp, you should first take care of the cooling system. This is where many manufacturers save, which is why the temperature regime is disrupted and the LEDs burn out. Also, the electronic components of the device often suffer. The design may look like the picture below.
Design of a homemade lamp.
To assemble this lamp you will need experience. Therefore, it is better for a novice master to remake a purchased LED lamp. An eternal lamp can be considered a product with elements replaced with more powerful and efficient ones.
Manufacturing stages
You need to fold 5 light bulbs so that they form a pentagon or other shape.
The easiest way to make a lamp
Around the burning lamp, hang several burnt ones on a thin chain, cord, fishing line or wire.
Lighting principles
The lighting device is used to illuminate a whole room or a separate area. This is the basic principle of building light. Light affects the perception of the interior of the house. The light falling from the lamps must perform the following tasks:
creating a suitable atmosphere for work; correct lighting of interior details for a decorative effect; focus a person’s attention on the advantages of the room and hide its disadvantages; illuminate specific places for personal needs.
The location of the light source is of great importance for the distribution of illumination. A lamp in the center of the room provides radial illumination. The center will be clearly visible, but the corners will remain in the visual twilight zone.
The distribution of point light sources throughout the apartment or house allows you to provide light in any corner of the room
This method makes it possible to focus attention on specific objects. Local lighting has many useful properties, and table lamps help fill the lack of lighting
A table lamp allows you to illuminate certain areas of the room with high quality. This is an additional light source that is used for reading or working. They are also good as a night light.
Oil candle
Remove all the parts through the hole drilled in the base, insert a cotton wick and fill the flask with oil.
Making a candle
Drill a hole in the base, get rid of the internal elements of the lamp, insert a cotton wick and fill the flask with melted paraffin. Then break the flask and clean the candle from fragments.
Various original crafts:
- Miniature plant in a lamp;
- In the same vase are plants that require little water (succulents, for example, cacti) or do not require watering at all (aerophytes);
- Various small objects in the flask, from gravel to coins. This easily accessible and stylish decor makes a big impression;
- Gifts in a light bulb: money, congratulations, messages, etc.;
- Spices, salt, miniature cookies in former light bulbs;
- Ladybugs from light bulbs in the garden;
- A miniature kerosene lamp made from a burnt-out lamp.
What is an everlasting LED light bulb
None of the manufacturers produces LED lamps with the loud name “eternal”. Quality products can last up to 50,000 hours, but only if there are no wiring problems and reliable assembly elements that will help overcome overheating if this occurs. To extend the service life, the technician can replace the components with more expensive ones, which will prevent the diodes from burning out even after 5-6 years.
To make an eternal LED lamp, you should first take care of the cooling system. This is where many manufacturers save, which is why the temperature regime is disrupted and the LEDs burn out. Also, the electronic components of the device often suffer. The design may look like the picture below.
Design of a homemade lamp.
To assemble this lamp you will need experience. Therefore, it is better for a novice master to remake a purchased LED lamp. An eternal lamp can be considered a product with elements replaced with more powerful and efficient ones.
Miniature light bulb vase
For work you will need: a screwdriver, pliers or a pocket knife. Using these tools, it is necessary to remove all parts located inside the flask. When doing this, proceed with caution, otherwise the product may be damaged.
The lamp with the internal elements removed is a ready-to-use vase. Such vases can be hung on a wire or a stand can be made for them. Plants that do not need watering, moss, or succulents are placed inside.
The material for the stand can be cork or any other material suitable for fixing the product.
Lamps from China
China is the main supplier of LED lamps to the Russian market. The advantages include their low cost. The downside is unreliability. The Chinese are not always willing to give away top quality goods for free. China's policy is to sell an inexpensive product and console the buyer: if it breaks, buy another one, it's inexpensive.
Before choosing an LED lamp for your home, pay attention to the manufacturer; it is still better to give preference to well-known brands, for example Gauss, Philips
There are a great many enterprises operating in China, constantly competing with each other. This time. The semiconductor industry is still developing, and leading suppliers are supplying the market with experimental batches of devices, which, naturally, are sold cheaper than proven and established ones. That's two. Therefore, buying a good Chinese light bulb is a kind of lottery for the buyer.
Before purchasing, pay attention to signs of low-quality products:
- flickering visible on the phone camera indicates a low-quality driver;
- the quality of the cooling system, the radiator should be made not just of plastic, but at least of high-quality composite materials, preferably metal (aluminum is an ideal option).
If you order from Aliexpress, then ask the seller to shoot a video. If you see such defects in the video, then do not buy or be prepared for a short service life. A good lamp has a massive radiator with fins, lights up quickly but smoothly, and shines without flickering and without changing brightness.
Chandelier with 12 volt remote control
You can consider the possibility of replacement using the example of a chandelier with a remote control and with halogen lamps powered by 12 volts. One of the problems associated with replacement has already been mentioned - this is the receipt of an unstabilized current at the output of the transformer
But there are a couple more difficulties that are important to be aware of.
Chandelier with 12 volt remote control
Firstly, the transformer feeding 20-watt lamps will begin to operate unstable when the power is reduced, which is inevitable when installing LEDs up to 1–1.5 watts per lamp.
Periodic power outages are also inevitable. Of course, not all such devices are susceptible to this “sore”, but still many of them are.
Well, secondly, oddly enough, when completely replacing lamps from halogen G4 to LED, the remote control for the chandelier ceases to control the lighting device. It is only enough to turn it on; other commands have no effect on the chandelier. Moreover, if not all, but only part of the light bulbs are replaced, the remote control operates in normal mode. This happens for the reason that the power consumed by the diodes is so small that the transformer stops fully powering the control unit, leaving it with only one main function.
So, where do you start to remodel a chandelier, considering all the problems associated with replacing halogen lamps with LEDs?
Transformer
A 12-volt chandelier with a remote control, like all lamps of similar types, contains in the circuit three transformer blocks designed for halogen lamps, an LED control unit (one group on the chandelier initially consists of this type of elements and they can blink in two or three colors), and also a halogen lamp controller.
Next, you need to calculate what the total load on the stabilizers that will need to be installed will be. If there are 8 and 9 LEDs in two groups, the output will be 12 watts and 13.5 watts. For such a chandelier, you can choose good power supplies up to 15 W, which will be of a suitable size for placing them in the housing of the lighting fixture. Also, such stabilizers will protect against short circuits and voltage surges. Afterwards, you need to unsolder the wires from the power supplies for halogen lamps and connect them to the purchased devices for LED lamps. Now we install the lighting fixtures on the crystals, and the chandelier is ready.
TransformerStabilizing device
Using this action, all problems in the chandelier that appear when replacing lamps are immediately eliminated. The LEDs stop flickering, the light from them is smooth and clean, naturally, “dips” disappear, i.e. the stabilizer does not turn off due to the low power of consumers, and the remote control works like a clock.
To change or not
In general, of course, remodeling a chandelier will take a lot of time, effort, and will also force you to invest financial resources. But the main advantages of such a replacement are that in addition to a longer service life, which is 30,000 hours for LEDs versus 4,000 hours for halogen lighting elements, there are also significant energy savings. After all, the power of a chandelier with G4 lamps on crystals will generally be 25.5 watts, while if there are halogen lamps, this parameter will be 340 watts. Therefore, such modernization will be quite appropriate and reasonable.
But there is one more parameter that must be taken into account when choosing light elements on crystals - this is their color temperature. You need to understand that a warmer color will be more pleasing to the eye, but the colder it is, the brighter the luminous flux will be. This happens because the color temperature of a “warm” lamp (2,700-3,000 K) is much lower than the same parameter of a “cold” lamp (6,500 K). However, halogen lamps exist only at a temperature of 2,700 K.
A very common type of lighting is 12 volt halogen ceiling lamps. Here, as with the chandelier option, you will need to replace the power supply with a driver that stabilizes the voltage for comfortable operation of the LEDs.
Well, then you just need to replace the halogen bulb with an LED one. This is quite simple, of course, for those who have changed the lamp in a similar lamp at least once
The main thing is not to forget about precautions when working with dangerous voltage. It is imperative to turn off the voltage before performing any manipulations, as
j. Electrical installation work with the power on is not permitted, according to safety regulations.
12 volt halogen lamp with G4 socket
You can also make an LED lamp with your own hands, using a housing from a used halogen lamp with a 12 V G4 base. But the process is labor-intensive and requires at least basic knowledge in electrical engineering and skills in working with a soldering iron.
How to make an eternal light bulb from an LED light bulb in 5 minutes. Even a girl can handle it
Typically, the packaging in which the LED light bulb is sold indicates its service life. This could be 30, 40 or 50 hours. However, what the manufacturer promises usually does not live up to expectations and most light bulbs burn out within a year.
I want to share with you how to increase the service life of an LED light bulb in 5 minutes without tools.
I would like to remind you that LED light bulbs have a 1-7 year warranty. If during this time it stops working, then you can safely exchange it for a new one in the store where you bought it. Large stores don't even require packaging or a receipt.
Experts test the parameters of light bulbs, but they cannot check their reliability. It is clear that for many, the service life of the lamp is more important, and not its parameters.
Basically, light bulbs burn out for two reasons: due to burnout of LEDs and failure of capacitors.
If you reduce the power of the light bulb, the LEDs will last much longer, but at the same time reduce its brightness. This is exactly what I will do.
In the production of cheap light bulbs, capacitors of very poor quality are used, which do not even last a year. It makes no sense to extend the service life of such lamps - in any case, they will not last long.
To extend their service life, it is best to choose medium-priced light bulbs; perhaps they will have better quality capacitors. The higher its power, the better, because when they decrease, the lamp will shine quite brightly. 15 W is the best option. It’s even better to choose light bulbs with an impulsive driver, which have a built-in stabilizer, and they shine with the same brightness regardless of the mains voltage.
There are two types of light bulb designs:
- Two-board – there is a driver board inside the case, and above it there is a round board with LEDs.
- Single-board - the driver is located directly on the board with LEDs, and the capacitors are soldered to this board at the back.
So, to simply and quickly extend the service life, a second type of light bulb is required.
I had suitable lamps at home Navigator NLL-A60-15-230-4K-E27, released 04.19. I hope modern light bulbs have the same design as this one. This bulb has a power of 13.66 W, produces 1210 lumens of light, and does not pulsate. It is equipped with a pulse driver. Bulbs of this type cost from 120 rubles.
Of course, you can choose the warm light model NLL-A60-15-230-2.7K-E27.
First of all, remove the cap. This light bulb can be torn off by hand, you just need to apply force. There is one board under the hood. On it you need to find resistors R1 and R2, they set the current of the LEDs.
Resistors are connected in parallel, their values are 2.7 Ohm and 5.6 Ohm. Carefully break resistor R2, being careful not to break everything around the resistor.
Now you can return the cap to its place. That's the whole modification.
The light bulb power became 8.83 W. The luminous flux decreased to 925 lm. This bulb can now replace an 85W incandescent bulb, which is also good. Bulb efficiency increased from 89 lm/W to 105 lm/W.
The main thing is that the light bulb has become much “colder”.
The body temperature of the unmodified light bulb reached 67°C, while that of the modified light bulb reached only 52°C.
The thermal imager does not display the correct temperature on the turned on LEDs, but it is suitable for comparison. It turns out to be a very big difference - 21° C.
Now the LEDs, after modification, will last a long time. Everything now depends on capacitors. By the way, it will also be easier for them due to the decreased temperature inside the light bulb. If they are good, then the light bulb will work for decades.
Important points:
— only new lamps are suitable for extending their service life (if they have not been used for a long time, then the LEDs will still degrade and this process cannot be stopped);
— after modification, the warranty will not be valid (although if the light bulb still stops working, you can simply glue the lampshade back on and no one will look inside);
— it is worth remembering that while the light bulb is operating, there is dangerous voltage on the board.
Theoretical background
LEDs operate at low voltage - about 2-3V. But most importantly, for normal operation it is not the stability of the voltage that is required, but the stability of the current flowing through them. When the current decreases, the brightness of the glow decreases, and an excess leads to failure of the diode element. Semiconductor devices, which include LEDs, have a pronounced temperature dependence. When heated, the junction resistance drops and the forward current increases.
A simple example: a stable voltage source produces 3V, with a LED consumption current of 20mA. As the temperature rises, the voltage on the LED remains unchanged, but the current increases to unacceptable values.
To eliminate the described situation, semiconductor light sources are powered from a current stabilizer, also known as a driver. By analogy with fluorescent lamps, the driver is sometimes called a ballast for LEDs.
The presence of an input voltage of 220V, together with the requirement for current stabilization, leads to the need to create a complex power supply circuit for LED lamps.
Conversion of a lamp with electronic ballast
If the model of the illuminator is more modern - an electronic ballast choke and no starter - you will have to make an effort and change the connection diagram of the LED tubes. Components of the lamp before replacement:
- throttle;
- wires;
- cartridge pads located on both sides of the body.
We get rid of the throttle first, because... without this element the design will become lighter. Unscrew the fastening and disconnect the power wires. Use a narrow-tipped screwdriver or pliers for this.
The main thing is to connect 220 V to the ends of the tube: apply phase to one end, and zero to the other.
LEDs have a peculiarity - 2 contacts on the base in the form of pins are rigidly connected to each other. And in fluorescent tubes, the contacts are connected by a filament, which, when heated, ignites mercury vapor.
Lighting devices with electronic ballasts do not use a filament, and a voltage pulse breaks through between the contacts.
It is not so easy to supply 220 V between contacts with a hard connection.
To make sure the voltage is correct, use a multimeter. Set the device to resistance measurement mode, touch the two contacts with the measuring probes and take measurements. The multimeter display should show a zero value or close to it.
LED lamps have a filament between the output contacts, which has its own resistance. After applying voltage through it, the filament heats up and causes the lamp to work. Further connection of the LED lamp is recommended to be done using 2 methods:
- without dismantling cartridges;
- with dismantling and installing jumpers between the contacts.