Finding the problem
First, they look for the source of the problem that caused the chandelier to become faulty.
Switch
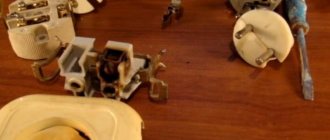
If the lamps are working, but the lighting is not working, the first thing to check is the switch. Most often, the cause of failure is burnt out contacts, which prevents electricity from reaching the lamp sockets. After disassembling the switch, the conductors are inspected at both the input and output. The status of the contacts is also checked. During the repair, the contacts are cleaned to a metallic shine and the housing is reassembled in the reverse order.
Note! If some of the light bulbs in a chandelier with several lighting groups stop turning on, the problem usually lies in burnt-out contacts.
In addition to the external inspection, you should check the presence of current supplied to the housing. They also check whether there is voltage further along the chain - directly to the chandelier. The check is carried out using an indicator screwdriver. The lamp works normally when, after touching the terminal with a screwdriver, the light diode of the handle lights up.
Note! If the light does not light up after the first press, but turns on again, the problem is usually in the switch.
It happens that only one socket does not work. In this case, checking the switch shows its serviceability. The problem is the sockets or the quality of the wiring.
Light bulbs
First, the physical integrity of the tungsten filament is checked (we are talking about an incandescent light bulb). Take the lamp out of the socket and check it in the light for broken filaments. A whole thread indicates serviceability.
The continuity of the circuit should also be tested. For this you will need a multimeter. One of the probes of the device is installed on the thread, and the second - on the end of the light source. The movement of the arrow of the device indicates the serviceability of the lamp. An arrow that remains motionless indicates the need to replace the light bulb.
In the case of an LED lamp, a test is also carried out using a multimeter. It happens that one of the diodes in the series circuit has failed, which is why the entire chandelier does not work.
Wiring
The reason for the chandelier not glowing may be a wiring fault. Check for voltage. To do this, dismantle the lamp to gain access to the conductors removed from the junction box. The voltage is checked using an indicator screwdriver.
In the case of old aluminum wiring, a violation of the integrity of the wires often occurs. When the wire is broken, the contact breaks. Correct the situation by extending the old wire to connect it to the chandelier body. However, a more reliable option is to replace the wiring with a modern one.
Note! If the voltage from the junction box is confirmed, but after pressing the key on the switch the light bulbs still do not light up, the problem is in the lamp itself.
The chandelier is flashing! What to do?
A ceiling or hanging chandelier is the main source of light in residential and industrial premises. And the emotional state and health of a person largely depends on how well it performs its functions. One of the problems that consumers face is the flickering of the chandelier, both when it is on and when the power is turned off. The latter situation is typical for lamps using LED lamps.
To eliminate such a negative aspect as the blinking of lamps in lighting devices, it is necessary to find out the reasons due to which the unstable operation of the lamps is observed.
Chandelier repair
To repair a chandelier, disassemble its body and check the joints between the wires. Also pay special attention to the condition of the insulating layer. A common cause of a malfunction is a short circuit, after which one of the conductors burns out.
In addition, lamp sockets are subject to mandatory inspection. Elements made in China especially often fail. If the reason is in the cartridge, it cannot be repaired, this part is replaced with a new one.
If the ballast capacitor fails, strip the wire coming from it and connect a multimeter. A normal voltage level indicates failure of the series lamp chain. If the voltage deviates from the norm, replace the capacitor.
Advice! If replacing the lamp does not give a positive result, it is recommended to treat the board with a degreasing solution.
If the chandelier does not turn on, the control relay may be the cause of the problem. The functionality of the device is checked with a multimeter with a conductor from the relay connected to it. If a fault is found, replace the relay with a new one.
Other problems
The most common faults are described above. However, those who decide to repair the chandelier themselves are faced with others:
- Incompatibility of new lamps with old chandelier models.
- Poor quality twisting of conductors. Insufficiently twisted conductors prevent normal contact, which leads to lighting problems.
- The power of the screw-in lamps does not match the needs. For example, a chandelier is designed for four 60-watt light bulbs, and four 100-watt light sources are installed. For this reason, not only power supplies fail, but also transformers.
- Fuses blown. In the housings of modern chandeliers, fuses are used to break the circuit in the event of a short circuit. Repair work in this case consists of finding the blown fuse, dismantling it and installing a new component.
- Broken chandelier. A break occurs due to mechanical impact on the device or in case of poor-quality hanging (weak fastening).
Main causes of the problem
Weak contacts or their oxidation can lead to a crackling sound when the switch is turned on.
The crackling sound may resemble a buzzing or buzzing sound. There are several reasons for a breakdown.
Oxidation of contacts
If the contacts of the device become overgrown with carbon deposits or oxidize, an electric arc occurs the moment they come together. The cause of sparking is complicated by the size of the deposit. When shoots form on the end plates, the wiring can catch fire, i.e., the contacts close.
Plate loosening
The spring that presses the contact at the moment of switching on weakens - the characteristic sharp and clear click is no longer heard. A problem is indicated by the device turning on softly and the need to press the button for the light to appear. The danger is that the switch sparks constantly, causing a fire risk.
Lamp power mismatch with contacts
A halogen lamp or high-power LED source creates a load on the contacts. The simplest way to solve the problem is to replace the switch with one that corresponds to the lighting power indicators.
Poor quality of contacts and plates
A breakdown typical of budget models. The button operates on the principle of soft start, which, in combination with low-power automatic machines, provokes sparking.
Other causes of contact failure
High humidity causes oxidation of switch contacts
Factors that cause switch sparks and crackles also include:
- high humidity – activates the oxidation reaction;
- incorrect or weak connection of cores;
- increased load on contacts - humming occurs;
- constant voltage fluctuations.
Broken contacts will lead to failure of household appliances.
LED chandelier repair
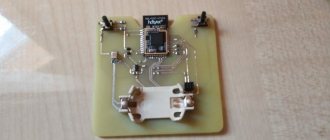
Transformers are used to operate LED devices. To check the serviceability of this component, use a multimeter. If the transformer is working properly, pay attention to the operation of the diodes. The test is performed using a 9-watt battery and a resistor. Each LED is tested sequentially. If a faulty diode is found, a short circuit is performed. Upon completion of the repair work, the structure is assembled in the reverse order.
When newly installed LED bulbs begin to flicker, the problem lies in a dimmer incompatibility. Some types of LED light bulbs will not work properly with this device. Only dimmable LED lamps are compatible with it.
Repair algorithm
Dismantling the switch
If the switch shorts, you can repair it yourself, working in stages:
- Line loss. The machine in the input panel is turned off.
- Checking for voltage. This can be done by touching the indicator screwdriver to an outlet in another room.
- Dismantling the device. You will need to remove the switch from the groove and remove the decorative trim. After this, the voltage is checked again, the screws on the sides are unscrewed, and the housing is removed from the socket.
- Disconnecting cables. For two-key models, you will need to mark the input wire with a marker.
- Disassembling the case and searching for contacts. The contact group is located above a plastic button mounted on screws.
- Troubleshooting. The contacts are cleaned or the device is completely replaced.
- Reassemble the case in the reverse order, reconnect the wires. The finished mechanism in the housing is returned to the socket box.
- Turning on the machine in the panel and testing the switch for serviceability.
Chandeliers with remote control
Lighting devices with remote controls often break down. The main signs of failure of such chandeliers:
- despite transmitting a signal from the remote control, the lamps do not light up;
- Some modes do not function, the chandelier switches off spontaneously;
- the same modes do not work when controlled from the remote control, but function when switched manually;
- flickering occurs that is not caused by any human action, and spontaneous switching between modes occurs.
The listed problems are the most common, but a combination of several of them is rare. Typically 1 or 2 components of a remote control chandelier need to be replaced.
The search for a problem in a lamp with a remote control begins with checking the batteries. If new ones are installed, but the chandelier still does not work, the next possible cause of the malfunction is the controller.
Different groups of lamps are most often connected in separate blocks. These elements are connected using a controller. A common situation is that it launches only some modules of the device. In this case, it will need to be replaced.
It happens that the light does not turn on either using the remote control or when pressing the switch. In this case, you should pay attention to the number of non-working components. One lamp may burn out. However, when all the bulbs do not work, the likely problem is in the electronic transformer. This element is replaced with a new one, while working with clean gloves.
Causes of sparks and arcs
Before we look at why contacts spark, let's understand the basic concepts. The switching device and its contact system must provide a reliable connection with the possibility of breaking it at any time. The contacts consist of two electrical plates, which in the closed position must be securely pressed against each other.
An arc occurs when switching inductive circuits. These include various electric motors and solenoids, but it is worth remembering that even a straight piece of wire has a certain inductance, and the longer it is, the greater it is. At the same time, the current in the inductance cannot stop instantly - this is described in the laws of commutation. Therefore, a self-inductive emf is formed at the terminals of the inductive load, its value is described by the formula:
E=L*dI/dt
Interesting! In our case, the rate of change of current plays an important role. When turned off, it is extremely high, and accordingly the EMF will tend to large values, up to tens of kilovolts (for example, a car ignition system).
As a result, the EMF increases to such an extent that its value breaks the gap between the contacts - or sparks are formed. The quality of any connections is described by their contact resistance: the lower, the better the connection and the less heating. When they open, it increases sharply and tends to infinity. At the same moment, the area of their contact heats up.
In addition, between the open contacts against the background of increasing self-induction EMF and increased air temperature due to heating of the surfaces when the plates are opened, air ionization occurs. As a result, all the conditions for arcing and sparking are present.
If we talk about why contacts spark when an electrical circuit is closed, then this happens not with an inductive load, but with a capacitive load. You see this every time you plug in your laptop or phone charger. The fact is that the discharged capacitance (capacitor) at the input of the device at the initial moment of time represents a short-circuited section of the circuit, the current of which decreases as it is charged.
If you observe sparking in a relay or switch in the closed position, the reason for this is the poor condition of the contact surfaces and their high temperature.
Crystal chandelier repair
The most common problem with a crystal chandelier is the breaking off of structural elements due to mechanical stress. Ordinary glue in this case is not a solution to the problem, since the seam will be noticeable after gluing. Therefore, it is recommended to use a special silicate glue.
Before gluing the crystal fragment, prepare the surface to give it better adhesion. To do this, the crystal is washed with soapy water, and then dried and degreased. Another result of proper surface preparation is that the seam will be less noticeable.
Glue is applied to the crystal, after which the elements are connected and held for a while so that they set. Then, using a piece of cloth, remove excess glue from the surface of the lighting fixture. After a few hours, the parts will be completely glued together and the chandelier will be ready for use as usual.
In order to independently repair a chandelier with a remote control, you must, first of all, know the operating principle of such a lighting device, as well as independently identify and determine the causes of the malfunction.
Problems during operation can arise both with the control device and with the light sources.
In this article we will look at repairing a chandelier with a remote control yourself.
Repair methods
- Remote controller. There is a very simple way to determine if the remote is working. To do this, turn on any camera - even a smartphone is suitable for these purposes. Point the remote sensor, which emits an IR signal to the relay, directly at the camera lens. Press various buttons on the remote control. A working remote control will display a flashing element on the smartphone screen that emits a signal. We won’t see anything with the naked eye; this happens because our eyes can’t perceive light in the infrared spectrum, but a smartphone’s camera can.
How does a chandelier with a remote control work?
The complete set of a standard chandelier with a remote control consists of control and power units for the chandelier, a driver, a lighting source and the control panel itself, which consists of a power source, a generator for high-frequency vibrations, an encoder, a transmitting device and an antenna, enclosed in a small plastic case.
The control unit belongs to the category of electronic switching devices and receives a signal from the remote control. Through internal devices, the signal is converted to switch lighting circuits. Operation is ensured by alternating current and voltage of 220V.
Installation of a chandelier with remote control
It should be remembered that the operation of the unit and the remote control is single-frequency, and the breakdown of one of the devices will require the purchase of a full-fledged new set.
How to determine a breakdown?
The most common malfunction is the failure to turn on the chandelier from the remote control or switch.
There may be several reasons for this - starting with the banal failure of the batteries in the remote control or burnout of light bulbs, and ending with irregularities in the electrical wiring or contacts, as well as a malfunction of the controller.
Failure to turn on when the chandelier clicks characteristically can indirectly confirm the serviceability of the controller, but does not exclude the possibility of damage to other components or contact groups.
In most cases, you will have to independently replace the remote control kit with the receiver or carry out repair work related to the electronic transformer.
If the chandelier stops turning on from the remote control
Does the chandelier with the remote control not turn on?
If the ceiling light is turned on using conventional switching equipment, but does not respond at all to the signals sent by the remote control, then the cause is a malfunction in the remote control device.
If you plan to replace the receiver yourself, then the technology for such repair work is as follows:
- turning off the voltage supply in the electrical panel;
- dismantling the ceiling lighting fixture;
- unwinding the box, cutting wires and dismantling the old receiver;
- fixing a new food blog with double-sided tape in a box;
- stripping the insulation on the wires and connecting them in accordance with the color markings.
At the final stage, you need to check the correctness of the electrical wiring and insulation connections, close the box and install the lighting fixture in its original place.
After connecting the network to supply electricity, routine testing of the performance of the ceiling lamp is mandatory.
The light switch can be installed without the help of specialists. You will learn how to connect a light switch in the article.
Why does the LED lamp blink when the light is on and how to fix this problem, read on.
It is very useful to know how to properly connect a light bulb socket. Read more about this here.
Why does the LED lamp blink and what to do in this case?
In order to understand why the LED chandelier blinks, and this situation is possible even when it is turned off, you need to understand what this type of lamp is.
In the base of lamps of this type there is an electronic control unit with a diode bridge, to which an alternating current of 220 V is supplied through a fuse, and at the output a direct current with a certain ripple is formed, which negatively affects the operation of the product. To eliminate, or, as they say, “smooth out” the pulsation, a capacitor is installed as a filter element. This is what causes the LED lamp to blink when it is turned off.
The most common situation when a switched-off chandelier on LED lamps blinks occurs when installing a switch equipped with backlighting. When turned off, a small current passes through the indication LED, which provides a glow, while the circuit is closed through the light bulb, which leads to charging of the capacitor. Having reached a certain capacity, the capacitor tries to start the lamp, but this is only enough for one time and full switching does not occur. Well, then the process repeats.
The easiest option to get rid of the chandelier blinking in this case is to simply remove the indicator from the housing. There is another solution in which a resistor is connected parallel to the lamp. It takes on the load and prevents the LED lamp from flickering. If you don’t particularly want to do soldering and get into the design of the lamp, you can replace one LED lamp with a low-power incandescent lamp, the tungsten spiral of which will act as a resistor.
Sometimes, before these complex operations, it is enough to check the circuit breaker installation diagram. Incorrect installation, when the switch breaks the neutral wire, can also be the reason why the LED lamps in the chandelier blink.
In conclusion, we note that constant blinking of lamps in chandeliers or other lighting devices significantly reduces their service life. And if the reasons are not identified in a timely manner, the product will fail earlier than stated by the manufacturer.
What to do if some of the lamps stop burning?
As a rule, light sources do not burn out all at once, but one by one. In this case, you can almost immediately exclude the failure of the transformer unit, but to make sure that it is working, you can connect this unit to a 220V power supply:
- check the response of the chandelier receiver controller to commands sent from the remote control;
- check the relation to “zero” voltage of 220V when the outputs are turned on;
- check the voltage supply to the power supplies of the lighting groups;
- check the correct voltage at the outputs of the group blocks;
- check the serviceability of the electrical wiring in the area from the block to the lamps;
- check the serviceability of the lighting lamps.
Checking lamps that do not light is carried out visually or by test replacing the element. The replacement of halogen lamps requires increased attention and caution, which is due to the design feature of such a lighting element.
If any contaminants or a large amount of dust gets on the surface of the glass cylinder, after turning on the chandelier, local burnout of substances, redistribution of temperature heat and burnout can occur.
Burnt-out halogen light sources should be replaced only with bulbs that have similar parameters.
Main causes of the problem
Loose or oxidized contacts may cause a rattling noise when the switch is turned on.
The crackling sound may sound like a buzzing or buzzing sound. There are several reasons for the failure.
Oxidation of contacts
If the contacts of the device are covered with carbon deposits or oxidized deposits, an electric arc will occur when they approach. The cause of sparks is complicated by the size of the deposit. When branches are formed on the end plates, the wiring may ignite, that is, the contacts will close.
Plate loosening
The spring that tightens the contact at the moment of ignition weakens: the characteristic high and clear click is no longer heard. A malfunction is indicated by the device turning on softly and the need to press a button for the warning lamp to light up. The danger is that the switch will continuously spark, creating a fire hazard.
Lamp power mismatch with contacts
The contacts are charged with a halogen lamp or a powerful LED source. The easiest way to fix this is to replace the switch with one that matches the wattage of the light.
Poor quality of contacts and plates
Typical breakdown for budget models. The button operates on the soft start principle, which, in combination with low-power automatic machines, causes sparks.
Other causes of contact failure
High humidity causes oxidation of switch contacts
Other factors that cause sparking and crackling switch noise include:
- high humidity – activates the oxidation reaction;
- incorrect or loose connection of cores;
- increased load on the contacts - a hum occurs;
- constant voltage fluctuations.
Broken contacts will lead to failure of the device.
Search for burnt diodes
If you have an LED chandelier with a remote control, you need to check the integrity of the diodes.
In order to determine the failure of a ceiling chandelier operating via remote control, it may be necessary to check the lighting element units, including diode emitters.
Replacing such devices involves installing them inside special connectors, strictly observing polarity.
The emitters are connected in series order, so if even one of the diodes breaks down, the functionality of the entire chain is disrupted.
The test is carried out using a tester, after which all failed emitters are replaced with elements with similar parameters, which will prevent the network load from being exceeded. Lighting devices with a remote control quite often do not work due to the burnout of the power elements in the LED unit, and such a breakdown can be determined by direct connection to a 220V network.
If your lamps burn out one after another, you need to find out the reason. Why light bulbs burn out - causes and solutions to problems.
You will find the DRL lamp connection diagram at the link.
How to repair touch switches
Touch modifications are equipped with a remote control and special boards with control chips. It is worth disassembling such a switch after reading the manufacturer's instructions.
- Removing the decorative trim.
- Visual search for the panel with sensors, which is located under the plate. Depending on the number of lines served, there are 1-3 elements.
- Search for a sensitive area on the pad - sensors are indicated by circles.
- Detection of LEDs indicating the position of the switch (red - on, blue - off). Under this panel there are nodes to which conductors are connected.
- Disconnecting inputs and outputs. You need to remove the clips that secure the touchpad.
- Removing the bolts from the housing mounted on the socket box and inspecting problem areas.
- Checking voltage on individual cables. The faulty wire is replaced.
- Reassembling the mechanism. The main unit is connected to the power supply, placed in the socket and secured with screws. After this, the touch panel and decorative overlay are attached.
A special feature of the touch switch is that it interrupts the power supply in the event of a breakdown. When the light bulb burns out, the device is switched off. It does not change even after installing a new lamp. To turn on the light you need to touch the plate.
Video on the topic
Remote control (remote control) of a chandelier is more convenient than using a switch. But there is also a drawback - the ability to forget the location of the remote control (remote control). This doesn't happen with a wall switch. Therefore, when switching to radio remote control, you should not give it up.
There are several types of pendant lighting you can buy:
- with LEDs;
- with halogen lamps;
- with conventional incandescent light bulbs;
- combined.
LEDs can be in the form of individual elements or garlands, allowing you to create special effects. They are connected via a capacitor. To connect halogen light bulbs, transformers are required to convert the voltage.
The most complex combined models of lighting fixtures are more difficult to determine why they do not turn on.
Design and principle of operation of a chandelier with remote control
You can remotely control any chandelier, even an exclusive antique one with incandescent lamps. You need to buy a remote control and a radio receiver (controller), which is built in instead of a switch, on the ceiling or lamp cover. The first option is rarely used, as it requires the installation of additional wiring for the zero connection.
Modern pendant lamps are manufactured with a radio receiver inside and a remote control that serves as a radio signal transmitter. The receiver and remote control are tuned to the same frequency and use a common signal encryption algorithm. This avoids interference from neighbors using similar equipment.
The remote control (the simplest one) has 4 buttons that allow you to work in 4 modes: turning on/off individual blocks (up to 3) and simultaneously turning off all of them at once. Complex models have more buttons (for color selection mode, brightness adjustment, timer settings). The order in which the modes are turned on does not matter.
When you press one of the buttons, the radio signal enters the receiver, is processed and transmitted to the control unit responsible for the specific function. The remote control can operate at different distances; for a standard city apartment, eight meters is enough (in a country cottage, the distance must be increased).
To operate the remote control, batteries are inserted into it, and the receiver is powered from a household electrical outlet. It is necessary to connect phase and zero to the terminals. For an old chandelier, you need to buy a kit adapted for pair work. It is configured by the manufacturer; if one of the elements is faulty, another set is purchased.
There is one peculiarity when combining a remote control with a switch. The radio receiver is not able to recognize the method by which voltage is supplied. When you turn off the lighting device using the remote control, it should light up from the switch. If there is a break in the power supply before turning on, the lamp lights up spontaneously if the switch keys are not moved to the off position.
The disadvantage of remote control is the possibility of overheating of the radio signal receiver. The maximum temperature level is indicated on the packaging; if it is exceeded, there is a risk of fire. The risk increases if the receiver is built into the lighting fixture structure. The problem is solved by a blower device or by placing the controller separately on a radiator that removes excess heat.
Regardless of the type of chandelier, it is mounted on a strip attached to the ceiling. At its base there are holes for the strip studs. The weight is held in place by nuts. The controller is placed in a hollow base along with other parts.
Lamps can be regular halogen or LED. When installing, it is necessary to take into account their features.
Important! For stretch ceilings, only LEDs can be used. The halogen lights are too hot and can damage the design.
The most common problems and how to solve them
Chandeliers equipped with a remote control system break down more often than with traditional shutdowns. The reasons can be different - from the need to replace batteries to the failure of the radio, power supply or software board.
The lamp does not turn on at all: neither from the remote control nor from the switch
If the chandelier stops turning on both from the switch and from the control panel, you need to check the presence of voltage in the network and the functionality of the battery (it is better to replace it immediately). If there is current and the battery is new, but the problem is not solved, use a multimeter to check the serviceability of the light bulbs.
The incandescent lamps are unscrewed and the filaments are examined. The absence of breaks does not indicate serviceability, so a check with a multimeter is necessary. One probe is fixed on the thread of the base, the second - on the end. If the tester does not respond, the light bulb has burned out.
Checking halogen lamps is carried out similarly (probes are applied to the terminals). If the product is working properly, the resistance is 0.5-1 Ohm. When checking diodes, a positive multimeter probe is applied to the anode, and a negative one to the cathode. The voltage drop value appears on the display. When changing the polarity, the voltage does not change if the bulb is intact.
If the LED lamp begins to shine dimly
The situation when an LED lamp shines dimly often comes as a surprise to consumers. They purchased a light source using advanced technology and expected it to produce a bright and powerful stream of light. We will look at the main reasons why an LED lamp shines less brightly than expected, and suggest ways to change this.
The LED lamp began to shine dimly due to low voltage
The first thing you should check when looking for an answer to why an LED lamp is dim is whether the voltage level in the network is sufficient. The lighting device is powered by an alternating current network, so when the voltage drops, even a high-quality lamp with good working light does not shine at full strength.
This is easy to check - just connect another device to the AC mains. If this LED lamp also begins to shine dimly, then the reason is low voltage. This problem is typical for suburban housing. This can be solved by installing a stabilizer on the light and socket.
Natural degradation process of LEDs
Any LED lamp or LED lamp with a built-in light module at a certain moment begins to shine less brightly.
This is due to the degradation of LEDs - a natural process when the elements technically cannot work at full capacity.
This is checked using the information on the product packaging, where the manufacturer indicates the probable degradation period of the LED components. If the period coincides with the period when the lamp began to shine dimly, it needs to be replaced.
LED light is dim due to incorrect wattage selection
This happens when replacing an old lamp in a lamp with an LED light source, but with the wrong power selection.
Like other light sources, an LED lamp is selected for the lighting fixture according to the manufacturer’s recommendations. If the LED light is dim and the lamp was installed recently, you need to check the information on the device.
This problem can be solved by replacing the LED lamp with a similar one, but with the correct characteristics.
A lamp with incorrect assembly or low-quality components
If the voltage in the network is correct, the lamp power is selected correctly, and it is too early to talk about the natural degradation of LEDs, most likely the problem is in the quality of lighting products.
Therefore, when purchasing an LED lamp or light source, it is important to pay attention to products from trusted manufacturers - for example, LED lamps from Arlight. They are manufactured in accordance with international standards, certified and have a warranty period
They are manufactured in accordance with international standards, certified and have a warranty period
They are manufactured in accordance with international standards, certified and have a warranty period.
Replacing the chandelier control unit
If a chandelier with a remote control does not turn on due to a faulty controller, it cannot always be repaired. In such situations, you have to buy a new remote kit and install a new controller.
The process begins with removing the lamp. First, the faulty receiver is disconnected, and the network zero is connected to all the zeros of the new one. The phases of each group of light bulbs are connected to the channel wires. Next, the receiver is connected to the network, and the lamp is hung on the ceiling. At the last stage, an assistant is required to hold it in his hands.
Main conclusions
Remote control of lighting is vital in public places with a large area (theatres, stadiums, concert halls). Similar systems are also purchased for residential premises.
The connection is not complicated, but requires compliance with some nuances. It is necessary to determine the operating range, select light bulbs and the location of the lamp, and take into account the characteristics of specific conditions. Remote control is suitable if you need to expand the functionality of a double or triple switch.
The best option is to purchase a lighting fixture equipped with a remote control system. This makes the connection easier, since there is a ready-made circuit. You can do this kind of work yourself if you first get advice from a qualified specialist.
Remote system breakdowns do happen, but fixing them rarely creates problems. In the worst case scenario, a new kit is purchased and installed.
Types of switches
Three-button switch
When the switch crackles or sparks when turned on, it is necessary to install a new device or repair it. Flickering lights or switching on with a bang can lead to line shorts, fires, and breakdowns of household appliances. To properly repair the device, you need to understand its design.
Manufacturers produce the following product modifications:
- With one, two, three keys. Designed for installation in residential premises. To turn on the device, you need to press a key, closing the circuit.
- Push-button. Models that have an LED indicator. The design does not differ from standard ones.
- Dimmer. Allows you to adjust the lighting at the user’s discretion - adjustable brightness or intensity. The contacts are activated by rotating the wheel.
- Repeated. Devices that turn on the light by turning a button on the body.
Depending on the type of control, you can choose sensor devices, devices with a timer, acoustic or remote options.