The organization of a lighting system involves performing a wide range of technical operations. The scale of such activities depends on the nature of the design task - in particular, on the area of light coverage, on the number of lighting devices, their power, control method, etc. Since any lighting group in one form or another involves interfacing with an electrical wiring line, to perform such tasks, special standards are provided. Both the installation of lighting in a private home and the installation of street lighting equipment are carried out according to certain instructions.
General rules for installation work
Gas-discharge lamps, traditional incandescent lamps, fluorescent and LED devices are allowed for installation of components of electrified lighting systems. In systems that are based on gas-discharge radiation elements, it is necessary to provide protective equipment - as a rule, this requirement applies to objects where the influence of radio interference is expected. Sometimes combined lighting is allowed - that is, several groups of devices of different types are introduced into the lighting infrastructure.
The main power line in relation to the installation of general purpose lamps must have a voltage of no more than 380V. The limit value applies to industrial use, when electric lighting is installed in three-phase networks. For home and street lighting, elements powered by 220V are more often used. Spot models of lighting devices and lighting elements can have power supply with voltage characteristics of 127V and lower. In this case, luminescent devices with a voltage in the 127-220V spectrum are mounted at a level of no more than 2.5 m.
Spot lighting in the interior
Spotlights (spots) deserve special attention. They emit directional streams of light that spread at a certain angle. As a result, you can illuminate the entire space of the room.
Types of spotlights:
- Built-in.
- Invoices.
- Track.
Recessed luminaires are devices whose housing is hidden in the ceiling or other surface where they are installed. The products are compact in size and versatile. They are almost invisible in the interior and perfectly complement more original lighting sources.
Surface-mounted lamps are mounted to the plane of the wall, furniture or ceiling so that the body is located in plain sight. Most often, such models have a laconic design, so they are not noticeable. They go well with other lighting fixtures and fit into any interior.
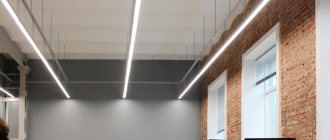
Track lamps are a relatively new trend in lighting design. This is the name given to devices mounted on the busbar trunking. The main advantage of the models is the presence of a rotating mechanism, which makes it possible to change the direction of the light flow.
Important! If spotlights appear as the main sources of lighting, they must be evenly positioned on the ceiling. The optimal distance between devices is no more than 1.5 m.
Track lamps in the interior
Spotlights in the interior
Installation instructions for emergency power supplies
Emergency power supply is mandatory for industrial lighting and for devices that are planned to be operated in an open area. The regulations require that such luminaires be supplied with energy from separate independent sources. For example, leased lines can be connected to different transformers, and multiple transforming stations can be connected to a single distribution source.
It should also be noted that there is a need to separate working and evacuation lighting. Working light refers not only to a set of devices in production, but also to the communal infrastructure in ordinary residential buildings. Escape routes must have a separate supply line from the entry point that is independent of the operating panel. In critical areas, lighting installation is carried out together with the installation of protective frames that insure against accidental damage. This applies to both production premises and external lighting systems. If difficulties arise with the organization of separate power supply lines, then you can use autonomous power sources in the form of internal or external batteries, as well as generator sets (gasoline or diesel).
Scenarios and rules of modern lighting
The main rule of lighting design is the choice of lamps for specific tasks. You should not place devices in the room that are unlikely to be used. To avoid mistakes, you need to think through the scenario.
You can combine several scenarios in one space. The most common option is a multi-level lighting system. This solution is especially relevant for spacious rooms. The scheme includes:
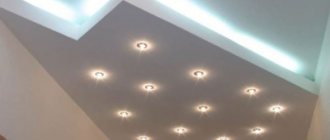
- Main ceiling lighting.
- Additional lights in certain areas of the room.
- Accent lighting for interior items.
- Creative lighting.
You can experiment with designer lighting as much as you like, but the organization of the main thing should come first. One chandelier or lamp is not enough, so it is important to think about how many light sources there will be in the room and how to arrange them. To do this, experts draw up a lighting scheme.
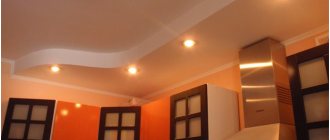
Multi-level lighting in the kitchen interior
Multi-level designer lighting in the living room interior
Installation and protection of the lighting group
When drawing up a diagram for organizing a lighting network, it is necessary to adhere to the main rule, which excludes the possibility of power wires coming into contact with elements of the main lighting and lines that supply other equipment. All wiring must be insulated - both outside the box and inside the lamp.
If outdoor lighting is being installed, then additional insulation, moisture and wind protection means are introduced into the supporting structure. The cable is fixed to the main line while maintaining a distance from other connection points and cable routes of at least 2 cm. As for the installation of technical wiring for evacuation and work lighting, it is possible to use several phases. To do this, a busbar must be introduced into the infrastructure.
Installation of lighting systems is not complete without electrical protection, the choice of which will be determined by the characteristics of starting currents, lamp powers, etc. Protective equipment is installed in groups in places that provide access for maintenance. If the lighting system is supplied from distribution lines, then distributed installation schemes can be used. In terms of restrictions in this part, it can be noted that the rules prohibit the use of automatic switches and switches, as well as fuses in the neutral wire.
Rules for installing lamps
Installing a lamp is not as complicated a process as it might seem at first glance. Even an inexperienced person, having thoroughly understood the theory, can easily carry out this work. The main thing is to be careful and follow all safety rules. If you show interest and hard work, then the need to seek help from specialists will immediately disappear. So, for those new to electrical installation work, we provide detailed instructions on how to properly install a lamp with your own hands.
Installation of the lamp depends on its type.
Lighting devices come in different types.
For example, wall (interior lighting) and ceiling. The installation process and its complexity depend on what type a particular lamp is. Wall lamps are distinguished by the simplest installation, which is not accompanied by serious problems. It consists of screwing a dowel or other fastening element into the wall on which the lighting fixture will be installed. The main thing is to consider the size of the power wire. It should be long enough to connect to the nearest electrical outlet. Connecting a ceiling lamp begins with the preliminary installation of the fastening element. Basically, the role of fastening is performed by a hook that is screwed into the mounting box. Of course, today there are many different fasteners, the choice of which is directly related to the type of suspended lamp. Today, most such devices are attached to a pre-mounted metal plate, which eliminates the possibility of hanging on a hook if necessary. What to do in a situation where the lamp can only be installed using a plate, but a box is already installed in the ceiling? In this case, the metal plate is simply attached to the installation box with screws or other parts. Installation of various types of fasteners
In the previous paragraph, we superficially touched on the fact that the installation of fasteners can be different. Let's look at this in more detail.
A situation may arise when there is no installation box, and it is simply not provided. In this case, the metal plate
can be installed in other ways:
- screwing with self-tapping screws to a wooden block, which is inserted into a hole in the ceiling;
- make a couple of holes in the ceiling, the location of which corresponds to the metal plate for mounting. After this, screw the dowels into the resulting holes and secure the plate with screws. A hook can be secured in a similar way.
Conductors going to the lamp: phase and zero
Conductors that are connected to the lighting device are very important, so you need to pay special attention to them.
In the case of a two-key switch, you need to figure out in advance which of the wires is neutral or phase, in accordance with the keys. This process is carried out using an indicator screwdriver as follows: with the switch key turned on, each conductor of the electrical wiring line that goes to the lamp is checked in turn. As a result, the identified phase should be marked or written down in a notebook. After this, the first key is turned off and the second one, which has not yet been checked, is turned on. And in a similar way, conductors are recognized with phase identification. The remaining conductor is zero. Preparing the lighting fixture for installation
Before installing the luminaire, you need to carefully check it for the level of assembly quality.
If the bolted connections are weak, they must be tightened. Cartridges, contacts and connections to conductors must also be inspected and corrected if necessary. Correct connection of conductors from sockets
A lighting device with one lamp (i.e. 1 socket) does not have any installation difficulties, since only 2 conductors (phase and neutral) need to be connected to the network. In the case of a luminaire with more than one socket, it is necessary to make the correct connection between them. In addition, it is necessary to decide and differentiate which lamp will be powered by which key. After the cartridges and phases have been distributed, you need to start connecting one conductor from each cartridge. That is, any cartridge has black and red wires, therefore, all red wires are connected to each other, which must be connected to a specific phase conductor. The same must be done with black conductors. Similar processes must be carried out with the remaining cartridges.
How are conductors coming from different cartridges connected?
Some models of lighting devices have terminal blocks, inside of which the cartridge conductors are connected, and terminals that connect the conductors of the electrical wiring line.
If there are no terminal blocks, connecting the wires and connecting them to the network can be done using other methods:
- The conductors coming from the cartridges are twisted and soldered. The same can be done with electrical wiring made of copper;
- Aluminum wires in electrical wiring require terminal blocks. The best option is Wago terminals, as they provide a good connection and reliable operation of the device over time. In addition, these terminals are very easy to use;
- PPE – connecting self-insulating clamps .
Besides the fact that this method is easy to perform, it also does not require the user to have specific skills.
The connection process boils down to twisting the lamp conductors and wiring together, followed by screwing on the PPE caps .
These caps must be of a certain cross-section, which is calculated based on the total cross-section of the conductors being twisted; - If there are no terminal blocks or other connecting devices, ordinary bolted connections can help. A bolt, nut and some washers are all you need. When both the lamp conductors and the wiring conductors are made of copper, they are clamped together with a pair of washers. You will need an additional washer when the lamp wires and wiring wires are made of copper and aluminum, respectively. This will help avoid them touching. Experts advise adding grover
. This element helps ensure a high-quality connection that will not weaken over time. After all the previous processes, it is necessary to insulate the resulting connections either with heat-shrink tubing or electrical tape.
Be very careful!
Accuracy is one of the main principles that must be followed when installing lamps, since there is a very high probability of damage to the electrical wiring.
The Planet Electric retail chain is pleased to present a wide range of lighting products, which you can view in the catalog.
Network grounding
High-quality grounding is carried out using an appropriate wire, subject to the rules of the technical organization of this protection. In particular, the rules require that a reliable electrical connection must first be ensured in the design of the lamp itself - for example, the gap from the lamp body to the fixing bracket must be neutralized with a protective conductor. The laying of the circuit through which the grounding will pass may concern not only the body of the lighting device. The grounding wiring is often connected to the supporting structure on which the device is mounted. For example, if the lighting installation was based on metal poles or other structures, then they must be connected to the housing with the same protective wires. If portable lamps with low voltage are used, grounding is organized using a flexible wire core.
Do-it-yourself installation of street lamps
Important installation requirements:
- it is forbidden to lay power lines under the foundations of buildings;
- the distance from the trench to the foundation must be at least 0.6 meters;
- when laying several cables in parallel, it is necessary to ensure their separation by 0.1 meters;
- the cable route should be no closer than 2 meters from trees;
- the distance of the cable line to the sewer and water pipes must be at least 1 meter, and to the gas pipe - 2 meters;
- crossing cables in trenches is allowed provided a distance of 0.5 meters is maintained;
- underground cable connections must be made only using special couplings;
- Twisted connections of wires are not allowed; special terminal blocks should be used.
Rules for installing interior lighting
Single luminaires do not have to be provided with automatic switches and fuses. If it comes to group circuits supplying devices with a current strength of up to 25 A, then the introduction of such equipment is mandatory. In addition, group lines with gas-discharge lamps and incandescent lamps with a power from 42 to 125 V should be provided with auto-switch releases or fusible protective fuse links. If in such networks it is planned to form branches no longer than 3 m in steel pipes, then the installation of additional protective equipment is not required.
At home, lighting installation can be carried out on the basis that there will be no more than 20 lamps per phase. In this case, sockets should also be considered as consumers. An increase in the number of lamps is possible provided that low-power lamps are used - for illumination or spot lighting.
Lighting Design Trends
Interior fashion tends to change quickly. This directly applies to lighting design. We tell you what trends professionals use in decorating rooms.
Eco trends
Lighting devices made from natural and environmentally friendly materials are gaining popularity. Lamps with lampshades made of wood, thick paper, or stone look impressive. Lamps with wicker shades deserve attention. Such models are appropriate in almost all modern interior styles.
Chandelier made of elk antlers in the interior
Corrugated cardboard chandelier in the interior
Laconism and minimalism
First of all, this category of trends includes compact lamps in transparent shades. The devices look original and create a special atmosphere in the room. They are suitable as additional sources of general lighting and accent lighting of certain areas of the room.
Lamps in laconic round shades are at the height of fashion. They are considered universal because they combine well with other lighting devices.
Chandelier in the style of minimalism in the interior
Unusual shapes
Lamps with non-standard configurations are becoming fashionable. Triangular, square and trapezoidal lampshades will be a wonderful accent in modern designs. Lamps with balloon-shaped lampshades are very popular. They are ideal for installation in a nursery.
Original chandeliers in the interior
Rules for installing external lighting
One of the main parameters that lighting engineers focus on when organizing street light is height. Thus, cable lamps must be installed at a level of at least 6.5 m above the ground. Standard lighting of boulevards or pedestrian areas is carried out at a height of 3 m or more. If lawn tools are used, then the height value does not matter. Group installation of street lighting also implies the possibility of installing a large number of devices in one phase. In this case, the value exceeds 20 units, but only on the condition that the branch circuits have their own circuit breakers or fuses.
How interior lighting affects the space of rooms
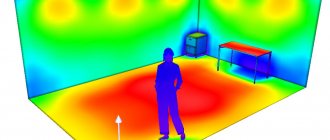
Good lighting will highlight interior details, visually enlarge the space and make the room cozy. Some more interesting facts:
- Ceiling lights placed in a row will visually add height to the room.
- Reflective elements on the walls will visually expand the space.
- Lamps located longitudinally on the wall will visually “stretch” the room.
If there is not enough light in the room, it will look gloomy. Even the original design of the home will not correct the situation - all furnishings will appear in an unfavorable light. A poorly lit room will visually appear smaller than it actually is.
We present a photo that shows successful and unsuccessful lighting options. The image perfectly illustrates the influence of light on the perception of space.
An example of successful and unsuccessful room lighting
Features of installation of load-bearing structures
Typically, supports are used for the technical organization of street lighting. At the intersections of lines with roads and streets, gaps of about 40 m are maintained between the supports. Anchor elements and double cable fastenings are used as mounting fittings. The process of wiring and installation of lighting poles is carried out as part of a single event. After installing the structure, a cable line is inserted, and the pole is fenced with a plinth. The base elements must have dimensions that will allow them to accommodate wiring connections, fuses and a protection unit with access to maintenance.
Types of street lighting
Basics
This is lighting necessary for everyday life and used daily. It is created by a combination of lamps installed near the house and other buildings, on the fence, on the site. All lighting devices are distributed along separate power lines and are turned on by different switches.
Additional
This is lighting that is used periodically, for example, when receiving guests, celebrating holidays or evening family recreation on weekends. This includes decorative lighting of landscape elements, gardens and flower beds. Lamps with multi-colored glow and outdoor multi-color RGB strips are often used.
Rules for installing advertising lighting
Features of installation of advertising lighting are determined by the type of devices used. The most popular means of such illumination is a gas light tube. LED multimedia panels are less common due to their high cost, but their efficiency is much higher. Since the installation of such devices is carried out outdoors, the rules require the use of transformers in metal insulated casings, which also have a secondary voltage of up to 13 kV. When installing lighting poles for the same advertising multimedia panels or tubular lighting structures, it should be taken into account that current-carrying open elements must be removed from combustible materials at a distance of more than 5 cm. Transformer blocks for gas-light pipes should, if possible, be installed close to the devices being served, but so, so that third parties do not have access to them.
Connecting the street lighting system to power
When connecting the power supply, it is necessary to take into account the requirements of the PUE, Chapter 6.3. "External electric lighting":
- power supply to street lamps must be carried out via independent lines;
- it is allowed to use additionally laid phase and common neutral wires of the electrical network of the populated area;
- lamps can be powered from the input device at home;
- According to the instructions, it is recommended to power security lighting via a separate line;
- It is recommended to connect external lighting fixtures at the entrance to the building to the internal lighting system.
Instructions for working with light fittings
Auxiliary elements included in the lighting system infrastructure must comply in their characteristics with both the loads in the electrical circuit and the external operating conditions. For example, if we are talking about places subject to vibrations, then the fixing fittings are selected with a design in mind that will prevent the components of the lamp or working equipment from falling out or self-unscrewing on the line. Without fail, installation of LED lighting involves performing work with current-carrying cartridge sleeves - usually screw-type. On lines with solidly grounded neutrals, the cartridges are connected not to the phase conductor, but to the neutral conductor. However, this requirement does not apply to portable lamps that do not require grounding or grounding.
Lighting fixtures in the interior
Interior lighting is represented by different types of lamps. Instrument options:
- Chandeliers.
- Hanging lamps.
- Spotlights.
- Sconce.
- Desk lamp.
- Floor lamps.
Let's talk about each group of lamps. You will learn about the features of the products and be able to evaluate examples of interesting models.
Chandeliers
A chandelier is often used as the centerpiece of a lighting system. It becomes a bright accent and a source of powerful light flux. However, it should not become the only device in the room.
The design of the chandelier must be chosen depending on the height of the ceiling and the size of the room. If the room is small, a massive model will visually “steal” the space.
The design of the chandelier must correspond to the trends of the chosen interior style. Models with crystal horns and pendants will look great in classic and luxurious art deco. Modern trends allow you to experiment with the shape, color and size of devices.
The elegant Vitaluce pendant chandelier will fit perfectly into the living room. For the bedroom you can choose the fashionable Vele Luce Modena model. And Favorite Bulla will look great in a modern kitchen design.
buybuy
Vitaluce chandelier for the living room
buybuy
Vele Luce Modena chandelier for the bedroom
buybuy
Favorite Bulla chandelier for the kitchen
Advice! If there are several chandeliers in the room, it is better to choose models that are identical or similar in design.
Pendant lamps
Pendant lamps are often present in the lighting scheme of an apartment. They provide directional streams of light, so they are used to highlight individual areas of the room. Most often they are placed above kitchen and gaming tables, and a bar counter.
Suspended models are ideal for lighting design in rooms with high ceilings. Devices are rarely placed individually - more often in groups of 3-4 copies.
Examples of original lighting sources: the exquisite Globo Ticon model and the stunningly interesting Lussole Loft Bristol lamp in the shape of a badminton shuttlecock.
buybuy
Pendant lamp Globo Ticon
buybuy
Pendant lamp Lussole Loft Bristol
Sconce
Sconces are wall lamps that serve for local lighting. There are several types of products: open, near-surface, models on a bracket.
Near-surface specimens fit tightly to the wall. They are usually miniature lamps enclosed in a transparent housing. Such sconces emit soft reflected light, so they serve more as decorative lighting. Suitable for the interior of a bedroom, nursery, living room.
Open lamps are lamps without a shade. Outwardly, they are very similar to candles. Most often they decorate offices, living rooms and hallways. The sconces shine quite brightly, so they are suitable as a source of local lighting.
Wall sconces are lamps mounted on an adjustable arm. If desired, they can be brought almost close to the wall or, conversely, moved further away. Such devices are an excellent option for an office, library, or hallway.
Surface sconces in the interior
Sconce on a bracket in the interior
Open sconces in the interior
Desk lamp
Table lamps are a popular attribute in lighting design projects. From the name of the lamps it is clear that these are devices intended for placement on horizontal surfaces: countertops, shelves, cabinets. The products do not require special installation and look great in any room.
Table lamp in the interior
Floor lamps
Floor lamps are floor lamps on a high base. The devices are equipped with figured lampshades or laconic shades. A huge variety of designs allows you to choose a model to suit any interior style.
Original floor lamp in the interior
Instructions for working with installation devices
Installation accessories include switches, connectors, panels, adapters and switches. This equipment is also selected based on current characteristics and external operating conditions. There are special models for areas of high humidity, devices designed for use in explosive areas, etc. The basic operation for installing this equipment will be the installation of lighting panels, which involves mounting a protected cabinet and introducing electrical devices into it. Next, secondary fittings with boxes, which may have protective blocks, are mounted openly or hidden. If devices are installed with open electrical wiring, then pads made of non-conductive materials should also be provided - as a rule, their thickness does not exceed 1 cm.
Installation of street lamps: main stages
Preparatory work
- selection of models and quantity of lamps according to characteristics and design;
- selection of installation locations for lighting fixtures;
- choosing a method for laying electrical cables;
- marking cable routes taking into account the terrain and measuring their lengths;
- digging trenches/suspending support cables;
- purchase of materials.
Calculations
It is required to calculate the power consumption for each line of the street lighting system. Based on these data, the calculation and selection of power supply circuit breakers, RCD devices, switches, and cable core cross-sections are performed.
Creating a street lighting connection diagram
When independently designing a street lighting system, it is necessary to prepare its functional diagram. The circuit design can be drawn by hand or done in a graphics editor. The drawing needs to show the placement points of lighting devices, connection of street lamps, cable routes, installation locations of switches, distribution of power lines among the circuit breakers in the panel.
Installation of supports for lamps
Supports will need to be installed only to accommodate large-sized LED lights, for example, cantilever ones. The following work algorithm should be followed:
- digging a hole under the foundation with a depth of 0.6-0.7 meters;
- preparation of wooden formwork;
- installation of a metal anchor for fastening the support and a plastic pipe for entering the power cable;
- pouring concrete;
- installation of the support on the anchor fastening.
Consolidation
Most spotlights have brackets on the sides. They are bent upward until it stops. In this position, the lamps are inserted into the hole. Be careful not to allow the wires to get caught under hooks. After you insert the lamp, the hooks independently press against the ceiling, thereby holding the spot on the surface (read: “Inserting on a suspended ceiling”).
After installing all the elements, you can connect the lighting system to the main power wire on the junction box, step-down power supply or switch. At this point, the work on installing a spot lighting system can be considered complete.
As you can see, there is nothing difficult in installing spotlights in the house. You can see the results of such work in the photo. Using lamps of different colors and brightness, you can highlight certain decorative elements or divide the room into functional zones.
Spot light
There is an opinion on the Internet that spotlights are the most difficult to install; information about the difficulty of installing spotlights in the bathroom is especially common.
In fact, there is absolutely no difficulty in this, you will just need to spend a little more time on planning. I believe that the technology for installing lamps in the same bathroom is not so different from all other mounting options, but here you will need to work with the cutout for the lamp itself.
For example, you already have a bathroom and you plan to cover the entire ceiling with plastic panels to make everything look more attractive and interesting. First, you should think about the cable routing - this is a very simple process for which you just need to calculate the length of the cables, leaving a little space in case you make a mistake in some calculations.
After this, you need to approximately mark in which places the lamps on plastic panels will be installed and make holes that are equal to the lamp without an external panel. That is, it is worth cutting not according to the shape of the lamp itself, but a little smaller in diameter, then the lamp will not fall inside the structure.
Wire distribution
At the stage of forming the ceiling frame, it is necessary to distribute the wires and secure them so that when drilling holes for the lamps they can be easily reached. As a last resort, you can stretch the wire to the first hole, and for the remaining lamps the wire will be threaded from hole to hole. However, this method has a significant drawback - you will not be able to attach the wires to the frame, that is, they will simply lie on the ceiling material.
With the usual method of wiring distribution, the wire is laid according to a certain pattern to the places where the lamp is installed, leaving 10-15 cm of wire at each point. The wiring is secured to the frame using plastic ties. But do not tighten them too much, as the wires tend to change their length when heated. Now you can begin installing the suspended ceiling.
Scheme of actions for completed repairs
Often, the understanding that wiring for a spotlight is required occurs after all repair work has been completed. Many people think that there is no way to correct a banal injustice, but this is not the case.
It is necessary to have free access to the work surface, so move the bed, sofa or steel, unscrew the baseboards. After dismantling the baseboard, carefully from the joint, the wallpaper begins to peel off from the wall surface. To make the process easier, you can use a sharp blade to separate the canvas from the wall. After separation, they begin to trench the wall to the required location and lay the cable.
Then the actual installation of the lamp is carried out; the “shaft” in the wall is filled with alabaster. To re-glue the wallpaper, you can use specialized glue or regular PVA. If all the work was done carefully, then no traces will remain.
Today there are no difficulties in installing wiring for spotlights. Of course, there is still the possibility of some error, however, if you are careful, you can create custom lighting for yourself tomorrow!
Safety regulations
To ensure a secure system, it is recommended to adhere to the following rules:
- It is advisable to avoid low-quality Chinese products; they can be unsafe and almost always short-lived.
- Use a voltage stabilizer, it makes the system safer.
- Install lamps intended for outdoor conditions.
- Use reliable insulation.
- For outdoor use, supports and brackets with anti-corrosion coating should be installed.
- Underground wiring is located at the appropriate distance (according to the rules of the Electrical Code) from other objects.
- The cable must be accompanied throughout its entire length by a support cable.
All work can be done with your own hands if you follow safety precautions and installation instructions. In the absence of at least basic knowledge of electrical engineering and experience, it is better to entrust the work to an electrician.