How can you take Mercury 230 electricity meter readings?
Electricity consumption is an everyday part of our lives. Today, not a single device operates without electricity. And every month we receive bills or we ourselves calculate how much we need to pay for light. There are special meters for metering electricity.
And if earlier it was easy to calculate the required amount, then with the development of technology, devices for recording spent energy have also improved. But there are also different tariff plans.
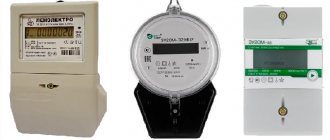
Types of electric meter models
We all pay for electricity based on accurate data taken from installed meters. Of course, the method of accounting for energy consumption using electrical equipment is the most optimal. By carrying out calculations, we can independently monitor the amount of energy spent per month, and it is convenient for energy companies to receive timely payment and, if necessary, check the operation of the device.
There are certain standards that an energy meter must meet.
Therefore, today they are produced in several types:
- Induction meters, outdated model. It is based on electromechanics.
- Statistical instruments, a more modern model, with electronic microprocessors in its design.
Each of these electricity meters has its own advantages. Their operating principles are the same. They record any energy power, displaying the information received in digital equivalent on a special display. The numbers on the device are constantly updated, thereby increasing the number on the display.
The uninterrupted operation of the electrical appliance allows you to record consumption both during the day and at night. By comparing the readings of the previous payment on the meter with the new data and carrying out simple calculations, the consumer pays for electricity.
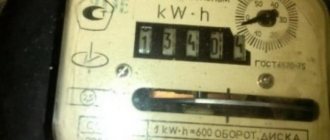
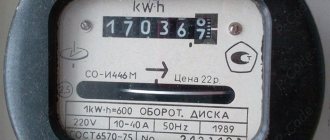
It is easy to obtain accurate information from induction devices. We have become accustomed to them since childhood. Most often they are single-phase and are designed for a couple of decades of uninterrupted operation. All necessary information is indicated on the front of the meter. A counter designed for a four-digit number does not take into account the fifth digit.
To carry out calculations, it is enough to take the current numbers and subtract the previous ones from them. The difference must be multiplied by the cost of kW in your region. For example, 9970.2 is the current counter reading, the previous one is 9870.1. Now let’s calculate: 9970.2 – 9870.1 = 100.1 kW, now multiply by the fixed cost.
Meter with built-in computer
Electronic meters are produced without a rotating wheel, with installed digital displays. Due to their versatility, they have a standard menu where additional settings are located.
The latest models of electricity meters are much better equipped. Several phases can be summed up to them. This is very convenient considering that many consumers switch to two or three tariff plans:
All additional settings allow you to find out in more detail information about consumption at a certain time of day, the operating time of the meter and data on the readings T1 and T2.
The consumer's first impression is that it will be difficult to read information from an electronic meter. To do this, you need to study the manual for the electrical appliance or consult an electrician.
In addition, there are models that do not need to regularly take readings. They are connected to a common central network and send readings to a server at the power company. And you just receive a monthly electricity bill.
The gradual introduction of two-tariff energy metering allows saving on electricity, especially in apartment buildings, as well as optimally distributing energy. But here it’s also worth considering at what hours your consumption is greater and at which times it is less. If daytime consumption is small, and the main load occurs at night, then the Mercury 230 model is perfect.
Read also: Contactor on the diagram according to GOST
How to legally avoid paying for electricity
Technical characteristics: Mercury electricity meter
Using the Mercury-230 meter as an example, let's look at the main technical qualities:
- Installed dimensions – 258 by 170 by 74 mm;
- The weight of the device is about 1.5 kg;
- The period after which the inspection must be done is 10 years;
- The average length of work is 17 years;
- Service life – 30 years;
- Manufacturer's warranty – 3 years.
The functionality of this counter includes the fact that it not only records data, but also stores it, measures it and displays it on a liquid crystal display. In addition, it transmits reactive and active energy in accordance with each tariff, both for a certain period of time and for the entire period in total.
What kind of lighting do you prefer?
Built-in Chandelier
80221-20: Mercury 230AM Three-phase static electric energy meters - Manufacturers, suppliers and verifiers
Unlike disk electricity meters, with digital devices, when the zero and phase are reversed, the electricity consumption will still be recorded correctly. That is, it is impossible to “rewind” the readings.
Expert opinion
Viktor Pavlovich Strebizh, lighting and electrical expert
Any questions ask me, I will help!
Below is a table where, for clarity, several modifications from this model range are given with a description of the main technical characteristics. If there is something you don’t understand, write to me!
How to take Mercury 230 electricity meter readings
If you have a two-tariff plan installed, then readings must be taken from both tariffs, which are indicated:
- T1 – readings of daily energy consumption;
- T2 – night consumption readings.
To take readings of the 1st tariff, you need to go to the menu and call the T1 mode; how to do this is described in detail in the instructions for the meter. Press the “Enter” button and with subsequent pressing the data will be displayed:
- Control mark (in the upper left corner).
- Designation T1 (just below the control mark).
- And in the center there is an indication of how much kW has been consumed.
To fix the 2nd tariff, it is necessary to carry out the same manipulations. You should press the “Enter” button until the display shows the designation T2 with readings of the consumed electricity.
After readings are taken, calculations can be made. The previous figures are taken from the pay stub for the previous month. If you don’t have it, you can contact the energy company, requesting previous readings, to carry out the calculations yourself, or simply transfer the readings you took to the company. Below is a video that explains and shows in detail how to take readings from the Mercury 230 model.
We hope our tips will help you understand the electronic meter.
Electric meter Mercury 230 is a model of an accounting device that allows you to measure consumed electricity and power indicators. The device is designed for use in a three- or four-wire network with several pricing options via direct or transformer connection.
The device provides the ability to operate in individual mode or connected to an external device.
The main tasks of the device include:
- counting and displaying on the liquid crystal display via the interface information on consumed electricity for any of the configured rates and in total;
- number of tariffs – 4, with 16 time zones, with 4 types of days;
- calculation of power, current and frequency indicators;
- influence on loads through the interface;
- storing the most important events (10 for each), displaying the moment the device was started and turned off, the appearance or disappearance of individual phases, when the meter opened and closed, the tariff schedule was adjusted, permissible parameters were exceeded.
The energy meter is equipped with protection that prevents unauthorized use for the purpose of stealing electricity. Accounting is carried out with an accrual total, regardless of the direction of the current.
How to take readings from the Mercury 230 meter - Click!
Electric meters of the Mercury 230 family are designed for use in alternating current power supply networks with a frequency of 50 Hz and are widely used in both apartment buildings and individual buildings.
They represent a further development of the previously well-proven devices of the 200 and 201 series. The principle of their operation is based on determining the current and voltage using appropriate sensors. In this article we will analyze the features of taking readings from the electricity meter of the Mercury 230 family.
Operating principle
Series 201 device with a mechanical drum-type indicator. The operating principle of the Mercury family of meters is based on determining the current and voltage using appropriate sensors. The sensor signals are then digitized and converted into power.
The devices can operate both autonomously and connect to ASKUE (automated system for monitoring and accounting of energy resources), if technically possible, using a cable or wireless modem.
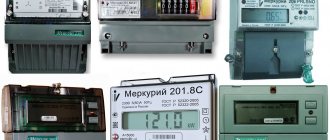
Main modifications and their features
There are several types of Mercury devices on sale (series 200, 201, 202, 206, 230 and 231 in various modifications). They differ from each other in the number of supported tariffs, the type of indicator and the number of directions for metering power transmission.
From their single-phase predecessors of the 200 and 201 series, the 230 series devices inherited high accuracy, significantly exceeding the requirements of the standards. This is valuable because it guarantees that the device will not need to be replaced for at least 15 years.
In terms of the range of its consumer qualities, the equipment of the Mercury 230 family has no analogues among domestic devices.
They compare favorably with imported models at a noticeably lower cost, while at the same time not being inferior, and often even surpassing them in accuracy.
The most advanced meter models allow you to read the power consumption of electricity at four different tariffs. Most often in practice there is a three-tariff system with gradations:
- Peak (from 7 to 10 am and from 17 to 21 pm);
- Half peak (from 10 to 17 pm and from 21 to 23 pm);
- Night (from 23 to 7 am).
Thanks to the presence of a multifunctional LCD screen, working with these devices does not cause much difficulty.
Determining the amount of electricity consumption and paying for it
Mercury 230 meter with liquid crystal indicator The procedures for determining the flow rate using different models of devices are similar.
Therefore, in the future we will limit ourselves only to a multifunctional multi-tariff three-phase device with a liquid crystal indicator of the Mercury 230ART type, which is most widely used in practice.
Understanding the operating principle of this device will make it easy to take readings from other devices of this family.
The electricity meter is controlled by two buttons, which are located on its front panel to the right of the screen. The left Enter button is used to switch between readings for individual tariffs, the right button with a symbol in the form of a ring with an arrow selects operating modes.
First, the readiness of the device to take flow readings for individual periods is checked (operating mode A). This is indicated by an indicator in the form of a small dash in field A (top of the screen) above the numbers showing consumption values. If there is no indication A, then the device should be switched to mode A by briefly pressing the right control button.
Please note: pay attention to the readiness of the meter to display electricity consumption readings. This is indicated by the display of the “kWh” indication to the right of the numbers in the central part of the screen.
Then you should remove the expense for individual tariffs using the Enter button. When you press it successively, the indicator displays the data of tariffs T1 - T3. The tariff being read is marked with the symbols T1 (Peak), T2 (Night) and T3 (Half Peak), which are located on the display screen to the left of the flow rate.
To switch between tariffs, the Enter button is pressed briefly (like a computer click), without holding it down. This ensures that there is no danger of the device switching to other modes and the “kWh” indication disappearing. In case of an error, you should return to mode A using the right control button c and again read the flow rates for individual tariffs.
Multi-tariff device screen It is necessary to take readings once a month. The actual monthly electricity consumption is found by subtracting the readings of the previous month from the readings of the current month.
Further actions of the subscriber depend on the accepted payment system:
- In the case of issuing invoices by a service organization, data on the amount of consumption is transferred to the organization's accounting department to generate a payment document.
- When making independent payments through a bank operator, the amount of the expense is multiplied by the tariff, the result is entered into the receipt, paid through the bank's cash desk.
- When paying via an ATM, the expense amount is entered into the appropriate field on the terminal screen.
- When making online payments, fill out an interactive form.
Watch the video with a review of the Mercury 230 counter:
Specifications
Device service life
The standard operating life of the energy meter is 30 years; the manufacturer provides a guarantee for trouble-free operation for the first 3 years. Warranty cases are provided if the failure is caused by deviations during assembly at the factory. In case of violation of operating conditions, or if the breakdown is associated with a connection error, the device is not subject to warranty repair.
Calibration interval
The initial verification of the meter is carried out by the manufacturer. After installation, the verification period is 10 years. The specialist performing this work displays the date and result of the verification in the passport.
Meter cost
The device can be purchased at wholesale or retail chains for a price of about two thousand. Ordering online will cost a little less, but in this case you need to carefully control the quality of the product and you will have to pay for delivery.
Technical characteristics of the meter Mercury 230 AM-01
The RosEnergoSnab company offers to buy Mercury multi-tariff single-phase electricity meters - Mercury 230 AM-01 at factory prices from the warehouse or on order. Check the delivery time and cost of each batch of electricity meters produced by Incotex in our sales departments. Please note that the price will depend on the volume of purchase.
Electric meters Mercury 230 AM are designed for commercial metering of active electrical energy in one direction in a three- or four-wire alternating current network and operate both independently and as part of an automated power supply system.
- metering of active electricity in a single-tariff mode on an accrual basis from the moment of commissioning;
- work only in the direction of increasing readings in case of any phasing violation of the connection of the meter's current circuits;
- Electric meters use an electromechanical reading device and an LED indicator for the presence and consumption of electrical energy.
The standard telemetry output allows you to operate an electricity meter as part of an automated accounting system that has the ability to receive accounting information in telemetry pulses; Design options
Advantages of the device
The advantages of an electric meter include the following capabilities:
- high class of accuracy;
- the presence of an infrared port and the ability to connect to an external device;
- protection against unauthorized rewinding and independence of data accounting from the direction of current;
- the presence of self-diagnosis with indication of possible problems in operation;
- electronic sealing of the external panel, which eliminates interference with the structure;
- compact size and reliable design.
Read also: Grinder disc for wall slitting
To ensure reliable operation, it is necessary to comply with the temperature and humidity levels of the environment declared by the manufacturer, and install the meter indoors.
How to take readings
Taking readings is quite simple. They can be determined automatically - the indicators for sections periodically change on the display. There is a function of push-button switching of the displayed information. Indicators are written out separately for each rate at the beginning and end of the accounting month, the difference is determined by subtraction and multiplied by the corresponding rate, the values are summed up.
Meter Mercury 230, instructions for taking readings
The display shows visual parameters: date and time (current values), frequency of the measured network, total power factor, as well as separately for all phases, maximums - morning and evening, current and voltage value at a given time, consumption of active and reactive electricity, accuracy – up to hundredths of kW/h.
To take readings, you need to select the electricity metering tariff you are interested in by time of day:
- T1 – day;
- T2 – night.
Then multiply the value to a decimal point by the cost of the tariff, add the two resulting numbers and pay.
Varieties of this counter
The device is available in ten versions. Next - more details about the features of each modification.
ART-00 С(R)N
It is characterized by a calculated phase voltage of 57.7 V, normal and maximum current of 5 and 7.5 A, respectively, the presence of a CAN or RS485 interface, accuracy class for the active type of electricity - 0.5S, reactive - 1.
ART-01 С(R)N
It differs from the previous version in the value of the rated voltage for a separate phase - 230 V, the maximum current - 60 A, the accuracy class for reactive electricity - 2.
ART-02 С(R)N
It differs from the above modification in the current limit value - 100 A, other parameters are identical.
ART-03 C(R)N
This model has a rated and maximum current of 5 and 7.5 A, respectively, the error value for the active type of electricity is different - 1, other parameters are similar.
ART-01 PQRSIN
It differs in current indicators - 10 (100) A, error values - 1/2, IrDA is installed instead of the CAN interface.
ART-02 PQRSIN, ART-03 PQRSIN
The differences are in the magnitude of the electric current - 10 (100) and, accordingly, 5 (7.5) A, the rest is identical.
ART-01 CLN, ART-02 CLN, ART-03 CLN
CAN and PLC-I ports are used; the versions differ from each other in the current value.
Features of the Mercury 230 electricity meter
This metering device is intended for use indoors, and must be additionally protected. Therefore, when installing it, it is placed either in a special cabinet or in a panel. Electricity indicators are displayed on the liquid crystal display, which is located on the front panel of the meter.
This meter can be operated autonomously or used in an automated system for collecting data on electricity consumption. In the case of autonomous operation, it is pre-programmed for the required operating mode. This is done by specialists, and your home will have a device already configured.
It takes into account active energy, and the measurement accuracy class is in the range of 0.5 or 1, depending on the model. It has a three-year warranty, but the service life of domestic metering devices in reality is at least 30 years. Moreover, they need to be verified once every 10 years.
Note! The Mercury 230 electricity meter has several modifications, and can be single-tariff, or operate at two tariffs - day/night.
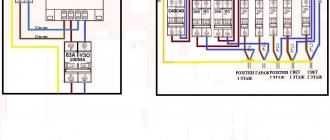
Meter installation
The device is mounted on a DIN rail. Direct connection is made according to the following scheme:
The following diagrams are used for transformer connections:
The specified device complies with state standards and can be used on the territory of the Russian Federation and in neighboring countries.
Reading information from the Mercury 230 meter indicator using buttons
When the counter is turned on, within 1.5 s, all indication elements are turned on: cursors, icons and all segments of digital indicators. After which the counter goes into the display mode of current measurements. The LCD of the counter during its operation when using the keys can be in one of three modes:
- in the display mode of consumed electricity;
- in the mode of recording the indication of maximum power;
- in the display mode of the current values of auxiliary parameters (instantaneous values of active, reactive and apparent power, both in each phase and the sum, current in each phase, voltage in each phase, cos ϕ in each phase and in sum, network frequency, and for meters with an internal tariff (additionally - current time and date).
Display mode of accumulated energy according to current tariffs.
When the meter is turned on, the liquid crystal display (hereinafter referred to as LCD) shows the amount of active energy consumed at the current tariff for the entire period of operation of the meter. This value is displayed in kWh, with a resolution of 0.01 kWh (two decimal places). To the right of this number are the units in which the displayed value is expressed (kW⋅h). The number of the current tariff is shown on the left (T1 is the first tariff, T2 is the second, T3 is the third, T4 is the fourth). At the top of the LCD there are elements that indicate the type of energy: A+, A-, R+, R-.
Read also: Why do you need a power transformer?
The counter has two indication modes: manual and automatic.
In automatic mode, the LCD screen sequentially displays information about the accumulated active and reactive energy for each tariff and the sum for all tariffs for each type of energy. The number of parameters is no more than 12 and no less than one and is programmed using the “Configurator...” program. The duration of parameter display is also set by the “Configurator...” program. In manual mode, when you press the “ENTER” , the information on the LCD changes cyclically as follows: the sum of the accumulated active energy at all current tariffs, then the next time you press the “ENTER” , the amount of accumulated active energy at tariff 1 is indicated, indicating the tariff number, with further “ENTER” key, the amount of accumulated active energy according to tariffs 2, 3, 4 is sequentially displayed, indicating the tariff number. After the last tariff (if the meter is four-tariff, then after the fourth, if three-tariff - after the third, if two-tariff - after the second), the amount of accumulated reactive energy at all current tariffs is displayed, the subsequent pressing of the “ENTER” displays the amount of accumulated reactive energy at tariff 1 with an indication tariff numbers. When you further press the “ENTER” , the amount of accumulated reactive energy according to tariffs 2, 3, 4 is sequentially displayed, indicating the tariff number. In this case, the number of the displayed tariff is displayed on the left, and if the amount is displayed, then the inscription “Amount” . The amount of information displayed on the LCD is determined by the configurator, but does not exceed more than 12 parameters and at least one. For electricity meters with software version 2.2.83 and higher (production began on 04/07/2008), information on all tariffs and on all types of energy (active, reactive) is displayed manually on the LCD. The ability to change this indication mode using the “Configurator …” program is blocked at the electric meter level.
Indication of auxiliary parameters.
When you briefly press the “” key, auxiliary parameters are displayed on the LCD screen in the following sequence: active power (W) – reactive power (VAr) – apparent power (VA) – network voltage (V) – angle between phases – load current (A) – cos ϕ – network frequency (Hz) , and for meters with an internal tarifficator – current time (s) – current date. The parameter is selected by pressing the “” key for a long time (more than 3 seconds). When you briefly press the “” key, the total parameter value and for each phase separately are displayed on the LCD screen. When indicating network voltage and current, the total value is not indicated. If during the timeout for returning to automatic mode (5÷255 s) the “” button is not pressed, the indicator goes into automatic indication mode.
Power peak indication
“ENTER” button for a long time (more than 2 seconds), the LCD screen displays the current month in the “month _ year” . Next, short presses of the “ENTER” lead to sequential display of morning and evening power maximums for the current month on the LCD. You can also look at the previous three months. When displaying morning maximum power, symbols T1 and T2 are displayed, evening maximums – T3 and T4. The type of power is indicated at the top with the symbol “-” in the appropriate place.
Manual clock correction mode.
Clock correction is carried out in the current time display mode. By long pressing (more than 3 seconds) and releasing the “ENTER” , the current time is corrected. In this case, if the value of the seconds of the current time is less than 30 seconds, the moment the “ENTER” , the seconds of the current time are reset to zero; if the value of the seconds of the current time is more than 29 seconds, at the moment the “ENTER” , the value of the seconds of the current time is set to 59 seconds. Implementation of maximum correction of the current time up to ±29 sec. perhaps once a day.
Verification of Mercury 230 AM meters
Verification method Mercury 230 AM AVLG.411152.025 I3 This method is compiled taking into account the requirements of the Order of the Ministry of Industry and Trade of Russia dated July 2, 2015 No. 1815, RMG 51-2002, GOST 8.584-2004, GOST 31818.11-2012, GOST 31819.2 1-2012, GOST 31819.22- 2012 and establishes the methodology for primary, periodic and extraordinary verification of the meter, as well as the scope, conditions of verification and preparation for it. (Changed edition, Amendment No. 1)
The meter modifications covered by this verification procedure are given in Table 1.
Table 1 - Modifications of the meter produced by the manufacturer
| Counter modifications | Accuracy class | Basic or rated (maximum) current, A | Rated voltage, V |
| Mercury 230 AM-00 | 0.5S | 5(7,5) | 57,7 |
| Mercury 230 AM-01 | 1,0 | 5(60) | 230 |
| Mercury 230 AM-02 | 1,0 | 10(100) | 230 |
| Mercury 230 AM-03 | 0.5S | 5(7,5) | 230 |
When meters are released from production and repair, an initial verification is carried out. Each copy of the meters is subject to primary verification.
The calibration interval for Mercury 230 AM meters is 10 years.
Meters that are in operation or in storage after the expiration of the verification interval are subject to periodic verification. Extraordinary verification is carried out in the following cases:
- damage to the verification mark (seal) and in case of loss of the passport
- commissioning of the meter after long-term storage (more than half of the calibration interval)
- re-adjustment or tuning, known or suspected shock to the meter or unsatisfactory performance of the meter
- sales (dispatch) to the consumer that were not sold after the expiration of a period equal to half the inter-verification interval.
Operations and means of verification of Mercury 230 AM meters
The operations performed during verification, as well as the verification tools used, are indicated in Table 2. The sequence of verification operations is mandatory.
Table 2 — Sequence of verification operations
| the name of the operation | Item number | Mandatory verification | Name of verification means, technical characteristics | |
| during initial verification | during periodic (extraordinary) verification | |||
| 1. External inspection | 6.1 | Yes | Yes | |
| 2. Checking the electrical strength of insulation | 6.2 | Yes | Yes | Installation for testing the electrical strength of insulation UPU-10 post. and AC voltage 0 - 4000 V |
| 3. Testing | 6.3 | Yes | Yes | Installation K68001: measurement of the main error of class 1.0 meters; rated voltage 3*230/400 V and 3*57.7/100 V, current (0.01.100) A. Power supplies B5-30: constant voltage (5...24) V, current (0...50) mA. |
| 3. Checking the metrological characteristics of the meter | 6.4 | Yes | Yes | |
| 3.1. Determination of meter error values | 6.4.1 | Yes | Yes | |
| 3.2. Checking the sensitivity threshold and the absence of self-propelled | 6.4.2 6.4.3 | Yes | Yes | |
Notes
| ||||
Safety requirements for verification
When carrying out verification, the requirements of the “Rules for the technical operation of consumer electrical installations” and the “Safety rules for the operation of consumer electrical installations” must be observed.
Qualification requirements for verifiers
Verification is carried out by legal entities and individual entrepreneurs accredited in accordance with the established procedure in the field of ensuring the uniformity of measurements.
All actions for carrying out measurements when checking Mercury 230 AM electricity meters and processing measurement results are carried out by persons who have studied this document, the operating instructions for the measuring instruments used and auxiliary verification tools.
Conditions for checking electricity meters Mercury 230 AM
The procedure for submitting meters for verification must comply with the requirements of Order of the Ministry of Industry and Trade of Russia dated July 2, 2015 No. 1815. During verification, the following conditions must be met:
- Ambient air temperature, °C - 23 ± 2
- Relative air humidity, % from 30 to 80
- Atmospheric pressure, mm Hg. Art. from 630 to 795
- There is no external magnetic field
- Measuring network frequency, Hz 50 ± 0.3
- The shape of the voltage and current curve of the measuring network is sinusoidal, Kg no more than 2%
- Nominal voltage deviation ± 1.0%
Verification must be carried out on certified equipment using verification means that have a valid verification mark.
Preparation for verification of Mercury 230 AM meters
Before carrying out verification, the following preparatory work should be completed:
- Check the availability and operability of the reference measuring instruments and auxiliary verification tools listed in Table 2.
- Check the availability of valid verification certificates (certification) and verification stamps for reference measuring instruments and verification auxiliary means.
- Check that all components of the verification circuit are grounded.
- Prepare reference measuring instruments and auxiliary verification means for operation in accordance with their operating instructions.
- Check the performance of reference measuring instruments and auxiliary verification means by test running them.
Verification of Mercury 230 AM meters
Visual inspection
During an external inspection, the meter’s compliance with the following requirements must be established:
- the front panel of the meter must be clean and clearly marked in accordance with the requirements of the design documentation
- Screws with good threads must be screwed into all threaded holes of down conductors until they stop.
- On the cover of the meter clamping block there must be a diagram of how the meter is connected to the electrical network.
- The meter must include a passport
The following must be applied to the front of the meter panel using offset printing or another method that does not degrade the quality:
- symbol of the meter type: “Mercury 230 AM-XX”
- accuracy class according to GOST 8.401
- symbol of electrical energy metering units
- counter constant
- meter number according to the manufacturer's numbering system
- rated (base) and maximum current
- Rated voltage
- nominal power frequency
- manufacturer's trademark
- year of manufacture of the meter
- type approval mark according to PR 50.2.009
- graphic representation of a single sign of product circulation on the market of member states of the EAC Customs Union
- insulation test voltage (symbol C2 according to GOST 23217)
- GOST 31818.11-2012, GOST 31819.21-2012 or GOST 31819.22-2012 (depending on the accuracy class)
- symbol for connecting the meter to the electrical network according to GOST 25372
- sign GOST 25874
- Made in Russia.
Electrical strength test
The power of the test voltage source must be at least 500 VA. The voltage during the test should be increased smoothly, starting from 100-230 V and then evenly or in steps not exceeding 10% of the set voltage, for 5-10 s. Upon reaching the specified value of the test voltage, the meter must be kept under its influence for 1 minute, monitoring the absence of breakdown. Then it is necessary to gradually reduce the test voltage.
The test result is considered positive if the electrical insulation can withstand an alternating current voltage of 4 kV with a frequency of 50 Hz for 1 minute between the meter contacts 1-16 on one side and 17, 20, 19, 22, “ground” on the other side.
Testing
During testing, the functioning of the reading device is checked. Connect the meter's power supply circuits to the K68001 installation. Set the K68001 installation to phase voltages of 230 V for meters with a rated voltage of 3 * 230 V and 57.7 V for meters with a rated voltage of 3 * 57.7 V. There is no current in the load. Record the electricity consumption reading.
Set the installation to a current of 10 A with a power factor of 1.0 in each phase for meters with a maximum current of 50 A or 100 A and 5 A for meters with a maximum current of 7.5 A. The LED indicator should flash periodically. An increase in the value of consumed electricity should occur on the reading device. After 15 minutes, record the electricity consumption readings. The difference in readings should be within:
- (1.5…1.8) kWh for meters with a maximum current of 50 A or 100 A
- (0.2…0.25) kWh for meters with a maximum current of 7.5 A and a nominal voltage of 57.7 V
- (0.8.0.85) kWh for meters with a maximum current of 7.5 A and a rated voltage of 230 V
If all the described actions are completed successfully, then the meter is functioning properly. The meter is considered tested.
Checking metrological characteristics:
- meter error values
- starting current (sensitivity)
- lack of self-propelled guns
The meter error is determined by direct comparison using the K68001 installation. Some tests are carried out in telemetry mode, some in verification mode.
The test is carried out at the values of the informative parameters of the input signal specified in Table 3.
Table 3 — Values of informative parameters of the input signal
| No. | Informative parameters of the input signal | Limit of permissible error value when measuring active energy, % | Measurement time, s | ||||
| Voltage, V | Current, A | Cos f | Basic mode | Verification mode | |||
| accuracy class | |||||||
| 0.5S | 1 | ||||||
| 1 | 3 x Unom | 3 x 0.01 IN | 1,0 | ±1,0 | — | — | 60 |
| 2 | 3 x Unom | 3 x 0.05 IN (Ib) | 1,0 | ±0,5 | ±1,5 | — | 60 |
| 3 | 3 x Unom | 3 x 0.1 Ib | 1,0 | — | ±1,0 | — | 60 |
| 4 | 3 x Unom | 3 x IN (Ib) | 1,0 | ±0,5 | ±1,0 | 30 | — |
| 5 | 3 x Unom | 3 x Imax | 1,0 | ±0,5 | ±1,0 | 30 | — |
| 6 | 3 x Unom | 3 x 0.02 IN | 0.5ind | ±1,0 | — | — | 60 |
| 7 | 3 x Unom | 3 x 0.02 IN | 0.8 capacity | ±1,0 | — | — | 60 |
| 8 | 3 x Unom | 3 x 0.01 Inom(Ib) | 0.5ind | ±0,6 | ±1,5 | — | 60 |
| 9 | 3 x Unom | 3 x 0.01 Inom(Ib) | 0.8 capacity | ±0,6 | ±1,5 | — | 60 |
| 10 | 3 x Unom | 3 x 0.02 Ib | 0.5ind | — | ±1,0 | — | 60 |
| 11 | 3 x Unom | 3 x 0.02 Ib | 0.8 capacity | — | ±1,0 | — | 60 |
| 12 | 3 x Unom | 3 x IN (Ib) | 0.5ind | ±0,6 | ±1,0 | 30 | — |
| 13 | 3 x Unom | 3 x IN (Ib) | 0.8 capacity | ±0,6 | ±1,0 | 30 | — |
| 14 | 3 x Unom | 3 x Imax | 0.5ind | ±0,6 | ±1,0 | 30 | — |
| 15 | 3 x Unom | 3 x Imax | 0.8 capacity | ±0,6 | ±1,0 | 30 | — |
| 16 | 3 x Unom | 1 x 0.05 IN | 1,0 | ±0,6 | — | — | 60 |
| 17 | 3 x Unom | 1 x 0.01 Ib | 1,0 | — | ±2,0 | — | 60 |
| 18 | 3 x Unom | 1 x IN (Ib) | 1,0 | ±0,6 | ±2,0 | 30 | — |
| 19 | 3 x Unom | 1 x Imax | 1,0 | ±0,6 | ±2,0 | 30 | — |
| 20 | 3 x Unom | 1 x 0.1 IN | 0.5ind | ±1,0 | — | — | 60 |
| 21 | 3 x Unom | 1 x 0.2 Ib | 0.5ind | — | ±2,0 | — | 60 |
| 22 | 3 x Unom | 1 x IN (Ib) | 0.5ind | ±1,0 | ±2,0 | 30 | — |
| 23 | 3 x Unom | 1 x Imax | 0.5ind | ±1,0 | ±2,0 | 30 | — |
Tests 16-23 (Table 3) with a single-phase load with symmetry of phase voltages must be carried out sequentially for each phase separately.
During testing, the measurement time is selected according to Table 3. In this case, the change in error during two or three measurements should not exceed 0.1 of the permissible error value (Table 3).
The test results are considered positive, and the meters correspond to the accuracy class if the difference between the error value, expressed as a percentage, with a single-phase load and the error value, expressed as a percentage, with a symmetrical multiphase load at rated current and cos f = 1 for active energy does not exceed 1% and 1.5% for meters of accuracy class 0.5S and 1.0, respectively.
Checking the starting current (sensitivity)
Before starting the test, it is necessary to switch the pulse output of the meter to the verification mode (for those meters in which this mode is provided). The starting current (sensitivity) is checked by direct comparison using the K68001 installation at the current values indicated in Table 4 with a symmetrical load.
Note - Before testing, the meters must be kept for 10 minutes
The test results are considered positive if the meter registers electricity.
Checking the self-propelled gun
The self-propelled vehicle is checked in the absence of current in the series circuits and the applied phase voltage of 1.15 Unom
An LED indicator connected to the pulse output is used as an indicator. Before starting tests, switch the pulse output to verification mode (for those meters in which this mode is provided). After setting the phase voltage values, remove the voltage from the parallel circuits of the meter. After 10 s, apply voltage to the parallel circuits of the meter and turn on the stopwatch.
The test result is considered satisfactory if the test output of the meter produces no more than one pulse during the time specified in table 4.
Table 4
| Counter modifications | Meter constant, imp./(kWh) | Sensitivity, mA | Time, min |
| Mercury 230 AM-00 | 170700 | 5 | 3 |
| Mercury 230 AM-01 | 1600 | 20 | 9 |
| Mercury 230 AM-02 | 1600 | 25 | 5,5 |
| Mercury 230 AM-03 | 17070 | 5 | 7 |
Dimensions of the Mercury 230 AM meter
Mercury 230 AM dimensional drawing of the meter
Connection diagrams for Mercury 230 AM to a 230 V network
Diagram of direct connection of the Mercury 230 AM meter to a 230 V network
Connection diagram of the Mercury 230 AM meter to a 230 V network using three current transformers
Connection diagrams for Mercury 230 AM to a 57.7 V network
Connection diagram for Mercury 230 AM to a three-phase 3 or 4 wire network using three voltage transformers and three current transformers
Connection diagram for Mercury 230 AM to a three-phase 3-wire network using three voltage transformers and two current transformers
Connection diagram for Mercury 230 AM to a three-phase 3-wire network using two voltage transformers and two current transformers Return to list